
CrispMaxx Serie 6 MAF671B5IN - Deep fryer BOSCH - Free user manual and instructions
Find the device manual for free CrispMaxx Serie 6 MAF671B5IN BOSCH in PDF.


| Product Type | Deep fat fryer |
| Brand | BOSCH |
| Model | CrispMaxx Serie 6 MAF671B5IN |
| Power Consumption | 2400 W |
| Oil Capacity | 3.5 L |
| Temperature Range | 130°C - 190°C |
| Thermostat | Adjustable electronic thermostat |
| Filter System | Integrated odor filter |
| Removable Pot | Yes, removable inner pot with non-stick coating |
| Dishwasher-Safe Parts | Yes, all removable parts are dishwasher-safe |
| Safety Features | Cool-touch handles, safety switch, overheat protection |
| Cord Storage | Integrated cord storage |
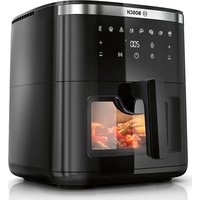
| Viewing Window | Yes, for monitoring frying progress |
| Dimensions (W x D x H) | 380 x 420 x 380 mm |
| Weight | 4.7 kg |
| Colour | Stainless steel / Black |
| Spare Parts Availability | Spare parts available for 10 years |
| Warranty | 2 years manufacturer warranty |
| Included Accessories | Frying basket, lid |
Frequently Asked Questions - CrispMaxx Serie 6 MAF671B5IN BOSCH
User questions about CrispMaxx Serie 6 MAF671B5IN BOSCH
0 question about this device. Answer the ones you know or ask your own.
Ask a new question about this device
Download the instructions for your Deep fryer in PDF format for free! Find your manual CrispMaxx Serie 6 MAF671B5IN - BOSCH and take your electronic device back in hand. On this page are published all the documents necessary for the use of your device. CrispMaxx Serie 6 MAF671B5IN by BOSCH.
USER MANUAL CrispMaxx Serie 6 MAF671B5IN BOSCH
Register your new device on MyBosch now and get free benefits: bosch-home.com/ welcome
CrispMaxx Serie | 6
MAF6...
[en] Information for Use
[en] You can find additional information and explanations online. Scan the QR code on the title page.


2
3

4

5

6

7

8

9

10

∴ m = 3/11

12

∴ m = 3/11

14

15

16

∴ m = 3/11
18

19

20

The image is too blurry to recognize any text content.
22

23


24
 | √ | √ | × | × | × | × | × | × |
 | √ | √ | × | × | × | √ | √ | √ |
 | √ | √ | × | × | × | √ | √ | √ |
26


27
4 Safety
- Read this instruction manual carefully.
- Keep the instruction manual and the product information safe for future reference or for the next owner.
■ Do not connect the appliance if it has been damaged in transit.
Only use this appliance:
■ with genuine parts and accessories.
■ for warming, cooking, baking and frying with hot air.
■ for normal processing quantities and for normal processing times for domestic use.
■ in private households and in enclosed spaces in a domestic environment at room temperature.
■ up to an altitude of max. 2000 m above sea level.
The appliance must always be disconnected from the mains after each use, whenever the appliance is unsupervised, before cleaning and in the event of an error.
This appliance may be used by children aged 8 or over and by people who have reduced physical, sensory or mental abilities or inadequate experience and/or knowledge, provided that they are supervised or have been instructed on how to use the appliance safely and have understood the resulting dangers.
Do not let children play with the appliance.
Children must not perform cleaning or user maintenance unless they are at least 8 years old and are being supervised.
Keep children under the age of 8 years away from the appliance and power cable.
▶ Never operate a damaged appliance.
▶ Never operate an appliance with a cracked or fractured surface.
▶ Never pull on the power cord to unplug the appliance. Always unplug the appliance at the mains.
▶ If the appliance or the power cord is damaged, immediately unplug the power cord or switch off the fuse in the fuse box.
▶ Call customer service.→Page 16
- Connect and operate the appliance only in accordance with the specifications on the rating plate.
- Connect the appliance to a power supply with alternating current only via a properly installed socket with earthing.
- The protective conductor system of the domestic electrical installation must be properly installed.
▶ Never equip the appliance with an external switching device, e.g. a timer or remote control.
- Repairs to the appliance should only be carried out by trained specialist staff.
▶ Only use genuine spare parts when repairing the appliance.
If the power cord of this appliance is damaged, it must be replaced by the manufacturer, the manufacturer's Customer Service or a similarly qualified person in order to prevent any risk.
▶ Never immerse the appliance or the power cord in water or clean in the dishwasher.
▶ Only use the appliance in enclosed spaces.
▶ Never expose the appliance to intense heat or humidity.
- Do not use steam- or high-pressure cleaners to clean the appliance.
▶ Never let the power cord come into contact with hot appliance parts or heat sources.
▶ Never let the power cord come into contact with sharp points or edges.
▶ Never kink, crush or modify the power cord.
▶ Never place the appliance on or near hot surfaces.
- Never place the appliance on or near flammable materials, e.g. curtains or tablecloths.
▶ Always maintain a safety distance of at least 10 cm to walls and other objects to avoid a build-up of heat.
▶ Never cover the appliance or set other objects down on it.
- Do not store or deposit objects in the basket or the cooking compartment.
▶ Never leave the appliance unattended while it is switched on.
▶ Never fill oil or fat into the basket.
▶ Never heat food containing high-proof alcohol or other highly flammable constituents in the appliance.
▶ Take note of the maximum permitted capacity. Never fill food beyond the upper edge of the basket.
- Do not use loose pieces of baking paper or lightweight ingredients that could be sucked in by the fan, e.g. dry herbs.
- If dark smoke comes out of the appliance, disconnect it from the mains immediately. Do not take the basket out until the amount of smoke has decreased.

The appliance becomes hot during operation. Never touch the hot surfaces.
- Allow the appliance to cool down before cleaning or transporting.
▶ Never reach into the hot cooking compartment.
▶ Never touch the hot baking tin or the hot handle with bare hands. Use suitable tools, e.g. potholders or cooking utensils.
- Be careful when taking out the basket as hot air and steam may escape.
▶ Do not lean over the appliance.
▶ Always keeps your hands and face away from the air outlets.
▶ To avoid injuries, only use the appliance for its intended purpose.
- Keep packaging material away from children.
▶ Do not let children play with packaging material.
- Keep small parts away from children.
▶ Do not let children play with small parts.
▶ Follow the cleaning instructions.
- Clean surfaces which come in contact with food before each use.
▶ To prevent the development of acrylamide, do not cook the food to the point where it is too dark and remove any burnt residues.
▶ Never heat fresh potatoes to over 180 °C.
Avoiding material damage
- Do not use sharp, pointed or metal cooking utensils. Only use cooking utensils made of wood or heat-resistant plastic.
▶ Never stand the hot basket on heat-sensitive surfaces. Use a heat-resistant base underneath, e.g. a heat or table mat.
▶ Never fill water or other liquids into the basket.
Familiarising yourself with your appliance
Overview
After unpacking all parts, check for any damage in transit and completeness of the delivery.
→Fig. 1
A Main unit
B Basket
Baking tin 1 → "Baking tin", Page 13
1 Cooking compartment
2 Control panel
3 Air inlet
| 4 | Air outlet |
| 5 | Cord storage |
| 6 | Top heating element and fan |
| 7 | Handle |
| 8 | Viewing window |
| 9 | Grid |
Control panel
You can find an overview of the control panel here.
Note: Press the buttons with your fingers without wearing rubber/oven gloves. Do not operate buttons with objects, e.g. a wooden spoon.
Display elements and function buttons
| Symbol Function | |
| Standby modeActivate and deactivate standby mode or cancel the cooking process | |
| DII | Start/PauseStarting or pausing cooking |
| 00:00 | DisplayWhen °C lights up, the display shows the temperature.When min lights up, the display shows the time. |
| TEMP | Temperature settingIncrease the temperature with+or reduce it with-Settings range: 40-200 °C in 5-degree stepsNote: If a time of more than 120 minutes has been set, the maximum temperature is 80 °C. |
| TIME | Time settingIncrease the cooking time with+or reduce it with-Settings range: 1-120 minutesNote: If a temperature of 40-80 °C has been set, the cooking or keep-warm time can be extended to up to 8 hours. |
| → "Interior lighting", Page 11 | |
| → "Display SHAKE", Page 11 | |
Programme buttons
| Symbol Programme | |
| French fries | |
| Poultry | |
| Meat | |
| Fish | |
| Vegetables | |
| Bread | |
| Small pastries | |
| Keep warm | |
Symbols
| Symbol Description | |
| MAX | Mark for the maximum filling quantity on the inside of the basket |
Standby mode
If the appliance is not used for a certain period of time before or after cooking, it will switch to standby mode and will light up. The appliance only consumes a small amount of energy when in standby mode. Press to deactivate standby mode and use the appliance.
Display SHAKE
On certain programmes, SHAKE flashes after a certain period of time and a signal tone sounds. Shake or turn the food in the basket when the display flashes. This ensures that all food in the basket is cooked to the same degree. → "Shaking or turning food", Page 13
Note: If you do not take the basket out and put it back again, the display will flash until the end of the cooking process and the signal tone will sound roughly every 5 seconds.
Interior lighting
Check the progress in cooking the food without taking the basket out of the appliance. Press ⚙ to switch on the interior lighting.
en Before using for the first time
Note: The interior lighting switches off automatically after approx. 10 seconds.
Before using for the first time
Prepare the appliance for use.
Attaching the handle
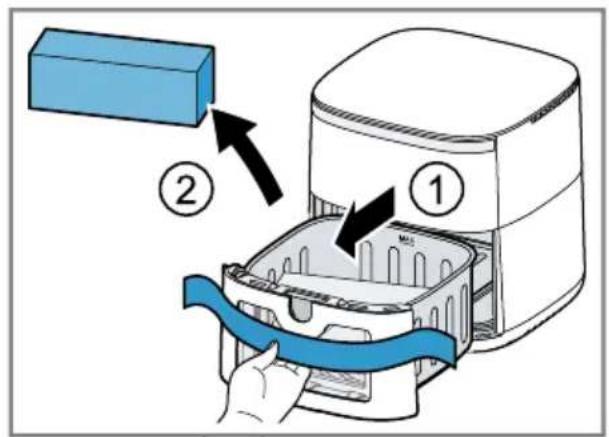
- Loosen the band from the casing enough to pull out the basket.
Do not remove the band from the basket.
→ Fig. 2
- Pull the basket out of the appliance by the band and remove the packaging from the basket.
→ Fig. 3
- Completely remove the band and take the handle out of the packaging.
→ Fig. 4
- Insert the handle in the relevant opening on the basket and press down. Push the assembled basket into the appliance. →Fig. 5
The handle must have snapped fully into place and be securely connected to the basket.
Cleaning the appliance before using it for the first time
- Remove any packaging material.
- Remove any stickers or film.
- Make sure a window is open and allow the appliance to heat up without food for 30 minutes at the highest temperature setting and then cool down.
→ "Starting cooking", Page 12 - Clean all parts that come into contact with food before using for the first time.
Note: Slight smoke or odour emission during initial use is normal.
Operation
General information
Please bear this information in mind so that you can get the best out of your appliance.
■ To change these values faster, hold down the settings buttons.
- To change the temperature or time during cooking, press▶|change the values and then resume cooking with▶ll
Setting up appliance
- Place the appliance on a stable, horizontal, flat and heat-resistant work sur-
face. Always maintain a safety distance of at least 10 cm to walls and other objects.
- Unwind the power cord to the required length.
Adding food to the basket
- Remove the basket. Put the grid in the basket as shown and press it down.
- Add the food to the basket and push the basket fully into the appliance.
Observe the mark for the maximum filling quantity.
→ Fig. 6
→ Fig. 7
Starting cooking
- Insert mains plug.
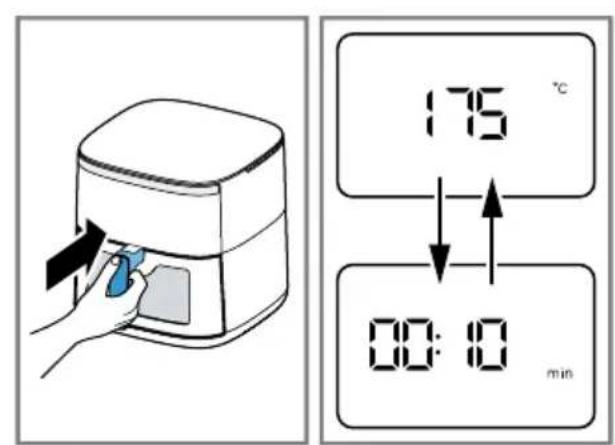
√ A signal tone sounds and the control panel is active.
√ The display alternately shows the preset temperature and the cooking time for manual cooking.
→ Fig. 8
→ Fig. 9
- To use a programme, press the required symbol on the control panel, e.g.
French fries.
→ F i g . 1 0
√ The programme symbol flashes and the display alternately shows the preset temperature and the cooking time for the programme.
→ Fig. 1 1
-
To return to manual cooking mode, press the flashing programme symbol again.
-
To adjust the preset temperature, select the required value with TEMP- or +. →Fig. 12
-
To adjust the preset cooking time, select the required value with TIME- or +. →Fig. 13
-
Start cooking with ▷|Start/Pause. →Fig. 14
√ The display alternately shows the selected temperature and the remaining cooking time.
- To check the progress of cooking, press ⚙ Interior lighting.
→ F i g . 1 5
√ The cooking compartment is illuminated and the food can be seen through the viewing window.
Shaking or turning food
- When SHAKE flashes, take the basket out of the appliance.
→Fig. 16
√ Cooking is paused and the control panel is not lit up as long as the basket is removed.
2. Shake the food in the basket. Turn large items of food or delicate foods using cooking utensils made of wood or heat-resistant plastic.
→Fig. 17
- Push the basket fully into the appliance.
→Fig. 18
√ Cooking will continue automatically and the display alternately shows the selected temperature and the remaining cooking time.
Taking cooked food out
- When cooking has ended, End flashes on the display. An acoustic signal sounds and all symbols light up on the control panel.
→Fig. 19
- Take out the basket with the cooked food.
→Fig. 20
- With food that has not given off any excess fat, e.g. french fries, shake it out of the basket or take the food out with a cooking utensil.
→Fig. 21
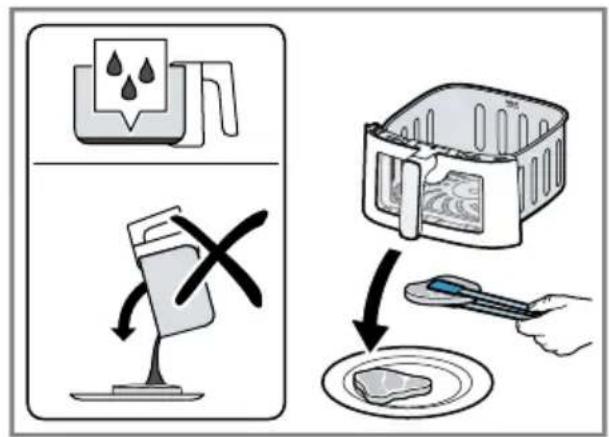
- With food that has given off excess fat, e.g. marbled meat or pieces of poultry,
take it out of the basket with a cooking utensil. To prevent fat running out of the basket onto the cooked food, do not tip the basket out.
→Fig. 22
Dispose of the hot excess fat carefully or leave it to cool down in the basket.
Note: If you have cancelled the current cooking process manually with 🔒, the display shows COOL and the fan will run for a certain period of time. Do not remove the basket until COOL has disappeared.
Tip: You can now directly cook additional portions or other food with the appliance.
Baking tin
You can use the baking tin to make cakes, bakes and gratins or to warm up pre-cooked curries.
Overview
→Fig. 23
1 Handle
2 Baking tin
Using the baking tin
- Place the finished dough or the prepared food in the baking tin.
→Fig. 24
Place the grid in the basket and set the baking tin on top in the middle.
- Push the basket with the baking tin fully into the appliance.
→Fig. 25
Application examples
Your appliance offers 8 different preset programmes. Select a suitable programme depending on the food.
Note: The values specified here are recommendations. As foods differ in terms of origin, size, shape, condition and brand, an optimal setting for your food may diverge from these values.
| Food Presetting Information | ||
| Frozen french fries, 10 x 10 mm, 500 g | French fries 180 °C23 min. | When SHAKE flashes, shake or turn the food |
| Chicken legs, 5 pcs, each 125 g | Poultry 200 °C25 min. | When SHAKE flashes, shake or turn the food |
| Meat patties, 5 pcs, each 40 g | Meat 200 °C20 min. | When SHAKE flashes, shake or turn the food |
| Fish slices, 7 pcs, approx. 2 cm thick | Fish160 °C12 min. | When the programme has ended, turn the fish slices and start the programme again |
| Grilled vegetables, 500 g | Vegetables180 °C20 min. | Cut the vegetables into large pieces and mix with max. 1 tsp. of oilWhen SHAKE flashes, shake or turn the food |
| Cakes Small pastries | 150 °C18 min. | Using the baking tinWhen the programme has ended, start the programme again |
| Bread sticksSmall buns, 6 pcs, diameter 60-70 mm | Bread160 °C12 min. | Using the baking tinPreheat the appliance for 10 min. |
| Keeping cooked food warm | Keep warm80 °C30 min. | |
Tips
■ If the size of the food diverges from those in the table, shorten or lengthen the cooking time.
■ If the food is not cooked after the selected cooking time, extend the cooking time or increase the temperature.
■ To ensure an even cooking result, shake or turn the food in the basket when SHAKE flashes.
- If the food is not as crispy as you would like, apply a little oil to the food before cooking, e.g. with a brush or oil spray. Allow excess oil to drip away or wipe it off.
Overview of cleaning
Clean all parts immediately after use so that residues do not dry on.
- Do not use cleaning agents containing alcohol or spirits.
- Do not use sharp, pointed or metal objects.
- Do not use abrasive cloths or cleaning agents.
▶ Only clean the control panel and the display using a damp microfibre cloth.
Clean the individual parts as indicated in the table.
→Fig. 26
Cleaning the appliance and parts
- Clean the main unit with a damp cloth and dry.
Use a damp microfibre cloth for the display. - If necessary, clean the cooking compartment with hot water and a soft cloth or sponge.
- Remove remnants of food on the heating element with a soft brush.
- Remove any excess fat and oil from the basket.
- If there are stubborn fat residues in the basket, add hot water and a few drops of washing-up liquid to the basket to pre-clean it and leave to act.
- Clean the basket and the grid with detergent solution and a soft cloth or sponge or put in the dishwasher.
Troubleshooting
Fault Cause and troubleshooting
| The appliance is not working. | Appliance has no power supply. ▶ Check whether your appliance is supplied with power. |
Fault Cause and troubleshooting
| Appliance automatically resumes cooking following an interruption to the power supply. | Appliance saves the aborted cooking process for a certain period of time.1. If the power supply has been interrupted, unplug the mains plug.2. Once the power supply has been restored, plug in the mains plug.√ The aborted cooking process is resumed.3. Select one of the following options:▶ Allow the cooking process to run until the end.▶ Press ▷to interrupt the cooking process in order to change the values, e.g. increase the temperature.▶ Cancel the cooking process with↓Note:If the power supply was interrupted for a prolonged period of time, the cooking process will not resume automatically. |
| Cooking does not start or continue. | Basket has not been properly inserted in the appliance.▶ Push the basket fully into the appliance. The basket should not protrude from the housing. |
| Basket cannot be fully pushed into the appliance. | Food or objects in the cooking compartment.▶ Remove food or objects from the cooking compartment. Food or objects in the cooking compartment become hot during cooking. Use heat-resistant cooking utensils and proceed with care. |
| An error code appears on the display, e.g.Ex. | The electronics have detected a fault.1. Pull out the mains plug.2. Re-insert the mains plug in the socket.3. If the fault persists, call Customer Service.→ "Customer Service", Page 16 |
| White smoke escapes from the appliance. | Dripping fat and residues of fat in the basket or cooking compartment produce white smoke during heating.▶ Clean the basket, grid and cooking compartment thoroughly after each use to remove all residues of fat.Note:White smoke caused by residues of fat does not affect the cooking result or the appliance. |
| Appliance does not fit into the transport packaging with the handle attached. | Once installed, the handle is securely connected to the basket.Note:Only remove the handle in exceptional circumstances, e.g. if you want to return the appliance.1. Press down the rubber plug on the top of the handle using a suitable tool, e.g. a small screwdriver.→Fig. 272. Press the tool back whilst pulling the handle off the basket.→Fig. 28 |
Disposing of old appliance
- Dispose of the appliance in an environmentally friendly manner. Information about current disposal methods are available from your specialist dealer or local authority.

Dispose of packaging in an environmentally-responsible manner. This appliance is certified in accordance with the guidelines on E-waste (Management) Rules 2022 which govern waste electrical and electronic equipment.
The guideline provide a framework for the return and recycling of used appliances.
Note: This product doesn't contain any of hazardous substances as specified in the e-waste Management and Handling Rules 2022.
Dos
- Please visit our website https://www.bosch-home.in/metapages/e-waste-management to find out more details regarding e-waste disposal.
- Keep the product in isolated area, after it becomes
non-functional/un-repairable so as to prevent its accidental breakage.
- Consult the authorized service center as to whether the Electronic Equipment can be repaired or not, before discarding.
- Consult the retailer about appliance take back schemes.
Don'ts
- The product should not be opened by the user himself/herself, but only by authorized service personnel.
- The product is not meant for re-sale to any unauthorized agencies/scrap dealers/kabariwalah.
- Don't dispose of the discarded Electronic Equipment in household bins or Municipal bins.
- Don't dump the discarded Electronic Equipment in the open or in any land fill site, as this will result in contamination of the soil and the ground water.
- Do not keep any replaced spare part(s) from the product in exposed area.
Customer Service
Detailed information on the warranty period and terms of warranty in your country is available from our after-sales service, your retailer or on our website.
Helpline no.: 1800-266-1880 (Monday to Saturday – 8 am to 8 pm)
Email ID: service.in@bosch-home.com
Chat with us (WhatsApp): +91-8451000555

Warranty conditions
Warranty Terms & Conditions:
- The warranty period for this product will be for 2 years from the date of purchase.
- The warranty can be availed only by the first purchaser of the appliance and is non-transferable.
-
The warranty covers manufacturing defect in material and workmanship that arises despite normal operation and usage of the appliance as prescribed in the operating manual.
-
In case of the product being tampered with or attempted to be repaired by unauthorised personnel, then the warranty terms will be void and the company shall have no further obligations under warranty. Further, the customer waives all rights against the company which has arisen due to the breach of the warranty terms by the customer.
-
In the event that the company decides to provide a replacement/ refund of the product during this warranty period, customers are mandated to carry the product to the specified service centre/ authorised dealer at their own cost.
-
The warranty coverage is not applicable outside India.
-
In case of replacement, the replaced product will be warranted only for the remaining of the original warranty period
-
The Company shall not have any liability nor deemed to be in default of warranty obligations for any delay or failure in performance of warranty obligations resulting from causes beyond its reasonable control (e.g. strikes, floods, earthquakes etc.) including delay in servicing due to non-availability of product.
-
The Company gives no warranties other than those stated above and specifically excludes any implied warranty of fitness for any particular purpose.
-
In the event of change of address, the new address shall be intimated to the given toll-free number.
-
In case repair cannot be completed onsite, the company reserves the right to carry the appliance to its Authorized Service Center and return the same after repair.
Warranty is not applicable in any of the following cases:
-
-
- The warranty card is not duly fitted and does not bear the stamp, date and signature of an Authorised Dealer.
- The warranty does not cover any consequential or resulting liability, damage or loss to property or life arising directly or indirectly as a result of appliance failure, breakdown, or accident or usage of the appliance not in accordance with the operating manual.
- The appliance has been subjected to improper use such as not following DFU/ User Manual provided by the company, misused, not cared for, abnormal use, exposure to dampness, excessive heat, excessive humidity and other extreme environmental conditions, corrosion, damage beyond repair, rusting, unauthorised modifications, unauthorised repairs, neglect, accident, alteration, acts of God, spillage of liquid or food particles, faulty electric wiring/cabling, abnormal voltage/ power supply beyond appliance specifications, damage/ breakage/non-functioning of appliance due to rodents, rats, cockroaches and ants etc.
- The warranty does not cover consumables, normal wear & tear parts, plastic, glass and/or rubber parts, non-operational parts and related accessories.
- The warranty does not include preventive checks, routine maintenance, cleaning, de-scaling and overhaul.
- The appliance is used by a commercial establishment or by an individual for commercial purpose.
- The serial number of the appliance is removed, altered, made illegible/tampered with.
- Damage to the product or any parts due to transportation or shifting or arising out of improper storage of the appliance at the customer's premises.
Important: Please present this warranty card to our staff at the time of service.
1) Contact the following for availing the support of your Product:
1-800-266-1880(toll free) Monday – Saturday – 8:00 am to 8:00pm
2) Email: service.in@Bosch-Home.com | Website: www.bosch-home.com/in
WARRANTY CARD

BOSCH
Customer's Name
Address
City Pin State
Telephone Mobile
E-mail Model/E-Nr
Serial No.
Date of Purchase Date of Expiry
Dealer's Name
Dealer's Signature and Stamp Customer's Signature
Note: Warranty will start from the date of purchase.
Customer Service
Regardless of the nature of your concern, you can always be sure of personal attention from the Bosch Customer Service: on the internet and on the phone.
India, Bhārat, भारत BSH Household Appliances Mfg. Pvt. Ltd. Arena House, Main Bldg, 2nd Floor, PlotNo. 103, Road No. 12, MIDC, Andheri East Mumbai 400093 Toll Free 1800 266 1880* www.bosch-home.com/in *Mon-Sat 8am to 8pm (exclude public holidays)
E-mail: service.in@bosch-home.com

Thank you for buying a Bosch Home Appliance!
Register your new device on MyBosch now and profit directly from:
- Expert tips & tricks for your appliance
- Warranty extension options
• Discounts for accessories & spare-parts
• Digital manual and all appliance data at hand - Easy access to Bosch Home Appliances Service
Free and easy registration – also on mobile phones:
www.bosch-home.com/welcome
BOSCH HOME APPLIANCES SERVICE
Looking for help? You'll find it here.
Expert advice for your Bosch home appliances, help with problems or a repair from Bosch experts.
Find out everything about the many ways Bosch can support you: www.bosch-home.com/service
Contact data of all countries are listed in the attached service directory.
BSH Household Appliances Manufacturing Pvt. Ltd.
Arena house, 2nd floor, Main building,
Plot no 103, Road no 12, MIDC,
Andheri East, Mumbai - 400 093
www.bosch-home.in

8001357753 (050825)
en


- CRISPMAXX SERIE
- SAFETY
- AVOIDING MATERIAL DAMAGE
- FAMILIARISING YOURSELF WITH YOUR APPLIANCE
- OVERVIEW
- CONTROL PANEL
- STANDBY MODE
- DISPLAY SHAKE
- INTERIOR LIGHTING
- BEFORE USING FOR THE FIRST TIME
- ATTACHING THE HANDLE
- CLEANING THE APPLIANCE BEFORE USING IT FOR THE FIRST TIME
- OPERATION
- GENERAL INFORMATION
- SETTING UP APPLIANCE
- ADDING FOOD TO THE BASKET
- STARTING COOKING
- SHAKING OR TURNING FOOD
- TAKING COOKED FOOD OUT
- BAKING TIN
- USING THE BAKING TIN
- APPLICATION EXAMPLES
- TIPS
- OVERVIEW OF CLEANING
- CLEANING THE APPLIANCE AND PARTS
- TROUBLESHOOTING
- DISPOSING OF OLD APPLIANCE
- CUSTOMER SERVICE
- WARRANTY CONDITIONS
- WARRANTY TERMS & CONDITIONS
- WARRANTY IS NOT APPLICABLE IN ANY OF THE FOLLOWING CASES
- WARRANTY CARD
- BOSCH
- THANK YOU FOR BUYING A BOSCH HOME APPLIANCE
- LOOKING FOR HELP? YOU'LL FIND IT HERE
Brand : BOSCH
Model : CrispMaxx Serie 6 MAF671B5IN
Category : Deep fryer