
FHNE 805 4G TC - Gas cooktop FRANKE - Free user manual and instructions
Find the device manual for free FHNE 805 4G TC FRANKE in PDF.


| Product type | Built-in gas hob |
| Brand | Franke |
| Model | FHNE 805 4G TC |
| Category | Gas hob |
| Installation type | Built-in, class 3, type Y |
| Appliance dimensions (W x D x H) | 790 x 510 x 50 mm |
| Cutout dimensions (W x D) | 770 x 490 mm |
| Net weight | 12.6 kg |
| Electrical supply | 220-240 V ~ 50/60 Hz, 0.6 A |
| Gas type | G20 (natural gas) / G30 (butane) / G31 (propane) – Cat. II 2H3+ |
| Gas pressure | 20 mbar (G20) / 28-30 mbar (G30) / 37 mbar (G31) |
| Total installed power | 11.8 kW (gas) – 860 g/h (G30/G31) |
| Number of burners | 5 |
| Burner configuration | 1 auxiliary, 1 semi-rapid, 2 rapid, 1 double crown |
| Ignition | Integrated spark ignition (rotary knob) |
| Safety device | Safety thermocouple (automatic gas shut-off if flame goes out) |
| Surface material | Stainless steel |
| Cleaning | Soft sponge with soapy water – do not use steam cleaner or abrasives |
| Gas connection | Rigid copper connection 12 mm or flexible stainless steel, elastomer seal supplied |
| Electrical connection | 3-conductor cable (H05RR-F 3x0.75 mm²) |
Frequently Asked Questions - FHNE 805 4G TC FRANKE
User questions about FHNE 805 4G TC FRANKE
0 question about this device. Answer the ones you know or ask your own.
Ask a new question about this device
Download the instructions for your Gas cooktop in PDF format for free! Find your manual FHNE 805 4G TC - FRANKE and take your electronic device back in hand. On this page are published all the documents necessary for the use of your device. FHNE 805 4G TC by FRANKE.
USER MANUAL FHNE 805 4G TC FRANKE
EN Installation and user manual Gas Hob
UK Installation and user manual Gas Hob
Installation procedure 8
Intended use 11
Cleaning and care 12
Cleaning the appliance 12
Maintenance and repair 13
Disposal 14
Packaging 14
Disconnection 14
Customer service 14
ABOUT THIS MANUAL
This user manual applies to several models of the device. Thus it may be possible that some of the described features and functions are not available on your specific model.
The explanatory images and figures, described in the various sections, are available at the end of the manual.
- Carefully read the user manual before using the device.
- Keep the user manual.
- Use the device described in this user manual only according to the intended use.
Franke reserves the right to make modifications to the product without prior notice.
All information correct at time of issuance.
Symbol Meaning

Warning symbol. Warning against risks of injury.

Actions in safety and warning notes to avoid injury or damage.

Action step. Specifies an action to be done.
SAFETY INFORMATION
In this manual and on your appliance we have provided many important safety messages. Always read and obey all safety messages.
Franke reserves the right to make modifications to the product without prior notice. All information correct at time of issuance.

This appliance can be used by
children aged from 8 years and above and persons with reduced physical, sensory or mental capabilities or lack of experience and knowledge if they have been given supervision or instruction concerning use of the appliance in a safe way and understand the hazards involved. Children shall not play with the appliance.
Cleaning and user maintenance shall not be made by children without supervision.

Risk of injury!
This device is not a toy. Keep children and pets away from the device and the packaging material (e.g., plastic film and polystyrene); it can be dangerous. Dispose of it in a proper way.
Do not leave children near the device unattended. Do not let children play with the device.

Risk of burns!
During use the appliance becomes hot. Care should be taken to avoid touching the hob.
WARNING: Accessible parts may become hot during use. Young children should be kept away. Children less than 8 years of age shall be kept away unless continuously supervised.
Ensure the gas type and supply are compatible with appliance specifications. The hob was developed exclusively for non-professional, domestic use in the household only. The type of gas for which the appliance is arranged is specified on the data plate on the bottom of the tray. Prior to installation, ensure that the local distribution conditions (nature of the gas and gas pressure) and the adjustment of the appliance are compatible.
This appliance is not connected to a combustion products evacuation device. It shall be installed and connected in accordance with current installation regulations. Particular attention shall be given to the relevant requirements regarding ventilation. The adjustment conditions for this appliance are stated on the label (or data plate). Pay particular attention to the applicable regulations on ventilation. After use, switch off the hob by its controls. Make sure the burners are cold before closing the lid, if the appliance has one.
Risk of electric shock due to entering liquid!
The device contains electrical components.
Make sure that no liquid enters the interior of the device. Do not use pressurised steam to clean the device. In the event of the burner flames accidentally extinguished, turn off the burner control and do not attempt to reignite the burner for at least 1 min. The device shall not be operated for more than 15 seconds if after 15 seconds the burner has not lit, stop operating the device and open the compartment door and/or wait at least 1 minute before attempting a further ignition of the burner. Ensure that the device is installed in a way that allows to disconnect it from the power supply, with a contact opening distance (3 mm) that ensures complete disconnection in category III overvoltage conditions. Ensure that the appliance is connected to an earthing system in compliance with the current regulations.
CAUTION: The use of a gas cooking appliance results in the production of heat, moisture and products of combustion in the room in which it is installed.
Ensure that the kitchen is well ventilated especially when the appliance is in use: keep natural ventilation holes open or install a mechanical ventilation device (mechanical extractor hood). Do not operate the appliance with an external time switch or a separate remote control system.
CAUTION: The cooking process has to be supervised. A short term cooking process has to be supervised continuously.
Do not use steam cleaners or direct jets of water. Never use scouring pads, steel wool, muriatic acid or other products which could scratch or mark the surface. Never use sharp objects, as they could damage the seals between the trim and worktop. Ensure the gas outlet zones are perfectly clean. These instructions are only valid if the country symbol appears on the appliance. If the symbol does not appear on the appliance, it is necessary to refer to the technical instructions which will provide the necessary instructions concerning modification of the appliance to the conditions of use of the country.
Risk of fire!
Do not store items on the cooking surfaces.
WARNING: Unattended or automatic cooking on a hob with fat or oil can be dangerous and may result in fire. Hot oil ignites readily.
TECHNICAL DATA
FHNE 604 3G TC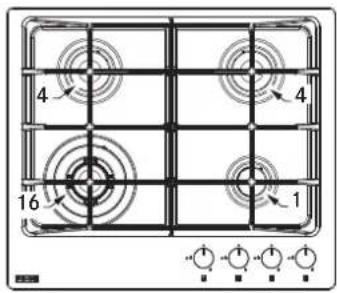
FHNE7554GTC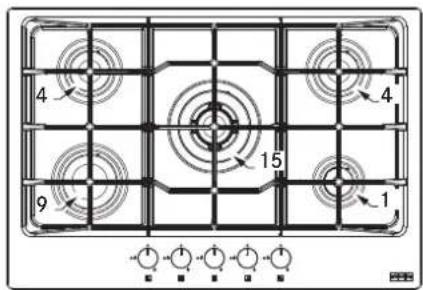
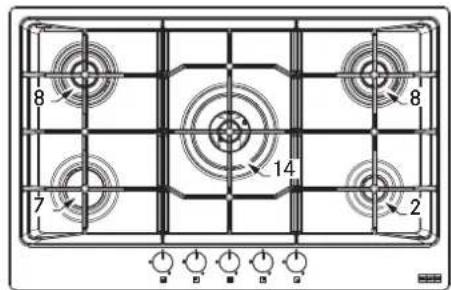
FHNE8054GTC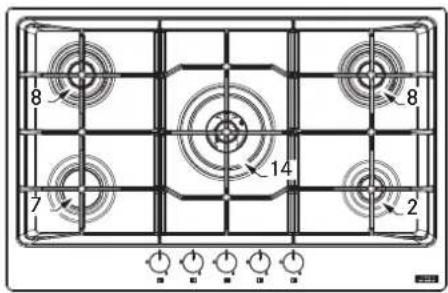
FHNE 12043GTC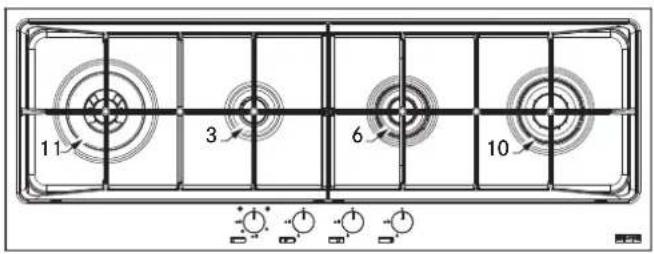
FHNE COR4 3G TC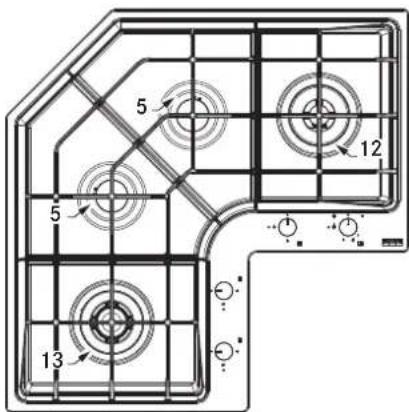
| Position Burner | Rated Capacity - G20 | Injectors G20 - 20 mbar | Rated Capacity - G30 | Rated Capacity - G31 | Injectors G30/G31 28-30/37 mbar | Rated Power (kW) | Reduced Power (kW) |
| 16 | TC | 0.343 | 1.28 | 262 | 262 | 0.96 | 3.60 |
| 15 | TC | 0.362 | 1.33 | 277 | 277 | 0.97 | 3.80 |
| 14 | TC | 0.362 | 1.41 | 277 | 277 | 0.98 | 3.80 |
| 13 | TC | 0.362 | 1.33 | 277 | 277 | 0.97 | 3.80 |
| 12 | DUAL INT | 0.105 | 0.75 | 80 | 80 | 0.46 | 1.10 |
| DUAL TOT | 0.476 | 0.75+1.47 | 364 | 364 | 0.46+0.95 | 5.00 | |
| 11 | DUAL INT | 0.076 | 0.71 | 58 | 58 | 0.46 | 0.80 |
| DUAL TOT | 0.381 | 0.71+0.95 | 291 | 291 | 0.46+0.65 | 4.00 | |
| 10 | R DC | 0.286 | 1.28 | 218 | 218 | 0.88 | 3.00 |
| 9 | R | 0.286 | 1.15 | 218 | 218 | 0.85 | 3.00 |
| 8 | SR DC | 0.238 | 1.18 | 182 | 182 | 0.80 | 2.50 |
| 7 | SR | 0.191 | 1.03 | 146 | 146 | 0.69 | 2.00 |
| 6 | SR DC | 0.238 | 1.18 | 182 | 182 | 0.80 | 2.50 |
| 5 | SR | 0.167 | 0.97 | 127 | 127 | 0.65 | 1.75 |
| 4 | SR | 0.167 | 0.97 | 127 | 127 | 0.65 | 1.75 |
| 3 | AUX | 0.095 | 0.77 | 73 | 73 | 0.50 | 1.00 |
| Position | Burner | Rated Capacity - G20 | Injectors G20 - 20 mbar | Rated Capacity - G30 | Rated Capacity - G31 | Injectors G30/G31 28-30/37 mbar | Rated Power (kW) | Reduced Power (kW) |
| 2 | AUX | 0.095 | 0.78 | 73 | 73 | 0.50 | 1.00 | 0.65 |
| 1 | AUX | 0.095 | 0.72 | 73 | 73 | 0.50 | 1.00 | 0.65 |
| Pressure (mbar) | min | 17 | 20 | 25 | ||||
| nom | 20 | 28-30 | 37 | |||||
| max | 25 | 35 | 45 | |||||
| Type of Gas | G20 natural gas | GPL G30 Butane - G31 Propane | Cat. II 2H3+ | |||||
| MODELS' CONFIGURATION | |||||||||||||||
| MODEL | nr AUX | nr SR | nr SR DC | nr R DC | nr DUAL | nr TC | N Bumers | Heat Source | Total Rated Capacity G20 (m3/h) | Total Rated Capacity G30/ G31 (g/h) | Air Necessa- ry for com- bustion (m3/h) | Tot. Installed Gas Rated Power (kW) | Tot Installed GPL Rated Power (kW) | Weight (net- gross) (kg) | |
| FHNE 604 3G TC | 1 | 2 | 1 | 4 | GAS | 0.77 | 589 | 16.2 | 8.1 | 8.1 | 10-11.5 | ||||
| FHNE 755 4G TC | 1 | 2 | 1 | 1 | 5 | GAS | 1.075 | 822 | 23 | 11.3 | 11.3 | 14.2-15.8 | |||
| FHNE 805 4G TC (FM) | 1 | 1 | 2 | 1 | 5 | GAS | 1.124 | 860 | 24 | 11.8 | 11.8 | 12.6-14 | |||
| FHNE 1204 3G TC (FM) | 1 | 1 | 1 | 1 | 4 | GAS | 1 | 764 | 21.6 | 10.5 | 21.9-24.3 | ||||
| FHNE COR 4 3G TC | 2 | 1 | 1 | 4 | GAS | 1.17 | 895 | 24.6 | 12.3 | 20-24 | |||||
DC = Double Crown SR = Semi-Rapid R = Rapid AUX = Auxiliary C = Cast Iron Grid E = Enameled Grid Power supply = 220-240 V; Frequency = 50-60 Hz; Power/current = 0.6 Watt
INSTALLATION

Installation and electrical/gas connection must only be carried out by specialized and licensed personnel. The manufacturer declines any
liability for injury to persons or damage to things due to failure noncompliance with these provisions.
The gas connection must comply with the regulations in force in the country at the time of installation.
Ensure that the device is connected directly to the mains socket. Ensure that no adapters, no multi-sockets and no extension cables are used to connect the device.
Cabinet requirements
This handbook refers to a class 3 built-in gas hob and type Y for electric part.
The gas pipe must not come into contact with the sides of any oven under the hob.
For fitted units, the components (plastic materials and veneered wood) must be assembled with heat-resistant adhesives (min. 100°C). Unsuitable materials and adhesives can result in warping and detachment.
The ventilation of rooms must be in compliance with local regulation.
The kitchen element must allow sufficient room for the electrical connections of the appliance.
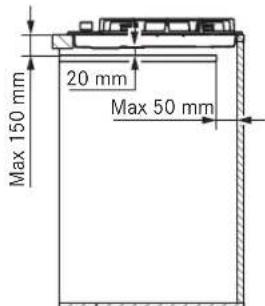
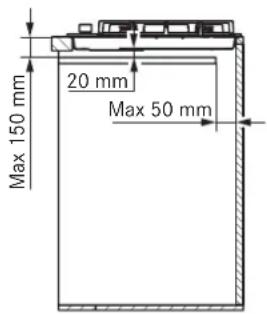
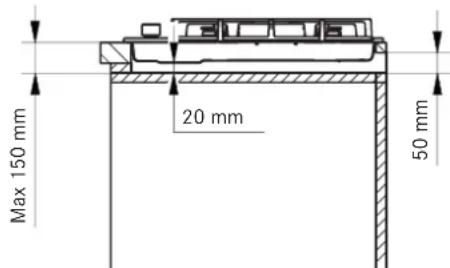
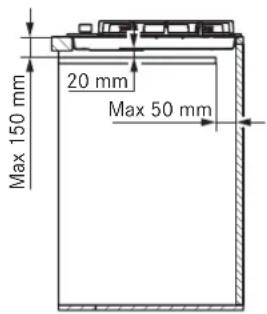
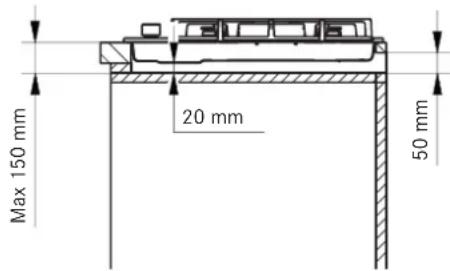
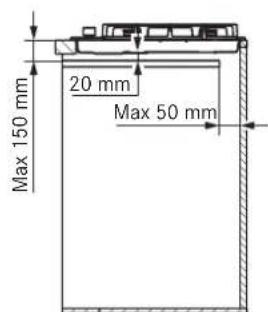
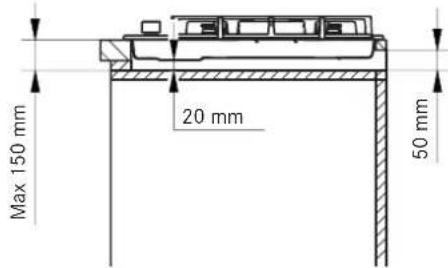
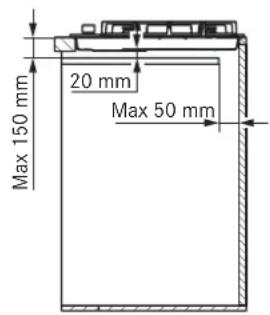
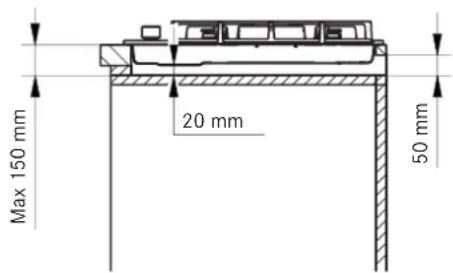
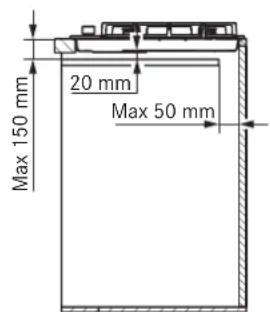
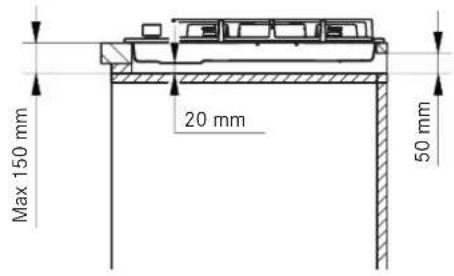
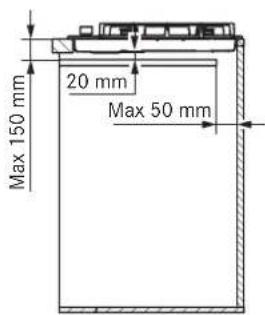
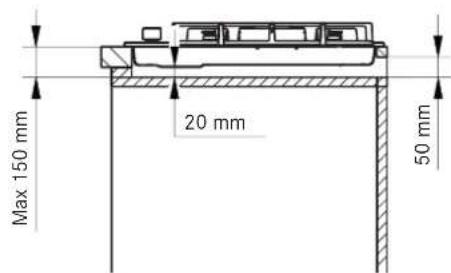
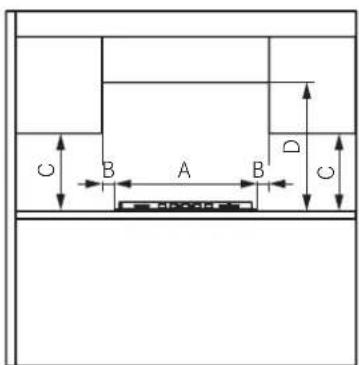
Important: These devices are "Y" type with respect to the degree of protection against the dangers of fire. The minimum distance from the edge appliance is 150 mm for the side wall, 50 mm for the rear and 700 mm for any cabinets above it. The appliance is recommended to be built into 40 mm thick worktops. In case the dimensions are different, eventual modifications have to be managed by the technician.
Note: if a hood is installed above the hob, for the distance to be respected refer to the assembly instructions of the hood.
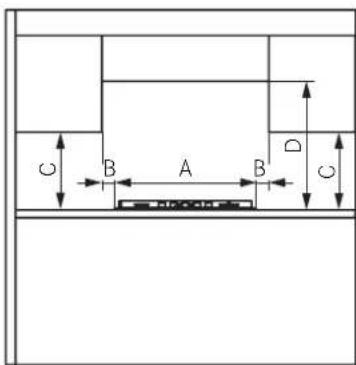
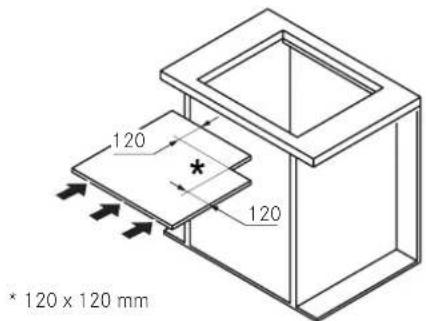
MINIMUM DIMENSIONS (MM)
| A = 590/750/790/1090/ (Diagonal COR TBC) | B = 50 |
| C = 400 D = 700 |
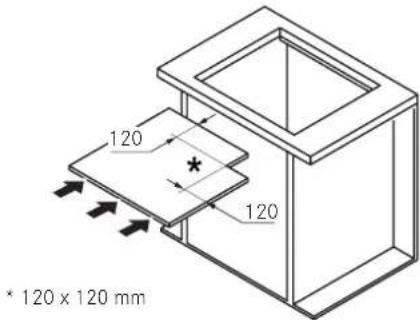
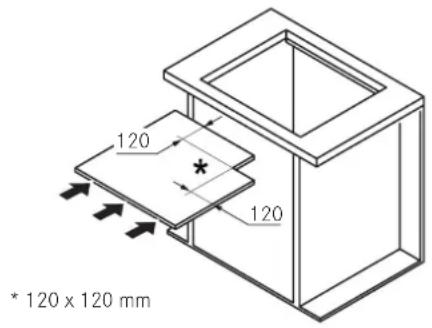
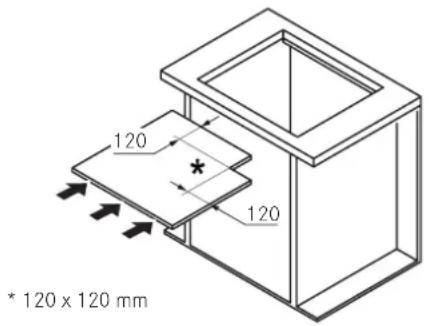
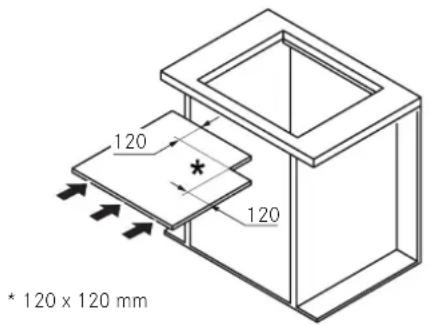
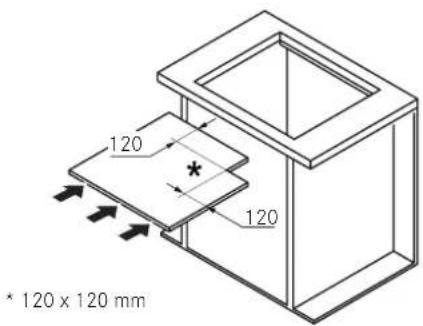
If the appliance is not installed above an oven: arrange a separator baffle.
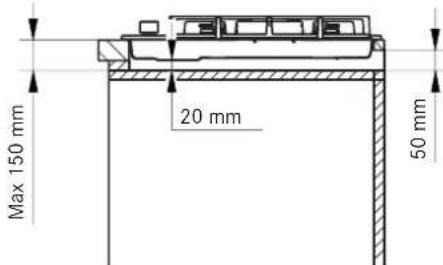
Installation procedure
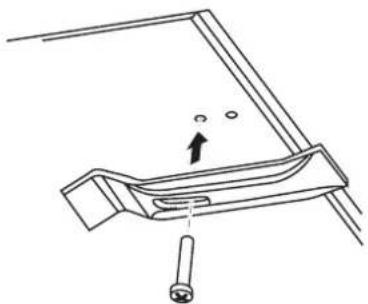
The appliance is fixed to the unit by means of the brackets and accessories provided.
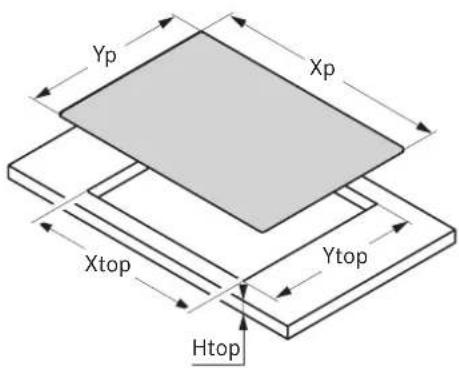
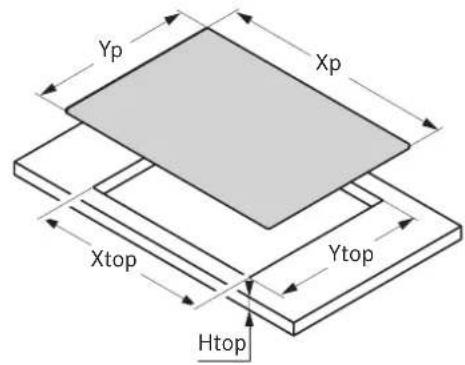
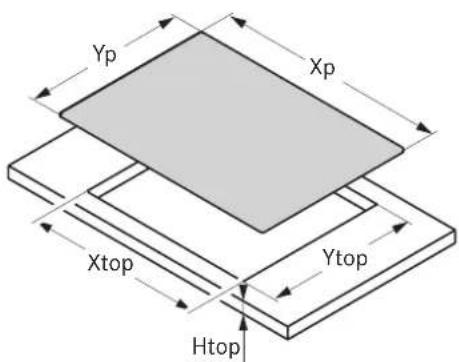
Make sure that there is free access to the fixing elements in front and in the rear after the installation of the appliance. Prepare the hole in the worktop according to the dimensions indicated. Be sure to comply with the dimensions indicated.
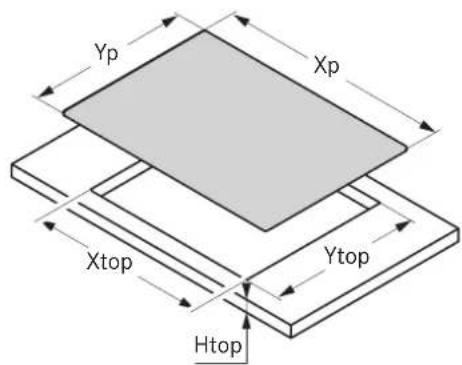
| Model | Xp | Yp | X top | Y top | H top |
| FHNE 604 3G TC | 590 | 510 | 560 | 480 | 40 |
| FHNE 755 4G TC | 750 | 510 | 560 | 480 | 40 |
| FHNE 805 4G TC | 790 | 510 | 770 | 490 | 50 |
| FHNE 805 4G TC FM | 790 | 510 | 770 | 490 | 50 |
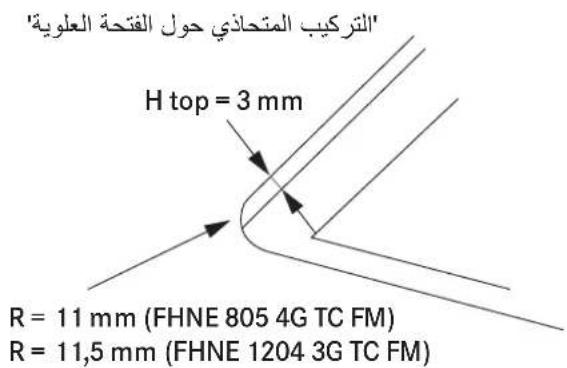
| *Flush fitting around top hole | 792 | 512 | 3 | ||
| FHNE 1204 3G TC | 1090 | 410 | 1070 | 390 | 50 |
| FHNE 1204 3G TC FM | 1090 | 410 | 1070 | 390 | 50 |
| *Flush fitting around top hole | 1093 | 413 | 3 |
* Flush fitting around top hole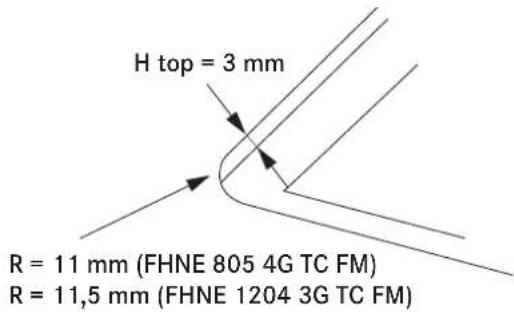
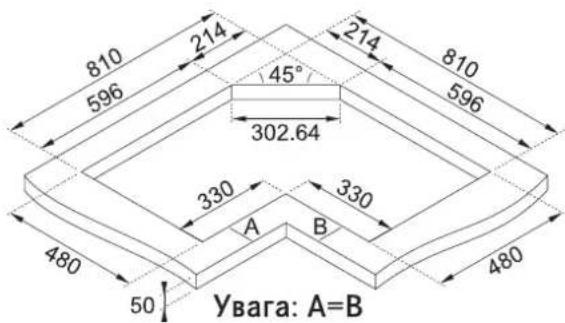
Model FHNE COR 4 3G TC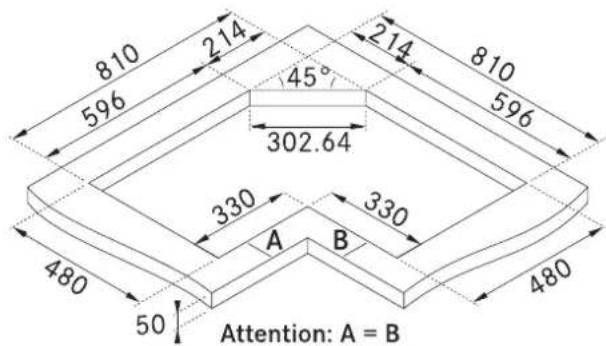
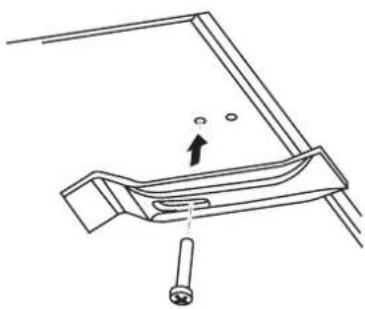
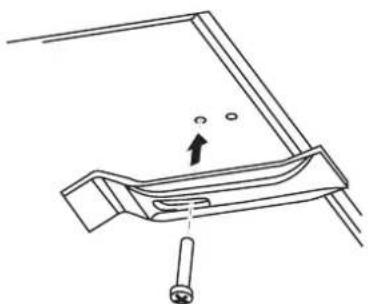
Apply the sealing strip around the hole and position the hob. Fix the appliance with the screws and brackets. Remove any excess sealing strip.
Connection to gas supply
Connect the appliance to the gas supply in compliance with the current regulations, only after making sure it is arranged for the type of gas to be used. Otherwise, carry out the operations described in the paragraph "Replacing injectors". For liquid gas use pressure regulators complying with the current regulations.
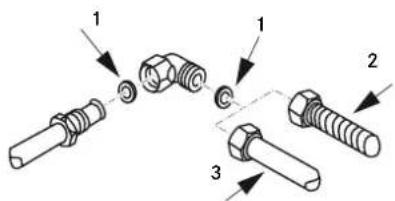
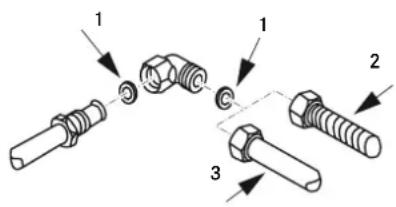
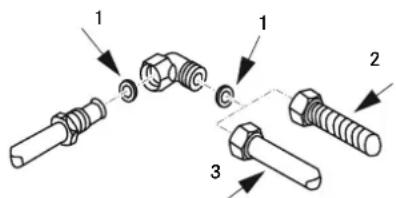
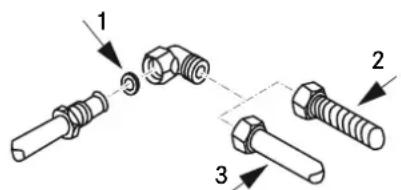
Connection to the gas supply can be made in two ways:
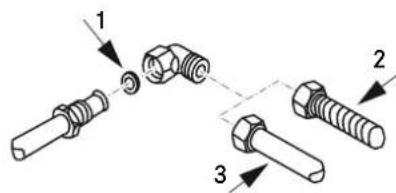
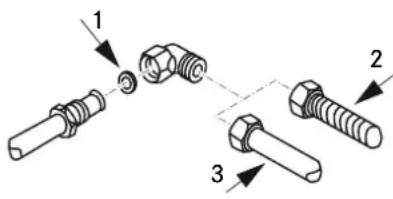
A. Connect the gas hob using a 12 mm diameter rigid copper pipe (3). To ensure a good seal, use the elastomer gasket supplied as an accessory (1). B. Connect the hob using a continuous-surface flexible steel tube (2). Also in this case, to ensure a good seal use the gasket supplied as an accessory (1). The maximum length of the hose is 2 linear metres.
Important: if a stainless steel hose is used, it must be installed so as not to touch any mobile part of the furniture. It must pass through an area where there are no obstructions and where it is possible to inspect it on all its length.
After connection to the gas supply light up the burners and turn the knobs from max position to minimum position to check flame stability. After carrying out the connection use soapy water to check for any leaks.
For United Kingdom, Northern Ireland and Republic of Ireland.
Electrical connection
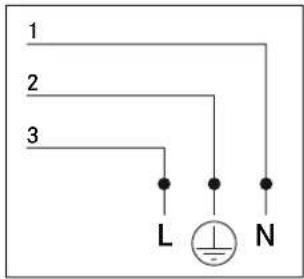
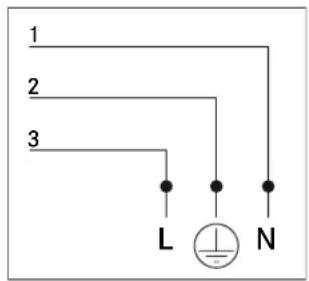
The FRANKE cooking hob comes with a 3-core power cable with free terminals.
Ensure the following:
- The characteristics of your household electrical power supply (voltage, maximum output and current) are compatible with those of your FRANKE hob.
- The plug and the socket can be easily reached and are positioned so that no live part is accessible when inserting or removing the plug.
- A 3 × 0.75 mm H05RR-F type cable for completely gas hobs is used when replacing the power cable.
- The terminals of two appliances are not connected to the same plug.
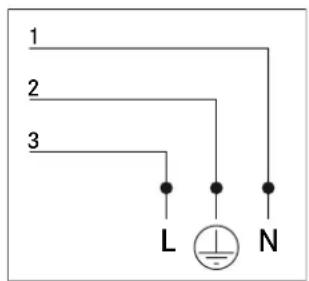
- The polarities of the free terminals (Blue = Neutral = (1) / Yellow and Green = Earth = (2) / Brown = Live = (3)) are respected.
Adjustment to different types of gas
WARNING: This operation must be performed by a qualified technician.
Minimum flame adjustment
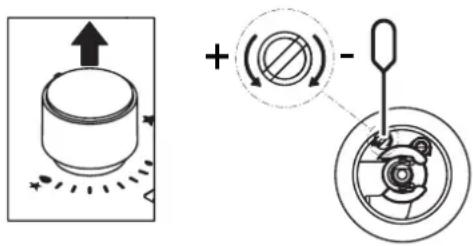
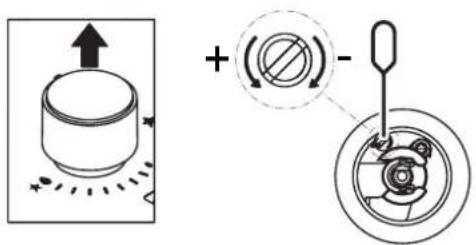
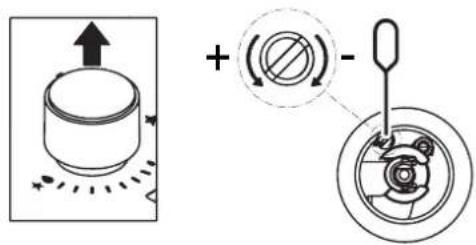
Remove the knob. Adjust the minimum flame by turning the screw clockwise to decrease the flame and anticlockwise to increase it. The screwdriver for adjustment is supplied with the accessories.
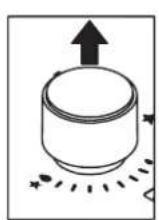
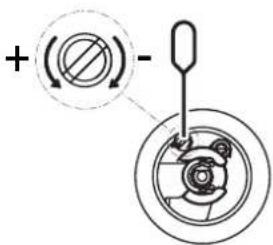
- Remove the grids, burner caps and flame-spreaders;
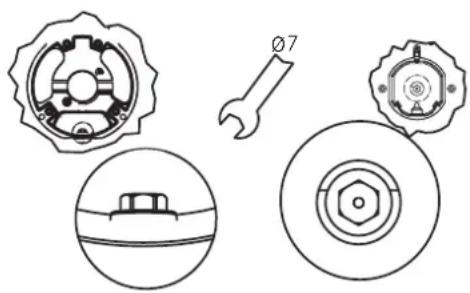
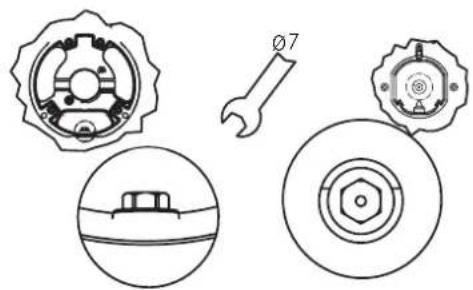
- Unscrew the injectors and replace them with those provided and suitable for the gas supply, making sure the marking matches that given in the table;
- Refit the flame-spreaders, burner caps and grids. These burners do not require air adjustment.
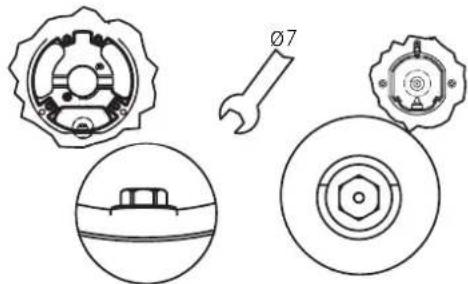
Accessing the hob
To access the tray containing the functional parts, proceed as follows:
- Remove the grids, burner caps and flame-spreaders;
- Remove the knobs, sliding them off their pins;
- Remove the screws that fix the burners to the hob;
- Lift the hob.
Important: When converting the appliance to a different type of gas, place the corresponding sticker (supplied as an accessory) in the special space on the data plate. For operation with LPG (G30 or G31), the minimum flame adjustment screw must be fully screwed down. These appliances are supplied in cat. II 2H3+.
Replacing injectors
Injectors not supplied must be requested from customer service.
Important: All appliances are factory-set for natural gas (G20). If a different type of gas is to be used, change the injectors as follows:
INTENDED USE
CAUTION: This appliance is for cooking purposes only. It must not be used for other purposes, for example room heating.
Do not pull the appliance or the power cable to unplug it. Close the general gas supply cock when the hob is not in use.

Risk of burns!
Do not touch the pot grids during use. Do not touch the appliance with wet parts of the body.
Lighting the burners
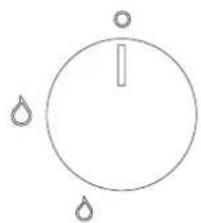
The hob is lit with the control knobs. To light the burners, proceed as follows:
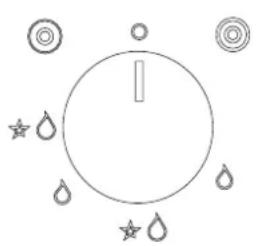
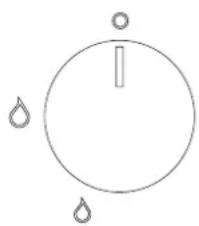
- Press and turn the required knob to the lighting and max delivery position.
- Keep the knob pressed down for 3-4 seconds to allow the sparks to ignite the gas coming out of the burner and to allow the thermocouple to heat up.
Then release the knob and, turning it anticlockwise, adjust the flame as required. If the flame does not stay lit, repeat the operation from step 1.
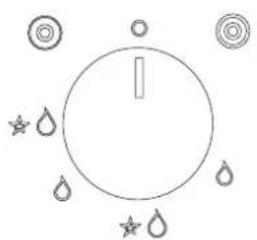
FHNE 604 3G TC, FHNE 755 4G TC, FHNE 805 4G TC, FHNE 805 4G TC FM, FHNE COR4 3G TC
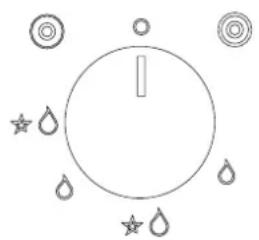
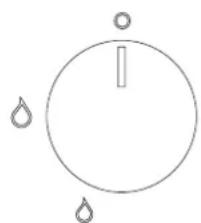
FHNE 1204 3G TC, FHNE 1204 3G TC FM
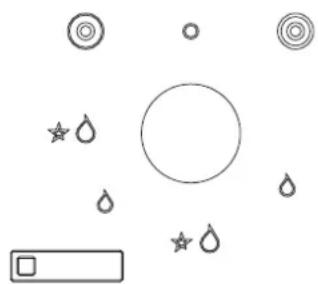
cock closed

lighting and max. delivery

min delivery

dual total

dual inner
The hob is an item for daily use: signs of usage such as scratches or visible material abrasion from pots or cookware are normal. Intensive use leads to more distinctive signs of usage. In such cases, the appliance continues to function perfectly and a complaint is not justified. Safety is always guaranteed.
Do not use the appliance as support top.
To avoid damaging the appliance:
In the case of thermal failure, switch the solid plate off and allow to cool down completely. Do not put any dishes on it. Do not cool with cold water under any circumstances. Do not climb onto the appliance.
The appliance is manufactured in compliance with the relevant effective safety standards and safety requirements of the Gas Directive.
Automatic Safety Valve
These hobs have a safety device that automatically closes the gas flow if the flame accidentally goes out due to draughts, pot spilling, or a temporary interruption of the gas supply. This device is activated approximately 30 seconds after the flame goes out.
Burner use
For lower gas consumption and better efficiency, use pots of widths suitable for the burners, making sure the flame does not go beyond the edges (comply with the following table):
| Burner Pan bottom min-max TBC Ø (recommended) | |
| Auxiliary 80 -140 | |
| Semi-rapid 160 - 220 | |
| Semi-rapid double crown | 180 - 220 |
| Rapid | 220 - 240 |
| Rapid double crown | 220 - 240 |
| Triple crown 240 - 260 | |
| Dual 80 - 140 / 260 - 280 | |
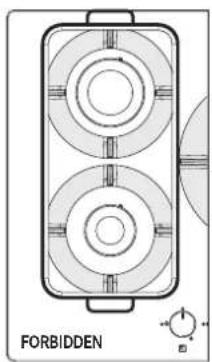
The use of larger pots than those specified can cause excessive overheating of the knobs and top and, in case of prolonged use, yellowing of the cover (if in stainless steel). Franke declines any liability for damage due to such use (Fig. 1).
Do not put the same pan on two burners (Fig. 1). Do not use two burners working at the same time with a single container, like a saucepan or a fish pan (Fig. 1).
Improper use of the grids can damage the hob: do not position the grids upside down or slide them across the hob. In case of use of cast iron griddles, soapstone, terracotta pots and pans, use them for no more than 20 minutes and, in case of prolonged cooking, adjust the burner to the minimum. Heat diffusers such as metal mesh, or any other types, are not recommended.
CAUTION: The use of particular pans or pots may cause a light temporary deformation of the steel cooking surface. This is normal and does not affect the operation of the appliance.
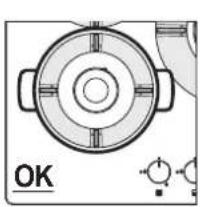
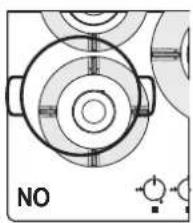
Fig. 1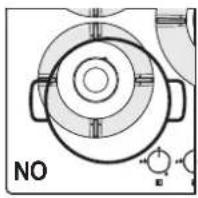
CLEANING AND CARE

Risk of burns!
Do not clean the appliance and its accessories until they are cold. Do not use flammable liquids near the appliance.
Before performing any cleaning and care: turn the appliance off.
Foods that accidentally fall or settle on the surface, on the functional or aesthetic elements of the hob, must not be eaten.
Cleaning the appliance
Clean the hob after every use in order to prevent food residues from burning on. To clean food residues, use a soft cloth or sponge with water. We recommend using protective cleaning agents. - Immediately remove any foods with high sugar content that spill onto the hob. To prevent limescale stains from forming, always thoroughly dry the appliance after going over it with a damp cloth.
- Clean the grids, burner caps and flame-spreaders with hot soapy water, making sure to carefully dry them. Do not clean in a dishwasher. Make sure the gas outlet zones are perfectly clean.
The natural colour of the pot grids in the pot placing section may alter over time due to the heat.
MAINTENANCE AND REPAIR
Before any maintenance operations disconnect the appliance from the mains power supply.
In case of any operation problems, contact the Franke Technical Service Centre.
Make sure that maintenance on electrical components is carried out only by the manufacturer or the customer service. Use original spare parts only. Make sure that damaged cables are changed only by the manufacturer or the customer service.
- When contacting the customer service, please provide the following information:
-type of fault - appliance model (Art. / Cod.) - serial number (S.N.)
This information is given on the data plate on the booklet or under the hob.
If the hob doesn't operate correctly, before calling the Franke Technical Service Centre, refer to the Troubleshooting Guide to determine the problem:
| TROUBLESHOOTING GUIDE | |
| Type of failure Check if: | |
| A The burner fails to ignite, does not stay lit or the flame is not steady | 1 The gas or electrical supplies are not shut off |
| 2 The gas supply tap is not open | |
| 3 The refillable gas cylinder (liquid gas) is not empty | |
| 4 The burner openings are not clogged | |
| 5 The plug end is not dirty | |
| 6 All the burner parts have not been positioned correctly | |
| 7 There are no draughts near the hob | |
| 8 When lighting the burner, the knob has not been pressed for enough time to activate the protection device (see page 11 „Intended use“) | |
| 9 The burner openings are not clogged near the thermocouple | |
| 10 The minimum gas setting is not correct | |
| B The containers (pots, pans, kettles) are not stable | 11 The bottom of the container is not perfectly flat |
| 12 The container is not centered on the burner | |
| 13 The grids have not been exchanged or positioned incorrectly | |
If after the above checks the fault still occurs, get in touch with the nearest Franke Technical Service Centre.
DISPOSAL
Packaging
All packaging materials (cardboard, plastic film (PE) and polystyrene (EPS)) are marked and should, if possible, be collected for recycling and disposed of in an environmentally friendly way.
Disconnection
- Disconnect the appliance from the mains. With a fixed appliance, this must be carried out by a qualified electrician.
Disposal
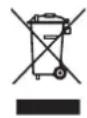
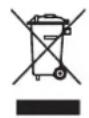
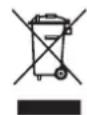
The symbol on the product or on the packaging indicates that the device must not be disposed of in the domestic waste.
Dispose of the device, which is to be discarded, via a specialised waste collection point for electronic and electrical devices.
In accordance with the Directive 2012/19/EU, regarding the reduction of the hazardous substances used in electrical and electronic appliances, and waste disposal.
Proper separate waste collection of the scrapped appliance for subsequent recycling, treatment and environmentally-friendly disposal helps prevent a potentially negative impact on the environment and health and facilitates recycling of the materials used in appliance construction.
CUSTOMER SERVICE
Refer to the contact address for your country on the back page or on our website: www.franke.com
A = 590/750/790/1090/ B = 50
(Diagonaler COR TBC)
C=400D=700
A=590/750/790/1090/B=50
(COR TBC diagonale)
C=400D=700
A = 590/750/790/1090/ B = 50
(COR TBC diagonal)
C = 400, D = 700
A = 590/750/790/1090/ B = 50
(Diagonal COR TBC)
C=400, D=700
If the appliance is not installed above an oven: place a separating deflector.
Adjustment to different types of gas
A=590/750/790/1090/B=50
(COR TBC diagonal)
C=400, D=700
Aikaiεykaratao 81
Ppooipzouevn xpon 83
KaOaipouoc kai povtri8a 85
Kaopiooc nC ouokenuc 85
Sigma npnKai EIOKeu 85
Anoppi
Sigmaεασια
Anouovδεη
Eunnpesnon nAatowv 86
80
86
86
86
INFORMATION ABOUT THIS MANUAL
This user manual is valid for different models of the device. Therefore, some of the features and functions described may not be available on your specific model.
The instructions and the numbers mentioned in the instructions are found at the end of the manual.
Read the manual carefully before using the device. Keep the manual for future reference. Use the device only as described in the manual and in accordance with the intended use.
Franke reserves the right to make changes to the product without prior notice. All information is current at the time of publication.
Symbol Meaning

A = 590/750/790/1090/ B = 50
(Diagonal COR TBC)
C=400 D=700
If the device is installed by a professional, it will emit a signal.
A = 590/750/790/1090/ B = 50
(Diagonal COR TBC)
C=400 D=700
A=590/750/790/1090/B=50
(COR TBC diagonal)
C=400 D=700
| MINIMÁLNE ROZMERY (MM) | |
| A = 590/750/790/1090/ | B = 50 |
| (Uhlopička COR TBC) | |
| C = 400 D = 700 | |
If the appliance is not installed above a pipe, install a separating partition.
Installation procedure
The appliance is attached to the unit using the provided brackets and accessories.
The device is activated by the action that needs to be performed.
SAFETY INFORMATION
This manual and the device you have purchased contain safety instructions. Always read the safety instructions and follow them.
The manufacturer reserves the right to make changes to the product without prior notice.
The information provided here is valid at the time of document release.
Use of this appliance by children aged 8 and above and by persons with reduced physical, sensory, or mental capabilities or lack of experience and knowledge is permitted only under supervision or after they have been given instructions concerning safe use and the hazards involved. Do not allow children to play with the appliance. Children may perform cleaning and maintenance of the device only under supervision!

Risk of injury!
This device is not a toy! Do not allow children or pets to approach the device and packaging material, for example, plastic film and polystyrene; this can be dangerous. Dispose of the packaging properly. Do not leave children near the device without supervision. Do not allow children to play with the device.

Risk of burns! The
During operation, the appliance heats up significantly. Care should be taken to avoid contact with hot surfaces.
WARNING! During operation, some accessible parts of the appliance become very hot. Do not allow children near the appliance. Children aged 8 and over may be near the appliance only under constant supervision.
Make sure that the type of gas used corresponds to the characteristics of the appliance. The hotplate has been designed exclusively for non-professional use in domestic environments. The type of gas is indicated on the technical data plate located on the lower part of the appliance.
Before installation, it is necessary to ensure that the local supply conditions (gas type and gas pressure) are compatible with the adjustment of the appliance. This appliance is not connected to a flue for combustion products. When installing and connecting the appliance, current standards and regulations must be observed. Particular attention should be paid to ventilation requirements. The adjustment characteristics of this appliance are given on the rating plate (or on the technical data label). Pay special attention to standards and regulations regarding ventilation when using the device. After using the hotplate, be sure to turn it off using the corresponding control elements. Before closing the lid (if present), make sure that the burners have cooled sufficiently.
Risk of electric shock due to liquid ingress inside the appliance!
The appliance contains electrical components.
Make sure that no liquid gets inside the internal parts of the appliance. Do not clean the appliance with a pressure washer.
If the flame accidentally goes out, turn off the control knob and do not attempt to relight it for at least 1 minute. The hob should not operate for more than 15 seconds; if it does not ignite within 15 seconds, turn off the appliance and open the compartment door and/or wait at least 1 minute before trying to relight the hob. Ensure that the appliance is installed in such a way that it can be disconnected from the electrical supply by opening the contacts by at least 3 mm, which guarantees complete disconnection according to overvoltage category II conditions.
It is mandatory to ensure proper grounding of the appliance in accordance with current standards and regulations.
WARNING! During operation of gas appliances, heat, moisture, and combustion products are produced.
The kitchen must be well ventilated, especially during appliance operation. Do not block the natural ventilation openings. If necessary, install the appliance with forced ventilation (mechanical extractor). Do not use the appliance with an external timer or a separate remote control system.
WARNING! It is mandatory to monitor the cooking process. If the preparation of a dish does not take much time, monitor the cooking process continuously.
Do not use steam cleaners or water jets.
Do not use abrasive sponges, steel wool, hydrochloric acid, or other products that may scratch the surface or leave stains on it. In no case use sharp objects near the appliance, as they may damage the insulating layer between the hob and the worktop. Keep the gas outlet area perfectly clean. This instruction is valid only if the appliance has a country code letter. If the appliance does not have such a country code letter, refer to the technical instructions for information.
The appliance complies with applicable national standards as per the technical instructions.

Risk of fire!
Do not store any objects on the cooking surface.

WARNING! Extreme
DANGER: Cooking food containing fat or oil on the cooking surface without proper supervision or in automatic mode is dangerous. This can lead to a fire! Overheated oil ignites almost instantly!
TECHNICAL DATA
FHNE 604 3G TC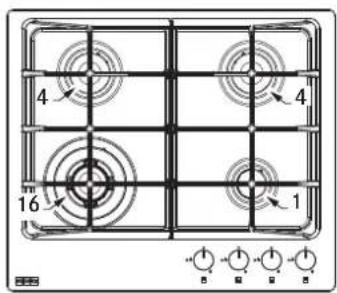
FHNE 755 4G TC FHNE 805 4G TC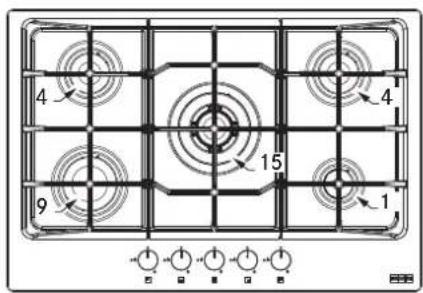
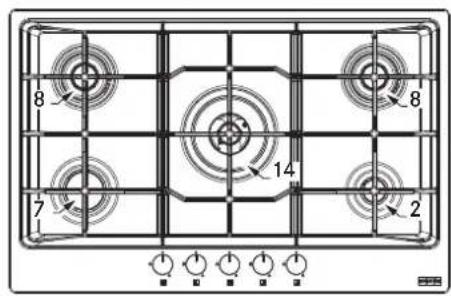
FHNE 1204 3G TC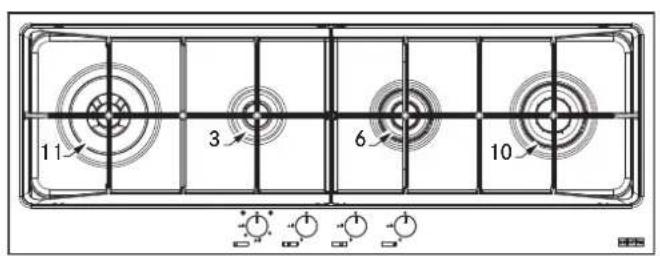
FHNE COR4 3G TC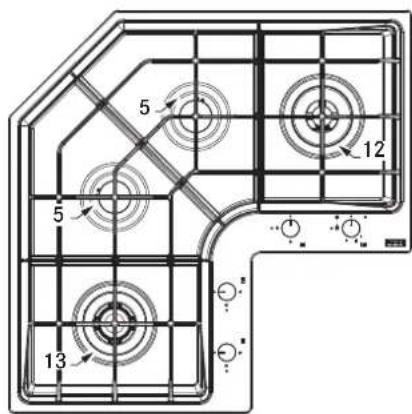
| Положения Кoningдорка Нominhalьнaj | Форсуну G20, 20 мбap | Hominhaig G30 | Hominhaig G31 | Форсуну G30/G31, 28-30/37 mбap | Hominhaig Mошноctb (кВт) | Положения Haima Мошноctb (кВт) | |
| 16 | TC | 0,343 | 1,28 | 262 | 262 | 0,96 | 3,60 |
| 15 | TC | 0,362 | 1,33 | 277 | 277 | 0,97 | 3,80 |
| 14 | TC | 0,362 | 1,41 | 277 | 277 | 0,98 | 3,80 |
| 13 | TC | 0,362 | 1,33 | 277 | 277 | 0,97 | 3,80 |
| 12 | Двий. BHYТР. | 0,105 | 0,75 | 80 | 80 | 0,46 | 1,10 |
| Двий. ПОЛN. | 0,476 | 0,75+1,47 | 364 | 364 | 0,46+0,95 | 5,00 | |
| 11 | Двий. BHYТP. | 0,076 | 0,71 | 58 | 58 | 0,46 | 0,80 |
| Двий. ПОЛN. | 0,381 | 0,71+0,95 | 291 | 291 | 0,46+0,65 | 4,00 | |
| 10 | R DC | 0,286 | 1,28 | 218 | 218 | 0,88 | 3,00 |
| 9 | R | 0,286 | 1,15 | 218 | 218 | 0,85 | 3,00 |
| 8 | SR DC | 0,238 | 1,18 | 182 | 182 | 0,80 | 2,50 |
| 7 | SR | 0,191 | 1,03 | 146 | 146 | 0,69 | 2,00 |
| 6 | SR DC | 0,238 | 1,18 | 182 | 182 | 0,80 | 2,50 |
| 5 | SR | 0,167 | 0,97 | 127 | 127 | 0,65 | 1,75 |
| 4 | SR | 0,167 | 0,97 | 127 | 127 | 0,65 | 1,75 |
| 3 | AUX | 0,095 | 0,77 | 73 | 73 | 0,50 | 1,00 |
| 2 | AUX | 0,095 | 0,78 | 73 | 73 | 0,50 | 1,00 |
| 1 | AUX | 0,095 | 0,72 | 73 | 73 | 0,50 | 1,00 |
| Давлие (мбар) | Мин | 17 | 20 | 25 | |||
| HOM | 20 | 28-30 | 37 | ||||
| Мамс | 25 | 35 | 45 | ||||
| Сжисnéльный ragaz | |||||||
| Тиг раза | Приpondный ragaz G20 | Бутан G30 | Кат. II 2H3+ | ||||
| Проган G31 | |||||||
| XAPAKTEPRICTNIK MODEJIEN | |||||||||||||||
| MOДЕЛБ | № | № | № | № | №R | № | № | К-ВО | Истонник | Овsiая | Овsiая | Овsiая | Овsiая | Bec | |
| AUX | SR | SR | R | DC | ДВОДH. | TC | ropeLOK | Теллa | HOMN-HaMbHаЯEMKOCtB(raz G20) | HOMN-HaMbHаЯEMKOCtB(raz G30/G31) | BOZdUxa,Heobxo-ДиMbIйmoшноCTb(Iryя G30/G31) | YctanOB-ПeннayHOMHaHьнayHOMHaHьнayHOMHaHьнayHOMHaHьнayHOMHaHьнayG(Kr) | NETTO-6pyTTO(Kr) | ||
| DC | |||||||||||||||
| FHNE 604 3G TC | 1 | 2 | 1 | 4 | ГАЗ | 0,77 | 589 | 16,2 | 8,1 | 8,1 | 10-11,5 | ||||
| FHNE 755 4G TC | 1 | 2 | 1 | 1 | 5 | ГАЗ | 1 075 | 822 | 23 | 11,3 | 11,3 | 14,2-15,8 | |||
| FHNE 805 4G TC(FM) | 1 | 1 | 2 | 1 | 5 | ГАЗ | 1 124 | 860 | 24 | 11,8 | 11,8 | 12,6-14 | |||
| FHNE 1204 3G TC(FM) | 1 | 1 | 1 | 1 | 4 | ГАЗ | 1 | 764 | 21,6 | 10,5 | 10,5 | 21,9-24,3 | |||
| FHNE COR 4 3G TC | 2 | 1 | 1 | 4 | ГАЗ | 1,17 | 895 | 24,6 | 12,3 | 20-24 | |||||
| DC = Двийов рассекател памени SR=Пolyб委书记р R = Биславая AUX = BCnomoratелпьога C = Угун E = МалированаяЭльк无所谓 = 220-240 B;Частota = 50-60 Г; Мошость = 0,6Вт | |||||||||||||||
INSTALLATION

Installation and connection to the electrical and gas networks must be carried out only by qualified personnel.
The manufacturer accepts no liability for injury or damage to property resulting from failure to follow these instructions. The gas connection must comply with national standards and regulations in force at the time of installation.
The device must be connected directly to the electrical outlet. It is forbidden to use adapters, multi-socket outlets, or extension cords to connect the device.
Requirements for the hood cabinet
This manual applies to built-in gas cooking surfaces of class 3, belonging to electrical devices of type Y. The gas pipe must not touch the walls or the panel under the cooking surface.
For cabinets made of plastic or wood, heat-resistant materials (min. 100°C) must be used.
Inappropriate materials for the adhesive may lead to deformation or detachment of components.
Ventilation of the room must comply with local regulations.
The cabinet element must have sufficient space for the electrical connections of the appliance.
The devices belong to fire hazard class Y. The minimum distance from the surface is 150 mm to the side wall, 50 mm to the rear wall, and 700 mm to any hanging cabinets. The appliance is recommended to be installed on a worktop with a thickness of 40 mm. If the dimensions of the existing furniture elements differ, a service technician must make appropriate modifications to their structure.
Application: if a ventilation hood is installed above the appliance, the mandatory distance between the two devices is given in the assembly instructions for the hood.
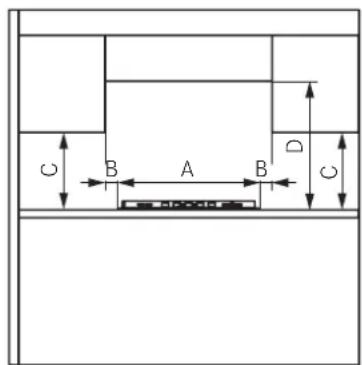
MINIMUM DIMENSIONS (MM)
A = 590/750/790/1090/ B = 50
(for gas cookers)
C=400 D=700
If the appliance is not installed above a gas hob: install a separating partition.
Installation procedure
The appliance is fixed to the furniture element using the brackets and accessories included in its kit.
Make sure that after installation, free access to the fixing elements is ensured from the front and rear. Make a hole in the worktop according to the specified dimensions. When doing so, it is necessary to adhere to the specified dimensions.
| Моdenь | Xp | Yp | X top | Y top | H top |
| FHNE 604 3G TC | 590 | 510 | 560 | 480 | 40 |
| FHNE 755 4G TC | 750 | 510 | 560 | 480 | 40 |
| FHNE 805 4G TC | 790 | 510 | 770 | 490 | 50 |
| FHNE 805 4G TC FM | 790 | 510 | 770 | 490 | 50 |
| *Установka зanолиць Ворруг ворхеног OTbercentry | 792 512 3 | ||||
| FHNE 1204 3G TC | 1090 | 410 | 1070 | 390 | 50 |
| FHNE 1204 3G TC FM | 1090 | 410 | 1070 | 390 | 50 |
| *Установka зanолиць Ворруг ворхеног OTbercentry | 1093 413 | 3 |
* Installation of the seal around the top hole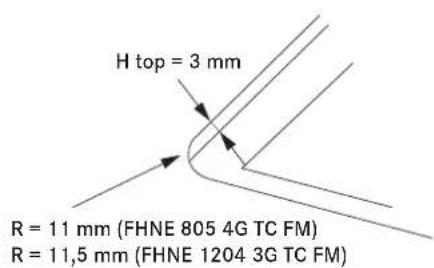
Model FHNE COR 4 3G TC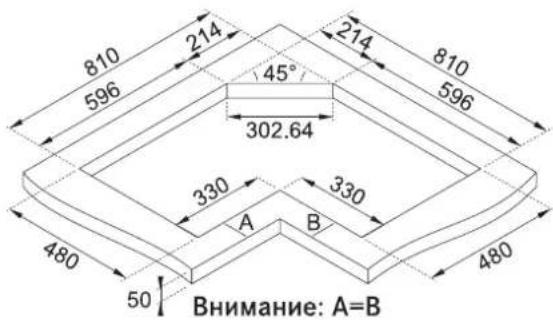
Apply the sealing tape around the hole for the appliance and install the gas surface into the hole. Secure the appliance with the screws and brackets. Remove any protruding remnants of the sealing tape.
Connection to the gas supply
Connect the appliance to the gas supply in accordance with current standards and regulations, after first making sure that the appliance matches the type of gas used. Otherwise, perform the operations described in the section "Replacing the injectors".
When using liquefied gas, use pressure reducers that comply with current standards and regulations.
Connection to the gas supply source can be made in the following ways:
A. Connect the gas hob surface using a flexible copper pipe with a diameter of 12 mm (3). To ensure proper sealing, use the elastic gasket (1) included in the accessories. B. Connect the hob surface using a flexible steel pipe with a continuous surface (2). In this case, also use the elastic gasket (1) included in the accessories to ensure proper sealing. The maximum length of the hose is not more than 2 meters.
Important: if a hose made of stainless steel is used, it must be installed so that it does not touch any part of the furniture. The hose must pass through an area without obstacles and where it can be inspected along its entire length.
After connecting to the gas source, open the taps and turn the knobs from maximum to minimum position to check the stability of the flame. After assembling the connection, use a soapy solution to check for leaks.
For the United Kingdom, Northern Ireland, and the Republic of Ireland.
Electrical connection
The hob surface is supplied with a 3-core power cord with free terminals.
The following conditions must be ensured.
- The hob surface is compatible with the characteristics of the household electrical network (in terms of voltage, maximum power, and current). - The plug and socket must be easily accessible and positioned so that parts under voltage are not accessible when inserting or removing the plug. - For replacing the power cord of gas hobs, use a 3-core cable with a cross-section of 0.75 mm² type H05RR-F. - The cables of the appliances must not be connected to the same socket. - For free terminals, observe polarity [Brown = Live (1), Blue = Neutral (2), Green/Yellow = Earth (3)].
Adjustment for operation with different gas types
WARNING: This operation must be performed by a qualified technician.
Adjusting the minimum flame level
Remove the knob. Adjust the minimum flame level by turning the adjustment screw in the direction of the arrow to decrease (counterclockwise to increase). The adjustment screwdriver is included in the accessories.
Replacing injectors
Spare parts that were not supplied should be requested from the technical support service.
Important! All devices are adjusted at the factory for use with natural gas (G20). If you intend to use another type of gas, replace the nozzles as follows:
- Remove the grates, burner caps, and flame spreaders;
- Unscrew the nozzles and replace them with ones suitable for the type of gas supply (included in the kit). In this case, the marking must match the values indicated in the table; - install the flame spreaders, burner caps, and grates.
For the described burners, no air supply adjustment is required.
Access to the burner surface
To access the functional components, perform the following actions:
- Remove the grates, burner caps, and flame spreaders;
- Remove the knobs by pulling them off the pins on which they are mounted;
- Unscrew the screws holding the burners to the burner surface; - lift the burners.
Important: When converting the device to another type of gas, place the corresponding sticker (supplied as an accessory) on the data plate. When re-converting the device to gas, apply the corresponding sticker (included in the kit) in the designated place on the data plate. When using propane-butane mixtures (G30 or G31), it is necessary to fully tighten the minimum flame adjustment screw. The described devices are supplied in category II 2H3+.
PURPOSE OF THE DEVICE
WARNING: This device is intended only for cooking. Use for other purposes, for example, for heating rooms, is prohibited.
Do not pull the device, nor its power cord, to disconnect it from the outlet. Close the main gas tap when not using the hob.

Danger of burns!
Do not touch the grates or the appliance during use. Do not touch the appliance with wet hands.
Ignition of burners
The burner surface is ignited using the burner knobs. To ignite the burners, perform the following steps.
- Press and turn the required knob to the ignition position and maximum output. - Keep the knob pressed for 3-4 seconds so that the sparks ignite the gas coming from the burner and the thermocouple heats up sufficiently.
After this, release the knob and, turning it counterclockwise, adjust the flame. If the flame still goes out, repeat all steps starting from step 1.
FHNE 604 3G TC, FHNE 755 4G TC, FHNE 805 4G TC, FHNE 805 4G TC FM, FHNE COR4 3G TC
FHNE 1204 3G TC, FHNE 1204 3G TC FM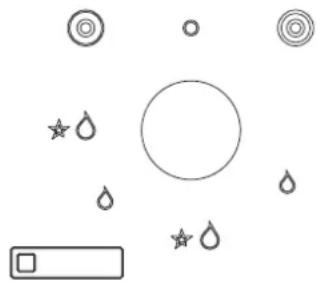
Tap closed

Ignition maximum output

Minimum output

Double flame

Double inner flame
The burner surface is an appliance for daily use. Accordingly, traces from pans and other cookware (for example, dark marks from material) are completely normal. With intensive use, the marks will be more noticeable. In this case, the appliance will continue to work flawlessly, so there is no need to worry. We always guarantee the safety of our product.
Do not place foreign objects on the surface of the appliance.
How to avoid damage to the appliance:
If the appliance is switched off due to the external temperature conditions, it is necessary to open the burner surface and let it cool down as required. Do not place any pot on it. Under no circumstances use cold water for cooling. It is forbidden to lean on the appliance. The device is manufactured in accordance with the current safety standard and the safety requirements of the basic directive.
Automatic safety valve
The described burner surfaces are equipped with a safety device that automatically shuts off the gas flow in case the flame goes out, for example due to drafts, liquid boiling over from the pan, or temporary gas supply interruptions. The described device activates approximately 30 seconds after the flame goes out.
Use of the hob
To reduce gas consumption and increase the efficiency of the appliance, use pots with lids suitable for the hob diameter. In doing so, it is necessary to ensure that the flame does not extend beyond the edge of the pot (see the table below).
Customer service center
See the contact addresses for your country on the back cover or on our website: www.franke.com
Contents
About this manual 149
Safety instructions 149
Technical data 151
Installation 153
Installation procedure 154
Use for intended purpose 156
Cleaning and maintenance 158
OuHnenn npnna 158
O6cnyroByBaHHra Ta peMOHT 159
Ytulizia 159
Ynakobka 159
BikloueHn 159
CepbicnH 160
ПОЦЕМ ПОСIBNHК
This manual is intended for several device models. Some described features and functions may be unavailable for your specific model.
Illustrations described in this chapter may differ from the actual device.
Do not allow liquid to get inside the device.
Do not touch electrical components.
Make sure that no liquid gets inside the device. It is forbidden to clean the device with a stream of water. In case of accidental contact with moisture, turn off the device and do not attempt to turn it on again for at least 1 minute. Do not use the device for more than 15 seconds if the coffee maker has not started after 15 seconds, stop the device and open the lid and/or
or wait 1 minute before the next attempt to start the coffee maker.
Make sure that the device is installed so that it can be disconnected from the power supply by pulling out the plug (3 mm) which guarantees complete disconnection under overvoltage category III. Be sure to provide reliable grounding of the device in accordance with current standards.
WARNING: Using a gas stove for cooking can lead to problems with heat, moisture, and combustion products in the room where it is installed.
Ensure the kitchen is well ventilated, especially during use of the appliance: keep the natural ventilation openings open or install a mechanical ventilation device (mechanical extractor). Do not use the appliance with an external timer or a separate remote control system.
WARNING: Supervise the cooking process. If cooking dishes that do not take much time, continuously supervise the cooking process.
Do not use the appliance with steam or water jets. In any case, do not use abrasive sponges, metal scrapers, hydrochloric acid, or other agents that may damage the surface and leave marks on it. In any case, do not use sharp objects near the appliance, as they may damage the enamel between the hob and the countertop.
Follow the complete cleaning of the area around the hob. These instructions are valid, unless the symbol of the country is indicated on the appliance. If the symbol does not light up on the appliance, it is necessary to consult the technical instructions, which provide the necessary information about the possible use of the appliance taking into account the operating conditions of certain countries.
RISK OF FIRE!
Do not store objects on the cooking surface.
WARNING: Cooking on the cooking surface with oil or fat without supervision or in automatic mode can be dangerous. This may lead to fire! The oil ignites quickly!
TECHNICAL DATA
FHNE 604 3G TC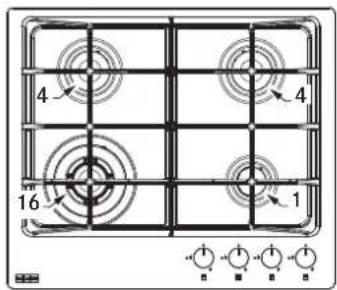
FHNE 755 4G TC FHNE 805 4G TC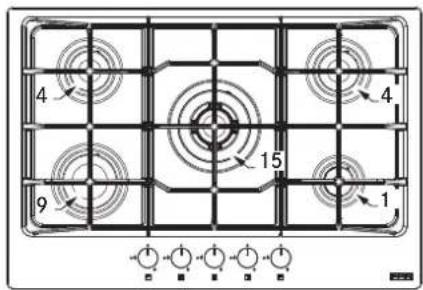
FHNE 1204 3G TC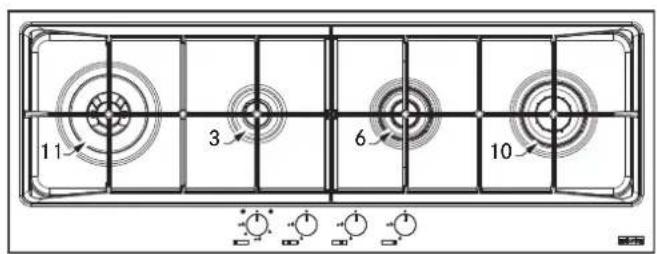
FHNE COR4 3G TC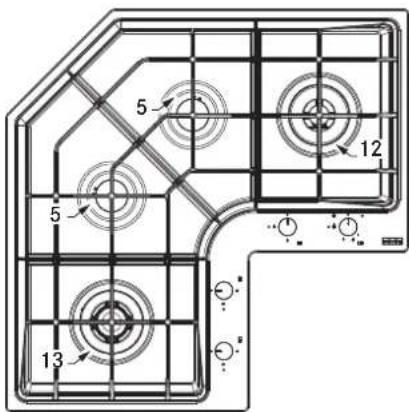
| Положеня | Конфоркa | Hominaльна смнICTь дд G20 | Инжektори G20, 20 мбap | Hominaльна смнICTь дд G30 | Hominaльна смнICTь дд G31 | Инжektори G30/G31, 28- 30/37 мбap | Hominaльна notyxnICTь (κВт) | Положеня notyxnICTь (κВт) |
| 16 | TC | 0,343 | 1,28 | 262 | 262 | 0,96 | 3,60 | 2,10 |
| 15 | TC | 0,362 | 1,33 | 277 | 277 | 0,97 | 3,80 | 2,10 |
| 14 | TC | 0,362 | 1,41 | 277 | 277 | 0,98 | 3,80 | 2,10 |
| 13 | TC | 0,362 | 1,33 | 277 | 277 | 0,97 | 3,80 | 2,10 |
| 12 | DUAL INT | 0,105 | 0,75 | 80 | 80 | 0,46 | 1,10 | 0,40 |
| DUAL TOT | 0,476 | 0,75+1,47 | 364 | 364 | 0,46+0,95 | 5,00 | 2,60 | |
| 11 | DUAL INT | 0,076 | 0,71 | 58 | 58 | 0,46 | 0,80 | 0,40 |
| DUAL TOT | 0,381 | 0,71+0,95 | 291 | 291 | 0,46+0,65 | 4,00 | 1,90 | |
| 10 | R DC | 0,286 | 1,28 | 218 | 218 | 0,88 | 3,00 | 1,75 |
| 9 | R | 0,286 | 1,15 | 218 | 218 | 0,85 | 3,00 | 1,30 |
| 8 | SR DC | 0,238 | 1,18 | 182 | 182 | 0,80 | 2,50 | 0,65 |
| 7 | SR | 0,191 | 1,03 | 146 | 146 | 0,69 | 2,00 | 0,65 |
| 6 | SR DC | 0,238 | 1,18 | 182 | 182 | 0,80 | 2,50 | 1,30 |
| 5 | SR | 0,167 | 0,97 | 127 | 127 | 0,65 | 1,75 | 0,70 |
| 4 | SR | 0,167 | 0,97 | 127 | 127 | 0,65 | 1,75 | 0,70 |
| 3 | AUX | 0,095 | 0,77 | 73 | 73 | 0,50 | 1,00 | 0,55 |
| 2 | AUX | 0,095 | 0,78 | 73 | 73 | 0,50 | 1,00 | 0,65 |
| 1 | AUX | 0,095 | 0,72 | 73 | 73 | 0,50 | 1,00 | 0,65 |
| Тиск (mбар) | mIH | 17 | 20 | 25 | ||||
| HOM | 20 | 28-30 | 37 | |||||
| Мakc. | 25 | 35 | 45 | |||||
| Ти п raу | Прирodedни ragа G20 | Зрджени вуглевODни ragа Бутан G30 Погалн G31 | Kа.T. II 2H3+ | |||||
| KOHΦΙΓΥPALÇΙΑ MODENELÉ | ||||||||||||||
| MOD. | K-CTb | K-CTb | K-CTb | K-CTb | K-CTb | K-CTb | K-CTb | K-CTb | K-CTb | K-CTb | K-CTb | K-CTb | K-CTb | |
| AUX | SR | SR | R | R.DC | ПОДВ. | СП | Конфорok | Тетлa | Номин掣ь | Номин掣ь | Нимин掣ь | Yстановлиа | ||
| DC | емпсь | емпсь | ддлогінь | номин掣ь | ||||||||||
| (Ra3 G20) | G30/G31) | (M³/юd)) | notукhiсты | |||||||||||
| (M²/юd) | (r/юd) | (KBr) | ||||||||||||
| (KBr) | Фгелов闳о raу (кВт) | |||||||||||||
| FHNE 604 3G TC | 1 | 2 | 1 | 4 | ГАЗ | 0,77 | 589 | 16,2 | 8,1 | 8,1 | ||||
| FHNE 755 4G TC | 1 | 2 | 1 | 1 | 5 | ГАЗ | 1 075 | 822 | 23 | 11,3 | 11,3 | |||
| FHNE 805 4G TC (FM) | 1 | 1 | 2 | 1 | 5 | ГАЗ | 1 124 | 860 | 24 | 11,8 | 11,8 | |||
| FHNE 1204 3G TC (FM) | 1 | 1 | 1 | 1 | 4 | ГАЗ | 1 | 764 | 21,6 | 10,5 | 10,5 | |||
| FHNE COR 4 3G TC | 2 | 1 | 1 | 4 | ГАЗ | 1,17 | 895 | 24,6 | 12,3 | 12,3 | ||||
DC = Direct current SR = ? R = ? AUX = Auxiliary C = ? E = Enameled? Voltage = 220-240 V; Frequency = 50-60 Hz; Power/current = 0.6 W
INSTALLATION

Installation of electrical/gas hobs must be carried out by a licensed professional.
The manufacturer shall not be liable for any damage or injury resulting from misuse or improper installation of the appliance. The appliance must comply with national regulations in force at the time of installation.
The appliance must be connected directly to the electrical outlet. It is forbidden to connect the appliance through extension cords, adapters, or splitters.
Connection to the gas supply
The appliance is intended for installation on gas cooking surfaces of class 3, to be placed on electrical installations of type Y. The appliance is intended for installation on gas cooking surfaces of class 3, to be placed on electrical installations of type Y.
The gas pipe must not protrude beyond any ventilation opening under the cooking surface.
For assembling furniture components, use heat-resistant materials (e.g., 100°C) for panels and plywood.
The room ventilation must comply with local regulations.
The kitchen furniture element must have sufficient space for connecting the electrical connections of the appliance.
Important! The specified appliance belongs to class Y for protection against electric shock. The minimum distance from the edge of the appliance is 150 mm from the side wall, 50 mm from the rear wall, and 700 mm from any surface above it. It is recommended to install the appliance in walls with a thickness of 40 mm. If the dimensions of the furniture elements differ from those specified, a qualified technician must make the necessary modifications to the furniture construction.
Note: If a ventilation hood is installed above the cooking surface, the distances mentioned must be in accordance with the hood installation instructions.
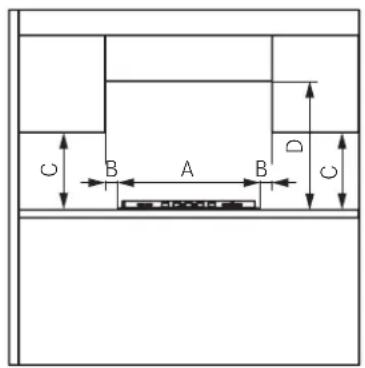
Minimum overall dimensions (mm)
A = 590/750/790/1090/ B = 50
(Diagonal of the oven
refined)
C=400D=700
The device must not be installed above a cooker hood: install a separating partition.
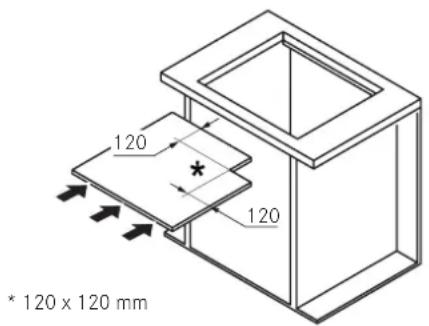
* Installation level with top opening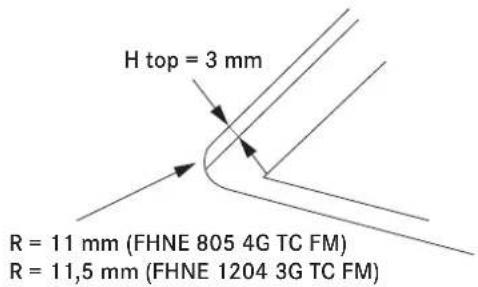
Installation procedure
The device is attached to the furniture element using brackets and accessories included in the kit.
During installation, free access to the hinged elements from the rear after installation of the device will be ensured. Make holes in the strip according to the specified dimensions. Follow the specified dimensions.
| Моdenь | Xp | Yp | X top | Y top | H top |
| FHNE 604 3G TC | 590 | 510 | 560 | 480 | 40 |
| FHNE 755 4G TC | 750 | 510 | 560 | 480 | 40 |
| FHNE 805 4G TC | 790 | 510 | 770 | 490 | 50 |
| FHNE 805 4G TC FM | 790 | 510 | 770 | 490 | 50 |
| *Встановлини Вриевь 3 ворхим OTвором | 792 | 512.3 | |||
| FHNE 1204 3G TC | 1090 | 410 | 1070 | 390 | 50 |
| FHNE 1204 3G TC FM | 1090 | 410 | 1070 | 390 | 50 |
| *Встановлини Вриевь 3 ворхим OTвором | 1093 | 413 | 3 |
Model BFNE COR 4 3G TC
Apply the sealing strip around the opening and install the device on the prepared surface. Close the device with screws and brackets. Then remove the protruding sealing strips.
Connection to the gas supply
Connect the device to the gas supply in accordance with current regulations, after making sure that the device matches the type of gas used. In this case, perform the operations described in the section "Replacing injectors".
When using liquefied gas, use a pressure regulator that complies with current regulations.
Connection to the gas supply can be made in the following ways:
A. Connect the gas supply to the prepared surface using a flexible metal hose with a diameter of 12 mm (3). To ensure a perfect seal, use the gasket (included in the accessories kit) (1). B. Connect the prepared surface using a flexible steel hose with a continuous surface (2). To ensure a perfect seal, also use the gasket (included in the accessories kit) (1). The maximum length of the hose is 2 linear meters.
Important: if a hose with a non-metallic surface is used, it must be installed so that it does not come into contact with any moving part of the furniture. It must pass through a zone where there are no obstacles and where it can be checked along its entire length.
After connecting the gas supply, check the connections and the handles in the maximum and minimum positions, and check the stability of the flame. After assembly, check the connections using the appropriate section for checking the presence of leaks.
For the appliance to function properly, it is necessary to maintain the device.
Switching to electric
The cooking surface is supplied complete with a 3-core power cord, but without a plug.
Ensure the following conditions are met: - The parameters of the household electrical supply (voltage, maximum power and maximum current) are compatible with the parameters of the FRANKE cooking surface. - The socket and plug are easily accessible, positioned so that when inserting or removing the plug, they do not come into contact with the hot parts of the appliance; - For the connection of the fixed electrical installation of the gas cooking surfaces, a cable of 3x0.75 mm² type H05RR-F is used. - The terminals of both devices are not connected to the same switch. - For free terminals, it is necessary to connect (blue = neutral (1), brown = live (2), green/yellow = earth (3)).
Adaptation to different gas types
WARNING: The operation must be carried out by a qualified technician.
Regulating the minimum flame level
Remove the knob. Adjust the minimum flame, turning the screw with a screwdriver in the direction of the arrow to decrease or against the arrow to increase. The adjustment screw is included in the accessories kit.
Replacing the injectors
The injectors not supplied must be requested from the after-sales service.
Important! All appliances are set at the factory for use with natural gas (G20). If you plan to use another type of gas, replace the injectors as described below:
Remove the grates, the burner caps and the burner rings, unscrew the injectors and replace them with those suitable for your gas supply type (included in the kit); their marking must match the values given in the table; replace the burner rings, caps and grates.
For the described burners, no adjustment of the air supply is required.
Access to the cooking surface
To access the area with the functional components, proceed as follows:
Remove the grates, the burner caps and the burner rings, remove the screws that hold the burners in place; unscrew the screws that secure the cooking surface; - lift the cooking surface.
Adapter: Connect the adapter (supplied as an accessory) to the special place on the data plate. When using a propane cylinder (G30 or G31), fully tighten the low-level adjustment screw. The adapter is supplied by the manufacturer. See Fig. 2.3+.
INTENDED USE
WARNING: This device is intended only for cooking. It must not be used for other purposes, such as heating the room.
Do not pull the device by its cord, and do not disconnect the device from the outlet by pulling the cord. When the device is not in use, close the main gas valve.
Danger of burns!
Do not touch the hot surfaces during operation. Do not touch the device with wet body parts.
IGNITION OF THE BURNERS
The burner is ignited manually with the regulators. To ignite the burners, do the following:
- Press and turn the required knob to the ignition position and maximum power. Hold the knob for 3-4 seconds until the sparks ignite the gas coming out of the burner and the thermocouple heats up.
After the flame appears, release the knob, turning it counterclockwise to adjust the flame. If the flame goes out, repeat the operation from point 1.
FHNE 604 3G TC, FHNE 755 4G TC, FHNE 805 4G TC, FHNE 805 4G TC FM, FHNE COR4 3G TC
FHNE 1204 3G TC, FHNE 1204 3G TC FM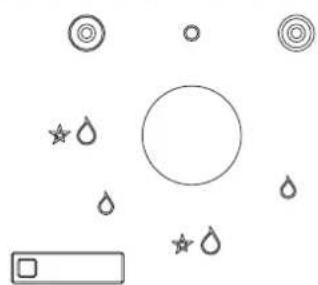
Gas tap closed

Ignition and maximum power

Minimum power


The surface of the device may become hot during normal use. Accordingly, the handles of the saucepan and other cookware (for example, the handles of a pressure cooker) may become hot. With intensive use, the handles may become worn. In any case, the device must continue to operate safely, so do not worry. We guarantee the safety of our product.
Do not touch the hot surface of the device.
Turning off the device
In case of shutdown due to violation of the temperature regime, turn off the device and let it cool down. Do not immerse it in water. In cold conditions, do not use cold water for cooling. Do not leave the device unattended.
The device is manufactured in accordance with the relevant safety standards and safety requirements for gas appliances.
Automatic shut-off valve
These hot surfaces have a safety device that automatically stops the gas flow if it accidentally goes out through the burner or through a temporary interruption of gas supply. The device will shut off approximately 30 seconds after the flame goes out.
Using the cookware
To ensure proper gas combustion and increase the efficiency of the device, use cookware of such a diameter that matches the size of the burner. It is necessary to use cookware that fits well on the burner (according to the following table):
Burner / Max. diameter of cookware will be specified (recommended)
Do not clean the device and its accessories until they have cooled down. Do not use abrasive cleaners for the device.
Before first use, wipe the device with a damp cloth as follows: turn off the device.
It is forbidden to use the device in a way that could damage the surface, functional or aesthetic components of the hot surface.
After each use, wipe the cooking surface with a soft cloth or sponge dampened in water. We recommend using mild cleaning agents with protective properties. Do not use abrasive cleaners or those containing sugar.
Before cleaning the appliance, unplug it and let it cool down. Do not immerse the appliance, cord, or plug in water or any other liquid. Do not wash the appliance in a dishwasher. Keep the gas inlet area clean. The burner parts may change color over time due to heating.
MAINTENANCE AND CARE
Before performing any operations with the appliance, disconnect it from the power supply.
If problems occur during operation of the appliance, contact the Franke service center.
Maintenance of electrical components should only be carried out by the manufacturer's representatives or a service center. Use only original spare parts. Replacing the power cord is only allowed by the manufacturer's representatives or a service center.
When contacting the service center, be sure to provide the following information:
- Fault description
- Appliance model (Art. / Cod.)
- Serial number (S.N.)
The information is provided on the data plate, on the bottom or on the cooking surface.
If the cooking surface is not working properly, before calling the Franke service center, consult the troubleshooting and fault correction instructions to identify the problem:
TROUBLESHOOTING AND FAULT CORRECTION INSTRUCTIONS
| Tун HeсspravnotiПepebipte Настунne: | |
| A | Конфорка не розалюевся, не розовуже ratipiti и abo polу'mя не с CTиКИМ |
| 1 He nepekrta пада ra3y abo eilektprkn | |
| 2 He bIDkrHTo кран падчia ra3y | |
| 3Зравни газовий балон (скразлелого ra3y) не с поожим | |
| 4ОТьорп пальниka не заши | |
| 5Загушka не εб rudно | |
| 6Вci detani конфоркп розміцени He nprabильно | |
| 7БILA пл'tи Нема epotягIB | |
| 8При заллованни конфорк ручka натуckалася пOTЯгOM He doctatnboro уасу, szob akTNByBatni zaxinchni писчri (dNbITbS cTOpINKу 156 "Koroc'tyaBaHry 3a пизданя" | |
| 9ОТьорк konhфоркп He zacmiiuehi popyu 3 TePmOnapoiu | |
| 10He nprabильп He nalaSTyBaHnMy mIHimalbhoI noaduyra3y | |
| B | Емостi (Каструл, сковорідки, чayніки) e He cteiKIMNI |
| 11Дно посу'dу He e ideалho pIBHIM | |
| 12Посyd He bIDcentropoBaHo Na KOHΦopci | |
| 13Рeshitki He nomiHHi Miczamn i po3MiUyIbCSправильно | |
If the fault still occurs after the checks, contact the nearest Franke service center.
This packaging material (cardboard, plastic film (PE) and polystyrene (EPS)) is marked with the appropriate symbol. When wet, they must be sent for secondary processing and disposed of in an environmentally safe manner.
Disconnection
Disconnect the device from the mains before cleaning. If the device is fixed, the specified operation must be performed by a qualified electrician.
Disposal
This symbol on the packaging indicates that the device must not be disposed of with household waste.
This device is intended for connection to a dedicated power point. Directive 2012/19/EU applies to the amount of electrical and electronic equipment waste and to the disposal of waste.
Proper sorting of old devices for recycling, processing, and environmentally friendly disposal helps prevent potential negative effects on the environment and human health, and also facilitates the recycling of materials used in the production of devices.
SERVICE CENTER
The contact address of the service center in your country is indicated on the last page of the manual, as well as on our website www.franke.com.
CONTENTS
About this manual 162
| A = 590/750/790/1090/ (Diyagonal COR TBC) | B = 50 |
| C = 400 D = 700 |

| H Y top top top | XpYpX | ||||
| 40 | 480 | 560 | 510 | 590 | FHNE 604 3G TC |
| FHNE 755 4G TC75051056 | |||||
| 50 | 490 | 770 | 510 | 790 | FHNE 805 4G TC |
| FHNE 805.4G TC FM79051077049050 | |||||
| 7925123 | JLJLJLJLJLJLJLJLJLJLJLJLJLJLJLJLJLJLJLJLJLJLJLJLJLJLJLJLJLJLJLJLJLJLJLJLJLJLJLJLJLJLJLJLJLJLJLJLJLJLJ | ||||
| 50 | 390 | 1070 | 410 | 1090 | FHNE 1204 3G TC |
| 50 | 390 | 1070 | 410 | 1090 | FHNE 1204 3G TC FM |
| 10934133 | JLJLJLJLJLJLJLJLJLJLJLJLJLJLJLJLJLJLJLJLJLJLJLJLJLJLJLJLJLJLJLJLJLJLJLJLJLJLJLJLJLJLJLJLJLJLJLJ | ||||
B = 50 A = 590/750/790/1090/
(COR TBC)
C=400 D=700
J 1
| الإستعمال الإستعمال (الإستعمال) | الإستعمال الإستعمال (الإستعمال) | م,…م,…م,…م,…م,…م,…م,…م,…م,…m,…m,…m,…m,…m,…m,…m,…m,…m,…m,…m,…m,…m,…m,…m,…m,…m,…m,…m,…m,…m,…m,…m,…m,…m,…m,…m,…m,…m,…m,…m,…m,…m,…m,…m,…m,…m,…m,…m,…m,…m,…m,…m,…m,…m,…m,…m,…m,…m,…m,… m,…m,…m,…m,…m,…m,…m,…m,…m,…m,…m,…m,…m,…m,…m,…m,…m,…m,…m,…m,…m,…m,…m,…m,…m,…m,…m,…m,…m,…m,…m,…m,…m,…m,…m,…m,…m,…m,…m,…m,…m,…m,…m,…m,…m,…m,…m,…m,…m,…m,… | ||||||||
| 0,2381,181824829,802,580,65 | ||||||||||
| 0,65 | 1,00 | 0,50 | 73 | 73 | 0,78 | 0,095 | AUX | 2 | ||
| 25 | 20 | 17 | ال…” | ال…” | (ال…” | |||||
| 28-3037 | 20 | ال…” | ال…” | (ال…” | ||||||
| 45 | 35 | 25 | ال…” | ال…” | (ال…” | |||||
| .+II 2H3 | ال…” | ال…” | ال…” | ال…” | G30 | G31 | G20 | ال…” | ال…” | ال…” |
153, 21, 124, 125, 126, 127, 128, 129, 130, 131, 132, 133, 134, 135, 136, 137, 138, 139, 140, 141, 142, 143, 144, 145, 146, 147, 148, 149, 150, 151, 152, 153, 154, 155, 156, 157, 158, 159, 160,

i 1
- ABOUT THIS MANUAL
- SYMBOL MEANING
- SAFETY INFORMATION
- RISK OF INJURY
- RISK OF BURNS
- RISK OF ELECTRIC SHOCK DUE TO ENTERING LIQUID
- RISK OF FIRE
- TECHNICAL DATA
- INSTALLATION
- CABINET REQUIREMENTS
- INSTALLATION PROCEDURE
- CONNECTION TO GAS SUPPLY
- CONNECTION TO THE GAS SUPPLY CAN BE MADE IN TWO WAYS
- ELECTRICAL CONNECTION
- ADJUSTMENT TO DIFFERENT TYPES OF GAS
- MINIMUM FLAME ADJUSTMENT
- ACCESSING THE HOB
- REPLACING INJECTORS
- INTENDED USE
- LIGHTING THE BURNERS
- AUTOMATIC SAFETY VALVE
- BURNER USE
- CLEANING AND CARE
- CLEANING THE APPLIANCE
- MAINTENANCE AND REPAIR
- DISPOSAL
- PACKAGING
- DISCONNECTION
- CUSTOMER SERVICE
- INFORMATION ABOUT THIS MANUAL
- RISK OF BURNS! THE
- RISK OF ELECTRIC SHOCK DUE TO LIQUID INGRESS INSIDE THE APPLIANCE
- WARNING! DURING OPERATION OF GAS APPLIANCES, HEAT, MOISTURE, AND COMBUSTION PRODUCTS ARE PRODUCED
- WARNING! IT IS MANDATORY TO MONITOR THE COOKING PROCESS. IF THE PREPARATION OF A DISH DOES NOT TAKE MUCH TIME, MONITOR THE COOKING PROCESS CONTINUOUSLY
- WARNING! EXTREME
- REQUIREMENTS FOR THE HOOD CABINET
- MINIMUM DIMENSIONS (MM)
- CONNECTION TO THE GAS SUPPLY
- CONNECTION TO THE GAS SUPPLY SOURCE CAN BE MADE IN THE FOLLOWING WAYS
- ADJUSTMENT FOR OPERATION WITH DIFFERENT GAS TYPES
- ADJUSTING THE MINIMUM FLAME LEVEL
- ACCESS TO THE BURNER SURFACE
- PURPOSE OF THE DEVICE
- DANGER OF BURNS
- IGNITION OF BURNERS
- USE OF THE HOB
- CUSTOMER SERVICE CENTER
- CONTENTS
- ПОЦЕМ ПОСIBNHК
- DO NOT ALLOW LIQUID TO GET INSIDE THE DEVICE
- WARNING: USING A GAS STOVE FOR COOKING CAN LEAD TO PROBLEMS WITH HEAT, MOISTURE, AND COMBUSTION PRODUCTS IN THE ROOM WHERE IT IS INSTALLED
- WARNING: SUPERVISE THE COOKING PROCESS. IF COOKING DISHES THAT DO NOT TAKE MUCH TIME, CONTINUOUSLY SUPERVISE THE COOKING PROCESS
- MINIMUM OVERALL DIMENSIONS (MM)
- MODEL BFNE COR 4 3G TC
- CONNECTION TO THE GAS SUPPLY CAN BE MADE IN THE FOLLOWING WAYS
- SWITCHING TO ELECTRIC
- ADAPTATION TO DIFFERENT GAS TYPES
- REGULATING THE MINIMUM FLAME LEVEL
- REPLACING THE INJECTORS
- ACCESS TO THE COOKING SURFACE
- IGNITION OF THE BURNERS
- AUTOMATIC SHUT-OFF VALVE
- USING THE COOKWARE
- MAINTENANCE AND CARE
- SERVICE CENTER
Brand : FRANKE
Model : FHNE 805 4G TC
Category : Gas cooktop