
RCEC-80/700C4B - Cooker Royal Catering - Free user manual and instructions
Find the device manual for free RCEC-80/700C4B Royal Catering in PDF.

| Product type | Electric cooker with cabinet |
| Brand | Royal Catering |
| Model | RCEC-80/700C4B |
| Power supply | 400 V ~ 50 Hz |
| Total power | 10.4 kW |
| Dimensions (W x D x H) | 800 x 740 x 930 mm |
| Weight | 58.5 kg |
| Protection rating | IPX4 |
| Number of top burners | 4 hot plates |
| Built-in oven | Yes, with thermostat |
| Temperature adjustment | 3 power levels (burner); thermostat for the oven |
| Installation type | On a stable surface, free space of 10 cm on the sides, 20 cm at the back |
| Grounding | Required before use |
| Required electrical protection | Circuit breaker and residual current device nearby |
| Surface material | Glass (burner); stainless steel? |
| Cleaning | Damp cloth and non-corrosive cleaner; do not use water directly |
| Preventive maintenance | Regularly clean oil from the plates |
| Troubleshooting | Indicator off or insufficient heating: check connections, replace element if necessary |
| Spare parts available | Burner plate, heating element, temperature controller, indicator lights |
| Repairability | Replacement possible by a qualified professional |
| Transport and storage | Handle with care, store in a ventilated warehouse, avoid moisture |
| Disposal | Do not dispose of with household waste; recycle at a WEEE collection point |
Frequently Asked Questions - RCEC-80/700C4B Royal Catering
User questions about RCEC-80/700C4B Royal Catering
0 question about this device. Answer the ones you know or ask your own.
Ask a new question about this device
Download the instructions for your Cooker in PDF format for free! Find your manual RCEC-80/700C4B - Royal Catering and take your electronic device back in hand. On this page are published all the documents necessary for the use of your device. RCEC-80/700C4B by Royal Catering.
USER MANUAL RCEC-80/700C4B Royal Catering
natural_image
Abstract white line drawing of a mythical creature on a blue background (no text or symbols)| DE | Produktname | Elektroherd mit Schrank |
| EN | Product name | Electric stove with cabinet |
| PL | Nazwa produktu | Kuchenka elektryczna z szafką |
| CZ | Název výrobku | Elektrický sporák se skříňkou |
| FR | Nom du produit | Cuisinière électrique avec armoire |
| IT | Nome del prodotto | Cucina elettrica con mobiletto |
| ES | Nombre del producto | Estufa eléctrica con mueble |
| HU | Termék neve | Elektromos tůzhely szekrénnyel |
| DA | Produktnavn | Elektrisk komfur med skab |
| FI | Tuotteen nimi | Sähköliesi kaapilla |
| NL | Productnaam | Elektrisch fornuis met kast |
| NO | Produktnavn | Elektrisk komfyr med skap |
| SE | Produktnamn | Elspis med skáp |
| PT | Nome do produto | Fogão elétrico com armário |
| SK | Názov produktu | Elektrický sporák so skrinkou |
| BG | Име на продукта | Електрическа печка с шкаф |
| EL | Όνομα προϊόντος | Нлектрикні кOUZÍVA με ντουλάπι |
| HR | Naziv proizvoda | Električni štednjak sa ormarićem |
| LT | Produkto pavadinimas | Elektrinė viryklė su spintele |
| RO | Numele produsului | Aragaz electric cu dulap |
| SL | Ime izdelka | Električni štedilnik z omarico |
| DE Modell | EN Product model |PL Model produktu |CZ Model výrobku | FR Modèle |IT Modello | ES Modelo | HU Modell |DA Model | FI Tuotteen malli |NL Productmodel | NO Produktmodell | SE Produktmodell | PT Modelo do produto| SK Model | BG Модел на продукт |EL Movtéλo проϊόντος | HR Modelproizvoda | LT: Gaminio modelis | RO:Model de produs | SL: Model izdelka | RCEC-80/700C4B |
| DE Hersteller | EN Manufacturer |PL Producent | CZ Výrobce |FR Fabricant | IT Produttore |ES Fabricante | HU Termelő |DA Producent | FI Valmistaja |NL Producent | NO Produsent | SE Tillverkare | PT Fabricante |SK Výrobca | BG Производител |EL Kataσκευαστής | HR Proizvođač |LT Gamintojas | RO Producător |SL Proizvajalec | expondo Polska sp. z o.o. sp. k. |
| DE Anschrift des Herstellers |EN Manufacturer Address | PL Adres producenta | CZ Adresa výrobce |FR Adresse du fabricant | IT Indirizzo del produttore | ES Dirección del fabricante |HU A gyártó címe | DA Producentens adresse | FI Valmistajan osoite |NL Adres producent | NO Produsentens adresse | SE Tillverkarens adress |PT Endereço do fabricante | SK Adresa výrobcu | BG Адрес на производителя |EL: Διεύθυνοη κατασκευαστή | HR Adresa proizvođača | LT Gamintojo adresas |RO Adresa producătorului | SL Naslov proizvajalca | ul. Nowy Kisielin – Innowacyjna |
This User Manual has been translated using machine translation. We have made every effort to ensure the translation is accurate, but please note that automated translations are not perfect and are not meant to replace human translators. The official version of the User Manual is in English. Any differences between the translated version and the original English are not legally binding. If you have any questions about the accuracy of the translation, please refer to the English version, which is the official reference.
Technical data
| Parameter description | Parameter value |
| Product name | Electric stove with cabinet |
| Model | RCEC-80/700C4B |
| Voltage [V] / Frequency [Hz] | 400~ / 50 |
| Power [kW] | 10.4 |
| Dimensions (Width x Length x Height) (mm) | 800x740x930 |
| Weight [kg] | 58.5 |
| Dust protection level | IPX4 |
Purpose
The product is used to provide an efficient cooking appliance that operates using electricity for heating, while also offering convenient storage space underneath.
Requirements for Installation and Usage Environment
- This product should be placed on a stable surface, with at least 10 cm of clearance on both sides from non-combustible materials. The back of the unit should be at least 20 cm away from non-combustible surfaces (e.g., brick walls).
• The voltage of the power supply must match the voltage specified on the product label. - The customer must install a power switch, a circuit breaker, and a leakage protection device near the equipment. Keep the area in front of the switch clear of obstructions for easy access.
• This equipment must be properly grounded before use. - Be cautious not to touch the heating plate while it is operating, and avoid splashing liquids on the machine to prevent damage to electrical components.
- Do not move or bend the temperature probe inside the basin.
- Before turning the machine on, check that all electrical connections are secure and that the grounding connection is reliable.
- If the power cable needs to be replaced, use a cable of the same model, and have the replacement done by a qualified professional.
- Installation and maintenance of this product's electrical connections must be performed by a certified electrician.
Operation
Upper Burner
- Ensure the power supply is properly installed and that the working power matches the rated voltage.
- Connect the power supply and turn it on. The green indicator light on the power switch will illuminate, showing that the stove is powered.
- Turn the temperature controller clockwise to adjust to the desired temperature. The highest power is at the first setting, followed by the second, with the third being the lowest. The yellow heating indicator will light up, and the green light will turn off, indicating that the stove is working, and the heating element is active.
- Once the desired temperature is reached, you can turn the temperature controller to the second or third setting to maintain the heat.

NOTE
- Regularly clean any oil from the burner plate to prevent damage and extend the life of the machine.
- If any abnormal conditions occur during use, stop the machine immediately. After troubleshooting and resolving the issue, you may resume using the stove.
Lower Oven
- Connect the power supply, and the green indicator light on the power switch will illuminate, showing the oven is powered.
- Turn the temperature controller clockwise to adjust to the desired temperature. The yellow heating indicator will light up, and the green indicator will turn off, indicating that the heating element is active and the oven is heating.
- When the oven reaches the set temperature, the temperature controller will automatically cut off the power. The yellow indicator will turn off, and the green indicator will turn back on, showing that the heating element has stopped. As the temperature slightly decreases, the controller will reconnect the power, the yellow indicator will light up again, and the green one will turn off. This cycle repeats to maintain the set temperature.

NOTE If any abnormal conditions occur during use, stop the machine immediately. After troubleshooting and resolving the issue, you may resume using the oven.
Maintenance
• Before cleaning and maintenance, ensure the power supply is turned off to prevent accidents.
- After daily use, wipe the surface and power cord with a damp cloth and a non-corrosive cleaner. Do not use water directly to clean the machine, as this could damage its electrical components.
Troubleshooting
| Phenomenon | Possible Reasons | Handling Methods |
| The plug is connected, but the indicator light is off and the machine does not heat. | The temperature is controlled normally, but the indicator light is off. | Reinsert the plug securely. |
| The heating indicator light is off, and the burner plate or oven is not heating. | 1. Loose or disconnected connection of the burner plate or heating element.2. The burner plate or heating element is burnt out. | 1. Tighten the connections or screws at both ends of the burner plate or heating element.2. Replace the burner plate or heating element. |
| The power supply indicator light is on, but the set temperature is not reached. | The temperature controller or switch is burnt out. | Replace the temperature controller or switch. |
| The temperature is controlled normally, but the indicator light is off. | The indicator light is burnt out. | Replace the indicator light. |
Transportation and Storage
This product, made of glass, should be handled with care during transportation to prevent damage from excessive vibration. Generally, the packed product should not be stored outdoors for extended periods. It should be kept in a well-ventilated warehouse with no exposure to corrosive air. Do not store the product upside down. If temporary outdoor storage is necessary, ensure that adequate protection is provided against rain.
Disposing of Used Devices
Do not dispose of this device in municipal waste systems. Hand it over to an electric and electrical device recycling and collection point. Check the symbol on the product, instruction manual and packaging. The plastics used to construct the device can be recycled in accordance with their markings. By choosing to recycle you are making a significant contribution to the protection of our environment.
Contact local authorities for information on your local recycling facility.
Electrical diagram
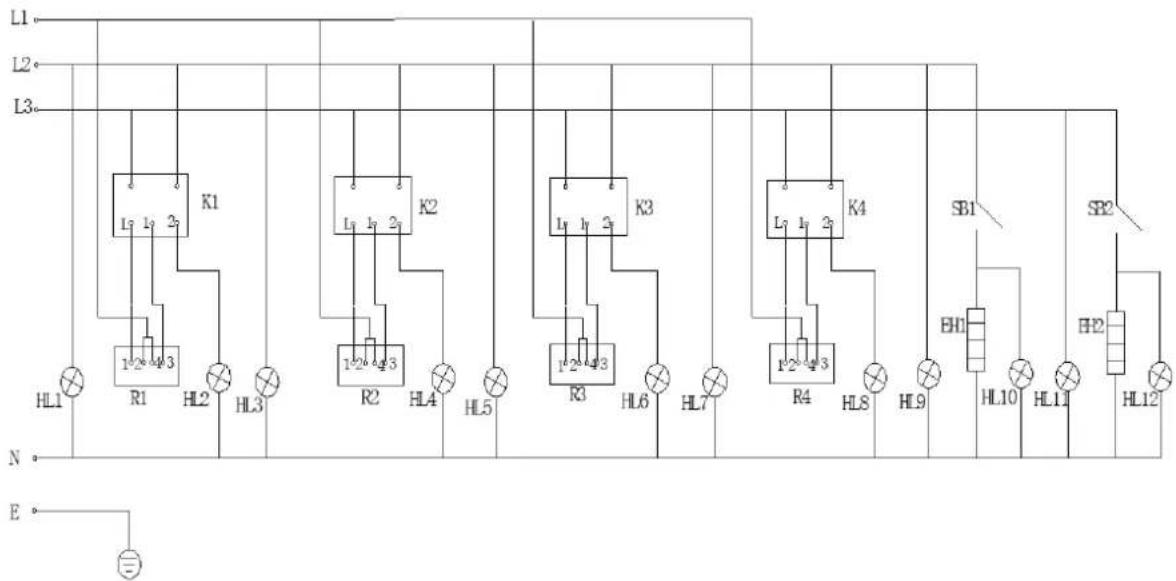
SB1, SB2 - Temperature Controller
EH1, EH2 - Heating Pipe
K1, K2, K3, K4 - Switch
R1, R2, R3, R4 - Burner Plate
HL1, HL3, HL5, HL7, HL9, HL11 - Power Supply Indicator Light
HL2, HL4, HL6, HL8, HL10, HL12 - Heating Indicator Light
E - Ground Connection

K1, K2, K3, K4 - Changer
SB1, SB2 - Temperaturregulator
EH1, EH2 - Varmerør
K1, K2, K3, K4 - Skift
SB1, SB2 - Temperatuurregelaar
EH1, EH2 - Verwarmingsbuis
K1, K2, K3, K4 - Schakelaar
R1, R2, R3, R4 - Branderplaat
HL1, HL3, HL5, HL7, HL9, HL11 - Voedingsindicatielampje
HL2, HL4, HL6, HL8, HL10, HL12 - Verwarmingsindicatielampje
E - Aardverbinding

K1, K2, K3, K4 - Bytt
R1, R2, R3, R4 - Brennerplate
HL1, HL3, HL5, HL7, HL9, HL11 - Indikatorlys for strømforsyning
HL2, HL4, HL6, HL8, HL10, HL12 - Indikatorlys for varme
E - Jordforbindelse

SB1, SB2 - Regulátor teploty
EH1, EH2 - Vykurovacie potrubie
K1, K2, K3, K4 - Prepínač
R1, R2, R3, R4 - Doska horáka
HL1, HL3, HL5, HL7, HL9, HL11 - Kontrolka napájania
HL2, HL4, HL6, HL8, HL10, HL12 - Kontrolka vykurovania
E - Uzemnenie

SB1, SB2 - Regulator temperature
EH1, EH2 - Cijev za grijanje
K1, K2, K3, K4 - Zamjena
R1, R2, R3, R4 - Ploča plamenika
HL1, HL3, HL5, HL7, HL9, HL11 - Svjetlo indikatora napajanja
HL2, HL4, HL6, HL8, HL10, HL12 - Indikator grijanja
SB1, SB2 - Temperatūros reguliatorius
EH1, EH2 - Šildymo vamzdis
K1, K2, K3, K4 - Jungiklis
R1, R2, R3, R4 - Degiklio plokšte
HL1, HL3, HL5, HL7, HL9, HL11 - Maitinimo indikatoriaus lemputė
HL2, HL4, HL6, HL8, HL10, HL12 - Šildymo indikatoriaus lemputė
E - Jžeminimo jungtis

SB1, SB2 - Regulator de temperatura
EH1, EH2 - Conducta de incalzire
K1, K2, K3, K4 - Comutator
R1, R2, R3, R4 - Placa arzatorului
HL1, HL3, HL5, HL7, HL9, HL11 - Indicator luminos al sursei de alimentare
HL2, HL4, HL6, HL8, HL10, HL12 - Indicator luminos de încălzire
E - Conexiune la pământ

SB1, SB2 - Regulator temperature
EH1, EH2 - Ogrevalna cev
K1, K2, K3, K4 - Preklopite
R1, R2, R3, R4 - Gorilna plošča
HL1, HL3, HL5, HL7, HL9, HL11 - Indikatorska lučka za napajanje
HL2, HL4, HL6, HL8, HL10, HL12 - Indikatorska lučka za ogrevanje
Brand : Royal Catering
Model : RCEC-80/700C4B
Category : Cooker