BIPCARE - Blood pressure monitor Create - Free user manual and instructions
Find the device manual for free BIPCARE Create in PDF.

| Product type | Automatic digital blood pressure monitor for adults |
| Brand | Create |
| Model | BIPCARE |
| Dimensions | 118 x 110 x 57 mm |
| Weight | 265 g (excluding batteries and adapter) |
| Power supply | 4 AAA 1.5 V batteries or 5 V DC / 1 A mains adapter (micro USB) |
| Measurement method | Oscillometric |
| Pressure measurement range | 0–280 mmHg |
| Pressure accuracy | ±3 mmHg |
| Pulse measurement range | 40–199 pulses/min |
| Pulse accuracy | ±5% of reading |
| Memory | 120 measurements per user (2 users, total 240) |
| Main functions | Irregular heartbeat detection, WHO classification, average value, cuff auto-test, automatic shut-off, voice function (depending on model) |
| Cuff | Circumference 22–40 cm, latex-free tube |
| Display | Digital LCD screen |
| Operating conditions | Temperature 5°C to 40°C, humidity 15%–93% RH |
| Storage conditions | Temperature -25°C to 70°C, humidity ≤93% RH |
| Maintenance and cleaning | Clean with a soft dry cloth; do not use solvents; the cuff can be cleaned with a damp cloth and mild soap |
| Safety | Not suitable for newborns, children, pregnant women; avoid strong electromagnetic fields; do not repair yourself |
| Spare parts and repairability | Cuff and mains adapter available; no user-serviceable parts; contact the dealer in case of failure |
| Included accessories | 1 device, 1 cuff, 1 instruction manual, 1 warranty card |
| Estimated lifespan | 5 years |
Frequently Asked Questions - BIPCARE Create
User questions about BIPCARE Create
0 question about this device. Answer the ones you know or ask your own.
Ask a new question about this device
Download the instructions for your Blood pressure monitor in PDF format for free! Find your manual BIPCARE - Create and take your electronic device back in hand. On this page are published all the documents necessary for the use of your device. BIPCARE by Create.
USER MANUAL BIPCARE Create
natural_image
Simple line drawing of a device with rounded corners and a central screen (no text or symbols)DIGITAL TENSIOMETER TENSIÓMETRO DIGITAL
USER MANUAL
CREATE CREATE CREATE ATE CREATE CREATE CRE CREATE CREATE CREATE ATE CREATE CREATE CRE CREATE CREATE CREATE ATE CREATE CREATE CRE CREATE CREATE CREATE ATE CREATE CREATE CRE CREATE CREATE CREATE ATE CREATE CREATE CRE CREATE CREATE CREATE ATE CREATE CREATE CRE CREATE CREATE CRE CREATE CREATE CRE CREATE CREATE CRE CREATE CREATE CRE CREATE CREATE CRE CREATE CREATE CRE CREATE CREATE CRE CREATE CREATE CRE CREATE CREATE CRE
INDEX
ENGLISH
Safety measures 6
Blood pressure and its measurement. 8
Components of your digital blood pressure monitor 9
First time use 10
How to take your blood pressure 11
Battery charge indicator 17
Using the AC adapter 18
Care and maintenance 18
EMC statement 19
Certificates 23
Technical specifications 23
PORTUGUÊS
Thank you for choosing our product. Before using the appliance, and to ensure the best use, please read these instructions carefully.
The safety precautions listed here reduce the risk of fire, electric shock and injury when properly followed. Keep the manual in a safe place for future reference, as well as the warranty, sales receipt and carton. If applicable, give these instructions to the future owner of the appliance. Always follow basic safety instructions and hazard prevention measures when using an electrical appliance. The manufacturer shall not be liable for any damage resulting from the user's failure to follow these instructions.
This is an automatic digital blood pressure measuring device for adults, for application on the upper arm, for use at home or in the doctor's office. It provides fast and reliable measurement of systolic and diastolic blood pressure and pulse rate using the oscillometric method. This device offers a clinically proven degree of accuracy and its design makes it easy to use.
SAFETY MEASURES
When using any electrical appliance, the following basic safety precautions should always be observed.
- Not suitable for use in newborns, children and pregnant women.
- This device should not be used near high frequency surgical equipment.
- Only a health professional is trained to interpret blood pressure measurements. It is recommended that your physician review your procedure for using this device.
- Blood pressure readings obtained by this device should be verified before prescribing or making adjustments to any medication used to control hypertension. Under no circumstances should you alter the doses of any medication prescribed by your doctor.
- This device is NOT intended to replace regular medical checkups.
- This monitor is designed for adult use only. Consult a physician before using this instrument on a child.
- In case of irregular heart rhythm (arrhythmia), the measurements made with this instrument should be evaluated by medical consultation.
- Carefully read the section “Important information about Blood Pressure and its measurement”. It explains the dynamics of blood pressure readings and will help you get more accurate results.
- This product, including its accessories, must be processed and disposed of in accordance with local regulations once it has reached the end of its life cycle.
-
This device contains sensitive electronic components. Avoid strong electric or electromagnetic fields in the direct vicinity of the device (eg mobile phones, microwave ovens) during use. These can lead to erratic results.
-
Do not use AC adapters with characteristics other than those specified in the Technical Specifications of this manual.
- Do not use the batteries and the AC adapter at the same time.
- Measurement accuracy may be affected if the device is used or stored in temperature and humidity conditions outside the range established in the Technical Specifications section of this manual.
- If this appliance is not going to be used for a long period of time, remove the batteries.
- The user must check that the equipment is safe and in good working order before using it.
- Do not attempt to modify, repair or maintain this device yourself, there are no user serviceable parts inside. In case of failure, contact your local dealer or the manufacturer. Never service the device while it is in place on the patient.
- The device is not suitable for use in the presence of flammable anesthetic mixtures with air, oxygen or nitrous oxide.
- The user can safely perform battery replacement, clean the device, and monitor blood pressure and pulse rate.
- Do not position the power cord in such a way as to interfere with and complicate its operation or cause people to trip and fall.
- Keep the appliance and the power adapter away from liquids, heat sources, flames, moisture, direct sunlight and corrosive gases. Do not use in any of the above environments.
• To avoid any possibility of accidental strangulation, keep this unit away from children and pets and do not cover tubing around the neck. - The standard material used for the bladder and tube is latex-free
- Self-measurement is indicated for monitoring, not for diagnosis or treatment. Unusual values should always be discussed with your doctor. Under no circumstances should you alter the doses of any medication prescribed by your doctor.
- The pulse display is not suitable for checking the rate of pacemakers! Taking measurements too frequently may cause injury to the patient due to interference in blood circulation.
- Do not place the cuff on injuries or wounds on the arm.
- Cuff pressurization may cause temporary interruption of operation in electrical medical equipment connected to the same arm as the cuff.
Contraindications
- Use of this instrument on patients undergoing dialysis or on anti-coagulant, antiplatelet, or steroid medications may cause internal bleeding.
How does high or low blood pressure arise?
Your blood pressure level is determined in the brain's circulatory center and adjusts to a variety of situations through feedback from the nervous system. To adjust blood pressure, the force and speed of the heart (pulse) as well as the width of the circulatory blood vessels is altered.
The width of the blood vessels is controlled by fine muscles in the walls of the blood vessels. Your blood pressure level changes periodically during heart activity: During “blood ejection” (systole) the value is highest (systolic blood pressure value). At the end of the “rest period” of the heart (Diastole) the pressure is lower (diastolic blood pressure value).
Blood pressure values must be within normal ranges in order to prevent certain cardiac pathologies.
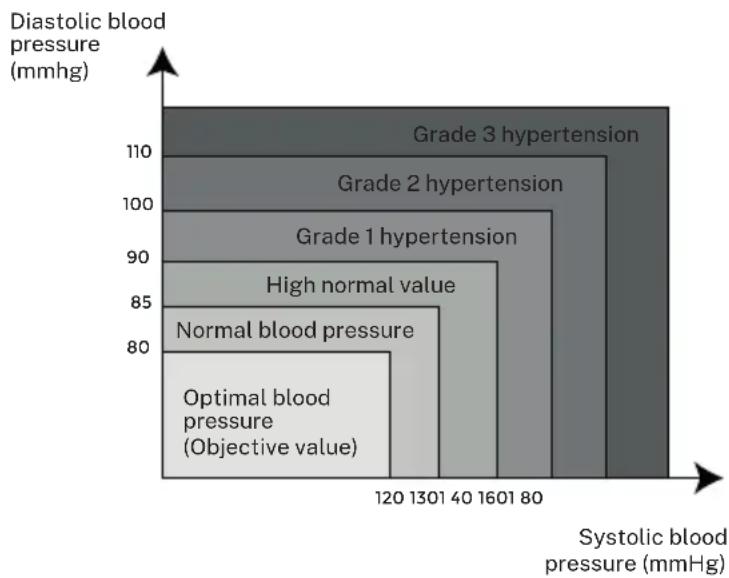
What values are normal?
Please see the following table.
There are six boxes on the device screen. Please refer to photo-01-01. Different grids represent different OMS interval scales.
bar_stacked
| Category | Diastolic blood pressure (mmHg) | Systolic blood pressure (mmHg) | |---|---|---| | Optimal blood pressure (Objective value) | 80 | 120-1301-40-1601-80 | | Normal blood pressure | 85 | 120-1301-40-1601-80 | | High normal value | 90 | 120-1301-40-1601-80 | | Grade 1 hypertension | 95 | 120-1301-40-1601-80 | | Grade 2 hypertension | 100 | 120-1301-40-1601-80 | | Grade 3 hypertension | 110 | 120-1301-40-1601-80 |- Your blood pressure is very high if your diastolic pressure is greater than 90 mmHg and/or your systolic blood pressure is greater than 160 mmHg while at rest. In this case, consult your doctor immediately. Long-term values at this level endanger your health due to continued damage to the blood vessels in your body.
- If your systolic blood pressure values are between 140 mmHg and 159 mmHg and/or diastolic blood pressure values between 90 mmHg and 99 mmHg, see your doctor. Regular self-checks are required.
- If you have blood pressure values that are too low (ie, systolic values less than 105 mmHg and/or diastolic values less than 60 mmHg), consult your doctor.
- Even with normal blood pressure values, a regular self-check with your blood pressure monitor is recommended. You can detect possible changes in your values early and react accordingly.
| Blood pressure value OMS Table OMS classification | ||
| DIA <80 / SYS >120 1 Optimal blood pressure | ||
| DIA <85 / SYS >130 2 Normal blood pressure | ||
| DIA <90 / SYS >140 3 Normal high value | ||
| DIA <100 / SYS >160 | 4 Mild hypertension | |
| DIA <110 / SYS >180 5 | Moderate hypertension | |
| DIA >=110 / SYS <=180 | 6 | Severe hypertension |
- If you are under medical treatment to control your blood pressure, keep a record of the values along with the time of day and date. Show these values to your doctor. Never use the results of your measurements to independently alter the medication doses prescribed by your physician.
More information:
If your values are generally normal under resting conditions, but exceptionally high under conditions of physical or psychological stress, it is possible that you suffer from so-called “labile hypertension”. Check with your doctor.
Correctly measured diastolic blood pressure values above 120mmHg require immediate medical treatment.
What can be done if regular high or low values are obtained?
- Check with your doctor.
- Increased values of blood pressure (various forms of hypertension) are associated with considerable health risks over time. The arterial blood vessels in your body are in danger due to constriction caused by deposits in the vessel walls (arteriosclerosis). Poor blood supply to important organs (heart, brain, muscles) can be the result of arteriosclerosis.
- Also, the heart will be structurally damaged with increased blood pressure values.
- There are many different causes of high blood pressure. We differentiate common primary (essential) hypertension and secondary hypertension. This last group can be attributed to specific organ malfunctions. Please consult your doctor for information on the possible sources of your own increased blood pressure values.
- There are steps you can take (such as diet and lifestyle changes) to reduce and even prevent high blood pressure.
COMPONENTS OF YOUR DIGITAL BLOOD PRESSURE MONITOR
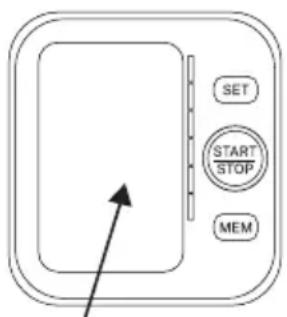
Screen LED
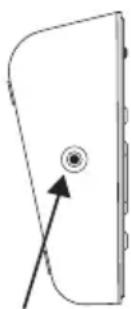
natural_image
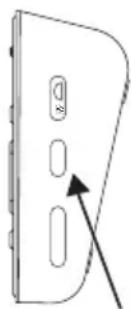
Simple line drawing of a door with a circular button and an arrow pointing to the center (no text or symbols)Connection port
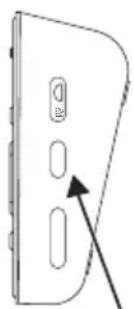
natural_image
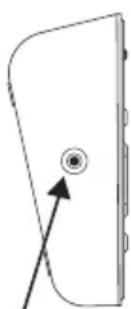
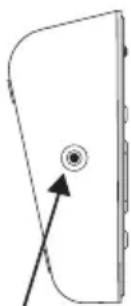
Diagram of a smartphone rear panel with buttons and a directional arrow pointing to the side (no text or symbols)AC port adapter
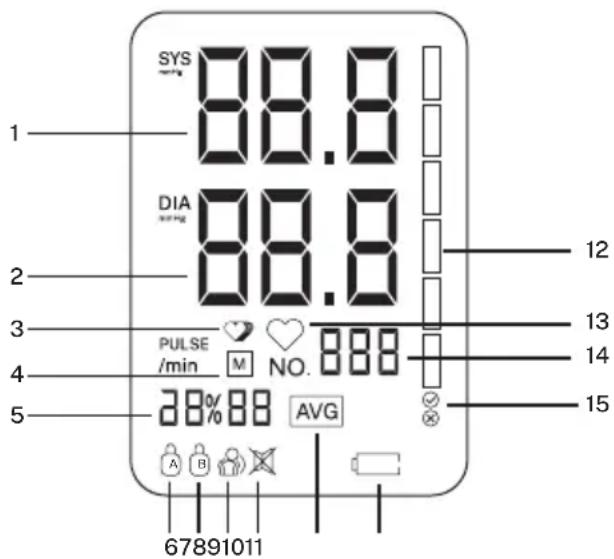
The symbols that appear on the LCD screen
- Systolic blood pressure
- Diastolic blood pressure
- Irregular heart rhythm (arrhythmia) symbol
- Memory symbol
- Date hour
- User a
- User b
- Motion error symbol
- Silence symbol
- Mean value symbol
- Low battery symbol
- Oms function symbol
- Heartbeat symbol
- Pulse
- Cuff self-test function
Functions
- Voice function
- Two users: 2 x 120 memory sets
- Date hour
- Irregular heart rhythm check
- Mean value function
- Low battery indicator
- Function of the who scale
- Auto off
- External power cord
- Volume adjustment
- Cuff self-check function
Note: Arm circumference should be measured with a tape measure at the center of the relaxed arm. Do not force the hose connection into the opening. Make sure the cuff connection is not pushed into the AC adapter port.
FIRST TIME USE
Battery Installation
This device uses four 1.5V "AAA" alkaline batteries. Do not try to insert any other type of batteries.
- Press the tab at the bottom of the battery cover and lift the cover in the direction of the arrow.
- Insert the four "AAA" batteries so that the + (positive) and - (negative) polarities match the polarities in the battery compartment, and replace the battery cover. Make sure the battery cover is on properly.
Replacing the batteries
- When the "Low Battery" indicator appears on the screen, turn off the monitor and remove all batteries. Replace them with 4 new batteries at the same time. We recommend using long-life alkaline batteries.
- Batteries may leak. To avoid damaging the monitor, remove the batteries if it is not going to be used for a long time (more than three months). Should battery fluid come into contact with your eyes, rinse immediately with plenty of clean water and contact your GP.
Dispose of this device and all its accessories in accordance with local regulations to avoid unnecessary contamination. Do not dispose of batteries with normal trash.
System configuration
- Once you have inserted the batteries or connected the device to the mains, press the SET key for more than 3 seconds to turn it on. The MEM key increases the values and the SET key switches between the different parameters.
- User settings.
Press the MEM button to select User A or User B. When the display shows A(/B), press the MEM button to switch between users. To confirm, press the SET button.
- Year setting.
When the screen flickers.
• Date setting (Month/Day).
The initial month/day displayed is 1/01. When the month is flashing, press the MEM button to increase the number in increments of 1. Press the SET button to confirm and repeat the same process for the days.
- Time setting.
When the hour is flashing, press the MEM button to increase the hours in 1 hour increments, press SET to confirm. Repeat the same process for the minutes.
• Volume setting (where applicable):
Some models have a built-in speaker..When the screen shows SP flashing, press MEM button to select volume 1, 2, 3 or OFF, and then press SET to confirm.
- Clear record
To clear existing user data, press and hold the MEM button.
Note: You cannot delete both users' records from the monitor's memory at the same time, if you decide to delete all recorded data, be sure to save all recorded information elsewhere for future medical reference. Removing the batteries will not erase any data.
Cuff Tube Connection
Insert the cuff tube into the opening on the left side of the monitor.
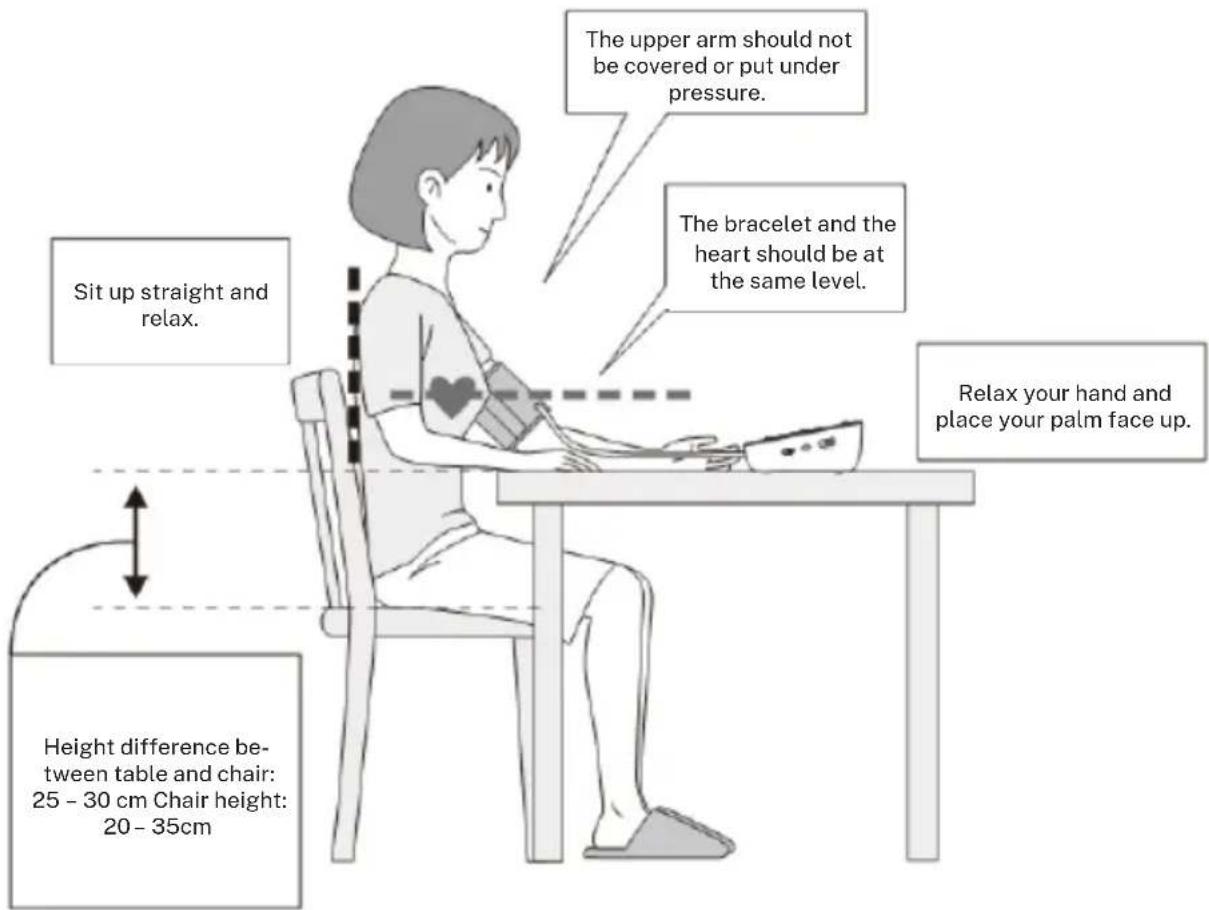
You should always be seated before and during the measurement
Before Measurement
- Avoid eating and smoking as well as all forms of exertion directly before the measurement. These factors influence the measurement result. Find time to relax by sitting in an easy chair in a quiet environment for about ten minutes before taking a measurement.
- Remove any clothing that is too tight on your arm.
• Always measure on the same arm (usually the left).
• Always compare measurements taken at the same time of day, as blood pressure changes over the course of the day by as much as 20-40mmHg.
Common Sources of Error
Note: Comparable blood pressure measurements always require the same conditions.
- Conditions should always be calm.
- All efforts by the user to support the arm can increase blood pressure. Make sure you are in a comfortable and relaxed position and do not flex any of the measurement arm muscles during the measurement. Use a cushion for support if necessary.
• If the artery in the arm is considerably lower or higher than the heart, an erroneously high or low blood pressure will be measured. Every 15cm (6 inches) difference in height between the heart and the cuff results in a measurement error of 10mmHg - Cuffs that are too narrow or too short result in false measurement values. Selecting the correct bracelet is extremely important. The size of the cuff depends on the circumference of the arm (measured in the center). The allowed range is printed on the cuff.
• The cuff works under a pressure range of 0-299MMHG
• The measurement range of the bracelet is: 8.7" - 15.7" (22 - 40cm)
• Note: Use only manufacturer-approved cuffs.
- A loose cuff or an air pocket protruding to the sides causes false measured values
- With repeated measurements, blood pools in the arm, which can lead to false results. Consecutive blood pressure measurements should be repeated after a 1-minute pause or after your arm has been held high to allow pooled blood to flow. If you decide to re-measure in averaging mode, be sure to wait at least one minute before.
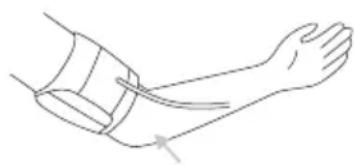
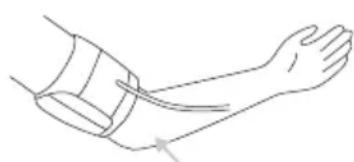
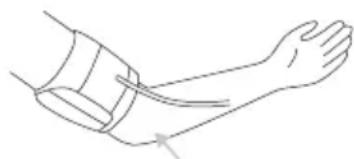
Cuff Placement
- The cuff is preformed for ease of use. Remove tight or bulky clothing from your arm
- Wrap the bracelet around the upper left arm. The rubber tube should be on the inside of your arm extending down to your hand. Make sure the cuff is approximately 1/2" to 3/4" (1 to 2 cm) above the elbow.
Important! The symbol ⏻The edge of the cuff (Artery Mark) should be over the artery that runs down the inside of the arm.
-
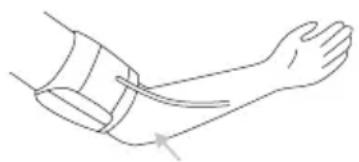
To secure the cuff, wrap it around your arm and press the hook and loop closure together.
-
There should be little clearance between the arm and the cuff. You should be able to fit 2 fingers between your arm and the cuff. Cuffs that do not fit correctly produce false measurement values. Please measure your arm circumference if you are unsure of the proper fit
-
Place your arm on a table (palm up) so the cuff is at the same height as your heart. Make sure the tube is not bent.
-
Sit quietly for at least two minutes before starting the measurement.

Measurement Procedure
The monitor is designed to take and store measurements in its memory for two users. Sit comfortably in a chair with your feet flat on the floor.
- Sit comfortably in a chair with your feet on the floor.
- Select your user (A or B).
- Stretch your arm forward across the desk and stay relaxed, make sure your palm is facing up. Make sure your arm is in the correct position to prevent your body from moving. Sit still and do not talk or move during the measurement.
After the cuff has been properly placed on the arm and connected to the blood pressure monitor, the measurement can begin:
- Press the ON/OFF/START button. The pump begins to inflate the cuff. On the screen, the increasing cuff pressure is continuously displayed.
• After automatically reaching a single pressure, the pump stops and the pressure drops slowly. During the measurement, the cuff pressure is displayed. - When the device has detected your pulse, the heart symbol on the screen begins to flash and an audible pulse tone sounds.
• After the measurement is finished, a long beep sounds. The systolic and diastolic blood pressure values are now displayed, as well as the pulse - The measurement results are displayed until the device is turned off. If no button is pressed during
- Cuff self test symbol(√) ⊗
The correct cuff symbol Ⓧ it will be displayed if the cuff is correctly positioned, otherwise the error symbol will be displayed ✕ Please check again to see if the error symbol still appears ✗
- Motion error symbol
The movement error symbol appears if you move your body during measurement. Please remove the cuff and wait 2-3 minutes. Reapply the cuff and take another measurement.
NOTE
The patient should be in the following position:
- Sitting in a comfortable position
- With legs uncrossed
- Feet flat on the ground
- Back and arms supported
- The center of the cuff at the level of the right atrium of the heart
Recommendations for use
- We recommend that before using the blood pressure monitor you are as relaxed as possible and quiet while taking your blood pressure measurement.
- We advise that the patient sit for 5 minutes before the first reading.
- Any reading can be affected by the environment, the patient's position, exercise or their physiological state.
- The performance of the automatic sphygmomanometer can be affected by extreme temperatures, humidity and altitude.
- To stop inflation or measurement, press the START/STOP button. The monitor will stop inflating, the cuff will begin to deflate, and it will turn off.
- After the meter has detected your blood pressure and heart rate, the cuff automatically deflates and your blood pressure and heart rate will be displayed on the screen.
- The monitor will automatically turn off after one minute.
Irregular heart rhythm detector
This “-” symbol indicates that certain irregularities in the pulse have been detected during the measurement.
In this case, the result may deviate from your normal basal blood pressure - repeat the measurement.
Please inform your doctor if the Irregular Heart Rhythm Symbol appears frequently.
This instrument is an oscillometric blood pressure monitoring device that also analyzes the pulse rate during measurement. This instrument has been clinically proven.
If pulse irregularities occur during the measurement, the irregular heart rhythm symbol will appear. If the symbol appears more frequently (ie several times a week in daily measurements) or if it suddenly appears more frequently than usual, the patient is advised to seek medical attention. The instrument is not a substitute for a cardiac examination, but serves to detect pulse irregularities at an early stage.
Error messages
| SYMBOL CAUSE SOLUTION | ||
| Screen stays blank | Low battery or batteries inserted incorrectly. | If the screen is blank, remove the batteries and then replace them with new ones. Check the polarity. |
| Er1 Irregularity in the sensor. | Check whether the pump works or not. If it is working, then the problem is that the sensor is faulty. Please send it to your local dealer. | |
| Er2 | The monitor could not detect the pulse wave or cannot calculate the blood pressure data. | Check if the air is coming out too slow or not. If it is too slow, check for dust on the cuff tube plug and the cuff port of the device. If there is, clean it and start the measurement again. If not, please contact your local dealer. |
| Er3 | The measurement result is abnormal (SYS 45mmHg, DIA 24mmHg). | Occasionally - Measure again / Always - Contact your dealer. |
| Er4 | The cuff is too loose or there is an air leak (cannot inflate to 30mmHg in 15 seconds). | Tighten the cuff correctly and make sure the air inlet is well inserted into the unit. |
| Er 5 The air tube is collapsed. | Correct it and perform the measurement again. | |
| Er 6 | The sensor detects a large fluctuation in pressure. | Please keep quiet and don't move. |
| Er 7 | The pressure that the sensor detects is above the limit. | Please contact your dealer. |
| Er 8 | The demarcation is incorrect or the device has not been demarcated. | Please contact your dealer. |
| PROBLEM CAUSE SOLUTION | ||
| It does not turn on. | The batteries are depleted. Change them for new ones. | |
| The polarity of the batteries is reversed | Insert the batteries correctly with respect to polarity. | |
| It does not swell. | The tube is disconnected. | Connect it to the air outlet. |
| The tube is broken or has a leak. Change tube/cuff. | ||
| The message Err appears and it stops working. | You have moved your arm while it was swelling. | Keep the body relaxed. |
| I was speaking during the reading. | Please do not talk while a measurement is being taken. | |
| The cuff loses air. | The cuff is buttoned too loose. Tighten the sleeve a little more. | |
| The cuff is torn. Change the cuff. | ||
If the problem persists, please contact your dealer. Do not try to repair the product yourself.
Description of symbols
The following symbols may appear in this manual, on the blood pressure monitor's digital monitor, or on its accessories. Some of the symbols represent standards and compliances associated with the digital blood pressure monitor and its use.
 | Authorized representative in the European Union |
 | CE marking in accordance with the essential requirements of the medical device directives 93/42/EEC |
 | Manufacturing date |
 | Maker |
 | Serial number |
 | BF type component |
 | DC |
 | Elimination: This product must not be disposed of with household waste. |
 | Follow the instructions for use |
 | This side Up |
 | Fragile |
 | Save in a dry place |
 | Avoid direct sunlight |
 | Handle with care |
 | Temperature range |
| Does not need sterilization | |
| This device is not an AP/APG equipment | |
| Operating mode: Continuous | |
Memory
At the end of a measurement, this monitor automatically stores each result with date and time. Each unit stores up to 120 measurements per user and up to a total of 240 measurements.
Display of stored values:
With the unit off, press the memory button. The display first shows "A", then shows an average of all measurements stored in the unit.
Note: Measurements for each user are averaged and stored separately. Make sure you are viewing the measurements for the correct user. Pressing the Memory button again displays the previous value. To view a particular stored memory, press and hold the Memory button to scroll to that stored reading.
Abort measurement
If it is necessary to interrupt a blood pressure measurement for any reason (eg, the patient feels unwell), the Start / ON / OFF button can be pressed at any time. The device then immediately lowers the cuff pressure automatically.
BATTERY CHARGE INDICATOR
Low batteries - change batteries
When the batteries are flat, the battery symbol will flash as soon as the instrument is turned on. You cannot take any further action and you must replace the batteries.
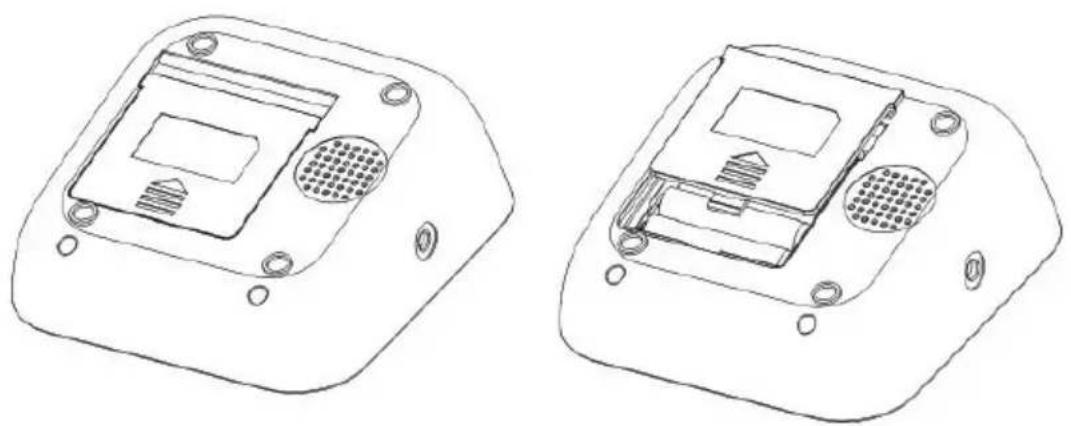
- The battery compartment is located on the back of the device.
- Remove the bottom plate cover, as illustrated.
- Insert the batteries (4 x AA size). Always use long life AA batteries or 1.5v alkaline batteries.
- The memory retains all the values, although the date and time (and possibly also the alarm times) must be reset - the year number flashes automatically after replacing the batteries.
- d) To set the date and time, follow the procedure described above.
natural_image
Technical line drawings of two electronic device enclosures (no text or symbols)What batteries to use and how to change them
Use four new, long-life 1.5V AA batteries. Do not use batteries past their expiration date. If the monitor is not going to be used for an extended period, remove the batteries.
Use of rechargeable batteries
You can also use this instrument with rechargeable batteries.
- Use only reusable "NiMH" batteries.
- If the battery symbol appears ☐ remove and recharge the batteries. They should not remain inside the instrument, as they can be damaged by full discharge, even when it is turned off. If you do not intend to use the instrument for a week or more, always remove the rechargeable batteries.
- Recharge these batteries with an external charger and carefully follow the manufacturer's instructions.
USING THE AC ADAPTER
You can also use this monitor with the AC adapter (5V DC/1A output with Micro USB connector). Use only adapters approved by the manufacturer to avoid damaging the product.
- Make sure the AC adapter and cable are not damaged.
- Plug the adapter cable into the AC adapter port on the right side of the blood pressure monitor.
- Plug the adapter into the power outlet. When the AC adapter is connected, the batteries are not consumed.
Note: While the AC adapter is connected, the batteries are not consumed. If power is interrupted (for example, by accidentally removing the adapter from the wall outlet), the monitor must be reset by removing the plug from the outlet and reinserting the adapter connection.
CARE AND MAINTENANCE
Wash your hands after each time you use the device.
If the device is going to be used by different patients, please wash your hands before and after each use.
- Do not expose the device to extreme temperatures, humidity, dust, or direct sunlight.
- The cuff contains an air sensitive bubble. Handle this sleeve with care and avoid any stress from twisting or buckling.
- Clean the device with a soft, dry cloth. Do not use gas, thinners or similar solvents. The stitches on the cuff can be carefully removed with a damp cloth and soaps. The bladder cuff should not be washed in a dishwasher, clothes washer, or submerged in water.
- Handle the tube carefully. Don't throw it away. Do not let the tube bend and keep away from sharp edges.
- Do not drop the monitor or treat it roughly. Avoid strong vibrations.
- Never open the monitor! This voids the manufacturer's warranty.
- Batteries and electronic instruments must be disposed of in accordance with locally applicable regulations, not with household waste.
Precision test
The accuracy of sensitive measuring devices should be checked from time to time. We recommend a periodic inspection of your unit by an authorized dealer at least once a year. Contact your local dealer or the manufacturer.
Medical Electrical Equipment needs special EMC precautions and needs to be installed and put into service in accordance with the EMC information provided below, and this device may be affected by portable and mobile RF communications equipment.
- Do not use a mobile phone or other devices that emit electromagnetic fields near the unit. This may result in incorrect operation of the unit.
- Caution: This unit has been thoroughly tested and inspected to ensure proper function and operation.
- Caution: This machine should not be used in conjunction with or stored with other equipment and should it need to be used in conjunction with or stored, it should be observed to verify normal operation in the configuration in which it will be used.
ELECTROMAGNETIC EMISSIONS
This device is intended for use in the electromagnetic environment specified below. The customer or the user of the unit should ensure that it is used in this environment.
| EMISSIONS TEST COMPLIANCE | ENVIRONMENT GUIDE ELECTROMAGNETIC | |
| RF emissions CISPR 11 | Group 1 | The A&D unit uses RF energy only for its internal function. Therefore, its RF emissions are very low and are not likely to cause any interference in nearby electronic equipment. |
| RF emissions CISPR 11 | Class B | The A&D unit is suitable for use in all establishments, including domestic establishments and those directly connected to the public low voltage power supply network that supplies buildings used for domestic purposes. |
| Harmonic emissions IEC 61000-3-2 | NA | |
| Voltage fluctuations / fluctuating emissions IEC IEC 61000-3-3 | NA | |
ELECTROMAGNETIC IMMUNITY
The device is intended for use in the electromagnetic environment specified below. The customer or user of the device must ensure that it is used in the appropriate environments.
| IMMUNITY TEST | TEST LEVELIEC60601 | LEVEL OF ACCORDANCE | ENVIRONMENT GUIDE ELECTROMAGNETIC |
| Electrostatic Discharge (ESD)IEC 61000-4-2 | ±8kV contact ±2 kV, ±4 kV, ±8 kV, ±15 kV air | ±8kV contact ±2 kV, ±4 kV, ±8 kV, ±15 kV air | Floors should be wood, concrete, or ceramic tile. If the floors are covered with synthetic material, the relative humidity must be at least 30%. |
| Electrical fast transients/ bursts IEC 61000-4-4 | ±2 kV for power lines ±1 kV for input/output lines | NA | Mains power quality should be that of a typical commercial or hospital environment. |
| ArisesIEC 61000-4-5 | ±1 kV line to line ±2 kV line to ground | NA | Mains power quality should be that of a typical commercial or hospital environment. |
| Voltage dips, short interruptions and voltage variations on input power lines IEC 61000-4-11 | 0% UT; 0.5 cycles at 0°,45°,90°,135°,180°,225°,270°,315°0%UT; 1 cycle70% UT; 25/30cycle0% UT; 250/300cycle | NA | Mains power quality should be that of a typical commercial or hospital environment. If the user of the unit requires continued operation during mains power interruptions, it is recommended that the unit be powered from an uninterruptible power supply or battery. |
| Power frequency (50/60 Hz) Magnetic field IEC 61000-4-8 | 30 A/m50/60Hz | 30 A/m50/60Hz | Power frequency magnetic fields should be at levels characteristic of a typical location in a typical commercial or hospital environment. |
| NOTE: UT is the AC mains voltage before application of the test level. | |||
The device is intended for use in the electromagnetic environment specified below. The customer or user of the device must ensure that it is used in the appropriate environments.
| IMMUNITY TEST | IEC 60601 TEST LEVEL | LEVEL OF COMPLIANCE | ENVIRONMENT GUIDE ELECTROMAGNETIC |
| Portable or mobile RF communications equipment should not be used closer to any part of the unit, including cables, than the recommended separation distance calculated from the equation applicable to the frequency of the transmitter. | |||
| Conducted RF IEC 61000-4-6 | 3Vrms150kHz to 80MHz3 V RMS outside the ISM band, 6 VRMS in the ISM and amateur bands80% AM at 1kHz | NA | Recommended Separation Distance: d=0.35√p d=1.2√p |
| Radiated RF IEC 61000-4-3 | 10V/m80 MHz to 2.7 GHz80% AM at 1kHz | 10V/m80 MHz to 2.7 GHz80% AM at 1kHz | 80MHz to 800MHz d=1.2√p800MHz to 2.7GHz d=2.3√pWhere, P is the maximum output power rating of the transmitter in watts (W) according to the transmitter manufacturer and d is the recommended separation distance.Field strengths from fixed RF transmitters, as determined by an electromagnetic site survey, a should be less than the compliance level in each frequency range.Interference may occur in the vicinity of equipment marked with the following symbol:▲ |
| NOTE:At 80 MHz and 800 MHz, the higher frequency range applies.These guidelines may not apply in all situations. Electromagnetic propagation is affected by absorption and reflection from structures, objects and people. | |||
- Field strengths from fixed RF transmitters, such as base sets for radio (cellular/cordless) telephones and mobile field radios, amateur radio, AM and FM radio broadcast and TV broadcast cannot be predicted theoretically with accuracy. To assess the electromagnetic environment due to fixed RF transmitters, an electromagnetic site survey should be considered. If the measured field resistance in the location in which the unit is used exceeds the applicable RF compliance level above, the device should be examined for normal operation. If abnormal performance is observed, additional measures may be necessary, such as reorienting or relocating the drive.
• Over the frequency range 150 kHz to 80 MHz, field strengths should be less than 3 V/m.
ELECTROMAGNETIC RESISTANCE
This device is intended for use in the electromagnetic environment specified below. The customer or the user of the unit should ensure that it is used in this environment.
| Test frequency (MHz) | Band (MHz) | Service Modulation | Power Maximum (w) | Distance (m) | Resistance test level Interference (v/m) | |
| 385 380-390 TETRA 400 | Pulse modulation 18hz | 1.8 0.3 27 | ||||
| 450 430-470 | GMRS 460 FRS 460 | FM ±5 kHz jitter 1 kHz sine | 2 0.3 28 | |||
| 710 | 704-787 | LTE Band 13, 17 | Pulse modulation 217hz | 0.2 0.3 9745 | ||
| 780 | ||||||
| 810 | 800-960 | GSM 800/900 TETRA 800 iDEN 820 CDMA 850 LTE Band 5 | Pulse modulation 18hz | 2 0.3 28 | ||
| 870 | ||||||
| 930 | ||||||
| 1720 | 1700-1990 | GSM 1800 CDMA 1900 GSM 1900 DECT LTE Band 1.3 4.25 UMTS | Pulse modulation 217hz | 2 0.3 28 | ||
| 1845 | ||||||
| 1970 | ||||||
| 2450 | 2400-2570 | Bluetooth WLAN 802.11 b/g/n RFID 2450 LTE Band 7 | 217 Hz pulse mod-ulation | 2 0.3 28 | ||
| 5240 | 5100-5800 | WLAN 802.11 a/n | Pulse modulation 217hz | 0.2 0.3 9 | ||
| 5500 | ||||||
| 5785 | ||||||
| Note If it is necessary to reach the endurance test level, the distance between the transmitting antenna and the ME equipment or ME system can be reduced to 1 m. The test distance of 1 m is allowed by IEC 61000-4-3. | ||||||
- For some services, only uplink frequencies are included.
- The carrier will be modulated using a 50% duty cycle square wave signal.
- As an alternative to FM modulation, 50% pulse modulation at 18Hz can be used because, while it does not represent actual modulation, it would be the worst case.
The manufacturer should consider reducing the minimum separation distance, based on risk management, and use higher immune test levels that are appropriate for the reduced minimum separation distance. The minimum separation distances for higher immunological test levels
They will be calculated using the following equation: where p is the maximum power in w, d is the minimum separation distance in m, and e is the immunity test level in v/m.
RECOMMENDED SEPARATION DISTANCES BETWEEN PORTABLE AND MOBILE RF COMMUNICATIONS EQUIPMENT AND THE UNIT
The unit is intended for use in an electromagnetic environment in which radiated RF disturbances are controlled. The customer or the user of the unit can help prevent electromagnetic interference by maintaining a minimum distance between portable and mobile RF communications equipment (transmitters) and the unit as recommended below, according to the maximum output power of the unit. communications equipment.
| Transmitter Maxi-mum Rated Output Power (W) | Separation distance according to transmitter frequency (m) | ||
| 150 KHz to 80 MHz 80 MHz d = 1,2 | Hz to 800 MHz d = 1,2 | 800 MHz to 2.7 GHz d = 2,3 | |
| 00.1 0.12 0.12 0.23 | |||
| 0.1 0.38 0.38 0.73 | |||
| 11.2 1.2 2.3 | |||
| 10 3.8 3.8 7.3 | |||
| 100 | 12 | 12 | 23 |
| For transmitters rated at a maximum output power not listed above, the recommended separation distance d in meters (m) can be estimated using the equation applicable to the frequency of the transmitter, where P is the maximum output power rating of the transmitter in watts (W) according to the transmitter manufacturer. | |||
CERTIFICATES
Device standard.
This device is manufactured to comply with the European regulations on sphygmomanometers:
EN1060-1 / 1995 • EN1060-3 / 1997 IEC 80601-2-30/2013 • ISO81060-1/2012 • IEC60601-1-11/2015 • IEC60601-1/2012
Electromagnetic compatibility:
The device complies with the requirements of the international standard IEC60601-1-2.
TECHNICAL SPECIFICATIONS
- Weight: 265g (batteries and AC adapter not included).
• Screen: 3.74"x2.52" LCD digital display
• Dimensions: 118(W) x 110(L) x 57(H)mm - Accessories: 1x Device, 1x Cuff, 1x Instruction Manual, 1x Warranty Card
- Funcionament condition: Temperature: 5^ to 40^ ; Humidity: 15% to 93% RH.
- Storage and shipping conditions: Temperature: -25°C to 70°C; Humidity: ≤ 93% RH.
• Method of measurement: Oscillometric - Pressure sensor: resistive
• Measuring range: 0-280mmHg - Press: 40 to 199 per minute
- Cuff pressure display range: < 300mmHg
• Memory: Automatically stores the last 120 measurements for 2 users (total 240)
• Measurement resolution: 1mmHg
- Precision: Pressure ± 3 mmHg / pulse ± 5% of reading
- Power supply:
- 4*AAA batteries, 1.5V
- AC adapter INPUT 100-240VAC 50/60HZ OUTPUT 5V DC 1st
- Accessories: Cuff 8.7"-15.7" (22-40 cm)
• Auto power off: 60 seconds
- Users: Adults
• Estimated useful life of the device and its accessories: 5 years
- Reserved the right to technical modifications.
Pantalla LED

natural_image
Simple line drawing of a door with a circular button and an arrow pointing to the center (no text or symbols)Puerto de conexión

natural_image
Diagram of a smartphone rear panel with buttons and a pointing arrow (no text or symbols)natural_image
Line drawing of a human forearm with hand and wrist, showing pressure point indicated by arrows (no text or symbols)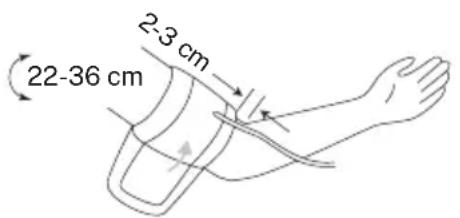
natural_image
Line drawing of a human forearm and hand with a wristband, no text or symbols presentnatural_image
Technical line drawings of two electronic device modules with ports and mounting holes (no text or symbols)Se calcularán utilizando la siguiente ecuación: where p is the maximum power in w, d is the minimum separation distance in m, and e is the immunity test level in v/m.
Tela de led

natural_image
Simple line drawing of a door with a circular button and an arrow pointing to the center (no text or symbols)Porta de conexão

natural_image
Diagram of a smartphone rear panel with buttons and a pointing arrow (no text or symbols)Adaptador de porta AC
natural_image
Line drawing of a human forearm with hand placement and pressure arrows indicating movement (no text or symbols)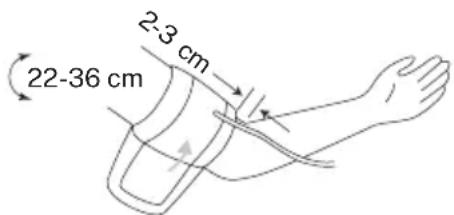
natural_image
Line drawing of a human forearm and hand with a wristband, no text or symbols presentnatural_image
Technical line drawings of two electronic device modules with mounting holes and internal components (no text or symbols)bar_stacked
| Category | Hypertension de grade 1 (mmHg) | Hypertension de grade 2 (mmHg) | Hypertension de grade 3 (mmHg) | Tension artérielle normale (Valeur objective) (mmHg) | Tension artérielle optimale (Valeur objective) (mmHg) | |---|---|---|---|---|---| | Hypertension de grade 1 | 85 | 90 | 100 | 80 | 80 | | Hypertension de grade 2 | 85 | 90 | 100 | 80 | 80 | | Hypertension de grade 3 | 85 | 90 | 100 | 80 | 80 | | Tension artérielle normale (Valeur objective) | 80 | 85 | 95 | 75 | 75 | | Tension artérielle optimale (Valeur objective) | 80 | 85 | 95 | 75 | 75 | The chart displays a stacked bar chart with values ranging from approximately 80 to 110 mmHg. The x-axis represents the pressure sanguine diastolique (mmHg) and the y-axis represents the pressure artérielle systolique (mmHg). There are no labels for the bars in the image.Ecran LED
natural_image
Simple line drawing of a door with a circular button and an arrow pointing to the center (no text or symbols)Port de connexion

natural_image
Diagram of a smartphone rear panel with buttons and an arrow pointing to the side (no text or symbols)natural_image
Line drawing of a human forearm with hand placement and pressure arrow indicating left or down motion (no text or symbols)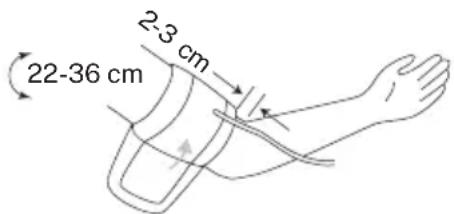
natural_image
Line drawing of a human forearm and hand with a wristband, no text or symbols presentProcédure de mesure
LED Bildschirm

natural_image
Simple line drawing of a door with a circular button and an arrow pointing to the center (no text or symbols)Anschlussport
natural_image
Diagram of a smartphone rear panel with buttons and a pointing arrow (no text or symbols)AC-Port-Adapter
SO MESSEN SIE IHREN BLUTDRUCK
natural_image
Technical line drawings of two electronic device modules with mounting holes and internal components (no text or symbols)LED scherm

natural_image
Simple line drawing of a door with a circular button and an arrow pointing to the center (no text or symbols)Verbindingspoort

natural_image
Diagram of a smartphone rear panel with buttons and a pointing arrow (no text or symbols)AC-poortadapter
natural_image
Technical line drawings of two electronic device modules with mounting holes and internal components (no text or symbols)Ekran LED
natural_image
Simple line drawing of a door with a circular button and an arrow pointing to the center (no text or symbols)Port połączenia

natural_image
Diagram of a smartphone rear panel with buttons and a pointing arrow (no text or symbols)Adapter portu AC
natural_image
Illustration of a human hand receiving pressure or suction from a medical device (no text or symbols present)
natural_image
Line drawing of a human forearm and hand with a wristband (no text or symbols)Procedura pomiarowa
natural_image
Technical line drawings of two electronic device modules with mounting holes and internal components (no text or symbols)In compliance with Directives: 2012/19/EU and 2015/863/EU on the restriction of the use of dangerous substances in electric and electronic equipment as well as their waste disposal. The symbol with the crossed dustbin shown on the package indicates that the product at the end of its service life shall be collected as separate waste. Therefore, any products that have reached the end of their useful life must be given to waste disposal centres specialising in separate collection of waste electrical and electronic equipment, or given back to the retailer at the time of purchasing new similar equipment, on a one for one basis. The adequate separate collection for the subsequent start-up of the equipment sent to be recycled, treated and disposed of in an environmentally compatible way contributes to preventing possible negative effects on the environment and health and optimises the recycling and reuse of components making up the apparatus. Abusive disposal of the product by the user involves application of the administrative sanctions according to the laws.
2nd floor, A-building, No. 2 Guiyuan Road, Guihua community, Guanlan town, Longhua new district, 518100 Shenzhen, PEOPLE'S REPUBLIC OF CHINA
EC REP
Shanghai International Holding Corp. GmbH (Europe) Eiffestrasse 80, 20537 Hamburg, Germany.
shholding@hotmail.com