
Warm Towel Crystal - Towel racks Create - Free user manual and instructions
Find the device manual for free Warm Towel Crystal Create in PDF.

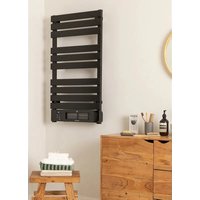
| Product type | Electric towel warmer (heated towel rail) |
| Brand | Create |
| Model | Warm Towel Crystal |
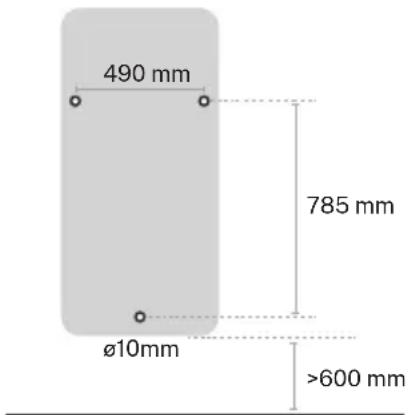
| Dimensions (approx.) | Width 490 mm, height 785 mm |
| Net weight (approx.) | Approximately 12 kg |
| Power supply | 220-240 V ~ 50/60 Hz |
| Power (estimated) | 600 W |
| Panel material | Tempered glass |
| Main functions | Heating via glass panel, remote control, CREATE HOME mobile app, 1-24h timer, thermostat 5-40°C |
| Installation type | Wall-mounted (fixation with wall plugs and screws) |
| Minimum installation height | Lower rail at least 600 mm from the floor |
| Overheat protection | Yes, built-in automatic shut-off |
| Child safety | Lock via remote control or control panel (3 s) |
| Wi-Fi connection | Yes, compatible with 2.4 GHz |
| Mobile app | CREATE HOME (iOS and Android) |
| Remote control | Included, CR2032 battery (not supplied?) |
| Cleaning and maintenance | Soft, damp cloth; do not use solvents |
| Spare parts / repairability | Repair only by authorized workshop; parts: front panel, brackets, screws, remote control |
| Recommended use | Indoor, domestic |
| Standards / directives | CE, RoHS (2012/19/EU, 2015/863/EU) |
Frequently Asked Questions - Warm Towel Crystal Create
User questions about Warm Towel Crystal Create
0 question about this device. Answer the ones you know or ask your own.
Ask a new question about this device
Download the instructions for your Towel racks in PDF format for free! Find your manual Warm Towel Crystal - Create and take your electronic device back in hand. On this page are published all the documents necessary for the use of your device. Warm Towel Crystal by Create.
USER MANUAL Warm Towel Crystal Create
natural_image
Simple line drawing of a rectangular container with a horizontal bar and small circular mark at bottom (no text or symbols)ELECTRIC TOWEL RACK
TOALLERO ELÉCTRICO
USER MANUAL
CREATE CREATE CREATE ATE CREATE CREATE CRE CREATE CREATE CREATE ATE CREATE CREATE CRE CREATE CREATE CREATE ATE CREATE CREATE CRE CREATE CREATE CREATE ATE CREATE CREATE CRE CREATE CREATE CREATE ATE CREATE CREATE CRE CREATE CREATE CREATE ATE CREATE CREATE CRE CREATE CREATE CREATE ATE CREATE CREATE CRE CREATE CREATE CREATE ATE CREATE CREATE CRE CREATE CREATE CREATE ATE CREATE CREATE CRE CREATE CREATE CREATE ATE CREATE CREATE CRE CREATE CREATE CREATE ATE CREATE CREATE CRE CREATE CREATE CRE CREATE CREATE CRE ATE CREATE CRE
CREATE CREATE CREATE ATE CREATE CREATE CRE CREATE CREATE CREATE ATE CREATE CREATE CRE CREATE CREATE CREATE ATE CREATE CREATE CRE CREATE CREATE CREATE ATE CREATE CREATE CRE CREATE CREATE CREATE ATE CREATE CREATE CRE CREATE CREATE CREATE ATE CREATE CREATE CRE CREATE CREATE CREATE ATE CREATE CREATE CRE CREATE CREATE CREATE ATE CREATE CREATE CRE CREATE CREATE CREATE ATE CREATE CREATE CRE CREATE CREATE CREATE ATE CREATE CREATE CRE CREATE CREATE CREATE ATE CREATE CREATE CRE CREATE CREATE CRE CREATE CREATE CRE CREATE CREATE CRE CREATE CREATE CRE
INDEX
ENGLISH
Security instructions 6
Parts list 7
Installation instructions 8
How to use the tower rack 9
Control panel 9
Operation using the remote control 10
App connection 10
Cleaning 11
PORTUGUÊS
Thank you for choosing our towel rack. Before using the appliance, carefully read these instructions to ensure it is used correctly.
The safety precautions enclosed will reduce the risk of death, injury and electrical shock when correctly followed. Keep the manual in a safe place for future reference, along with the completed warranty card, purchase receipt and package. If applicable, pass these instructions on to the next owner of the appliance. Always follow basic safety precautions and accident prevention measures when using an electrical appliance. We assume no liability for customers failing to comply with these requirements.
SECURITY INSTRUCTIONS
When using any electrical appliance, basic safety precautions should always be observed.
- During the whole process of installing the appliance, please do not knock the glass and please handle with care during the installation.
Warning: The heater must not be used if the glass panels are damaged.
- The appliance must not be located immediately below a socket outlet.
- It is forbidden to cover the glass surface of the appliance with articles such as a towel or clothes.
- In normal working status, please do not touch the glass surface of the appliance.
• Always unplug heater when not in use.
- Choose the installation position of the product according to the requirement, and the appliance shall be kept away from burning or explosive articles.
- If you are going to use the appliance in the bathroom, the appliance must be connected to a waterproof socket which must be installed where the people in the bath tank or the people in bathing area could not reach it.
- If the supply cord of this appliance is damaged, it must only be replaced by a repair shop appointed by the manufacturer or its agent, as special purpose tools are required.
- This appliance is not intended for use by persons (including children) with reduced physical, sensory or mental capabilities, or lack of experience and knowledge, unless they have been given supervision or instruction concerning use of appliance by a person responsible for their safety.
- Children should be supervised to ensure that they do not play with the appliance.
- Joists, beams and rafters shall not be cut or notched to install the appliance.
- The fixed wire must be in accordance with the wiring rules, having a contact separation in all poles that provide full disconnection under overvoltage category iii conditions.
- Children under 3 years old should be kept away unless continuously supervised.
- Children aged from 3 years old and under 8 years old shall only switch on/off the appliance provided that it has been placed or installed in its intended normal operating position and they have been given supervision or instruction concerning use of the appliance in a safe way and understand the hazards involved. Children aged from 3 years old and under 8 years old shall not plug in, regulate and clean the appliance or perform user maintenance.
Caution: Some parts of this product can become very hot and cause burns. Particular attention has to be given where children and vulnerable people are present.
- This appliance can be used by children aged from 8 years old and above and persons with reduced physical, sensory or mental capabilities or lack of experience and knowledge if they have been given supervision or instruction concerning use of the appliance in a safe way and understand the hazards involved. Children shall not play with the appliance. Cleaning and user maintenance shall not be made by children without supervision - This product applies various safety protection measures. Since it has overheat protection device, when the appliance exceeds the range of normal working temperature because of the cover of external things, the built-in temperature sensing device will stop the working of the appliance, to avoid any danger.
Warning: This appliance is for household indoor use only. In order to avoid overheating, do not cover the heater.
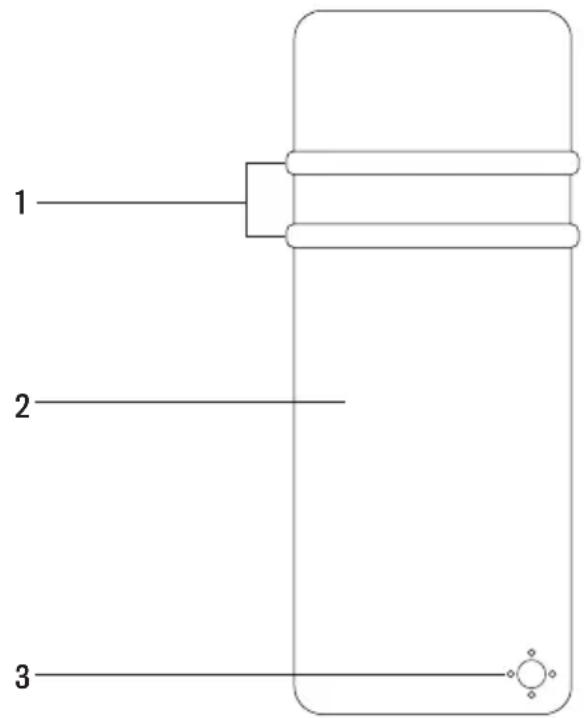
PARTS LIST
- Towel hanger
- Front panel
- Control panel
Follow the steps below for the correct installation of the towel rail:
- Mark the installation holes on the wall parallel to the floor as shown in the picture, remember that the wall must support the weight of the towel rail.
- Drill the holes with a 10mm drill bit and not less than 60mm deep, make sure the hole is vertical with the wall and the lateral and vertical distance between the holes is correct.
Warning: To avoid risk to small children, this appliance must be installed so that the lowest rail is at least 600mm from the floor.
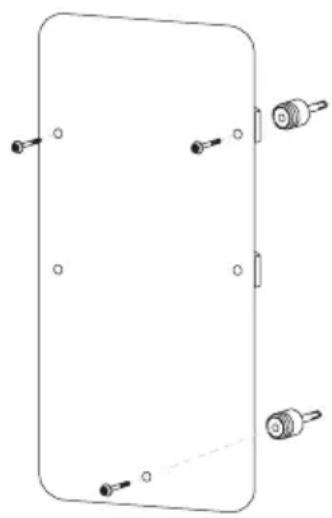
Brackets

natural_image
Technical line drawings of two mechanical components (no text or symbols)- Fix the 3 brackets on the wall with the expansion screw. Please note that the fixed brackets can be moved to adjust the position to fix the glass panel.
- Remove the protective film on the back of the glass, then install the glass panel on the fixed bracket on the wall. Please note that you can adjust the position of the fixed bracket on the wall to install the glass panel. Then tighten the screws on the side of each support cover.
- Upon completion of installation, connect the towel rack to the power source to test the appliance and ensure it is working properly.
- Remove the protective film from the glass front surface of the appliance and press the power switch at the bottom of the appliance to check that the towel rack works properly.
natural_image
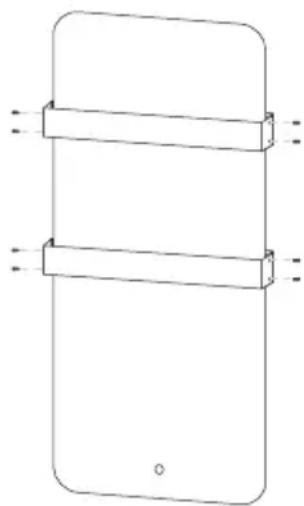
Pure technical line drawing of a rectangular component with mounting holes and connectors (no text or symbols)Mounting the towel rails:
- Attach one of the shelves by snapping it into the wall brackets.
- Secure the shelf with the M4x10 screws and tighten them so that they are secure.
- Follow the same steps to place the second towel rack shelf.
natural_image
Simple line drawing of a smartphone with two horizontal bars and dotted lines indicating measurement or alignment (no text or symbols)- Turn on the heater by pressing the power button. The LED will display room temperature, then please use touch control or remote control to set power, temperature and time.
- If the appliance is not used for a long time, switch the power button off and unplug the appliance.
CONTROL PANEL
Insert the plug in a suitable power socket. The touch screen buttons located on the product correspond to the remote control functions.
-
Mode
-
Temperature
-
Power
-
Display
-
Timer
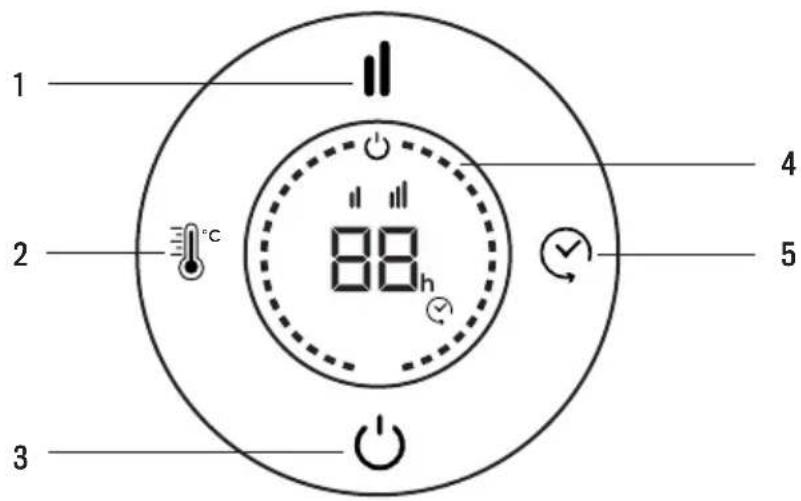

Power
When the product is on, press "power". The upper part of the display shows temperature. The heater is working at low power heating conditions.

Mode
It enters heating mode.

Temperature
Press temperature button. The temperature can be set from 5 °C to 40 °C.
Internal temperature is displayed every time the appliance is started up. The temperature can be set when the appliance is on stand-by or heating. When the room temperature reaches the set level, the high temperature power stops and the low temperature power remains active. When room temperature is two degrees over the set temperature, both the high and lower temperature powers will stop operating. The machine will begin operating again only when temperature decreases two degrees with respect to the set temperature.

Timer
The timer button can be set to start or stop the appliance at the desired time, with a time interval between 1 and 24 hours.
-
Insert the plug in a suitable power socket.
• The touch screen buttons located on the product correspond to the remote control functions. -
Power button
- Mode
- Temperature
- Timer
- Lock
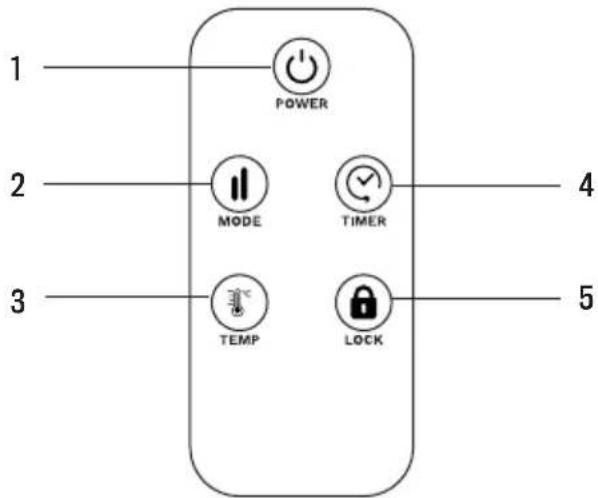

Child Lock
Press the child clock button for three seconds to lock the heater. After pressing the Child Lock button for three seconds again, the heater is unlocked.
You can also press the mode button on the control panel for 3 seconds to lock the screen or unlock it.
APP CONNECTION
- CREATE HOME application is available for Android and iOS, look for the app on Google Play or App Store or scan the QR code below.
- This appliance allows you to operate the appliance via your home network. A prerequisite is a permanent WiFi connection to your router and the free app CREATE HOME.
• We recommend disconnecting the appliance from the power supply when you are away from home to prevent unintentional switching on while you are away.


iPhone OS Android OS
- Install the CREATE HOME app and create a user account.
- Select the time zone to enter the account and click to get the verification code.
- Enter the received verification code for verification.
- Set up a login password and log in the app.
- Click on "Add device" (+) and then on the category corresponding to the towel rack (heater).
- In the towel rack, press the temperature key ⚙ for approximately 5 seconds. The Wi-Fi connection indicator light will start to flash rapidly.
- Click on "Confirm" when the indicator light is blinking rapidly.
- Enter the password of your Wi-Fi network and confirm.
- While connecting, make sure your router, mobile phone and device are as close as possible. Afterwards, your towel rack will be successfully added to your CREATE HOME app.
CLEANING
Attention: Please shut off the unit and unplug from the mains before cleaning or performing any maintenance.
- Clean the heater with a duster or a soft wet cloth. Do not use chemical solvents (such as benzene, alcohol or gasoline) as they may cause irreversible damage. Make sure no water enters the control panel or gaps in the casing.
- Do not run the unit until completely dry.
- Place the heater in its original box or cover to protect it from dust when not in use.
- Store it in a cool dry place.
In compliance with Directives: 2012/19/EU and 2015/863/EU on the restriction of the use of dangerous substances in electric and electronic equipment as well as their waste disposal. The symbol with the crossed dustbin shown on the package indicates that the product at the end of its service life shall be collected as separate waste. Therefore, any products that have reached the end of their useful life must be given to waste disposal centres specialising in separate collection of waste electrical and electronic equipment, or given back to the retailer at the time of purchasing new similar equipment, on a one for one basis. The adequate separate collection for the subsequent start-up of the equipment sent to be recycled, treated and disposed of in an environmentally compatible way contributes to preventing possible negative effects on the environment and health and optimises the recycling and reuse of components making up the apparatus. Abusive disposal of the product by the user involves application of the administrative sanctions according to the laws.
natural_image
Pure technical diagram of a rectangular panel with mounting holes and connectors, no text or symbols presentnatural_image
Simple line drawing of a smartphone with two horizontal bars and dotted lines indicating measurement or alignment (no text or symbols)
iPhone OS Android OS
natural_image
Technical line drawings of two mechanical components (no text or symbols)natural_image
Pure technical line drawing of a rectangular panel with four corner connectors and mounting holes (no text or symbols)natural_image
Simple line drawing of a smartphone with two horizontal bars and dotted lines indicating measurement or alignment (no text or symbols)COMO USAR O TOALHEIRO

iPhone OS Android OS
natural_image
Technical line drawings of two mechanical components, one with a threaded end and the other with a cylindrical shaft (no text or symbols)natural_image
Pure technical diagram of a rectangular component with mounting holes and connectors, no text or symbols presentnatural_image
Simple line drawing of a smartphone with two horizontal bars and dotted lines indicating measurement or alignment (no text or symbols)COMMENT UTILISER LE PORTE-SERVIETTE

iPhone OS Android OS
natural_image
Technical line drawings of two mechanical components (no text or symbols)natural_image
Pure technical line drawing of a rectangular component with mounting holes and connectors (no text or symbols)natural_image
Simple line drawing of a smartphone with two horizontal bars and dotted lines indicating measurement or alignment (no text or symbols)COME USARE IL ASCIUGAMANI

iPhone OS Android OS
natural_image
Technical line drawings of two mechanical components, one cylindrical and one rectangular, with no visible text or symbols.natural_image
Pure technical diagram of a rectangular component with mounting holes and connectors, no text or symbols presentnatural_image
Simple line drawing of a smartphone with two horizontal bars and dotted lines indicating measurement or alignment (no text or symbols)WIE MAN DEN TUCHRAUM BENUTZT

iPhone OS Android OS
natural_image
Technical line drawing of two mechanical components with no visible text or symbolsnatural_image
Pure technical diagram of a rectangular component with mounting holes and connectors, no text or symbols presentnatural_image
Simple line drawing of a smartphone with two horizontal bars and dotted lines indicating measurement or alignment (no text or symbols)HOE DE HANDDOEKRUIMTE TE GEBRUIKEN

iPhone OS Android OS
natural_image
Technical line drawings of two mechanical components, one cylindrical and one rectangular, with no visible text or symbols.natural_image
Pure technical diagram of a rectangular panel with four labeled connectors (no text or symbols)natural_image
Simple line drawing of a smartphone with two horizontal bars and dotted lines indicating measurement or alignment (no text or symbols)JAK KORZYSTAĆ Z POKOJU RĘCZNIKA

iPhone OS Android OS

- INDEX
- ENGLISH
- PORTUGUÊS
- SECURITY INSTRUCTIONS
- Mounting the towel rails:
- CONTROL PANEL
- Power
- Mode
- Temperature
- Timer
- Child Lock
- APP CONNECTION
- CLEANING
- COMO USAR O TOALHEIRO
- COMMENT UTILISER LE PORTE-SERVIETTE
- COME USARE IL ASCIUGAMANI
- WIE MAN DEN TUCHRAUM BENUTZT
- HOE DE HANDDOEKRUIMTE TE GEBRUIKEN
- JAK KORZYSTAĆ Z POKOJU RĘCZNIKA
Brand : Create
Model : Warm Towel Crystal
Category : Towel racks