Warm Towel Mini - Towel racks Create - Free user manual and instructions
Find the device manual for free Warm Towel Mini Create in PDF.

| Product type | Electric towel warmer |
| Brand | Create |
| Model | Warm Towel Mini |
| Power supply | 230 V ~ 50 Hz |
| Power | 500 W |
| Dimensions (H x W x D) | 80 x 50 x 10 cm |
| Weight | 5 kg |
| Mounting method | Wall-mounted (4 points) or on legs (optional) |
| Timer | 1 to 8 hours (adjustable in 1-hour increments) |
| Heating mode | Continuous or timed |
| Heating type | Oil (oil radiator) |
| Material | Steel with glass panel |
| Protection rating | IP24 (suitable for bathroom) |
| Display | Ambient temperature LED |
| Maximum temperature | Approximately 70 °C (surface) |
| Safety | Splash-proof, automatic shut-off in case of overheating (not specified, estimate) |
| Cleaning | Soft non-abrasive cloth |
| Included accessories | Wall brackets, wall plugs, screws, legs (optional) |
| Recommended use | Dry indoor or bathroom (respect safety distances) |
Frequently Asked Questions - Warm Towel Mini Create
User questions about Warm Towel Mini Create
0 question about this device. Answer the ones you know or ask your own.
Ask a new question about this device
Download the instructions for your Towel racks in PDF format for free! Find your manual Warm Towel Mini - Create and take your electronic device back in hand. On this page are published all the documents necessary for the use of your device. Warm Towel Mini by Create.
USER MANUAL Warm Towel Mini Create
natural_image
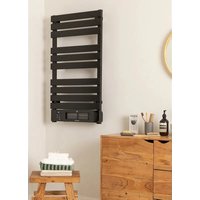
Line drawing of a multi-tiered horizontal ladder with a control panel at the bottom (no text or symbols)Warm Towel Mini
User manual | Manual de instrucciones
CREATE CREATE CREATE ATE CREATE CREATE CRE CREATE CREATE CREATE ATE CREATE CREATE CRE CREATE CREATE CREATE ATE CREATE CREATE CRE CREATE CREATE CREATE ATE CREATE CREATE CRE CREATE CREATE CREATE ATE CREATE CREATE CRE CREATE CREATE CREATE ATE CREATE CREATE CRE CREATE CREATE CREATE ATE CREATE CREATE CRE CREATE CREATE CREATE ATE CREATE CREATE CRE CREATE CREATE CREATE ATE CREATE CREATE CRE CREATE CREATE CREATE ATE CREATE CREATE CRE CREATE CREATE CREATE ATE CREATE CREATE CRE CREATE CREATE CRE CREATE CREATE CRE ATE CREATE CRE
CREATE CREATE CREATE ATE CREATE CREATE CRE CREATE CREATE CREATE ATE CREATE CREATE CRE CREATE CREATE CREATE ATE CREATE CREATE CRE CREATE CREATE CREATE ATE CREATE CREATE CRE CREATE CREATE CREATE ATE CREATE CREATE CRE CREATE CREATE CREATE ATE CREATE CREATE CRE CREATE CREATE CREATE ATE CREATE CREATE CRE CREATE CREATE CREATE ATE CREATE CREATE CRE CREATE CREATE CREATE ATE CREATE CREATE CRE CREATE CREATE CREATE ATE CREATE CREATE CRE CREATE CREATE CREATE ATE CREATE CREATE CRE CREATE CREATE CRE CREATE CREATE CRE CREATE CREATE CRE
INDEX
ENGLISH
Security instructions 6
Parts list 7
Assembly of the legs 7
Wall installation 8
Facility 8
How to use 9
Cleaning 9
PORTUGUÊS
Thank you for choosing our towel rack. Before using the appliance, carefully read these instructions to ensure it is used correctly.
The safety precautions enclosed will reduce the risk of death, injury and electrical shock when correctly followed. Keep the manual in a safe place for future reference, along with the completed warranty card, purchase receipt and package. If applicable, pass these instructions on to the next owner of the appliance. Always follow basic safety precautions and accident prevention measures when using an electrical appliance. We assume no liability for customers failing to comply with these requirements.
SECURITY INSTRUCTIONS
When using any electrical appliance, basic safety precautions should always be observed.
- Carefully read these instructions before using the appliance for the first time and keep them for future consultation.
- This appliance is not intended for use by persons (including children) with reduced physical, sensory or mental capabilities, or lack of experience and knowledge, unless they have been given supervision or instruction concerning use of the appliances by a person responsible for their safety.
- Keep plastic bags and other packaging materials out of the reach of children. They can be dangerous.
- Do not plug in before making sure the voltage on the rating plate and that of your household are the same.
- Make sure the electric socket is adequately earthed.
- Do not place the appliance close to showers, bathtubs, pools, etc.
- Do not submerge the appliance in water or any other liquids.
- Do not let children play with the appliance. Keep the appliance out of the reach of children.
• Always use it with the elements in the upright position. - The external parts of the appliance get hot during use; avoid touching them until the appliance cools down.
- Do not place the appliance under a socket.
- Do not place the appliance near inflammable objects or products
- When you use it for the first time, leave the heater on for 2 or 3 hours at the maximum temperature setting in a ventilated place, in order to disperse the initial “new” smell.
- If this appliance is installed on a bathroom wall, it must always be in a place where no person in the shower or in the bath may touch it or switch it on.
-
It is normal to hear some noises caused by the oil heating up or cooling.
-
Do not use the thermal heater directly on the floor without attaching the legs.
- If the cable is damaged it must be changed by an Authorised Service Centre.
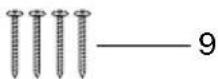
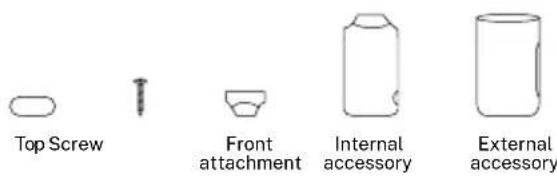
PARTS LIST
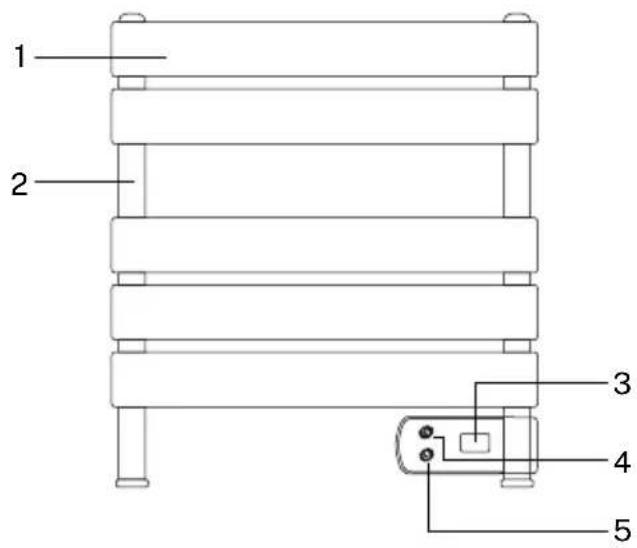
- Heating bars
- Side supports
- Temperature indicator
- 1h heating time button
- On/Off button
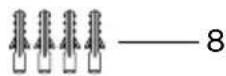
- Wall brackets x4
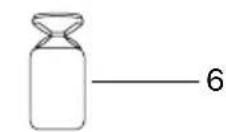

- Fixing screws
- Wall plugs
- Wall screws
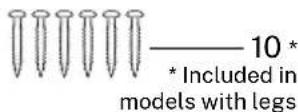
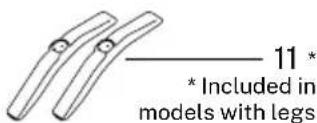
- Screws for legs (Optional)
- Paws (Optional)
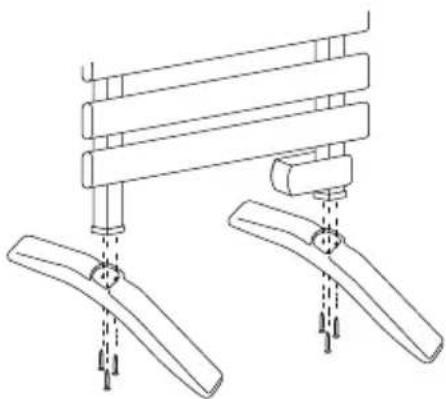
ASSEMBLY OF THE LEGS
natural_image
Technical line drawing of a mechanical assembly with two lever arms and a central shaft (no text or symbols)- Place the legs on the bottom of the towel rack.
- Using a screwdriver, use the screws for the legs and screw them in.
- Make sure the legs are installed correctly.
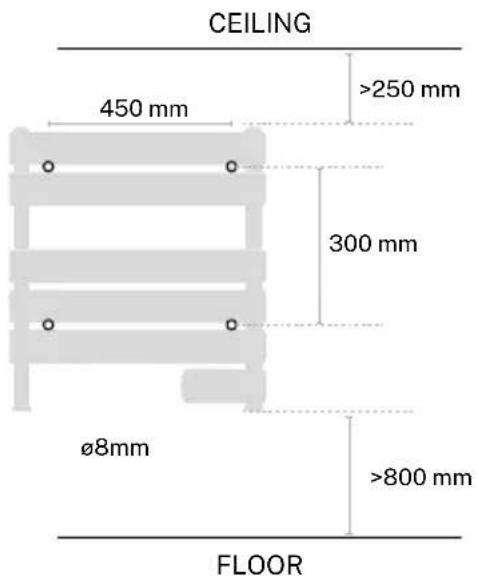
Before installation, check the following:
-
The control panel must be in the lower position during installation.
-
The distance between the bathtub and the appliance must be at least 60 cm.
-
The distance between the top of the house and the appliance must be at least 25 cm.
-
The distance between the floor and the appliance must be at least 80 cm.

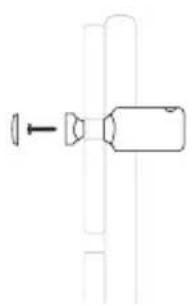
FACILITY
-
Mark on the wall the 4 holes to be made with the drill. The horizontal separation between the holes must be 450 ~mm and vertically 300 ~mm .
-
Once the holes have been marked, drill the 4 holes of 8 mm diameter.

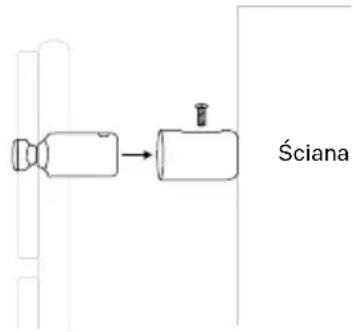
- Detach the wall brackets as shown in the image.
- Insert the plug into the wall hole, then attach the outer accessory to the wall brackets and use the wall screw to fix the accessory properly. Repeat the step for the rest of the holes.

-
Fix the internal accessories and the 4 front accessories to the towel rack with the screws, then attach the decorative cover so that the screw is not visible.
-
Once the accessories are attached to the towel rack, insert the internal accessories to the external ones on the wall, adjust the distance you want and fix the fixing screws so that it is well secured.
natural_image
Pure mechanical component diagram without any text, numbers, or symbols
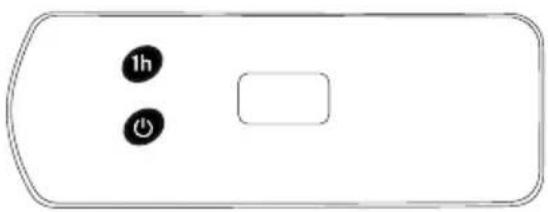
HOW TO USE
1. Continual Heating Mode:
When you press the power button, the appliance will be in Continual Heating mode, and will continue to heat until you turn it off.
2. Towel Warming Mode:
Press the time button to start the timer, the screen will show the time 1 hour, continue pressing to choose the desired time as many times as you want until it reaches 8 hours.
The LED display always shows the room temperature.
natural_image
Simple diagram of a remote control panel with two buttons labeled '1h' and '0', no text or symbols beyond basic labels.CLEANING
• Always switch off the power and let the appliance cool down before cleaning.
- Use a soft cloth to carefully wipe the glass surface.
- Do not use an abrasive material to wipe it, to avoid damaging the glass surface.
In compliance with Directives: 2012/19/EU and 2015/863/EU on the restriction of the use of dangerous substances in electric and electronic equipment as well as their waste disposal. The symbol with the crossed dustbin shown on the package indicates that the product at the end of its service life shall be collected as separate waste. Therefore, any products that have reached the end of their useful life must be given to waste disposal centres specialising in separate collection of waste electrical and electronic equipment, or given back to the retailer at the time of purchasing new similar equipment, on a one for one basis. The adequate separate collection for the subsequent start-up of the equipment sent to be recycled, treated and disposed of in an environmentally compatible way contributes to preventing possible negative effects on the environment and health and optimises the recycling and reuse of components making up the apparatus. Abusive disposal of the product by the user involves application of the administrative sanctions according to the laws.
natural_image
Technical line drawing of a mechanical assembly with two arms and a central shaft, no text or symbols presentnatural_image
Pure mechanical component diagram without any text, numbers, or symbols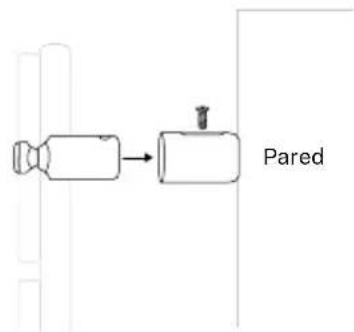
INSTRUCCIONES DE USO
natural_image
Simple line drawing of a remote control panel with two buttons and a blank button (no text or symbols)LIMPIEZA
natural_image
Technical line drawing of a mechanical assembly with two lever arms and a central shaft (no text or symbols)natural_image
Pure mechanical component diagram without any text, numbers, or symbols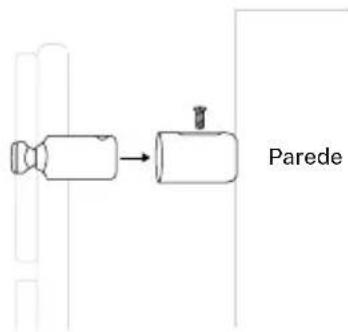
COMO UTILIZAR
natural_image
Simple diagram of a remote control panel with two buttons labeled '1h' and a play button (no text or symbols beyond basic labels)LIMPEZA
natural_image
Technical line drawing of a mechanical assembly with two curved components and vertical supports (no text or symbols)natural_image
Pure mechanical component diagram without any text, numbers, or symbols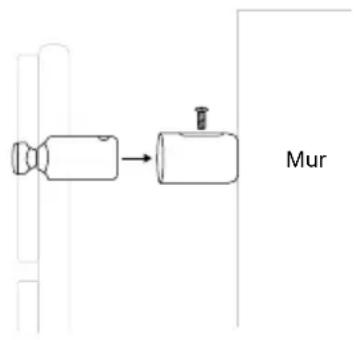
COMMENT UTILISER L'APPAREIL
natural_image
Simple diagram of a remote control panel with two buttons labeled '1h' and 'Power', no text or symbols beyond basic labels.NETTOYER
natural_image
Technical line drawing of a mechanical assembly with two arms and a central shaft (no text or symbols)natural_image
Pure mechanical component diagram without any text, numbers, or symbols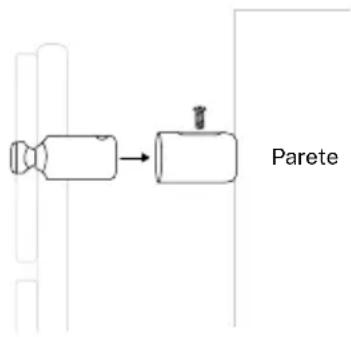
MODO D'USO
natural_image
Simple diagram of a remote control panel with two buttons labeled '1h' and 'Power', no text or symbols beyond basic labels.PULIZIA
natural_image
Technical line drawing of a mechanical assembly with two lever arms and a central shaft (no text or symbols)natural_image
Pure mechanical diagram showing a lever and shaft assembly without any text, numbers, or symbols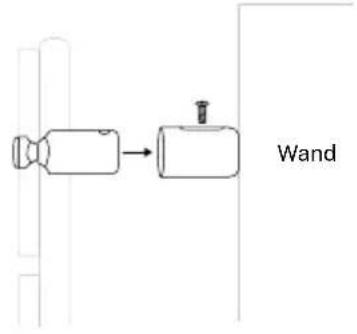
GEBRAUCHSANWEISUNG
natural_image
Simple diagram of a remote control panel with two buttons labeled '1h' and a blank button (no text or symbols beyond basic labels)AUFREINIGEN
natural_image
Technical line drawing of a mechanical assembly with two identical lever arms and a central pivot (no text or symbols)natural_image
Pure mechanical component diagram without any text, numbers, or symbols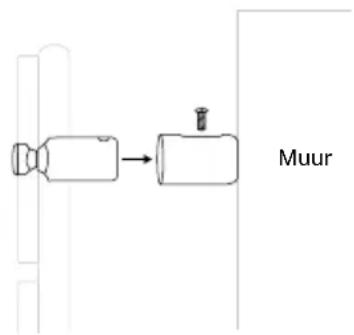
GEBRUIKSAANWIJZING
natural_image
Simple diagram of a remote control panel with two buttons labeled '1h' and '0', and a blank rectangular button (no text or symbols beyond basic labels)SCHOONMAKEN
natural_image
Technical line drawing of a mechanical assembly with two curved components and downward force arrows (no text or symbols)natural_image
Pure mechanical component diagram without any text, numbers, or symbols