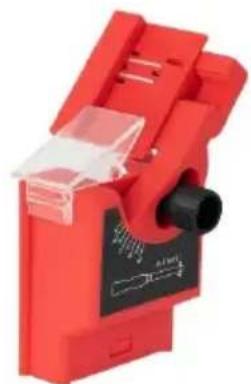
MS-65 - Sharpener MSW - Free user manual and instructions
Find the device manual for free MS-65 MSW in PDF.

| Product type | Multifunction sharpener |
| Model | MSW-MS-65 |
| Brand | MSW |
| Supply voltage | 230 V ~ / 50 Hz |
| Nominal power | 65 W |
| Protection class | II |
| IP protection rating | IP20 |
| Dimensions (L x D x H) | 190 x 200 x 137 mm |
| Weight | 1.9 kg |
| Abrasive disc rotation speed | 6480 rpm |
| Max. sharpening disc diameter | 51 mm |
| Sharpened drill diameter | 3 - 13 mm |
| Material of sharpened drills | HSS (high-speed steel) |
| Drill sharpening angle | 118° (standard) |
| Width of sharpened chisels or blades | up to 50 mm |
| Sharpening functions | Drills, knives, scissors, chisels, planer blades |
| Duty cycle | S2 (10 min) |
| Sound pressure level LpA | 59.3 dB(A) (uncertainty K=3 dB) |
| Included accessories | Sharpening stone, 3 interchangeable accessories (drills, knives/scissors, chisels/planer blades) |
| Cleaning and maintenance | Disconnect before cleaning; use a non-abrasive cloth; do not immerse; clean ventilation slots with a brush and compressed air |
| Safety | Mandatory wearing of hearing protection, goggles, gloves, and dust mask |
| Repairability | Repairs only by the manufacturer's after-sales service |
Frequently Asked Questions - MS-65 MSW
User questions about MS-65 MSW
0 question about this device. Answer the ones you know or ask your own.
Ask a new question about this device
Download the instructions for your Sharpener in PDF format for free! Find your manual MS-65 - MSW and take your electronic device back in hand. On this page are published all the documents necessary for the use of your device. MS-65 by MSW.
USER MANUAL MS-65 MSW
PRODUCT NAME MULTI-SHARPENER
NAZWA PRODUKTU UNIWERSALNA OSTRZAeKA
NAZEV VYROBKU OSTRICI STANICE
NOM DU PRODUIT AFFUTEUR MULTIFONCTION
| Parameter description | Parameter value |
| Name of the product | MULTI-SHARPENER |
| Model | MSW-MS-65 |
| Supply voltage [V~] / Frequency [Hz] | 230 / 50 |
| Rated power [W] | 65 |
| Protection class | II |
| IP Code | IP20 |
| Dimensions [Width x Depth x Height; mm] | 190 x 200 x 137 |
| Weight [kg] | 1.9 |
| Grinding wheel rotating speed [rpm] | 6480 |
| Maximum diameter of grinding wheel [mm] | 51 |
| Diameter of drill bits to be sharpened [mm] | 3-13 |
| Drill bit material | HSS (High Speed Steel) |
| Drill bit sharpener inclination angle [°] | 118 – test |
| Diameter of chisels or blades to be sharpened [mm] | Up to 50 |
| Sound pressure level LpA | 59.3 |
| Measurement uncertainty K=[dB(A)] | K = 3 |
| Operation cycle | S2 (10 min) |
1. General description
These instructions are intended to assist you in safe and reliable use. The product is designed and manufactured strictly according to technical specifications using the latest technology and components and maintaining the highest quality standards.
READ THE INSTRUCTIONS CAREFULLY AND UNDERSTAND THEM BEFORE USE.
To ensure long and reliable operation of the device, care should be taken to operate and maintain the device correctly in accordance with the instructions. The technical data and specifications contained in these instructions are up-to-date. The manufacturer reserves the right to make changes for the purpose of quality improvement. Taking technological progress and the possibility to reduce noise into account, the device is designed and built so that risks resulting from noise emissions are reduced to the lowest possible level.
Explanation of symbols
| CE | The product meets the requirements of relevant safety standards. |
| Read the instructions before use. | |
| Recyclable product. | |
| Wear hearing protection. Exposure to noise may cause hearing loss. | |
| Wear protective goggles. | |
| Wear protective gloves. | |
| Use dust mask (respiratory protection). | |
| CAUTION! Risk of electric shock! | |
| CAUTION! Rotating parts! | |
| A III protection class device with double insulation. |

CAUTION! The illustrations in this manual are for illustrative purposes only and may differ in some details from the actual product appearance.
The original version of the instructions is the German version. Other language versions are translations from German.
2. Safe use
CAUTION! Read all safety warnings and all instructions. Failure to follow the warnings and instructions may result in electric shock, fire and/or serious injury or death.
The term "device" or "product" in the warnings and instructions refers to: MULTI- SHARPENER.
2.1. Electrical safety
a) The device plug must fit into the socket. Do not modify the plug in any way. Original plugs and matching sockets reduce the risk of electric shock.
b) Avoid touching earthed items such as tubes, radiators, heaters and refrigerators. There is an increased risk of electric shock if your body is earthed and touches the device exposed to direct rain, wet floor and humid environment. If water penetrates into the device, there is an increased risk of damage to the device and electric shock.
c) Do not touch the device with wet or damp hands.
d) Do not use the cable in a wrong way. Never use it to carry the device or to pull the plug out of the socket. Keep the cable away from heat sources, oil, sharp edges or moving parts. Damaged or tangled cables increase the risk of electric shock.
e) In the case of working with the device outdoors, use an extension cable intended for outdoor use. Using an extension cable for outdoor use reduces the risk of electric shock.
f) Do not use the device if the power cable is damaged or shows clear signs of wear. A damaged power cable should be replaced by a qualified electrician or the manufacturer's service.
g) To avoid electric shock, do not immerse the cable, plug or device itself in water or other liquid. Do not use the device on wet surfaces.
h) CAUTION - DANGER TO LIFE! When cleaning or using the device, never immerse it in water or other liquids.
i) Do not use the device in high humidity rooms or in a direct vicinity to a water tanks!
j) The device must not get wet. Risk of electric shock!
2.2. Safety in the work area
a) Keep the work area tidy and well lit. Disorder or poor lighting can lead to accidents. Be careful, watch what you are doing and use common sense when working with the device.
b) Do not use the device in an area with a risk of explosion, for example in the presence of flammable liquids, gases or dust. The device produces sparks which can ignite dust or vapours.
c) If in doubt as to whether the device is working properly, contact the manufacturer's service.
d) Repairs to the device may only be carried out by the manufacturer's service. Do not carry out repairs yourself!
e) In the event of fire or fire, use only powder or snow (CO2) extinguishers to extinguish fire in the device where there is voltage.
f) No children or unauthorised persons are allowed in the work area. (Lack of attention may result in loss of control over the device).
g) Dust and debris are generated when the device is working. Protect bystanders from their harmful effects.
h) Check the condition of the safety stickers regularly. Replace them if they are illegible.
i) Keep these instructions for future reference. If the device is to be passed on to third parties, the instructions for use must be handed over together with the device.
j) Keep packaging parts and small assembly parts out of the reach of children.
k) Keep the device away from children and animals.
I) When using this device together with other devices, the other instructions for use must also be followed.

Remember! Keep children and other bystanders safe while operating the device.
2.3. Personal safety
a) Do not operate the device if you are tired, ill or under the influence of alcohol, drugs or medication which might impair your ability to operate the device.
b) The device may only be operated by persons who are physically fit, capable of handling the device and who have been adequately trained, who have read these instructions and have received training in health and safety.
c) The device is not intended to be used by persons (including children) with reduced mental, sensory or intellectual functions or lack of experience and/or knowledge, unless they are supervised by a person responsible for their safety or have been given instructions by them on how to operate the device.
d) Be careful and use common sense when operating the device. A short moment of distraction during operation may lead to serious personal injury.
e) Use the required personal protective equipment when working with the device specified in section 1 of the explanation of symbols. The use of appropriate, approved personal protective equipment reduces the risk of injury.
f) To prevent accidental start-up, make sure the switch is in the OFF position before connecting the device to the power source.
g) Do not overestimate your capabilities. Maintain body balance at all times during operation. This allows for better control of the device in unexpected situations.
h) Do not wear loose clothing or jewellery. Keep hair, clothing and gloves away from moving parts. Loose clothing, jewellery or long hair can be caught by moving parts.
i) Remove all adjusting tools or keys before turning the device on. A tool or key left in the rotating part of the device may cause injury.
j) The device is not a toy. Children should be supervised to ensure that they do not play with the device.
k) Do not put your hands or objects inside the working device!
2.4. Safe use of the device
a) Do not overload the device. Use tools that are suitable for the given application. A correctly selected device ensures better and safer performance of work.
b) Do not use the device if the ON/OFF switch does not function properly (does not switch on and off). Devices that cannot be controlled by the switch are dangerous, must not be operated and must be repaired.
c) The device must be disconnected from the power supply before adjustment, cleaning and maintenance. This preventive measure reduces the risk of accidental activation.
d) Keep unused devices out of the reach of children and anyone not familiar with the device or these instructions. Devices are dangerous in the hands of inexperienced users.
e) Keep the device in good working order. Before each use, check for general damage or damage to moving parts (cracks in parts and components or any other condition that may affect the safe operation of the device). If damaged, have the device repaired before use.
f) Keep the device out of the reach of children.
g) To ensure the designed operational integrity of the device, do not remove factory-installed covers or loosen any screws.
h) Avoid situations where the device stops under heavy load during operation. This can cause overheating of the drive elements and subsequent damage to the device.
i) Do not touch moving parts or accessories unless the device has been disconnected from the power supply.
j) Do not move, shift or rotate the device during operation.
k) Clean the device regularly to prevent the permanent accumulation of dirt.
I) Do not work with two objects at the same time.
m) The device is not a toy. Cleaning and maintenance must not be performed by children without adult supervision.
n) It is forbidden to tamper with the device in order to change its parameters or construction.
o) Keep the device away from sources of fire and heat.
p) Do not overload the device.
q) Do not cover the vents of the device!

CAUTION! Although the device has been designed to be safe and has been equipped with adequate safeguards, and despite the use of additional safety measures, there is still a small risk of accident or injury when operating the device. Caution and common sense are advised when using the device.
3. Rules of use
This universal product is intended for sharpening drill bits, scissors, knives, chisels, planes etc. items.
The user is responsible for any damage caused by improper use.
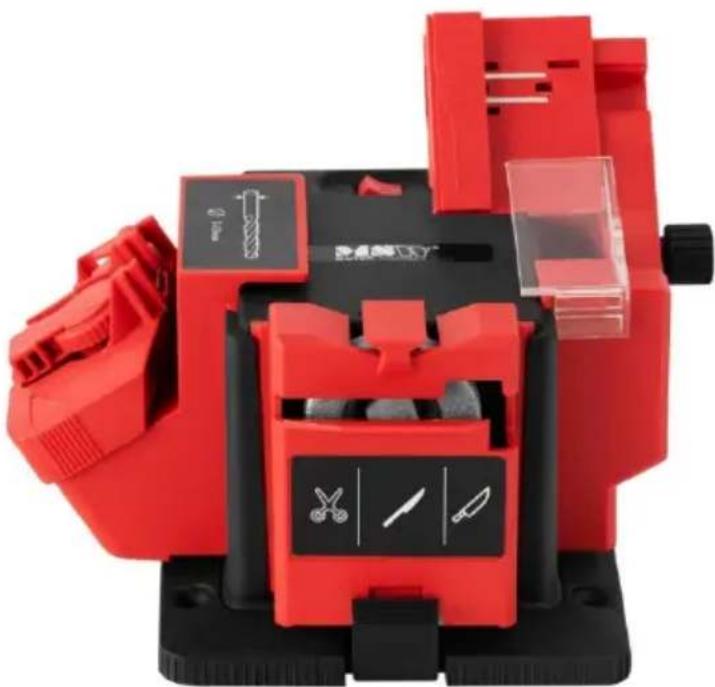
3.1. Description of the device
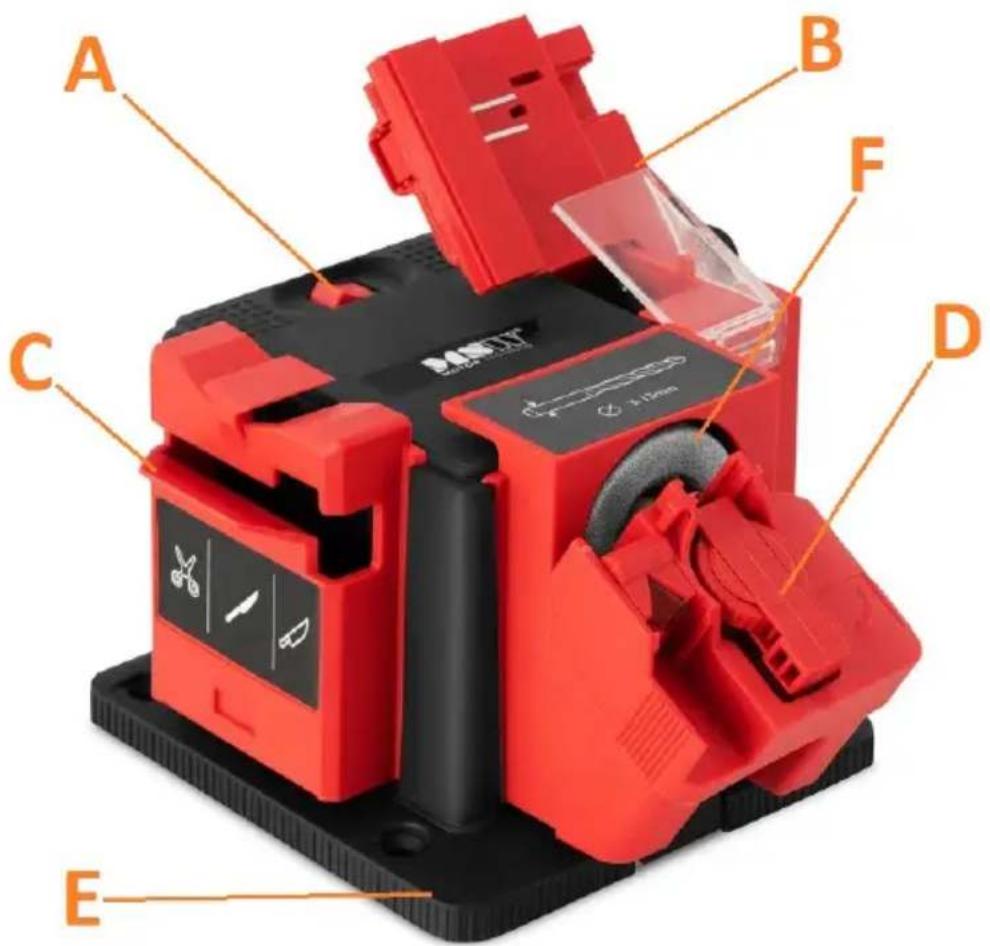
A. ON/OFF button
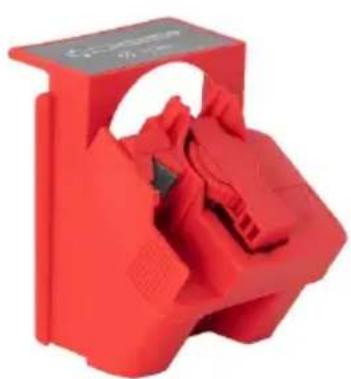
B. Chisel/plane sharpening attachment
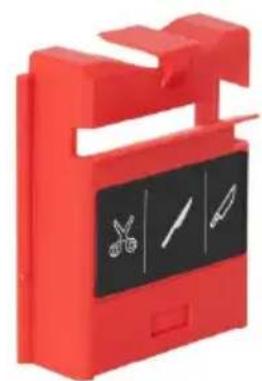
C. Knife/scissor sharpening attachment
D. Drill/bit sharpening attachment
E. Base
F. Whetstone
3.2. Preparation for work
LOCATION OF THE DEVICE
The ambient temperature should not exceed 40^ and the relative humidity should not exceed 85% . Position the device in a way that allows for good air circulation. Keep the device away from any hot surfaces. Always operate the device on a level, stable, clean, fireproof and dry surface and out of the reach of children and persons with reduced mental, sensory and intellectual abilities. Position the device in such a way that the power supply plug can be reached at any time. Make sure that the device's power supply corresponds to the data on the rating plate!
ASSEMBLY OF THE DEVICE
The device must be securely attached to the base (E) – it has openings in the bottom intended for screws (not included). After attaching the device to the base, fit the appropriate attachment (B or C or D) to the whetstone, depending on what you want to sharpen. The remaining attachments can be installed on the sides of the device – see images below.
Connect the device to the power supply.
3.3. Working with the device
3.3.1 Sharpening drills/bits
The drill/bit sharpening attachment enables the sharpening of not only blunt, but also broken drill bits (on the condition that the drill bit has been broken in its working part).
Proper installation of the drill bit in the clamp
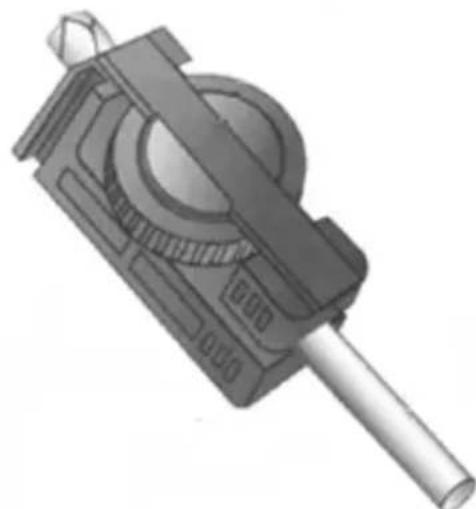
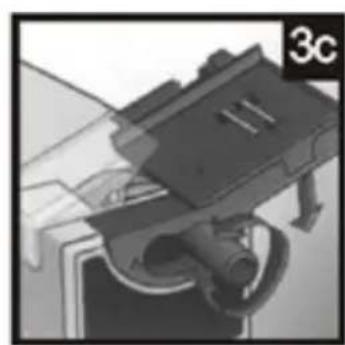
a) Fit the appropriate drill/bit sharpening attachment (D) on the device.
b) Remove the clamp from the clamp mounting and insert the drill bit to be sharpened (see figure 1a). Pull the clamp so that the drill bit has some free play.
c) Insert the clamp with the drill bit in the clamp mounting pocket, using the special groove for this purpose (figure 1b).
d) Move the drill bit forwards, so that it remains in the guide wedge and touches the limiter (figure 1c).
e) Rotate the drill until the wedge-shaped guide covers it completely (figure 1c), i.e. all 4 corners of the drill should touch the walls of the wedge-shaped guide.
f) Make sure that the drill and the clamp were fully inserted in the groove. Then, screw in the clamping knob (figure 1d).
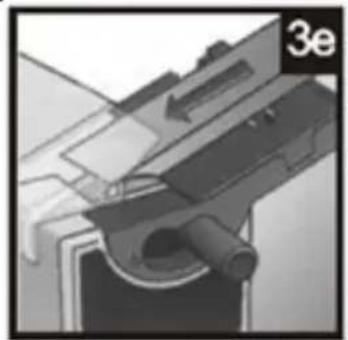
g) Lift the guide wedge and remove the clamp and the drill bit.
h) Turn the guide from one side to other, blocking it and pressing on it slightly with finger (figure 1f).
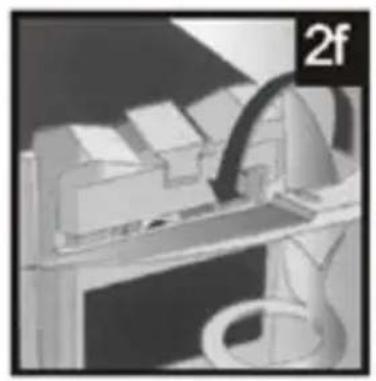
i) Switch the device with the ON/OFF button (A).
j) Turn the guide from one side to other, blocking it and pressing on it slightly with finger (figure 1f).
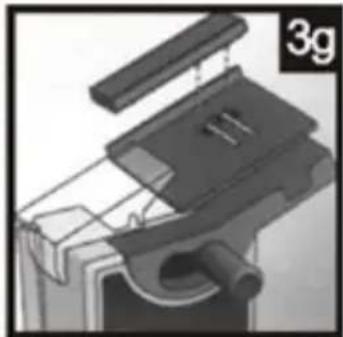
k) Remove the drill bit and the mounting and turn it (1g). Repeat step k).
1) Check with the help of the wedge provided on the attachment that both edges of the flank on the drill bit are evenly sharpened. They should meet exactly in the middle, as in figure 1h. Figure 1i shows how it should not look.
m) After completing the sharpening and if the device is no longer used switch it off with the ON/OFF button (A). Wait until the whetstone stops before removing the attachment.
3.3.2 Sharpening knives/scissors
Sharpening knives:
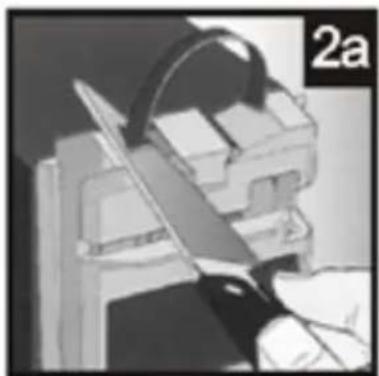
CAUTION: The device enables sharpening only flat-blade knives - do not use for serrated blades, etc.
a) Fit the appropriate knife/scissor sharpening attachment (C) on the device.
b) Switch the device with the ON/OFF button (A).
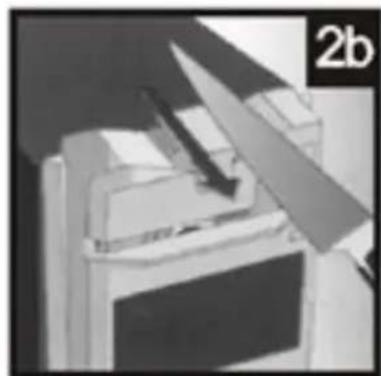
c) Grasp the knife to be sharpened firmly by the handle and insert the grind of the cutting edge of the blade into the knife sharpening groove (see figure 2a).
d) Pull the cutting edge on the whetstone from the handle to the tip, applying a constant, light pressure – do not press too hard (figure 2b)! Then remove the knife from the groove.
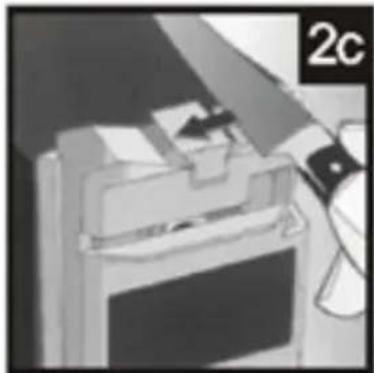
e) Place other side of the cutting edge into the knife sharpening groove (figure 2c) and repeat the action from point d).
f) Repeat the sharpening of each side of the cutting edge's sides until even, sharp blade is obtained.
g) After completing the sharpening and if the device is no longer used switch it off with the ON/OFF button. Wait until the whetstone stops before removing the attachment.
Sharpening of scissors
a) Fit the appropriate knife/scissor sharpening attachment (C) on the device.
b) Switch the device with the ON/OFF button (A).
c) Spread the scissor blades as far as possible (scissors fully open).
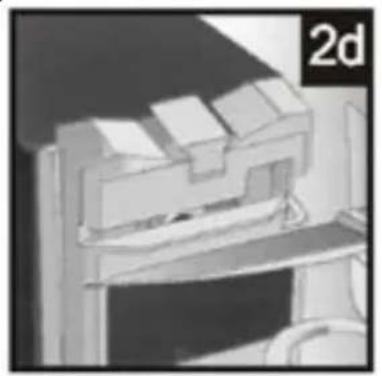
d) Insert the first blade of the scissors into the groove on the attachment (figure 2d) – the axis of the scissors and keep the other blade on the right side of the attachment.
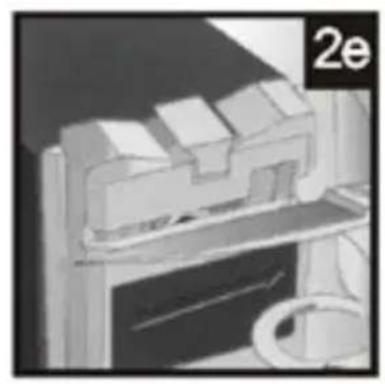
e) Move the blade of the scissors along the stone from the axis to the tip while maintaining a constant, light pressure on the blade - do not press too hard! (figure 2e).
f) Remove the scissors and turn them over to sharpen the second blade (figure 2f) - hold the axis of the scissors and their other blade on the right side of the attachment.
g) Repeat the sharpening of each blades until even, sharp cutting edge is obtained.
h) After completing the sharpening and if the device is no longer used switch it off with the ON/OFF button. Wait until the whetstone stops before removing the attachment.
3.3.3 Sharpening chisels/planes
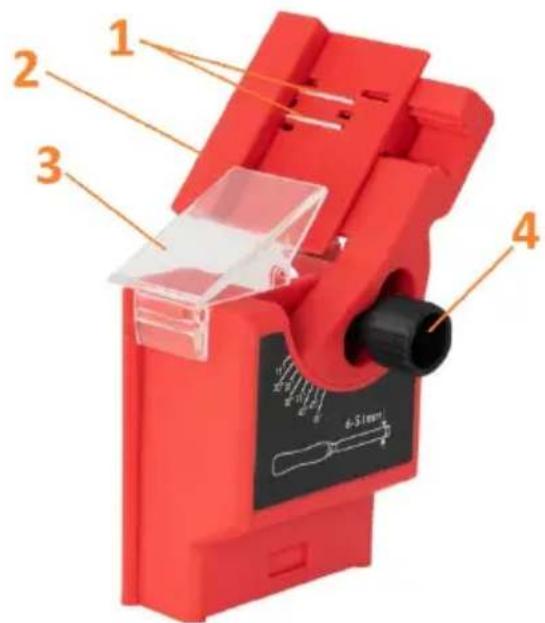
- Blade retaining magnet
- Guide for slim chisel
- Protection shield
- Cut angle regulation knob (20-40°)
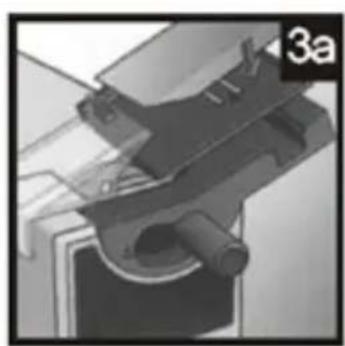


a) Fit the appropriate chisel/plane sharpening attachment on the device.
b) Place the blade by supporting it on the bracket on the attachment (see figure 3a) – the magnet retains the blade in place.
c) The sharpening angle must correspond to the angle of the workpiece blade, so if necessary, adjust it by adjusting the knob (4) – to do this, loosen the knob and set the angle, then tighten it again.
d) When it is ensured that the blade edge touches the whetstone, turn the device on by using the ON/OFF button.
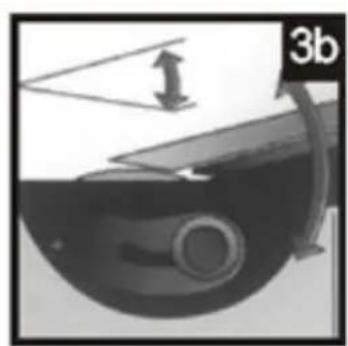
e) Move the blade up and down along the whetstone applying light, constant pressure (figure 3d). Avoid keeping the blade in one, constant position, as this results in uneven sharpening!
f) Gradually adjust the blade to the whetstone while sharpening (figure 3e) - do not exert too much pressure on the blade. Sharpen the blade by repeating this step.
g) Extend the blade to make sure that the bevelled edge and the blade itself are sharpened evenly – if not, adjust the sharpening angle. It is important that the sharpening angle is identical to the blade bevel angle in order to avoid unnecessary removal of the blade material and to maintain its optimum working angle (figure 3f).
CAUTION: in the case of sharpening thin chisel blades, use the provided guide (2), which acts as a spacer. The sharpening itself should be done following the same steps as explained above.
It is recommended that the blade is finished using an oilstone, which would additionally protect it against rust.
h) After completing the sharpening and if the device is no longer used switch it off with the ON/OFF button. Wait until the whetstone stops before removing the attachment.
3.4. Cleaning and maintenance
a) Before cleaning, adjustment or replacement of accessories, and when the device is not in use, pull the power supply plug and let the device cool down completely.
Wait until the spinning elements stop.
b) Use only non-corrosive agents for cleaning the surface.
c) Store the device in a dry and cool place protected from moisture and direct sunlight.
d) Do not spray the device with a stream of water and do not immerse it in water.
e) Ensure that no water enters through the ventilation openings in the housing.
f) Clean the ventilation openings with a brush and compressed air.
g) Regularly inspect the device for technical failure and damage.
h) Do not use sharp and/or metal objects for cleaning (e.g. a wire brush or metal scraper) as these may damage the surface of the device.
i) Do not clean the unit with acidic substances, medical products, thinners, fuel, oil or other chemicals as they may damage it.
DISPOSAL OF USED DEVICES
At the end of its service life, this product must not be disposed of with normal household waste, but should be taken to a collection point for the recycling of electrical and electronic devices. This is shown by the symbol placed on the product, operating manual or the packaging. The materials used in the device can be reused according to their intended use. By reusing materials or conducting other forms of using used devices, you make a significant contribution to the protection of our environment.
Local administration will provide you with information about the appropriate point for disposal of used devices.
DE Produktname: SCHÄRFSTATION
EN Product name: MULTI-SHARPENER
EN Manufacturer Address
For the disposal of the device please consider and act according to the national and local rules and regulations.
CONTACT
expondo Polska sp. z o.o. sp. k.