SPS-18 - Mechanical tool MSW - Free user manual and instructions
Find the device manual for free SPS-18 MSW in PDF.

User questions about SPS-18 MSW
0 question about this device. Answer the ones you know or ask your own.
Ask a new question about this device
Download the instructions for your Mechanical tool in PDF format for free! Find your manual SPS-18 - MSW and take your electronic device back in hand. On this page are published all the documents necessary for the use of your device. SPS-18 by MSW.
USER MANUAL SPS-18 MSW
WHEEL HUB BEARING TOOL SET
MSW-SPS-18
| DE | Produktname: | RADLAGER WERKZEUG-SATZ |
| EN | Product name: | WHEEL HUB BEARING TOOL SET |
| PL | Nazwa produktu: | ZESTAW DO DEMONTAŻU PIAST I ŁOŻYSK KÓŁ |
| CZ | Název výrobku | SADA NÁŘADÍ NA LOŻISKA KOL |
| FR | Nom du produit: | COFFRET D'OUTILS DE MONTAGE ET DE DÉMONTAGE POUR ROULEMENT DE MOYEU DE ROUE |
| IT | Nome del prodotto: | KIT DI SMONTAGGIO DEI MOZZI E CUSCINETTI DELLE RUOTE |
| ES | Nombre del producto: | SET DE HERRAMIENTAS PARA RODAMIENTO DE RUEDA |
| HU | Termék neve | KERÉKCSAPÁGY-LEHÚZÓ KÉSZLET |
| DA | Produktnavn | DEMONTERINGSSÆT til HJULNAV OG LEJE |
| DE | Modell: | MSW-SPS-18 |
| EN | Product model: | |
| PL | Model produktu: | |
| CZ | Model výrobku | |
| FR | Modèle: | |
| IT | Modello: | |
| ES | Modelo: | |
| HU | Modell | |
| DA | Model | |
| DE | Hersteller | expondo Polska sp. z o.o. sp. k. |
| EN | Manufacturer | |
| PL | Producent | |
| CZ | Výrobce | |
| FR | Fabricant | |
| IT | Produttore | |
| ES | Fabricante | |
| HU | Termelő | |
| DA | Producent | |
| DE | Anschrift des Herstellers | ul. Nowy Kisielin – Innowacyjna 7, 66-002 Zielona Góra | Poland, EU |
| EN | Manufacturer Address | |
| PL | Adres producenta | |
| CZ | Adresa výrobce | |
| FR | Adresse du fabricant | |
| IT | Indirizzo del produttore | |
| ES | Dirección del fabricante | |
| HU | A gyártó címe | |
| DA | Producentens adresse |
Technische Daten
1. General Description
The instruction manual is intended to assist in safe and reliable use. The product is designed and manufactured strictly according to technical specifications using the latest technology and components and maintaining the highest quality standards.
CAREFULLY READ AND UNDERSTAND THIS MA BEFORE PROCEEDING.
To ensure long and reliable operation of the unit, make sure to operate and maintain it properly in accordance with the guidelines in this instruction manual. The technical data and specifications contained in this instruction manual are up to date. The manufacturer reserves the right to make changes in order to improve the quality.
Explanation of symbols
 | Please read the instructions before use. |
 | CAUTION! or WARNING! or REMINDER! describing a situation.(general warning sign). |
 | Wear protective goggles. |
 | Wear protective gloves. |
 | CAUTION! Danger of crushing your hand!! |

CAUTION! The illustrations in this instruction manual are for reference only and may differ from the actual product in some details.
The original instruction manual is in the German language version. Other language versions are translations from German.
2. Safety of use

CAUTION! Read all safety warnings and all instructions. Failure to follow warnings and instructions could result in serious injury or even death.
The term "unit" or "product" in the warnings and in the description of the instructions refers to the WHEEL HUB BEARING TOOL SET.
a) Keep the work area tidy and well lit. Disorder or poor lighting can lead to accidents. Be foresighted, watch what you are doing and use common sense when using the unit.
b) If you have any doubts as to whether the unit is working properly or if it is damaged, contact the manufacturer's service department.
c) Only the manufacturer's service department may repair the unit. Do not carry out repairs yourself!
d) No children or unauthorized persons are allowed in the work area. (Inattention may result in loss of control of the unit.)
e) Keep these instructions for use for future reference. If the unit is to be passed on to a third party, the operating instructions must also be handed over together with the unit.
f) Keep the packaging and small assembly parts out of the reach of children.
g) Keep the unit away from children and animals.
h) When using this unit together with other units, also follow the other instructions for use.
i) Do not operate this unit if you are tired, ill or under the influence of alcohol, drugs or medication that could impair your ability to operate the unit.
j) The unit may be operated by persons who are physically fit, capable of operating it and appropriately trained, and who have read this instruction manual and have been trained in occupational safety and health.
k) Use caution and common sense when operating this unit. A moment's inattention during operation may result in serious personal injury.
I) Use personal protective equipment as required when operating the unit as specified in Section 1 of the explanation of symbols. The use of appropriate, approved personal protective equipment reduces the risk of injury.
m) Do not overestimate your capabilities. Maintain body balance and equilibrium at all times during operation. This allows for better control of the machine in unexpected situations.
n) Do not wear loose clothing or jewelry. Keep hair, clothing, and gloves away from moving parts. Loose clothing, jewelry, or long hair can be caught in moving parts.
o) The unit is not a toy. Children should be watched to ensure that they do not play with the unit.
p) Keep unused equipment out of the reach of children and out of the reach of anyone unfamiliar with the unit or this instruction manual. These units is dangerous in the hands of inexperienced users.
q) Keep the unit in good working condition. Check before each use for general damage or damage to moving parts (cracks in parts and components or any other condition that may affect the safe operation of the device). If damaged, have the unit repaired before use.
r) Keep the unit out of the reach of children.
s) Clean the unit regularly to prevent permanent dirt build-up.
t) Do not process two workpieces at the same time.
u) The unit is not a toy. Cleaning and maintenance must not be performed by children without adult supervision.
v) Do not tamper with the unit to alter its performance or design.
w) Keep the unit away from sources of fire and heat.
x) If the vehicle to be repaired is elevated, make sure it is properly supported and secured against slipping or tipping.
y) Do not install a bearing with a damaged retaining ring.

CAUTION! Although the product has been designed to be safe, with adequate safeguards, and despite the additional safety features provided to the user, there is still a slight risk of accident or injury when handling the unit. You are advised to use caution and common sense when using this product.
3. Rules of use
The kit is designed to assist in removing/installing the hub on Ford, Mazda, Volvo vehicles in the following models:
• Ford - Focus 2 (from 2004), C-Max (from 2003)
- Mazda - 3 (bk) 1.4 / 1.6 / 1.6 turbo (from 2003)
- Volvo - C30 (from 2006), C70 convertible (from 2006), S40 (from 2004), V50 (from 2004)
The user is responsible for any damage resulting from misuse.
3.1. Description
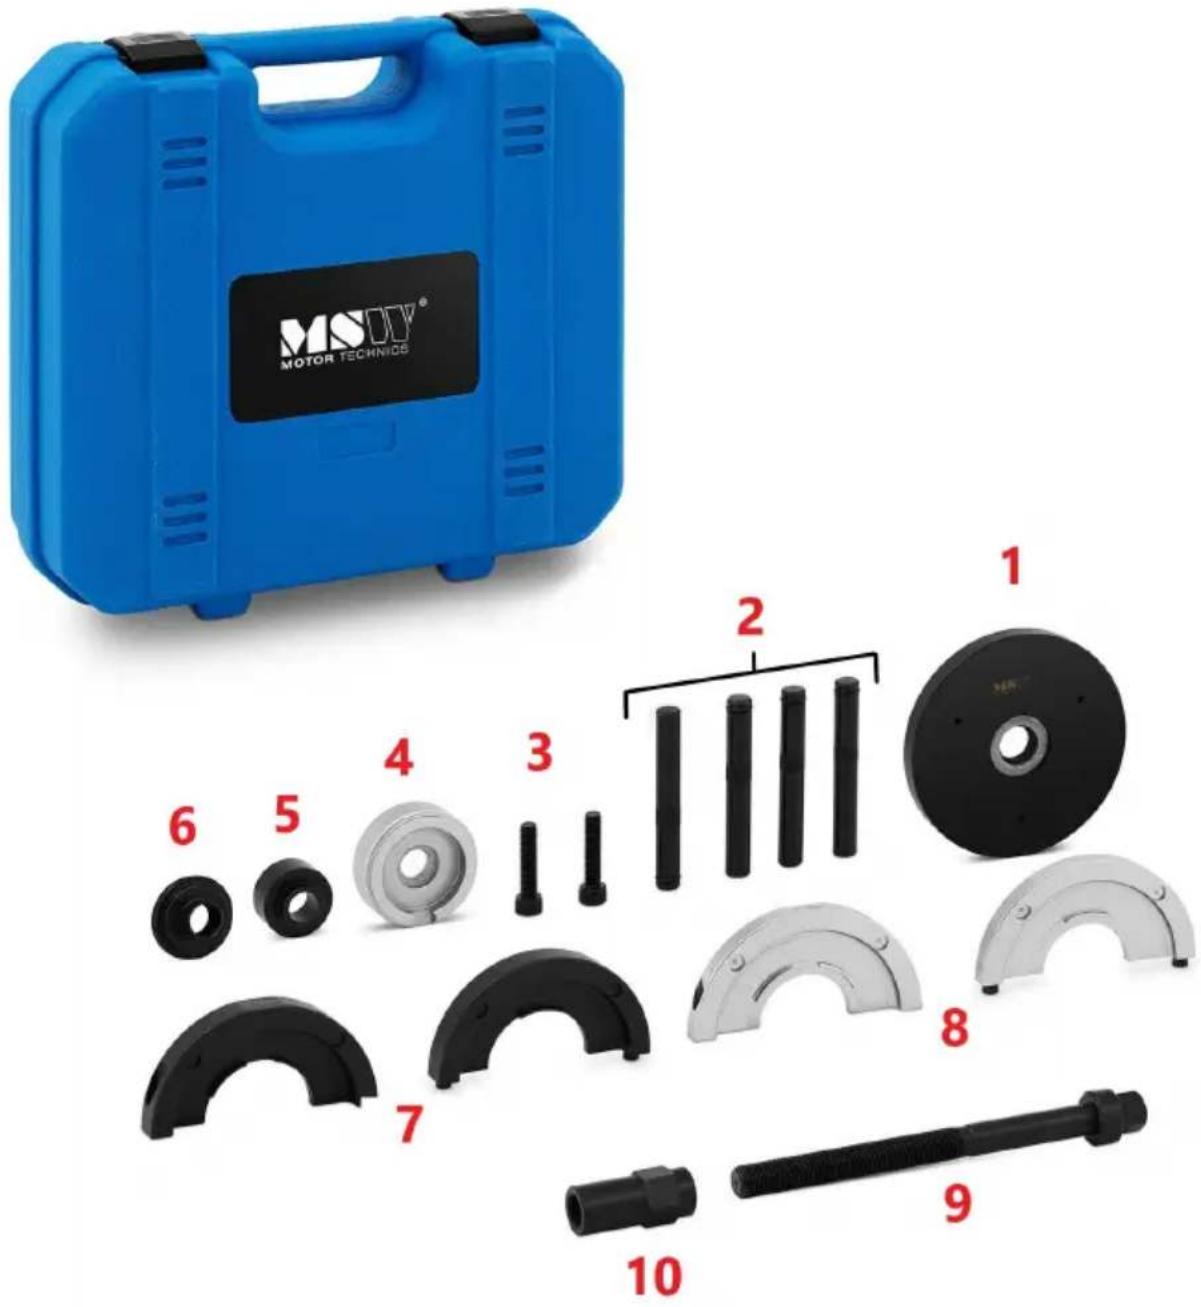
text_image
MSIY® MOTOR TECHNIOS 1 2 3 4 5 6 7 8 9 101 - Pressure plate
2 - Studs
3 - Screws for connecting the covers
4 - Clamping element for assembly (silver)
5 - Clamping element for removal (black)
6 - Pressure plate adapter
7 - Pair of removal covers (black)
8 - Pair of covers for fitting (silver)
9 - Main screw
10 - Nut
3.2. Working with the unit
CAUTION: Always refer to the vehicle manufacturer's service manual to determine how to repair vehicle components.
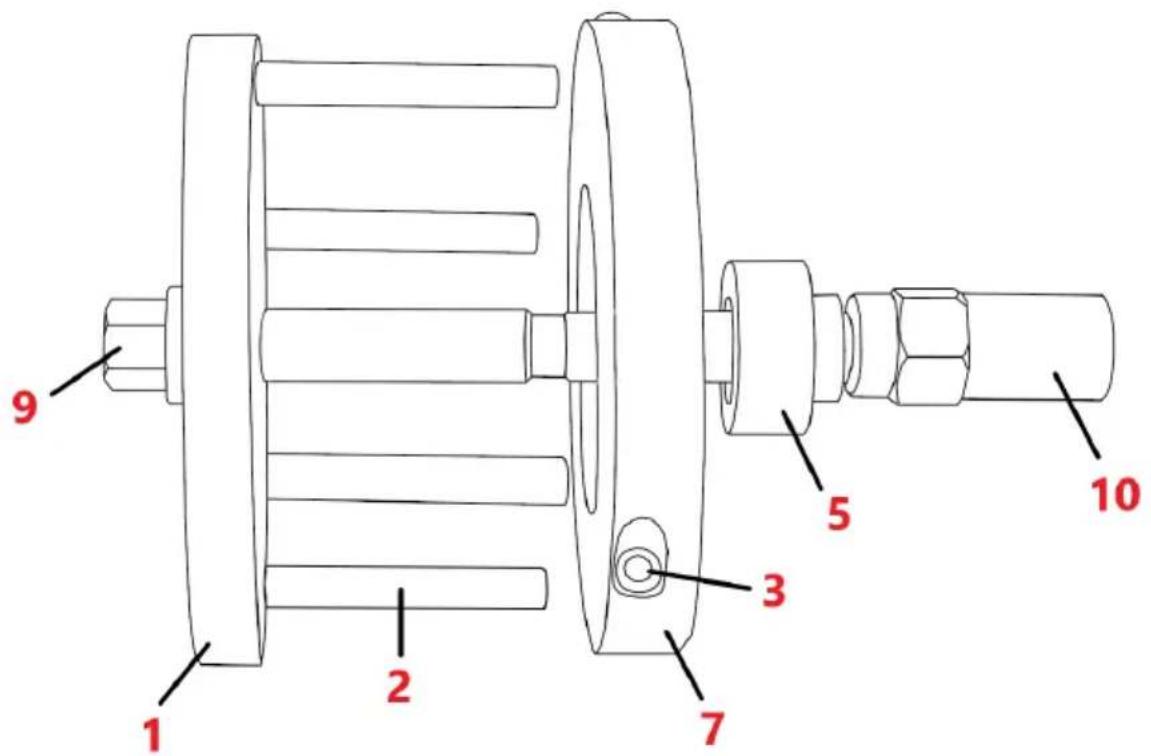
text_image
9 1 2 7 3 5 10Removing the bearing
a) Prepare the vehicle for removal of the wheel bearing. b) Install the black shield pair (7) behind the hub flange with the recessed side facing the hub bracket. Assemble the shield pair (7) with the screws (3).
c) Install the studs (2) in the pressure plate (1). Fit the pressure plate adapter (6) into the center hole of the pressure plate (1).
d) Slide the main screw (9) into the hole of the pressure plate adapter (6).
e) Lubricate the main screw (1).
f) Slide the other end of the main screw (9) into the bearing hole. Slide the pins (6) installed in the pressure plate (1) into the holes in the hub flange so that they fit over the pair of shields (7).
g) Place the black pressure piece (5) on the main screw (9) so that it rests against the bearing.
h) Thread the nut (10) onto the main screw (9) so that it rests against the pressure piece (5).
i) Grip the nut (10) and the head of the main screw (9) with suitable wrenches. Pull the bearing out of the hub holder by turning the head of the main screw.
Mounting the bearing
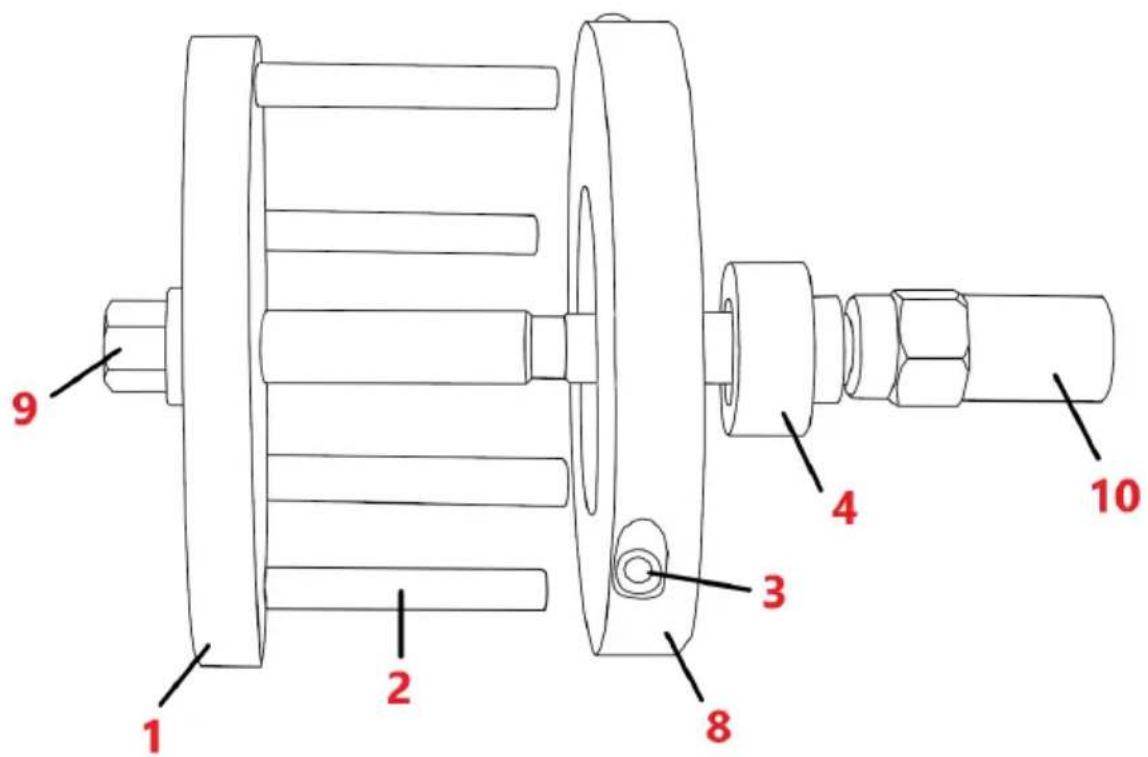
text_image
9 1 2 3 4 8 10CAUTION! Do NOT install the bearing with a damaged retaining ring.
a) Fit a silver shield pair (8) to the hub flange. Assemble the shield pair (8) with the screws (3).
b) Install the studs (2) in the pressure plate (1). Fit the pressure plate adapter (6) into the center hole of the pressure plate (1).
c) Slide the main screw (9) into the hole of the pressure plate adapter (6).
d) Lubricate the main screw (9).
e) Slide the other end of the main screw (9) into the bearing hole. Insert the dowels (6) installed in the pressure plate (1) into the holes in the hub flange so that they flush with the cover pair (7).
f) Slide the bearing and the assembled tool elements into the hub holder. Make sure that the bearing is seated perpendicular to the hub boss before mounting.
g) Position the silver colored pressure piece (4) on the main screw (9) so that it rests against the outer edge on the back of the hub holder.
h) Thread the nut (10) onto the main screw (1) so that it rests against the pressure piece (4).
i) Grip the nut (10) and head of the main screw (9) with a suitable wrench. Slide the bearing into the hub boss by turning the head of the main stud.
j) When the bearing is correctly mounted, the retaining ring engages in the retaining groove.
3.3. Cleaning and maintenance
a) Use only non-corrosive cleaning agents for cleaning the surfaces.
b) After each cleaning, all the parts should be dried well before the unit is used again.
c) Store the unit in a dry and cool place protected from moisture and direct sunlight.
d) Perform regular inspections of the unit checking technical fitness and any damages.
e) Use a soft cloth for cleaning.
Dane techniczne
1 Product Name: O Ring Assortment
2 Model: MSW-CA-I47
3 Production Year:
4 Serial No.:
OUR CUSTOMERS' SATISFACTION IS OUR MAIN GOAL! PLEASE CONTACT US WITH QUESTIONS AT:
NASZYM GŁÓWNYM CELEM JEST SATYSFAKCJA KLIENTÓW W PRZYPADKU PYTAŃ PROSIMY O KONTAKT Z PRZEDSTAWICIELEM W DANYM KRAJU:
NAŠÍM HLAVNÍM CÍLEM JE SPOKOJENOST NAŠICH ZÁKAZNÍKŮ! V PŘÍPADĚ OTÁZEK NÁS PROSÍM KONTAKTUJTE NA:
NOTRE BUT PREMIER EST VOTRE SATISFACTION! POUR TOUTE QUESTION, CONTACTEZ NOUS SUR: