ES-1000 - Paint spray MSW - Free user manual and instructions
Find the device manual for free ES-1000 MSW in PDF.

| Product type | Electric paint sprayer |
| Brand | MSW |
| Model | ES-1000 |
| Supply voltage | 230 V~ / 50 Hz |
| Rated power | 800 W |
| Rated current | 3.25 A |
| Dimensions (L x W x H) | 300 x 280 x 300 mm |
| Weight | 2.8 kg |
| Tank capacity | 1000 ml |
| Spray nozzle size | 1.2 mm / 1.0 mm |
| Operating air pressure | 0.1 - 1 bar |
| Max flow rate | 230 - 270 ml/min |
| Speed under load | 28,500 rpm |
| Sound level | 97 dB(A) |
| Electrical insulation class | II (double insulation) |
| Usage | Domestic |
| Applicable materials | Dispersion paints, oil-based paints, stains, varnishes, impregnations |
| Main functions | Paint/varnish spraying, flow adjustment, interchangeable nozzles |
| Required protective equipment | Hearing protection, safety glasses, gloves, respiratory protection, overalls |
| Maintenance and cleaning | Clean immediately after use with solvent, do not immerse, dry completely |
| Included accessories | Viscosity cup, nozzles, shoulder strap, stand |
Frequently Asked Questions - ES-1000 MSW
User questions about ES-1000 MSW
0 question about this device. Answer the ones you know or ask your own.
Ask a new question about this device
Download the instructions for your Paint spray in PDF format for free! Find your manual ES-1000 - MSW and take your electronic device back in hand. On this page are published all the documents necessary for the use of your device. ES-1000 by MSW.
USER MANUAL ES-1000 MSW
PRODUKNAME FARBSPRUHSYSTEM
PRODUCT NAME ELECTRIC PAINT SPRAYER
NAZWA PRODUKTU SYSTEM NATRYSKOWY DO MALOWANIA
NAZEV VYROBKU SYSTÉM STRÍKÁN BAREV
NOM DU PRODUIT PULVERISATEUR DE PEINTURE ELECTRIQUE
NOME DEL PRODOTTO SISTEMA PER VERNICIATURA A SPRUZZO
NOMBRE DEL PRODUCTO SISTEMA DE PULVERIZACION DE PINTURA
MODELL
PRODUCT MODEL
MODEL PRODUKTU
MODEL VYROBKU
MODELE
MODELLO
MODELO
IMPORTTEUR
IMPORTER
IMPORTER
DOVOZCE
IMPORTATEUR
IMPORTATORE
IMPORTADOR
EXPONDO POLSKA SP, Z O.O. SP, K.
UL. NOWY KISIELIN-INNOWACYJNA 7, 66002 ZIELONA GORA | POLAND, EU
Technische Daten
1. General Description
The instruction manual is intended to assist in safe and reliable use. The product is designed and manufactured strictly according to technical specifications using the latest technology and components and maintaining the highest quality standards.
PLEASE CAREFULLY READ AND UNDERSTAND THIS INSTRUCTION MANUAL BEFORE OPERATION,
To ensure long and reliable operation of the device, make sure to operate and maintain it properly in accordance with the guidelines in this instruction manual. The technical data and specifications contained in this instruction manual are up to date.
The manufacturer reserves the right to make changes in order to improve the quality. Taking the technical progress and the possibility of reducing noise into account, the
appliance is designed and built in such a way so that risks resulting from noise emissions are reduced to the lowest possible level.
Explanation of symbols
| CE | The product complies with applicable safety standards. |
| Please read the instruction manual before use. | |
| Recyclable product. | |
| CAUTION! or WARNING! or REMINDER! describing a situation. (general warning sign). | |
| Wear ear protection. Exposure to noise may cause hearing loss. | |
| Wear protective goggles. | |
| Wear protective gloves. | |
| Use respiratory protection. | |
| Wear a protective suit. | |
| CAUTION! Warning of electric shock! | |
| CAUTION! Danger of fire - flammable material! | |
| Warning against poisoning by toxic substances! |

Safety class II equipment with double insulation.

The original instruction manual is in the German language version. Other language versions are translations from German.
2. Safety of use
CAUTION! Read all safety warnings and all instructions. Failure to follow the warnings and instructions may result in electric shock, fire and/or severe personal injury or death.
The term "appliance" or "product" in the warnings and in the description of the instructions refers to the ELECTRIC PAINT SPRAYER.
1.1. Electrical safety
a) The plug of this device must fit into the outlet. Do not modify the plug in any way. Original plugs and matching outlets reduce the risk of electric shock.
b) Avoid touching grounded parts, such as pipes, heaters, ovens, and refrigerators. There is an increased risk of electric shock if your body is grounded and touches the device exposed to direct rain, wet pavement, and operation in a humid environment.
If water enters the device, there is an increased risk of damage to the device and electric shock.
c) Do not touch the device with wet or damp hands.
d) Do not use the cord in an unintended manner. Never use it to carry the device or to pull the plug out of the socket.
Keep the cord away from heat sources, oil, sharp edges or moving parts.
Damaged or tangled cords increase the risk of electric shock.
e) When operating the device outdoors, use an extension cord designed for outdoor use.
Using an extension cord designed for outdoor use reduces the risk of electric shock.
f) Do not use the device if the power cord is damaged or shows signs of wear.
A damaged power cord should be replaced by a qualified electrician or the manufacturer's service department.
g) To avoid electric shock, do not immerse the cable, plug, or device itself in water or other liquid.
Do not use the device on wet surfaces.
h) CAUTION - THREAT TO LIFE! When cleaning or using the device, never immerse it in water or other liquids.
i) Do not use the device in rooms with very high humidity / in the immediate vicinity of water tanks!
j) Do not allow the device to get wet. Risk of electric shock!
1.2. Safety in the workplace
a) Keep the work area tidy and well lit.
Disorder or poor lighting can lead to accidents. Be foresighted, watch what
you are doing and use common sense when using the device.
b) Do not use the device in an explosive area, for example in the presence of flammable liquids, gases or dust.
The device produces sparks that can ignite dust or fumes.
c) If you have any doubts as to whether the product is working properly or if it is damaged, contact the manufacturer's service department.
d) Only the manufacturer's service department can repair the device.
Do not carry out repairs yourself!
e) In case of open flames or fire, use only dry powder or snow (CO2) fire extinguishers to extinguish the live equipment.
f) No children or unauthorized persons are allowed in the work area. (Inattention may result in loss of control of the device.)
g) Use the device in a well-ventilated area.
h) Connecting and disconnecting the pressure line should be done with the air valve closed.
i) Do not cut off the compressed air supply by crushing or kinking the pressure hoses.
j) Check the condition of the safety stickers regularly.
Replace them if they are illegible.
k) Keep these instructions for use for future reference. If the device is to be passed on to a third party, the operating instructions must also be handed over together with the device.
I) Keep the packaging and small assembly parts out of the reach of children.
m) Keep the device away from children and animals.
n) When using this device together with other devices, also follow the other instructions for use.
Please note! Keep children and other bystanders safe while operating the device.
1.3. Personal safety
a) Do not operate this product if you are tired, ill or under the influence of alcohol, drugs or medication that could impair your ability to operate the product.
b) Use caution and common sense when operating this device.
A moment's inattention during operation may result in serious personal injury.
c) Use personal protective equipment as required when operating the device as specified in Section 1 of the explanation of symbols.
The use of appropriate, approved personal protective equipment reduces the risk of injury.
d) To prevent accidental start-up, make sure the switch is in the off position before connecting to a power source.
e) Do not overestimate your capabilities. Maintain body balance and equilibrium at all times during operation. This allows for better control of the machine in unexpected situations.
f) Do not wear loose clothing or jewelry. Keep hair, clothing, and gloves away from moving parts. Loose clothing, jewelry, or long hair can be caught in moving parts.
g) Eye, ear, and respiratory protection is recommended.
h) The device is not a toy. Children should be watched to ensure that they do not play with the device.
Pointing the gun at yourself, other people or animals is prohibited.
1.4. Safe use of the device
a) Do not overload the device. Use tools that are suitable for the application.
A correctly selected device will do a better and safer job for which it was designed.
b) Do not use the device if the ON/OFF switch does not function properly (does not turn on and off). Devices that cannot be controlled by the switch are unsafe, cannot operate, and must be repaired.
c) Unplug the device before making adjustments, changing accessories, or putting it away. This precaution reduces the risk of accidental start-up.
d) Keep unused equipment out of the reach of children and out of the reach of anyone unfamiliar with the device or this instruction manual.
These devices is dangerous in the hands of inexperienced users.
e) Keep the device in good working condition. Check before each use for general damage or damage to moving parts (cracks in parts and components or any other condition that may affect the safe operation of the device).
If damaged, have the device repaired before use.
f) Keep the device out of the reach of children.
g) To ensure the designed operational integrity of the device, do not remove factory-installed covers or loosen screws.
h) When transporting or moving the device from storage to the place of use, observe the health and safety rules for manual handling applicable in the country where the device is used.
i) Avoid situations in which the device stops under heavy loads during operation. This can cause overheating of the drive elements and consequent damage to the equipment.
j) Do not leave the device switched on unattended.
k) Clean the device regularly to prevent permanent dirt build-up.
I) Do not process two workpieces at the same time.
m) Before each use, make sure that the nozzle is properly mounted in the machine and that the hose is properly attached and undamaged.
n) Do not carry or hang the device by the pressure hose.
o) Do not obstruct the air inlet or outlet.
p) The device is not a toy. Cleaning and maintenance must not be performed by children without adult supervision.
q) Do not tamper with the device to alter its performance or design.
r) Keep the device away from sources of fire and heat.
s) Do not overload the device.
t) Do not block the ventilation openings of the device!
u) Do not point the paint jet in the direction of air blowing/circulating sources.

3. Rules of use
The device is used for spraying paint and is intended for painting/varnishing various objects or surfaces by spraying.
The product is intended for home use only!
The user is responsible for any damage resulting from misuse.
3.1.Description
MSW-ES-700
- Gun body
- Nozzle seal
- Paint nozzle
- Isolating ring
- Air nozzle
- Retaining knob
- Container fixing gasket
- Suction tube
- Container
- Firing pin gaskets
- Firing pin fixing bolt
-
Trigger stop
-
Trigger
- Firing pin
- Spring
- Adjustment screw
- Outer cap
- Inner cap
- Hose coupling
- Air pump
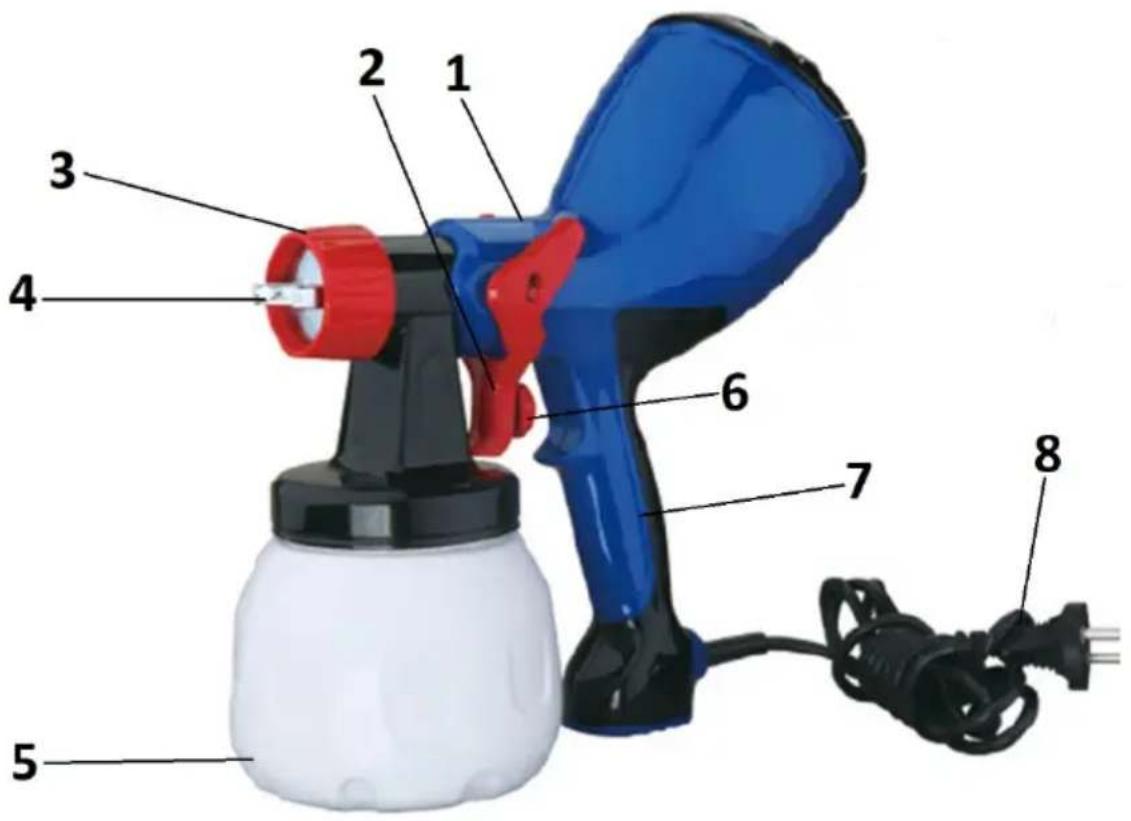
MSW-ES-700M
- Casing
- Trigger
- Retaining knob
- Nozzles
- Container
- Adjustment knob
- Handle
- Power cord
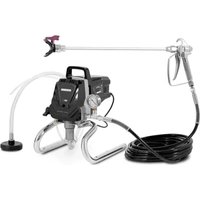
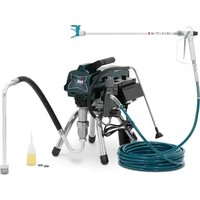
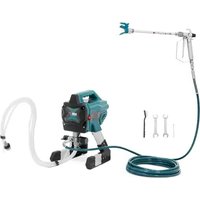
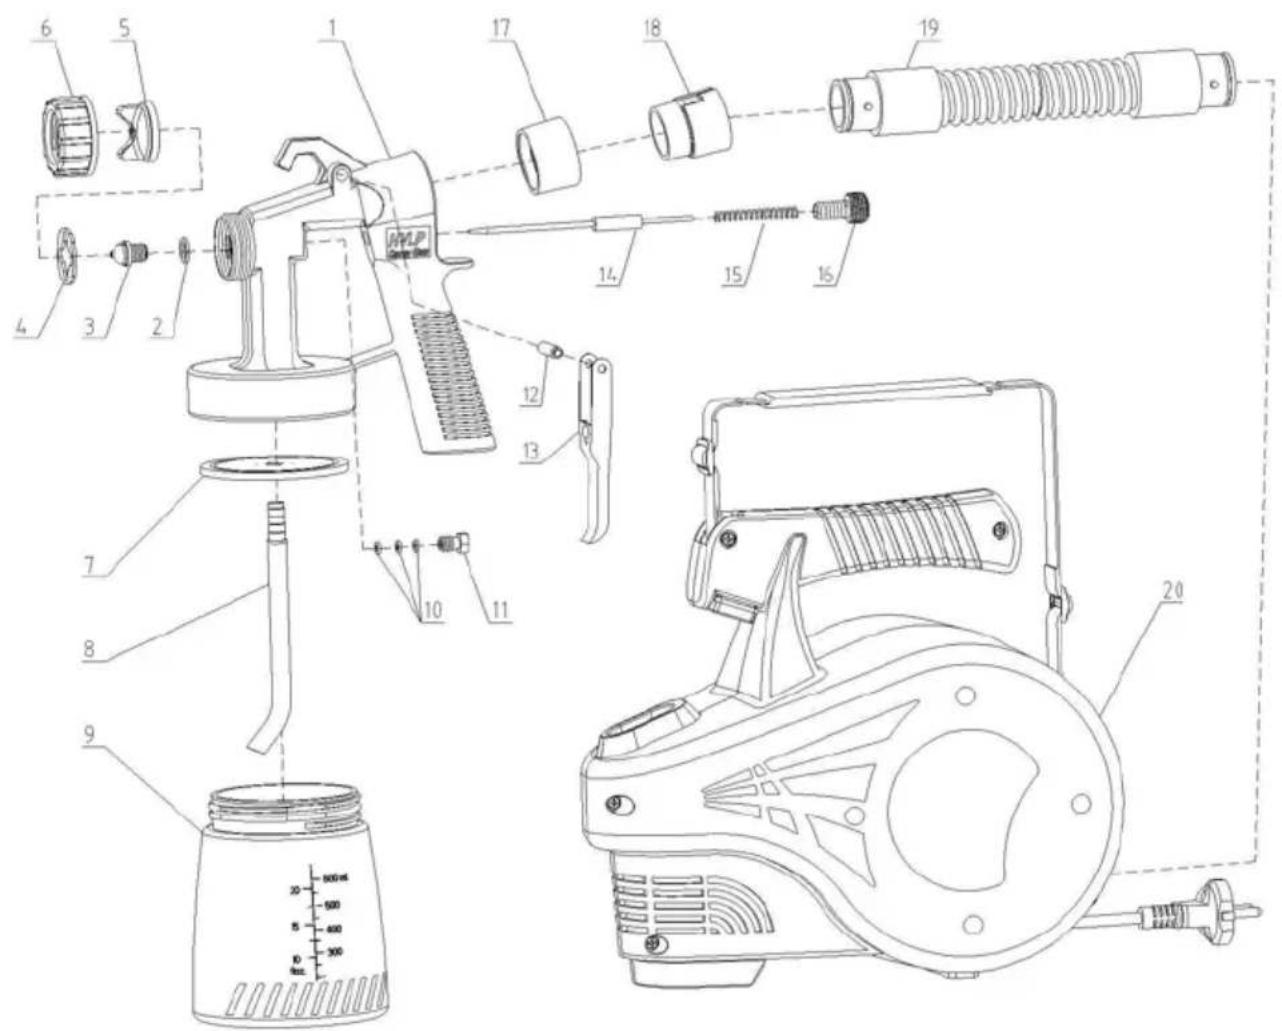
MSW-ES-1000
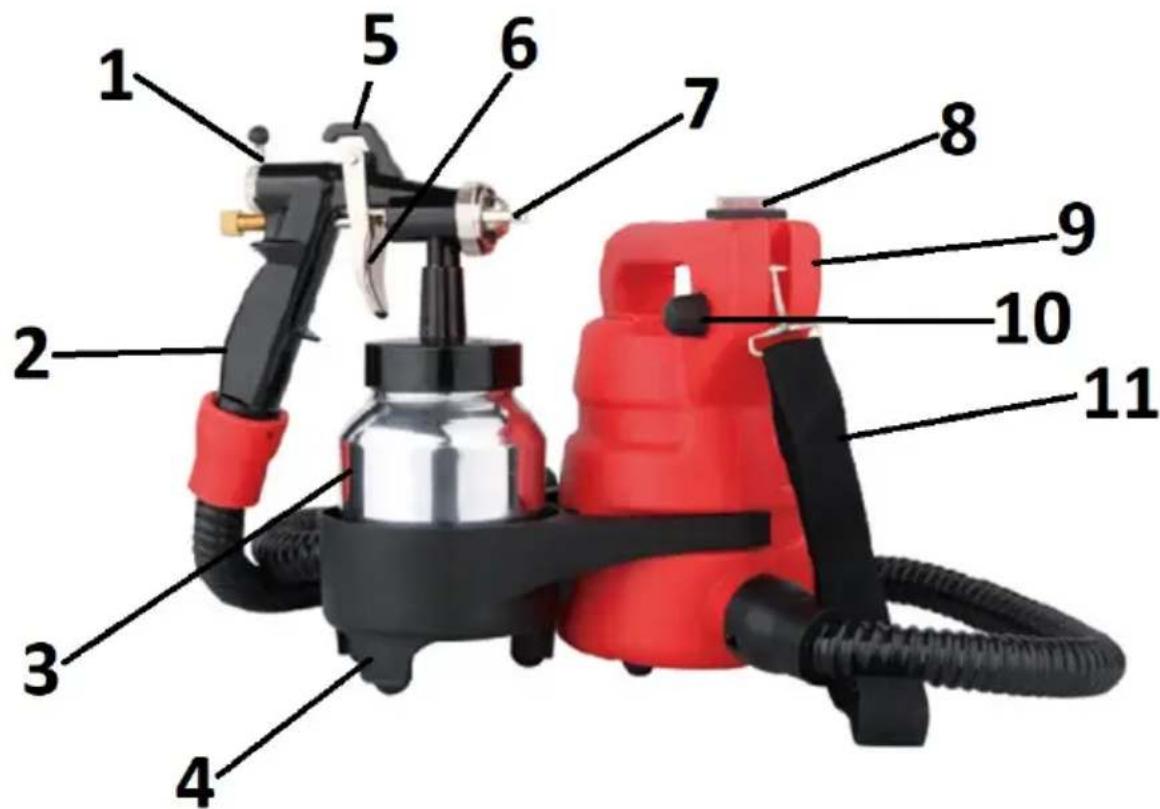
- Air regulator
- Handle
- Container
- Handle
- Hanger
- Trigger
- Nozzles
- Power switch
- Air pump
- Power control knob
- Shoulder strap
3.2. Preparation for operation
LOCATION OF THE DEVICE
The ambient temperature must not exceed 40^ and humidity should not exceed 85% . Place the device in a way that ensures good air circulation. Always keep the device out of reach of children and persons with reduced mental, sensory or intellectual functions.
Place the device in such a way that the mains plug can be reached at any time.
Ensure that the power supply to the appliance corresponds to that specified on the identification plate!
Do not block the air outlet of the device.
ASSEMBLY OF THE DEVICE
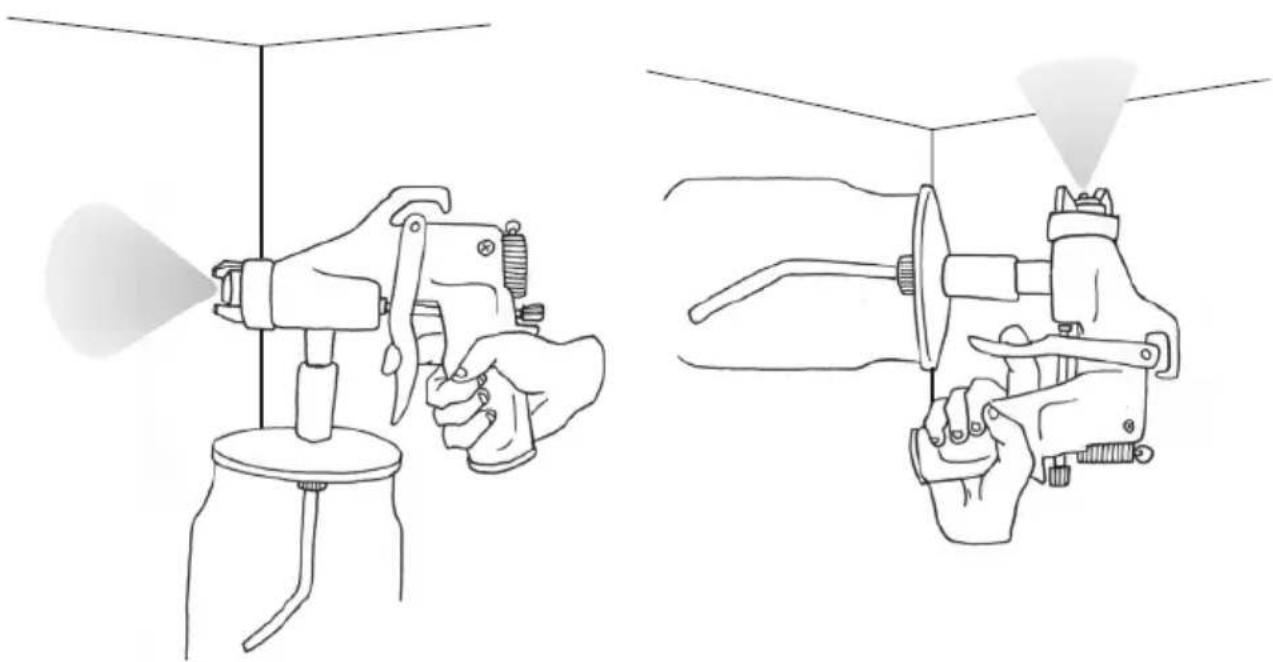
ATTENTION: if you intend to paint ceilings and similar surfaces that are horizontal or nearly horizontal from the bottom, before filling the container, use a wrench to set the suction pipe with its tip curved roughly towards the side, which after tilting the gun will temporarily be the bottom of the container.
This will enable trouble-free suctioning of paint in this position.
MSW-ES-700
Fill the container with the appropriate paint/paint and screw it back to the gun.
Connect the air hose from the pump to the gun.
Connect the plug to the power socket. Set the required amount of sprayed material with the adjusting screw - by turning it clockwise the amount decreases, and by turning it counterclockwise the amount increases.
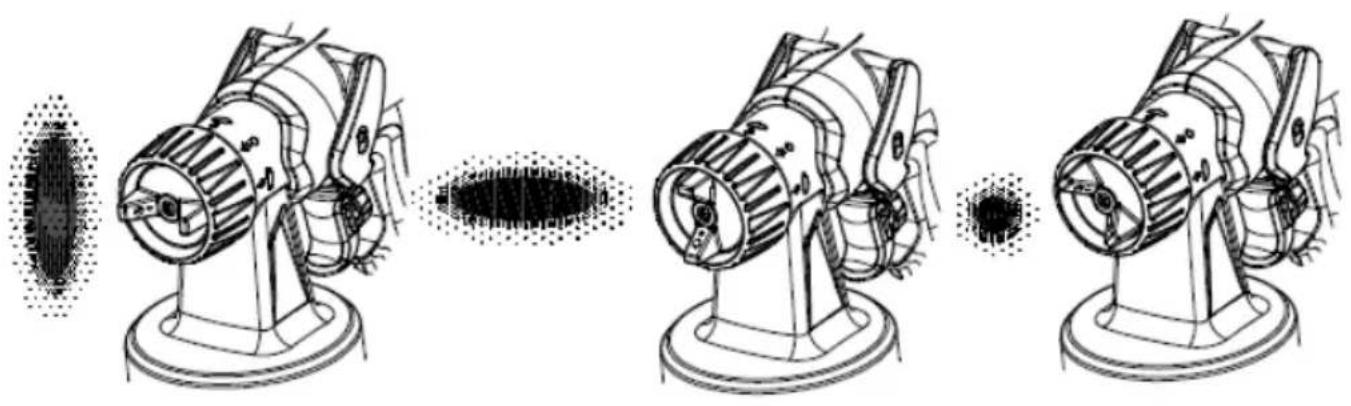
Adjust the nozzle angle position according to the desired spray pattern (see image below).
MSW-ES-700M
Fill the container with the appropriate paint/paint and screw it back to the gun. Adjust the power and angle of the nozzle.
MSW-ES-1000
Fill the container with the appropriate paint/paint and screw it back to the gun. Connect the air hose between the pump and the gun. Set the required amount of sprayed material with the adjusting screw - by turning it clockwise the amount decreases, and by turning it counterclockwise the amount increases. Adjust the nozzle angle position according to the desired spray pattern (see image below). Before painting/varnishing, press the power switch until it lights up.
3.3. Working with the device
3.3.1 Proper paint viscosity
Keep in mind that this is a multi-purpose device, i.e. you can apply dispersion paints (acrylic, latex), oil paints, as well as stains, varnishes, lacquers, stain varnish, impregnates, etc., so to achieve the best possible result, consider the paint viscosity before application.
Some paints require dilution. For this purpose, using the supplied special funnel - viscosity meter - is recommended.
The time needed for the paint to flow completely from the viscosity
meter will indicate the viscosity of the paint. A low viscosity means liquid paint, while a high viscosity means thick paint. For some paints, the viscosity can be set at 18 ± 2 seconds, while for oil paints it should be 40-60 seconds.
For MSW-ES-1000, the recommended viscosity is: Wood painting, selected varnishes - 30/40 seconds Waterborne paints - 30-60 seconds Solvent-based paints - 40-60 seconds Varnishes - 40-50 seconds
Wood stains, selected varnishes - no dilution required.
It should also be taken into account that sometimes some surfaces require additional treatment such as sanding and/or degreasing before painting/varnishing for better coverage.
Before actually painting/varnishing a surface, it is a good idea to conduct a test on a piece of cardboard to make sure that the settings are satisfactory.
3.3.2 Basics of correct painting/varnishing
When painting, keep a steady distance between the gun perpendicular the surface to be painted / varnished at a maximum of 20 cm (see the picture below).
If the distance is too close, too much paint may appear in the middle of the surface to be painted (e.g. risk of streaking), and if the distance is too long, the painted surface will not cover properly.
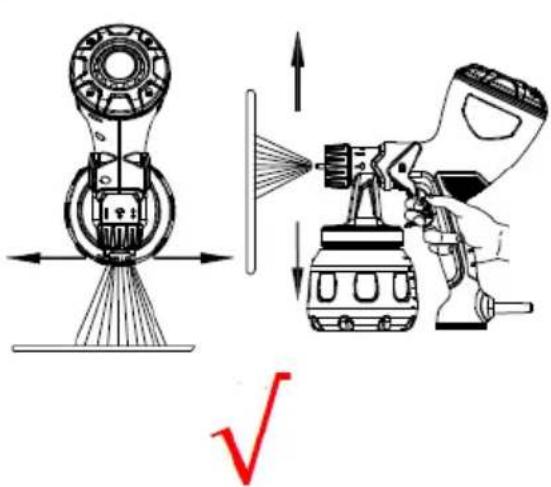
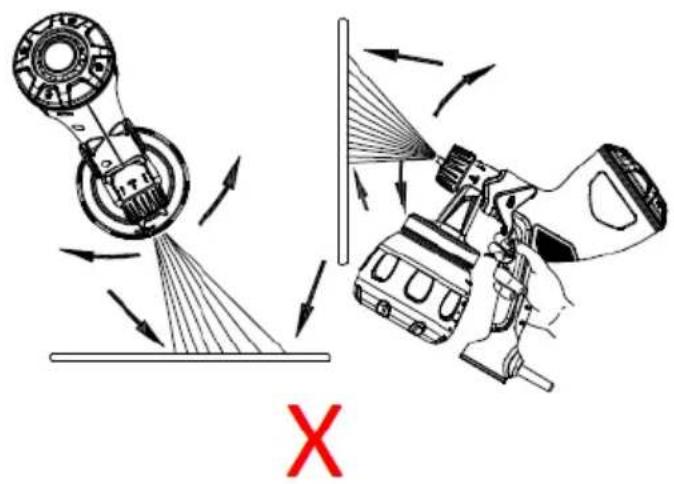
When starting painting/varnishing, first start moving the gun perpendicularly to the surface to be painted, and after a short moment press and hold the trigger, maintaining a smooth, steady arm movement (not your hand!) even a moment after releasing the trigger. The correct course of the paint application phase is illustrated in the diagram below:
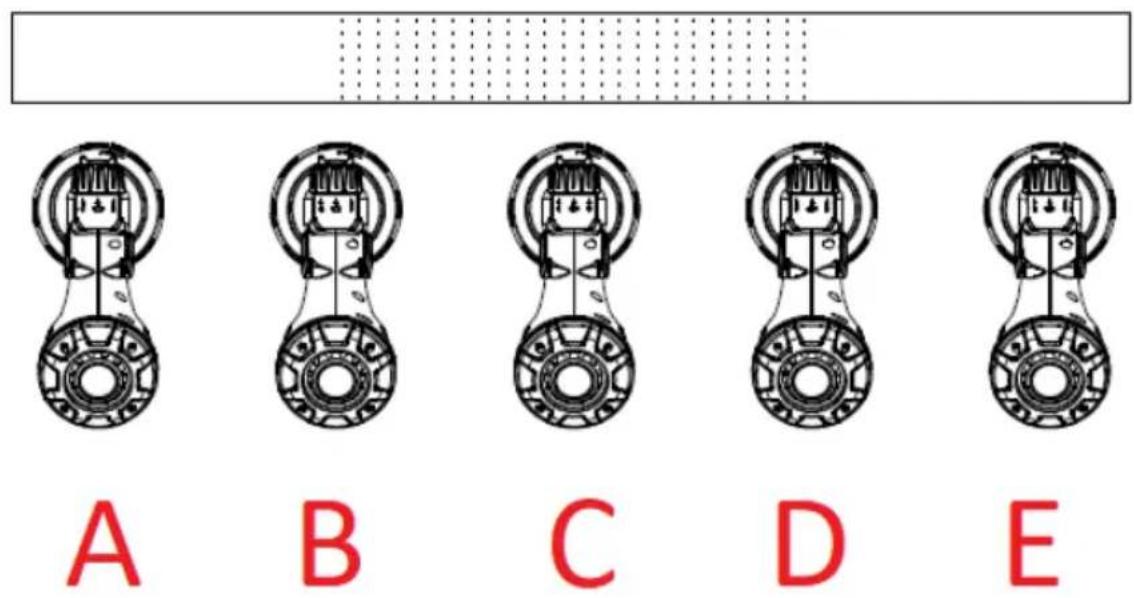
A. Starting to move the gun
B. Pressing and holding the trigger
C. Smooth uniform movement
D. Release the trigger
E. Finishing the paint/varnish application phase
If you need to apply another layer of paint, apply it in the opposite plane - on the grid principle - by adjusting the paint nozzle accordingly (see picture at the end of "Assembling the machine"):

3.3.3 Troubleshooting
NOTE: Some troubleshooting tips may only apply to a specific model!
E.g. model MSW-ES-1000 has a power adjustment knob which can be used to adjust the spray to the paint and its coating, without having to stop and dilute or thicken the paint itself.
| Shape of the paint trace/jet | Possible cause Action | |
| Wider at one end/more paint, narrower at the other/less paint | 1. Paint builds up on the outlet nozzle and/or air nozzle. 2. Paint nozzle incorrectly mounted. | 1. Remove debris or replace if damaged. 2. Remove paint nozzle and clean its fixing or seat. |
| Intermittent, fluttering | 1. Air enters between the paint nozzle and the conical seat of the body of the gun. 2. Air enters through the paint suction tube from the container. 3. Air enters through the connection between the container and the gun. | 1. Clean the paint nozzle seat - if damaged, replace the nozzle. 2. Tighten the paint suction tube. 3. Tighten/repair the seal on the connection between container and gun. |
| Too much paint in the middle | 1. Paint viscosity too high. 2. Paint flow set too low. | 1. Thin the paint. 2. Increase paint throughput with the knob. |
| Shaped like a cone | Paint collects on the air nozzles partially blocking them, so that the air flow is different on each nozzle. | Remove the paint from the nozzles, but do not use any metal objects to clean the nozzle openings. |
| Split | 1. Paint viscosity too low. 2. Paint viscosity set too high. | 1. Add ink to the container to increase its viscosity. 2. Turn the knob to reduce the ink throughput. |
3.4. Cleaning and maintenance
a) Pull out the mains plug before each cleaning and when the device is not in use.
b) Use only non-corrosive cleaning agents for cleaning the surfaces.
c) After each cleaning, all the parts should be dried well before the device is used again.
d) Store the device in a dry and cool place protected from moisture and direct sunlight.
e) Do not spray the device with a stream of water or immerse it in water.
f) Make sure that no water enters through the ventilation openings in the housing.
g) Clean the ventilation openings with a brush and compressed air.
h) Use a soft cloth for cleaning.
i) The device (gun + container) should be cleaned immediately after each use, not allowing the paint/paint to dry.
Empty the residue and thoroughly rinse the container with solvent, then pour some fresh solvent into it, connect to the gun and press the trigger several times to rinse the gun from the inside.
Wipe the gun from the outside with a soft cloth soaked in solvent.
Disassemble the nozzle's metal parts and rinse them in clean solvent.
Repeat the operation if necessary until the device is fully cleaned.
Dane techniczne
APPARATETS PLACERING
For the disposal of the device please consider and act according to the national and local rules and regulations.
CONTACT
expondo Polska sp. z o.o. sp. k.