
RCSL 1/6A - Ice machine Royal Catering - Free user manual and instructions
Find the device manual for free RCSL 1/6A Royal Catering in PDF.

| Product Type | Slush Machine |
| Model | RCSL 1/6A (single cylinder) |
| Brand | Royal Catering |
| Tank Capacity | 6 L |
| Dimensions (L x W x H) | 46 x 19 x 60 cm |
| Weight | 15 kg |
| Power Supply | 230 V ~ / 50 Hz |
| Rated Power | 320 W |
| Refrigerant | R290 (flammable) |
| Cooling Temperature Range | -2 °C to 10 °C |
| Service Cycle Time | 8 to 16 hours |
| Functions | Cooling, mixing, cleaning, speed adjustment (1-10) |
| Display | Digital display with alarm codes |
| Tank Material | Stainless steel (estimate) |
| Safety | Low speed protection, automatic shutdown in case of alarm, double insulation |
| Maintenance | Regular cleaning of tanks, stirrers, and nozzles; easy disassembly |
| Spare Parts | Available: seals, stirrers, tanks, valves, etc. |
| Repairability | Repair by qualified professional; accessible circuit |
| Use | Slushies, iced coffees, frozen yogurts, iced alcoholic beverages |
| Noise Level | Designed to reduce noise (not precisely specified) |
Frequently Asked Questions - RCSL 1/6A Royal Catering
User questions about RCSL 1/6A Royal Catering
0 question about this device. Answer the ones you know or ask your own.
Ask a new question about this device
Download the instructions for your Ice machine in PDF format for free! Find your manual RCSL 1/6A - Royal Catering and take your electronic device back in hand. On this page are published all the documents necessary for the use of your device. RCSL 1/6A by Royal Catering.
USER MANUAL RCSL 1/6A Royal Catering
This user manual has been translated for your convenience using machine translation. Reasonable efforts have been made to ensure accurate translation; however, no automated translation is perfect, nor is it intended to replace human translators. The official user manual is in English. Any discrepancies or differences arising in translation are not binding and have no legal effect for compliance or enforcement purposes. If any questions arise regarding the accuracy of the information contained in the user manual, please refer to the English version of this content, which is the official version.
Technical data
| Parameter description | Parameter value | |
| Product name | SLUSH MACHINE | |
| Model | RCSL 1/6A | RCSL 2/6A |
| Supply voltage [V~] / frequency [Hz] | 230/50 | 230/50 |
| Rated power [W] | 320 | 500 |
| Refrigerant | R290 | R290 |
| Cooling temperature [°C] | -2 - 10 | -2 - 10 |
| Duty cycle time [h] | 8 - 16 | 8 - 16 |
| Number of tanks | 1 | 2 |
| Capacity [l] | 6 | 2x6 |
| Dimensions [width x depth x height; mm] | 46 x 19 x 60 | 45 x 39 x 61 |
| Weight [kg] | 15 | 32 |
1. Overall description
The manual is intended to assist in safe and reliable use. The product is designed and manufactured strictly according to technical specifications, using the latest technologies and components and maintaining the highest quality standards.
BEFORE STARTING WORK, PLEASE READ AND UNDERSTAND THIS INSTRUCTION CAREFULLY.
To ensure long and reliable operation of the device, ensure its proper operation and maintenance in accordance with the instructions contained in this manual. The technical data and specifications contained in this manual are current. The manufacturer reserves the right to make changes to improve quality. Taking into account technical progress and the possibility of reducing noise, the device was designed and built in such a way as to reduce the risk resulting from noise emissions to the lowest level.
Explanation of symbols

The product meets the requirements of relevant safety standards.

Please read the instructions before use.
Recyclable product.

ATTENTION! or WARNING! or REMEMBER! A general warning sign describing a given situation.
ATTENTION! Warning against electric shock!
ATTENTION! Swirling elements!

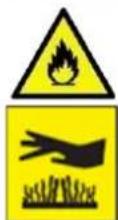
ATTENTION! Fire hazard - flammable materials!

Attention! Hot surface may cause burns!
For indoor use only.

ATTENTION! The illustrations in this user manual are for illustration purposes only and may differ in some details from the actual appearance of the product.
2. Safety of use a

ATTENTION! Read all safety warnings and all instructions. Failure to follow warnings and instructions may result in electric shock, fire and/or serious injury or death.
The term "device" or "product" in warnings and instructions refers to: SLUSH MACHINE
2.1. Electrical safety
a) The device plug must fit into the socket. Do not modify the plugin in any way. Original plugs and matching sockets reduce the risk of electric shock.
b) Avoid touching grounded items such as pipes, radiators, stoves and refrigerators. There is an increased risk of electric shock if your body is grounded and touches equipment exposed to direct rain, wet surfaces, and operation in a humid environment. Water entering the device increases the risk of damage and electric shock.
c) Do not use the cable improperly. Never use it to carry the appliance or to remove the plug from the socket. Keep the cord away from heat, oil, sharp edges or moving parts. Damaged or tangled cords increase the risk of electric shock.
d) It is prohibited to use the device if the power cord is damaged or shows obvious signs of wear. A damaged power cord should be replaced by a qualified electrician or the manufacturer's service center.
e) To avoid electric shock, do not immerse the cable, plug or appliance in water or any other liquid. Do not use the device on wet surfaces.
f) ATTENTION - DANGER TO LIFE! When cleaning or using the device, never immerse it in water or other liquids.
g) Do not use the device in rooms with very high humidity / in the immediate vicinity of water tanks!
h) Before first use, please check whether the type of current and mains voltage correspond to the data indicated on the nameplate.
2.2. Safety in the workplace
a) Maintain order in the workplace and good lighting. Clutter or poor lighting can lead to accidents. Be proactive, watch what you are doing and use common sense when using the device.
b) If damage or irregularities in the operation of the device are detected, it should be turned off immediately and reported to an authorized person.
c) In the event of a fire or fire, use only powder or snow (CO2) fire extinguishers to extinguish the live device.
d) Use the device in a well-ventilated space.
e) Please check the condition of your safety stickers regularly. If the stickers are illegible, they should be replaced.
f) Keep the instructions for use for future reference. If the device is to be passed on to third parties, the instructions for use must also be provided with it.
g) Packaging elements and small assembly elements should be kept out of the reach of children.
h) Keep the device away from children and animals.
i) When using this device with other devices, please also follow the remaining instructions for use.

Remember! Protect children and other bystanders when operating the device.
2.3. Personal security
a) It is prohibited to operate the device when tired, ill, or under the influence of alcohol, drugs or medications that significantly limit the ability to operate the device.
b) The machine may be operated by physically fit people, able to operate it and properly trained, who have read this manual and have been trained in occupational health and safety.
c) Be careful and use common sense when working with the device. A moment of inattention while working may result in serious personal injury.
d) You should not overestimate your capabilities. Maintain body balance and balance at all times while working. This allows for better control of the device in unexpected situations.
e) Do not wear loose clothing or jewelry. Keep hair, clothing and gloves away from moving parts. Loose clothing, jewelry or long hair can become caught in moving parts.
f) The device is not a toy. Children should be supervised to ensure that they do not play with the device.
g) Do not put your hands or objects inside the working device!
2.4. Safe use of the device
a) Do not overload the device. Use tools appropriate for the application. A properly selected device will perform the work for which it was designed better and safer.
b) Before carrying out adjustments, cleaning and maintenance, the device must be disconnected from the power supply. This preventive measure reduces the risk of accidental start-up.
c) Unused devices should be kept out of the reach of children and people unfamiliar with the device or these operating instructions. The devices are dangerous in the hands of inexperienced users.
d) Keep the device in good technical condition. Before each work, check for general damage or damage related to moving parts (cracks in parts and elements or any other conditions that may affect the safe operation of the device). In case of damage, have the device repaired before use.
e) Keep the device out of the reach of children.
f) Repair and maintenance of devices should be performed by qualified persons using only original spare parts. This will ensure safe use.
g) To ensure the designed operational integrity of the device, do not remove factory-installed covers or loosen screws.
h) When transporting and moving the device from storage to the place of use, the occupational health and safety rules for manual transport work applicable in the country where the devices are used should be taken into account.
i) Avoid situations where the device stops under heavy load during operation. This may cause overheating of the drive elements and, consequently, damage to the device.
j) Do not touch moving parts or accessories unless the device has been disconnected from the power supply.
k) It is prohibited to move, rearrange or rotate the device while in operation.
I) The device should be cleaned regularly to prevent permanent contamination.
m) The device is not a toy. Cleaning and maintenance must not be performed by children without adult supervision.
n) Do not start the device empty.
o) It is prohibited to interfere with the structure of the device to change its parameters or structure.
p) Keep devices away from sources of fire and heat. Do not expose the device to direct sunlight.
q) Do not cover the ventilation openings of the device!
r) ATTENTION! During operation, some elements of the device heat up to high temperatures - there is a risk of burns!
s) Do not place the device upside down or tilt it at an angle greater than 45^ .
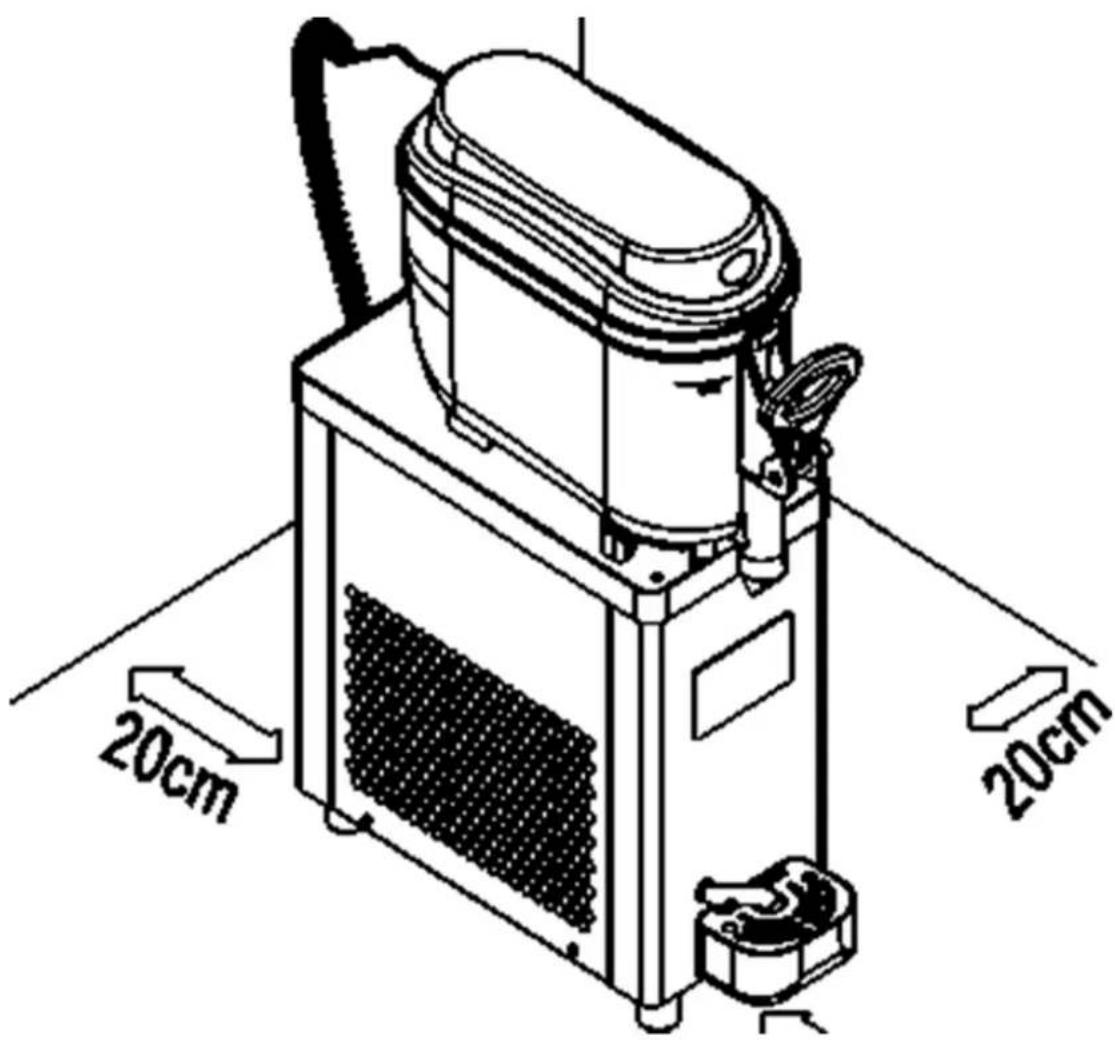
t) Keep a free space around the device (at least 20~cm on each side).
u) Do not damage the refrigerant circulation system.

ATTENTION! Even though the device has been designed to be safe, has appropriate protective measures, and despite the use of additional user safety features, there is still a small risk of accident or injury while working with the device. It is recommended to exercise caution and common sense when using it.
3. Terms of Use
The machine is designed to produce granita and cold drinks, such as iced coffee, frozen cappuccino, frozen yogurt, and frozen alcoholic beverages.
The user is responsible for any damage resulting from improper use.
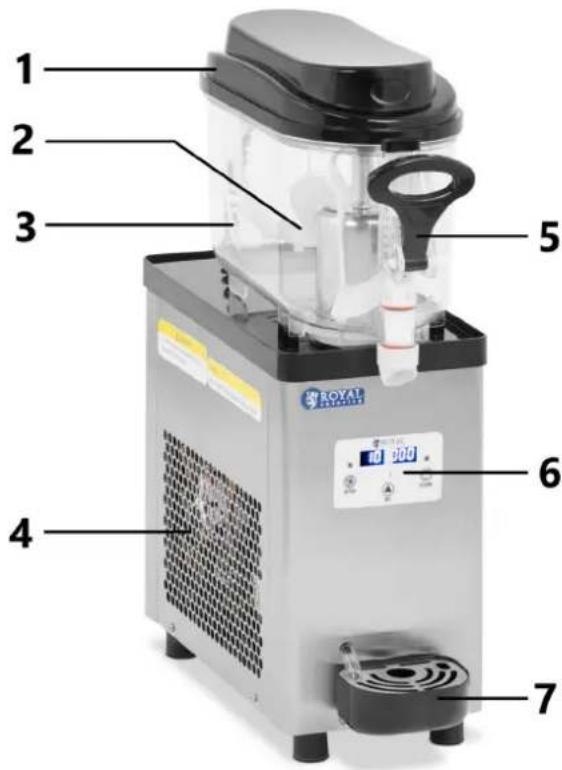
3.1. Description of the device
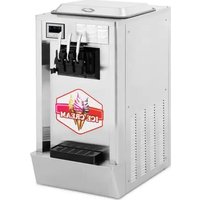
RCSL 1/6A
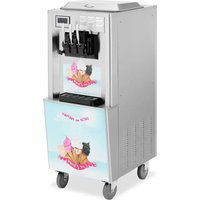
RCSL 2/6A
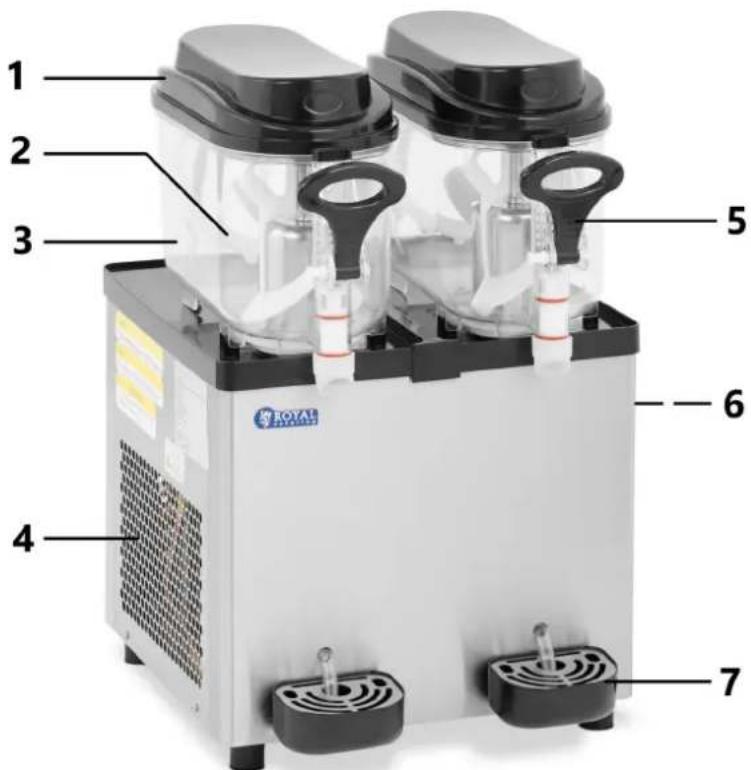
1 - Tank cover
2 - Stirrer
3-Tank
4 - Vents
5 - Dispenser lever
6 - Control panel
7 - Drip tray
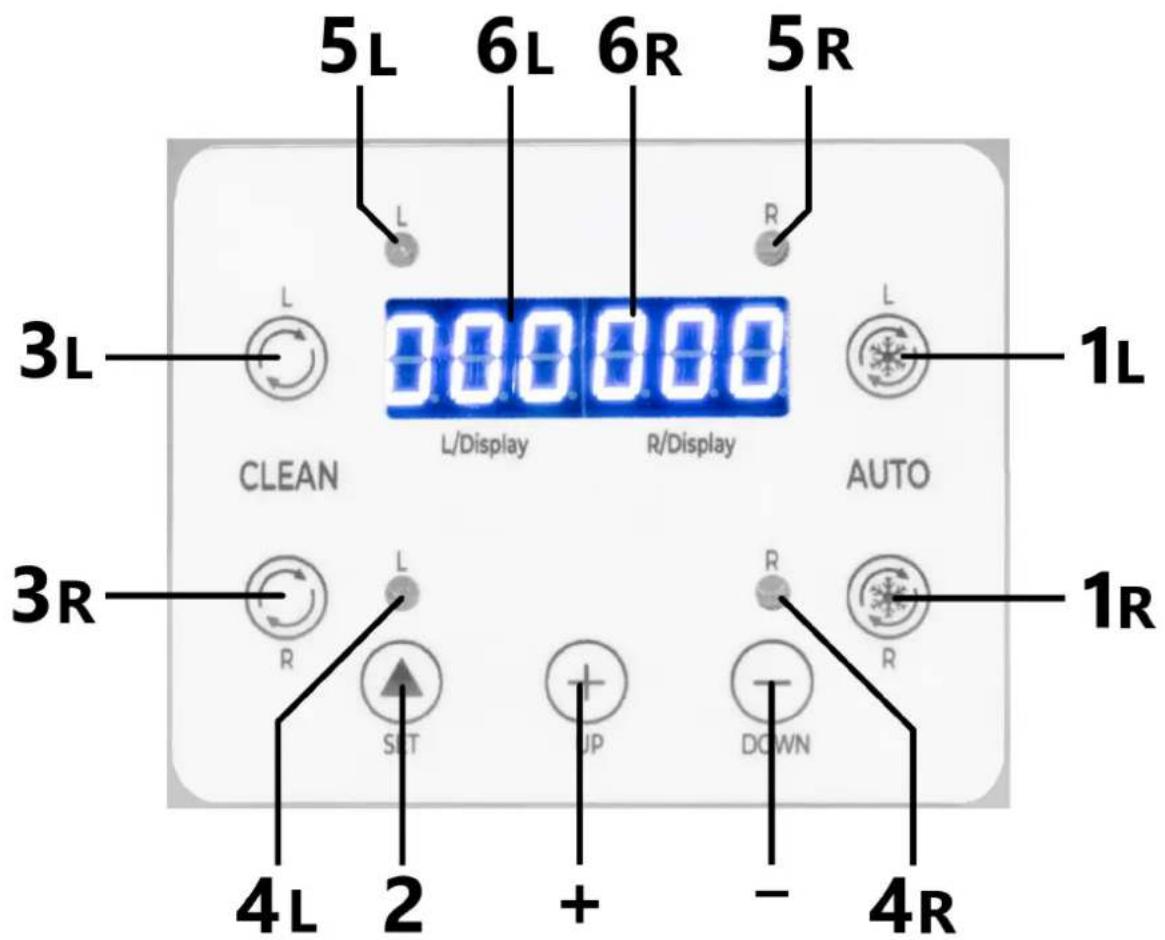
3.2. Description of control panels
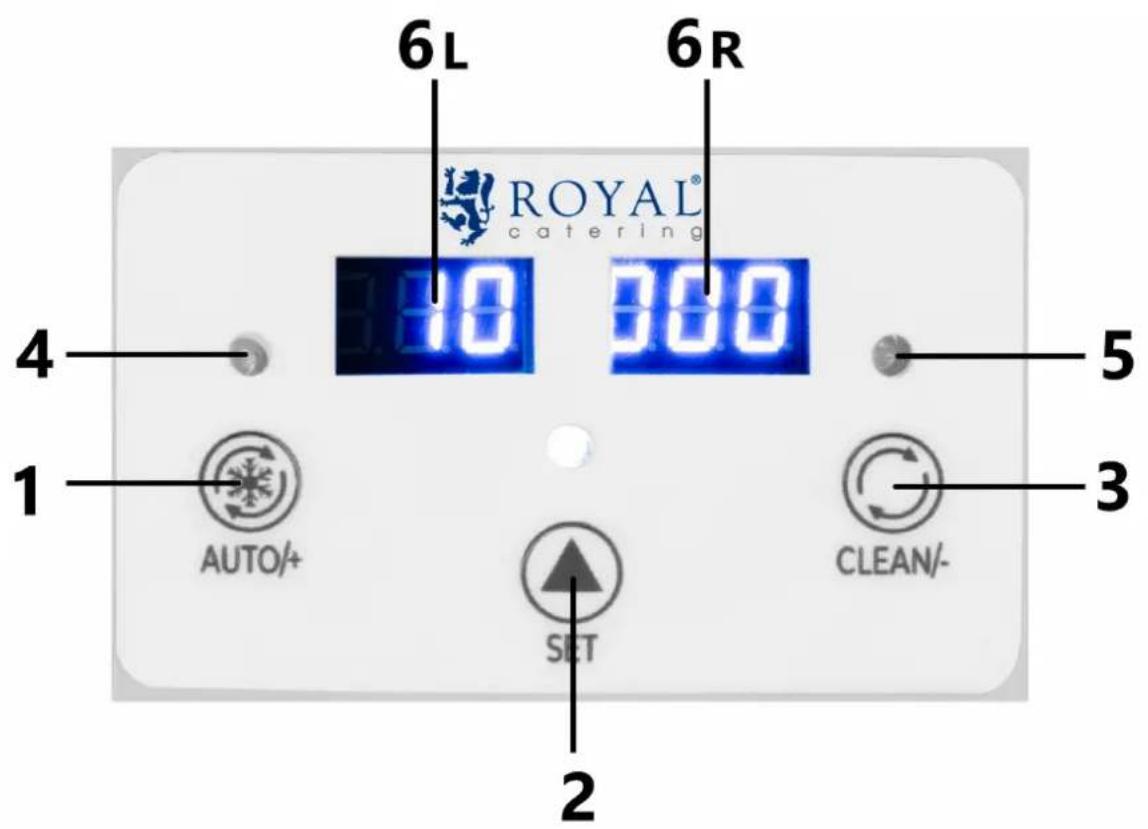
RCSL 1/6A control panel
1 - Auto mode (cooling)/increase button
2-Settingsmodebutton
3-Cleaning mode button/decrease value
4-Cooling indicator light
5-Cleaning indicator light
6L-Left display
6P - Right display
RCSL 2/6A control panel

1L-Button for automatic operation (cooling) of the left tank
1R - Automatic operation (cooling) button for the right tank
2- Settings mode button
3L-Left cylinder cleaning mode button
3R - Right cylinder cleaning mode button
4L - Left cylinder cleaning mode indicator light
4R - Right cylinder cleaning mode indicator light
5L - Left cylinder cooling mode indicator light
5R - Right cylinder cooling mode indicator light
6L-Left display
6P - Right display
+ - increasing the value in settings mode
--decrease the value in setting mode
3.3. Preliminary steps
Removing the machine from the packaging:
Remove the machine from its packaging and carefully inspect it for any visible damage that may have occurred during shipping. Remove any protective coverings such as plastic bags and make sure they are kept out of the reach of children.
Moving the machine:
Never lift the machine by the tank or plastic parts as this may cause damage. Always grasp the machine at the bottom, near the legs, and use both hands when lifting or carrying it to ensure stability and avoid damage.
Power check before starting:
Before connecting the machine, check that the electrical installation is properly grounded and meets legal requirements and the voltage and current specifications listed on the nameplate or in the manual. Plug the machine directly into the socket or use a single, certified extension cord with a maximum length of 3 meters. Avoid using multiple power supplies or extension cords at the same time, as this may damage the device and void the warranty.
The device must be located in such a way that the power plug can be reached at any time.
Consultation with a specialist:
If you are unsure about the appropriate power supply or electrical requirements of your device, have the electrical installation and device checked by a qualified technician before first use.
Liability Warning:
The manufacturer and distributors are not liable for damage to the machine, property or operators resulting from incorrect connection or installation of the machine.
Preparation for launch:
Before starting the device, clean it thoroughly in accordance with the recommendations contained in the chapter on cleaning and maintenance.
Device installation:
Place the machine away from heat sources and provide adequate space around the device to allow proper air circulation. The ambient temperature must not exceed 40^ . Make sure there is at least 20cm of free space on each side of the device. The device should always be used on an even, stable, clean, fireproof and dry surface and out of the reach of children and people with limited physical, sensory and mental functions.
3.4. Preparation to work
1) Cleaning before filling:
Before filling the tank, thoroughly clean and rinse all surfaces that will come into contact with the drink. Use appropriate cleaning agents intended for contact with food to ensure hygiene and safety of use.
2) Filling the tank:
Fill the tanks with the drink mix, but be careful not to exceed the maximum level indicated on the tank. Exceeding this limit may cause the drink to overflow or the machine to operate inefficiently.
Warning: The device is not intended for use with sugar-free liquids. Use natural juices or blends with a sugar content ranging from 15% to 25% , or use commercial blends according to the manufacturer's recommendations.
3) Replacing the Cover:
After filling the tank, install the top cover onto the bowl. Make sure the lid is properly attached to ensure safe and effective operation of the machine while preparing your drink.
3.5. Control panel operation
Model RCSL 1/6A (single cylinder machine)
Engine speed display (single cylinder machine)
- Activating the motor speed display: Press the clean key ("CLEAN/-") to enter cleaning mode. Then press the setting key ("SET") to display the real-time speed value on the screen.
- Display reading: The left part of the screen displays "--2" and the right part shows the remaining digits. By combining these numbers, you can read the speed of the main engine, e.g. 2385 rpm.
Setting the gear position (single cylinder machine)
- Enter setting mode: Press and hold "SET" key for 2 seconds to enter gear parameter setting mode.
Gear shifting: The left part of the display will flash. Press "SET" key to switch gears (range 1~10). - Saving Settings: If you do not use the keys for 5 seconds, the system will automatically save the set value and exit the setting mode.
Note: The higher the gear number, the lower the temperature of the drink.
Factory settings (single cylinder machine)
- Entering Factory Setting Mode: In gear setting mode, press and hold the setting key ("SET") for 5 seconds.
- Changing parameters: Press the setting key ("SET") to select the parameter to change. Press the cool key ("AUTO/+") to increase the value or the clean key ("CLEAN/-") to decrease the value.
- Saving Settings: If you do not use the keys for 10 seconds, the system will automatically save the set values and exit the setting mode.
Factory Parameters Table (Model RCSL 1/6A - Single Cylinder Machine)
| Number | Value | Parameter Name |
| F0 | 80 | Gear ratio |
| F1 | 1100 | Low speed protection value |
| F2 | 3 | Start protection time |
| F4 | thirty | Engine warm-up time |
Description of Alarm Codes
1) "--": Displays when the motor does not run or the motor speed cannot be detected. The motor and mixer stop working.
2) "NL": Displays when the motor fails or the temperature of the drink is too high, causing heavy load on the motor and the speed drops below the set value. The motor and mixer stop working.
Single Cylinder Machine Features (Model RCSL 1/6A)
1) Mixing:
- Press the mix/clean key ("CLEAN/-") to start the mix function; the mix light will illuminate.
- Press the CLEAN/ key again to disable the mixing function.
2) Cooling:
- Press the cooling key ("AUTO/+") to start the cooling function; the cooling light will start flashing. Once the compressor starts, the indicator light will stop flashing.
- When cooling reaches 100% , the cooling light will flash again.
- Press the cooling key ("AUTO/+") again to turn off the cooling function; the cooling light will go off.
Note: When switching from cleaning to cooling, turn off cleaning mode first. Similarly, turn off cooling mode before switching to cleaning.
Model RCSL 2/6A (two-cylinder machine)
Engine speed display (two cylinder machine)
- Activating the motor speed display: Press the CLEAN key to enter cleaning mode. Then press the setting key ("SET").
- Display reading: The left display shows the speed of the left cylinder and the right display shows the speed of the right cylinder. For example, a value of 285 means that the main engine speed is 2850 rpm.
Setting the gear position (two-cylinder machine)
- Enter setting mode: Press and hold "SET" key for 2 seconds to enter left cylinder gear parameter setting mode.
Gear Shift: Press "SET" key to switch to right cylinder settings. Use the add "+" or subtract "-" keys to change the value (range 1~10). - Saving Settings: If you do not use the keys for 5 seconds, the system will automatically save the set value and exit the setting mode.
Note: The higher the gear number, the lower the temperature of the drink.
Factory settings (two-cylinder machine)
- Entering Factory Setting Mode: In gear setting mode, press and hold the setting key for 5 seconds to enter factory setting mode.
- Changing Parameters: Press the "SET" setting key to select the parameter to change. Use the add "+" or subtract "-" keys to change the value.
- Saving Settings: If you do not use the keys for 10 seconds, the system will automatically save the set values and exit the setting mode.
Factory parameters table (Model RCSL 2/6A - two-cylinder machine)
| Number | Value | Parameter Name |
| F0 | 80 | Left cylinder gear ratio |
| F1 | 80 | Right cylinder gear ratio |
| F2 | 1100 | Low speed protection value |
| F3 | 3 | Start protection time |
| F4 | thirty | Engine warm-up time |
Description of Alarm Codes
3) "--": Displays when the motor does not run or the motor speed cannot be detected. The motor and mixer stop working.
4) "NL": Displays when the motor fails or the temperature of the drink is too high, causing heavy load on the motor and the speed drops below the set value. The motor and mixer stop working.
Twin-cylinder machine features (Model RCSL 2/6A)
1) Mixing:
- Press the left or right CLEAN key to activate the mixing function for that cylinder; the appropriate mix light will illuminate.
- Press the CLEAN key again to disable the mixing function for that cylinder.
2) Cooling:
- Press the cooling key ("AUTO") on the left or right side to start the cooling function for that cylinder; the cooling light will start flashing. Once the compressor starts, the indicator light will stop flashing.
- When cooling reaches 100% , the cooling light will flash again.
- Press the cooling key ("AUTO") again to disable the cooling function for that cylinder; the cooling indicator light goes off.
3) Two-cylinder operation:
- Try to have both sides working at the same time. The compressor will stop running when both cooling lights start flashing.
- During operation, press the cooling key ("AUTO") to stop operation; the cooling indicator light goes off.
Note: When switching from cleaning to cooling, turn off cleaning mode first. Similarly, turn off cooling mode before switching to cleaning.
3.6. Cleaning and maintenance
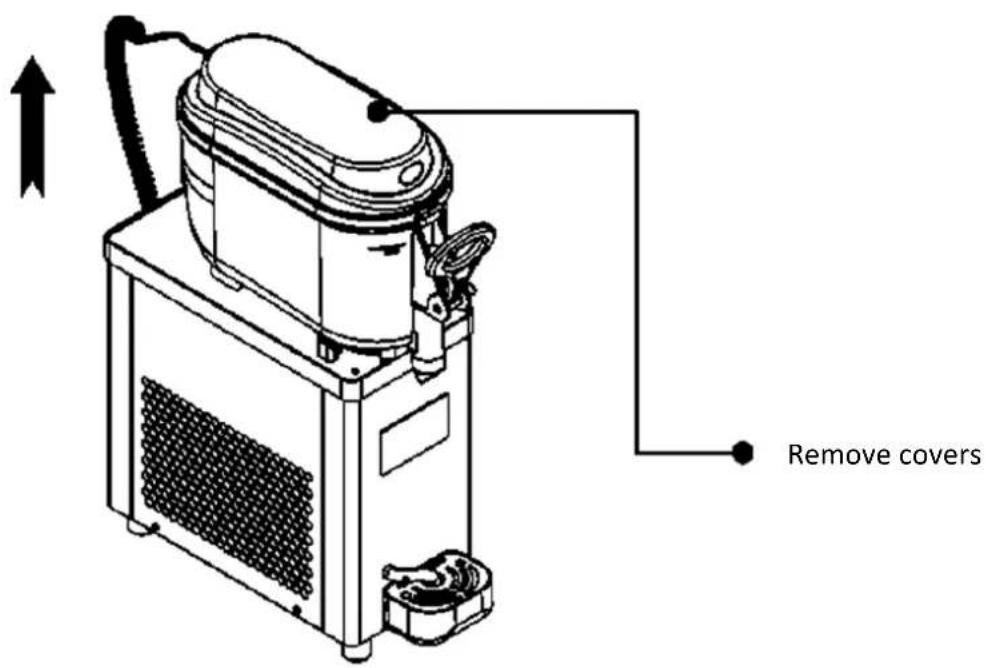
WARNING: Before cleaning or maintaining the machine, turn it off and disconnect it from the power source. Remove the plug from the electrical outlet by pulling the plug itself, not the cable. All machine elements that come into direct contact with the products should be thoroughly cleaned. Cleaning should be carried out according to the illustrations in the manual.
Cleaning process:
1) Disassembly:
- Removing Covers: Start by removing all accessible covers to gain access to the machine's internal components.
- Emptying tanks: Empty any remaining product from the tanks.
- Cleaning tanks: Fill tanks with lukewarm water to remove any product residue, then rinse thoroughly.
2) Disassembly of components:
- Removing the Mixer: To remove the mixer, rotate it counterclockwise and then pull it up as shown in the illustration.
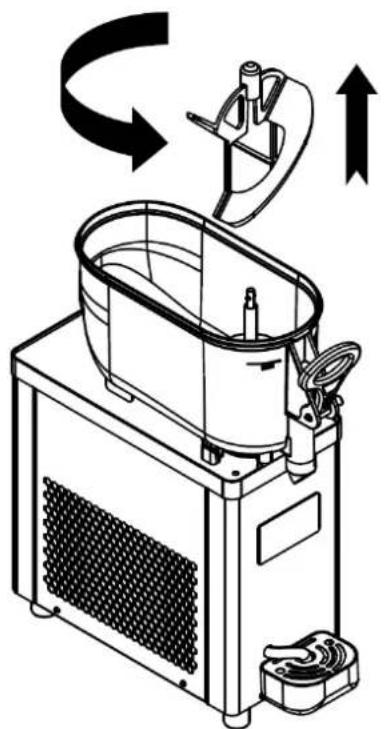
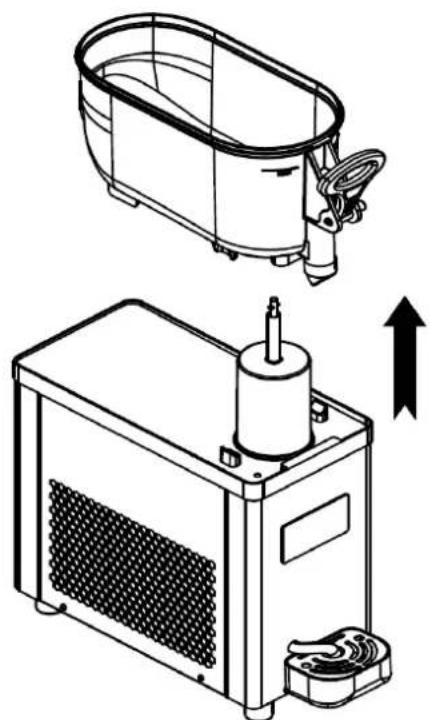
- Removing the tank: Grasp the tank and pull out as shown. If the tank seal remains on the cylindrical evaporator, remove it as well, as shown in the figure.
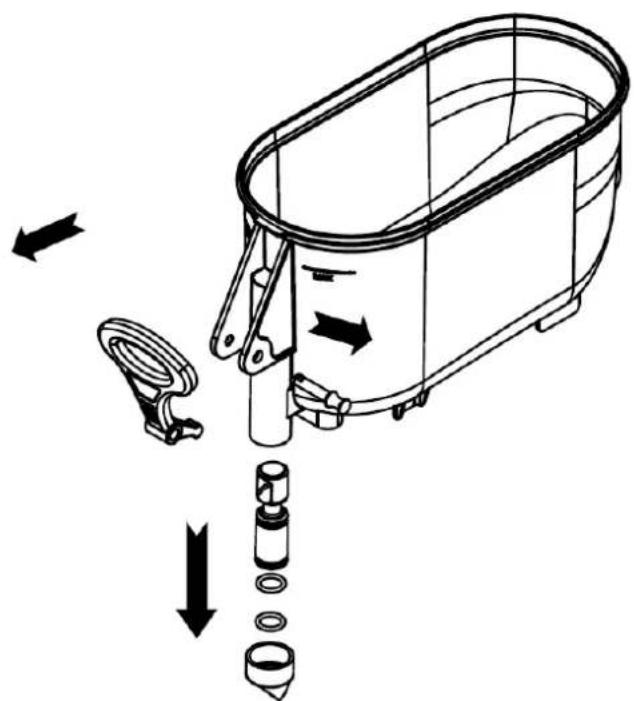
3) Cleaning the dispensing nozzle:
-
Removing the Safety Lever: Remove the safety lever by pulling in the direction shown in the illustration.
-
Removing the lever: Once the safety lever is removed, the tap and spring can be removed.
4) Tank installation:
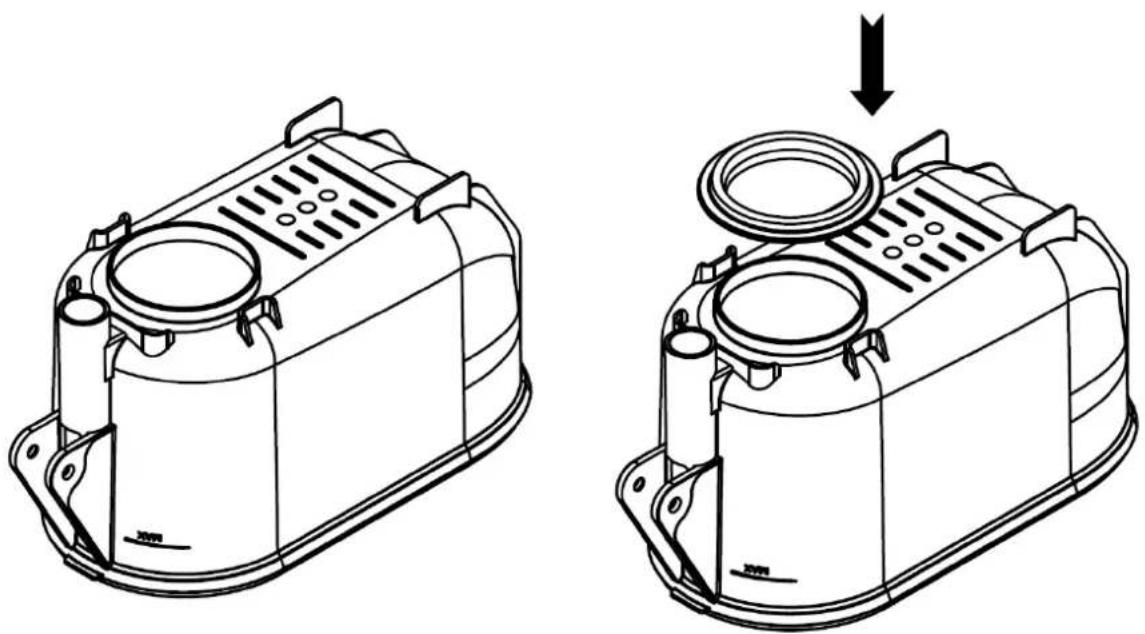
- Gasket Installation: When reassembling the tank, the tank gasket should be installed on the bottom of the pan or on the evaporator as shown in the picture.
Note: After cleaning and maintenance is completed, make sure all components are properly installed and secure before turning the machine back on. Carrying out regular cleaning and maintenance in accordance with the manufacturer's recommendations is crucial to maintaining the hygiene and operational efficiency of the machine.
Disposal of used devices:
At the end of its useful life, this product must not be disposed of with normal municipal waste, but should be taken to a collection point for the recycling of electrical and electronic equipment. This is indicated by the symbol placed on the product, user manual or packaging. The materials used in the device are reusable according to their marking. By reusing, reusing materials or otherwise using used equipment, you make an important contribution to protecting our environment.
Your local administration will provide you with information about the appropriate disposal point for used devices.
3.7. Troubleshooting
| The most common problems Solution | |
| No cooling: Typically, the drink does not change significantly after the device has been operating for some time. | 1) Check if the power connection is correct, if it is not connected, please connect it properly;2) Check if the cooling light is on. If it is not lit, press the cool button. If the light is on and the unit is still not cooling, contact customer service. |
| Poor cooling: Poor cooling performance, working for a long time, it can cool normally, but cannot achieve the desired effect. | 1) Check whether the raw materials used meet the requirements2) Adjust gear position setting, adjust high quality position3) Check whether the machine placement position meets the requirements4) If you still cannot resolve the above issues, please contact customer service. |
| Out of material: When the device is running, the mixer is working, but when the handle is pulled down, no material is discharged. | 1) Check whether the raw materials used meet the requirements.2) Adjust the gear position setting, adjust the lower gear position;3) If you still cannot resolve the above issues, please contact customer service. |
| "--" alarm: the mixer running speed is normal for 2~3 seconds after starting, then "--" alarm appears, please contact customer service for help."NL" alarm: appears after some time of operation and the mixer is running slowly. | 1) Check whether the raw materials used meet the requirements.2) Adjust the gear position and lower the gear position.3) If you still cannot solve the above problems, please contact customer service. |
| Material leak: A leak is a leak from a beverage keg or spout while the unit is operating. | 1) Check and replace the seal ring |
| Frozen cylinder: The beverage tank or spout is frozen while the machine is operating. | 1) Check whether the raw materials used meet the requirements to add the appropriate amount of sugar or water.2) Press the cooling button, stop cooling and let stand for a while, then discharge. |
3.8. Assembly drawing
RCSL 1/6A
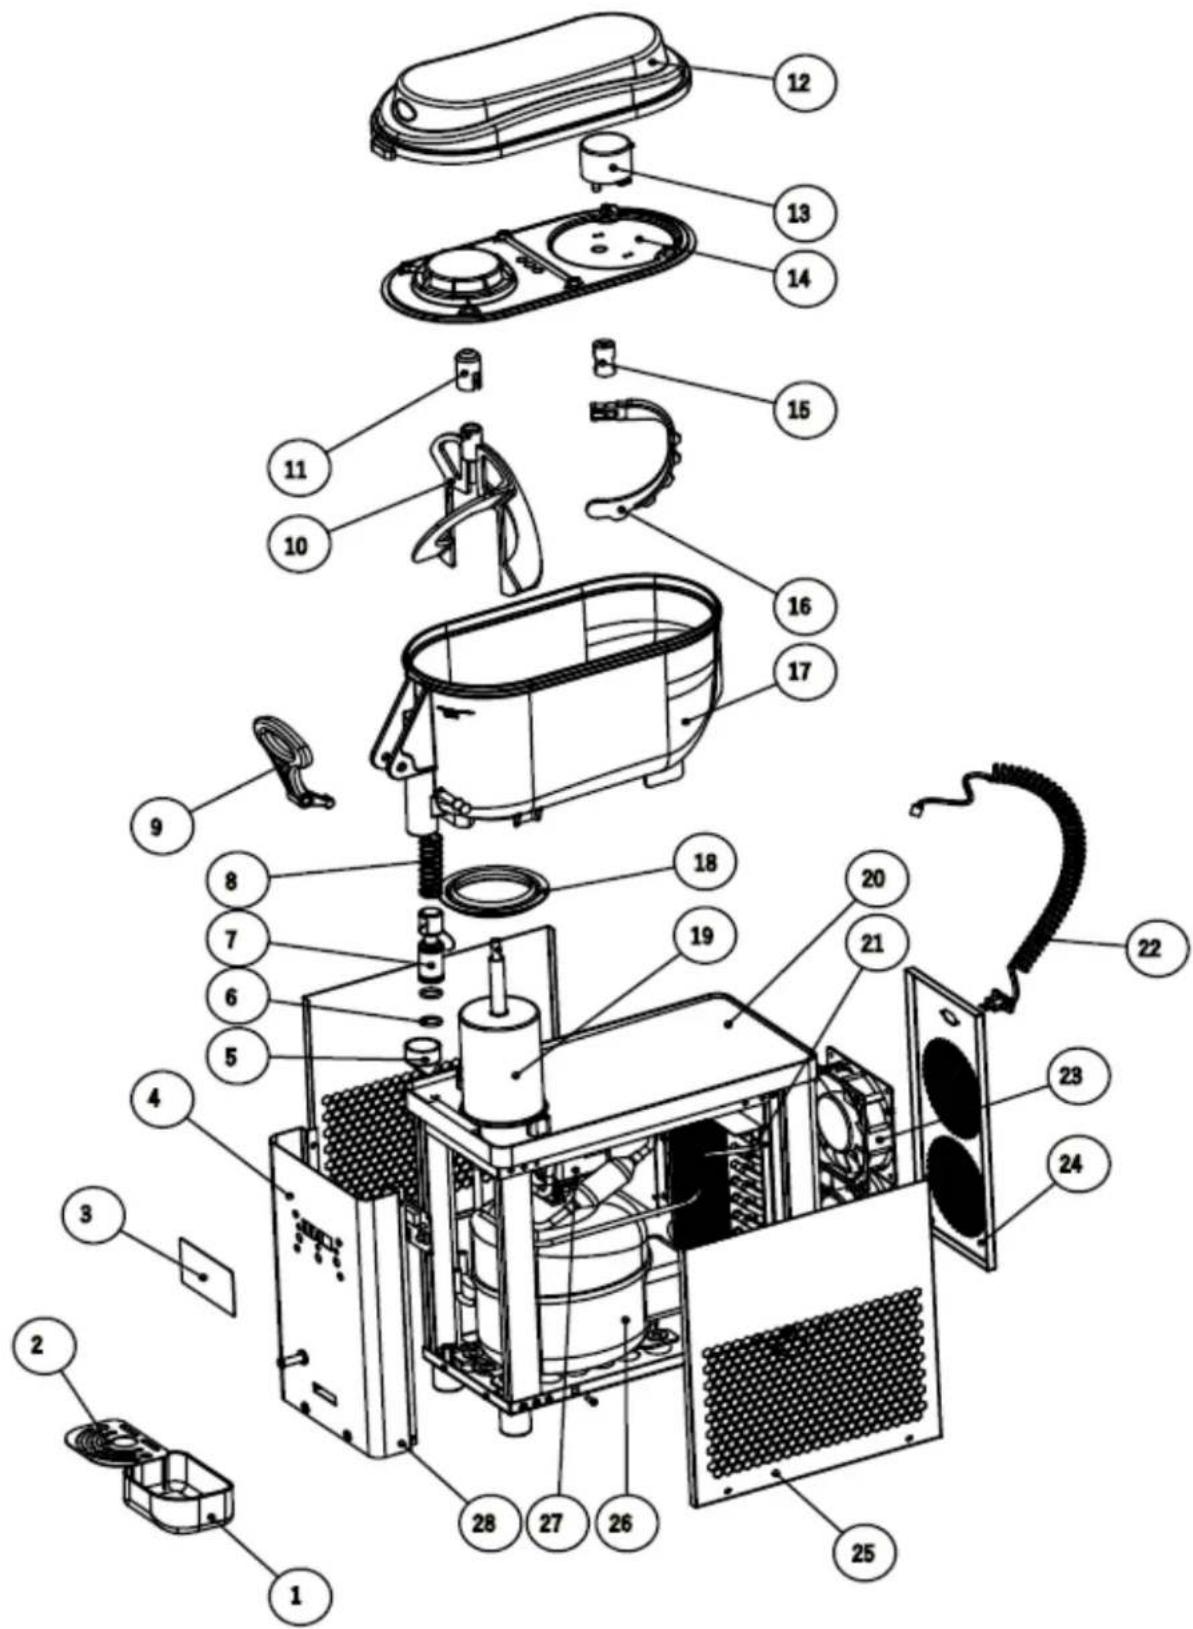
| Number | Name | Number | Name |
| 1 | Drip tray | 15 | Sleeve for gear motor |
| 2 | Drip tray grid | 16 | Rear agitator |
| 3 | Control panel | 17 | Tank |
| 4 | Front cover | 18 | Tank seal |
| 5 | Push rod tip | 19 | Evaporator |
| 6 | Sealing ring | 20 | Machine base |
| 7 | Pusher | 21 | Condenser |
| 8 | Spring | 22 | Wire |
| 9 | Handle | 23 | Fan |
| 10 | Stirrer | 24 | Back panel |
| 11 | Mixer cover | 25 | Side panel |
| 12 | Top cover | 26 | Compressor |
| 13 | Gear motor | 27 | Gear motor |
| 14 | Inner cover |
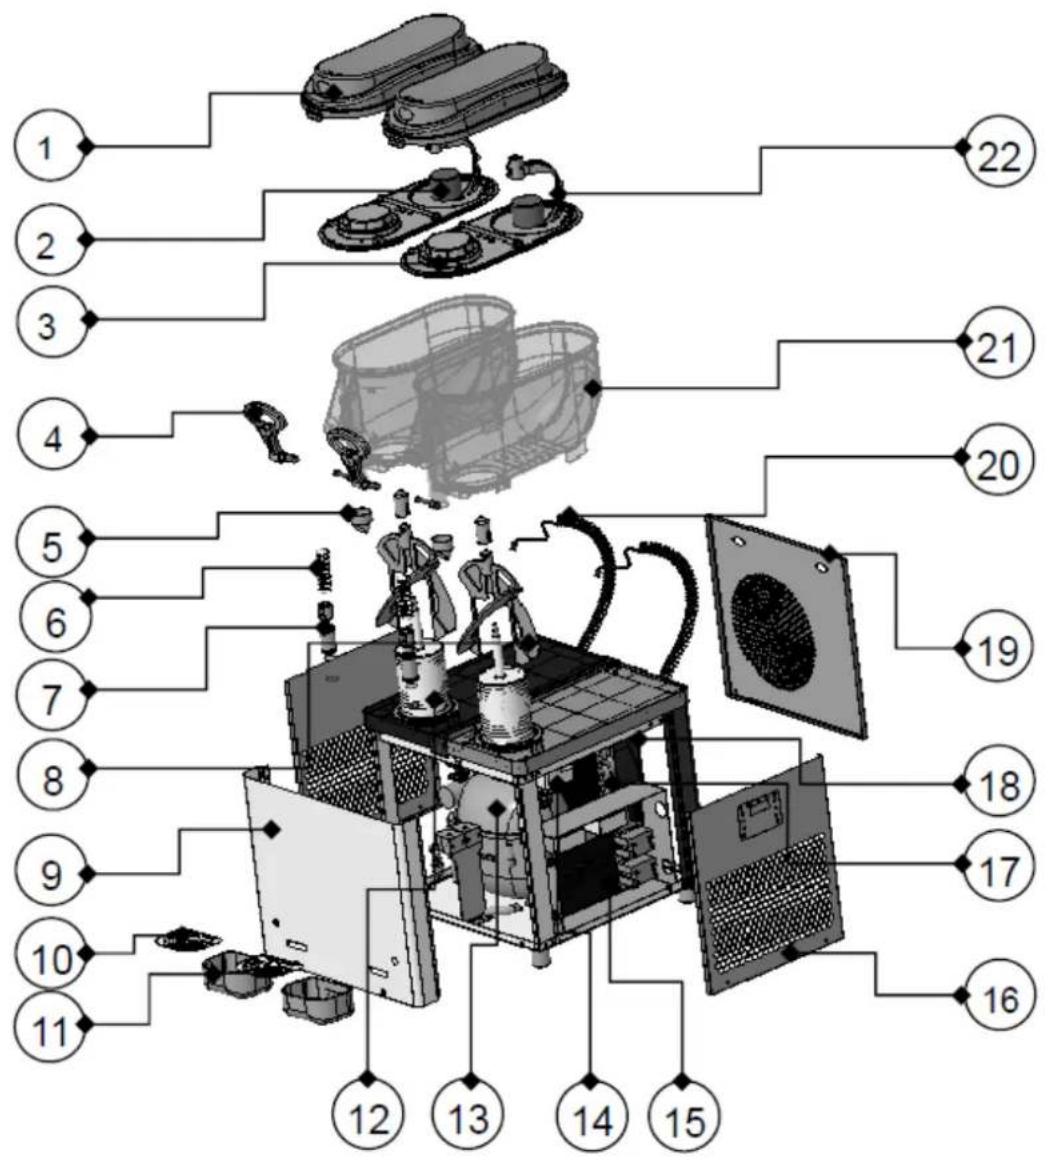
RCSL 2/6A
| Number | Name | Number | Name | Number | Name |
| 1 | Cover | 9 | Front panel | 17 | Condenser |
| 2 | Gear motor | 10 | Drip tray grid | 18 | Fan |
| 3 | Inner cover | 11 | Drip tray | 19 | Back panel |
| 4 | Handle | 12 | Evaporator | 20 | Wire |
| 5 | Push rod tip | 13 | Compressor | 21 | Tank |
| 6 | Spring | 14 | Agitator motor | 22 | Rear agitator |
| 7 | Pusher | 15 | Control panel | ||
| 8 | Stirrer | 16 | Side panel |
3.9. Electrical diagram

RCSL 1/6A
PCB - Printed circuit board
BT - Transformer
YJ - Compressor
MF - Fan motor
M1 - DC gearmotor
M2 - AC gearmotor
KM - Relay contact
SO - Sensor
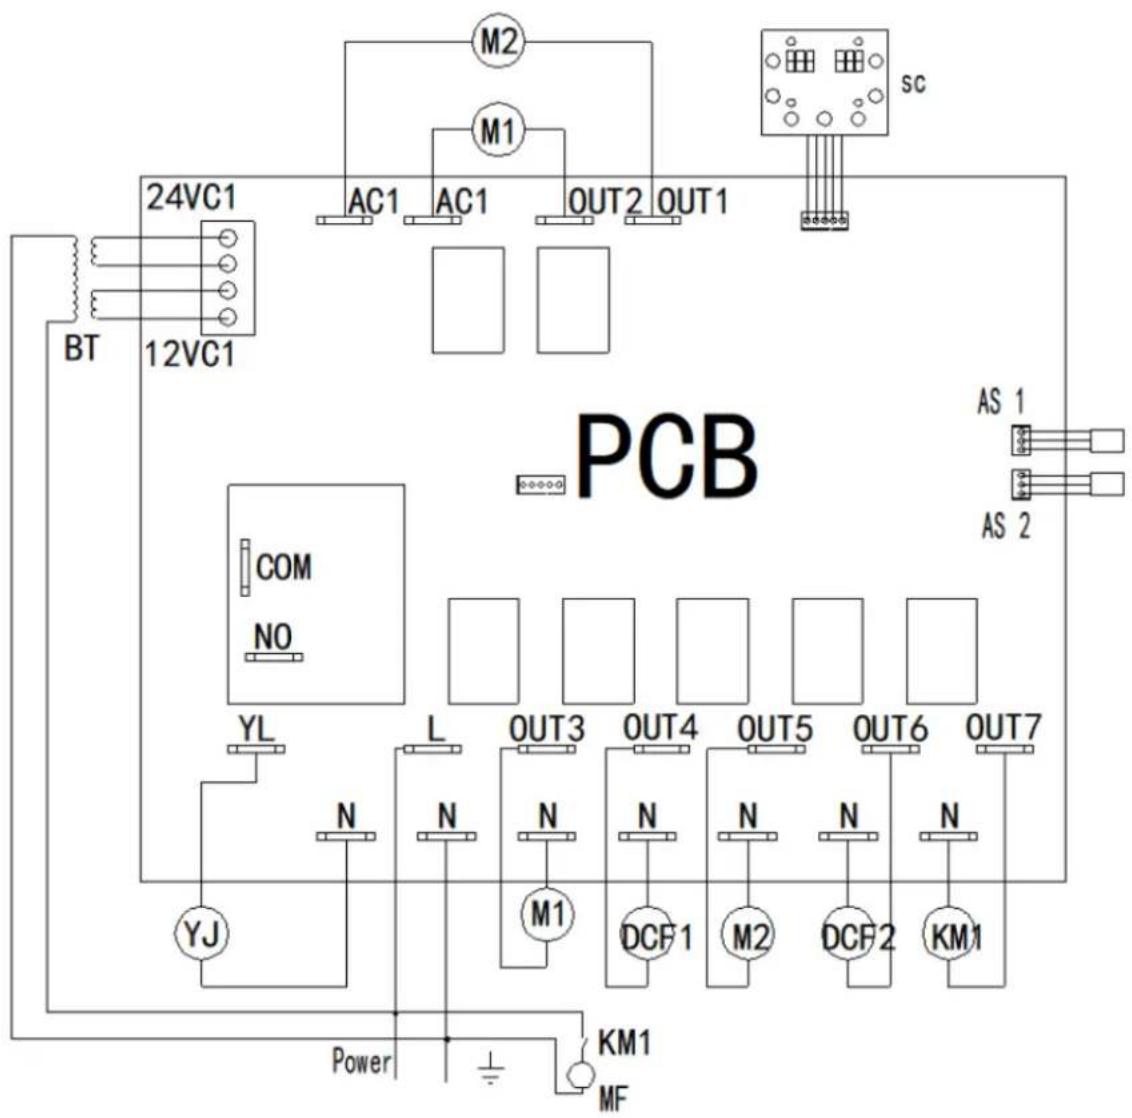
RCSL 2/6A
PCB - printed circuit board
BT-Transformer
YJ - Compressor
MF - fan motor
m1, m2 - DC gearmotor
M1, M2 - AC gearmotor
KM - Relay contact
DCF-Solenoid valve
AS-Adjacent Switch

Caracteristicas techniques
Strømtjek for start:
Installation of Enhed:
4) Installation at tank:
RCSL 1/6A-bedieningspaneel
1-Knop Automodus (koelen)/verhogen
2-KnopInstellingenmodus
3-Knop Reinigingsmodus/waarde verlagen
4-Controleampje koeling
5 - Controleampje reinigen
6L-Linkerdisplay
6P-Rechterdisplay
RCSL 2/6A-bedieningspaneel
POZOR! Virive privky!
For the disposal of the device please consider and act according to the national and local rules and regulations.
CONTACT
expondo Polska sp. z o.o. sp. k.
- Technical data
- Overall description
- Explanation of symbols
- Safety of use a
- Electrical safety
- Safety in the workplace
- Personal security
- Safe use of the device
- Terms of Use
- Description of the device
- Description of control panels
- Preliminary steps
- Removing the machine from the packaging:
- Moving the machine:
- Power check before starting:
- Consultation with a specialist:
- Liability Warning:
- Preparation for launch:
- Device installation:
- Preparation to work
- 1) Cleaning before filling:
- 2) Filling the tank:
- 3) Replacing the Cover:
- Control panel operation
- Model RCSL 1/6A (single cylinder machine)
- Engine speed display (single cylinder machine)
- Setting the gear position (single cylinder machine)
- Factory settings (single cylinder machine)
- Description of Alarm Codes
- Single Cylinder Machine Features (Model RCSL 1/6A)
- Model RCSL 2/6A (two-cylinder machine)
- Setting the gear position (two-cylinder machine)
- Factory settings (two-cylinder machine)
- Twin-cylinder machine features (Model RCSL 2/6A)
- 1) Mixing:
- 2) Cooling:
- 3) Two-cylinder operation:
- Cleaning and maintenance
- Cleaning process:
- 1) Disassembly:
- 2) Disassembly of components:
- Disposal of used devices:
- Troubleshooting
- Assembly drawing
- Electrical diagram
- Caracteristicas techniques
- Strømtjek for start:
- Installation of Enhed:
- RCSL 2/6A-bedieningspaneel
- CONTACT
Brand : Royal Catering
Model : RCSL 1/6A
Category : Ice machine