RCGK-MB33L - Fridge Royal Catering - Free user manual and instructions
Find the device manual for free RCGK-MB33L Royal Catering in PDF.

| Product Type | Minibar Refrigerator |
| Brand | Royal Catering |
| Model | RCGK-MB33L |
| Nominal Volume | 24 L |
| Energy Class | G |
| Climate Class | N |
| Annual Energy Consumption | 130 kWh |
| Nominal Voltage | 230 V |
| Frequency | 50 Hz |
| Nominal Power | 58 W |
| Protection Class | I |
| Dimensions (W × D × H) | 380 × 440 × 465 mm |
| Weight | 10,4 kg |
| Insulating Material | Cyclopentane |
| Refrigerant / quantity | R600a / 25 g |
| Adjustable Temperature Range | 5 °C à 15 °C environ (positions 1 to 3) |
| Recommended Temperature | 12 °C |
| Defrosting System | Automatic |
| Interior Lighting | LED |
| Door reversal possible | Yes, left or right side |
| Adjustable feet | Yes |
| Door material | Glass (glazed) |
| Number of shelves | 1 shelf (adjustable) |
| Power supply | Mains plug 230 V / 50 Hz |
Frequently Asked Questions - RCGK-MB33L Royal Catering
User questions about RCGK-MB33L Royal Catering
0 question about this device. Answer the ones you know or ask your own.
Ask a new question about this device
Download the instructions for your Fridge in PDF format for free! Find your manual RCGK-MB33L - Royal Catering and take your electronic device back in hand. On this page are published all the documents necessary for the use of your device. RCGK-MB33L by Royal Catering.
USER MANUAL RCGK-MB33L Royal Catering
natural_image
Abstract white line drawing of a stylized mythical creature on a dark blue background (no text or symbols)| DE | Produktname | Minibarkühlschrank |
| EN | Product name | Minibar |
| PL | Nazwa produktu | Mini-barowa lodówka |
| CZ | Název výrobku | Minibar |
| FR | Nom du produit | Minibar |
| IT | Nome del prodotto | Minibar |
| ES | Nombre del producto | Nevera minibar |
| HU | Termék neve | Minibár hűtő |
| DA | Produktnavn | Minibar |
| FI | Tuotteen nimi | Minibaari |
| NL | Productnaam | Minibar |
| NO | Produktnavn | Minibar |
| SE | Produktnamn | Minibar |
| PT | Nome do produto | Minibar |
| SK | Názov produktu | Minibar |
| BG | Име на продукта | Минибар |
| EL | Όνομα προϊόντος | Mívi μπαρ |
| HR | Naziv proizvoda | Minibar |
| LT | Produkto pavadinimas | Mini baras |
| RO | Numele produsului | Minibar |
| SL | Ime izdelka | Minibar |
| DE Modell | EN Product model | PL Model produktu | CZ Model výrobku | FR Modèle | IT Modello | ES Modelo | HU Modell | DA Model | FI Tuotteen malli | NL Productmodel | NO Produktmodell | SE Produktmodell | PT Modelo do produto | SK Model | BG Модел на продукт | EL Movtělo προϊόντος | HR Model proizvoda | LT: Gaminio modelis | RO: Model de produs | SL: Model izdelka | RCGK-MB33LRCGK-MBG33LRCGK-MBD21L | |
| DE Hersteller | EN Manufacturer | PL Producent | CZ Výrobce | FR Fabricant | IT Produttore | ES Fabricante | HU Termelő | DA Producent | FI Valmistaja | NL Producent | NO Produsent | SE Tillverkare | PT Fabricante | SK Výrobca | BG Производител | EL Κατασκευαστής | HR Proizvođač | LT Gamintojas | RO Producător | SL Proizvajalec | expondo Polska sp. z o.o. sp. k. | |
| DE Anschrift des Herstellers | EN Manufacturer Address | PL Adres producenta | CZ Adresa výrobce | FR Adresse du fabricant | IT Indirizzo del produttore | ES Dirección del fabricante | HU A gyártó címe | DA Producentens adresse | FI Valmistajan osoite | NL Adres producent | NO Produsentens adresse | SE Tillverkarens adress | PT Endereço do fabricante | SK Adresa výrobcu | BG Адрес на производителя | EL: Διεύθυνση κατασκευαστή | HR Adresa proizvođača | LT Gamintojo adresas | RO Adresa producătorului | SL Naslov proizvajalca | ul. Nowy Kisielin – Innowacyjna 7, 66-002 Zielona Góra | Poland, EU | |

This User Manual has been translated for your convenience using machine translation. Reasonable efforts have been made to provide an accurate translation; however, no automated translation is perfect nor is it intended to replace human translators. The official User Manual is the English version. Any discrepancies or differences created in the translation are not binding and have no legal effect for compliance or enforcement purposes. If any questions arise related to the accuracy of the information contained in the User Manual, please refer to the English version of those contents which is the official version.
Technical data
| Parameter description | Parameter value | ||
| Product name | Minibar | ||
| Model | RCGK-MB33L | RCGK-MBG33L | RCGK-MBD21L |
| Nominal volume [L] | 24 | 26 | 16 |
| Energy rating | G | E | F |
| Climate class | N | N | N |
| Annual energy consumption | 130 kWh 75 kWh | 90 kWh | |
| Rated voltage [V] | 230 | ||
| Frequency [Hz] | 50 | ||
| Rated power [W] | 58 | ||
| Protection class | I | ||
| Dimensions [width x depth x height; mm] | 380×440×465 | 380×440×465 | 385×470×375 |
| Weight [kg] | 10.4 | 13.2 | 10.1 |
| Insulation material | Cyclopentane | ||
| Refrigerant/Amount | R600a/25g | ||
1. General description
The user manual is designed to assist in the safe and trouble-free use of the device. The product is designed and manufactured in accordance with strict technical guidelines, using state-of-the-art technologies and components. Additionally, it is produced in compliance with the most stringent quality standards.
DO NOT USE THE DEVICE UNLESS YOU HAVE THOROUGHLY READ AND UNDERSTOOD THIS USER MANUAL.
To increase the product life of the device and to ensure trouble-free operation, use it in accordance with this user manual and regularly perform maintenance tasks. The technical data and specifications in this user manual are up to date. The manufacturer reserves the right to make changes associated with quality improvement. The device is designed to reduce noise emission risks to a minimum, taking into account technological progress and noise reduction opportunities.
Legend
| CE | The product satisfies the relevant safety standards. | |
 | Read instructions before use. | |
 | The product must be recycled. | |
 | WARNING! or CAUTION! or REMEMBER! Applicable to the given situation.(general warning sign) | |
 | ATTENTION! Electric shock warning! | |
 | ATTENTION! Fire hazard - flammable materials! | |
 | Only use indoors. | |

PLEASE NOTE! Drawings in this manual are for illustration purposes only and in some details may differ from the actual product.
2. Usage safety

ATTENTION! Read all safety warnings and all instructions. Failure to follow the warnings and instructions may result in electric shock, fire and/or serious injury or even death.
The terms "device" or "product" are used in the warnings and instructions to refer to: Minibar
2.1. Electrical safety
a) The plug must fit the socket. Do not modify the plug in any way. Using original plugs and matching sockets reduces the risk of electric shock.
b) Avoid touching earthed elements such as pipes, heaters, boilers and refrigerators. There is an increased risk of electric shock if the earthed device is exposed to rain, comes into direct contact with a wet surface or is operating in a damp environment. Water getting into the device increases the risk of damage to the device and of electric shock.
c) Do not touch the device with wet or damp hands.
d) Use the cable only for its designated use. Never use it to carry the device or to pull the plug out of a socket. Keep the cable away from heat sources, oil, sharp edges or moving parts. Damaged or tangled cables increase the risk of electric shock.
e) If using the device in a damp environment cannot be avoided, a residual current device (RCD) should be applied. The use of an RCD reduces the risk of electric shock.
f) Do not use the device if the power cord is damaged or shows obvious signs of wear. A damaged power cord should be replaced by a qualified electrician or the manufacturer's service centre.
g) To avoid electric shock, do not immerse the cord, plug or device in water or other liquids. Do not use the device on wet surfaces.
2.2. Safety in the workplace
a) Make sure the workplace is clean and well lit. A messy or poorly lit workplace may lead to accidents. Try to think ahead, observe what is going on and use common sense when working with the device.
b) If you discover damage or irregular operation, immediately switch the device off and report it to a supervisor without delay.
c) If you are unsure about whether the product is operating correctly or if you find damage, please contact the manufacturer's service centre.
d) Only the manufacturer's service centre may make repairs to the product. Do not attempt to make repairs yourself!
e) In case of fire, use a powder or carbon dioxide (CO _2 ) fire extinguisher (one intended for use on live electrical devices) to put it out.
f) Use the device in a well-ventilated space.

Remember! When using the device, protect children and other bystanders.
2.3. Personal safety
a) The machine is not designed to be handled by persons (including children) with limited mental and sensory functions or persons lacking relevant experience and/or knowledge unless they are supervised by a person responsible for their safety or they have received instruction on how to operate the machine.
b) To prevent the device from accidentally switching on, make sure the switch is on the OFF position before connecting to a power source.
2.4. Safe device use
a) Make sure the plug is disconnected from the socket before attempting any adjustments, accessory replacements or before putting the device aside. Such precautions will reduce the risk of accidentally activating the device.
b) When not in use, store in a safe place, away from children and people not familiar with the device who have not read the user manual. The device may pose a hazard in the hands of inexperienced users.
c) Keep the device in perfect technical condition. Before each use check for general damage, especially check moving components for cracked parts or elements, and for any other conditions which may impact the safe operation of the device. If damage is discovered, hand over the device for repair before use.
d) Keep the device out of the reach of children.
e) Device repair or maintenance should be carried out by qualified persons, only using original spare parts. This will ensure safe use.
f) To ensure the operational integrity of the device, do not remove factory-fitted guards and do not loosen any screws.
g) When transporting and handling the device between the warehouse and the destination, observe the occupational health and safety principles for manual transport operations which apply in the country where the device will be used.
h) Do not move, adjust or rotate the device in the course of work.
i) Clean the device regularly to prevent stubborn grime from accumulating.
j) Do not cover the air intake and outlet.
k) ATTENTION! DANGER TO LIFE! While cleaning, never immerse the device in water or other liquids.
I) Do not store heavy, poisonous or corrosive objects in the device.
m) Do not use the appliance in unheated rooms and in locations with high air humidity.
n) ATTENTION! Do not use any electrical appliances inside the chamber of the appliance which serves to store food.
o) PLEASE NOTE The device contains flammable substances. Consequently, it should be handed over for disposal to specialists when its service life is over.
p) It is not allowed to store potentially explosive substances in the appliance, e.g.: cans containing compressed flammable gas.
q) It is forbidden to place the device near an open flame, electric stoves, coal stoves or other heat sources, as well as near direct sunlight. High temperatures can damage the cooling capacity and raise the consumption of electricity.
r) The device must not be connected to the outlet other than wall-mounted socket, do not use a multiple outlet adapter or multiple sockets.
s) If the door is opened too often, there is increased energy consumption, which could lead to possible damage.
t) The power cord connected to the appliance must be properly grounded and correspond to the technical details!
u) The device is not designed for store objects on it.
v) Do not place heavy objects on the device.
w) Keep packaging elements and small assembly parts in a place not available to children.
x) The device is not a toy. Children should be supervised so that they will not play with the device.
y) ATTENTION! The ventilation openings of the appliance should always be free from blockages.
z) Please make sure that the device is properly earthed.
aa) Take care not to damage any parts of the device, in particular those containing the refrigerant. If the refrigerant comes into contact with the user's eyes, it may cause serious eye damage.
bb) Please note: Do not hold the device by its door during transport. The device should be transported in a vertical position. Do not tilt the device.

ATTENTION! Despite the safe design of the device and its protective features, and despite the use of additional elements protecting the operator, there is still a slight risk of accident or injury when using the device. Stay alert and use common sense when using the device.
3. Use guidelines
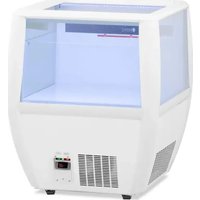
This is a compact fridge for cooling drinks and snacks. Chosen models are equipped with a glass door for content visibility.
The user is liable for any damage resulting from unintended use of the device.
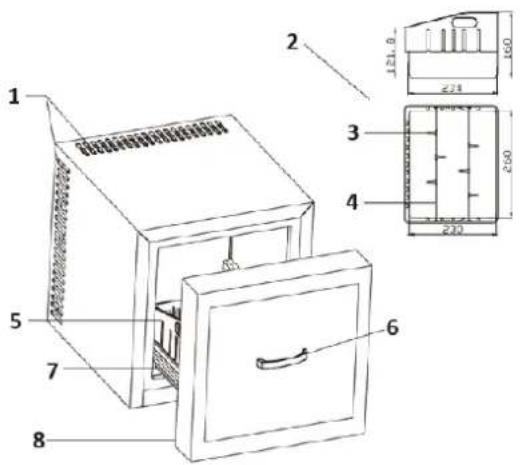
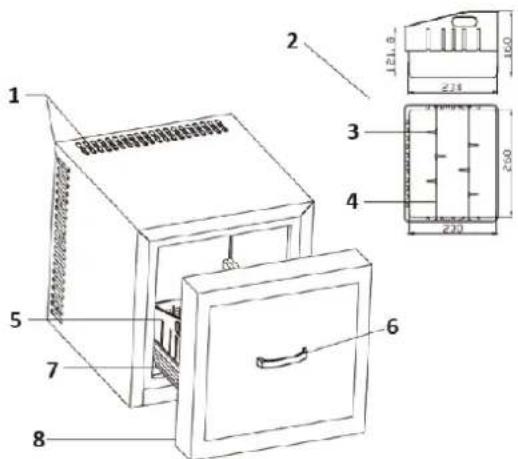
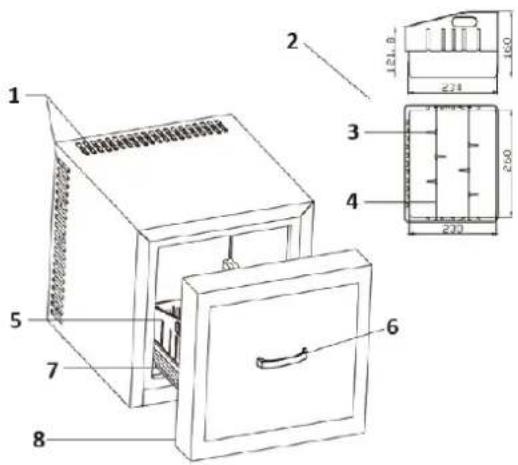
3.1. Device description
RCGK-MB33L
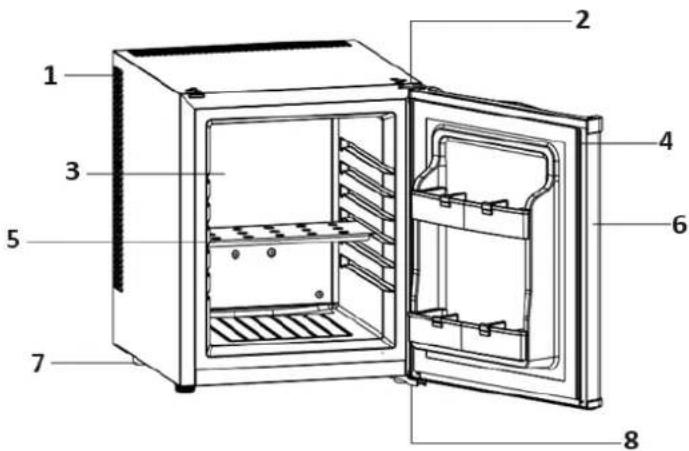
| Number | Description |
| 1 | Heat pump |
| 2 | Upper hinge |
| 3 | Cooling sheet |
| 4 | Door gasket |
| 5 | Shelf |
| 6 | Door |
| 7 | Foot |
| 8 | Lower hinge |
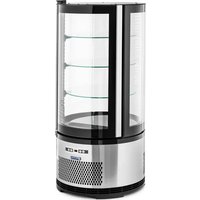
RCGK-MBG33L
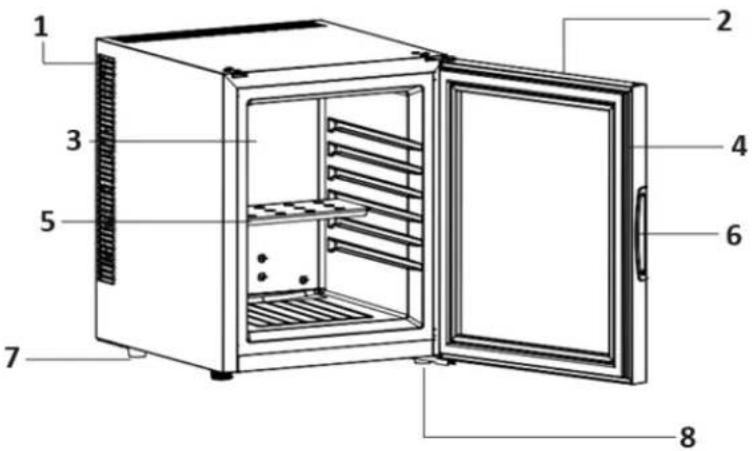
| Number | Description |
| 1 | Heat pump |
| 2 | Door |
| 3 | Cooling sheet |
| 4 | Door gasket |
| 5 | Shelf |
| 6 | Handle |
| 7 | Foot |
| 8 | Lower hinge |
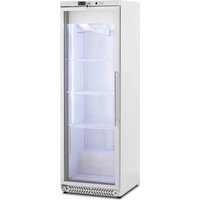
RCGK-MBD21L
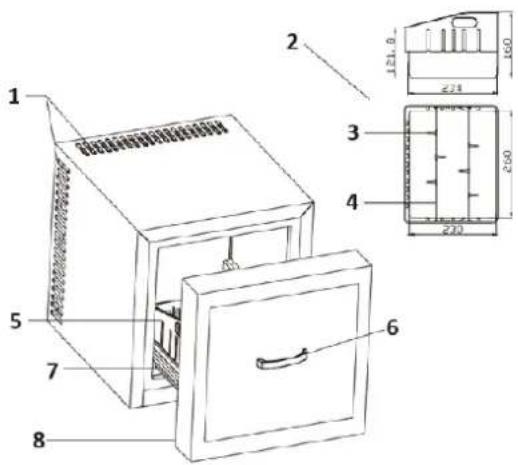
| Number | Description |
| 1 | Heating pore |
| 2 | Basket |
| 3 | Slide |
| 4 | Fixing bar |
| 5 | Basket |
| 6 | Handle |
| 7 | Guide rail |
| 8 | Gasket |
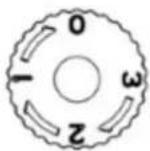
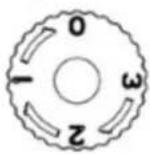
The temperature control knob is located on top of the product's inside.
Temperature control knob
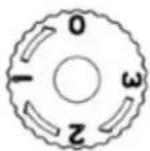
Setting the knob to "3" adjusts the temperature to approximately 5±2°C.
Setting the knob to "2" adjusts the temperature to approximately 10 ± 2^ .
Setting the knob to "1" adjusts the temperature to approximately 15 ± 2^ .
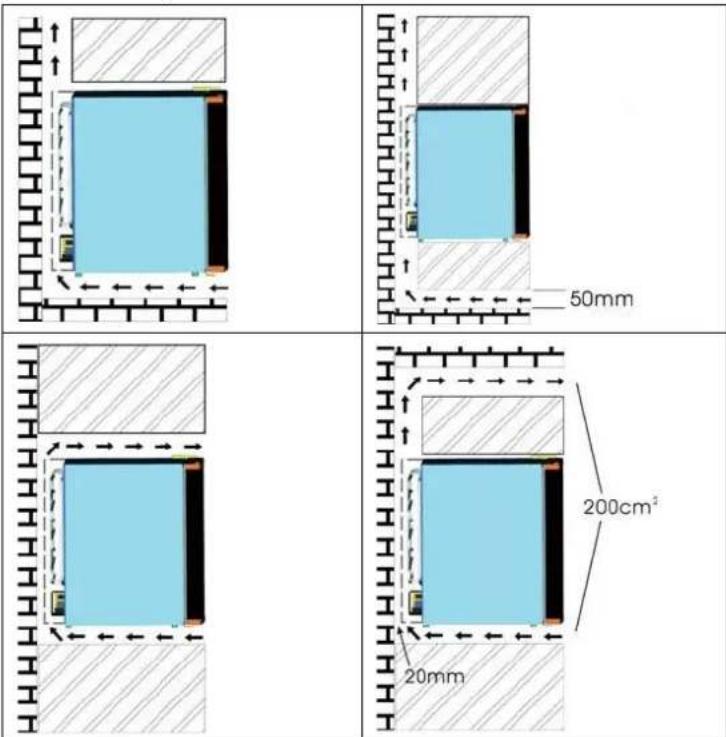
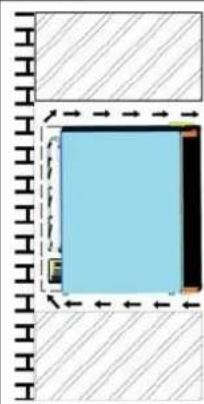
3.2. Installation
Pay attention to ventilation when installing this product:
- Ensure a minimum of 200 cm ^3 of space for ventilation and maintain at least 20 mm between the product and the wall.
- Ensure at least 50mm of clearance at the bottom for airflow to prevent reheating.
• The entire cooling system must be considered in the ventilation planning.
The following illustrations demonstrate different installation methods:
• Position the product so that the plug is accessible.
- Keep the product out of direct sunlight.
• Do not place the product next to heat generating appliance.
• Do not place the product directly on the ground. Provide suitable stand.
- The product has better performance at an ambient temperature of 20-25°C. We suggest the refrigerator be powered off if the ambient temperature is lower than 10 degrees Celsius.
- After plugging the product, allow the unit to cool down for 2-3 hours before placing beverage into the compartment.
- Ventilation is very important for the product. The internal PCB is prone to damage in environments with poor ventilation. Besides, poor ventilation also reduces the life of the product.
• This product features an automatic defrosting system, eliminating the need for manual defrosting.
3.3. Function description
• Use the product exclusively for the pantry.
• The product is not suitable for the freezing foodstuffs.
- The temperature of the pantry is recommended to be at 12°C for RCGK-MB33L and RCGK-MBD21L, and 17°C for RCGK-MBG33L.
- The factory-set shelf configuration provides the most energy-efficient use of the product.
- When the ambient temperature is 25^ C and the pantry has no load, it takes around 3.5 hours to decrease the pantry's temperature from 25^ C to 12^ C for RCGK-MB33L and RCGK-MBD21L, and to 17^ C for RCGK-MBG33L.
The pantry is recommended to be set at 12°C for RCGK-MB33L and RCGK-MBD21L, and 17°C for RCGK-MBG33L.
3.4. Changing the swing hinge
This product is designed to allow the door to open from either the left or right side. If you wish to reverse the door opening direction, follow the instructions below.
- Remove the three screws from the right hinge.
- Detach the upper and lower hinges.
- Install the door in the desired position with the hinges, using three self-tapping screws to secure them in place.
3.5. Troubleshooting
| Problem | Possible cause |
| The product does not work. | The product is not plugged in.The circuit breaker tripped or there is a blown fuse.The room temperature is without the normal operating range.The door is opened too frequently.The door is not closed completely.The temperature control is not set correctly.The door gasket does not seal properly.The refrigerator does not have the required clearances for proper ventilation.The voltage supply is abnormal. |
| The light does not work. | The product is not plugged in.The circuit breaker tripped or there is a blown fuse.The LED light has burned out. |
| The product is experiencing vibrations | The product is not placed on a level surface. |
| The door will not close properly. | The refrigerator placed on a level surface.The door is installed reversed.The gasket is dirty.The shelves, bins, or baskets are out of position. |
3.6. Electric diagram
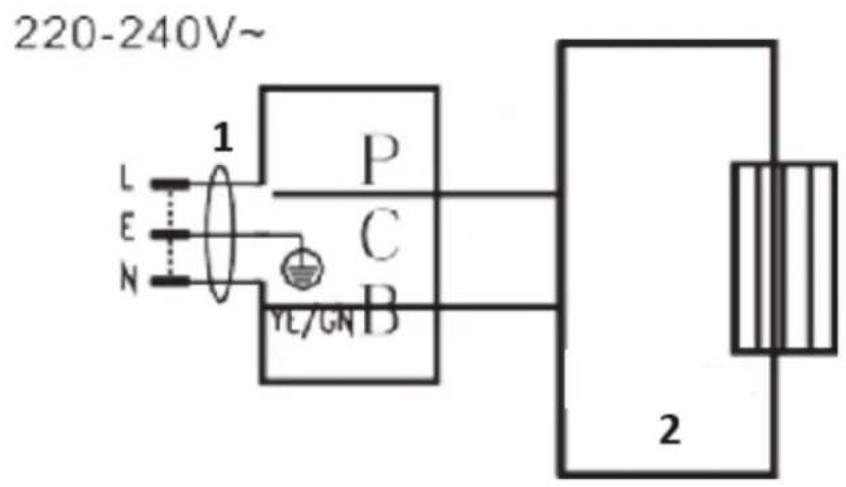
| Number | Description |
| 1 | Plug |
| 2 | Cooling unit |
| Antall | Beskrivelse |
| 1 | Varmepumpe |
| 2 | Dør |
| 3 | Kjøleark |
| 4 | Dørpakning |
| 5 | Hylle |
| 6 | Håndtak |
| 7 | Fot |
| 8 | Nedre hengsel |
RCGK-MBD21L
| Antall | Beskrivelse |
| 1 | Oppvarming pore |
| 2 | Kurv |
| 3 | Lysbilde |
| 4 | Festestang |
| 5 | Kurv |
| 6 | Håndtak |
| 7 | Føringsskinne |
| 8 | Pakning |
Knott for temperaturinnstilling
| číslo | Popis |
| 1 | Tepelné čerpadlo |
| 2 | Dvere |
| 3 | Chladiaca plachta |
| 4 | Tesnenie dverí |
| 5 | Polička |
| 6 | Rukovát' |
| 7 | Noha |
| 8 | Spodný pánt |
RCGK-MBD21L
| číslo | Popis |
| 1 | Vyhrievací pór |
| 2 | Košík |
| 3 | Šmykl'avka |
| 4 | Upevnovacia lišta |
| 5 | Košík |
| 6 | Rukovát' |
| 7 | Vodiace zábradlie |
| 8 | Tesnenie |
natural_image
Diagram showing a rectangular object with a blue interior and directional arrows, surrounded by a patterned border (no text or symbols)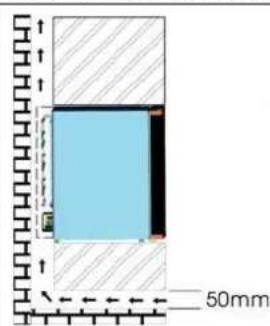
natural_image
Simple diagram of a rectangular object with dashed and solid arrows indicating direction, surrounded by diagonal hatching (no text or symbols)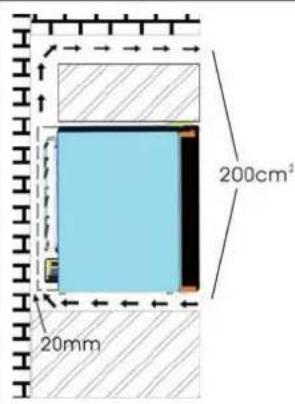
| Broj | Opis |
| 1 | Dizalica topline |
| 2 | Vrata |
| 3 | Rashladna ploča |
| 4 | Brtva za vrata |
| 5 | Polica |
| 6 | Ručka |
| 7 | Noga |
| 8 | Donja šarka |
RCGK-MBD21L
| Broj | Opis |
| 1 | Grijanje pora |
| 2 | Košara |
| 3 | slajd |
| 4 | Šipka za pričvrš čivanje |
| 5 | Košara |
| 6 | Ručka |
| 7 | Vodilica |
| 8 | brtva |
Gumb za kontrolu temperature nalazi se na vrhu unutarnje strane proizvoda.
Gumb za kontrolu temperature

Postavljanjem gumba na "3" podešava se temperatura na približno 5±2°C.
Postavljanjem gumba na "2" podešava se temperatura na približno 10 ±2°C.
Postavljanjem gumba na "1" podešava se temperatura na približno 15 ±2°C.
3.2. Montaža
Obratite pozornost na ventilaciju prilikom postavljanja ovog proizvoda:
- Osigurajte najmanje 200 cm ^3 prostora za ventilaciju i održavajte najmanje 20 mm između proizvoda i zida.
| številka | Opis |
| 1 | Ogrevanje por |
| 2 | Košarica |
| 3 | Diapozitiv |
| 4 | Pritrdilna palica |
| 5 | Košarica |
| 6 | Ročaj |
| 7 | Vodilna tirnica |
| 8 | Tesnilo |
Gumb za nadzor temperature se nahaja na vrhu notranjosti izdelka.
Gumb za nadzor temperature
Z nastavitvijo gumba na "3" se temperatura nastavi na približno 5±2°C.
Z nastavitvijo gumba na "2" se temperatura nastavi na približno 10 ±2°C.
Z nastavitvijo gumba na "1" se temperatura nastavi na približno 15 ±2°C.
3.2. Namestitev
For the disposal of the device please consider and act according to the national and local rules and regulations.
CONTACT
expondo Polska sp. z o.o. sp. k.