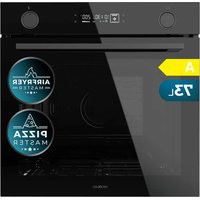
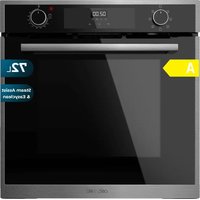
Bolero Hexa V 3000 Black - Oven CECOTEC - Free user manual and instructions
Find the device manual for free Bolero Hexa V 3000 Black CECOTEC in PDF.

| Product type | Built-in oven |
| Brand | Cecotec |
| Model | Bolero Hexa V 3000 Black |
| Reference | 02400 |
| Power supply | 220-240 V~, 50-60 Hz |
| Power | 3.15 kW |
| Number of cooking functions | 10 modes: Conventional, Convection, Double top heating element + Fan, Conventional + Fan, Radiant heat, Bottom heating element, Fermentation, Drying, ECO, and 4 steam modes (Conventional + Steam, Convection + Steam, Conventional + Fan + Steam, Bottom heating element + Steam, Radiant heat + Steam) |
| Automatic programs | 25 preset menus |
| Temperature probe | Yes (meat probe included) |
| Interior light | Yes (LED) |
| Child safety lock | Yes (lock by holding Start/Pause button 3 seconds) |
| Delayed start | Yes |
| Quick preheating | Yes |
| Steam cleaning | Yes (with citric acid) |
| Removable door | Yes (removable for cleaning) |
| Side racks | Removable |
| Included accessories | Oven grid, baking tray, temperature probe |
| Installation type | Built-in |
| Eco mode | Yes |
| After-sales service | Official Cecotec Service (tel. +34 963210728) |
Frequently Asked Questions - Bolero Hexa V 3000 Black CECOTEC
User questions about Bolero Hexa V 3000 Black CECOTEC
0 question about this device. Answer the ones you know or ask your own.
Ask a new question about this device
Download the instructions for your Oven in PDF format for free! Find your manual Bolero Hexa V 3000 Black - CECOTEC and take your electronic device back in hand. On this page are published all the documents necessary for the use of your device. Bolero Hexa V 3000 Black by CECOTEC.
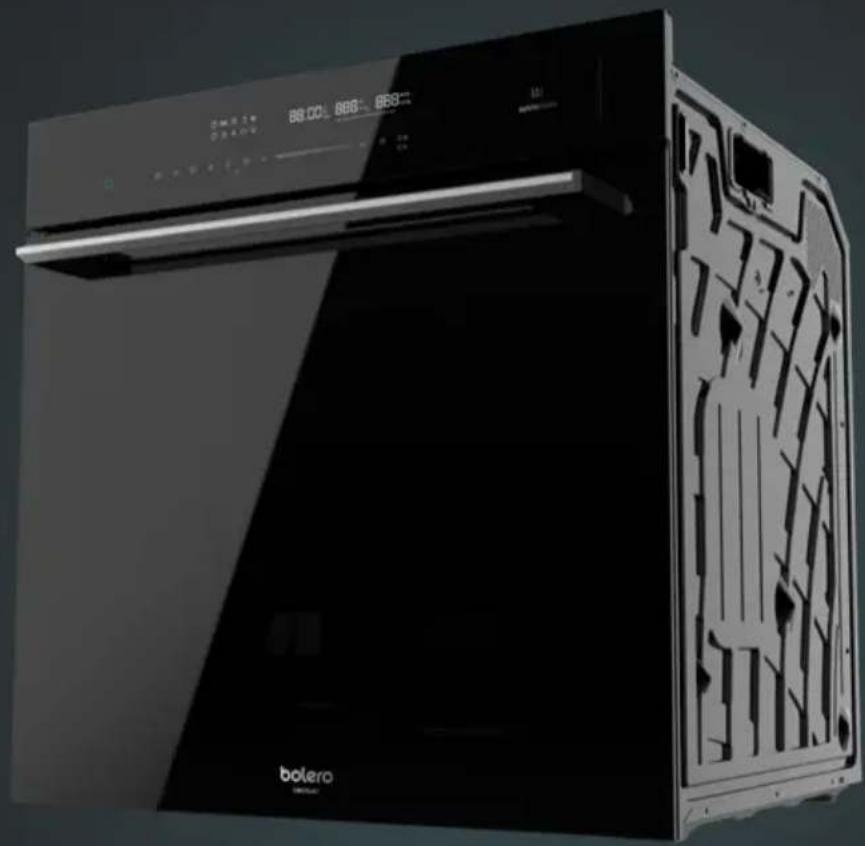
USER MANUAL Bolero Hexa V 3000 Black CECOTEC
Built-in oven with steam cooking
natural_image
Exterior view of a modern black Boletro air purifier with digital display and internal structure (no visible text or symbols)| Instrucciones de seguridad 4 | 7. Nettoyage et entretien | 110 | |
| Safety instructions 10 | 8. Résolution de problèmes | 115 | |
| Instructions de sécurité 15 | 9. Conseils | 117 | |
| Sicherheitshinweise 21 | 10. Efficacité énergétiqueconforme à la norme EN 60350-1 | 118 | |
| Istruzioni di sicurezza 27 | 11. Spécifications techniques | 119 | |
| Instruções de segurança 32 | 37 | 12. Recyclage des équipementsélectriques et électroniques 119 | |
| Veligheidsvoorschrillen | 13. Garantie et SAV | 119 | |
| Instrukcie bezpieczefislava 42 | 14. Copyright | 120 | |
| Bezpočnostní pokyny 47 | |||
| ÍNDICE | |||
| 1. Panel de control 52 | INHALT | ||
| 2. Antes de user 53 | 1. Bedienfeld 121 | ||
| 3. Instalación 53 | 2. Vor dem Gebrauch | 122 | |
| 4. Funciones | 55 | 3. Montage | 122 |
| 6. Accesorios 63 | 4. Funktionen | 124 | |
| 7. Limpieza y montenimiento 65 | 5. Gerät benutzen | 129 | |
| 8. Resolución de problemas 69 | 6. Zubehör 131 | ||
| 9. Consejos 72 | 7. Reinigung und Wartung | 134 | |
| 10. Eficiencia energética según lanorma EN 60350-1 | 73 | 8. Problemehebung | 139 |
| 9. Ratschlage/ Tips | 141 | ||
| 11. Especificaciones técnicas | 74 | 10. Energieeffizienz nach EN 60350-1 | 142 |
| 12. Reciclaje de Aparatos Eléctricosy Eléctricinos | 74 | 11. Technische Spezifikationen | 143 |
| 12. Recycling von Eickbro- undEicktroniligeräten | 143 | ||
| 13. Garantie y SAV | 74 | 13. Garantie und Kundendienst | 143 |
| 14. Copyright | 75 | 14. Copyright | 144 |
| INDEX | |||
| 1. Control panel | 76 | INDICE | |
| 2. Before use | 77 | 1. Pannello di controllo | 145 |
| 3. Installation | 77 | 2. Prima dell'uso | 146 |
| 4. Functions | 79 | 3. Installazione | 146 |
| 5. Device operation | 83 | 4. Funzioni | 148 |
| 6. Accessories | 86 | 7. Pulizia e manutenzione | 156 |
| 7. Cleaning and maintenance | 88 | 8. Risoluzione dei problemi | 162 |
| 8. Troubleshooting 92 | 9. Consigiù | 164 | |
| 9. Tips | 94 | 10. Eficienza energetica secondola norma EN 60350-1 | 165 |
| 10. Energy efficiency according toEN 60350-1 | 95 | 11. Specifiche tecniche | 166 |
| 11. Technical specifications | 95 | 12. Riciclaggio di apparecchiatureelétriche ed elettroniche 166 | |
| 12. Disposal of old electrical appliances | 96 | ||
| 13. Technical support and warranty | 96 | 13. Garanzia e supporto tecnico | 166 |
| 14. Copyright | 96 | 14. Copyright | 167 |
| SOMMAIRE | |||
| 1. Panneau de contrôle | 97 | ÍNDICE | |
| 2. Avant utilisation | 98 | 1. Paine de controllo | 168 |
| 3. Installation | 98 | 2. Antes de usar | 169 |
| 4. Fonctions 100 | 3. Instalação | 169 | |
| 4. Funções 171 | |||
| 5. Utilisation de l'appareit | 105 | 6. Acessórios | 178 |
| 6. Accessores | 108 | 7. Limpeza e manutenção 181 | |
- Read these instructions thoroughly before using the product or removing its packaging. You will only be able to use the device correctly and safely after reading them.
- Following these instructions will lengthen the shelf life of your oven. Keep this instruction manual for future reference or new users.
- The device is equipped with an earth connection for functional purposes only.
- Check if the device is damaged after removing the packaging. Do not connect the device to the power supply if it is damaged. Damage caused by incorrect connection is not covered by the warranty.
- Use this appliance indoors only. The appliance may only be used to prepare food and drinks. The appliance must be supervised during operation.
- This appliance can be used by children aged 8 and above, and persons with reduced physical, sensory or mental capabilities or lack of experience and knowledge, as long as they have been given supervision or instruction concerning the use of the appliance in a safe way and understand the hazards involved. Children must not play with the appliance. The cleaning and maintenance of the appliance should not be carried out by children without supervision.
- Keep this appliance and its power cord out of reach of children under the age of 8.
- Always insert the accessories into the oven in the correct way.
RISK OF ELECTRIC SHOCK
- Incorrect repairs can be dangerous. Repairs and replacement of damaged power cables must only be carried out by authorised technical personnel. If the appliance is faulty, disconnect it from the mains or switch off the circuit breaker in your home. Contact the Technical Support Service of Cecotec.
- The insulation of electrical appliance cables could melt if they come into contact with the hot parts of the appliance. Never allow the electrical appliance cables to come into contact with the hot parts of the appliance.
- The appliance is not intended to be operated by means of an external timer or a separate remote-control system.
- Do not use pressurised water or steam, as this may cause an electric shock.
- A defective appliance can cause an electric shock. Never turn a defective appliance on. Unplug the device from the mains or switch off the circuit breaker of your home. Contact the Technical Support Service of Cecotec.
RISK OF BURNS

- This symbol means: caution, hot surface. The temperature of the accessible surfaces may be hot when the device is operating. Never touch the internal ice of the device nor the heating elements.
- Allow the device to cool down after being used.
- Oven accessories may reach high temperatures. Always use oven gloves to remove accessories or other objects from the interior of the oven.
-
Alcohol vapours may ignite if heated inside the oven. Never cook food with large amounts of drinks with high alcohol content in the device. Open the oven door carefully.
-
When you open the device door, this may release hot steam. This steam may not be visible, it depends on the temperature reached. When opening the device, do not stand near it.
- Open the device door carefully. Keep children away from the device.
RISK OF INJURIES
- If the door glass is damaged, it could crack. Do not use glass scrapers, cleaning agents or abrasive detergents to clean the device door.
- The device hinges move when you open and close the door, be careful not to get caught. Keep hands away from hinges.
RISK OF FIRE
- If you store flammable items inside the oven, they may catch fire. Never store flammable items inside the oven. Never open the door of the device if there is smoke inside. Unplug the device from the mains or switch off the circuit breaker of your home.
- An air flow is created when the appliance door is opened. Baking paper may catch fire if it comes into contact with the heating elements. Do not place baking paper on accessories while preheating the oven. Always place baking paper on a tray or mould suitable for the oven. Cover only the necessary surface with baking paper.
- Baking paper cannot exceed the edges of the accessories.
RISK DUE TO MAGNETISM
The control panel and control elements use fixed magnets. These can affect electronic implants, such as pacemakers or insulin pumps. Users with electronic implants must stay at least at 10 cm from the control panel.
POSSIBLE DAMAGE AND CAUSE
- Do not cover the interior base of the oven with any type of aluminium or vegetable foil. Do not place oven safe cookware in the interior base of the oven if you have set a temperature over 50°C. This could lead to a heat accumulation. The enamel will be damaged.
- Do not allow aluminium foil to come into contact with the glass door. This could cause permanent discolouration of the glass door.
- Do not use silicone frying pans, nor lids with silicone covers or silicone accessories. This could damage the oven sensor.
- Never pour water inside the oven when it is hot. It could cause steam. Temperature changes can damage the enamel.
- Moisture inside the oven for a long period of time could cause corrosion. Allow the device to dry after every use. Do not store wet food inside the oven while it is closed for long periods of time. Do not store food in the oven.
- Allow the oven to cool down with the door open after use. Do not allow any objects to be trapped between the exterior and the interior of the oven. The front part of the furniture near the oven could be damaged over time if the door is left open, even if the opening is small. Allow the device to dry with the door open only if there is too much moisture because of the oven operation.
- Fruit juice: when baking cakes with particularly juicy fruit, do not overfill the baking tray. If fruit juice drips from the baking tray, it could cause permanent stains. If possible, use the deepest tray.
-
Extremely soiled gaskets: if the gaskets are soiled, the device door will not close properly during operation. This could damage the front part of the adjacent devices and furniture. Make sure that the gaskets are always clean.
-
Do not sit on the device door, nor place or hang objects on it. Do not place tableware or accessories in the device door.
- Accessory positioning: depending on the model, accessories may scratch the door panel when closing it. Always insert accessories inside the oven until they reach the interior front wall.
- Do not transport nor hold the device by the door handle. The door handle cannot withstand the weight of the appliance and could break.
- If you use residual heat when the oven is off to keep food warm, you can create a high moisture content inside the oven. This could lead to condensation and damage due to corrosion in the device, as well as damage to your kitchen.
- You can prevent condensation if you open the door or use the Defrost function.
INSTRUCTIONS DE SÉCURITÉ
-
On/off button: use it to turn the device on and off, as well as to stop its operation.
-
Baking: use it to activate the Baking function.
-
Only steam: use it to activate the Only steam function.
-
Steam cooking: use it to activate the Steam cooking function.
-
Automatic menu: use it to select the automatic menu.
-
Delay end: use it to set a delay end time.
-
Light: press the Delay end and Fast preheating buttons to turn on and off the oven light.
-
Fast preheating: use it to preheat the oven.
-
Slider bar: use your finger to modify the cooking time and temperature.
-
Time/temperature/steam setting: use it to establish the cooking time, temperature and steam.
-
Start/Pause/Child lock: press this button once to start or pause the cooking process: hold it down for 3 seconds to activate or deactivate the child lock.
-
Water tank: use it to remove the water tank, used for the Steam function. When you press it, the water tank will be released.
Display
-
Timer i con
-
Fast preheating function icon
-
Defrost icon
-
Rotisserie function icon
-
Time indicator
-
Lock icon
-
Temperature indicator
-
Temperature units
-
Empty water tank icon
-
Weight indicator
-
Delay end icon
-
Steam function icon
-
Automatic menu icon
-
Ferment function icon
-
Light icon
-
Time units
-
Weight units
(*) The graphics in this manual are schematic representations and may not exactly match the product.
2. BEFORE USE
- This product includes a package designed to protect it during transport. Unpack the appliance and keep the original packaging and materials in a safe place. It will help prevent any damage if the product needs to be transported in the future. In case the original packaging is disposed of, make sure all packaging materials are recycled accordingly.
- Make sure all parts and components are included and in good conditions. If there is any piece missing or not in good condition, immediately contact the Technical Support Service of Cecotec.
Box contents
- Oven
- Baking tray
- Oven rack
- Thermal probe
- Instruction manual
3. INSTALLATION
On the following figures you can see the minimum distances necessary for the oven installation.
Fig. 2. Oven installation on a cabinet
- Ventilation opening
- The minimum space on the base for proper ventilation is 250 cm ^-1 .
Fig. 3. Oven installation in a cabinet
- Ventilation opening
Fig. 4. Side with the oven height
- Oven
Fig. 5. Side with the furniture height
-
Oven
-
To operate this device on a safe manner, it is recommended for a professional to install the oven respecting the instructions. Damage produced by an incorrect installation are not covered by the warranty.
- During installation, use protective gloves to prevent cuts with sharp edges.
- Dimensions are expressed in mm.
- The plug must be accessible or a switch must be incorporated in the fixed wiring, so that the device can be disconnected from the supply after installation if necessary.
ENGLISHENGLISH
Warning
- You should not install the device behind a decorative door to avoid overheating the door.
- Do not cover the ventilation grilles. Otherwise, the device could overheat.
First use
- Remove all stickers, surface protection films and transport protection parts.
- Remove every accessory and side racks from the interior.
- Thoroughly clean the accessories and side racks with soap and water and a kitchen cloth or a soft brush.
-
Make sure there are no packaging materials inside, as polystyrene pellets or pieces of wood which may cause a fire hazard.
-
Clean all interior smooth surfaces and the door with a soft and clamp cloth.
-
To remove the smell of new appliances, use it while empty and with the oven door closed.
-
Keep your kitchen well ventilated while the device is heating for the first time. Keep children and pet away from the kitchen during use. Close the door of the rooms next to it.
-
Use the following settings. You can see how to set the type of heating and temperature in the following section.
Settings for the first use:
| Baking function: conventional | |
| Temperature 250°C | |
| Time 1 h |
When the device cools down:
-
Clean the flat surfaces and the door with water and soap and a kitchen cloth.
-
Dry every surface.
-
Install the side racks.
Clock setting
Before using the oven, you must set the time.
-
When turning on the oven, the control panel will show '00' you can set the clock using the slider bar or buttons + and -
-
Press the time/temperature/steam setting button to confirm your choice.
Note
- If you need to modify time again, hold down the time/temperature/steam setting button for 3 seconds and repeat steps 1 and 2 to establish the new time.
- The clock has a 24-hour display.
4. FUNCTIONS
- The device has different operation modes for an easier use.
- Follow these instructions to find the mode that best suits your needs.
4.1 Baking function
Use: select the heating elements, set the time or temperature and start the cooking process.
| Heating modes Temperature Use | ||
| Conventional 30-250°C For a traditional baking or toasting in a single level. Specially suitable for cakes with wet toppings. | ||
| Convection 50-250°C For toasting or baking in two levels. The heat is released evenly from the heat ring around the fan. | ||
| Upper double heating element + Fan | 50-250°C To cook food with flat surfaces and to brown food. The fan distributes heat evenly in the interior. | |
| Conventional + Fan | 50-250°C For toasting or baking in two levels. The fan distributes the heating elements heat evenly in the interior. | |
| Radiation heat | 150-250°C To cook small amounts of food and to brown food. Place food on the centre under the upper heating element. | |
| Lower heating element | 30-200°C To add an extra browning to pizza, pie and cake bases. Heat is released from the bottom of the oven. | |
| Dough fermentation | 30-45°C To prepare yeast dough and sourdough for leavening and fermenting yoghurt. | |
| Drying function | ||
| ECO | 140-240°C To save energy during the cooking process. | |
ENGLISHENGLISH
4.2 Steam cooking function
- Use: select the Steam cooking function, set the desired time, temperature and steam and the cooking process will start.
- The Steam cooking function will cook food in a tenderer manner and the skin of some food will be crispier.
| Heating modes Temperature Use | |||
| Conventional + Steam | 160-230°C For a traditional baking or toasting in a single level. Specialty suitable for cakes with wet toppings. | ||
| Convection + Steam 150-250°C For toasting or baking in two levels. The heat is released evenly from the heat ring around the fan. | |||
| Conventional + Fan + Steam | 160-230°C For toasting or baking in two levels. The fan distributes the heating elements heat evenly in the interior. | ||
| Lower heating element + Steam | 160-200°C To add an extra browning to pizza, pie and cake bases. Heat is released from the bottom of the oven. | ||
| Radiation heat + Steam | 160-235°C To cook small amounts of food and to brown food. Place food on the centre under the upper heating element. | ||
Note
- Before using the Steam cooking function, add water to the water tank.
- Steam level is set from L1 to L3, being L3 the highest level.
- When you activate the Steam cooking function, the steam icon will light up, as well as the rotisserie icon (2).
Warning
If you open the device door while it is operating, it will pause. Be especially careful because there is burn hazard.
Cooling fan
The cooling fan will turn on and off if necessary. Hot air is released over the door.
4.3 Automatic menu
Use: select the automatic menu function and a menu, and start the cooking process. Within the automatic menu you can select 25 different programmes/menus with a specific function, and pre-set temperature and time.
| Display | Menu | Function | Temperature | Cooking type | Preheating |
| 01 | Roasted pumpkin with goat cheese and rocket | 230°C | 10 min | Yes | |
| 02 | Aubergine gratin | 180°C | 30 min | Yes | |
| 03 | Ratatouille (stewed vegetables) | 160°C | 40 min | Yes | |
| 04 | Crab in salt crust | 200°C | 23 min | Yes | |
| 05 | Escabeche | 160°C | 30 min | Yes | |
| 06 | Sole fillet with fresh herbs | 220°C | 10 min | Yes | |
| 07 | Oven-roasted chicken with root vegetables and potatoes | 200°C | 55 min | Yes | |
| 08 | Crispy pork belly | 180-230°C | 67 min | Yes | |
| 09 | Beef rib | 230°C | 25 min | Yes | |
| 10 | Meat pie | 100°C | 30 min | Yes | |
| 200°C | 20 min | Yes |
ENGLISHENGLISH
| 11 Pasta au | gratin | 200°C 45 min Yes | |||
| 12 Chicken with | harissa, olives and chickpeas | 160 °C 40 min Yes | |||
| 13 Banana broad | 160 °C 60 min | Yes | |||
| 14 Chocolate | fondant | 180°C 10 min Yes | |||
| 15 Apple strudel with vanilla sauce | 180°C 30 min Yes |
Warning
- Do not cover the ventilation grilles. Otherwise, the device could overheat.
- The cooling fan will continue operating for a short period of time so the device cools down quickly after every use.
Only steam menus
| Display | Menu | Function | Temperature | Cooking type | Preheating |
| 16 | Vegetable snack | 100°C 20 min | NO | ||
| 17 | Australian pumpkin soup | 100°C 40 min | NO | ||
| 18 | Stuffed courgettes | 100°C 30 min | NO | ||
| 20 | Curry fish with peaches | 100°C 25 min | NO | ||
| 21 | Sea bass with vegetables | 100°C 30 min | NO | ||
| 22 | Mussels in sauce | 100°C 40 min | NO | ||
| 23 | Chicken breast with sundried tomatoes | 100°C 40 min | NO |
| 24 | Crema catalona (Crème brûlée) | 100°C 30 min | NO | ||
| 25 | Sticky toffee pudding | 100°C 45 min | NO |
Warning
- To heat tableware, it is convenient to remove the side racks and use the hot air and fan heating modes with a temperature setting of 50^ C. The hot air function must be used if the tableware covers more than half of the oven base.
- To get the best heat distribution inside the oven during fan heating, fan will operate at certain times during the heating process to guarantee the best possible performance.
5. DEVICE OPERATION
- After connecting the oven to the mains, press the function symbol to be used (in the previous section you can find an explanation for every function).
- Use the slider bar or buttons + and - to set the cooking temperature.
- Press the Start/Pause button so the oven starts operating, if you do not, after 5 minutes, the oven will show the clock.
- During the cooking process, you can press the On/Off button to stop the oven.
Note
After setting the temperature, you can press the time/temperature/steam setting button to set the cooking process time with the slider bar or buttons +/-
Fast preheating
- You can use the fast preheating to reduce the cooking time.
- Press the Fast preheating button. The corresponding symbol will light up on the display.
Note
Place food in the oven when it has reached the preheating temperature.
Modifications during cooking
- To modify the time, temperature or steam amount during the cooking process, press the time/temperature/steam setting button or use the slider bar or buttons +/-
- When you wish to cancel the cooking process, press the On/Off button.
ENGLISHENGLISH
Note
Modifying the cooking mode, temperature or time may have negative consequences on the cooking results, we strongly recommend that you do not do this unless you are very experienced in cooking.
Warning
- After turning on the device, it will become very hot, especially inside. Never touch the internal surface of the device nor the heating elements. Use oven gloves to remove accessories or cookware from inside, and allow the device to cool down after every use.
- Keep children at a distance while using the oven to prevent any burn risk.
Child lock
- This device features a child lock so children do not turn on the oven or modify the settings accidentally.
- Hold down the Start/Pause button for 3 seconds to activate or deactivate the child lock function.
Energy save mode
- On standby mode, after 10 minutes of inactivity, the oven will automatically enter the energy save mode. You can also activate this mode if you hold down the On/Off button for 3 seconds.
- On the energy save mode, press any button to access to the standby mode again.
Steam cleaning function
- Remove the water tank, add water and half a packet of citric acid (not included) to the water tank, mix it well and place the water tank back in the slot.
- On standby mode, press the automatic menu button once and access the Steam cleaning function with the slider bar or press buttons +/- , and the display will show dES.
- Press the Start/Pause button to start this function. When the countdown reaches 08:00 min, the oven will indicate there is no more water.
- Remove the tank, add water and place it back in its slot. Press the Start/Pause button to continue using this function.
Delay end function
- Once you have set the time, press the Delay end function button to establish the cooking end time.
- Select the function (this function is not available with the automatic menu and fast preheating functions), set the time, temperature and cooking steam, and press the Start/Pause button to establish the delay end.
- Press the Delay end button to check the stabilized time.
Exact temperature function
- On any mode, introduce the short end of the probe on the oven display and the long end on the food and insert it in the oven.
- Select the grill function (on any of these modes: Conventional, Upper double heating element + Fan, Convection), set the probe temperature with buttons + and - and press the Start/Pause button to start the function.
- When the temperature on the food centre reaches the temperature set on the probe, the smoking process will stop and it will return to the standby mode.
Warning
- When you use the meat probe, make sure you introduce the end on the meat.
- Use only the meat probe provided with the oven.
Steam
- When the oven is on standby mode, press the Steam button to add steam after selecting the conking options.
- You can increase steam manually by pressing the Steam button during the cooking process.
- The default steam level is level 1.
Warning
- There are three steam levels, the amount of steam will increase as the level increases. Press the Steam button once to see the default level that is, level 1. Press the Steam button twice to set level 2 and three times to set level 3. The display will show the level (L1/L2/L3). Press the Steam button four times to cancel the Steam function and the steam level light indicator will turn off.
- Due to vibration during transport, the water tank may not be correctly placed after removing the product packaging. Remember to place it correctly.
Water tank
You can fill the water tank with two different processes:
- Press the water tank button and remove it, then, remove the sealing cap and add water. Fig. 6
- Press the water tank button and remove part of the tank, remove the sealing cap and add water. Fig. 7
Notes
When the cooking process ends, pour the remaining water on the water tank and dry it.
ENGLISHENGLISH
6. ACCESSORIES
This device includes accessories. Next, you will find the accessories included and its correct use.
Accessories included
- Oven rack: use it along with cookware, cake moulds and oven platters. To bake or brown food. Fig. 8
- Baking tray: use it to bake small items. Fig. 9
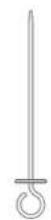
- Meat probe: introduce the probe in the meat centre, away from fat or bone. Fig. 10
- You can use the tray to place liquids or cook food with juice.
- Use only the original accessories. They are specially designed for this device.
- You can buy accessories in specialised stores.
Note
Accessories may deform when heated. This will not affect its operation. When they have cooled down, they will return to their original shape.
Accessories introduction
- The oven has 5 positions.
Warning
- Make sure you introduce accessories always in the right direction.
- Place accessories in the interior until they reach the interior wall, so they do not come into contact with the device door.
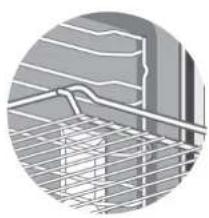
Lock function
Accessories can be removed approximately up to half way without tipping. The lock function prevents accessories from tipping because of its weight when they are removed. To prevent them from tipping, you must introduce accessories correctly.
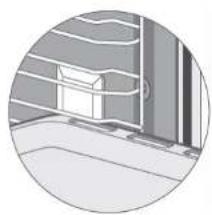
When you introduce the rack, make sure it is placed in the right direction, as shown in figures 11 and 13.
When you introduce the baking tray, make sure it is placed in the right direction, as shown in figures 11 and 14.
Additional accessories
You can buy accessories in specialised stores or on the internet.
- Rotisserie: to cook meat and vegetables. Fig. 15
Rotisserie introduction
The rotisseries are only suitable for the rotating system; these can be placed on the rotating system rack.
Before introducing this accessory in the oven, make sure every food is properly placed, then introduce them on level 2.
Warning
- The rotating system constantly rotates, there is an option to make it rotate during the cooking process according to food. Use oven gloves and be careful with the oven heat when you open the door. This system rotates at a 90° angle and it is not necessary for the user to rotate it.
- Rotisseries are dangerous due to their cusp-shaped heads, so make sure that children and disabled people stay away from them. Check they do not come into contact with heating elements before turning on the oven, as this could cause damage to the oven and users.
- We recommend you use level 2, activate the upper and lower heating elements to bake while using the rotating system.
Recommendations for an energy-efficient use
- Remove every unnecessary accessory during the cooking and baking process.
- Do not open the door during the cooking and baking process.
- If you open the door during the cooking process, it will stop and the light will turn on.
- Reduce the temperature setting for the modes without fan to 50°C from 5 to 10 minutes before ending the baking process. The interior heat will help you complete the cooking process.
- Use the fan heating function if possible. You can reduce the temperature in 20°C and 30°C intervals.
- You can cook and bake using fan heating in more than a height level at once.
- If it not possible to cook and bake different dishes at once, you can heat one after the other with the preheating mode.
- Do not preheat an empty oven if it is not necessary. If necessary, introduce food in the oven immediately after reaching the desired temperature; the light indicator will turn off when reached.
- Use the timer and/or temperature probe whenever possible.
- Use moulds or oven cookware with a dark matt finish and light weight. Try not to use heavy accessories with shiny surfaces, like aluminium or stainless steel.
Health risk
Acrylamide is mainly produced by heating starchy foods (e.g., potatoes, chips, bread) at very high temperatures for a long time.
ENGLISHENGLISH
Tips
- Use short cooking times.
- Cook food until its surface is brown, do not allow it to burn or get dark brown colours.
- Larger food portions contain more acrylamide.
- Use the fan heating function if possible.
- Chips: Use more than 450 g on a tray, distribute them evenly and stir them from time to time. Use the information on the chips package to get the best cooking results.
7. CLEANING AND MAINTENANCE
With proper care and cleaning, your device will preserve its original aspect and operate correctly for a long period of time.
Do not use:
- Abrasive or strong cleaning agents.
- Cleaning agents with high alcohol content.
- Sharp scouring pads or cleaning sponges.
- High-pressure or steam cleaners.
- Special cleaners to clean the device while it is hot.
Wash new sponge cloths thoroughly before using them.
| Exterior surface Cleaning | |
| Exterior surface Stainless-steel front part | Hot water with soap:Wipe it with a kitchen cloth and then dry it with a soft cloth. Immediately remove lime, grease, starch and albumen stains (e.g. egg white).Corrosion may form under these stains.You can buy special cleaning products to clean stainless steel and suitable for hot surfaces in specialised stores.Apply a very fine layer of cleaning product with a soft cloth... |
| Plastic parts, control panel and door panels | Hot water with soap:Wipe it with a kitchen cloth and then dry it with a soft cloth.Do not use glass cleaners, glass scrapers or stainless-steel scouring pads. |
| Coloured surfaces Hot water | with soap:Wipe them with a kitchen cloth and then dry them with a soft cloth. |
| Door handle Hot water with | soap:Wipe it with a kitchen cloth and then dry it with a soft cloth.If water softener comes into contact with the door handle,immediately clean it. Otherwise, you will not be able toremove the stains. |
| Enamelled and self-cleaning surfaces | Check the instructions below on how to clean the ovenInterior surfaces. |
| Glass cover for the interior lighting | Hot water with soap:Wipe it with a kitchen cloth and then dry it with a soft cloth.If the interior is very dirty, use an oven cleaner. |
| Door sealingDo not remove it. | Hot water with soap:Clean it with a kitchen cloth. Do not rub the gasket. |
| Stainless-steel cover Cleaning agent for stainless steel:Follow the manufacturer instructions.Do not use special products for stainless steel.Remove the door cover to clean it. | |
| Accessories Hot water with soap:Immerse them in water and clean them with a kitchen clothor a brush.If there are large dirt remains, use a stainless-steel scouring pad. | |
| Guides Hot water with soap:Immerse them in water and clean them with a kitchen clothor a brush. | |
| Removal system Hot water with soap:Clean it with a kitchen cloth or brush.Do not remove lubricant while the removal guides are spread out.The best solution is to clean the system when the guides arenot spread out.Do not wash it in the dishwasher. | |
| Meat probe Hot water with soap:Clean it with a kitchen cloth or brush. Do not wash it in thedishwasher. | |
ENGLISHENGLISH
Warning
- Slight differences in colour in the front part of the device are caused by the use of different materials, like glass, plastic and metal.
- The shadows on the door panels, which look like stripes, are due to reflections from the interior lighting.
- Enamel is made at very high temperatures. This can cause a slight colour variation. This is completely normal and does not affect the device operation. The edges on thin trays cannot be completely enamelled. As a result, these edges can be rough. This does not affect the corrosion protection.
- Always keep the device clean and immediately remove the dirt so that the appliance does not accumulate lasting dirt residues.
Tips
- Clean the oven interior after every use. This way, you will not cook food over this dirt.
- Immediately remove lime, grease, starch and albumen stains (e.g. egg white).
- Use suitable oven cookware, e.g., an oven platter.
Device door
- You can detach the oven door to clean and disassemble the door panels.
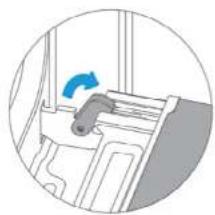
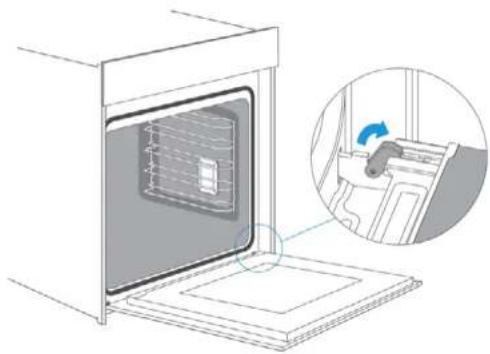
- The door hinges have a lock lever each. Fig. 16
- When the lock levers are locked, the device door is locked. It cannot be detached.
- When the lock levers are unlocked to detach the oven door, the hinges are blocked, so they cannot be locked all at once.
Warning - Risk of injury
- If the hinges are not blocked, they can be lock with energy. Make sure the lock levers are always completely locked or, when detaching the device door, they are completely unlocked.
- The device hinges move when you open and close the door, be careful not to get caught. Keep hands away from hinges.
Detaching the device door
Fig. 17
- Open the door completely.
- Open both lock levers located on the left and right.
- Close the device door until it is completely locked.
- With both hands, hold the door from its left and right side, and pull it upwards.
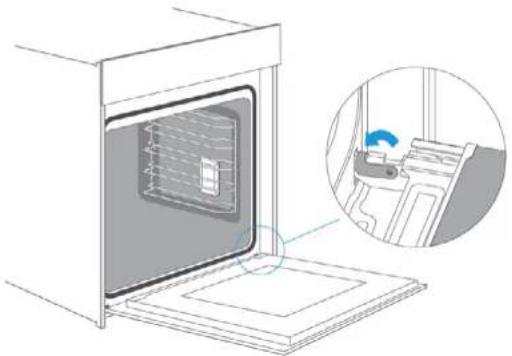
Attaching the device door
Fig. 18
- Place the device door again following the previous steps in reverse order.
- When fixing the device door, make sure both hinges match the installation holes on the interior front panel.
- Make sure the hinges are placed in the correct position. You must be able to introduce them easily, without applying pressure. If you feel there is some resistance, check the hinges are properly placed on the gaps.
- Open the door completely. While you open the device door, you can check again if the hinges are in their correct position. If they are incorrectly placed, the door will not open completely.
- Close both lock levers again.
- Close the device door. At the same time, check once again if the door is in the correct position and if the ventilation grilles are not partially blocked.
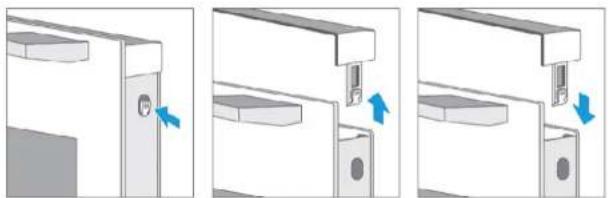
Removing the door cover
Fig. 19
- The plastic cover layer on the door can discolour. To thoroughly clean it, you must remove the cover.
- Remove the device door as previously indicated.
- Press the tabs on the left and right side of the cover as shown in figure 19.
- Remove the door cover.
- After removing the door cover, the remaining door parts can be easily removed to continue with the cleaning. Once you finish cleaning the device door, place the cover back in its position and press on it until it clicks into place.
- Install the device door as described on the previous chapter.
Warning
- You can also remove the door cover while the door is attached to the oven.
- After detaching the door cover, the interior door glass will be unlock, so it can easily move and cause damage or injury.
- Detaching the door cover and the interior glass reduces the total weight of the door. Hinges are easier to move when you close the door and you can get caught in them. Keep hands away from hinges.
- Due to the previous warnings, it is advisable you do not detach the door cover unless the door is detached. The warranty does not cover damage caused by improper use.
Guides
Fig. 20
To clean the guides and the interior of the oven, you can remove the guides and clean them as shown in figure 20.
Cord substitution
Cord substitution can only be carried out by the manufacturer, Cecotec Technical Support Service or qualified personnel.
ENGLISHENGLISH
8. TROUBLESHOOTING
- If there is a fault, before contacting Cecotec Technical Support Service, make sure it is not caused by an improper use and check the following table to try and solve the problem on your own.
- In most cases, the user itself can solve technical faults easily.
| Fault Possible | Cause Possible solution | |
| The device does not work | Blown fuse Check the circuit breaker. | |
| Power cut. Check if the kitchen | light or any other appliances work. | |
| The buttons fell off their bracket on the control panel. | The buttons have been accidentally released. | You can remove the buttons.Place the buttons again in their bracket on the control panel and push them into place so that they fit together and can be used normally. |
| The buttons cannot be easily used. | There is dirt under the buttons. | You can remove the buttons.To detach the buttons, you just need to remove them from their bracket.Atemately, you can press the lower edge on every button so they tilt and are easily removed.Clean the buttons carefully with a cloth and soapy water.Dry them with a soft cloth.Do not use detergents or abrasive sponges.Do not immerse them in water, nor wash them in the dishwasher.Do not remove the buttons too often so that their brackets remain stable. |
| The fan does not operate continuously in this mode: Fan heating | This is normal, it is due to a better heat distribution and oven performance. | |
| After use, there is some noise and air flow near the control panel. | The cooling fan is still active to prevent high moisture conditions in the interior and to cool down the oven for convenience. The cooling fan will turn off automatically. | |
| Food is not cooked enough on the time indicated in the recipe. | You are using a different temperature to the recipe one. Check the temperature again.The amount of ingredients is different to the recipe one.Check the recipe again. |
| Uneven toasting The temperature setting is too high, or it is not placed on the correct level. Check the recipe and settings again.The surface finish, colour and/or material of the cookware used was not the best option for the selected function. When using radiation heat, as well as using the upper + lower heating elements, use oven cookware with a matt finish, dark in colour and light in weight. | |
| The light does not turn on. You must replace the light bulb. | |
Warning - risk of electric shock
Incorrect repairs can be dangerous. A damaged cord repair or replacement can only be carried out by authorised technical personnel. If the device is defective, unplug it from the power supply or switch off your home circuit breaker. Contact the Technical Support Service of Cecotec.
Maximum operation time
The maximum operation time on this device is 9 hours, so that the circuit breaker does not trip.
Light bulb slot
- To light up the oven interior, your device features one or many long-lasting. LED light bulbs.
- If a LED light bulb or the light bulb glass cover are defective, contact Cecotec Technical Support Service. You must never remove the light bulb cover.
ENGLISHENGLISH
- TIPS
| How to prepare your own recipe | Try to use first similar recipe settings for optimal results. |
| How to know when the sponge cake is ready | Place a toothpick inside the cake 10 minutes before the preparation time expires. If there is no uncooked dough on the toothpick after removing it, the cake is ready. |
| The sponge cake surface is too brown. | Place it on a lower level and/or use a lower setting temperature (this can lead to a longer cooking time). |
| The sponge cake is too dry. Increase the temperature in 10^ (this could lead to a shorter cooking time). | |
| Food has good aspect, but the interior moisture is too high. | Decrease the temperature in 10^ (this could lead to an upper cooking time) and check the recipe steps. |
| Uneven browning. Decrease the temperature in 10^ (this could lead to an upper cooking time).Use the upper - lower heating element and place it on level 1. | |
| The sponge cake surface is less brown. | Place it on a lower level. |
| Cooking in more than a height level at once: food on a height level will be darker than food on another height level. | Use the fan heating mode to bake in more than a height level and remove trays individually when they are ready. It is not necessary every tray is ready at once. |
| Water condensation during cooking. | Steam is part of the cooking process and is usually released together with the cooling air flow. This steam can condensate in different oven surfaces or near them and form water drops. It is a physical process and cannot be completely prevented. |
| Suitable baking cookware You can use heat-resistant bakeware. It is recommended not to use aluminium in direct contact with food, especially when they are acidic.Make sure the container and lid fit properly. | |
| General oven use Preheat the oven | for 5 minutes and place food on the level indicated in the manual.Do not use the oven when the door is open, except to remove/introduce/check food. |
| How to keep the oven clean during cooking. | Fill the tray with water and place it on level 1. Almost every liquid dripping from food placed on the rack will fall into the tray. |
| The heating element on any cooking mode turns on and off during time. | It is a normal operation and it depends on the temperature setting. |
10. ENERGY EFFICIENCY ACCORDING TO EN 60350-1
Take into account the following information:
- The measurement is carried out in the ECO mode to determine the forced air mode data and the label class.
- The settings of the upper + lower heating element mode were used to determine the information on the conventional mode.
- During measurement, only the necessary accessory was placed in the interior.
-
The determination of the interior volume is carried out for the Defrost use as described in the previous sections. To ensure an efficient oven use, every accessory is removed, even the side guides.
-
TECHNICAL SPECIFICATIONS
| Reference: 02400 | |
| Model Bolero Hexa V 3000 Black built-in oven | |
| QR code | |
| Voltage 220-240 V - | |
| Frequency 50-60 Hz | |
| Electric power: | 3.15 kW |
Technical specifications may change without prior notification to improve product quality. Made in China | Designed in Spain
ENGLISH
FRANÇAIS
12. DISPOSAL OF OLD ELECTRICAL APPLIANCES

This symbol indicates that, according to the applicable regulations, the product and/or battery must be disposed of separately from household waste. When this product reaches the end of its shelf life, you should dispose of the batteries/accumulators and take them to a collection point designated by the local authorities.
Consumers must contact their local authorities or retailer for information concerning the correct disposal of old appliances and/or their batteries.
Compliance with the above guidelines will help to protect the environment.
13. TECHNICAL SUPPORT AND WARRANTY
Cecotec shall be liable to the end user or consumer for any lack of conformity that exists at the time of delivery of the product under the terms, conditions and deadlines established by the applicable regulations.
It is recommended that repairs are carried out by qualified personnel.
If at any moment you detect any problem with your product or have any doubt, do not hesitate to contact Cecotec official Technical Support Service at +34 963 210 728.
14. COPYRIGHT
The intellectual property rights over the texts in this manual belong to CECOTEC INNOVACIONES, S.L. All rights reserved. The contents of this publication may not, in whole or in part, be reproduced, stored in a retrieval system, transmitted or distributed by any means (electronic mechanical, photocopying, recording or similar) without the prior authorization of CECOTEC INNOVACIONES, S.L.
1. PANNEAU DE CONTRÔLE
lng.1(°)
8. PROBLEEMOPLOSSING
natural_image
Line drawing of an oven with internal grating and a handle (no text or symbols)Fig. / Img. / Rys. / Obr. 11
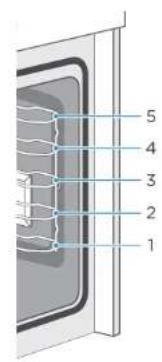
Fig. / Img. / Rys. / Obr. 12
natural_image
Close-up of a metal grid structure with curved lines and mesh overlay (no text or symbols)Fig. / Img. / Rys. / Obr. 13
natural_image
Circular grayscale illustration of a window with horizontal bars and a small object, no text or symbols present.Fig. / Img. / Rys. / Obr. 14 Fig. / Img. / Rys. / Obr. 15
natural_image
Diagram of a door handle with a blue arrow indicating direction (no text or symbols)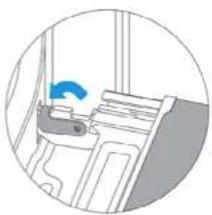
natural_image
Illustration of a hospital bed with a blue circular arrow indicating airflow or ventilation (no text or symbols)Fig. / Img. / Rys. / Obr. 16
natural_image
Diagram of a microwave oven with an inset showing a hand washing the interior (no text or symbols present)Fig. / Img. / Rys. / Obr. 17
natural_image
Diagram of a microwave oven with a close-up inset showing the interior mechanism (no text or symbols)Fig. / Img. / Rys. / Obr. 18
natural_image
Three-step diagram showing a door opening process with blue arrows indicating direction (no text or symbols)Fig. / Img. / Rys. / Obr. 19
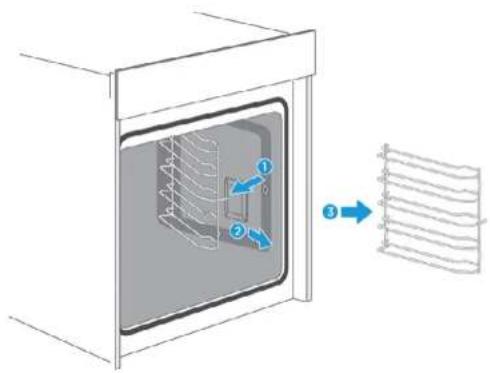
Fig. / Img. / Rys. / Obr. 20
www.cecotec.es
Quart de Poblet, Valencia (Spain) YV01220209
ČEŠTINA
ČEŠTINA ČEŠTINA
I bolero
HEXA V 3000 BLACK | 267266267266
ČEŠTINA