
Bolero Hexa MWO706000 Line - Oven CECOTEC - Free user manual and instructions
Find the device manual for free Bolero Hexa MWO706000 Line CECOTEC in PDF.

| Product type | Combi microwave oven (convection, grill, microwave) |
| Brand | Cecotec |
| Model | Bolero Hexa MWO706000 Line |
| Rated voltage | 230 V~, 50 Hz |
| Microwave power (output) | 800 W |
| Microwave power (input) | 1600 W |
| Grill power | 2200 W |
| Convection power | 1800 W |
| Maximum power | 2800 W |
| Microwave frequency | 2450 MHz |
| Cooking functions | Convection, grill, radiant heat, double heating element, pizza, defrost, fermentation, microwave, combi |
| Special functions | Quick preheat, delayed end, timer, child lock, preset menus (10 recipes) |
| Control type | Touch panel with adjustment bar |
| Display | Digital screen |
| Interior lighting | Yes (bulb) |
| Included accessories | Rack, oven tray, glass plate |
| Child safety | Yes (touch lock) |
| Installation type | Built-in |
| Cleaning | Warm water and dish soap, do not use abrasives |
Frequently Asked Questions - Bolero Hexa MWO706000 Line CECOTEC
User questions about Bolero Hexa MWO706000 Line CECOTEC
0 question about this device. Answer the ones you know or ask your own.
Ask a new question about this device
Download the instructions for your Oven in PDF format for free! Find your manual Bolero Hexa MWO706000 Line - CECOTEC and take your electronic device back in hand. On this page are published all the documents necessary for the use of your device. Bolero Hexa MWO706000 Line by CECOTEC.
USER MANUAL Bolero Hexa MWO706000 Line CECOTEC
bolero
Safety instructions 10
-
Parts and components 63
-
Before use 63
-
Installation 64
-
Operation 65
-
Cleaning and maintenance 72
-
Troubleshooting 75
-
Technical specifications 76
-
Disposal of old electrical and electronic appliances 77
-
Technical support and warranty 77
-
Copyright 77
SOMMAIRE
IMPORTANT SAFETY INSTRUCTIONS
READ CAREFULLY AND KEEP FOR FUTURE REFERENCE
Read these instructions thoroughly before using the device. Keep this instruction manual for future reference or new users.
- This appliance can be used by children aged 8 years and above and persons with reduced physical, sensory, or mental capabilities or lack of experience and knowledge if they have been given supervision or instruction concerning use of the appliance in a safe way and understand the hazards involved. Children must not play with the appliance. Cleaning and user maintenance should not be carried out by unsupervised children.
- This appliance is designed for domestic use only and is not intended for bars, restaurants, farmhouses, hotels, motels, and offices.
- This symbol means 'Caution: hot surface.' The
temperature of the accessible surfaces may be high when the appliance is in operation.
- The appliance heats up during use. Avoid touching the heating elements inside.
- WARNING: all accessible parts of the appliance and the appliance itself may heat up during use. Do not touch the heating elements. Children under 8 years of age should be kept away from the appliance unless continuously supervised.
- Do not use abrasive cleaners or sharp metal scrapers to clean the oven door glass, as it may scratch the surface and cause subsequent glass breakage.
-
Never clean the appliance with steam cleaners.
-
WARNING: make sure that the appliance is unplugged from the mains before replacing the lightbulb to avoid any risk of electric shock.
- Do not install the appliance behind a decorative panel to avoid overheating.
- Incorrect repairs can be dangerous. Refer only to authorised technical personnel for repairs and replacement of damaged power cables. If the appliance is defective, unplug it from the power supply or switch off your home circuit breaker. Contact the official Cecotec Technical Support Service.
- The appliance is not intended to be operated by means of an external timer or a separate remote-control system.
- Open the appliance door carefully. Keep children away from the appliance.
- If the door glass is damaged, it could crack. Do not use glass scrapers, cleaning agents, or abrasive detergents to clean the appliance door.
- The appliance hinges move when opening and close the door: be careful not to get caught. Keep hands away from hinges.
- If you store flammable items inside the oven, they may catch fire. Never store flammable items inside the oven. Never open the door of the appliance if there is smoke inside. Unplug the appliance from the mains or switch off the circuit breaker of your home.
- The control panel and control elements use fixed magnets. These can affect electronic implants, such as pacemakers or insulin pumps. Users with electronic implants must stay at least at 10 cm from the control panel.
-
Do not allow aluminium foil to come into contact with the glass door. This could cause permanent discolouration of the glass door.
-
Do not use silicone frying pans, nor lids with silicone covers or silicone accessories. This could damage the oven sensor.
- Moisture inside the oven for a long period of time could cause corrosion. Allow the appliance to dry after every use. Do not store wet food inside the oven while it is closed for long periods of time. Do not store food in the oven.
- When baking cakes with particularly juicy fruit, do not overfill the baking tray. If fruit juice drips from the baking tray, it could cause permanent stains. Use a deep tray if possible.
- If the gaskets are dirty, the appliance door will not close properly during operation. This could damage the front part of the adjacent appliances and furniture. Make sure that the gaskets are always clean.
- Do not sit on the appliance door or place or hang objects on it. Do not place tableware or accessories on the appliance door.
- Do not transport or hold the appliance by the door handle. The door handle cannot withstand the weight of the appliance and could break.
- If you use residual heat when the oven is off to keep food warm, you can create a high moisture content inside the oven. This could lead to condensation and corrosion damage in the appliance, as well as damage to your kitchen.
- WARNING: if the door or the door gaskets are damaged, the oven should not be used until repaired by authorised personnel.
- WARNING: it is dangerous for anyone other than a qualified person to perform maintenance or repair tasks involving the removal of a cover that provides protection against exposure to microwave energy.
-
WARNING: liquids and other foods should not be heated up in sealed containers, as they may explode.
-
When heating food in plastic or paper containers, keep an eye on the oven as there is possibility of ignition.
- This appliance is intended for heating up beverages and food. The drying of food or clothing and heating-up of pillows, shoes, sponges, wet clothes, and similar items may lead to injury, ignition, or fire.
- If smoke is emitted, stop, or unplug the appliance and keep the door closed to extinguish any flames.
- Microwave heating of beverages may result in a boiling cooking action. For this reason, precautions must be taken when handling the container.
- Metal food and beverage containers must not be used during microwave cooking.
- The contents of bottles and jars of baby food should be swirled or shaken, and the temperature should be checked before consumption to avoid burns.
- Eggs in their shell and whole hard-boiled eggs should not be heated in microwave ovens since they may explode even after microwave heating has ended.
- The appliance must be cleaned regularly, and you must remove any food remains.
- Failure to keep the appliance clean could lead to deterioration of the surface and could adversely affect the shelf life of the device and lead to hazards.
- WARNING: when the device is being used in combined mode, children should only use the oven under adult supervision, due to the temperatures generated.
INSTRUCTIONS DE SÉCURITÉ
INSTRUCTIONS DE SÉCURITÉ IMPORTANTES
LISEZ ATTENTIVEMENT ET CONSERVEZ POUR UNE RÉFÉRENCE FUTURE
- Cancel
- Microwave mode
- Timer/Child lock
- Delay end
- Fast preheating
- Functions
- Adjustment slider
- Pre-set menus
- Clock/Time/Temperature
- Weight
- Inner light
- Start/pause
- Decrease icon
- Increase icon
NOTE:
the graphics in this manual are schematic representations and may not exactly match the device.
2. BEFORE USE
- This appliance is packaged in a way as to protect it during transport. Take the device out of its box and remove all packaging materials. You can keep the original box and other packaging elements in a safe place. This will help you prevent damage to the device when transporting it in the future. In case the original packaging is disposed of, make sure all packaging materials are recycled accordingly.
- Make sure all parts and components are included and in good conditions. If there is any piece missing or in bad conditions, contact the official Cecotec Technical Support Service immediately.
Box content
- Oven
- Rack
- Baking tray
- Glass baking tray
- Instruction manual
ENGLISH
Before first use:
- Remove all stickers, surface protection films and transport protection parts.
- Remove every accessory and side racks from the interior.
- Thoroughly clean the accessories and side racks with soap and water and a kitchen cloth or a soft brush.
- Make sure there are no packaging materials inside, as polystyrene pellets or pieces of wood which may cause a fire hazard.
- Clean all interior smooth surfaces and the door with a soft and damp cloth.
Keep your kitchen well ventilated while the device is heating for the first time. Keep children and pet away from the kitchen during use. Close the door of the rooms next to it.
- Plug the oven power cord into a mains socket.
- Insert the baking tray and the rack.
- Select 250°C and heat up the oven while empty for 60 minutes.
Note: you may notice smoke and a burning smell at first. However, this does not affect the safety or operation of the appliance.
When the oven cools down:
- Clean the flat surfaces and the door with water and soap and a kitchen cloth.
- Dry every surface.
- Install the side racks.
3. INSTALLATION
- In order for the appliance to operate safely, it must be installed by a qualified professional in accordance with the installation instructions and local regulations. Damage produced by an incorrect installation are not covered by the warranty.
- During installation, use protective gloves to prevent cuts with sharp edges.
- Check the appliance for damage before installation, do not connect it to the mains if it is damaged.
- Before switching on the appliance, remove all packaging and adhesive film from the product.
- Figure 2 shows the dimensions (in mm) required for installation.
- The plug must be accessible, or a switch must be incorporated in the fixed wiring, so that the device can be disconnected from the supply after installation if necessary.
- Warning: you should not install the device behind a decorative door to avoid overheating the door.
-
Place the oven in the location you have selected, always making sure to comply with the dimensions detailed in figure 2.
-
Locate the two holes in the oven housing and fix it in place using parts [01], [02] and [03] shown in figure 3.
Warning
Do not overtighten the screws [01] to prevent any damage to the oven or the device housing - use a screwdriver only.
Accessories. Fig. 4
- Rack: use the rack for baking cakes and oven-safe dishes, as well as for grilling or browning food.
- Baking tray: use this tray for cooking smaller food.
- Glass baking tray: place this tray in the same position as the conventional baking tray.
Please note
- Accessories may deform when heated. This will not affect its operation. When they have cooled down, they will return to their original shape.
- Do not use the microwave mode when the oven is empty.
- When cooking with the microwave function, only use the glass tray. For best results, the glass tray should be placed at the lowest height of the rack.
The oven has 5 positions. The positions of the telescopic guides are counted from bottom to top. Accessories can be removed approximately up to halfway without tipping.
Note
- Make sure you introduce accessories always in the right direction.
- Place the accessories inside up to the inside rear wall, so that they do not touch the oven door.
Lock function
The accessories can be pulled out about halfway until they click into place. The lock function prevents the accessories from tilting during removal. To prevent them from tipping, you must introduce accessories correctly. When inserting the accessories, make sure they are facing the correct direction.
4. OPERATION
Fig. 1
- Cancel: press this icon to cancel the current operation and put the oven in standby mode.
- Microwave mode: use this icon to activate the microwave mode.
- Timer/child lock: press this icon to activate the timer or press and hold this icon for 3 seconds to activate the child lock function.
- Delay end: press this icon to set a delay end time for cooking.
ENGLISH
- Fast Preheating: use this icon to set the fast-preheating time and select the function. Then, set the time in standby mode.
- Functions: press and hold this icon to quickly select one or several functions.
- Adjustment slider: use the adjustment slider or the increase and/or decrease icons to adjust the parameters shown on the display.
- Pre-set menus: use this function to cook using pre-set menus.
- Clock/Time/Temperature: use this icon to adjust the clock in standby mode and to show the time and temperature configuration.
- Weight: use this icon to set the weight of the pre-set menus.
- Inner light: use this icon to switch on or off the inner light of the oven.
- Start/pause: use this icon to start or pause the cooking.
- Decrease: use this icon to decrease the parameters shown on the display.
- Increase: use this icon to increase the parameters shown on the display.
Setting the time
Before using the oven, you must set the time.
- After connecting the oven to the mains, press the ⏻ icon to set the current time using the setting slider or the X icons.
- Press the clock icon again to adjust the minutes with the setting slider or the ▽ / △ icons.
- Press the icon to complete the setting.
ATTENTION: the clock has a 24-hour display.
Heating modes
The oven has several operating modes that facilitate its use. To help you find the right heating mode for the food you want to cook, we explain the differences and areas of application here.
| Heating modes | Temperature (°C) | Use | |
 | Conventional 30~250 | For traditional single-height baking or roasting. Especially suitable for cakes with wet toppings. | |
 | Convection 50~250 | For baking or roasting at one or more heights. The heat is released evenly from the heat ring around the fan. | |
 | Conventional + Fan | 50~250 | For baking or roasting at one or more heights. The fan distributes the heating elements heat evenly in the interior. |
 | Radiation heat | 150~250 | To cook small amounts of food and to brown food. Place food on the centre under the upper heating element. |
 | Double heating element + Fan | 50~250 | To cook food with flat surfaces and to brown food. The fan distributes heat evenly in the interior. |
 | Double heating element | 150~250 | To cook food with flat surfaces and to brown food. |
 | Pizza 50~250 | For pizzas and dishes that need a lot of heat underneath. The bottom heating element and the heating ring will be activated. | |
 | Bottom heating element | 30~220 | For adding extra browning to pizza, pie and cake bases. Heat is released from the bottom of the oven. |
 | Defrost _ For lightly defrosting frozen food. | ||
 | Ferment 30~45 | To prepare yeast dough and sourdough for leavening and fermenting yoghurt. | |
Warning
If you open the device door while it is operating, it will pause. Be specially careful because there is burn hazard.
Note
To get the best heat distribution inside the oven during fan heating, fan will operate at certain times during the heating process to guarantee the best possible performance.
Cooling fan
The cooling fan will turn on and off if necessary. Hot air is expelled over the door.
Warning
Do not cover the ventilation grilles. Otherwise, the appliance could overheat.
The cooling fan will continue operating for a short period of time, so the device cools down quickly after every use.
Oven cooking
- After connecting the oven to the power supply, press the oven function symbol to select
ENGLISH
the desired functions. Use the setting slider or the ▽ / △ icons to set the cooking temperature.
- Press the Start/Pause icon ▷II to start the oven; otherwise, the oven will return to the time setting after 5 minutes.
- During the cooking process, you can press the cancel icon ⏻ to stop the oven.
NOTE: after setting the temperature, you can press the icon to adjust the duration of the cooking process using the setting slider or the Xicons.
Fast preheating
You can use the fast preheating function to shorten the preheating time. Next, select a function and press the fast preheating icon 🎨, the fast preheating icon will light up. If this function cannot be carried out, a beep will be heard. In automatic recipes and in defrosting and proofing modes, fast preheating cannot be used.
Delay end
After setting the cooking time, you can also set a delay end.
- Press the delay end icon ⏻, you can use the setting slider or the ▽ / △ icons to adjust the end time in hours. Press the icon again to adjust the minutes. When you have selected the delay end, press the same icon again to confirm.
- To set a delay end, you will also have to set the cooking time. See the "Oven cooking" section to set the cooking time.
For example, if the delayed end is set at 10:00 hours, and the cooking time is 1 hour, the oven will switch on at 9:00 hours, and finish at 10:00 hours.
Note
- You can set the delay end before choosing the function or select the function before setting the delay end.
- You cannot set the delay end in the defrost, heating, pre-set menus, combi microwave, microwave, and fermentation modes.
Modifications during cooking
- During operation of the appliance, you can change the heating mode setting and the temperature setting. After making the desired changes, and 6 seconds of inactivity, the oven will apply the selected changes.
- If you want to change the cooking time while it is active, press the Ⓥ icon and adjust it with the setting slider or the ▽ / △ icons. After making the desired changes, and 6 seconds of inactivity, the oven will apply the selected changes. If you start a cooking process with delayed end or a pre-set menu, you will not be able to make any changes to the cooking duration.
- When you want to cancel the cooking process, press the cancel icon 🔊.
Note
Modifying the cooking mode, temperature or time may have negative consequences on the cooking results, we strongly recommend that you do not do this unless you are very experienced in cooking.
Warning
After turning on the appliance, it will become very hot, especially inside. Never touch the internal surface of the appliance nor the heating elements. Use oven gloves to remove accessories or cookware from inside, and allow the appliance to cool down after every use. Keep children at a safe distance while the oven is in use to avoid the risk of burns.
Timer
- You can activate the timer function by pressing the Timer icon ⏻. Once the cooking time has finished, the oven will beep.
- When you press the ⏻ icon for the first time, you will access the timer hours setting; if you press it a second time, you will access the minutes setting. Press the icon a third time to confirm the settings.
- You can activate the timer before and during the cooking process, but the timer will not be available when you select the function and temperature.
Microwave and combi microwave
In standby mode, to set one of these modes, press the microwave icon ≈ to select the microwave function. The default time is 1 minute, the default power is 800 W. If you press the microwave icon again, the power will flash and you will be able to modify it with the setting slider. The power range is 80-800 W.
- Press the Ⓐ icon, the time will flash. Use the setting slider to change the time, in a range of 10 seconds to 30 minutes.
- You can combine the heating elements, upper heating element + radiation heat + fan modes, and the pizza menu with the microwave function by pressing the pre-set menu icon and the microwave icon. The appliance will beep.
- Press and hold the microwave icon for 3 seconds to cancel the function.
- You can set the microwave power and the combi microwave function in standby mode. The appliance will display the default value until cooking is started or the cancel icon is pressed.
Please note
- When cancelling the cooking process, the time and power will flash on the display.
- In this mode, press the microwave icon ≈ and the ▽ / △ icons or use the setting slider to modify the microwave power.
ENGLISH
| Heating modes | Power (W) | Temperature (°C) | Temperature range (°C) | Time | |
 | Microwave 80 / / | 00:10-30:00 min | |||
  | Microwave + Convection | 320 160 50~250 | 00:01-01:30 h | ||
  | Microwave + Double grill + Fan | 320 180 50~250 | 00:01-01:30 h | ||
  | Microwave + Pizza menu | 320 180 50~250 | 00:01-01:30 h | ||
| 5 4 3 2 1 | |||||
| Microwave power 100 | % (800) 70% (560) 50% (400) | 30% (240) 10% (80) | |||
| Combined power - 40 | % (320) 30% (240) 20% (160) | 10% (80) |
Safety child lock
In standby mode, delay end, during cooking or pause, if you press and hold the timer icon box for 3 seconds, the appliance will beep and the child lock icon will start flashing. Hold down the timer icon box for 3 seconds again to deactivate the child lock. While child lock is active, you will not be able to cancel the microwave mode.
Pre-set menus
The appliance has a wide range of pre-set menus that will allow you to obtain excellent results in an easy way. Just select the appropriate menu for the type of food you want to cook and follow the instructions on the display.
| No. | Menu | Microwave mode | Preheating Time | Weight | Weight range | |
| d01 | Defrost (meat) YES NO 08:00 min | NO 0.2 kg | 0.1 kg~1.5 kg | |||
| d02 | Defrost (poultry) YES NO 04:48 min | NO 0.2 kg | 0.1 kg~1.5 kg | |||
| d03 | Defrost (fish) | YES | NO | 04:00 min | 0.2 kg | 0.1 kg~1.0 kg |
| A01 | Popcorn YES NO 03:05 min | 0.1 kg | ||||
| A02 | Potato and cheese gratin | YES NO 00:35 min | 0.5 kg | |||
| A03 | Cheesecake | NO | NO | 01:16 h | / | |
| A04 | Quiche Lorraine | NO | 10 | Preheat for 10 minutes 00:40 h | / | |
| A05 | Meat pie | NO | NO | 01:15 h (default) 00:30 h | 1.00 kg | 1.00/0.50 kg |
| A06 | Marble sponge cake | NO | NO 01:20 h | / | ||
| A07 | Flatbread NO | 8 | Preheat for 8 minutes 00:35 h | / | ||
| A08 | Apple pie | NO | 7 | Preheat for 7 minutes 01:00 h | / | |
| A09 | Pizza with fresh dough on a tray | NO | 8 | Preheat for 8 minutes 00:35 h | / | |
| A10 | Apple crunch | NO | NO | 01:00 h | / |
Please note
When cooking menus d01, d02, d03, A01 and A02, you cannot use the baking tray.
Tips and tricks
| Food has good aspect, but the interior moisture is too high | Decrease the temperature in 10°C (this could lead to an upper cooking time) and check the recipe steps. |
| Uneven browning | Decrease the temperature in 10°C (this could lead to an upper cooking time).Use the upper + lower heating element and place it on level 1. |
| The sponge cake surface is less brown | Place it on a lower level. |
| Cooking in more than a height level at once: food on a height level will be darker than food on another height level | Use the fan heating mode to bake in more than a height level and remove trays individually when they are ready. It is not necessary every tray is ready at once. |
| Water condensation during cooking | Steam is part of the cooking process and is usually released together with the cooling air flow. This steam can condensate in different oven surfaces or near them and form water drops. It is a physical process and cannot be completely prevented. |
| Suitable baking cookware Heat-resistant baking utensils must be used. | |
| The heating element on any cooking mode turns on and off during operation | This is normal and it depends on the temperature setting. |
| What happens if a liquid is spilled on a food in the oven during the baking or cooking process? | The fluid will boil, and steam will form as a normal physical process.Be careful, the steam is already hot. If the liquid contains alcohol, the boiling process will be faster and may cause flames inside. Make sure the oven door is closed during these processes. Monitor the baking or cooking process carefully. Open the door with extreme care and only if necessary. |
5. CLEANING AND MAINTENANCE
Cleaning agent
With proper care and cleaning, your appliance will preserve its original aspect and operate correctly for a long period of time. Next, you have some instructions on cleaning and care of the product.
To avoid damage to different surfaces by using the wrong cleaning agent, please observe the information in the table.
Warning, risk of surface damage, DO NOT use:
- Abrasive or strong cleaning agents.
- Cleaning agents with high alcohol content.
- Sharp scouring pads or cleaning sponges.
- High-pressure or steam cleaners.
- Special cleaners to clean the device while it is hot.
Wash new sponge cloths thoroughly before using them.
Tip
Follow the manufacturer's instructions for cleaning and care products.
| Exterior surface Cleaning | |
| Exterior surface Stainless-steel front part | Hot water with soap:Wipe it with a kitchen cloth and then dry it with a soft cloth.Immediately remove lime, grease, starch, and albumen stains (e.g., egg white).Corrosion may form under these stains.You can buy special cleaning products to clean stainless steel and suitable for hot surfaces in specialised stores. Apply a very thin layer of the cleaning agent with a soft cloth. |
| Plastic | Hot water with soap:Wipe it with a kitchen towel and then dry it with a soft cloth. Do not use glass cleaner or a glass scraper. |
| Coloured surfaces | Hot water with soap:Wipe them with a kitchen towel and then dry them with a soft cloth. |
| Control panel | Hot water with soap:Wipe it with a kitchen towel and then dry it with a soft cloth. Do not use glass cleaner or a glass scraper. |
| Door panels | Hot water with soap:Wipe it with a kitchen cloth and then dry it with a soft cloth.Do not use a glass scraper or stainless-steel scouring pad. |
ENGLISH
| Door handle | Hot water with soap:Wipe it with a kitchen cloth and then dry it with a soft cloth.If water softener comes into contact with the door handle, immediately clean it. Otherwise, you will not be able to remove the stains. |
| Glass cover for the interior lighting | Hot water with soap:Wipe it with a kitchen cloth and then dry it with a soft cloth.If the interior is very dirty, use an oven cleaner. |
| Door gasketDo not remove it | Hot water with soap:Clean it with a kitchen cloth. Do not rub the gasket. |
| Stainless-steel cover | Stainless steel cleaner:Follow the manufacturer instructions. Do not use special products for stainless steel. Remove the door cover to clean it. |
| Exterior surface Cleaning | |
| Accessories | Hot water with soap:Immerse them in water and clean them with a kitchen cloth or a brush.If there are large dirt remains, use a stainless-steel scouring pad. |
| Oven guides | Hot water with soap:Immerse them in water and clean them with a kitchen cloth or a brush. |
| Removal system | Hot water with soap:Clean it with a kitchen cloth or brush.Do not remove lubricant while the removal guides are spread out. The best solution is to clean the system when the guides are not spread out.Do not wash it in the dishwasher. |
| Meat probe | Hot water with soap:Clean it with a kitchen cloth or brush. Do not wash it in the dishwasher. |
Note
- Slight differences in colour in the front part of the device are caused by the use of different materials, like glass, plastic, and metal.
- The shadows on the door panels, which look like stripes, are due to reflections from the interior lighting.
- Enamel is made at very high temperatures. This can cause a slight colour variation. This is completely normal and does not affect the appliance operation. The edges on thin trays cannot be completely enamelled. As a result, these edges can be rough. This does not affect the corrosion protection.
- Always keep the device clean and immediately remove the dirt so that the appliance does not accumulate lasting dirt residues.
Tips
- Clean the oven interior after every use. This way, you will not cook food over this dirt.
- Immediately remove lime, grease, starch, and albumen stains (e.g., egg white).
- Remove sugar-containing food stains immediately, if possible, while the stain is still warm.
- Use suitable roasting utensils, e.g., a roasting pan.
Oven door
Guides
When you want to clean the guides and the inside of the oven, you can remove the guides and clean them. Fig. 5
- Remove the white Teflon fittings.
- Lift the side rack.
- Remove the side rack.
6. TROUBLESHOOTING
If there is a fault, before contacting the official Cecotec Technical Support Service, make sure it is not caused by an improper use and check the following table to try and solve the problem on your own. In most cases, the user itself can solve technical faults easily.
| Fault Possible cause Possible solution | ||
| The appliance does not work | Blown fuse Check the circuit breaker. | |
| Power cut. Check if the kitchen light or any other appliances work. | ||
| The fan does not work continuously | This is normal due to better heat distribution and the best possible oven performance. | |
| After use, there is some noise and air flow near the control panel | The cooling fan is still active to prevent high moisture conditions in the interior and to cool down the oven for convenience. The cooling fan will turn off automatically. | |
| Food is not cooked enough on the time indicated in the recipe | You are using a different temperature to the recipe one. Check the temperature again. The amount of ingredients is different to the recipe one. Check the recipe again. | |
| Uneven toasting | The temperature setting is too high, or it is not placed on the correct level. Check the recipe and settings again. The surface finish, colour and/or material of the cookware used was not the best option for the selected function. When using radiation heat, as well as using the upper + lower heating elements, use oven cookware with a matt finish, dark in colour and light in weight. | |
| The light does not switch on | The bulb must be replaced, please contact the official Cecotec Technical Support Service. | |
Warning - risk of electric shock
Incorrect repairs can be dangerous. Refer only to authorised technical personnel for repairs and replacement of damaged power cables. If the appliance is faulty, disconnect it from the mains or switch off the earth leakage circuit breaker in your home. Contact the official Cecotec Technical Support Service.
Maximum operation time
The maximum operation time on this device is 9 hours, so that the circuit breaker does not trip.
Food testing according to EN 60350-1
| RECIPE Accessories Function | Temperature (°C) | Height | Time (min) | Preheating | ||
| Sponge cake | Removable mould Φ26 cm |  | 170 1 30-35 YE5 | |||
| Small sponge cake | Tray 150 2 30-40 Y  | |||||
| Apple pie | Removable mould Φ20 cm |  | 160 1 70-80 NO | |||
| Bread Tray 210 2 30-35 Yes |  | |||||
| Toasting | Rack |  | Max | 5 | 6-8 | Yes, 5 min |
| Chicken Rack and tray |  180 180 | Rack 2 Tray 1 | 75-80 Yes | |||
7. TECHNICAL SPECIFICATIONS
Product reference: 02835
Product: Bolero Hexa MW0706000 Line
Rated voltage: 230 V\~
Rated frequency: 50 Hz
Rated input power (microwave): 1600 W
Rated output power (microwave): 800 W
Rated input power (Grill): 2200 W
Rated input power (Convection) 1800 W
Maximum input power: 2800 W
Microwave frequency: 2450 MHz
Technical specifications may change without prior notification to improve product quality.
Made in China | Designed in Spain
8. DISPOSAL OF OLD ELECTRICAL AND ELECTRONIC APPLIANCES
This symbol indicates that, according to the applicable regulations, the product and/or batteries must be disposed of separately from household waste. When this product reaches the end of its shelf life, you should dispose of the cells/batteries/accumulators and take them to a collection point designated by the local authorities.
Consumers must contact their local authorities or retailer for information concerning the correct disposal of old appliances and/or their batteries.
Compliance with the above guidelines will help protecting the environment.
9. TECHNICAL SUPPORT AND WARRANTY
Cecotec shall be liable to the end user or consumer for any lack of conformity that exists at the time of delivery of the product under the terms, conditions, and deadlines established by the applicable regulations.
It is recommended that repairs be carried out by qualified personnel.
If at any moment you detect any problem with your product or have any doubt, do not hesitate to contact the official Cecotec Technical Support Service at +34 96 321 07 28.
10. COPYRIGHT
The intellectual property rights over the texts in this manual belong to CECOTEC INNOVACIONES, S.L. All rights reserved. The contents of this publication may not, in whole or in part, be reproduced, stored in a retrieval system, transmitted, or distributed by any means (electronic, mechanical, photocopying, recording or similar) without the prior authorization of CECOTEC INNOVACIONES, S.L.
FRANÇAIS
1. PIÈCES ET COMPOSANTS
Panneau de contrôle
Img. 1
6. PROBLEEMOPLOSSING
Fig./Img./Abb./Afb./Rys. 3
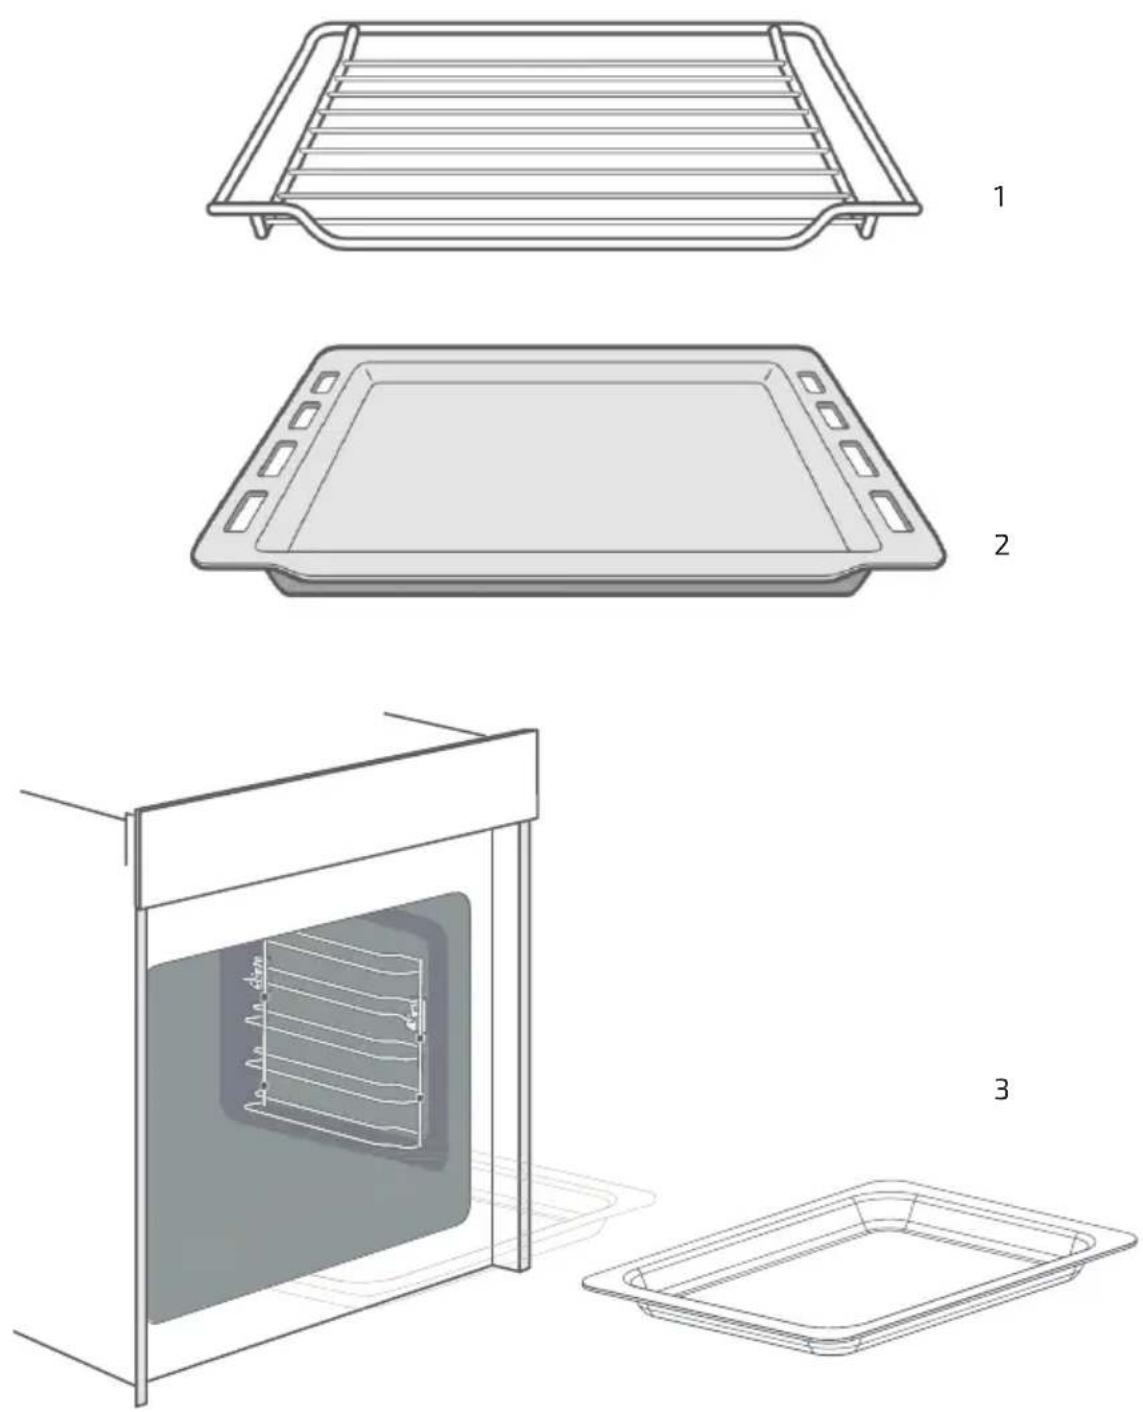
Fig./Img./Abb./Afb./Rys. 4
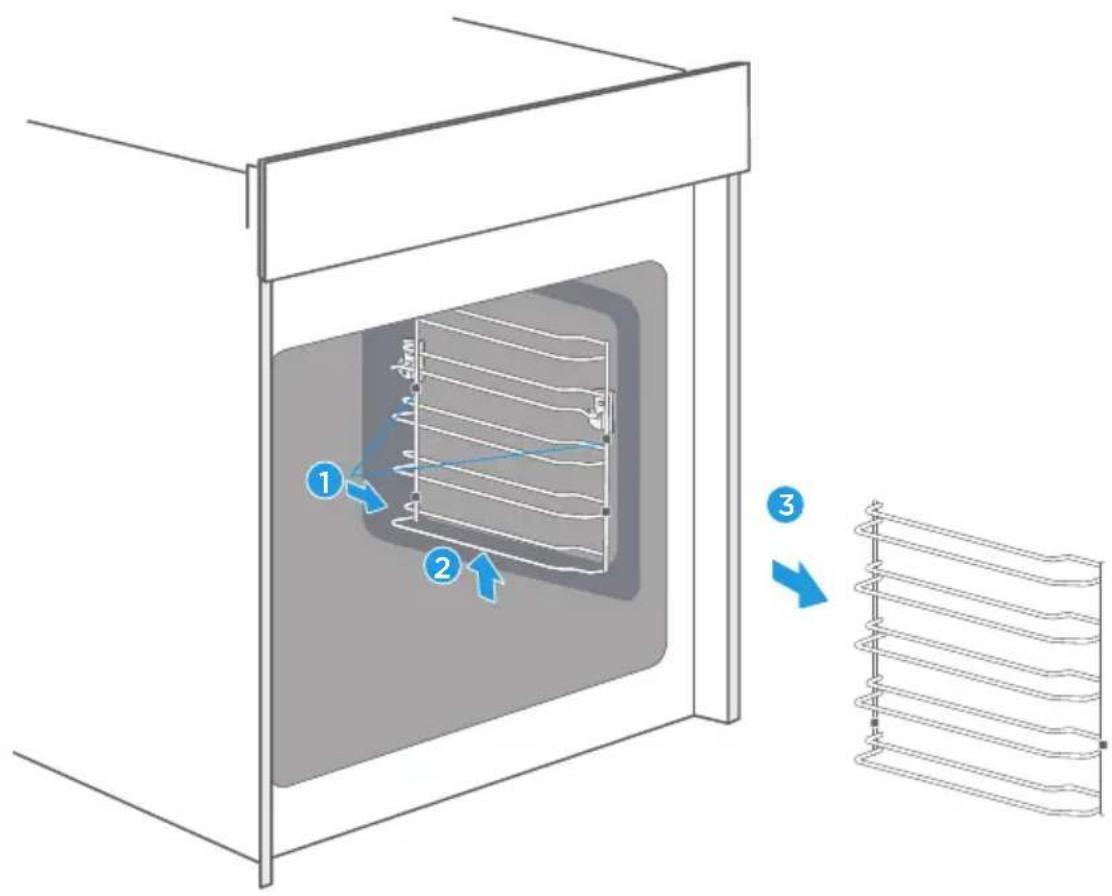
Fig./Img./Abb./Afb./Rys. 5
www.cecotec.es
- SOMMAIRE
- IMPORTANT SAFETY INSTRUCTIONS
- READ CAREFULLY AND KEEP FOR FUTURE REFERENCE
- INSTRUCTIONS DE SÉCURITÉ
- INSTRUCTIONS DE SÉCURITÉ IMPORTANTES
- LISEZ ATTENTIVEMENT ET CONSERVEZ POUR UNE RÉFÉRENCE FUTURE
- NOTE:
- BEFORE USE
- Box content
- ENGLISH
- Before first use:
- INSTALLATION
- Warning
- Accessories. Fig. 4
- Please note
- Note
- Lock function
- OPERATION
- Fig. 1
- Setting the time
- Heating modes
- Cooling fan
- Oven cooking
- Fast preheating
- Delay end
- Modifications during cooking
- Timer
- Microwave and combi microwave
- Safety child lock
- Pre-set menus
- CLEANING AND MAINTENANCE
- Cleaning agent
- Tip
- Tips
- Oven door
- Guides
- TROUBLESHOOTING
- Warning - risk of electric shock
- Maximum operation time
- TECHNICAL SPECIFICATIONS
- DISPOSAL OF OLD ELECTRICAL AND ELECTRONIC APPLIANCES
- TECHNICAL SUPPORT AND WARRANTY
- COPYRIGHT
- FRANÇAIS
- PIÈCES ET COMPOSANTS
- Panneau de contrôle
- PROBLEEMOPLOSSING
Brand : CECOTEC
Model : Bolero Hexa MWO706000 Line
Category : Oven