
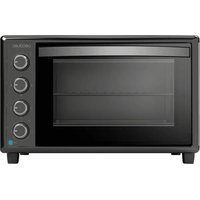
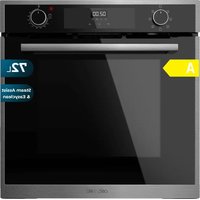
Bolero Hexa SM406000 - Oven CECOTEC - Free user manual and instructions
Find the device manual for free Bolero Hexa SM406000 CECOTEC in PDF.

| Product type | Multifunction built-in oven |
| Brand | Cecotec |
| Model | Bolero Hexa SM406000 |
| Volume | 68 L |
| Weight | 31.8 kg |
| Power supply | 220-240 V ~, 50-60 Hz, 2900 W |
| Energy class | A+ |
| Cooking modes | Conventional, Convection, ECO, Conventional + Fan, Radiant heat, Double upper heating element + Fan, Double Grill heating element, Pizza, Lower heating element, Defrost, Fermentation |
| Included accessories | Rack, Tray, Pizza stone, Meat accessory (Steak master), Side racks, Telescopic rail |
| Cleaning | Steam cleaning function (Steam Easy Clean) |
| Safety | Child lock, automatic stop when door opens, hinge safety |
| Display and controls | Touch panel with slider, backlit display |
| Special functions | Rapid preheating, Delayed end, Timer, Memory mode, Demonstration mode |
| Lighting type | Halogen, 25 W, 230 V |
| References | 02831, 02832, 02833, 02834 |
Frequently Asked Questions - Bolero Hexa SM406000 CECOTEC
User questions about Bolero Hexa SM406000 CECOTEC
0 question about this device. Answer the ones you know or ask your own.
Ask a new question about this device
Download the instructions for your Oven in PDF format for free! Find your manual Bolero Hexa SM406000 - CECOTEC and take your electronic device back in hand. On this page are published all the documents necessary for the use of your device. Bolero Hexa SM406000 by CECOTEC.
USER MANUAL Bolero Hexa SM406000 CECOTEC
natural_image
Product display of four white oven units with digital screens, arranged on a blue background (no visible text or labels)bolero
Safety instructions 9
-
Parts and components 69
-
Before use 69
-
Installation 70
-
Operation 71
-
Cleaning and maintenance 76
-
Troubleshooting 81
-
Technical specifications 84
-
Disposal of old electrical and electronic appliances 86
-
Technical support and warranty 86
-
Copyright 86
SOMMAIRE
Read these instructions thoroughly before using the product or removing its packaging. You will only be able to use the device correctly and safely after reading them.
- Following these instructions will lengthen the shelf life of your oven. Keep this instruction manual for future reference or new users.
- The appliance incorporates an earth connection for functional purposes only.
- Check the appliance for damage after removing the packaging. Do not connect the device to the power supply if it is damaged. Damage produced by an incorrect installation are not covered by the warranty.
- Use this appliance indoors only. The appliance can only be used to prepare food and drinks. The appliance must be monitored during operation.
- This appliance can be used by children aged 8 and above and persons with reduced physical, sensory, or mental capabilities or lack of experience and knowledge, as long as they have been given supervision or instruction concerning the use of the appliance in a safe way and understand the hazards involved. Children must not play with the appliance. The cleaning and maintenance of the appliance should not be carried out by children without supervision.
- Keep this appliance and its power cable out of reach of children under the age of 8.
- Always insert the accessories into the oven in the correct way.
Risk of electric shock
- Incorrect repairs can be dangerous. Refer only to authorised
technical personnel for repairs and replacement of damaged power cables. If the appliance is defective, unplug it from the power supply or switch off your home circuit breaker. Contact the official Cecotec Technical Support Service.
- The insulation of electrical appliance cables could melt if they come into contact with the hot parts of the appliance. Never allow the electrical appliance cables to come into contact with the hot parts of the appliance.
- The appliance is not intended to be operated by means of an external timer or a separate remote-control system.
- Do not use pressurised water or steam, as this may cause an electric shock.
- A defective appliance can cause an electric shock. Never turn a defective appliance on. Unplug the appliance from the mains or switch off the circuit breaker of your home. Contact the official Cecotec Technical Support Service.
Risk of burns
- This symbol means "caution, hot surface". The
temperature of the accessible surfaces may be hot when the device is in operation. Never touch the internal surface of the device nor the heating elements.
- Allow the device to cool down after being used.
- Oven accessories may reach high temperatures. Always use oven gloves to remove accessories or other objects from the interior of the oven.
- Alcohol vapours may ignite if heated inside the oven. Never cook food with large amounts of drinks with high alcohol content in the device. Open the oven door carefully.
- When you open the device door, this may release hot steam. This steam may not be visible, it depends on the temperature reached. When opening the device, do not stand near it.
- Open the appliance door carefully. Keep children away from the appliance.
Risk of injuries
- If the door glass is damaged, it could crack. Do not use glass scrapers, cleaning agents, or abrasive detergents to clean the appliance door.
- The appliance hinges move when opening and close the door: be careful not to get caught. Keep hands away from hinges.
Risk of fire
- If you store flammable items inside the oven, they may catch fire. Never store flammable items inside the oven. Never open the door of the appliance if there is smoke inside. Unplug the appliance from the mains or switch off the circuit breaker of your home.
- An air flow is created when the appliance door is opened. Baking paper may catch fire if it comes into contact with the heating elements. Do not place baking paper on accessories while preheating the oven. Always place baking paper on a tray or mould suitable for the oven. Cover only the necessary surface with baking paper.
- Baking paper cannot exceed the edges of the accessories.
Risk due to magnetism
- The control panel and control elements use fixed magnets. These can affect electronic implants, such as pacemakers or insulin pumps. Users with electronic implants must stay at least at 10 cm from the control panel.
Possible damage and cause
- Do not cover the interior base of the oven with any type of aluminium or vegetable foil. Do not place oven safe cookware in the interior base of the oven if you have set a temperature over 50 °C. This could lead to a heat accumulation. The enamel will be damaged.
- Do not allow aluminium foil to come into contact with the glass door. This could cause permanent discolouration of the glass door.
- Do not use silicone frying pans, nor lids with silicone covers or silicone accessories. This could damage the oven sensor.
- Never pour water inside the oven when it is hot. It could cause steam. Temperature changes can damage the enamel.
- Moisture inside the oven for a long period of time could cause corrosion. Allow the appliance to dry after every use. Do not store wet food inside the oven while it is closed for long periods of time. Do not store food in the oven.
- Allow the oven to cool down with the door open after use. Do not allow any objects to be trapped between the exterior and the interior of the oven. The front part of the furniture near the oven could be damaged over time if the door is left open, even if the opening is small. Allow the device to dry with the door open only if there is too much moisture because of the oven operation.
- Fruit juice: when baking cakes with particularly juicy fruit, do not overfill the baking tray. If fruit juice drips from the baking tray, it could cause permanent stains. If possible, use the deepest tray.
-
Extremely soiled gaskets: if the gaskets are soiled, the device door will not close properly during operation. This could damage the front part of the adjacent appliances and furniture. Make sure that the gaskets are always clean.
-
Do not sit on the appliance door or place or hang objects on it. Do not place tableware or accessories on the appliance door.
- Accessory positioning: depending on the model, accessories may scratch the door panel when closing it. Always insert accessories inside the oven until they reach the interior front wall.
- Do not transport or hold the appliance by the door handle. The door handle cannot withstand the weight of the appliance and could break.
- If you use residual heat when the oven is off to keep food warm, you can create a high moisture content inside the oven. This could lead to condensation and corrosion damage in the appliance, as well as damage to your kitchen.
- You can prevent condensation if you open the door or use the defrost function.
INSTRUCTIONS DE SÉCURITÉ
 | 1. Cancel On/off | Press to cancel the current operating status and enter standby mode. |
 | 2. Timer/Child-lock safety system | To activate the timer/child lock function, press and hold this icon for 3 seconds (approx.). |
 | 3. Delay end Press this icon to set the cooking end time. | |
 | 4. Fast preheating Press this icon to pre-heat the oven quickly. | |
 | 5. Oven function | Press and hold this icon for 3 seconds to change the heating mode. |
 | 6. Setting slider | Slide your fingertip over the setting slider to change the values displayed on the screen. |
 | 7. Duration and time setting | Set a cooking duration time and then, select the function and set the time in standby mode. |
| [2203] | 8. Temperature settings | Press the icon to set the desired temperature. |
 | 9. Light bulb on/off | Press this icon to switch on/off the light bulb. |
 | 10. Start/pause icon | Press this icon to start or pause cooking. |
Please note
The graphics in this manual are schematic representations and may not exactly match the appliance.
In operating mode, the orange light stays on; in standby mode, the white light stays on*.
*The colour of the lights may vary depending on the oven model.
2. BEFORE USE
- This appliance is packaged in a way as to protect it during transport. Take the device out of its box and remove all packaging materials. You can keep the original box and other packaging elements in a safe place. This will help you prevent damage to the device when
ENGLISH
transporting it in the future. In case the original packaging is disposed of, make sure all packaging materials are recycled accordingly.
- Make sure all parts and components are included and in good conditions. If there is any piece missing or in bad conditions, contact the Official Cecotec Technical Support Service immediately.
-
Before using the appliance for the first time, the oven interior and accessories must be cleaned.
-
Remove all stickers, surface protection films and transport protection parts.
- Remove all accessories, side racks and the telescopic rail from the interior.
- Thoroughly clean the accessories with soap and water and a kitchen cloth or a soft brush.
- Make sure there are no packaging materials inside, as polystyrene pellets or pieces of wood which may cause a fire hazard.
- Clean all interior smooth surfaces and the door with a soft and damp cloth.
- To eliminate the "new" smell, heat the appliance when it is empty and with the oven door closed.
- Keep your kitchen well ventilated while the device is heating for the first time. Keep children and pet away from the kitchen during use. Close the door of the rooms next to it.
- Set the settings as indicated below. You can find information on the heating mode and the temperature you should use in the "Operation" section.
When the oven cools down
- Clean the flat surfaces and the door with water and soap and a kitchen cloth.
- Dry every surface.
- Install the side guides and the telescopic guide.
Box content
- Multifunction built-in oven
- Tray
- Rack
- Pizza stone accessory
- Steak master accessory
- Side guides
- Telescopic guide
- Instruction manual
3. INSTALLATION
- In order for the appliance to operate safely, it must be installed by a qualified professional in accordance with the installation instructions and local regulations. Damage produced by an incorrect installation are not covered by the warranty.
- During installation, use protective gloves to prevent cuts with sharp edges.
- Check the appliance for damage before installation, do not connect it to the mains if it is damaged.
- Before switching on the appliance, remove all packaging and adhesive film from the product.
- The plug must be accessible, or a switch must be incorporated in the fixed wiring, so that the device can be disconnected from the supply after installation if necessary.
- Caution: you should not install the appliance behind a decorative door to avoid overheating the door.
- Follow the dimensions (in milimiters) shown in figure 2 to install the oven.
4. OPERATION
Time adjustment
Before using the oven, you must set the time.
- After connecting the oven to the mains, press the clock icon ⏻ to set the current time using the setting slider.
- Press the clock icon again to adjust the minutes with the setting slider.
- Press the clock icon to end the setting.
Attention
The clock has a 24-hour display.
Note
The defrost, fermentation and "ECO" functions cannot use the fast-preheating mode.
Heating modes
| Heating modes Temperature Use | |||
 | Conventional 30~250 °C | For traditional single-height baking or roasting. Especially suitable for cakes with wet toppings. | |
 | Convection 50~250 °C | For baking or roasting at one or more heights. The heat is released evenly from the heating ring around the fan. | |
 | ECO 140~240 °C Used to save energy during cooking. | ||
 | Conventional + Fan | 50~250 °C | For baking or roasting at one or more heights. The fan distributes the heating elements heat evenly in the interior. |
 | Radiation heat 150~250 °C | To cook small amounts of food and to brown food. Place the food in the central part under the upper heating element “Grill”. | |
 | Double upper heating element "Grill" + Fan | 50~250 °C | To cook food with flat surfaces and to brown food. The fan distributes heat evenly in the interior. |
 | Double “Grill” heating element | 150~250 °C | To cook food with flat surfaces and to brown food. |
 | Pizza 50~250 °C | For pizzas and dishes that need a lot of heat underneath. The bottom heating element and the heating ring will be activated. | |
 | Bottom heating element | 30~220 °C | For adding extra browning to pizza, pie and cake bases. Heat is released from the bottom of the oven. |
 | Defrost _ For lightly defrosting frozen food. | ||
 | Fermentation 30~45 °C | For making yeast dough and sourdough, for leavening (leavening the dough with yeast) and fermenting yoghurt. | |
Warning
If you open the device door while it is operating, it will pause. Be especially careful because there is burn hazard.
Note
- For defrosting large portions of food, you can remove the side guides and place the container on the oven base.
- To heat the cookware, it is convenient to remove the side guides and use the hot air heating modes (Convection and Conventional + Fan), with temperature setting of 50 °C. The hot air mode should be used if more than half of the oven base is occupied by cookware.
- To get the best heat distribution inside the oven during fan heating, fan will operate at certain times during the heating process to guarantee the best possible performance.
Cooling fan
- The cooling fan will switch on and off if necessary. The hot air will be expelled above the door.
Warning
- Do not cover the ventilation grilles. Otherwise, the appliance could overheat.
- In order for the appliance to cool down more quickly after use, the cooling fan will continue to run for a short period of time.
Using the appliance
- After connecting the oven to the power supply, press the oven function symbol≡ to select the desired functions. Use the setting slider or the "</>" icons to set the cooking temperature.
- Press the Start/Pause icon ▷II to start the oven; otherwise, the oven will return to the time setting after 10 minutes.
- During the cooking process, you can press the on/off icon ⏻ to stop the oven.
Attention
After setting the temperature, you can press the clock icon to adjust the duration of the cooking process using the setting slider or the “</>” icons.
Fast preheating
- You can use the quick preheat function to shorten the preheating time. After selecting a function, press the quick preheat icon, and the corresponding icon will light up on the display.
- If any of the functions cannot use the fast-preheating mode, the oven will beep. The defrost, fermentation and "ECO" functions cannot use the fast-preheating mode.
Set an end time (Delay end)
After setting the cooking time, you can also set a delay end.
Press the Delay End icon ⏻, use the setting slider or the “</>” icons to set the delay end in hours, and press the Delay End icon ⏻ again to change the minutes. When you have selected the delay end, press the same icon again to confirm.
- To set a delayed end, you must have previously set the time.
- For example, if the delayed end is set at 10:00 hours, and the cooking time is 1 hour, the oven will switch on at 9:00 hours, and finish at 10:00 hours.
Modifications during cooking
- During operation of the appliance, you can change the heating mode setting and the temperature setting using the oven function or the setting slider. After making the desired changes, and 6 seconds of inactivity, the oven will apply the selected changes.
ENGLISH
- If you want to change the cooking time while it is active, press the clock icon ⏻ and adjust it with the setting slider or the "</>" icons. After making the desired changes, and 6 seconds of inactivity, the oven will apply the selected changes. If you start a cooking process with delayed end, you will not be able to make any changes to the cooking duration.
- When you want to cancel the cooking process, press the on/off icon.
Please note
Changing modes/temperature/time during cooking can have negative consequences on the cooking result. We strongly recommend that you do not do this unless you are very experienced in cooking.
Warning
After turning on the appliance, it will become very hot, especially inside. Never touch the internal surface of the appliance nor the heating elements. Use oven gloves to remove accessories or cookware from inside, and allow the appliance to cool down after every use. Keep children at a safe distance while the oven is in use to avoid the risk of burns.
Timer
- You can activate the timer function by pressing the Timer icon ☑. Once the cooking time has finished, the oven will beep once. When you press the icon for the first time, you will access the timer hours setting; if you press it a second time, you will access the minutes setting. Press a third time to activate the timer with the set time.
- You can activate the timer before and during the cooking process, but the timer will not be available when you select function and temperature.
Safety child lock
- This appliance has a child safety lock so that children cannot accidentally switch on the oven or change settings.
- Press and hold the icon for 3 seconds to activate the child lock. Press it again for 3 seconds and the oven will unlock. When the child lock is activated, the lock icon will appear in the display.
- You can activate and deactivate the child lock when the oven is operating or not.
Demo mode
It features data save function when power off. Save function when the oven is switched off: for example, if the demonstration mode is set when the oven is switched on, the mode will have saved the previous data when the oven is switched off and on again. After switching on the demo mode, the heating elements do not work.
-
In standby mode, press and hold the Cancel of/off icon to enter demo mode, the display should show "off".
-
Slide the setting slider to the right to activate the demo mode, the display will show "off". Slide the setting slider to the left to deactivate the demo mode, the display will show "on".
Note
You can press the cancel on/off icon to exit the setting or wait 3 seconds to automatically exit the demo mode setting mode and return to the standby mode.
Memory mode
The memory mode has the function of saving data. It saves the cooking data every 25 minutes. If the power is cut off during operation, when the oven is switched on again, the memory mode will continue to operate until the cooking time is 0. You can press the Cancel on/off icon to return to standby mode.
- In standby mode, press and hold the quick warm-up icon for 3 seconds to enter memory mode. The display shows 5A8. The time setting range is 24-80 hours.
- The cooking time can be adjusted by sliding the setting slider.
- Press the start/pause icon (memory mode starts automatically after 8 seconds).
Note
During operation in this mode, only the Cancel on/off icon will function, all other functions will be disabled.
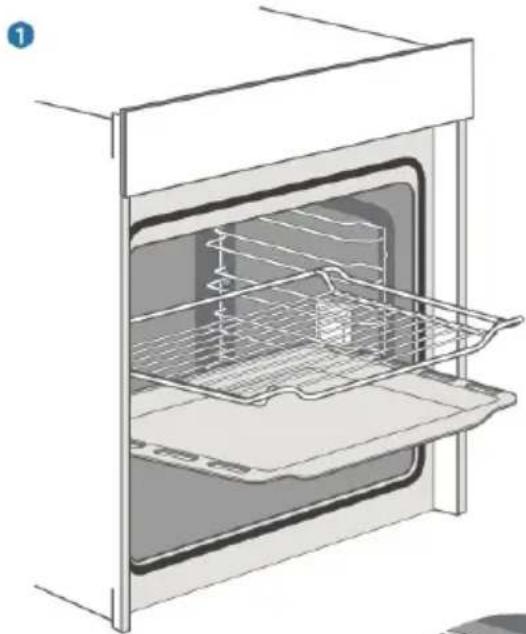
Accessories
- Rack (Fig. 3)
For bakeware, cake tins and ovenproof dishes. To bake or brown food. -
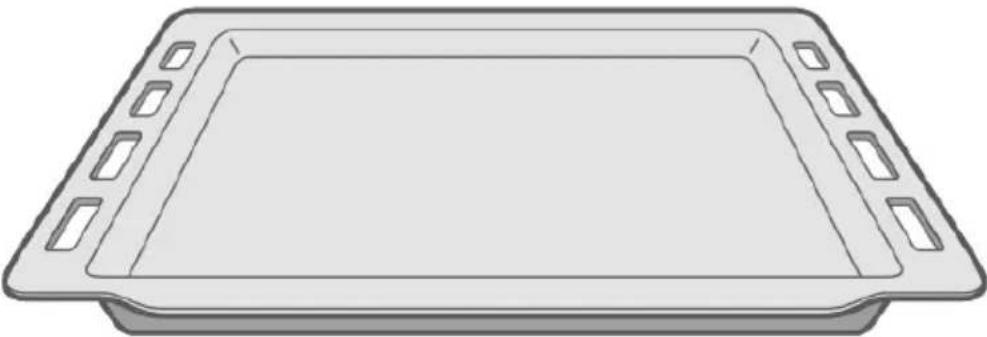
Oven tray (Fig. 4)
-
For baking smaller foods on this tray.
- You can use the tray to place liquids or cook food with juice.
-
For pies, cakes, frozen meals, and large roasts.
-
Pizza stone (Fig. 5)
-
Specific accessory for baking pizzas.
- Steak master accessory (Fig. 6)
- Specific accessory for cooking meat.
- Side guides (Fig. 7)
- Telescopic guide (Fig. 8)
Notes
- Only use original accessories supplied by Cecotec. They are especially designed for this appliance.
- Accessories may deform when heated. This will not affect its operation. When they have cooled down, they will return to their original shape.
Attaching the accessories
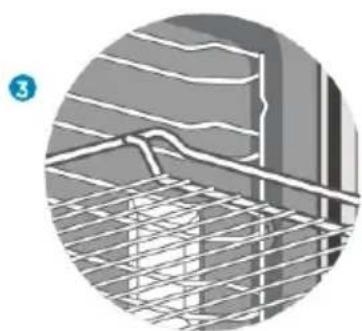
The oven has 5 positions in its interior cavity. The positions of the side guides are counted from bottom to top.
ENGLISH
Note
- Make sure you introduce accessories always in the right direction.
- Place the accessories inside up to the inside rear wall, so that they do not touch the oven door.
Tilt/fall protection
Accessories can be removed approximately up to halfway without tipping. When you introduce the rack, make sure it is placed in the right direction, as shown in figure 9.
Efficient energy consumption
- Remove every unnecessary accessory during the cooking and baking process. Try to open the door as little as possible during the baking process.
- If you open the door during cooking, the mode will change to "Light bulb". The temperature setting will not change.
- Reduce the temperature setting in non-fan modes to 50 °C 5 to 10 minutes before the end of the baking time. The interior heat will help you complete the cooking process.
- Use the fan heating function if possible. You can reduce the temperature between 20 °C and 30 °C. You can cook and bake using fan heating at more than one height at the same time. If it not possible to cook and bake different dishes at once, you can heat one after the other with the preheating mode.
- It is not necessary to preheat the oven when it is empty.
- If necessary, place the food in the oven immediately after reaching the desired temperature; the light indicator will go out.
- Do not use reflective foil to cover the interior. Use moulds or oven cookware with a dark matt finish and light weight. Try not to use heavy accessories with shiny surfaces, like aluminium or stainless steel.
Health risk
Acrylamide is mainly produced by heating starchy foods (e.g., potatoes, chips, bread, etc.) at very high temperatures for a long time.
Tips
- Use short cooking times.
- Cook food until its surface is brown, do not allow it to burn or get dark brown colours.
- Larger portions contain less acrylamide.
- Use the fan heating mode if necessary.
5. CLEANING AND MAINTENANCE
Make sure that the oven is switched off and disconnected from the mains before cleaning.
Cleaning agent
- With proper care and cleaning, your appliance will preserve its original aspect and operate correctly for a long period of time. Next, you have some instructions on cleaning and care of the product.
- To avoid damage to different surfaces by using the wrong cleaning agent, please observe the information in the table. Depending on the model, not all parts listed may be present in your device.
Warning
Risk of damage to the surface, do not use: strong or abrasive cleaning agents, cleaning agents with high alcohol content, hard scouring pads, or cleaning sponges, high-pressure or steam cleaners or special cleaners for hot cleaning of the appliance.
Tip
Follow the manufacturer's instructions for cleaning and care products.
Important
- Slight differences in colour in the front part of the device are caused by the use of different materials, like glass, plastic, and metal.
- The shadows on the door panels, which look like stripes, are due to reflections from the interior lighting.
- Enamel is made at very high temperatures. This can cause a slight colour variation. This is completely normal and does not affect the device operation. The edges on thin trays cannot be completely enamelled. As a result, these edges can be rough. This does not affect the corrosion protection.
- Always keep the device clean and immediately remove the dirt so that the appliance does not accumulate lasting dirt residues.
| Outer surface - Cleaning | |
| Outer surface of the appliance. Stainless-steel front part | Warm water with neutral soap:Wipe it with a kitchen cloth and then dry it with a soft cloth.Remove lime, grease, starch, and albumen stains immediately.Corrosion may form under these stains.Special stainless steel cleaning agents suitable for hot surfaces are available from specialist shops. Apply a very thin layer of the cleaning agent with a soft cloth. |
| Plastic | Hot water with neutral soap:Wipe it with a kitchen towel and then dry it with a soft cloth. Do not use glass cleaner or a glass scraper. |
| Coloured surfaces | Hot water with neutral soap:Wipe them with a kitchen towel and then dry them with a soft cloth. |
| Control panel | Hot water with neutral soap:Wipe it with a kitchen towel and then dry it with a soft cloth. Do not use glass cleaner or a glass scraper. |
| Door panels | Hot water with neutral soap:Wipe it with a kitchen cloth and then dry it with a soft cloth.Do not use a glass scraper or stainless-steel scouring pad. |
| External cleaning of the appliance | |
| Door handle | Hot water with neutral soap:Wipe it with a kitchen cloth and then dry it with a soft cloth.If water softener comes into contact with the door handle, immediately clean it. Otherwise, you will not be able to remove the stains. |
| Enamelled surfaces | Check the instructions on how to clean the oven interior surfaces. |
| Glass cover for the interior lighting | Hot water with neutral soap:Wipe it with a kitchen cloth and then dry it with a soft cloth.If the interior is very dirty, use a specific oven cleaner. |
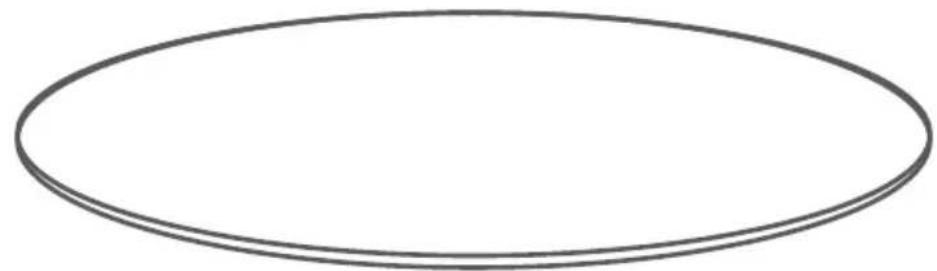
| Door gasket.Do not remove it. | Hot water with neutral soap:Clean it with a kitchen cloth. Do not rub the gasket. |
| Stainless steel door cover (depending on model) | Specific cleaner for stainless steel:You must follow the product's manufacturer instructions.Remove the door cover to clean it. |
| Accessories | Hot water with neutral soap:Immerse them in water and clean them with a kitchen cloth or a brush.If there are large dirt remains, use a stainless-steel scouring pad. |
| Side guides | Hot water with neutral soap:Immerse them in water and clean them with a kitchen cloth or a brush. |
| Extraction system (telescopic guide) | Hot water with soap:Clean it with a kitchen cloth or brush.Do not remove lubricant while the removal guides are spread out. The best solution is to clean the system when the guides are not spread out.Do not wash it in the dishwasher. |
- Clean the oven interior after every use. This way, you will not cook food over this dirt.
- Remove lime, grease, starch, and albumen stains immediately.
- Remove sugar-containing food stains immediately, if possible, while the stain is still warm. Exercise extreme caution to avoid burns. Wear suitable gloves.
- Use suitable roasting utensils, e.g., a roasting pan.
Oven door
- With proper care and cleaning, your appliance will preserve its original aspect and operate correctly for a long period of time.
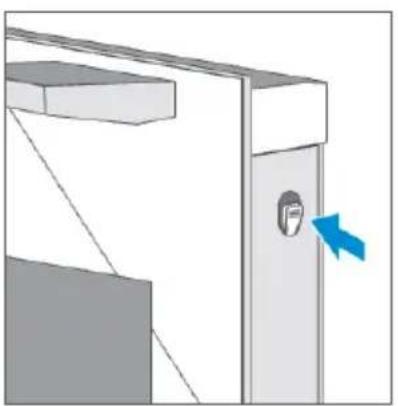
- To clean and remove the door panels, you can disassemble the oven door. The hinges of the appliance door each have a locking lever.
- When the locking levers are blocked, the device door is locked. It cannot be detached.
- When the locking levers are opened to remove the door from the appliance, the hinges are locked. They cannot be snapped shut. Fig. 10
Warning - Risk of injury
- If the hinges are not blocked, they can be lock with energy. Make sure the locking levers are always completely locked or, when detaching the device door, they are completely unlocked.
- The oven hinges move when opening and closing the door, be careful not to pinch your fingers. Keep hands away from hinges.
Removing the oven door. (Fig. 11)
- Open the door completely.
- Open the two locking levers on the left and right.
- Close the appliance door until it stops.
- With both hands, hold the door from its left and right side, and pull it upwards.
Assembling the oven door
Place the device door again following the previous steps in reverse order.
- When fixing the device door, make sure both hinges match the installation holes on the interior front panel. Make sure the hinges are placed in the correct position. You must be able to introduce them easily, without applying pressure. If you feel there is some resistance, check the hinges are properly placed on the gaps.
- Open the door completely. While you open the appliance door, you should check again if the hinges are in the correct position. If it is installed incorrectly, then the door will not be able to open fully.
- Close both locking levers again.
- Close the oven door. At the same time, check once again if the door is in the correct position, and if the ventilation grilles are not partially sealed. Fig. 12
ENGLISH
Removing the door cover
The plastic cover layer on the door can discolour. For thorough cleaning, you can remove the cover.
Remove the appliance door as previously indicated.
- Press on the right and left side of the cover.
- Remove the cover.
- After removing the door cover, the remaining door parts can be easily removed to continue with the cleaning. Once you finish cleaning the device door, place the cover back in its position and press on it until it clicks into place.
- Install the oven door and close it as indicated before. Fig. 13
Warning
While the appliance door is installed, you can also take the opportunity to remove the door cover.
- Removing the door cover will clear the inside glass of the appliance door; this glass can easily move and cause damage or injury.
- Detaching the door cover and the interior glass reduces the total weight of the door. Hinges are easier to move when you close the door and you can get caught in them. Keep hands away from hinges.
Due to the previous warnings, it is advisable you do not detach the door cover unless the door is detached. The warranty does not cover damage caused by improper use.
Side guides
When you want to clean the side and interior guides, you can remove and clean them. With proper care and cleaning, your appliance will preserve its original aspect and operate correctly for a long period of time.
- Pull the front of the side guides horizontally in the opposite direction until they come out. Then you will be able to remove the guides as shown in figure 14.
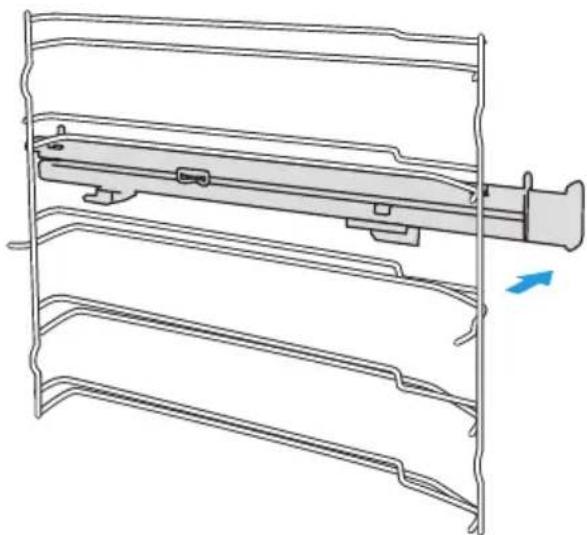
- Replace the side guides in the oven. First insert the back of the side guide into the hole in the oven correctly, then insert the front of the element into the hole.
Attaching the telescopic guides
(Take the left side as an example to attach the guides on the right side).
- Place points A and B (figure 15) of the telescopic guides horizontally on the outer wire.
- Turn the telescopic guides 90 degrees counterclockwise (for the right-hand side).
- Push the telescopic guides forward, make point C fit the lower wire and point D fit the upper wire.
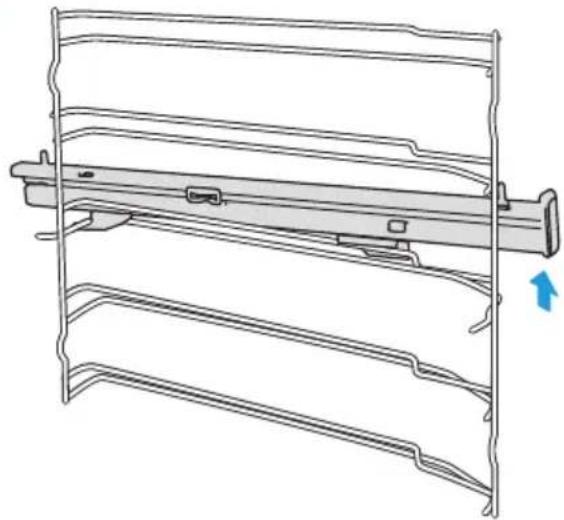
Removing the telescopic guides. Fig. 16
(Take the left side as an example to remove the guides on the right side).
- Lift up one end of the telescopic guides with force.
- Lift all telescopic guides and remove them by pulling them backwards.
Replacing the power cable. Fig. 17
Important
The replacement of the mains cable must only be carried out by the official Cecotec Technical Support Service or by a qualified and authorised electrician.
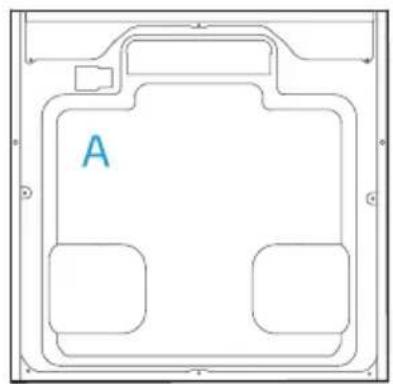
Position A shows the position of the junction box at the rear of the oven.
a. Turn off the power; use a small screwdriver to remove screws 1 and 2.
b. Use a Phillips screwdriver to unscrew screws 3, 4, 5 and 6.
c. Fit the new power cable: place the yellow/green cable in connector 3, the brown cable in connector 4 and the blue cable in connector 5.
d. When screw 6 is turned, the junction box cover closes, and the replacement is complete.
Fig. 17 key
7.- Brown wire (phase L)
8.- Yellow-Green wire (ground)
9.- Blue wire (neutral N)
6. TROUBLESHOOTING
- If there is a fault, before contacting Cecotec Technical Support Service, make sure it is not caused by an improper use and check the following table to try and solve the problem on your own. In most cases, the user itself can solve technical faults easily.
- If you do not get the desired results with certain foods, you can find many tips and preparation instructions at the end of the instruction manual.
| Problem Possible cause and solution | ||
| The appliance does not work | Blown fuse | Check the control and protection elements of the electrical panel in your home |
| Power cut. | Check if the kitchen light or any other appliances work. | |
ENGLISH
| Push buttons do not operate easily | There is dirt or grease | Carefully clean the control panel (see cleaning and maintenance section). |
| The fan does not work continuously: fan heating | This is normal due to better heat distribution and the best possible oven performance. | |
| After use, there is some noise and air flow near the control panel | The cooling fan is still active to prevent high moisture conditions in the interior and to cool down the oven for convenience. The cooling fan will turn off automatically. | |
| Food is not cooked enough on the time indicated in the recipe | You are using a different temperature to the recipe one. Check the temperature again. The amount of ingredients is different to the recipe one. Check the recipe again. | |
| Uneven toasting | The temperature setting is too high, or it is not placed on the correct level. Check the recipe and settings again. The surface finish, colour and/or material of the cookware used was not the best option for the selected function. When using radiation heat, as well as using the upper + lower heating elements, use oven cookware with a matt finish, dark in colour and light in weight. | |
| The light does not switch on | The light bulb must be replaced.The replacement of the light bulb must be carried out by the official Cecotec Technical Support Service or by a qualified technician. | |
- If none of these situations match your problem, do not attempt to disassemble, or repair the appliance by yourself. Repairs carried out by unqualified persons may result in injury or serious malfunctions. Contact the official Cecotec Technical Support Service. The repair must be carried out by an authorised technician, and you must use only original spare parts.
- Unauthorised maintenance will affect the safe use of the product and the application of the warranty policy.
Warning - risk of electric shock
Incorrect repairs can be dangerous. Refer only to authorised technical personnel for repairs and replacement of damaged power cables. If the appliance is faulty, disconnect it from the mains or switch off the earth leakage circuit breaker in your home. Contact the official Cecotec Technical Support Service.
Maximum operation time
The maximum operation time on this device is 9 hours, so that the circuit breaker does not trip.
Replacing of the light bulb inside the oven. Fig. 18
- If the oven light bulb does not work, please contact the official Cecotec Technical Support Service.
- The replacement of the light bulb must be carried out by the official Cecotec Technical Support Service or by a qualified technician.
- Lamp type > heat-resistant halogen bulb, 25 W, 230 V.
Warnings
- Danger of electric shock: when replacing the bulb, the contacts of the bulb socket will be live. Unplug the appliance from the mains or switch off the circuit breaker of your home.
- Risk of burns: the appliance can reach high temperatures during operation. Never touch the internal surface of the appliance nor the heating elements. Allow the device to completely cool down. Keep children away from the device.
- Place a kitchen towel in the oven when it is cold to prevent it from spoiling.
- Turn the glass cover counterclockwise to remove it (corner bulb). Pull the side grille outwards and then pry it slightly with a flat screwdriver to remove the glass cover (side bulb).
- Pull out the bulb, do not turn it.
- Screw the glass cover back on.
- Remove the kitchen towel and switch on the circuit breaker to see if the bulb lights up.
- After checking that the bulb works after replacing it, do not forget to replace the side grille.
Glass lid
If the glass cover of the halogen bulb is damaged, please contact the official Cecotec Technical Support Service.
ENGLISH
7. TECHNICAL SPECIFICATIONS
You can consult the technical information by scanning the attached QR code.
| Reference 02831 02832 02833 02834 | ||||
| Model | Bolero HexaSM406000Edge+ A+ | Bolero HexaSM406000Glass Black A+ | Bolero HexaSM406000Glass WhiteA+ | Bolero HexaSM406000Glass Grey A+ |
| QR code |  |  |  |  |
| Voltage 220-240 V~ | ||||
| Rated frequency 50-60 Hz | ||||
| Total power 2900 W | ||||
| Energy efficiency class* | A+ | |||
*A+++ (highest efficiency) to D (lowest efficiency)
| Symbol Value Unit | |||
| Model identification | 02831 / 02832 / 02833 / 02834 | ||
| Type of oven Electric oven | |||
| Mass of the appliance | M | 31.8 | Kg |
| Number of cavities | 1 | ||
| Heat source per cavity (electricity or gas) | Electricity | ||
| Volume per cavity | V | 68 | L |
| Energy consumption (electricity) required for heating a standardised charge in an electric furnace cavity for one cycle in conventional mode, per cavity (final electrical energy) | EC_electric cavity | 115.0 kWh/cycle | |
| Energy consumption required to heat a standardised load in a cavity of an electric heated oven during a cycle in fan-forced mode per cavity (electric final energy) | EC_electric cavity | 73.0 kWh/cycle | |
| Energy consumption required to heat a standardised load in a gas-fired cavity of an oven during a cycle in conventional mode per cavity (gas final energy) | EC_gas cavity | N/AN/A | MJ/cyclekWh/cycle(1) |
| Energy consumption required to heat a standardised load in a gas-fired cavity of an oven during a cycle in fan-forced mode per cavity (gas final energy) | EC_gas cavity | N/AN/A | MJ/cyclekWh/cycle |
| Energy Efficiency Index per cavity | EEI_cavity | 105.8 | |
| (1) 1 kWh/cycle = 3.6 MJ/cycle. | |||
The appliance complies with the European standards and directives in the version valid at the time of delivery.
EU 65/2014
EU 66/2014
Technical specifications may change without prior notification to improve product quality. Made in China | Designed in Spain
ENGLISH
8. DISPOSAL OF OLD ELECTRICAL AND ELECTRONIC APPLIANCES
This symbol indicates that, according to the applicable regulations, the product and/or batteries must be disposed of separately from household waste. When this product reaches the end of its shelf life, you should dispose of the cells/batteries/accumulators and take them to a collection point designated by the local authorities.
Consumers must contact their local authorities or retailer for information concerning the correct disposal of old appliances and/or their batteries.
Compliance with the above guidelines will help protecting the environment.
9. TECHNICAL SUPPORT AND WARRANTY
Cecotec shall be liable to the end user or consumer for any lack of conformity that exists at the time of delivery of the product under the terms, conditions, and deadlines established by the applicable regulations.
It is recommended that repairs be carried out by qualified personnel.
If at any moment you detect any problem with your product or have any doubt, do not hesitate to contact the official Cecotec Technical Support Service at +34 963 210 728.
10. COPYRIGHT
The intellectual property rights over the texts in this manual belong to CECOTEC INNOVACIONES, S.L. All rights reserved. The contents of this publication may not, in whole or in part, be reproduced, stored in a retrieval system, transmitted, or distributed by any means (electronic, mechanical, photocopying, recording or similar) without the prior authorization of CECOTEC INNOVACIONES, S.L.
1. PIÈCES ET COMPOSANTS
6. PROBLEEMOPLOSSING
natural_image
Simple line drawing of a container with a funnel pouring liquid into a basin (no text or symbols)
natural_image
Line drawing of a refrigerator interior with a fan and spray bottle (no text or symbols)Fig. 1 Fig. 2
NOTA:
natural_image
Simple line drawing of a bucket pouring liquid into a basin (no text or symbols)Fig. 1
NOTA:
Steam cleaning function (Steam Easy Clean)
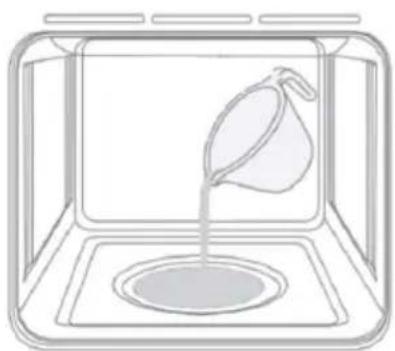
This function helps to remove food residues from inside the oven. This method is only effective for the removal of light, non-fouling dirt. It is not effective to remove stubborn stains caused by cooking. This function can only be used when the oven is cold.
Cleaning procedure:
- Remove all trays, plates, racks, etc., from the inside of the oven.
- Prepare a solution of water (85%), white vinegar (10%) and neutral dish detergent (5%) and spray generously on the door, side walls and rear wall of the oven cavity (Fig. 2). Make sure not to use abrasive detergents.
- Pour approximately 40 ml of water into the base of the oven cavity (Fig. 1).
- Close the door. Activate the Pizza mode and set the temperature to 130 °C.
- Switch off the oven after approximately 18 minutes.
NOTE: the cleaning time may vary depending on multiple factors.
NOTE: monitor the cleaning process at all times.
-
Allow to cool to a safe level before wiping the inside surface with a damp cloth.
-
Dry the entire inside of the oven properly with a cloth or absorbent paper. Remove the remaining water of the bottom cavity.
WARNING: make sure that the oven is completely cool before accessing the interior. Risk of burns.
natural_image
Simple line drawing of a pitcher pouring liquid into a square basin (no text or symbols)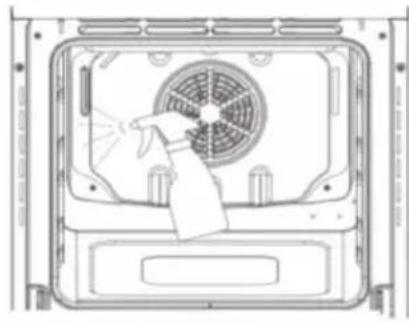
natural_image
Technical line drawing of a front-mounted air conditioner unit with a spray nozzle (no text or symbols)Fig. 1 Fig. 2
NOTE:
The graphics in this manual are schematic representations and may not exactly match the device.
EN
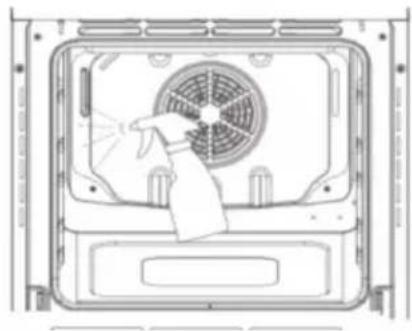
Steam assisted cooking function (Steam Assist)
You can use this function to add extra browning to pizza bases, pies, and cakes, or to cook different foods using a combination of bottom heat and steam.
If you wish, you can follow the steps below:
- Add approximately 100 ml of water in the bottom cavity (Fig. 1).
NOTE: the capacity may vary depending on the oven model.
-
Activate the Pizza mode and select a temperature of 200 °C . Approximate cooking time: 20 minutes.
-
Be sure to remove any excess water from the oven cavity at the end of the cooking process.
NOTE: you can adjust the amount of water, the cooking time, and the temperature according to the needs of the food to be prepared.
WARNING: make sure that the interior is completely cool before removing excess water. Risk of burns.

natural_image
Simple line drawing of a pitcher pouring liquid into a basin (no text or symbols)Fig. 1
NOTE:
The graphics in this manual are schematic representations and may not exactly match the device.
FR
natural_image
Simple line drawing of a pitcher pouring liquid into a basin (no text or symbols)Img. 1 Img. 2

natural_image
Technical line drawing of a front-mounted air conditioner unit with a spray nozzle (no text or symbols)NOTE:
natural_image
Simple line drawing of a pitcher pouring liquid into a square basin (no text or symbols)Img. 1
NOTE:
natural_image
Simple line drawing of a container with a pitcher pouring liquid into a basin (no text or symbols)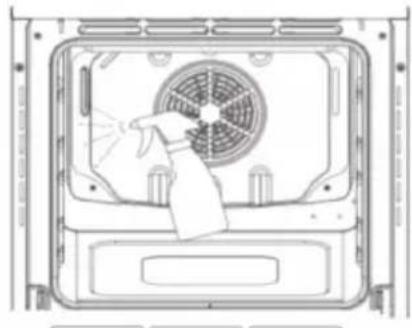
natural_image
Line drawing of a front-mounted air conditioner unit with fan and spray nozzle (no text or symbols)Abb. 1 Abb. 2
HINWEIS:
natural_image
Simple line drawing of a pitcher pouring liquid into a square basin (no text or symbols)Abb. 1
HINWEIS:
natural_image
Simple line drawing of a pitcher pouring liquid into a basin (no text or symbols)
natural_image
Line drawing of a front view of a microwave oven with a fan and spray bottle (no text or symbols)Fig. 1 Fig. 2
NOTA:
natural_image
Simple line drawing of a bucket pouring liquid into a basin (no text or symbols)Fig. 1
NOTA:
natural_image
Line drawing of a pitcher pouring liquid into a basin (no text or symbols)
natural_image
Line drawing of a front view of a microwave oven with a fan and spray bottle (no text or symbols)Fig. 1 Fig. 2
NOTA:
natural_image
Simple line drawing of a bucket pouring liquid into a square basin (no text or symbols)Fig. 1
NOTA:
natural_image
Simple line drawing of a pitcher pouring liquid into a square tank (no text or symbols)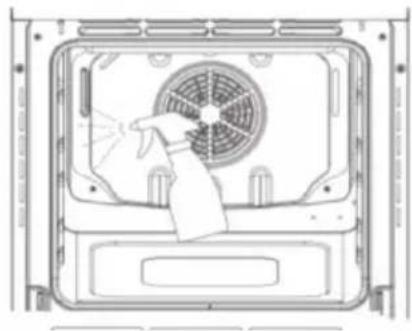
natural_image
Technical line drawing of a front-mounted air conditioner unit with a spray gun inside (no text or symbols)Fig. 1 Fig. 2
OPMERKING:
natural_image
Simple line drawing of a pitcher pouring liquid into a square basin (no text or symbols)Fig. 1
OPMERKING:
natural_image
Simple line drawing of a pitcher pouring liquid into a basin (no text or symbols)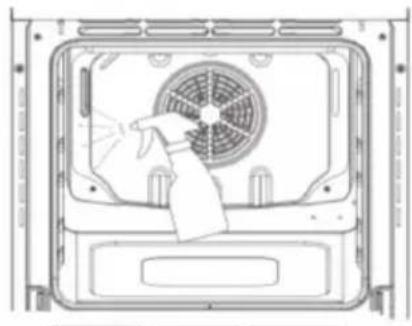
natural_image
Technical line drawing of a front-mounted air conditioner unit with fan and spray nozzle (no text or symbols)Rys. 1 Rys. 2
UWAGA:
natural_image
Simple line drawing of a pitcher pouring liquid into a basin (no text or symbols)Rys. 1
UWAGA:
natural_image
Line drawing of a pitcher pouring liquid into a basin (no text or symbols)Obr. 1 Obr. 2
natural_image
Line drawing of a front-mounted air conditioner unit with fan blades and spray nozzle (no text or symbols)POZNÁMKA:
natural_image
Simple line drawing of a bucket pouring liquid into a basin (no text or symbols)Obr. 1
POZNÁMKA:
natural_image
Line drawing of a rectangular plate with horizontal slats and side handles (no text or symbols)Fig./Img./Abb./Afb./Rys. 3
natural_image
Illustration of a rectangular baking tray with multiple square cutouts (no text or symbols)Fig./Img./Abb./Afb./Rys. 4
natural_image
Simple oval shape with no text, numbers, or symbolsFig./Img./Abb./Afb./Rys. 5
natural_image
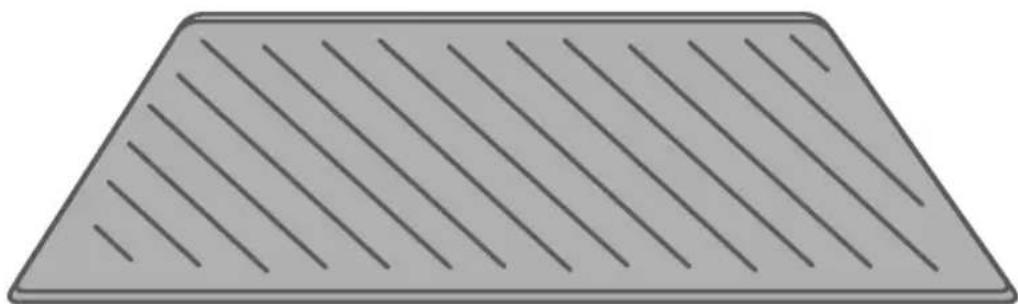
Gray trapezoidal plate with diagonal lines, no text or symbols presentFig./Img./Abb./Afb./Rys. 6
Fig./Img./Abb./Afb./Rys. 7
Fig./Img./Abb./Afb./Rys. 8
natural_image
Line drawing of an oven with a rack and insulation material inside (no text or symbols)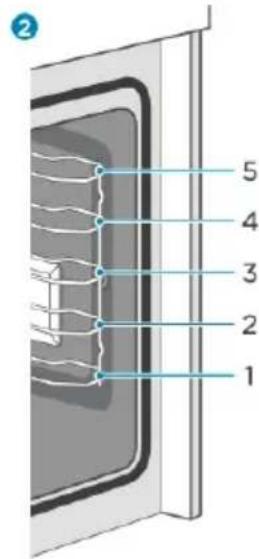
natural_image
Close-up of a steel rebar grid structure with no visible text or symbols
natural_image
Illustration of a window with a door and ladder, enclosed in a circular frame (no text or symbols)Fig./Img./Abb./Afb./Rys. 9
natural_image
Diagram of a mechanical device with a blue arrow indicating rotation (no text or symbols present)
natural_image
Diagram of a mechanical component with a blue arrow indicating direction (no text or symbols)Fig./Img./Abb./Afb./Rys. 10

natural_image
Diagram of a refrigerator interior with a rack-mounted air vent and a close-up inset showing the interior mechanism (no text or symbols)Fig./Img./Abb./Afb./Rys. 11
natural_image
Technical line drawing of a kitchen appliance with a side view showing internal components and a blue circular inset indicating rotation (no text or symbols)Fig./Img./Abb./Afb./Rys. 12
natural_image
Diagram of a door with a blue arrow indicating direction, no text or symbols present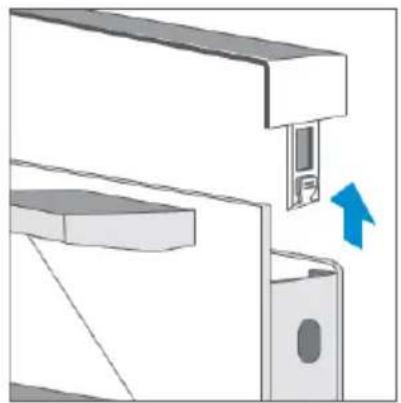
natural_image
Diagram of a mechanical assembly with a blue arrow indicating direction (no text or symbols present)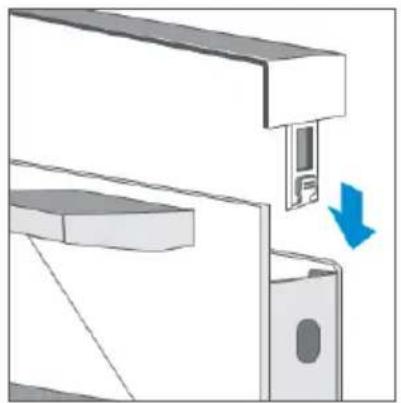
natural_image
Diagram of a mechanical assembly with a blue arrow indicating direction (no text or symbols present)Fig./Img./Abb./Afb./Rys. 13
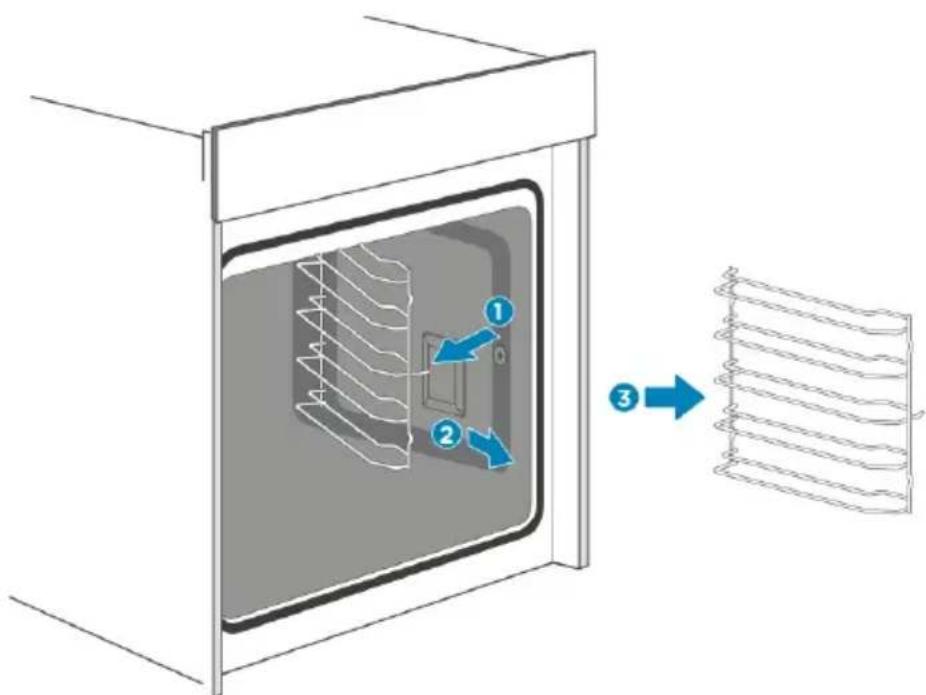
Fig./Img./Abb./Afb./Rys. 14
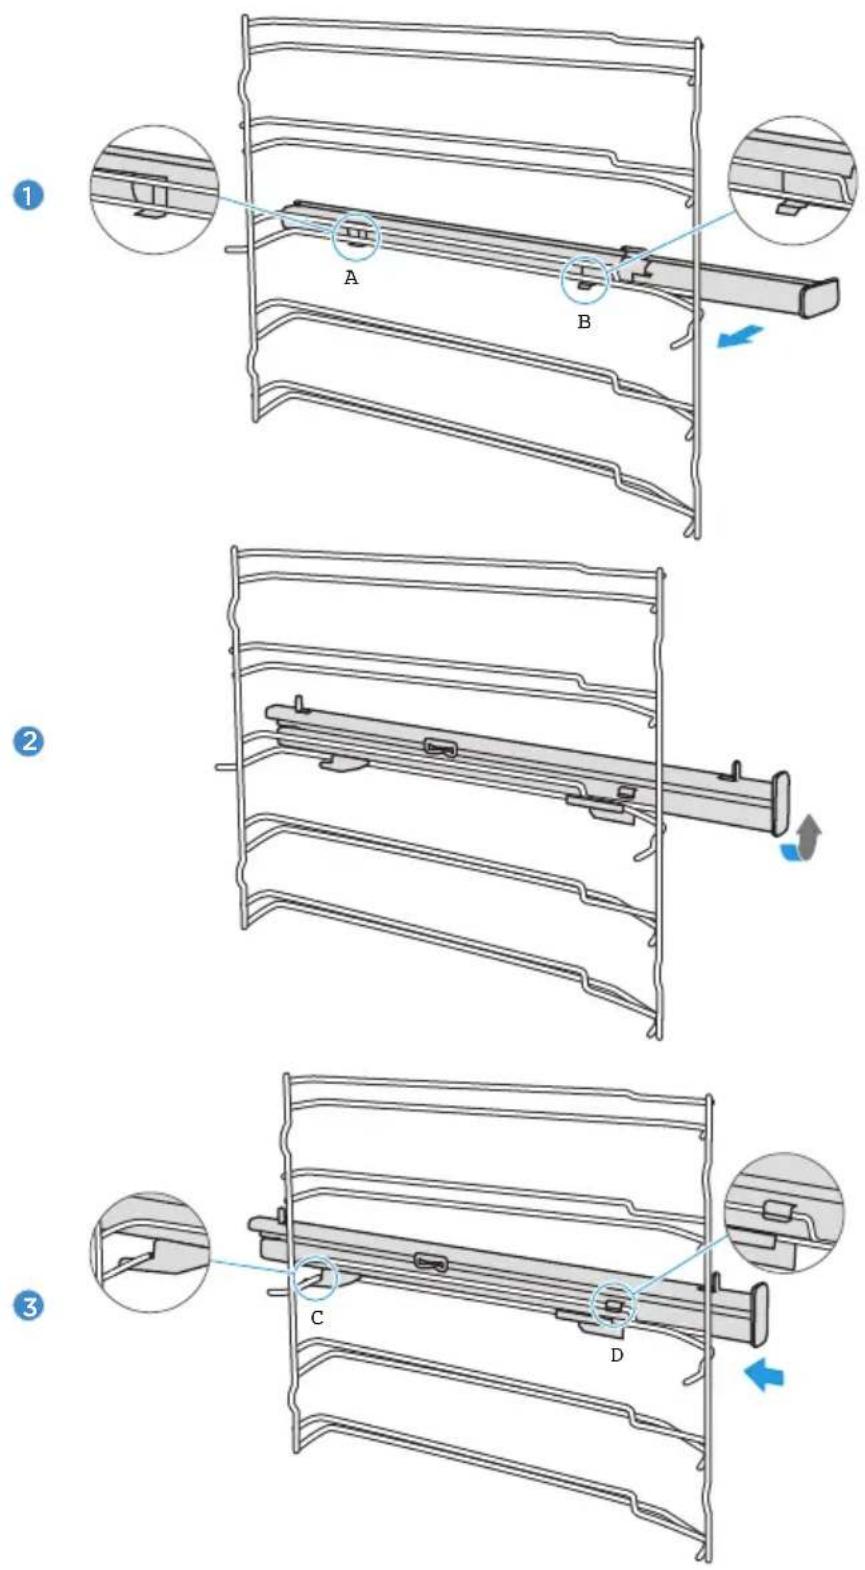
Fig./Img./Abb./Afb./Rys. 15
1
natural_image
Technical line drawing of a mechanical frame assembly with no visible text or symbols2
natural_image
Technical line drawing of a mechanical assembly with no visible text or symbolsFig./Img./Abb./Afb./Rys. 16
natural_image
Pure technical diagram of a rectangular device with labeled component 'A' (no text or symbols beyond label)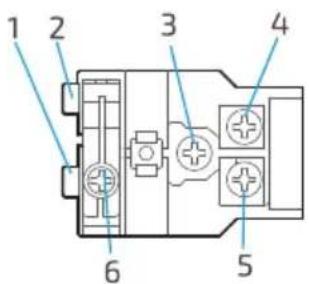
natural_image
Diagram of a cable connector with labeled wires (no text or symbols present)Fig./Img./Abb./Afb./Rys. 17
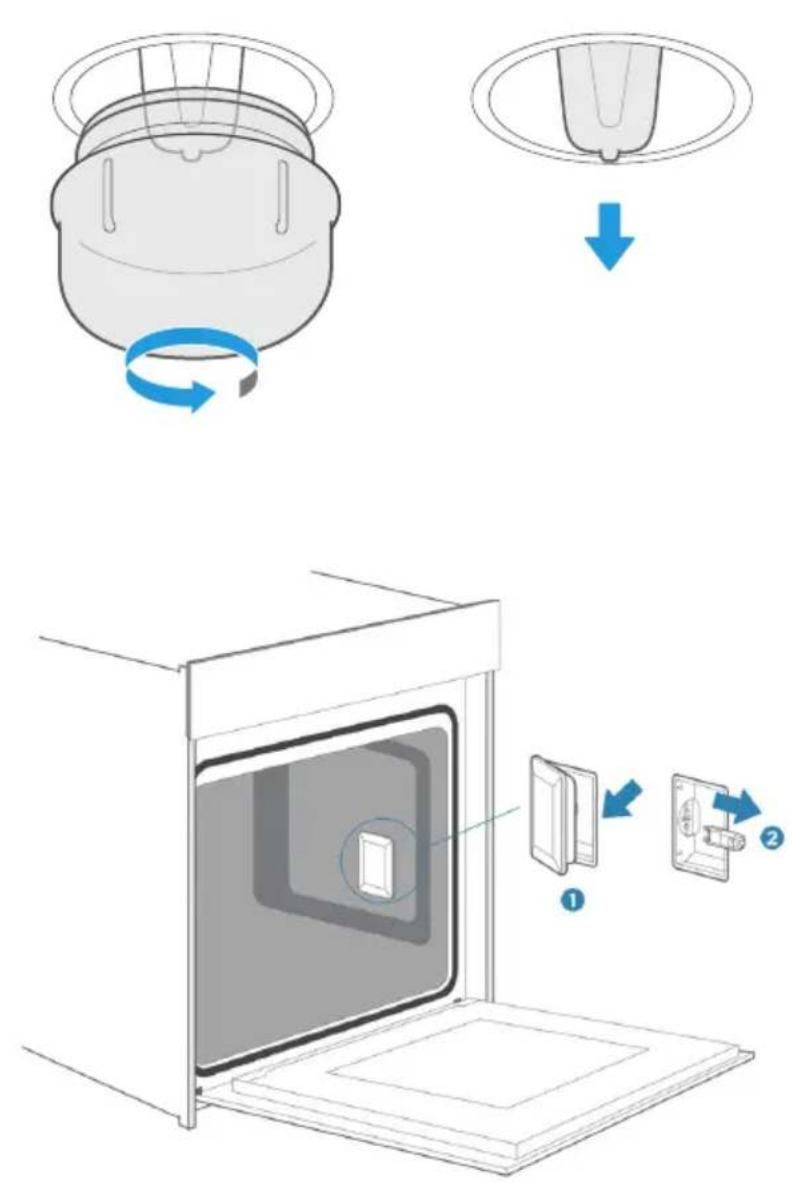
Fig./Img./Abb./Afb./Rys. 18
www.cecotec.es
- SOMMAIRE
- Risk of electric shock
- Risk of burns
- Risk of injuries
- Risk of fire
- Risk due to magnetism
- Possible damage and cause
- INSTRUCTIONS DE SÉCURITÉ
- BEFORE USE
- ENGLISH
- When the oven cools down
- Box content
- INSTALLATION
- OPERATION
- Time adjustment
- Warning
- Note
- Cooling fan
- Using the appliance
- Attention
- Fast preheating
- Set an end time (Delay end)
- Modifications during cooking
- Timer
- Safety child lock
- Demo mode
- Memory mode
- Accessories
- Notes
- Attaching the accessories
- Tilt/fall protection
- Efficient energy consumption
- Health risk
- Tips
- CLEANING AND MAINTENANCE
- Cleaning agent
- Tip
- Oven door
- Warning - Risk of injury
- Assembling the oven door
- Removing the door cover
- Side guides
- Attaching the telescopic guides
- Removing the telescopic guides. Fig. 16
- Replacing the power cable. Fig. 17
- Important
- Fig. 17 key
- TROUBLESHOOTING
- Warning - risk of electric shock
- Maximum operation time
- Replacing of the light bulb inside the oven. Fig. 18
- Warnings
- Glass lid
- TECHNICAL SPECIFICATIONS
- DISPOSAL OF OLD ELECTRICAL AND ELECTRONIC APPLIANCES
- TECHNICAL SUPPORT AND WARRANTY
- COPYRIGHT
- PIÈCES ET COMPOSANTS
- PROBLEEMOPLOSSING
- NOTA:
- Steam cleaning function (Steam Easy Clean)
- Cleaning procedure:
- NOTE:
- EN
- Steam assisted cooking function (Steam Assist)
- FR
- HINWEIS:
- OPMERKING:
- UWAGA:
- POZNÁMKA:
Brand : CECOTEC
Model : Bolero Hexa SM406000
Category : Oven