RS-9 - Synthesizer BEHRINGER - Free user manual and instructions
Find the device manual for free RS-9 BEHRINGER in PDF.

User questions about RS-9 BEHRINGER
0 question about this device. Answer the ones you know or ask your own.
Ask a new question about this device
Download the instructions for your Synthesizer in PDF format for free! Find your manual RS-9 - BEHRINGER and take your electronic device back in hand. On this page are published all the documents necessary for the use of your device. RS-9 by BEHRINGER.
USER MANUAL RS-9 BEHRINGER
Rhythm Sequencer Module with
64-Step Sequencer and 10 Drum Channels for Eurorack
23Quick Start GuideRS-9
EN Safety Instruction
- Please read and follow
all instructions.
-
Keep the apparatus away from water, except for outdoor products.
-
Clean only with a dry cloth.
-
Do not block any ventilation openings. Install in accordance with the manufacturer's instructions.
-
Do not install near any heat sources such as radiators, heat registers, stoves or other apparatus (including amplifiers) that produce heat.
-
Use only attachments/ accessories specified by the manufacturer.

- Use only specified carts, stands, tripods,
brackets, or tables. Use caution to prevent tip-over when moving the cart/apparatus combination.
-
Avoid installing in confined spaces like bookcases.
-
Do not place near naked flame sources, such as lighted candles.
-
Operating temperature range 5° to 45°C (41° to 113°F).
LEGAL DISCLAIMER
Music Tribe accepts no liability for any loss which may be suff ered by any person who relies either wholly or in part upon any description, photograph, or statement contained herein. Technical
specifi cations, appearances and other information are subject to change without notice. All trademarks are the property of their respective owners. Midas, Klark Teknik, Lab Gruppen, Lake, Tannoy, Turbosound, TC Electronic, TC Helicon, Behringer, Bugera, Aston Microphones and Coolaudio are trademarks or registered trademarks of Music Tribe Global Brands Ltd. © Music Tribe Global Brands Ltd. 2024 All rights reserved.
LIMITED WARRANTY
For the applicable warranty terms and conditions and additional information regarding Music Tribe's Limited Warranty, please see complete details online at community.musictribe.com/support.
Lake, Tannoy, Turbosound,
TC Electronic, TC Helican,
Behringer, Bugera, Aston
© Music Tribe Global Brands Ltd.
BESCHRÄNKTE GARANTIE
Die geltenden
Lake, Tamboy, Turbosound, TC Electronics, TC Helios
TC Electronic, TC Helicon,
Benninger, Bugera, Aston Micronhapes e Goelavdia são
Microphones e Cooradulo são
marcas ou marcas registraudas Muris Tribe Global Brands Ltd.
© Music Tribe Global Brands Ltd.
do Music Tribe, favor verifi car
website community.musictribe.
com/support.
IT Istruzioni di
Lake, Tannoy, Turbosound,
TC Electronic, TC Helicon,
Behringer, Bugera, Aston
© Music Tribe Global Brands Ltd.
musictribe.com/support.
NL Belangrijke
Turbosound, TC Electronic,
TC Helicon, Behringer, Bugera,
Ltd. © Music Tribe Global
Brands Ltd. 2024 Alle rechten
voorbehouden.
BEPERKTE GARANTIE
Turbosound, TC Electronic,
TC Helicon, Behringer, Bugera, Aston Microphones i Coolaudio
Turbosound, TC Electronic,
TC Helicon、Behringer、Bugera、Aston Microphones
および Coolaudio は
Music Tribe Global Brands Ltd.
の商標または-登録商標
- TRIGGER OUTS — each of the ten sequencer tracks has its own trigger out on a TS 3.5 mm jack for triggering external sources. MIDI notes are also allocated to each track (see MAP below).
- ACCENT OUT – each of the ten sequencer tracks can have accents added on any beat, which will cause a trigger to be output from these TS 3.5 mm jack sockets.
- TRACK SELECT BUTTONS – use these buttons to select the required sequencer track.
- LEVEL – use this control to change the level of the CV output (39), which is the equivalent of the RD-9's analog filter.
- ACCENT – use this button to program an accent on the current step.
- DISPLAY – the display shows tempo as default, and other information in conjunction with the MODE button (16).
- DATA – use this control to change tempo and other parameters in conjunction with the MODE button (16).
- TAP – use this button to set TAP tempo. Tap three times for accurate tempo setting.
- RECORD — use this button to put the RS-9 into record mode.
- STOP – use this button to stop the RS-9 playing or recording and reset the current pattern or song to the first step.
- PLAY/PAUSE – use this button to start the RS-9 playing, or in conjunction with the RECORD button (9) to start recording. A second press will cause the
RS-9 to pause. Third press resumes from the current step.
- SAVE – use this button to save the current pattern or song being programmed.
- COPY – use this button to make a copy of the current pattern or song that can be pasted to another location. Hold COPY to copy the current pattern, then select another pattern location to paste.
- ERASE – use this button to clear patterns and songs depending on whether the RS-9 is in pattern or song mode.
- DUMP – use this button to initiate a Sysex dump of the RS-9's memory.
- MODE - use this button to scroll through the parameters that can be adjusted by the Data Controller (7). Scroll between: Tempo, Swing, Prob (ability) and Flam. LEDs indicate which parameter is under control; and the Display (6) will show the current value.
- SYNC IN – use this 3.5 mm TRS jack socket to synchronize the RS-9 to an external analog clock source. Also accepts analog start/stop instructions. Clock settings can be adjusted in the SETTINGS menu.
- SYNC OUT – use this 3.5 mm TRS jack socket to synchronize external analog equipment to the RS-9.
-
SYNC – use this button to scroll through the RS-9's synchronization options: Int(ernal), MIDI, USB or Trig(ger) from the SYNC IN socket (17).
-
LENGTH LEDS – these LEDs indicate which block of 16 steps is the current one, in conjunction with buttons 21 – 24.
- AUTOSCROLL – in STEP mode AUTOSCROLL will always keep the playhead in view if the current is longer than 16 steps, by advancing through the blocks of 16 steps, with the current block indicated by the LENGTH LEDS (20).
- <<- in STEP mode when a pattern is longer than 16 steps the << button allows the playhead to be moved back a block, indicated by the LENGTH LEDS (20). In PATTERN mode the << button steps backwards through the patterns making up a song.
- LENGTH – use this button to set the pattern length in blocks of 16 steps from 16, 32, 48 or 64 using the >> and << buttons (22 & 24). Note that the final block can be shortened by setting a last step other than 16 by pressing a STEP key (44 – 59).
-
– in STEP mode when a pattern is longer than 16 steps the >> button allows the playhead to be moved forward a block, indicated by the LENGTH LEDS (20). In PATTERN mode the >> button steps forwards through the patterns making up a song.
-
-
- REPEAT SELECTORS - use these buttons in conjunction with buttons 29 - 31 to select the number of notes or steps that will be repeated when triggered by button 29, from 1, 2, 4 or 8.
-
-
TRIG – use this button to trigger either note repeat or step repeat in conjunction with buttons 30 and 31.
-
STEP REPEAT - when STEP REPEAT is selected the TRIG button (29) will cause the current step plus 1, 3 or 7 subsequent steps depending on which button from 25 - 28 is selected to repeat until TRIG is released. The pattern will then continue from the next step.
- NOTE REPEAT - when NOTE REPEAT is selected the TRIG button (29) will cause the note(s) on the current step to repeat once, twice, four or eight times on the step according to which button of 25 - 28 is selected. When TRIG is released the pattern will continue from the next step.
- SONG - use this button to put the RS-9 into SONG mode, which allows songs to be played.
- PATTERN – use this button to put the RS-9 into PATTERN mode, where individual patterns can be played or assembled into songs.
- STEP – use this button to put the RS-9 into STEP mode, which allows a pattern to be created by adding beats to individual steps.
- TRACK MUTE – hold this button and use the TRACK SELECT buttons (3) to temporarily mute individual tracks. Any muted track will not output triggers, accents or MIDI notes.
-
TRACK SOLO – hold this button and use the TRACK SELECT buttons (3) to temporarily solo one or more tracks. Other tracks will not output triggers, accents or MIDI notes until no tracks are soloed.
-
AUTOFILL – when the RS-9 is in Pattern Play mode pressing AUTOFILL and the selector for a different pattern will cause the second pattern to play once then return to the original pattern.
- SETTINGS – use this button in conjunction with the sixteen keypad buttons 44 – 59 to adjust the RS-9's settings.
- CV OUT - the RD-9, on which the RS-9 is based, included a powerful filter that could be applied to its voices. As the RS-9 does not have its own voices the CV OUT is provided to control external processing which can be applied to whatever voice source(s) the RS-9 is controlling.
To record CV select a trigger output using the track select buttons (3). While in step record mode with the pattern playing turn the level control and the CV will be recorded into the pattern. - RESET – applying a trigger to this 3.5 mm TS jack socket causes the current pattern to return to its first step in Pattern mode.
- USB – use this USB C socket to update the RS-9 firmware when appropriate, and to use MIDI over USB.
- MIDI IN – use this 5 pin DIN socket to synchronize the RS-9 to external MIDI equipment. Mapped notes (See 47 below) will also cause triggers to be output from their respective outputs (1).
- MIDI OUT – use this 5 pin DIN socket to output MIDI notes alongside the analog
triggers and to synchronize external MIDI equipment to the RS-9's clock.
Buttons 44 – 59 have different uses depending on what mode the RS-9 is in. In STEP MODE they are used to add a trigger/note for the selected track onto steps 1 – 16, 17 – 32, 33 – 48 or 49 – 64 depending on the pattern length. In PATTERN mode they are used to select patterns 1 – 16 in the current song. In SONG mode they are used to select songs 1 – 16.
When used with the SETTINGS button (38) the keys allow access to the RS-9's settings. Pressing SETTINGS again exits SETTINGS mode. TAP control (8) is used to scroll through the settings; DATA control (7) is used to scroll through the options.
44. MIDI
• MIDI IN CHANNEL (0 – 16, All, Out (follows MIDI OUT settings))
• MIDI OUT CHANNEL (0 – 16, All, Off)
• FORWARD TO USB (On / Off)
- SOFT OUT THRU (changes MIDI out socket to MIDI out + thru)
• DEVICE ID (1 – 16, for use with Sysex if multiple units are in use)
45. USB
- USB MIDI IN CHANNEL (1 – 16, All, Out (follows USB OFF MIDI OUT settings))
• USB MIDI OUT (1 – 16, All, Off)
• FORWARD TO MIDI (on / off)
46. CLOCK
• Tempo Preference (Global / Song / Pattern)
• Swing Preference (Global / Song / Pattern)
• Probability Preference (Global / Song / Pattern)
- Flam Preference (Global / Song / Pattern)
- Analog Clock Settings (1 PPS / 1 PPQN / 2 PPQN / 4 PPQN / 24 PPQN / 48 PPQN)
- MIDI Clock Out (on/off)
- MAP - this button maps MIDI notes to the sequencer tracks, for use with external MIDI equipment. After selecting MAP use the TRACK SELECT buttons (3) to select the required track, then use the DATA controller to scroll through the notes 0 - 127.
48. PREFS
- Trigger Time (1ms – 10ms/25% - 75% of sequencer step time). Trigger time is a Global setting. Default is 10 ms. Below 10 ms some drum machines may have synchronization issues.
- Accent Off Level (0% - 50%); Accent On level is adjusted using the level control (4) with the Accent button (5)
- Chain Songs Loop (song loops back to start once finished) / Hold (final pattern of song continues playing until stopped) / Stop (song stops after final pattern)
• CV (Global / Song / Pattern)
• Poly Preference (Global / Song / Pattern)
- Step Size (Global / Song / Pattern)
• Auto Advance (Global / Song)
• Auto Scroll (Global / Pattern)
- Mute (Global / Song / Pattern)
- Solo (Global / Song / Pattern)
- CV – use this button to edit the recorded CV: select the track using buttons (3) then enter CV mode by pressing the SETTINGS button (38) and CV (49). Use buttons 44 – 59 in conjunction with the << and >> buttons if necessary to select a sequence step; then use the data control (7) to adjust the CV for the selected step. CV range is 0 (minimum) to 255 (maximum).
In STEP mode turn CV automation on or off by pressing and holding the TAP button (8) then pressing the CV button (49). The display will show 'cvon' when CV automation is on; 'cvof' when it is off.
-
POLY – the RS-9 allows the non-destructive programming of Polymetric rhythms. Select button 50, use the DATA controller (7) to turn Poly on, then follow these steps to create Polymetric tracks:
-
Select a track using the TRACK SELECT buttons (3)
• The active steps in the pattern will light up -
Use the step keys (44 - 59) with the << / >> buttons (22 & 24) for patterns with more than 16 steps to select the last step that you want the selected track to trigger on.
-
Step LEDs will flash to indicate steps that will no longer sound.
-
RAND – The RS-9 allows random triggers/notes to occur on selected steps. To activate this select button 51, then use the TRACK SELECT buttons (3) to select the track(s) that you want to randomize. Then use the step keys (44 - 59) with the << / >> buttons (22 & 24) if necessary to select the steps within the pattern on which a random trigger/note might occur. Randomization is only available on a pattern basis.
-
PROB – Probability allows the user to select the probability of a programmed trigger/note sounding on a specified step, from 0% (will not trigger) to 100% (will always trigger). Select button 52, use the TRACK SELECT buttons (3) to select the track that you want to program, use the step keys (44 – 59) and << / >> buttons (22 & 24) to select the required steps (only one step can be set at a time), the use the DATA control (7) to set then percentage.
-
FLAM – the flam effect (that of a drummer hitting a drum with two sticks) can be added to any step for any track. Select button 53, use the TRACK SELECT buttons (3) to select the track to which you want to add flam, use the step keys
(44 - 59) and << / >> to select the required step then use the DATA control (7) to adjust the flam length from 0 (default) to 24.
- RPT - a ratchet (note repeat) can be added to any step for any track. Select button 54, use the TRACK SELECT buttons (3) to select the required track, use the step keys (44 - 59) and << / >> to select the required step then use buttons 25 - 28 to select the number of repeats for the step. Switch on the repeats with the NOTE REPEAT button (31).
- 1/8 – use this button to set the RS-9's step size to 1/8th notes.
- 1/8T - use this button to set the RS-9's step size to 1/8th note triplets.
- 1/16 – use this button to set the RS-9's step size to 1/16th notes.
- 1/16T – use this button to set the RS-9's step size to 1/16th note triplets.
- 1/32 - use this button to set the RS-9's step size to 1/32nd notes.
Global / Song / Pattern
When a parameter is set to Global then the settings will apply to all patterns in all songs. Set to Song it will only apply to the patterns in the current song. Set to Pattern then it will only apply to the current pattern.
TRIGGER OUTPUT LEVEL
To change the trigger output level remove the RS-9 from your rack. There is a surface mounted switch above and to the left of the tempo control. Set the switch up to select +5 V or down to select +10 V (default).
Programming
Creating a Pattern (Step Mode)
Patterns can use up to 64 steps which gives a great deal of flexibility. Here is how to record a basic 16-step pattern:
- Select a SONG.
- Press PATTERN.
- Select desired pattern number via step keys 1-16.
- Press STEP.
- Select desired tempo with Data control.
- Press RECORD.
- Select the VOICE you wish to use.
- Steps can be programmed either with the unit playing (press PLAY) or in the stopped position. The moving white LED is the play head which shows the current play position. The TRIGGER pad can also be used to play and record the currently selected voice.
- Select different voices to add into the current pattern.
- Press stop and record to exit record step mode.
Auto Save
The Auto Save function allows certain functions to be automatically stored as listed. All the below pattern changes will now be auto saved with STEP RECORD on:
-
Step on/off by pressing STEP button.
-
Press TRIGGER to set step on when playing.
-
Note repeat live record.
-
Set step on/off in RAND setting menu.
- Press STEP in pattern length setting.
- Sweep erase by Hold + VOICE button.
- Erasing all steps of selected voice by ERASE + VOICE button.
- Step copy 1-16 to 17-32 etc.
To activate Auto Save enter STEP mode, hold TAP/HOLD then press RECORD to set pattern auto save on or off.
When STEP RECORD is enabled, the display shows "auto" or "manu" for 1 second to indicate the save mode.
To recall a stored pattern hold TAP/HOLD + STEP button of the pattern you wish to restore. This only works when you are in Pattern mode and set to manu (manual) save mode.
How to save a pattern:
- Once you have created your pattern.
- Press SAVE.
- Press PATTERN again.
- Select the Step number of the Pattern you wish to save, current pattern will be displayed in white after which SAVE will flash. Note you can only save to the current pattern position.
- Press the flashing SAVE button to execute the operation.
How to copy a pattern to other pattern locations:
- In PATTERN mode, hold copy while pressing the step key you wish to copy to.
Note patterns can only be copied within the current selected song.
How to copy pages in step mode, copy page 1 (1-16), page 2 (17-32), page 3 (33-48) or page 4 (49-64) to other pages:
- In STEP mode, press LENGTH to enter pattern length setting.
- Select a page using the arrows and press COPY.
- Select the page you wish to copy to with the arrows then press SAVE.
Live Data Vs Stored Data
In Song and Pattern mode there are two forms of data stored:
Live Data: Any changes to songs or patterns that have been made and not stored are held in live memory.
Stored Data: When a song has been stored. How to erase a pattern:
- Press ERASE.
- The SONG and PATTERN buttons will flash. Press PATTERN.
- Use TAP/HOLD to select either the Live or Stored data to be erased.
- Select the pattern you wish to delete via one of the 16 step keys.
- Press the now flashing ERASE button to execute the delete process. This is a permanent and can't be undone.
How to dump a pattern:
The DUMP control works in the same way as the SAVE control. Instead of saving, the DUMP control will output the selection as a SysEx message. This action sends the
pattern/song data as SysEx. This information can be saved and loaded by a third-party program or sent to another RD-9.
Note: Pattern length, step on/off and accent on/off will be saved automatically when programmed in step mode with RECORD enabled.
Voice Erase:
To erase all of a selected voices steps in a pattern, hold ERASE and select the voice select button to delete all steps instantly.
The sweep erase function can be used while playing in STEP PLAY or RECORD mode, by holding TAP/HOLD and then pressing the voice button to remove the selected voices steps from pattern while playing. The voice will be deleted before it is played. In RECORD this is permanent, in PLAY mode the notes will be restored as the play head moves past steps.
Auto Fill
The Auto Fill function is used to insert fill rhythms into the live play mode of the RS-9. Fills are created in the same way a pattern is created and stored. The difference between Auto Fill and normal pattern playback is that once an Auto Fill has finished playing, the function will return you to the previously played pattern unless you have selected a different pattern while the Auto Fill function is active. If a different pattern is selected, the new pattern will play after the Auto Fill pattern has ended.
The SYNTHTRIBE app is an easy way to save song and pattern data. Patterns and Songs can be imported and exported quickly.
How to use Auto Fill
Once you have programmed patterns, use any of them by pressing the AUTO FILL button in pattern mode and selecting any step key. Tip: 4 or 8 steps are recommended for drum fills, but any size can be used up to 64 steps.
Pattern length
Pattern length can be changed from 1 to 64 steps and on a pattern by pattern basis. This adjustable length can be used to create different time signatures. For example, selecting a pattern length of 12 steps with a step size using 1/16th will create a 3/4 (waltz style) time signature.
To change the number of steps in a pattern:
- Press the STEP and RECORD buttons.
- Press LENGTH.
- Use the <</>> keys either side of the LENGTH button to choose either 16, 32, 48 or 64 range as the starting point show by the red LED.
- Press the step keys to change to the desired pattern length. For example, if length 64 is selected, choosing step key 12 will make the pattern 60 steps long. Pattern length is shown in solid white LEDs.
If you are recording a pattern with more than 16 steps, press the AUTO SCROLL button in Step Record to alternate between blocks. For example, when recording a 24 step pattern you will alternate between block one (LED above 16 is lit) with 16 steps and block two (LED above 32 is lit) with 8 steps.
Creating a Song
(Pattern Chaining Mode)
Pattern mode can be used to trigger any of the 16 patterns available when playing back. Patterns can be chained together to form a song by the following steps:
- Select song via 16 step keys.
- Press PATTERN to enter Pattern mode.
- In Pattern Mode press the RECORD button.
- Press the STEP BUTTON to select the first pattern in your song.
- Press the AUTO SCROLL button on and the LENGTH button will be flashing.
- Press the LENGTH button (lights solid),
- Use the DATA knob to select number of repeats.
- Press any of the STEP BUTTONS to add next step pattern to the song.
- Repeat steps 7–8 until all desired patterns have been entered.
- At any time use the << />> keys with the AUTO SCROLL button lit to move forward and backward through the song to check programming. If the LENGTH button is lit, the display will show. number of repeats; if the LENGTH button is flashing, the display will show the pattern number of that step.
- Save the song (with AUTO SCROLL on).
To save the song that you have just created:
- Press SAVE.
-
Press SONG.
-
Select destination via step key (current song highlighted with a white LED)
- Press SAVE to execute operation.
To Erase a selected pattern in the chain, move to the pattern you wish to remove (by using the << and >> buttons) and press Erase.
Note: Make sure you store the song with the AUTO SCROLL on otherwise your song will not playback as programmed.
Note: When you erase a pattern from the chain it doesn't remove/update the number of repeats in that place, so if Pattern 3 repeated 6 times and that pattern is deleted from the chain, Pattern 4 would move to that position and will be repeated 6 times.
Live Data Vs Stored Data
In Song mode there are two forms of data stored:
Live Data: Any changes to songs or patterns that have been made and not stored are held in live memory.
Stored Data: When a song has been stored.
Use the TAP/HOLD button while editing in COPY/ERASE/DUMP to select either the Live or Stored data.
To erase the live or stored song data:
- Enter SONG mode.
- Press ERASE.
- Select SONG.
-
Use TAP/HOLD to select Live or Stored data.
-
Press ERASE to complete the operation.
Changing the current song while in playback.
It is possible to change the current song while in playback. This allows songs to be changed on the fly when needed without having to stop playback.
- Enter SONG MODE.
- Hold TAP/HOLD button.
- Select the next song with step button (1-16) to go to after the current pattern has finished.
- The song step button you have selected will flash white while the others will flash red, now select the pattern from the new song.
- When pattern is selected, the button will fast flash red until the selected song and pattern starts.
Note: this will break the song chain playing.
Creating a Song Chain (Song Mode)
Songs are a collection of up to 16 patterns which can be played and interacted with in a live playing format. Pattern Record mode is used to arrange the patterns into the structure of a song (described in section 7). Songs must be stored with AUTO SCROLL on in order to chain songs together.
A total of 16 songs can be created with up to 16 patterns in each. That makes 256 possible patterns in the unit at any one time.
Please note a song has to play to the end before it will advance to the next song.
This is how seamless playback is created for extended performances. You cannot switch songs halfway through playback. This can only be done by stopping playback and selecting a different song.
To chain songs:
- Press the SONG button to enter Song Mode, make sure RECORD is disabled, USE the STEP BUTTONS 1-16 to choose a song (white LED on).
- Press the RECORD button.
- You can now select the next song in the chain, this will be shown by a red LED.
- If no Song is selected the chain will go back to Song 1.
- Save song.
Example:
After you have programmed and saved 3 songs that are song 1, song 2 and song 3, follow the above instructions, you can chain song 1 to song 2 as below:
- Press the SONG button to enter Song Mode, make sure the RECORD is disabled, press STEP 1 to choose song 1.
- Press the RECORD button.
-
Press STEP 2 to chain song 2 to song 1, the red LED of STEP 2 will light.
-
Save song 1.
Now to chain song 2 to song 3:
-
Press the SONG button to enter Song Mode, make sure the RECORD is disabled, press STEP 2 to choose song 2.
-
Press the RECORD button.
- Press STEP 3 to chain song 3 to song 2, the red LED of STEP 3 will light.
- Save song 2.
As song 3 has not been selected into a chain song, it has the default chain song which is song 1.
After finishing the above steps, press RECORD to disable it, press STEP 1 to select song 1, make sure both AUTO SCROLL in Song and Pattern Mode are set to on, then press play, the sequencer will play from song 1 to song 2 then to song 3. If the song chain PREFS is set to loop, after song 3 plays to the end it will go back to song 1 again.
Please note that this feature over-rides the Chain Songs function in Settings. Deselecting the AUTO SCROLL button while a song is playing reverts to the original Chain Songs setting.
NOTE: When Auto Scroll is active for Songs it will affect how patterns are played back so turn Auto Scroll off for normal pattern playback.
TIP: In the Synthtribe app patterns and songs can be created and saved to and from the RS-9.
Auto save the "chain" song:
In SONG mode with record enabled, press any step button to select that song as a chained song for current song, the chained song will be auto saved.
How to erase a song:
-
Press ERASE.
-
The SONG and PATTERN buttons will flash. Press SONG.
- Use TAP/HOLD to select either the Live or Stored data to be erased.
- Press ERASE to delete the current song.
Playing a Pattern (Pattern Mode)
Press the PATTERN button and select the pattern that you wish to play.
In pattern Mode, all patterns with stored pattern data are white, current active is red (you can see which patterns are programmed).
Step Repeat
This function can be used for changing patterns during a live performance. When STEP REPEAT is triggered the current step or steps (depending on the step settings) will be repeated until the TRIGGER button is released. The number of steps repeated are 1,2,4 or 8. This is a very powerful feature that can, for example be used to loop the end of a pattern creating a fill.
To use:
- Press STEP REPEAT.
- Select how many repeats you require (1,2,4 or 8)
- While a pattern is playing press and hold the TRIGGER button to repeat steps.
-
The step number can be changed while the TRIGGER button is held to create different loops effects.
-
Press STEP REPEAT to exit.
NOTE: Step repeat will not function If POLY mode is on any voice.
Note Repeat
This feature can be used for transforming patterns during a live performance. When Note Repeat is triggered the currently selected voice will be repeated until the TRIGGER button is released. The number of notes repeated are 1,2,4 or 8. This creative feature can be used to create drum roll and ratchet style effects on the fly by repeating the current note while the rhythm continues to run. This can be recorded into a pattern in RECORD STEP mode.
To use and record:
- Press NOTE REPEAT.
- Select how many repeats you require (1,2,4 or 8).
- Press RECORD in step mode.
- While a pattern is playing press and hold the TRIGGER button to repeat notes.
- The note number can be changed while the TRIGGER button is held to create different fill effects.
- Press NOTE REPEAT to exit.
NOTE: Note repeats can be recorded in STEP RECORD mode. To remove a NOTE REPEAT from a step, remove the programmed step from the pattern. The red LEDs above indicate if the selected step has a repeat of 1,2,4 or 8 programmed.
Note repeat can also be programmed:
Step 1: enable note repeat and select a repeat number in STEP mode.
Step 2: select any voice you want.
Step 3: hold STEP number button then press TRIGGER.
NOTE: Repeat can be added with or without step record on with this method.
Track Mute
This function lets you mute any voice(s) within a pattern, song or globally. To mute a voice(s):
- While a pattern is playing select track MUTE.
- Select the voice(s) you wish to mute.
- The muted voice(s) will be illuminated in red.
- Press track MUTE to exit.
NOTE: All mutes can be cleared by holding HOLD/TAP and pressing the MUTE button.
Solo functions
This function gives you the ability to solo a voice or voices within a pattern, song or globally.
To Solo a voice(s):
- While a pattern is playing select track SOLO.
- Select the voice(s) you wish to solo.
- The soloed voice(s) will be illuminated in white.
- Press track SOLO to exit.
NOTE: SOLO will always take priority
over MUTE. Soloing a voice that is muted will cause that voice to sound.
NOTE: All solos can be cleared by holding HOLD/TAP and pressing the SOLO button.
Instant Pattern Switching
This function allows patterns to be instantly switched to a different pattern at the same play head position in time.
To perform this switch first select PATTERN MODE. Then hold the PATTERN button and select the next pattern with any white step key (stored pattern).
Connecting the RS-9 to other modules
The RS-9 is designed to be a controller for other modules. Primarily this is by connecting the trigger outputs (1) and accent outputs (2) to any module that accepts a +5 V trigger and programming the pattern steps to produce triggers where required. In addition the ten 'voices' can be mapped as MIDI notes using the MAP function (47), which allows the RS-9 to control any MIDI synthesizer using DIN or USB.
The RS-9 will also act as a MIDI to Trigger interface by outputting triggers generated by incoming MIDI on DIN (42) or USB (41) using the mapped notes (other notes will be ignored).
The CV output (39) can be used to control external modules such a Voltage Controlled Filters, which require a continuously variable voltage between 0 V and +5 V and which can be used to process one or more of the modules being triggered.
Power Connection Installation
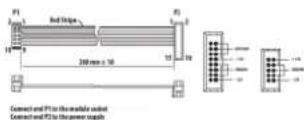
The module comes with the required power cable for connecting to a standard Eurorack power supply system. Follow these steps to connect power to the module. It is easier to make these connections before the module has been mounted into a rack case.
- Turn the power supply or rack case power off and disconnect the power cable.
- Insert the 16-pin connector on the power cable into the socket on the power supply or rack case. The connector has a tab that will align with the gap in the socket, so it cannot be inserted incorrectly. If the power supply does not have a keyed socket, be sure to orient pin 1 (-12 V) with the red stripe on the cable.
- Insert the 10-pin connector into the socket on the back of the module. The connector has a tab that will align with the socket for correct orientation.
- After both ends of the power cable have been securely attached, you may mount the module in a case and turn on the power supply.
The necessary screws are included with the module for mounting in a Eurorack case. Connect the power cable before mounting.
Depending on the rack case, there may be a series of fixed holes spaced 2 HP apart along the length of the case, or a track that allows individual threaded plates to slide along the length of the case. The free-moving threaded plates allow precise positioning of the module, but each plate should be positioned in the approximate relation to the mounting holes in your module before attaching the screws.
Hold the module against the Eurorack rails so that each of the mounting holes are aligned with a threaded rail or threaded plate.
Attach the screws part way to start, which will allow small adjustments to the positioning while you get them all aligned. After the final position has been established, tighten the screws down.
ES Controles
When TRIG is released the pattern will continue from the next step.
Global / song / pattern
Step Repeat [STEP RPT]
Connect and P1 to the module station Connect and P2 to the power supply
Connect and F1 to the module instant
Connect and F2 to the power sample
| Inputs | |
| MIDI In | |
| Type 5 pin DIN | |
| USB In/Out | |
| Type USB-C | |
| Reset In | |
| Type 3.5 mm TS jack, DC coupled | |
| Max input level 10 V | |
| Sync In | |
| Type 3.5 mm TRS jack, DC coupled | |
| Max input level 10 V | |
| Outputs | |
| Trigger Out | |
| Type 10 x 3.5 mm TS jack, DC coupled | |
| Impedance 1 kΩ, unbalanced | |
| Max output level 10 V p-p | |
| Accent Out | |
| Type 10 x 3.5 mm TS jack, DC coupled | |
| Impedance 330 Ω, unbalanced | |
| Max output level 10 V p-p | |
| Sync Out | |
| Type 3.5 mm TRS jack, DC coupled | |
| Impedance 220 Ω, unbalanced | |
| Max output level 5 V p-p | |
| MIDI Out | |
| Type 5 pin DIN | |
| Controls | |
| Knobs Accent Level, Multi-function | |
| Buttons | Track Select x 10 |
| Accent | |
| Tap, Record, Stop, Play/Pause | |
| Autoscroll, <, Length, >> | |
| Song, Pattern, Step | |
| Save, Copy, Erase, Dump | |
| Mode, Sync | |
| Trigger, Step Repeat, Note Repeat, 1, 2, 4, 8 | |
| Track Mute, Track Solo | |
| Autofill, Settings | |
| MIDI, USB, Clock, Map, Prefs, CV, Poly, Rand, Prob | |
| Flam, Repeat, 1/8, 1/3T, 1/6, 1/16T, 1/32 | |
| 4 character 7 segment LED | |
| Power | |
| Power supply Eurorack | |
| Current draw +12 V 350 mA / -12 V 20 mA | |
| Physical | |
| Standard operating temperature range | 5°C to 45°C (41°F to 113°F) |
| Dimensions | 263.8 x 128.5 x 41.1 mm(10.39 x 5.06 x 1.62") |
| Rack units | 52 hp |
| Weight | 0.51 kg (1.12 lb) |
EN
Read/Write: Set rw to 77 to read; 78 to write
Flag: Set fn as follows:
- Bit 0: 0 for song; 1 for pattern
- Bits 1 – 3 are not used and can be set to 0
- Bit 4: 0 for live data; 1 for stored data
• Bit 5: 0 for not used; 1 for global settings - Bit 6: 0 for normal; 1 for live and stored data
- Bit 7 is not used and can be set to 0
Note that if Bit 5 is set to 1 then all other bits will be ignored; and that if Bit 6 is set to 1 then both live and stored data will be used.
Song: set sn in the range 00 - 0F to select song 1 - 16
Pattern: set pn in the range 00 - 0F to select pattern 1 - 16. Note that when reading song data pattern setting will be disregarded.
Data: when writing use data to send data to the RS-9. When reading data setting is not required.
186 187 Quick Start Guide RS-9
技术参数
Other important information

Important information

Please register your new Music Tribe equipment right after you purchase it by visiting musictribe.com. Registering your purchase using our simple online form helps us to process your repair claims more quickly and efficiently. Also, read the terms and conditions of our warranty, if applicable.
-
Malfunction. Should your Music Tribe Authorized Reseller not be located in your vicinity, you may contact the Music Tribe Authorized Fulfiller for your country listed under "Support" at musictribe.com. Should your country not be listed, please check if your problem can be dealt with by our "Online Support" which may also be found under "Support" at musictribe.com. Alternatively, please submit an online warranty claim at musictribe.com BEFORE returning the product.
-
Power Connections. Before plugging the unit into a power socket, please make sure you are using the correct mains voltage for your particular model. Faulty fuses must be replaced with fuses of the same type and rating without exception.
1. Registro online.
Other important information

1. Registreer online.
Responsible Party Name: Music Tribe Commercial NV Inc.
Address: 122 E. 42nd St.1, 8th Floor NY, NY 10168, United States
Email Address:
legal@musictribe.com
RS-9
This equipment has been tested and found to comply with the limits for a Class B digital device, pursuant to part 15 of the FCC Rules. These limits are designed to provide reasonable protection against harmful interference in a residential installation. This equipment generates, uses and can radiate radio frequency energy and, if not installed and used in accordance with the instructions, may cause harmful interference to radio communications. However, there is no guarantee that interference will not occur in a particular installation. If this equipment does cause harmful interference to radio or television reception, which can be determined by turning the equipment off and on, the user is encouraged to try to correct the interference by one or more of the following measures:
- Reorient or relocate the receiving antenna.
- Increase the separation between the equipment and receiver.
- Connect the equipment into an outlet on a circuit different from that to which the receiver is connected.
- Consult the dealer or an experienced radio/TV technician for help.
This equipment complies with Part 15 of the FCC rules. Operation is subject to the following two conditions:
(1) this device may not cause harmful interference, and (2) this device must accept any interference received, including interference that may cause undesired operation.
Important information:
Changes or modifications to the equipment not expressly approved by Music Tribe can void the user's authority to use the equipment.

Hereby, Music Tribe declares that this product is in compliance with General Product Safety Regulation (EU) 2023/988, Directive 2014/30/EU, Directive 2011/65/EU and Amendment 2015/863/EU, Directive 2012/19/EU, Regulation 519/2012 REACH SVHC and Directive 1907/2006/EC.
Full text of EU DoC is available at https://community.musictribe.com/
EU Representative: Music Tribe Brands DK A/S Address: Gammel Strand 44, DK-1202 København K, Denmark
UK Representative: Music Tribe Brands UK Ltd. Address: 8th Floor, 20 Farringdon Street London EC4A 4AB, United Kingdom
Correct disposal of this product: This symbol indicates that this product must not be disposed of with household waste, according to the WEEE Directive (2012/19/EU) and your national law.
This product should be taken to a collection center licensed for the recycling of waste electrical and electronic equipment (EEE).
The mishandling of this type of waste could have a possible negative impact on the environment and human health due to potentially hazardous substances that are generally associated with EEE. At the same time, your cooperation in the correct disposal of this product will contribute to the efficient use of natural resources. For more information about where you can take your waste equipment for recycling, please contact your local city office, or your household waste collection service.
Quick Start Guide
193193
We Hear You