P16-HQ - Monitor BEHRINGER - Free user manual and instructions
Find the device manual for free P16-HQ BEHRINGER in PDF.

| Product Type | Personal Digital Mixing Monitor |
| Brand | Behringer |
| Model | P16-HQ |
| Number of Channels | 16 mono channels (with stereo linking possible) |
| Power Supply | External power adapter (DC IN), use only Behringer power supplies |
| Connectivity | UltraNet IN/THRU (RJ45), MIDI IN, line output L/MONO and R (TRS 6.35 mm), headphone output (TRS 6.35 mm) |
| Equalization | 3 bands: bass (BASS), variable frequency mid (FREQ), treble (TREBLE) |
| Mixing Functions | Volume, pan, stereo link, groups, solo, mute, presets (store/recall) |
| Main Output | Main volume (OUTPUT), limiter (LIMITER) with adjustable threshold |
| LED Indicators | UltraNet active, selected channel, signal activity, group, limiter active (GR) |
| MIDI Control | MIDI input for external control and firmware updates |
| Operating Temperature | 5°C to 45°C (41°F to 113°F) |
| Cleaning | Dry cloth only |
| Safety | Do not expose to water, do not open, repair by qualified personnel |
| Repairability | No user-serviceable parts, contact a qualified technician |
| Warranty | Limited warranty, see community.musictribe.com/support |
| Dimensions (approx.) | Standard 1U rack (not specified, estimate: 48.3 x 13.3 x 20 cm) |
| Weight (approx.) | Approximately 2.5 kg (estimate) |
Frequently Asked Questions - P16-HQ BEHRINGER
User questions about P16-HQ BEHRINGER
0 question about this device. Answer the ones you know or ask your own.
Ask a new question about this device
Download the instructions for your Monitor in PDF format for free! Find your manual P16-HQ - BEHRINGER and take your electronic device back in hand. On this page are published all the documents necessary for the use of your device. P16-HQ by BEHRINGER.
USER MANUAL P16-HQ BEHRINGER
16-Channel Personal Monitoring Mixer
P16-D
16-Channel Digital ULTRANET Distributor
23Quick Start Guide POWERFLAY P16 HQ/P16 D
EN

Important Safety Instructions
ES
Terminals marked with this symbol carry electrical current of sufficient magnitude to constitute risk of electric shock. Use only high-quality professional speaker cables with 14 " TS or twist-locking plugs pre-installed. All other installation or modification should be performed only by qualified personnel.
This symbol, wherever it appears, alerts you to the presence of uninsulated dangerous voltage inside the enclosure - voltage that may be sufficient to constitute a risk of shock.
This symbol, wherever it appears, alerts you to important operating and maintenance instructions in the accompanying literature. Please read the manual.
Caution To reduce the risk of electric shock, do not remove the top cover (or the rear section). No user serviceable parts inside. Refer servicing to qualified personnel.
Caution To reduce the risk of fire or electric shock, do not expose this appliance to rain and moisture. The apparatus shall not be exposed to dripping or splashing liquids and no objects filled with liquids, such as vases, shall be placed on the apparatus.
Caution These service instructions are for use by qualified service personnel only. To reduce the risk of electric shock do not perform any servicing other than that contained in the operation instructions Repairs have to be performed by qualified service personnel.

Warning
Please refer to the
information on the
exterior of bottom enclosure for electrical and safety information before installing or operating the device.
-
Please read and follow all instructions and warnings.
-
Keep the apparatus away from water (except for outdoor products).
-
Clean only with dry cloth.
-
Do not block ventilation openings. Do not install in a confined space. Install only according to manufacturer's instructions.
-
Protect the power cord from damage, particularly at plugs and appliance socket.
-
Do not install near any heat sources such as radiators, heat registers, stoves or other apparatus (including amplifiers) that produce heat.
-
Do not defeat the safety purpose of the polarized or grounding-type plug. A polarized plug has two blades with one wider than the other (only for USA and Canada). A grounding-type plug has two blades and a third grounding prong. The wide blade or the third prong are provided for your safety. If the provided plug does not fit into your outlet, consult an electrician for replacement of the obsolete outlet.
-
Use only attachments and accessories recommended by the manufacturer.

- Use only specified carts, stands, tripods, brackets, or tables. Use caution to prevent tip-over
when moving the cart/apparatus combination.
-
Unplug during storms, or if not in use for a long period.
-
Only use qualified personnel for servicing, especially after damage.
-
The apparatus with protective earthing terminal shall be connected to a MAINS socket outlet with a protective
earthing connection.
-
Where the MAINS plug or an appliance coupler is used as the disconnect device, the disconnect device shall remain readily operable.
-
Avoid installing in confined spaces like bookcases.
-
Do not place naked flame sources, such as lighted candles, on the apparatus.
-
Operating temperature range 5° to 45°C (41° to 113°F).
LEGAL DISCLAIMER
Music Tribe accepts no liability for any loss which may be suffered by any person who relies either wholly or in part upon any description, photograph, or statement contained herein. Technical specifications, appearances and other information are subject to change without notice. All trademarks are the property of their respective owners. Midas, Klark Teknik, Lab Gruppen, Lake, Tannoy, Turbosound, TC Electronic, TC Helicon, Behringer, Bugera, Aston Microphones and Coolaudio are trademarks or registered trademarks of Music Tribe Global Brands Ltd. © Music Tribe Global Brands Ltd. 2024 All rights reserved.
LIMITED WARRANTY
For the applicable warranty terms and conditions and additional information regarding Music Tribe's Limited Warranty, please see complete details online at community.musictribe.com/support.
ES
BESCHRÄNKTE GARANTIE
The Ground Truth image displays a single, solid horizontal line. According to Rule 2 (UNDERSCORE & LINE RULES), this is a stylistic or background line, not a placeholder underscore. Therefore, the OCR result must ignore it and output nothing or only meaningful text. The provided OCR content is "____", which consists of four underscores. This is an incorrect interpretation of the line as a placeholder, violating the rule that stylistic lines must be ignored. The OCR has hallucinated underscores where none should exist based on the GT's visual context. Hence, the OCR result is inconsistent with the Ground Truth.

CAUTION RISK OF ELECTRIC SHOCK DO NOT OPEN ATTENTION RESQUE D'ÉLECTROCUTIÓ

POWERPLAY P16-HQ Hook-up
Step 1: Hook-Up
ES Paso 1: Conexión
ETR Etape 1 : Connexions
OF Schritt 1: Verkabelung
PT Passo 1: Conexões
Passo 1: Allacciare
Stap 1: Aansluiten
SE Steg 1: Anslutning
PL Krok 1: Podłączeni
JP ステップ 1: フックアップ
第一步: 连接应用
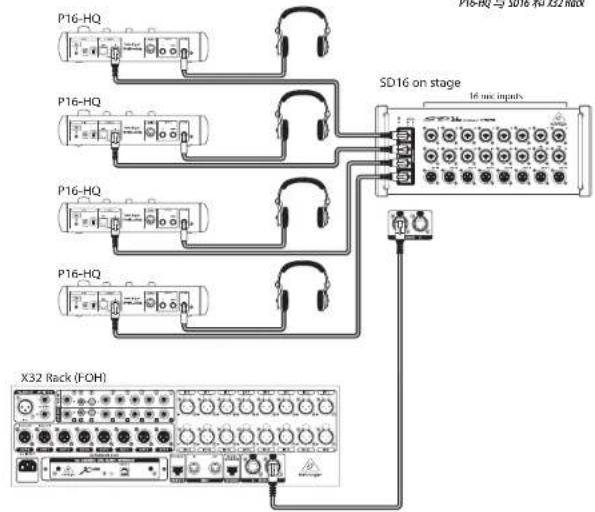
flowchart
graph TD
    A["P16-HQ"] --> B["SD16 on stage"]
    C["P16-HQ"] --> B
    D["P16-HQ"] --> B
    E["P16-HQ"] --> B
    F["X32 Rack (FOH)"] --> B
    B --> G["16 mic inputs"]
    B --> H["Ground"]
P16-HQ with SD16 and X32 Rock and P16-D
P16-HQ com SD16 e X32 Rock e P16-D
P16-HQzSD16,X32 Rock i P16-D
P16-HQとSD76、X32RackとP16-Dと
P16-HQ与SD16、X32Rock和P16-D
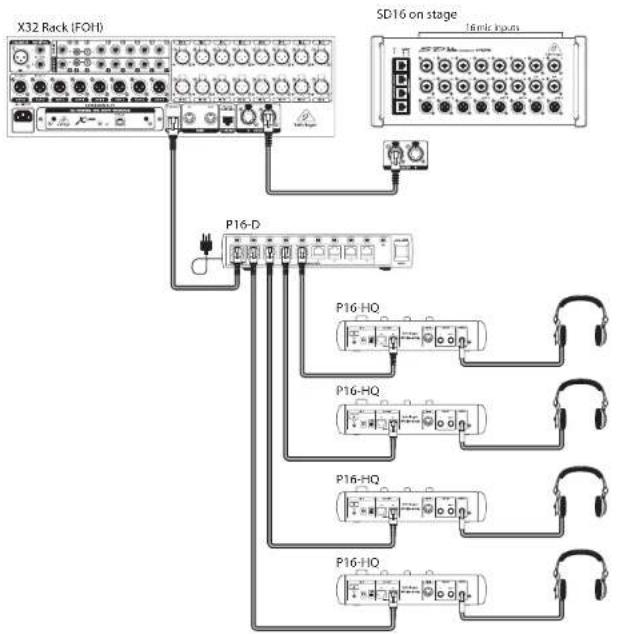
flowchart
graph TD
    A["X32 Rack (FOH)"] --> B["SD16 on stage"]
    B --> C["P16-D"]
    B --> D["P16-HQ"]
    B --> E["P16-HQ"]
    B --> F["P16-HQ"]
    B --> G["P16-HQ"]
    C --> H["16mic inputs"]
    D --> I["16mic inputs"]
    E --> J["16mic inputs"]
    F --> K["16mic inputs"]
    G --> L["16mic inputs"]
POWERPLAY P16-HQ Hook-up
Step 1: Hook-Up
ES Paso 1: Conexión
ETR Etape 1 : Connexions
OF Schritt 1: Verkabelung
PT Passo 1: Conexões
Passo 1: Allacciare
Stap 1: Aansluiten
SE Steg 1: Anslutning
PL Krok 1: Podłączeni
JP ステップ 1: フックアップ
第一步: 连接应用
P16-HO with XR18
P16-HQ con XR18
P16-HQ avec XRT8
P16-HQ mit KR18
P16-HQ com XR18
P16-HQ con XR18
P16-HQ met XR18
P16-HO med XR18
P16-HQZXR18
P16-HQとXR78と
P16HQ与XR18
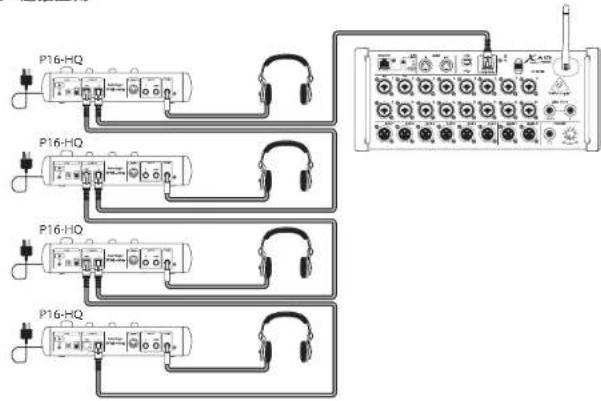
flowchart
graph TD
    A["P16-HQ"] --> B["Switch 1"]
    A --> C["Switch 2"]
    A --> D["Switch 3"]
    A --> E["Switch 4"]
    A --> F["Switch 5"]
    G["P16-HQ"] --> H["Switch 1"]
    G --> I["Switch 2"]
    G --> J["Switch 3"]
    G --> K["Switch 4"]
    G --> L["Switch 5"]
    M["P16-HQ"] --> N["Switch 1"]
    M --> O["Switch 2"]
    M --> P["Switch 3"]
    M --> Q["Switch 4"]
    M --> R["Switch 5"]
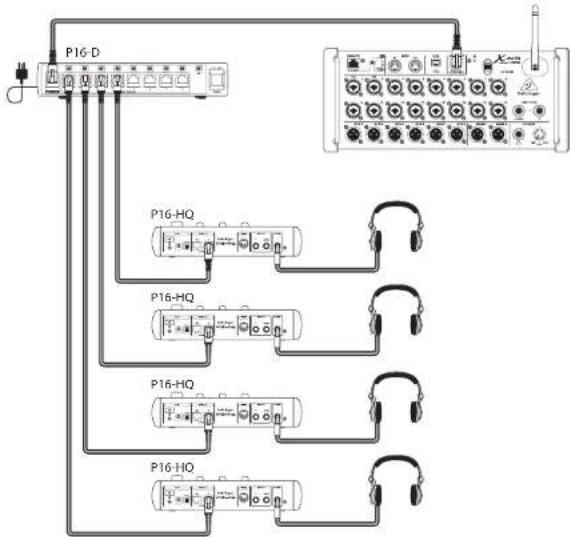
flowchart
graph TD
    A["P16-D"] --> B["P16-HQ"]
    A --> C["P16-HQ"]
    A --> D["P16-HQ"]
    A --> E["P16-HQ"]
    B --> F["Headphones"]
    C --> G["Headphones"]
    D --> H["Headphones"]
    E --> I["Headphones"]
    style A fill:#f9f,stroke:#333
    style B fill:#ccf,stroke:#333
    style C fill:#ccf,stroke:#333
    style D fill:#ccf,stroke:#333
    style E fill:#ccf,stroke:#333
POWERPLAY P16-HQ Controls
Step 2: Controls

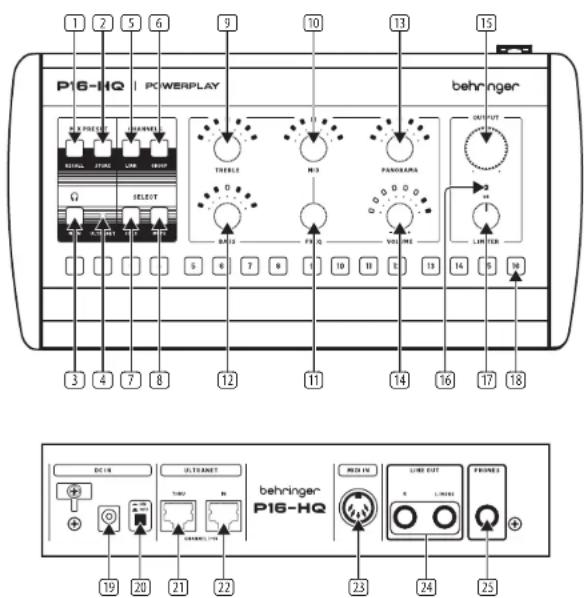
- RECALL: Hold this button and press one of the 16 CHANNEL SELECT buttons (18) to load the corresponding user mix preset.
- STORE: Hold this button and press one of the 16 CHANNEL SELECT buttons (18) to save your current settings to the corresponding user mix preset slot.
- MAIN button selects the main stereo mix, which has its own settings for volume, balance, and equalization.
- ULTRANET LED lights to indicate the ULTRANET input is connected and active.
- LINK: Hold this button and press one of the 16 CHANNEL SELECT buttons (18) to combine adjacent mono channels into a linked stereo pair.
- GROUP: Hold this button and press one of the 16 CHANNEL SELECT buttons (18) to combine any selected channels into one or more groups.
- SOLO button mutes all channels except for the selected mono channel or stereo-linked pair.
- MUTE: Hold this button and press one of the 16 CHANNEL SELECT buttons (18) to mute or unmute that channel.
- TREBLE knob controls the high band gain for the selected mono channel, stereo-linked pair, or MAIN stereo bus signal. Press the encoder to reset its value.
- MID knob controls the mid band gain for the currently selected mono channel, stereo-linked pair, or MAIN stereo bus signal. Press the encoder to reset its value.
- FREQ knob selects the specific mid-range frequency band to be cut or boosted using the MID knob. Press the encoder to reset its value.
- BASS knob controls the low band gain for the selected mono channel, stereo-linked pair, or MAIN stereo bus signal. Press the encoder to reset its value.
- PANORAMA knob adjusts the stereo placement of mono channels and the relative left-right balance of stereo-linked channels or the MAIN stereo bus signal. Press the encoder to reset its value.
-
VOLUME knob adjusts the mix level for selected mono and stereo-linked channels or the MAIN stereo bus signal. Press the encoder to mute.
-
OUTPUT knob controls the overall master output level.
- GR LED lights to show when the output limiter is active
- LIMITER knob controls the limiter threshold for the master output.
- CHANNEL SELECT buttons focus the desired mono and stereo-linked channels and groups for individual mix adjustment.
- DC IN connects to the included external power supply. Please use only BEHRINGER external power supplies.
- ON/OFF switch.
- ULTRANET THRU sends an unprocessed copy of the ULTRANET IN to additional ULTRANET devices.
- ULTRANET IN receives 16 channels from ULTRANET devices over a shielded CATS digital audio cable.
- MIDI IN for control of all parameters using external MIDI controllers, as well as for firmware updates.
- LINE OUT transmits a copy of the MAIN stereo mix over two TRS cables. Alternatively, a single TRS cable can be connected to the L/MONO jack.
- PHONES output transmits a copy of the MAIN stereo mix over a 6.35mm (1/4") TRS connector.
POWERPLAY P16-HQ Getting started
Step 3: Getting started
P16-HQ Basic Setup
-
Turn the OUTPUT knob all the way down to the full counterclockwise position.
-
Turn the LIMITER knob all the way up to the full clockwise position.
-
Confirm that the ULTRANET LED is lit.
-
The parameters for each individual channel can be adjusted by pressing the corresponding CHANNEL SELECT button.
The LED in each CHANNEL SELECT button lights as follows:
• Green (flickering): audio signal activity
- Red (constant): mono channel or stereo-linked pair selected without audio signal activity
- Yellow (flickering): mono channel or stereo-linked pair selected with audio signal activity
- Red (blinking): the channel is part of the selected group, but the channel is currently not selected and there is no audio signal activity
- Yellow (blinking): the channel is part of the selected group, but the channel is currently not selected and there is audio signal activity
-
While playing audio, slowly turn the OUTPUT knob clockwise until you have a comfortable monitoring level.
-
Slowly turn the LIMITER knob counterclockwise to get the limiter working and find an acceptable balance between dynamics and control of volume peaks.
-
To adjust any individual or stereo channel in the mix, press the corresponding CHANNEL SELECT button. The channel's LED will light red indicating the channel is selected for adjustment.
-
Turn the VOLUME knob clockwise or counterclockwise to adjust the channel's relative level in the mix.
-
Turn the PANORAMA knob clockwise or counterclockwise to adjust the channel's position in the stereo field.
-
Adjust the channel's low and high bands gain using the BASS and TREBLE knobs.
-
Select the mid band center frequency for adjustment using the FREQ knob, and then adjust the mid band gain using the MID knob.
-
Create stereo links by holding down the LINK button and then pressing the desired CHANNEL SELECT button. The related adjacent channel will become stereo-linked. Note that channels are always stereo-linked starting with an odd-numbered channel and assigning the odd-numbered channel to the left. All parameter values applied to the odd-numbered channel will be applied to both stereo-linked channels.
-
To group several channels together, hold down the GROUP button, and then press the CHANNEL SELECT buttons of the channels you want to assign to the group. The LEDs for the selected channels will blink. Press the same CHANNEL SELECT button again to deselect the channel. Release the GROUP button to create the group with your selection of channels.
After creating a group, it can be modified by holding down the GROUP button and pressing one of the CHANNEL SELECTION buttons assigned to the group. Now, channels can be added or removed from that group.
To create a new group from the remaining unassigned channels, hold down the GROUP button and then press the CHANNEL SELECT button on a channel that is not currently assigned to a group (LED is off). Pressing an unassigned CHANNEL SELECT button opens a new group. Add more channels as desired.
A channel can only be part of one group at the same time.
Adjusting the VOLUME of any channel within the group will modify the VOLUME of all the other grouped channels by the same amount. All other channel settings like EQ and PANORAMA remain independent.
-
To mute one or multiple channels, hold down the MUTE button and then press the CHANNEL SELECT buttons on the desired channels.
-
To solo the selected channel, press the SOLO button. Pressing another CHANNEL SELECTED button will solo the newly selected channel. To exit solo mode, press the SOLO button again.
-
Save your settings to a preset by holding the STORE button and then select the target preset slot by pressing any one of the 16 CHANNEL SELECT buttons.
-
Load a preset by holding the RECALL button and pressing the CHANNEL SELECT button containing the desired preset.
POWERPLAY P16-D Controls
Step 2: Controls

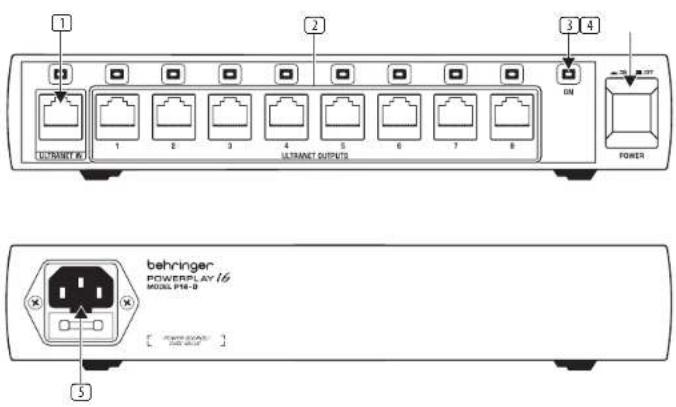
- ULTRANET IN input accepts signals from other POWERPLAY 16 devices using shielded CATS cable.
- ULTRANET OUTPUTS connect the P16-D with up to eight P16-HQ personal mixers or P16-D distribution hubs. Each output sends out 16 tracks of using shielded CAT5 cable.
-
ON LED lights when the device is powered up using the POWER switch.
-
POWER switch turns the unit on and off.
- POWER SOURCE jack accepts the included IEC power cable.
POWERPLAY P16-D Getting started
Step 3: Getting started
P16-D Basic Setup
- Make sure the P16-D is connected to a power outlet using the included IEC power cable. (To bus-power additional P16-HQ mixers from the P16-D, the P16-D must be connected to a power source.)
- Make sure the unit is powered down. The ON LED should be unlit.
- Connect a shielded CAT5 cable from a P16-I, P16-D, or another P16-HQ to the ULTRANET IN connection on the P16-D.
- Run shielded CATS digital cables out from the ULTRANET OUTPUTS to external devices (any combination of P16-HQ or P16-D units). For best results, do not use CATS cables longer than 75 m (246 ft.).
- Power up the P16-D by pressing the POWER switch. The ON LED will light up.
- LEDs above the ULTRANET IN and ULTRANET OUT connections will light up to confirm the CAT5 cables are connected and active.
24 25 Quick Start GuidePOWERPLAY P16 HQ/P16 D
POWERPLAY P16-HQ Controles
Paso 2: Controles

POWERPLAY P16-D Controles
Paso 2: Controles
POWERPLAY P16-D Réglages
Etape 2 : Réglages

P16-D Grundinstallation
POWERPLAY P16-D Controles
Passo 2: Controles

POWERPLAY P16-HQ Controlli
Passo 2: Controlli
POWERPLAY P16-D Controlli
Passo 2: Controlli

POWERPLAY P16-D Bediening
Stap 2: Bediening

P16-D Basisinstelling
POWERPLAY P16-D Kontroller
Steg 2: Kontroller

POWERPLAY P16-D はじめに
ステップ 3: はじめに
P16-D基本セットアップ
| P16-HQ/P16-D | |
| Ultranet Digital Network | |
| Digital Processing | |
| A/D conversion 24-bit, | 44.1 / 48 kHz sample rate |
| Converter type 24-bit,delta-sigma | |
| System | |
| Signal | 16 channels, plus bus-power for P16-HQ |
| Latency <0.9 ms (from P16-1to P16-HQ) | |
| Frequency response 20 Hz to 20 kHz (+0/-3 dB) | |
| Dynamic range 92 dB typ. | |
| Cabling | |
| Connectors RJAS | |
| Cables Shielded CATS | |
| Cable length max. 246ft / 75 m recommended | |
| P16-HQ Digital Personal Mixer | |
| Audio Connections | |
| Phones 3/4" TRS, stereo | |
| Line out 2 x 3/4" TS, unbalanced | |
| Ultranet Thru / In | 2 x R/45 |
| MIDI in | 5-pin MIDI connector |
| Performance Line Out | |
| Frequency response | 20 Hz - 20 kHz (+0 / -0.5 dB) |
| THD + N | 0.002 % typ. |
| Residual noise | -99 dBu unweighted / -102 a -weighted |
| Crosstalk L / R | <-75 dB |
| Output impedance | 1 kΩ |
| Max. output level | +12.5 dBu @ 200 kΩ load / +2.7 dBu @ 600 Ω load |
| Performance Phones Out | |
| Frequency response | 20 Hz - 20 kHz (+0 / -0.1 dB) |
| THD + N | typ. 0.002 % / 0.007 % @ 350 mW output power |
| Residual noise | -94.5 dBu unweighted / -97.5 dBu A -weighted |
| Crosstalk L / R | <-90 dB |
| Max. output level | 50 mW @ 600 Ω load 100 mW @ 300 Ω load 400 mW @ 30 Ω load |
P16-HQ/P16-D
| P16-HQ/P16-D | |
| Controls | |
| Equalizer | |
| Bass | +12 dB @ 100 Hz, shelving |
| Mid | ±12 dB, semi-parametric |
| Frequency | 100 Hz to 10 kHz, adjustable |
| Treble | ±12 dB @ 10 kHz |
| Output | |
| Limiter | Ratio << 1 |
| Level | -20 to +15 dBu (Phones) |
| Power Supply | |
| Power consumption | 5 W max. with included power supply adaptor |
| Mains connection | External power supply (included) or P16-1 / P16-D |
| Dimensions / Weight | |
| Dimensions(H x W x D) | 63 x 257 x 134 min(2.5 x 10.1 x 5.3") |
| Weight | 0.8 kg (1.8 lbs) |
| P16-D Ultranet Distributor | |
| Digital Inputs / Outputs (Ultranet) | |
| Ultranet in | 1 x RJ45 |
| Remote outputs | 8 x RJ45 |
| Power Supply/Voltage (Fuses) | |
| USA / Canada | 120 V~, 60 Hz (T 1 A H 250 V) |
| UK / Australia / Europe | 220-240 V~, 50 / 60 Hz(T 1 A H 250 V) |
| Korea / China | 220-240 V~, 50 / 60 Hz(T 1 A H 250 V) |
| Japan | 100 V~, 50 / 60 Hz (T 1 A H 250 V) |
| Power consumption 40 W | |
| Mains connection | Standard IEC receptacle |
| Dimensions/Weight | |
| Dimensions(H x W x D) | 44 x 254 x 160 mm (1U)(1.7 x 10 x 6.3") |
| Weight | 1.1 kg (2.4 lbs) |
技术参数
Quick Start Guide
85
EN
Other important information

Important information Asp

ortantes

Informations importantes
1. Register online.
Please register your new Music Tribe equipment right after you purchase it by visiting musictribe.com. Registering your purchase using our simple online form helps us to process your repair claims more quickly and efficiently. Also, read the terms and conditions of our warranty, if applicable.
- Malfunction. Should your Music Tribe Authorized Reseller not be located in your vicinity, you may contact the Music Tribe Authorized Fulfiller for your country listed under "Support" at musictribe.com. Should your country not be listed, please check if your problem can be dealt with by our "Online Support" which may also be found under "Support" at musictribe.com. Alternatively, please submit an online warranty claim at musictribe.com BEFORE returning the product.
3. Power Connections.
Before plugging the unit into a power socket, please make sure you are using the correct mains voltage for your particular model. Faulty fuses must be replaced with fuses of the same type and rating without exception.
1. Registro online.
Other important information

1. Registreer online.
POWERPLAY P16-HQ/P16-D
Responsible Party Name: Music Tribe Commercial NV Inc.
Address: 122 E. 42nd St.1,
8th Floor NY, NY 10168,
United States
Email Address: legal@musictribe.com
POWERPLAY P16-HQ/P16-D
This equipment has been tested and found to comply with the limits for a Class B digital device, pursuant to part 15 of the FCC Rules. These limits are designed to provide reasonable protection against harmful interference in a residential installation. This equipment generates, uses and can radiate radio frequency energy and, if not installed and used in accordance with the instructions, may cause harmful interference to radio communications. However, there is no guarantee that interference will not occur in a particular installation. If this equipment does cause harmful interference to radio or television reception, which can be determined by turning the equipment off and on, the user is encouraged to try to correct the interference by one or more of the following measures:
- Reorient or relocate the receiving antenna.
- Increase the separation between the equipment and receiver.
- Connect the equipment into an outlet on a circuit different from that to which the receiver is connected.
- Consult the dealer or an experienced radio/TV technician for help.
This equipment complies with Part 15 of the FCC rules. Operation is subject to the following two conditions:
(1) this device may not cause harmful interference, and (2) this device must accept any interference received, including interference that may cause undesired operation.
Important Information:
Changes or modifications to the equipment not expressly approved by Music Tribe can void the user's authority to use the equipment.
CE
Hereby, Music Tribe declares that this product is in compliance with Directive 2014/35/EU, Directive 2014/30/EU, Directive 2011/65/EU and Amendment 2015/863/EU, Directive 2012/19/EU, Regulation 519/2012 REACH SVHC and Directive 1907/2006/EC.
Full text of EU DoC is available at https://community.musictribe.com/
EU Representative: Music Tribe Brands DK A/S Address: Gammel Strand 44, DK-1202 København K, Denmark
UK Representative: Music Tribe Brands UK Ltd. Address: 8th Floor, 20 Famingdon Street London EC4A 4AB, United Kingdom

Correct disposal of this product: This symbol indicates that this product must not be disposed of with household waste, according to the WEEE Directive (2012/19/EU) and your national law. This product should be taken to a collection center licensed for the approval
of waste electrical and electronic equipment (EEE). The mishandling of this type of waste could have a possible negative impact on the environment and human health due to potentially hazardous substances that are generally associated with EEE. At the same time, your cooperation in the correct disposal of this product will contribute to the efficient use of natural resources. Far more information about where you can take your waste equipment for recycling, please contact your local city office, or your household waste collection service.
91Quick Start
We Hear You