
Studio 50USB - Monitor BEHRINGER - Free user manual and instructions
Find the device manual for free Studio 50USB BEHRINGER in PDF.


| Product Type | Reference Studio Monitor |
| Brand | Behringer |
| Model | Studio 50USB |
| Power Output (Total) | 150 W (bi-amped) |
| Amplifier Configuration | Bi-amping |
| Amplifier Type | Class D |
| Crossover Type | Active |
| Crossover Frequency | 2.5 kHz |
| Input Connections | 2 x XLR balanced, 2 x 1/4" TRS balanced |
| Computer Connection | USB 2.0, Type B |
| Input Trim | ±6 dB |
| High Frequency Adjustment | +2.70 / -2.74 dB at 12 kHz (switchable) |
| Frequency Response | 55 Hz – 20 kHz |
| Maximum SPL | 100 dB @ 1 m |
| Dimensions (W x H x D) | 254 x 204 x 128 mm (10 x 8 x 7 in) |
| Weight | 6.5 kg (14.3 lb) |
| Power Supply | 100–240 VAC, 50/60 Hz (switch-mode) |
| Enclosure Material | Plastic composite |
| Included Accessories | Power cable, speaker cable |
| Cleaning Instructions | Clean with dry cloth only |
| Safety Precautions | Do not expose to rain or moisture; unplug during storms |
| Warranty | See music-group.com/warranty |
Frequently Asked Questions - Studio 50USB BEHRINGER
User questions about Studio 50USB BEHRINGER
0 question about this device. Answer the ones you know or ask your own.
Ask a new question about this device
Download the instructions for your Monitor in PDF format for free! Find your manual Studio 50USB - BEHRINGER and take your electronic device back in hand. On this page are published all the documents necessary for the use of your device. Studio 50USB by BEHRINGER.
USER MANUAL Studio 50USB BEHRINGER
natural_image
Illustration of a speaker with two speakers and a circular head, labeled 'behninger' (no other text or symbols)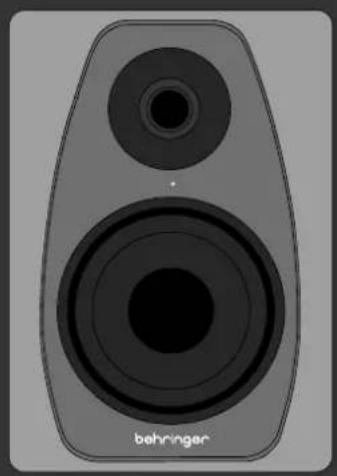
natural_image
Illustration of a speaker with two speakers and a circular head, labeled 'behninger' (no other text or symbols)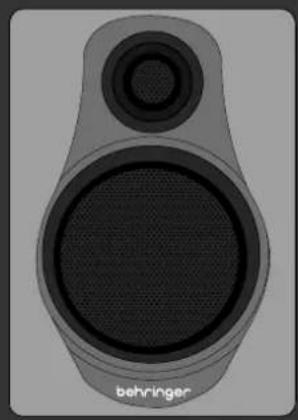
natural_image
Illustration of a behringer speaker with sound waves (no text or symbols on the speaker body)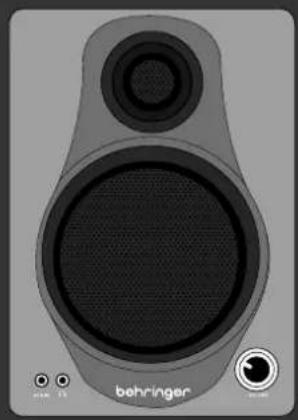
natural_image
Illustration of a bohringer audio speaker with sound waves and a circular dial (no text or symbols on the speaker body)Quick Start Guide

natural_image
Black-and-white collage showing a woman singing into headphones, a concert stage with audience, and a man smiling at the desk (no visible text or symbols)STUDIO 50USB
High-Resolution, 150-Watt Bi-Amped Reference Studio Monitors with USB Input
MEDIA 40USB
High-Resolution, 150-Watt Bi-Amped Digital Monitor Speakers with USB Input
2 S UOIO 50USB/MLDA 40USB Quick Start Guide 3
EN
ES
Terminals marked with this symbol carry electrical current of sufficient magnitude to constitute risk of electric shock. The only high quality professional speaker cables with 16" TS or twist lacking plugs pre installed. All other installation or modification should be performed only by qualified personnel.
This symbol, wherever it appears, alerts you to the presence of uninsulated dangerous voltage inside the enclosure—voltage that may be sufficient to constitute a risk of shock.
This symbol, wherever it appears, alerts you to important operating and maintenance instructions in the accompanying literature. Please read the manual.
Caution To reduce the risk of electric shock, do not remove the top cover (or the rear section). No user serviceable parts inside. Refer servicing to qualified personnel
Caution To reduce the risk of fire or electric shock, do not expose this appliance to rain and moisture. The apparatus shall not be exposed to dripping or splashing liquids and no objects filled with liquids, such as wares, shall be placed on the apparatus.
Caution These service instructions are for use by qualified service personnel only. To reduce the risk of electric shock do not perform any servicing other than that contained in the operation instructions. Repairs have to be performed by qualified service personnel.
- Read these instructions.
- Keep these instructions.
- Need all warnings.
- Follow all instructions.
- Do not use this apparatus near water.
- Clean-only with dry cloth.
- Do not block any ventilation openings. Install in accordance with the manufacturer's instructions.
-
Do not install near any heart sources such as rotators, heat registers, stores, or other apparatus (including amplifier) that produce heart.
-
Do not defeat the safety purpose of the polarized or grounding-type plug. A polarized plug has two blades with one wider than the other. A grounding-type plug has two blades and a third grounding prong. The wide blade or the third prong are provided for your safety. If the provided plug does not fit into your outlet, consult an electrician for replacement of the obsolete outlet.
-
Protect the power card from being walked on or pinched particularly at plugs, convenience receptacles, and the point where they eat from the apparatus.
- Use only attachments/accessories specified by the manufacturer.

- Use only with the cart, stand, tripod, bracket, or table specified by the manufacturer, or sold with the apparatus. When a cart is used, use caution when moving the cart'apparatus combination to avoid
injury from tip over
-
Unplug this apparatus during lightning storms or when unused for long periods of time.
-
Refer all servicing to qualified service personnel. Servicing is required when the apparatus has been damaged in any way, such as power supply cord or plug is damaged, liquid has been spilled or objects have fallen into the apparatus, the apparatus has been exposed to rain or moisture, does not operate normally, or has been dropped.
-
The apparatus shall be connected to a MANS socket outlet with a protective earthing connection.
-
Where the MAINS plug or an appliance coupler is used as the disconnect device, the disconnect device shall remain nearly operable.

- Correct disposal of this product: This symbol indicates that this product must not be disposed of with household waste, according to the IEEE Directive (2012/19/10), and your national law. This product should be taken
In a collection center licensed for the recycling or waste electrical and electronic equipment (EEC). The misunderstanding of the type of waste could have a possible negative impact on the environment and human health due to potentially hazardous substances that are generally associated with EEC. At the same time, your cooperation in the correct disposal of this product will contribute to the efficient use of natural resources. For more information about where you can take your waste equipment for recycling, please contact your local city office, or your household waste collection service. 18. Do not install in a confined space, such as a stock case or similar unit.
-
Do not place naked flame sources, such as lighted candles, on the apparatus.
-
Please keep the environmental aspects of battery disposal in mind. Batteries must be disposed-of at a battery collection point.
- Use the apparatus in tropical and/or moderate climates.
LEGAL DISCLAIMER
MUSIC Group accepts no liability for any loss which may be suffered by any person who relies other wholly or in part upon any description, photograph, or statement contained herein. Technical specific matters, appearances and other information are subject to change without notice. All trademarks are the property of their respective owners MIDAS, KLARK TERNIK, LAB GRUPPEN, LAKE, TANKOY, TURBOSOUNO, TC ELECTRONIC, TC HELICON, BEHINDINGER, BUGERA, and DOG are trademarks or registered trademarks of MUSIC Group IP Ltd. 92 MUSIC Group IP Ltd. 2017 All rights reserved.
LIMITED WARRANTY
For the applicable warranty terms and conditions and additional information regarding MUSIC Group's Limited Warranty, please see complete details online at music-group.com/warranty.
ES
BESCHRÄNKTE GARANTIE
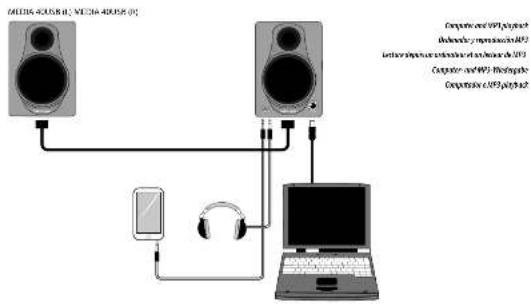
flowchart
graph TD
    A["Audio Device"] --> B["Headphones"]
    B --> C["Laptop"]
    D["Computer interface"] --> E["Computer and WiFi PlayStation"]
    E --> F["Bluetooth/Compressor (WiFi)"]
    F --> G["Bluetooth/Compressor (Bluetooth) / 2.0"]
    G --> H["Computer and WiFi Photopics"]
    H --> I["Compressor & WiFi phototips"]
    style A fill:#f9f,stroke:#333
    style D fill:#ccf,stroke:#333
    style E fill:#cfc,stroke:#333
    style F fill:#fcc,stroke:#333
    style G fill:#cff,stroke:#333
    style H fill:#ffc,stroke:#333
    style I fill:#cfc,stroke:#333
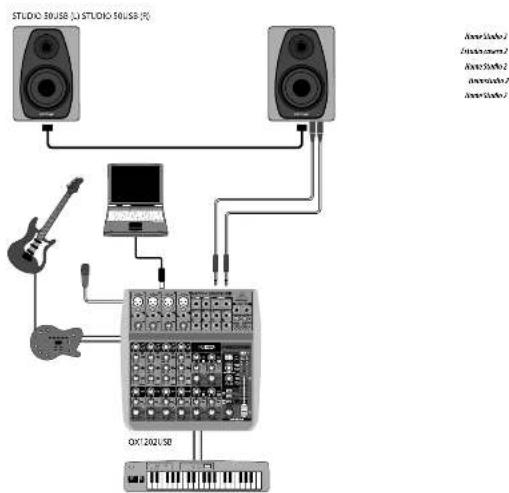
flowchart
graph TD
    A["Speaker"] --> B["Computer"]
    C["Speaker"] --> B
    D["Guitar"] --> B
    E["Audio System"] --> B
    B --> F["OXJ 2021-58"]
    F --> G["Audio System"]
    style A fill:#f9f,stroke:#333
    style C fill:#f9f,stroke:#333
    style D fill:#ccf,stroke:#333
    style E fill:#ccf,stroke:#333
    style F fill:#dfd,stroke:#333
10 STUDIOUSB/V/DIA 10USB
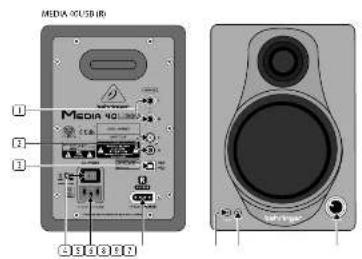
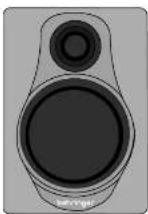
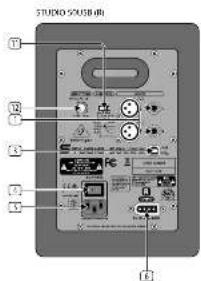
STUDIO 50USB/MEDIA 40USB Controls
natural_image
Close-up of a speaker with two speakers and a circular head, labeled 'B' (no text or symbols on the speaker itself)11 Quick Star Guide
FN Step 2: Controls
15 Paso 2: Controles
☐ INPUT – Plug a 14" TRS connector into each of these inputs to connect the audio source. The STUDIO 50USB has 14" TRS and XIR balanced inputs. The MEDIA 40USB 34" TRS inputs are unbalanced.
[2] RCA INPUT (MEDIA 40USB) – Plug an RCA connector into each of these inputs to connect the audio source.
USB CONNECTOR – Connect a USB B type connector from a computer to play the computer audio in the monitors.
POWER SWITCH - Turns the monitor on and off.
[5] POWER SOURCE – Connect the included power cable to this socket and to a mains outlet properly configured for your model
[6] SPEAKER OUTPUT - Connect the Included speaker cable to the SPEAKER INPUT connector on the left monitor. Four amplifiers inside the right monitor separately power the HF and LF drivers in both monitors.
AUX INPUT (MEDIA 40USB) - Accepts a 1/8" stereo connector, and allows convenient front panel connections to an external audio source such as an MP3 player.
HEADPHONE OUTPUT (MEDIA 40USB) Accepts a 1/8" stereo connector from headphones. The internal amplifiers are muted when headphones are connected.
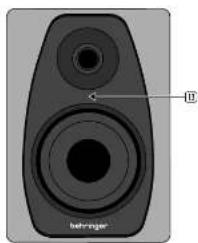
VOLUME KNOB (MEDIA 40USB) – Allows adjustment of the volume level of all inputs, including the USB input, and it adjusts the headphones level. This lights when the power is on.
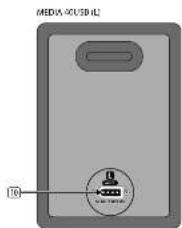
[10] SPEAKER INPUT – Connect the included speaker cable to the SPEAKER OUTPUT connector on the right monitor.
[1] HIGH-FREQ (STUDIO 50USB) – Adapts both monitor's frequency response to the damping characteristics of the room.
[12] INPUT TRIM (STUDIO SOUSE) – adjusts the monitor's input sensitivity to the audio source signal.
13 LED (STUDIO 50USB) - This lights when the power is on.
STUDIO 50USB/MEDIA 40USB Getting started
Step 3: Getting started

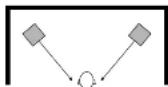
Place the monitor speakers at head level, unobstructed and at equal distances to the left and right of your
2 Connect the included power cable to the right monitor. Connect the other end to a mains outlet properly configured for your particular model. DO NOT turn the power on yet. If possible, connect the right monitor and the other audio equipment in the system to the same outlet to avoid ground loops.
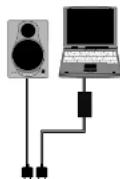
11111111111

Connect the audio source to the inputs of the right monitor. Balanced XLR or TRS connections are preferable. If your other
or equipment has balanced outputs. You may also connect the audio outputs from a computer using the type B USB connector.

Connect the supplied speaker cable from the right monitor's speaker output connector to the left monitor's speaker.
input connector.

MEDIA 40USB: Turn the VOLUME knob on the front of the right monitor to the fully-down position.
STUDIO 50USB: Tum the INPUT TRIM knob on the rear panel of the right monitor to the center (O dB) position.

Turn on your mixer, computer, or other audio source, and make sure the volume is turned down.

Turn on the power on the right monitor by flipping the rear panel power switch.

Start playing your audio source and slowly increase the volume until you reach a comfortable listening level.
MEDIA 40USB: Adjust the VOLUME knob on the front of the right monitor.
STUDIO 50USB: Adjust the INPUT TRIM knob on the back of the right monitor if required, or leave it at the center (0 dB) position.
STUDIO 50USB/MEDIA 40USB Getting started
FR Etape 3 : Mise en oeuvre
STUDIO 50USB/MEDIA 40USB Getting started
| Amplifier | ||
| Maximum output power | 150 Ω* | 150 Ω* |
| Configuration | Bi-amping | Bi-amping |
| Type | Class 0 | Class 0 |
| Overload protection | Dual-controlled limiter | Dual-controlled limiter |
| Crossover type | Active | Active |
| Crossover frequency | 2.5 kHz | 2.9 kHz |
| Audio Connections | ||
| Inputs | 2 x XLR, balanced2 x 3/4" XLS, balanced | 2 x 1/4" ITRS, unbalanced2 x RLS, unbalanced |
| Aux in | — | 1/8" TRS, stereo |
| Max. input level | +21 dBn | +21 dBn |
| Computer connection | USB 2.0, type B | USB 2.0, type B |
| Headphone output | — | 1/8" TRS, stereo |
| Controls | ||
| Volume | — | — dB to 10 dB |
| Input trim | ±6 dB, adjustable | — |
| High freq | +2.70/-2.74 dB or 12 kHz, switchable | — |
| Loadgrouder System Data | ||
| Type | 5" wooster25" wooster | 4" wooster25" wooster |
| Frequency response | 5.5 Hz to 20 kHz | 70 Hz to 20 kHz |
| Max. sound pressure level | 100 dB of 1 m | 97 dB ≤ 1 m |
| Physical | ||
| Enclosure | Plastic composite | Plastic composite |
| Grills | — | Perforated steel |
| Power Supply / Voltage (Fever) | ||
| Type | Switch mode power supply | |
| Voltage | 100-200 VAC, 50/Hz | |
| Power consumption ≤ 1/2 minimum power | 40 W | |
| Matts connection | Standard IEC connector | |
| Dimensions / Weight | ||
| Dimensions: (ft × 10^3 ft) | 254 x 204 x 128 mm [10 x 8 x 7"] | 224 x 196 x 157 mm (0.8 x 7.7 x 6") |
| Weight | 6.5 kg (14.3 lb) | 5.0 kg (11 lb) |
*Inconcentive research and performance
Other important information

Important information
- Register online. Please register your new MUSIC Group equipment right after you purchase it by visiting behinger.com. Registering your purchase using our simple online form helps us to process your repair claims more quickly and efficiently. Also, read the terms and conditions of our warranty, if applicable.
- Malfunction. Should your MUSIC Group Authorized Seller not be located in your vicinity, you may contact the MUSIC Group Authorized Fulfill for your country listed under "Support" at behringer.com. Should your country not be listed, please check if your problem can be dealt with by our "Online Support" which may also be found under "Support" at behringer.com. Alternatively, please submit an online warranty claim at behringer.com BEFORE returning the product.
- Power Connections. Before plugging the unit into a power socket, please make sure you are using the correct mains voltage for your particular model. Faulty fuses must be replaced with fuses of the same type and rating without exception.

Responsible Party Name:
MUSIC Group Services NV Inc.
Address: 5270 Procyon Street
Las Vegas, NV 89118
USA
Phone Number:
+1 702 800 8290
complies with the FCC rules as mentioned in the following paragraph:
This equipment has been tested and found to comply with the limits for a Class B digital device, pursuant to part 15 of the FCC Rules. These limits are designed to provide reasonable protection against harmful interference in a residential installation. This equipment must be used exclusively.
Information. This equipment generates, but the unit of reliable data frequently energy and, if not installed and used in accordance with the instructions, may cause harmful interference to radio communications. However, there is no guarantee that interference will not occur in a particular installation. If this equipment does cause harmful interference to radio or television reception, which can be determined by turning the equipment off and on, the user is encouraged to try to correct the interference by one or more of the following measures:
• Reorient or relocate the receiving antenna
- Increase the separation between the equipment and receiver
- Connect the equipment into an outlet on a circuit different from that to which the
receiver is connected
- Consult the dealer or an experienced radio/TV technician for help
This device compiles with Part 15 of the FCC rules. Operation is subject to the following two conditions:
(1) this desire may not cause harmful interference, and
(2) this device must accept any interference received, including interference that may cause undesired operation.
Important information:
Changes or modifications to the equipment not expressly approved by MUSIC Group can void the user's authority to use the equipment.
Dedicate Your Life to MUSIC
Brand : BEHRINGER
Model : Studio 50USB
Category : Monitor