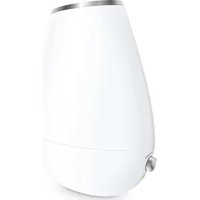
Air - Humidifier Medel - Free user manual and instructions
Find the device manual for free Air Medel in PDF.


| Product type | Ultrasonic air humidifier |
| Brand | Medel |
| Model | Air |
| Dimensions (L x W x H) | 21 cm x 11 cm x 25.5 cm |
| Cable length | 1.4 m |
| Voltage/Frequency | 100 - 240 V AC / 50 - 60 Hz |
| Rated power | 20 W max |
| Recommended area | Up to 20 m² |
| Tank capacity | 2 liters |
| Spray capacity | 200 ml/h |
| Noise level | 35 dB |
| Main features | Ultrasonic humidification, automatic shut-off when tank empty, mist flow adjustment, aroma compartment |
| Power supply | Mains |
| Protection class | Double insulation (class II) |
| Maintenance and cleaning | Cleaning of the ultrasonic membrane, regular descaling, cleaning of the tank |
| Safety | Automatic shut-off when tank empty, do not use with solvents, use on stable surface |
| Spare parts and repairability | Essential oil filters available commercially; 3-year warranty (spare parts not listed) |
| Box contents | Humidifier base, tank, cleaning brush, 15 aroma filters, user manual |
| Intended use | Private use, ambient air humidification |
| Warranty | 3 years from date of purchase |
Frequently Asked Questions - Air Medel
User questions about Air Medel
0 question about this device. Answer the ones you know or ask your own.
Ask a new question about this device
Download the instructions for your Humidifier in PDF format for free! Find your manual Air - Medel and take your electronic device back in hand. On this page are published all the documents necessary for the use of your device. Air by Medel.
USER MANUAL Air Medel
Instructions for use 10
DE Luftbefeuchter
- Intended use 11
- Safety standards 11
- Introduction 12
4.Description of the device. 12 - Commissioning. 13
-
Operation 14
-
Cleaning and care. 15
8.What to do in case of problems? 16 - Technical data. 17
- Disposal 17
- After-sale/additional items 17
- Warranty terms and conditions 17
What's in the box
- Humidifier base
- Humidifier tank
- Cleaning brush
15 essential oil filters - User Manual
Dear Customer,
thank you for choosing one of our products. Our brand guarantees high quality products, checked in every detail, for aerosol therapy, air quality, pressure/diagnosis, weight, beauty and baby care. Please read these instructions carefully, keep them for future use, make them accessible to other users, and follow the instructions.
Sincerely yours,
The Medel Team

WARNING
- This device can be used by children over the age of 8 years and by people with reduced physical, sensory or mental capacities or who does not have the necessary experience and knowledge, exclusively under supervision or if they have been trained on the safety measures and understand the risks related to them.
Children should not be allowed to play with the appliance. - Cleaning and maintenance should not be carried out by children, unless they are assisted.
- Disconnect the appliance from the mains during filling and cleaning.
- Do not use detergents containing solvents.
- If the power cord of the appliance is damaged, you need to dispose of it. In case it is not removable, it is necessary to dispose of the appliance.
Explanation of symbols
These instructions for use contain the following symbols

Warning Warning of danger of injury or risk to your health

Attention Safety indication for possible damage to the equipment/accessories

Note Note that provides important information
1. Intended use
Device functions
This humidifier is designed for humidification of air within rooms. The device is intended for private use.
2. Safety standards
Please read these instructions for use very carefully! Failure to comply with the following information may cause harm to people and property. Keep the operating instructions and make them accessible to all users. Hand over these instructions in case of transfer of the appliance to a new user.
Electric shock

WARNING
Like any other electrical appliance, the humidifier must be handled carefully and cautiously in order to avoid the risk of electric shock.
Fire hazard

WARNING
- In case of non-compliant use or non-compliance with the instructions for use, there is a fire hazard!
- Do not cover the appliance during use, for example with a blanket or pillow.
- Do not use the appliance in the vicinity of highly flammable substances.
Operation

WARNING
- The device is designed to be used exclusively for the purposes stated in the following instructions. The manufacturer is not liable in case of damage caused by non-compliant or incorrect use.
- This appliance cannot be used by people (including children) with reduced physical, sensory or intellectual capacities or not in possession of the necessary experience and/or knowledge, except under the supervision of a person responsible for their safety or who gives them indications on how to use the appliance.
- Make sure that you keep this appliance away from reach of children.
- Consult your doctor before using the humidifier if you have any problems with your lungs or airways.
- Turn off the appliance at the end of each use and before each cleaning. Pull the plug out of the socket.
- Put the power cord so as to avoid falling.

ATTENTION
- Make sure that the appliance is placed on a stable, safe and moisture-resistant surface.
- Do not insert any items into the slots of the appliance. Make sure that moving parts are always free.
-
Do not place objects on the appliance.
-
Protect the device from high temperatures.
- Avoid direct sunlight.

General indications
- Do not open the base or repair the appliance yourself so as not to compromise the correct operation. Otherwise, the warranty shall lapse.
- For further questions about how to use Medel equipment, please contact our Customer Service.
3. Introduction
People spend most of their time in closed environments.
For an ideal indoor climate, a relative humidity of between 40 and 60% is recommended. Often this value is not reached, particularly in winter time, due to heating that tends to dry the air in the room
- Dryness of mucous membranes and lips.
- Burning sensation in the eyes
- Infections and diseases of the respiratory tract
Fatigue, tiredness and difficulty in concentrating - Negative effects on pets and plants
- Increased dust deposits
- Electrostatic charge of synthetic fibre fabrics such as carpets, curtains and plastic floors
- Damage to wooden furniture and in particular to parquet floors
- Loss of tuning of musical instruments.
4. Description of the device
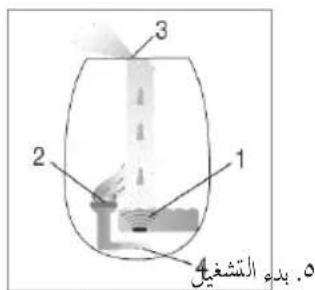
- Spray nozzle
- Water tank
3 essential oil compartment. - ON/OFF and adjustment knob
- Indicator light (green/red)
- Humidifier base
- Ultrasound membrane
- Tank screw cap
- Water inlet
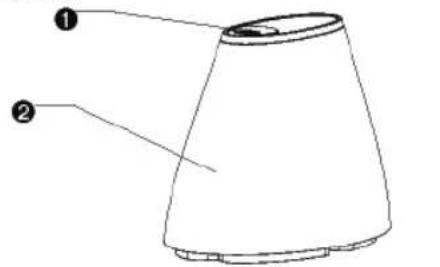
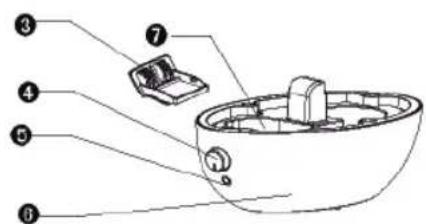
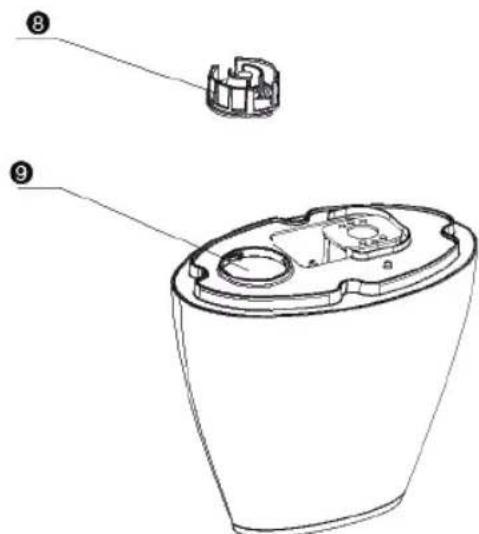
The humidifier:
- humidifies the air,
- works quietly,
- is suitable for rooms up to 20m^2
- operates with low power consumption and turns off automatically when the tank is empty,
- is easy to clean,
- is equipped with the automatic shut-off function when the tank is empty,
- is equipped with a knob for adjusting the mist volume level.
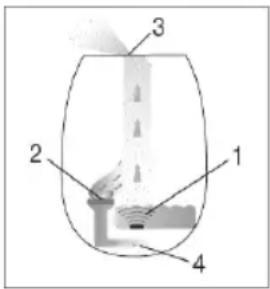
Operation of the humidifier Air
- A membrane activated by ultrasound moves water, releasing from surface tiny droplets of water.
- The fan draws air through the side essential oil compartment of the appliance.
- The air is enriched by the gently blown water droplets released towards the top opening.
- If required, the appliance can be used with essential oils.
5. Commissioning
Unpacking the appliance

WARNING
- Keep the packaging material away from reach of children. Choking hazard.
- Open the package.
- Remove the top protection. Keep the plastic closed.
- Take the appliance out of the package by pulling it upwards.
- Remove the plastic bag.
- Check the device, plug and cable for damage.
Place of installation

WARNING
Before putting the appliance into operation, read the Safety Rules in the Safety section.

Note
- The direct contact area of the humidifier may become damp.
Water with a high level of limestone can leave a white sediment. - Do not place the appliance on the floor, but above the floor (for example, on a table or shelf).
- Place the appliance so that the mist is not directed on objects.
- Eliminate residual water if the appliance is not used.
- Place the humidifier on a solid, horizontal and waterproof base.
In case of unexpected overturning of the appliance, water may escape even if the appliance is switched off and not connected to the electric power.
Water

Note
- Do not add essential oils or perfumes to water. Using additional substances can stain and damage the plastic material. The ultrasonic membrane glues and the operation is compromised.
- Use fresh drinking water below 40^ in the appliance. If the water is very hard, you can use demineralized or distilled water.
- Suggestion! In case of hard water we recommend the use of the anti-limescale filter.
Filling the tank
- Lift the water tank and turn it upside down. A safety valve closes the tank.
- Open the screw cap of the tank.
- Pour the water. The maximum capacity of the tank is 2 litres.
- Tighten the tank tightly by means of the screw cap.
- Turn the water tank upside down and place it on the base. The tank must be stable on the base.
6. Operation

Note
Constantly check the degree of humidity of the air in the room. Intensive use can cause over-humidification of the environment. Relative humidity should not exceed 60% .
Switching on the appliance
- Insert the plug into the socket and turn the knob clockwise.
- If there is no water in the tank or the level is insufficient, a red LED will light up.
The device turns off for safety reasons.
- Fill the water tank.
Fill the water tank as described in step 5. Start-up.

Note
The appliance is equipped with different emission modes:
to increase mist emission from minimum to maximum, turn the knob clockwise.
To adjust mist emission from maximum to minimum, turn the knob counterclockwise.
Turning off the appliance
- Turn counterclockwise.
- Pull the plug out of the electrical outlet
How to use the aromatherapy function
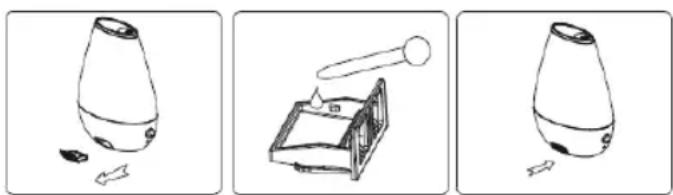
If desired, you can pour aromas and essential oils onto the insert inside the aroma compartment (3) to perfume the environment. Do not pour the aroma directly into the water.
Follow the steps below to use the aromatherapy function:
- Pull out the aroma box (Figure 1).
- Use water-soluble aromatic oil and drip on the sponge (Figure 2).
- Put the aroma box back into the machine, the aroma function will
turn on automatically when the machine is switched on (Figure 3).
- To stop the aroma function or if the machine will not be used for a while.
Remove the sponge from the aroma box, clean it with mild detergents
and put it back in the machine.
7. Cleaning and care
Regular cleaning and disinfection are essential to ensure hygiene and perfect functioning. The impurities present in the appliance depend on the quality of the water and the time of use. In any case, we recommend the following cleaning intervals.
| Every three days If necessary | |
| 4 Cleaning the ultrasound membrane with the brush, cleaning the base. | |
| 4 Tank washing, water replacement. | |
| 4 Internal and external cleaning of the humidifier. | |
| 4 Limescale removal. |

WARNING
Turn off the appliance at the end of each use and before each cleaning. Pull the plug out of the socket.

ATTENTION
Clean the water tank and always empty the humidifier completely if the appliance has not been in operation for more than one week.

Note
- Clean the appliance only as indicated.
- Avoid liquid penetrating into the base.
- Do not use detergents containing solvents.
- For cleaning and disinfection use only mild detergents or vinegar/vinegar-based detergents.
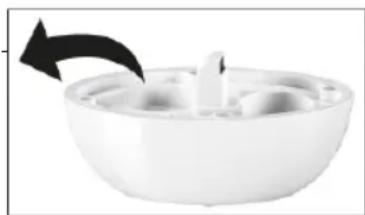
Cleaning the ultrasonic membrane with the brush, cleaning the base

Note
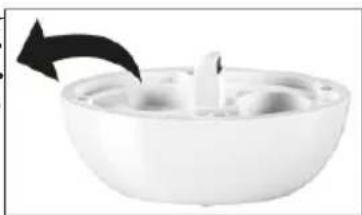
Remove the water from the base from the side edge in the direction of the arrow. Make sure that water does not penetrate into the appliance, for example through the opening of the fan.
- Clean the ultrasonic membrane using the special brush supplied.
- Remove the water from the base from the side edge.
- In case of residues of dirt in the base, pour clean water and then drain it from the side edge.
Tank washing, water replacement
Clean the tank regularly, in case of daily use at most weekly.
- Use a mild detergent or vinegar/vinegar-based detergent.
- Clean the screw cap thread with a soft brush.
- Fill half tank with water.
- Tighten the tank tightly by means of the screw cap.
- Drain all the water.
- Repeat the procedure with clean water.
External and internal cleaning of the humidifier
- Completely remove the anti-limescale solution.
- Clean the humidifier both externally and internally with a damp cloth.
For cleaning use only mild detergents or vinegar/vinegar-based detergents.
Removing limestone from the ultrasonic membrane
Hard water can create limescale deposits in the appliance and especially on the ultrasonic membrane. Limestone creates a clearly visible white sediment. Remove limescale from the appliance regularly.
- Pour a few drops of anti-limescale on the ultrasonic membrane.
- Leave for 2-3 minutes.
- Clean the ultrasonic membrane using the special brush.
- Rinse the base twice with clean water.
Internal cleaning of the base
- Soak a damp soft cloth briefly in an anti-limescale solution.
- Clean the inside of the base with the cloth.
- Carefully pour clean water into the base.
- Completely remove the anti-limescale solution.
- Repeat the procedure with clean water.
Removing limescale from the tank
- Fill half tank with water.
- Add a small amount of anti-limescale.
- Tighten the tank tightly by means of the screw cap.
- Turn over and shake the tank several times.
- Completely remove the anti-limescale solution.
- Repeat the procedure with clean water twice again.
8. What to do in case of problems?
| Problem Cause Solution | ||
| No mist is released The power cord is not plugged in. Insert the plug. | ||
| The water level is too low, the tank is empty. | Fill the water tank. | |
| Misted water has a strange smell New device. Remove the tank, unscrew and remove the screw cap.Leave the open empty tank to ventilate for 12 hours in a dry and cool place. | ||
| Stale or dirty water. Empty the base and water tank and clean thoroughly.Fill the tank with clean water. | ||
| Loud noise The water tank is not properly fixed on the base. | Remove the tank and place it correctly on the base.The tank must be stable on the base. | |
| Water in the tank is insufficient. Fill the water tank. | ||
| The device is not stable and flat. Install the appliance on a horizontal and fixed base. | ||
| Misted water escapes from the base of the tank | The water tank is not properly fixed on the base. | Remove the tank.Verify that the pass-way from the base to the tank is clean.If necessary, cleanPLACE the tank correctly on the base.The tank must be stable on the base. |
| The red indicator light is on but the tank is full | Due to a malfunction, the appliance incorrectly evaluates the water level in the tank. | Restart the device. |
9. Technical data
| Dimensions (WxDxH) approx. 21 cm x 11 cm x 25.5 cm | |
| Cable length 1.4 m | |
| Voltage/Network frequency 100-240 V AC /50/60 Hz | |
| Rated power max 20 W | |
| Room size up to 20㎡ | |
| Capacity approx. 2 litres | |
| Mist flow rate 200 ml/hour | |
| Explanation of symbols | ☐ The appliance is equipped with double protective insulation and meets protection class 2 standards. |
| Volume approx. 35 dB |
10. Disposal
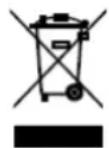
For ecological reasons, the appliance should not be disposed of as normal waste when it is thrown away. Disposal must be carried out in the appropriate collection centres. Dispos of the appliance according to the European Directive on Waste Electrical and Electronic Equipment (WEEE). For any clarification, please contact the municipal authorities responsible for disposal.
11. After-sale/additional items
Filters for essential oils are available on the market.
12. Warranty terms and conditions
- The device is guaranteed for 3 years from the date of purchase against any defects originating in materials or workmanship.
- The warranty consists of free replacement of defective components at the origin.
- The warranty does not cover accessories supplied and parts subject to normal wear and tear.
- The shipping costs of the appliance are borne by the user.
- The warranty shall lapse if the appliance has been tampered with, if the defect is caused by improper use or if the damage is not attributable to the manufacturer (accidental fall, improper transport, etc.).
- The warranty does not imply any compensation for damages, either direct or indirect, of any kind, to people or property during the period in which the product cannot be used.
- The warranty is valid from the date of purchase of the product certified by the receipt or the purchase invoice.
DEUTSCH
Inhaltsverzeichnis
Inhalt
m = 311
A
y 1
jia jia jia jia jia jia jia jia jia jia jia jia jia jia jia jia jia jia jia jia jia jia jia jia jia jia jia jia jia jia jia jia jia jia jia jia jia jia jia jia jia jia jia
$$ \begin{array}{l} \left. \right.\left. \right.\left. \right.\left. \right.\left. \right.\left. \right.\left. \right.\left. \right.\left. \right.\left. \right.\left. \right.\left. \right.\left.\left.\left.\left.\left.\left.\left.\left.\left.\left.\left.\left.\left.\left.\left.\left.\left.\left.\left.\left.\left.\left. \text {的} \right]\right]\right]\right]\right]\right]\right]\right]\right]\right]\right]\right]\right]\right]\right]\right]\right]\right]\right]\right]\right]\right] \ \left. \right.\left. \right.\left. \right.\left. \right.\left. \right.\left. \right.\left. \right.\left. \right.\left. \right.\left. \right.\left. \right.\left. \right.\left. \right.\left. \right.\left. \right.\left. \right.\left. \right.\left. \right.\left. \right.\left. \right.\left. \right.\left. \right.\left. \right.\left. \right.\left. \right.\left. \right.\left. \right.\left.\left.\left.\left.\left.\left.\left. \text {i s} _ {\text {i s}} ^ {\prime} = 1, 0, 0, 0, 0, 0, 0, 0, 0, 0, 0, 0, 0, 0, 0, 0, 0, 0, 0, 0, 0, 0, 0, 0, 0, 0, 0, 0, 0, 0, 0, 0, 0, 0, 0 \right) = \text {i s} _ {\text {i s}} ^ {\prime} = 1, 0, 0, 0, 0, 0, 0, 0, 0, 0, 0, 0, 0, 0, 0, 0, 0, 0, 0 \right) = \text {i s} _ {\text {i s}} ^ {\prime} = 1, 0, 0, 0, 0, 0, 0, 1 \right) = \text {i s} _ {\text {i s}} ^ {\prime} = 1, 0, 0, 0, 1 \right) = \text {i s} _ {\text {i s}} ^ {\prime} = 1, 0, 1 \right) = \text {i s} _ {\text {i s}} ^ {\prime} = 1, 1 \right) = \text {i s} _ {\text {i s}} ^ {\prime} = 1, 2 \right] \ \end{array} $$
$$ \therefore \angle B A C = 1 8 0 ^ {\circ} $$
$$ \therefore \frac {1}{2} \frac {1}{2} \frac {1}{2} \frac {1}{2} \frac {1}{2} \frac {1}{2} \frac {1}{2} \frac {1}{2} \frac {1}{2} \frac {1}{2} \frac {1}{2} \frac {1}{2} \frac {1}{2} \frac {1}{2} \frac {1}{2} \cdot $$
$$ i g o l y \left[ \sum_ {j = 1} ^ {n} a _ {j} \right] $$
$$ \mathrm {d i s t a t e} $$
1
1 2
a 3
1
jieh jie hui yu wuyi
$$ \therefore \frac {1}{2} x - 1 > 3 - \frac {3}{2} x $$
j 1
= 12( + )
1 1
$$ \therefore \angle 1 = \angle 2 $$
Jaaal Jaa Jaaal Cooa Jaa Jaa
S OBC = S COD + S_ BOC

()
yj 1
山
y
aill 1 aaln n pnnnne nnnnne nnnnne nnnnne nnnnne nnnnne nnnnne nnnnne nnnnne nnnnne nnnnne nnnnne nnnnne nnnnne nnnnne nnnnne nnnnne nnnnne nnnnne nnnnne nnnnne nnnnne nnnnne nnnnne nnnnne nnnnne
j 1
1( x - 2) ( x + 3) = 0
y
y 1
j#
a a a a a a a a a a a a a a a a a
d1j 1
y
1
jyjbj 1234567890
a
1
a
a a a a a a a a a a a a a a a a a a a a a a a
2-5yai jie 1
sucuul uuuuu
aayg yaiy
jaii aiee plaeuay jaii ci suiy

- What's in the box
- Dear Customer,
- WARNING
- Explanation of symbols
- These instructions for use contain the following symbols
- Intended use
- Device functions
- Safety standards
- Electric shock
- Fire hazard
- Operation
- ATTENTION
- General indications
- Introduction
- Description of the device
- Operation of the humidifier Air
- Commissioning
- Unpacking the appliance
- Place of installation
- Note
- Water
- Filling the tank
- Operation
- Switching on the appliance
- Turning off the appliance
- How to use the aromatherapy function
- Cleaning and care
- Cleaning the ultrasonic membrane with the brush, cleaning the base
- Tank washing, water replacement
- External and internal cleaning of the humidifier
- Removing limestone from the ultrasonic membrane
- Internal cleaning of the base
- Removing limescale from the tank
- What to do in case of problems?
- Technical data
- Disposal
- After-sale/additional items
- Warranty terms and conditions
- DEUTSCH
- Inhaltsverzeichnis
- Inhalt
- m = 311
- A
Brand : Medel
Model : Air
Category : Humidifier