USER MANUAL MUM5 BOSCH
1 Päckchen Backpulver
125 ml Milch
Congratulations on the purchase of your new BOSCH appliance. In doing so, you have opted for a modern high-quality domestic appliance. You can find further information about our products on our web page.
Contents
| For your safety | 16 |
| Overview | 19 |
| Operating the appliance | 20 |
| Cleaning and servicing | 23 |
| Storage | 24 |
| Troubleshooting | 24 |
| Application examples | 25 |
| Disposal | 26 |
| Warranty conditions | 26 |
| Optional accessories | 27 |
For your safety
Before use, read these instructions carefully in order to become familiar with important safety and operating instructions for this appliance.
If the instructions for correct use of the appliance are not observed, the manufacturer's liability for any resulting damage will be excluded. This appliance is designed for processing normal household quantities in the home or similar quantities in non-industrial applications.
Non-industrial applications include e.g. use in employee kitchens in shops, offices, agricultural and other commercial businesses, as well as use by guests in boarding houses, small hotels and similar dwellings.
Use the appliance for processing normal quantities of food for domestic use. Do not exceed permitted maximum quantities (see "Application examples").
This appliance is suitable for mixing, kneading and beating food. It must not be used for processing other objects or substances. Other applications are possible if the accessories approved by the manufacturer are used.
Use the appliance with original accessories only. When using the accessories, follow the enclosed operating instructions.
Please keep the operating instructions in a safe place. If passing on the appliance to a third party, always include the operating instructions.

General safety instructions
Electric shock risk
The appliance must not be used by children.
The appliance and its power cord must be kept away from children. Appliances can be used by persons with reduced physical, sensory or mental capabilities or lack of experience and knowledge if they have been given supervision or instruction concerning use of the appliance in a safe way and if they understand the hazards involved.
Children shall not play with the appliance.
Connect and operate the appliance only in accordance with the specifications on the rating plate. Do not use the appliance if the power cord and/or appliance are damaged.
Always disconnect the appliance from the supply if it is left unattended and before assembling, disassembling or cleaning.
Do not place the power cord over sharp edges or hot surfaces.
To prevent injury, a damaged power cord must be replaced by the manufacturer or his customer service or a similarly qualified person.
Only our customer service may repair the appliance.
Safety instructions for this appliance
Risk of injury
Risk of electric shock!
Do not insert mains plug until all preparations for working with the appliance are complete.
Never immerse the base unit in liquid or hold under running water.
Do not use a steam cleaner.
Do not adjust the swivel arm while the appliance is switched on.
Wait until the drive has come to a standstill.
Do not change tool/accessory until the drive is at a standstill – when the appliance is switched off, the drive continues running briefly.
Use only the rotary switch to switch the appliance on or off.
When the appliance is not in use, pull out the mains plug.
Before eliminating a fault, pull out the mains plug.
While the appliance is operating, never place fingers in the mixing bowl. Attach the cover (12) before operating the appliance!
Do not change tools until the drive has come to a standstill – when the appliance is switched off, the drive continues running briefly and stops in the tool change position. Do not move the swivel arm until the tool has come to a standstill.
For reasons of safety the appliance cannot be operated unless unused drives are covered with drive guards (5, 8).
Before attaching/removing the continuous-feed shredder, wait until the drive has come to a standstill and pull out the mains plug. Do not reach into the feed tube.
Risk of injury from sharp blades!
Do not grip the sharp blades or edges of the cutting discs. Take hold of cutting discs by the edge only.
Do not touch blender blades with bare hands.
Risk of injury from sharp blades/rotating drive!
Never place fingers in the attached blender! Do not remove/attach the blender until the drive is at a standstill! Operate the assembled blender only and with the lid attached.
Risk of scalding!
If processing hot liquids, steam escapes through the funnel in the lid. Add a max. 0.5 litres of hot or frothing liquid.
Important!
Use the appliance with original accessories only. When using the accessories, follow the enclosed operating instructions.
Use only one tool or accessory at any one time.
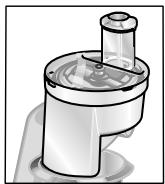
A Explanation of the symbols on the appliance or accessory

Follow the instructions in the operating instructions.

Caution! Rotating blades.

Caution! Rotating tools.
Do not place fingers in the feed tube.
Safety systems
Start lock-out
See "Operating positions" table.
The appliance can be switched on in pos. 1 and 3 only:
- when the bowl (11) has been inserted and turned until it locks into place and
- the blender drive cover has been attached (8).
Restart lock-out
If the power is interrupted, the appliance remains switched on but the motor does not start running again when the power is restored. To switch the appliance on again, turn the rotary switch to 0/off, then switch on.
Overload protection
If the motor switches itself off while the appliance is being used, the overload protection feature has been activated. A possible cause may be that too much food was processed at one time.
If a safety system is activated, see "Troubleshooting".
The operating instructions describe several models, see also overview of models (Fig. Ⅲ). The appliance requires no maintenance.
Overview
Please fold out the illustrated pages.
Fig. A
Base unit
1 Release button
2 Swivel arm
"Easy Amlift" function to support the upward movement of the arm (see "Work positions").
3 Rotary switch
When the appliance has been switched off (position 0/off), the appliance runs automatically to the optimum position for changing the tools.
0/off = Stop
M = Instantaneous switching at maximum speed, hold switch for required blending duration.
Settings 1-7, Operating speed:
1 = low speed - slow,
7 = high speed - fast.
4 Operating indicator
Is lit while the appliance is operating (rotary switch on M or 1-7).
Flashes if the appliance has been operated incorrectly, the electronic fuse has tripped on the appliance is defective - see section "Troubleshooting".
5 Drive cover
To remove the drive cover, press on the rear area and remove cover.
6 Drive for
When not in use, attach the drive cover.
7 Drive for tools (stirrer, whisk, kneading hook) and mincer (optional accessory )
8 Blender drive cover
9 Drive for blender (optional accessory )
When not in use, attach the blender drive cover.
10 Automatic cord winder
Bowl with accessories
11 Stainless steel stirring bowl
12 Lid
13 Professional flexi stirring whisk
14 Professional beating whisk
15 Kneading hook with dough deflector
16 Accessories bag
For storage of the tools and cutting discs.
Continuous-feed shredder
17 Pusher
18 Cover with filling shaft
19 Cutting discs
19a Professional Supercut reversible disc - coarse/fine
19b Reversible shredding disc - coarse/ fine
19c Grating disc - medium-fine
19d Grating disc - coarse *
19e Asian vegetable disc
20 Disc holder
21 Housing with outlet opening
Blender*
22 Blender jug
23 Lid
24 Funnel
- If an accessory is not included in the product package, it can be purchased via the trade or customer service.
Operating positions
Fig. 3

Attention!
Before operating the appliance, attach the tool/accessory to the correct drive and in the correct position and place in the operating position according to this table. The swivel arm must be engaged in every operating position.

Note:
The swivel arm features an "Easy Armlift" function which supports the upwards movement of the swivel arm.
Selecting the operating position:
- Press the Release button and move the swivel arm.
Support movement with your hand.
- Move the swivel arm until it engages in the required position.
| Position | Drive | Tool/Accessory | Operating speed |
| 1 | 7 | 5 | 1-5 |
| 1-7 |
| 1-3 |
| 2 | 7 | * | - |
| 3 | 6 | | 3-7 |
| 3-5 |
| 4 | 9 | | 5-7 |
| 7 | | 5-7 |
- Insert/remove whisk, stirrer or kneading hook. Add large quantities of ingredients.
Operation

Risk of injury!
Do not insert mains plug until all preparations for working with the appliance are complete.
Attention!
- Do not operate the appliance without an accessory/tool in the operating position.
- Do not operate the appliance empty.
-
Do not expose appliance or accessories to heat sources. Parts are not microwave-safe.
-
Before operating the appliance and accessories for the first time, clean thoroughly; see "Cleaning and servicing".
These operating instructions contain a sticker with reference values for the operating speed of the appliance when using the tools or accessories.
We recommend attaching this sticker to the appliance (Fig. ①).
Preparation
- Place the base unit on a smooth, clean surface.
- Pull out the cord in one go to the required length (max. 100cm ) and slowly release; the cord is locked (Fig. D).
- Reducing the cord length: Pull gently on the cord and allow it to roll up to the required length. Then gently pull the cord again and slowly release; the cable is locked.
Warning!
Do not twist the cord when inserting it. If the appliance features an automatic cord winder, do not insert the cord manually. If the cord jams, pull out the cord all the way and then allow it to wind up.

While the appliance is operating, never place fingers in the mixing bowl. Attach the cover (12) before operating the appliance!
Do not change tools until the drive has come to a standstill - when the appliance is switched off, the drive continues running briefly and stops in the tool change position. Do not move the swivel arm until the tool has come to a standstill.
For reasons of safety the appliance may only be operated when unused drives have been covered with drive guards (5, 8).

Attention!
Use bowl with this appliance only.
Professional flexi stirring whisk (13)
for stirring dough, e.g. cake mixture
Professional beating whisk (14)
for whisking egg whites, cream and light dough, e.g. sponge mixture
Kneading hook (15)
for kneading heavy dough and mixing-in ingredients that ought not be cut (e.g. raisins and chocolate chips)
the use of the whisk Fig. E
The whisk should almost touch the bottom of the bowl to ensure that the ingredients are optimally mixed. If not, adjust the height of the whisk as follows:
- Remove mains plug.
- Press the Release button and move the swivel arm to position 2.
- Insert the whisk into the drive until the whisk locks into position.
- Hold whisk in place and loosen nut clockwise using open-ended wrench (size 8).
- Set the whisk to the optimum height by rotating the whisk:
Turn clockwise: Raise
Turn anti-clockwise: Lower
- Press the Release button and move the swivel arm to position 1.
Check the height of the whisk and, if required, correct.


Fig. 1

- When the height has been set correctly, press Release button and move the swivel arm to position 2.

- Hold whisk in place and tighten nut anticlockwise using open-ended wrench (size 8).
- Press the Release button and move the swivel arm to position 2.

Fig.
Tilt the bowl forwards and then set it down.
- Turn anti-clockwise until it locks into place.
- Depending on the processing task, insert the stirrer, whisk or kneading hook until it locks into position.
Note:
If using the kneading hook, rotate the dough deflector until the kneading hook can lock into position (Fig. E-4b).
- Put the ingredients to be processed into the bowl.
- Press the Release button and move the swivel arm to position 1.

- Attach the cover.
- Set the rotary switch to the desired setting.
Our recommendation:
- Professional flexi stirring whisk:
First mix at setting 1-2, then setting 3-5 as required
- Professional beating whisk:
setting 7, mix in at setting 1
first stir in at setting 1, knead at setting 3
Adding more ingredients
- Switch off the appliance with the rotary switch.
- Add more ingredients through the feed tube in the cover.
or
- Remove lid.
- Press the Release button and move the swivel arm to position 2.
- Add ingredients.

After using the appliance
- Switch off the appliance with the rotary switch.
- Remove mains plug.
- Remove lid.
- Press the Release button and move the swivel arm to position 2.
- Take the tool out of the drive.
- Remove the bowl.
- Clean all parts, see "Cleaning and servicing".

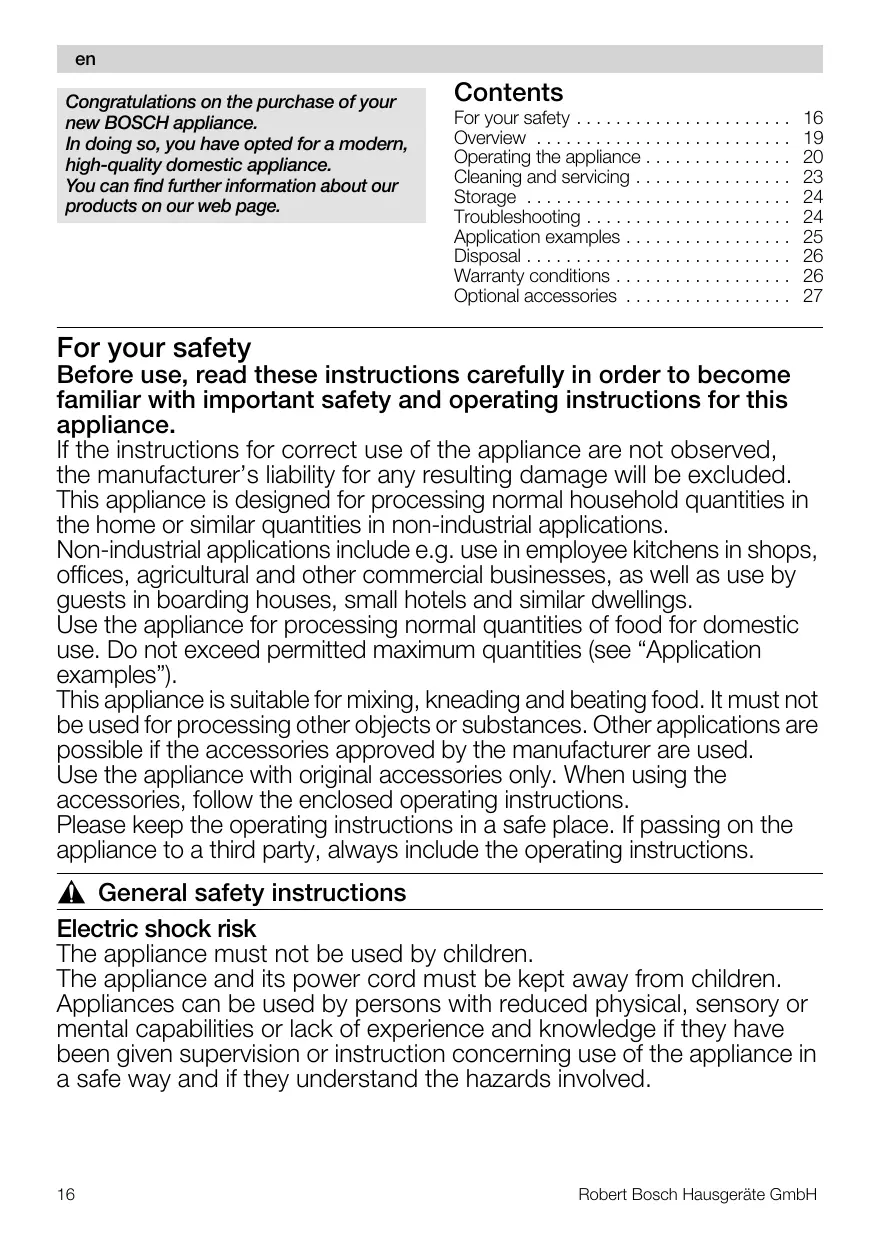
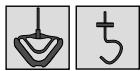
Continuous-feed shredder

Risk of injury
Do not grip the sharp blades or edges of the cutting discs. Take hold of cutting discs by the edge only.
Before attaching/removing the continuous-feed shredder, wait until the drive has come to a standstill and pull out the mains plug.
Do not reach into the feed tube.
Warning!
The continuous-feed shredder must be completely assembled before use. Never assemble the continuous-feed shredder on the base unit.
Operate the continuous-feed shredder in the indicated operating position only.
Predetermined breaking point Fig. 6
The built-in predetermined breaking point protects the drive of the appliance. If an overload occurs, the drive shaft of the con-tinous-feed shredder breaks. However, the drive shaft can easily be replaced.
A new disc holder with drive shaft is available from customer service.
Professional Supercut reversible disc - coarse/fine

for slicing fruit and vegetables. Process at setting 5.
Designation on the reversible slicing disc: "Grob" for the coarse cutting side
"Fein" for the fine cutting side
Warning!
The reversible slicing disc is not suitable for slicing hard cheese, bread, rolls or chocolate.
Slice boiled, waxy potatoes only when they are cold.
Reversible shredding disc - coarse/fine

for shredding vegetables, fruit and cheese, except for hard cheese (e.g. Parmesan).
Process at setting 3 or 4.
Designation on the reversible shredding disc:
"2" for the coarse shredding side
4" for the fine shredding side
Warning!
The reversible shredding disc is not suitable for shredding nuts. Shred soft cheese with the coarse side only at setting 7.
Grating disc - medium-fine

for grating raw potatoes, hard cheese (e.g. Parmesan), cooled chocolate and nuts.
Process at setting 7.
Warning!
The grating disc is not suitable for grating soft cheese and cheese slices.
Grating disc - coarse

for grating raw potatoes, e.g. for potato pancakes or dumplings.
Process at setting 7.
Asian vegetable disc

Fig. H
Slices fruit and vegetables into fine strips for Asian vegetable dishes.
Process at setting 5.
Working with the continuous-feed shredder
- Press the Release button and move the swivel arm to position 2.
-
Insert the bowl:
-
Tilt the bowl forwards and then set it down.
-
Turn anti-clockwise until it locks into place.
-
Press the Release button and move the swivel arm to position 3.

- Remove drive cover from the drive of the continuous-feed shredder (Fig. 1-5a).
- Hold disc holder at the lower end, ensuring that the two tips are face up.
- Carefully place the required slicing or shredding disc onto the tips of the disc holder (Fig. H-6a). In the case of reversible discs, ensure that the required side is face up.
- Grip disc holder at the upper end and insert into the housing (Fig. H-6b).
-
Attach the cover (note mark) and turn all the way in a clockwise direction.
-
Place continuous-feed shredder on the drive and rotate all the way in a clockwise direction, as illustrated in Fig. H-8.
- Turn rotary switch to recommended setting.
- Put food to be processed in the feed tube and push down with the pusher.
Warning!
Prevent the cut ingredients from building up in the outlet opening.
Tip: To ensure even cutting results, process thin ingredients in bunches.
Note: If the food to be processed sticks in the continuous-feed shredder, switch food processor off, pull out mains plug, wait until the drive comes to a standstill, remove cover from the continuous-feed shredder and empty feed tube.
After using the appliance
- Switch off the appliance with the rotary switch.
- Rotate the continuous-feed shredder in an anti-clockwise direction and remove.
- Rotate the lid in an anti-clockwise direction and remove.
- Remove disc holder with disc. To do this, press finger from below against the drive shaft (Fig. 1).
Clean parts.
Blender

Risk of injury from sharp blades/ rotating drive!
Never place fingers in the attached blender! Do not remove/attach the blender until the drive is at a standstill! Operate the assembled blender only and with the lid attached.

Risk of scalding!
If processing hot liquids, steam escapes through the funnel in the lid. Add a max. 0.5 litres of hot or frothing liquid.
Warning!
Blender may be damaged. Do not process deep-frozen ingredients (except ice cubes). Do not operate blender when empty.
Working with the blender
Fig. K
- Press the release button and move the swivel arm to position 4.

- Remove the blender drive cover.
- Attach blender jug (mark on the handle on mark on the base unit) and turn all the way in an anti-clockwise direction.
- Add ingredients.
Maximum capacity - liquid = 1.25 litres; maximum capacity frothing or hot liquids max. 0.5 litres; optimal processing capacity - solids = 50-100 g;
- Attach the cover and turn anti-clockwise all the way into the blender handle. The cover must be locked in position.
- Set the rotary switch to the desired setting.
Adding more ingredients (Fig. 1-8)
- Switch off the appliance with the rotary switch.
- Remove the lid and add ingredients or
- remove the funnel and gradually add solid ingredients through the refill opening or
- pour liquid ingredients through the funnel.
After using the appliance
- Switch off the appliance with the rotary switch.
- Rotate the blender in a clockwise direction and remove.
Tip: It is recommended to clean the blender immediately after use.
Cleaning and servicing

Attention!
Do not use abrasive cleaning agents. Surfaces may be damaged.
Cleaning the base unit

Risk of electric shock!
Never immerse the base unit in water or place under running water.
Do not use a steam cleaner.
- Remove mains plug.
- Wipe the base unit and drive cover with a damp cloth. If required, use a little detergent.
- Then dry the base unit.
en
The bowl and tools are dishwasher-proof.
Do not wedge plastic parts in the dishwasher, as they could be permanently deformed during the washing process!
Cleaning the continuous-feed shredder
All parts of the continuous-feed shredder are dishwasher-proof.
Tip: To remove the red film after processing e.g. carrots, pour a little cooking oil on a cloth and rub the film off the continuous-feed shredder (not the cutting discs). Then rinse the continuous-feed shredder.
Cleaning the blender

Risk of injury from sharp blades!
Do not touch blender blades with bare hands.
The blender jug, lid and funnel are dishwasherproof.
Tip: After processing liquids, it is often sufficient to clean the blender without removing it from the appliance. Pour a little water and washing-up liquid into the attached blender. Switch on the blender for several seconds (setting M). Pour out the water and rinse out the blender with clear water.

If required, clean accessories bag. Follow care instructions in the bag.
Storage

Risk of injury!
When the appliance is not in use, pull out the mains plug.
Fig.
- Store tools and cutting discs in the accessories bag.
- Keep accessories bag in the bowl.
Troubleshooting

Risk of injury!
Before eliminating a fault, pull out the mains plug.

Note:
The Operating indicator flashes if the appliance has been operated incorrectly or the electronic fuse has tripped or the appliance is defective.
The swivel arm must be engaged in every operating position.
Initially try to eliminate the problem which has occurred with the help of the following information.
Troubleshooting
Appliance does not start.
- Check the power supply.
- Check the mains plug.
- Check swivel arm. Correct position? Engaged?
- Screw on blender or bowl as far as possible.
- Attach the blender cover and screw on as far as possible.
- Attach drive cover to unused drives.
- The safety lock is active. Switch appliance to 0/off and then back to the required setting.
Troubleshooting
Appliance switches off during use. The overload protection feature has been activated. Too much food was processed at one time.
- Switch off the appliance.
- Reduce processing quantity. Do not exceed permitted maximum quantities (see "Application examples").
Troubleshooting
While the drive was running, the release button was inadvertently pressed. The swivel arm moves up. The drive switches off, but does not stop in the tool change position.
- Set the rotary switch to 0/off.
- Move swivel arm to position 1.
- Switch on appliance (setting 1).
- Switch off appliance again. Tool stops in tool change position.

Troubleshooting
Blender does not start working or stops during use, the drive is "humming". Blade is blocked.
- Switch off the appliance and pull out the mains plug.
- Detach the blender and remove the obstruction.
- Re-attach the blender.
- Switch on the appliance.

If the fault cannot be eliminated, please contact customer service.
Application examples
Whipped cream
100g-600g
Whip cream with the whisk for 1 12 to 4 minutes at setting 7 - depending on the quantity and properties of the cream.
Egg white
1 to 8 egg whites
- Beat egg white with the whisk for 4 to 6 minutes at setting 7.
Sponge mixture
Basic recipe
2 eggs
2-3 tbs. hot water
100 g sugar
1 packet of vanilla sugar
70 g flour
70 g comflour
Baking powder if required
- Beat the ingredients (except flour and cornflour) with the whisk for approx. 4-6 minutes at setting 7 until frothy.


- Rotate switch to setting 1 and spoon in the sifted flour and cornflour within approx. 12 to 1 minute.
Maximum quantity: 2 x basic recipe
Cake mixture
Basic recipe
3-4 eggs
200-250 g sugar
1 pinch of salt
1 packet of vanilla sugar or peel from 12 lemon
200-250 g butter or margarine (room temperature)
500 g flour
1 packet of baking powder
125 ml milk
- Mix all ingredients with the stirrer for approx. 12 minute at setting 1, then for approx. 3-4 minutes at setting 5.
Maximum quantity: 1.5 × basic recipe
Short pastry
Basic recipe
125 g butter (room temperature)
100-125 g sugar
1 egg
1 pinch of salt
A little lemon peel or vanilla sugar
250 g flour
Baking powder if required
- Mix all ingredients with the stirrer for approx. 12 minute at setting 1, then for approx. 2-3 minutes at setting 3.
From 500g flour:
- Knead the ingredients with the kneading hook for approx. 12 minute at setting 1, then for approx. 3-4 minutes at setting 3.
Maximum quantity: 2 x basic recipe
Yeast dough
Basic recipe
500 g flour
1 egg
80 g fat (room temperature)
80 g sugar
200-250 ml lukewarm milk
25 g fresh yeast or 1 packet of dried yeast
Peel of 12 lemon
1 pinch of salt


en
- Mix all ingredients with the kneading hook for approx. 12 minute at setting 1, then for approx. 3-6 minutes at setting 3.
Maximum quantity: 1.5 × basic recipe
Pasta dough

Basic recipe
300 g flour
3 eggs
1-2 tbs. (10-20 g) cold water as required
- Process all ingredients for approx. 3-5 minutes at setting 3 until a dough forms.
Maximum quantity: 1.5 × basic recipe
Bread dough

Basic recipe
750 g flour
2 packets of dry yeast
2 tsp. salt
450-500 ml warm water
Mix all ingredients with the kneading hook for approx. 12 minute at setting 1, then for approx. 4-5 minutes at setting 3.
Mayonnaise

2 eggs
2 tsp. mustard
1/4 I oil
2 tbs. lemon juice or vinegar
1 pinch of salt
1 pinch of sugar
Ingredients must be at the same temperature.
- Process the ingredients (except the oil) in the blender for several seconds at setting 3 or 4.
- Switch the blender to setting 7 and slowly pour the oil through the funnel and mix until the mayonnaise emulsifies.
Eat the mayonnaise immediately, do not store.
Honey bread spread

30g butter (from refrigerator, 7^ )
190 g honey (from refrigerator, 7^ )
- Cut butter into small pieces and put into the blender.
- Add honey and blend for 15 seconds at setting 7.
Disposal

This appliance has been identified in accordance with the European directive 2012/19/EG on Waste Electrical and Electronic Equipment – WEEE.
The Directive paves the way for effective EU-wide withdrawal and utilization of waste appliances.
Please ask your dealer or inquire at your local authority about current means of disposal.
Warranty conditions
The guarantee conditions for this appliance are as defined by our representative in the country in which it is sold. Details regarding these conditions can be obtained from the dealer from whom the appliance was purchased.
The bill of sale or receipt must be produced when making any claim under the terms of this guarantee.
Optional accessories
| MUZ5ZP1
Citrus press | For squeezing oranges, lemons and grapefruits. |
| MUZ5CC1
Dicer | For cutting fruit and vegetables into equally sized cubes |
| MUZ5FW1
Mincer | For cutting fresh meat for steak tartare or meat loaf. |
| MUZ45LS1
Perforated disc set fine (3 mm), coarse (6 mm) | For the mincer MUZ5FW1.
Fine disc for pasties and spreads, coarse disc for sausages and bacon. |
| MUZ45SV1
Viennese whirl attachment | For the mincer MUZ5FW1.
With metal template for 4 different pastry moulds. |
| MUZ45RV1
Grater attachment | For the mincer MUZ5FW1.
For grating nuts, almonds, chocolate and dried bread rolls. |
| MUZ45FV1
Juicer attachment | For the mincer MUZ5FW1.
For pressing soft fruit, except raspberries, tomatoes and rose hips, to a pulp. At the same time e.g. currants are automatically stemmed and pitted. |
| MUZ45PS1
Chipper disc | For the continuous-feed shredder MUZ5DS1.
For slicing raw potatoes for chips. |
| MUZ45AG1
Asian vegetable disc | For the continuous-feed shredder MUZ5DS1.
Slices fruit and vegetables into fine strips for Asian vegetable dishes. |
| MUZ45RS1
Grating disc coarse | For the continuous-feed shredder MUZ5DS1.
For grating raw potatoes, e.g. for potato pancakes or dumplings. |
| MUZ45KP1
Potato fritter disc | For the continuous-feed shredder MUZ5DS1.
For grating raw potatoes for rostis and potato fritters, for cutting fruit and vegetables into thick slices. |
| MUZ5ER2
Stainless steel stirring bowl | Up to 750 g of flour plus ingredients can be processed in the bowl. |
| MUZ5KR1
Plastic mixing bowl | Up to 750 g of flour plus ingredients can be processed in the bowl. |
| MUZ5MX1
Plastic blender attachment | For blending drinks, for pureeing fruit and vegetables, for preparing mayonnaise, for cutting fruit, nuts, for crushing ice cubes. |
| MUZ5MM1
Multi-mixer | For chopping herbs, vegetables, apples and meat, for shredding carrots, radishes and cheese, for grating nuts and cooled chocolate. |
If an accessory is not included in the product package, it can be purchased via the trade or from customer service.
Prudence! Lames rotatives.

Sécurité anti-surcharge
Lage 1-7 = Hastigheter
MnyBaZeTe note to xepi oac meo aTo tonoTheuEvO uEep!
Eeepyaia otn baOiida 5.
Epyaia Tov Koftn diapkeias xwpic mno

Liyo Euaa Iyauoiu n Ayn Baviia
250g aλεύρι
EvexoevocmuEikivnauvtep
Tia to oTupsiO npToKaIwv, Aevoviv Kau YKpeINppout.
MUZ5CC1
KβokΦπ
iokwv o (3 mm),
Xovrpo (6 mm)
(κόψμο/τρίψμο)
Tia nTv kpeatoynxavMUZ5FW1.
山 州 yia nate kai aalemuata, xovtpo yia laoukavika kai lapoi.
| MUZ45RS1
Rendeleme diski,
kaba | Doğrayıci MUZ5DS1®,®,®,%,%,%,%,%,%,%,%,%,%,%,%,%,%,%,%,%,%,%,%,%,%,%,%,%,%,%,%,%,%,%,%,%,%,%,%,%,%,%,%,%,%,%,%,%,%,%,%,%,%,%,%,%,%,%,%,%,%,%,%,%,%,%,%,%,%,%,%,%,%,%,%,%,%,%,%,%,%,%,%,%,%,%,%,%,%,%,%,%,%,%,%,%,%,%,%,%,%,%,%,%
Örnc. patatesten:yapilan tava keki veya gozlemesi ya da patates hamurundan:föfte yapmak®,®,®,®,®,®,®,®,®,®,®,®,®,®,®,®,®,®,®,®,®,®,®,®,®,®,®,®,®,®,®,®,®,®,®,®,®,®,®,®,®,®,®,®,®,®,®,®,®,®,®,®,®,®,®,®,®,®,®,®,®,®,®,®,®,®,®,®,®,®,®,®,®,®,®,®,®,®,®,®,®,®,®,®,®,®,®,®,®,®,®,®,®,®,®,®,®,®,®,®,® |
| MUZ45KP1
Patates hamuru diski | Doğrayıci MUZ5DS1®,®,®,%,%,%,%,%,%,%,%,%,%,%,%,%,%,%,%,%,%,%,%,%,%,%,%,%,%,%,%,%,%,%,%,%,%,%,%,%,%,%,%,%,%,%,%,%,%,%,%,%,%,%,%,%,%,%,%,%,%,%,%,%,%,%,%,%,%,%,%,%,%,%,%,%,%,%,%,%,%,%,%
Rendelenmiş patates kizartması veya patates hamuru kizartması®,®,®,®,®,®,®,®,®,®,®,®,®,®,®,®,®,®,®,®,®,®,®,®,®,®,®,®,®,®,®,®,®,®,®,®,®,®,®,®,®,®,®,®,®,®,®,®,®,®,®,®,®,®,®,®,®,®,®,®,®,®,®,®,®,®,®,®,®,®,®,®,®,®,®,®,®,®,®,®,®,®,®,®,®,®,®,®,®,®,®,®,®,®,®,®,®,®,®,⁄,seklinde meyve ve sebze kesmek®,®,⁄,kullanlr. |
| MUZ5ER2
Paslanmaz Çelik
karı,stirma kabı | Kabin®,®,⁄,un artı ek malzeme,islenebilir. |
| MUZ5KR1
Plastik karı,stirma kabı | Kabin®,⁄,un artı ek malzeme,islenebilir. |
| MUZ5MX1
Plastikten mikser üstparçasi | Îçecek karı,stirmak, meyve ve sebze pürelemek, mayonez hazirlamak, meyve vefindık.Doğramak,küp buz parçalamak®,çınkullanlr. |
| MUZ5MM1
Çok fonksiyonlu
mikser | Otsu baharatlar,sebze,elma ve etdoğanş,mıncı,havüz,turp ve peynir raspalamak®,çın,findık ve soğutulmş,cikolata rendelemek®,çınkullanlr. |
PpIMepbI NcNoJIb3OBAHnI 192
yTnIIN3aUH 193
IapaHTnHbIe ycIOBnA 193
CneuaJIbHbIe npHaJdJeXHOCTN 198
ДяВашевбezонachoctn
OCHOBHOI 6JIOK HIKoRda He NOrpyKaTb B XnIDKOCTb I He DepeXaTb NOI npOTouHoi BOd OI. He IcNoJIb3OBaTb napooChtnteJIb.
Ioka npi6op BkJIoueH, NOBOPOTbI KPOHSTeIH HeJIb3r IpeEBOdntb B dpyoe nolooKeHne. Chauana cJeDyET DoJdaTbcra NOLHO OCTaHOBKn npiBOda.
HacaIKN/npiHaJLeJXHOCTN 3aMeHATb TOJIbKO NocJe POJIHOJ OCTaHOBKn IpINBOJa - npINBOJ DnIXKeTcR eIe HeKOTOpoe BpeMa NOCJIe BbIKJIIOUeHInJ.
BkJIIOUaTb N BbIKJIIOUaTb npIbOp TOJbKO C NOMOu bIO NOBOPOTHOrO nepeKJIIOUaTeJI.
Pn HncnoJIb3OBAHm np6opa n3BLey BnJIky n3 p03eTKn.
Ipeed yctpaHeHem HeNCpabHOCTn 13BLey BILKy I3 pO3eTKI.
OnachocTb TpaBMnObaHn BpaaIOUmmnc HaCadkamN!
Bo Bpemr kcnnyaTaunn HNKoIa He onyckaTb pyKn B CmecnteJbHyU qauly. PaobToTb TOnbKc NaKpbITOn KpbIkwO (12)!
3aMeHrTb HacaIKN TOJbKO NOCJIe NOJIHOJ OCTaHOBKn PpNBOJa - NocJIe BbIKJIOUHeHn IprNBOJ DBNKETCJ eJe HeKOTOpoe BpeMn 3aTEM OCTaHaBJIbAeTCB NIOJOKeHn 3aMeHbI HaCaJOK.
IpeBnraTb NOBOPOTbI KPOHtEnB DpyrOe NIOJoxHeN ToIbKO IocJIe POJHO OCTaHOBKn HacaIKN.
I3 coo6paXeHn 6e3ONaChOCTn Pn6bOpOM MoXHO N0Jb3OBaTbcA TOJIbKO TOrda, KOrda HeNCNoJIb3YeEMbIe PnIBOdbI 3aKpbITbI 3aUHTbIMn KpbIShKaMn (5,8).
YCTaHaBJIbBaTb/CHIMaTb yHNBepCaJIbHyIO pe3Ky TOJbKO NocJe NOJIHO OCTaHOBKN npIBOda I n3BJIeEHn BUNKn n3 p03eTKN. He onyckaTb pyKn B 3aIrpy3OuHbI CTBOJ.
Onachoctb TpaBMnpoBaHna 6 octpbie HOxN!
He Tporatb octpbie HOKIN BbICTyNbl DnCKOB-IM3MeJbHTeJeI.
He TporaTb HOXN MINKcepa RoIbIMn pyKaMn.
OnachocTb TpaBMnpoBaHna 6 ocTpble HOxN/BpaaOuHnCn npvBoD!
HnKOrIa He onyckaTb pyKn B yCTaHOBJIeHHbI Mnkcep! Mnkcep CHIMMaTb/yCTaHaBJIuBaTb TOJIbKO NocIe NOJHOJ OCTaHOBKn IprNBOJa! IcNoJIb3OBAtB Mnkcep ToJIbKO B CO6paHHOM BnIe N C HaKpbITOn KpbIshKOi.
OnachocTB ownapubHnra!
He BkIIOuTaB IyCToN npIbOp.
Pnp6op npnHaJneJXHocTn He nDbepraB Bo3deICTBnIO UCTOuNkoB TeNJa. IeTaJIH He npEHa3HaueHbI JJIa NcNoJb3ObaHnB MVKpOBOJHOBOI NeH.
- Pered nepBbIM NcNoJIb3OBAHHeM TuaTeJIbHO NOnHCTnTb PnIbOp n PpINHaJIIeXKHOCTN, CM. pa3JeI «UncTkA IN yXoD».

Baxkhoeyka3aHne
BCTaBnTb BnJky Bpo3eKy.
CmecntelbHaayaHaHacaKn

ONaCHOCTb TpaBMnPOBaHnOBpaAouneCHaCaIKN
Bo Bpem 3KcnpaatauHnKoRda He
OnyckaTb pyKn B Cmecntelhnyu Haay.
PaobotaB ToJIbKO C HApkbyTOI
KpbIshkoi (12)!
3aMeHaTb HacaAaKN ToJIbKO NocJe NOnHO
OCTaHOBKn PnIBOda -NocJe
BbIKIOueHn PrIVBOd DnBXeTc EeIe
HeKOToOpE BpEMn I3aTeM
OCTaHaBJIbNAeTc B NIOJoxeHN 3aMeHbI
HacaDok. NpeEdBnraTb NOBOPOTbH
KPOHIteH B dpyRoE NIOJoxeHne TOLbKO
NOCJe NIOHOb H OCTaHOBKn HacaDN.
U3 CoobpaXeHN 6e30NaChOCTn
PnIBOpOM MOxHO NIOJb3OBaTbCn TOJIbKO
TORda, KOrDa HEnCNOJIb3YeMbIe PnIVBOdbl
3aKpbITb 3aUnTHbIMN KpbIshKaMn (5,8).

BhimaHne!
CmecntelbHyu qauy nCIOJIb3OBA TbTOJIbKO C 3TUM pIb6opom.
BenchДлп epemeuBaHnA «Profi Flexi» (13)
NcnoJb30BaHnIO BeHuKa
ДлвВ36иВань
Pucyok E
YTo6bI DOCTINrAICN OINTMImlbHbI pe3yJbTAT NpeMeWIBAHN INHPeDnEHTOB,BeHYNK JJI B3UBAHNIOJXKeH NOHTN KAcTaBcN DHa CMEcITeJIbHOH YaHN.
EcIn 3To He TaK, To NIOJoxKeHne BeHnka DJIa B3bUbaHnRA MOxHO OTpeyIuPObaTb NO BbICote CJeDyUOuIM O6pa3OM:

BCTaBtBBeHnKДJIbB36BaHnB PnBOJIOФHKcaUN.
- YdepxnBaTb BeHnK IJIa B36nBaHnI NOTKpyTNb RaKy C NOMOuHO RaeHOro KJIIOHa (WnpHa 3eBa 8) NO YacOBoi CTpeJIke.
- Поворачивая Веник, отераулироваъ ergо положенп NO Bbicote Do доступкеши ONТIMальboro pe3yЛьТараз:
BpauSeHne Pn YacOBoC TpeJIke: PNOHHTIe
BpaueHne npOTnB YacOBoN CTpeJIKN: OnyckaHne
- HaxaTb Ha KhoNkIy pa36JIOKInpOBKn
- I nepeBecTN IOBOPOTbI
- KPOHHTeH B NOJOKeHne 1.

PpOKoHTpOJIuPoBaTb NIOJoxKeHne
BENUka DJIa B3bUbaHnI NO BbICOTe, pN
HeoXoDmOCTn OTKOppeKTIpOBaTb.
EcnI noLoXeHne nO BbICote OtperyuipoBaHO npaBnUbHo,HaKaTb Ha KhoNky pa36IoKIpOBKn i nepeBecTN noBOPoThbI KPOHHTeIN B NoLoXeHne «2».

YdepxnBaTb BENKДЯB36nBaHnI npIKpyTuTb rAky C NOMOuHOraeHOro KJIOna (WipnHa 3eBa 8) npOTNB yacOBoi CTpeJKN.
Pa60Ta CO CmecnteIbHoi YaWei Hn HacaIkaMn PucyHok
HaxaTb Ha KhoNky pa36IoknpoBKN n nepeBeCTn NOBOPOTbI KPOHHTeIH B noJIOXKeHne 2.

- YCTaHOBka CMEcHTeJbHoi HaSi:
HakloHntb CmecnteHnyu auy Bnpeid n 3aTeM yCTaHOHTb ee,
IOBepHyTb ee IPOTINu YacOBOn CTpeJIKN IO QnKcaun.
B 3abucnmoCTn OT Bnda nepepa6aTbI-BAeMbIX pOdyKTOB BCTaBtB B npINBOJ DOΦNKcauN BeHnK DnI NepMeunBaHn,BeHnK DnI B3bUbaHn Nn MeCnJIbHbI KpIK.
YkaaHne:
Pn yCTaHOBKe KpIOKa IJIa TcTa IOBopauHbAte OTDeJIInTeIb DoTex nOp,
IOKa HacaJa He 3aФИКСИpyeTcH (pucyHok E-4b).
3aRpy3nTb B CmecuTeNbHyO YaSy npEiHa3NaueHHbIe DJIpepepa60KIn HnrgpeJeHtbl.
HaxaTb Ha KhoNkU pa36JIOKupOBKn I nepeBecTu NOBOPoTHbI KPOHHTeH B NOLOKeHne 1.
- Hakpbityb KpbiiKoN.
- YctaHOBnTb IOBOPOTHbI nepeKJIuOaTeJIb Ha Heo6xoDmMyO CTypeHb.
Hawa pekomehdaun:
- BeHnK dIa IepeMeuBaHnI «Profi Flexi»:
chauJIa nepemWeINBaTb Ha 1-2-η CTyneHn,3aTeM,piN Heo6oxOuMOCtN, IpeKJIIOHTb Ha 3-5-IO cTynHeB
- PpocceccnHaJIbHbI BcHcNk DJIaB36uBaHHa:
7-Ястуnevь, Добавлиейноюв
На 1-йстуnevи
-MecnIbHaHaHacaJaKa: ChaJa 3aMeuBaHne Ha 1-ikCkOpocTn, 3aTEM BbIMeunBaHne Ha 3-
D03arpy3ka uHrpeJeHNTOB
- BbIKIIOHTb npH6Op c NOMOsbIO NOBOPOTHO nepeKJIIOUaTeJIa.
BbIIOJIHNITb DO3aIpy3Ky INHrpeIeNHTOB Hepe3 DO3aIpy3OuHoe OTBepCTne B KpbIiKe. IJIi
- ChrTb KpbIiKy.
- HaxaTb Ha KhoIky pa36JIOKIpOBKIn I nepeBecTu IOBOpOTbI KPOHHTeIN B NOJIOKeHne 2.
3aRpy3ntb INHrpdeIeNEHTbl.
Pocje pa6oTbI
- BbIKIIOHTb npH6Op c NOMOsbIO NOBOPOTHO nepeKJIIOUaTeJIa.
- N3BJIeYbBNIky n3 pO3eTKI.
CHATb KpbliKy.
- HaxaTb Ha KhoIpya36JIOKIpOBKIn IpeBecTI IOBOPOTbIKoHHTeIN B IOJIOKeHne 2.
- I3BJIeYb HacaIky I3 npIBOda.
- ChartcmeCteJIbHyuHaIy.
- Побети Упстку BCex DeТаел, CM. pa3дeЛ «ЧИсткa и ухоД’.


YHnBepcaJbHaJpe3Ka

Onachoctb TpaBMnpoBaHna
He Tporatb octpbié HOXn N BvICTynbl
DnCKOB-N3MeJIbHuTEne. DnCKN-
N3MeJIbHuTEni 6paTb ToIbKO 3a Kpa!
YcTaHaBnBaTb/CHMaTb YHNBepCaJIbHyIO
pe3Ky ToJIbKO NocIe NOJHO OCTaHOBKn
PiuBOda N13BJIeueHnBnKn I3
po3eTKn.
He onyckaTb pykn B 3aRpy3OChn CTBOJ.
BHIMAHHe!
YHIBePcAJIbHyIO pe3Ky IcNOJIb3OBAITTOJbKO B IOJIHOCTbIO CO6paHHOM B4
YHbepcaIbHyIO pe3Ky HIKoIa He cO6bpaTb Ha OCHOBOM bIOKe.
YHIBepCaJIbHyIO pe3Ky IcNOJIb3OBA Tb TOJIbKO BYka3aHHOM pa6oYem NIOJoxeHN.
3aunTa oT neperpy3kn PucyHok G
TTo6bI npeIoTbpaTntb 3HaunTeJIbHbIe nobpeKdEHHBaWeero npu60pa Bo BpeMa neperpy3Kn yHnBepcaJIbHOJ pe3Kn, npINBOJHOB BaJ yHnBepcaJIbHOJ pe3Kn cHa6KeH HaceYCOJ (3aDaHHOe MeCTO CJOMa).B Cnyae neperpy3Kn npINBOJHOB BAJI CJOMaETC B 3TOM MeCTe.
HobbI IepKaTeJI BINCKOB C PnIBOdHbIM BaIOM MOxHO PnOpeCTN B CepBnCHOn cLyX6e.
IpepepaOToKa Ipon3BOUInTcHa 5-NTyneHn.
Pa60Ta c yHnBepcaJbHoI pe3KoI
Pucyok H
- HaxaTb Ha KhoIky pa36JIOKIpOBKIn I nepeBecTu NIOBOPOTbI KPOHHTeIN B NOJOKeHne 2.

- YCTaHOBka CMEcHTeJIbHOn HaAn:
HaKIOHnTb CmecnteJbHyU qauy BnpeI N 3aTEM yCTaHOBnTb ee, NOBepHyTb ee npOTNB YacOBoI CTpeJIKN Do qNKcauN.
- HaxaTb Ha KhoNkU pa36JIOKupOBKN
- IpeBecTu NOBOPOTbIIN KPOHHTeH B NIOLOKeHne 3.

- CHaTb 3aunTHyU KpbIshky C npNBOda yHnBepcaJIbHOJ pe3Kn (pucynok I-5a).
B3aTb DepKaTeIb NcKOB 3a HnKHiN KOHeU, pIn 3Tom o6a 3y6ua DoJXHbI nOKa3bIBaTb BBepx.
- UcTaHOBnTb HxKhI DnCK-pe3Ky IINn DnCK-IIIHNKOBky OCTOpOxH0 Ha 3y6CbI DePkaTeJIa DnCKOB (pncyHok II-6a). PIn yCTaHOBKe DByCTOpOHnx DnCKOB CNeIDNTb 3a TEM, YTObI HyxHaI CTOpOHa HaxoDIINaCb CBepxy.
B3aTb DepxKaTeJIb DnCKOB 3a BePxHm KOHeu N BCTaBnTB B KOpNyc (pucyHok II-6b).
- HaKpbIb KpbIbKy (O6paTbTB BHMaHne Ha MeTKy) И NOBepHyTb NO YacOBoCtpeJIke Do ynpa.
- YcTaHOBnTb yHnBepCaJIbHyIO pe3Ky Ha npINBOe TaK, KaK n3O6paXKeHO Ha pncyHke H-8, nIOBepHyTb ee NO YacOBoI CTpeJIKn Do yNopa.
- YctaHOBtB NOBOPOTbI NpeKJIIOuTaTeIb Ha peKOMeHdyEmyIO CTyneHb.
3aŋpy3nTb npOdyKtB IJIЯ nepepa60TKI B 3aŋpy3OHyB CTBOJ N NOДTaJIKNBaTb TOJIkATEJIeM.
BHUMAHne!
N36eraTb cKoJIeHnHape3aHHbIX npOdyKTOB B BbIXoIHOM OTBepCTm.
PekomeHdaa:ДЯ NOJUyeHnIpaBHomepHbIX pe3yJIbTaTOB TOHKInIpojkyTbI Hape3aTb NyUkAmI.
Yka3aHHe: B cIyae 3aKJIINHbAHnI nepepa6aTbIbAeMbIX IPOdYKTOB B uINHKOBKe HnepepbIBHO DeiCTBnI -BbIKIOHTe KxOHHH KOM6aIH, N3BJIeKNIte BUNKy n3 pO3eTKN, IOXJNTecb POJIHO OCTaHOBNI npVBOda, CHIMITE KpbIiWKy C uINHKOBKn HnepepbIBHO DeiCTBnI NOCBOOJITe 3aIpy3OHy CTBOJ OT IPOdYKTOB.
Pocne pa6oTbI
- BbIKJIOHTb npH6Op c NOMOsbIO NOBOPOTHOpeKJIIOHaTeJIa.
- Повернт bуньерcaльHyю pe3ky npotNB Yacobо CTpeJIKN n CHrTb.
- Повернть Кршky Роть Уасов CTpeЛКИ N CHТь ee.
CHaTb DepKaTeJIb NcCKOB BMeCTe C NcCKOM. JIJIa 3TOrO HaxKaTb NaJIbCuEM Ha IpNbBOJHO BaJI CHn3y (PncyHOK).
- Побети Упсту Детал.
Mukcep

Onachoctb TpaBMnpoBaHnO6 OcTpble HOxN/BpaAiouNci npBOd!
HnKoIa He onyckaTb pyKn B yctaHoBJIeHNbI MVKcep! MInkcep CHImaTb/ YcTaHaBJIbMaTb ToJIbKO IocNe IOnHO OCTaHOBKn npUBoJa! UcNoJIb3ObaTb MInkcep ToJIbKO B CO6paHHOM BnDe N C HApblToN KpbIshKoN.

Onachoctb ownapBaHnra!
Pn nepepa6oTke B MmKcepe ropnix npdykTOB Ype3 BOPOHky B KpbIiKe BbIXOINT nap. 3aJIINBaTb He bOJee 0,5 IITpa rOpaye nn CInbHO- PHeHsuecra XnIKoCTn.
BHIMAHHe!
MUKcep MOxHNO IOBpeuNTb. He nepepaBaTaIBaTb 3amOpOKeHHbIe INHpReJeNEHTbl (3a NCKJIIOUeHNEM Ky6IKOB JbJa). MUKcep He DOJXKeH pa6oTaTB NyCTOn.
Pa60Ta C MmKcepom
PucyHOK K
- HaxaTb Ha KhoNkIy pa36JIOKnPOBKn I nepeBeCTn NOBOPoTHbI KPOH- uTeiH B NOJIOKeHne 4.

- ChTb c npNBoDa MmKcepa 3aunTHyIO KpbIshKy.
- YcTaHOBtB CTaKaH MMKcepa (MeTKa Ha pyUKe DOJXHa COBnJaDaTb C MeTKoH Ha OCHOBHom 6I0Ke) IN NOBepHyTb IpOTNB YacOBOy CTpeJIKN Do yNopa.
3arpy3nTb nHrpeDneHTbl. MaKcImaJIbHOe KOJIuYeCTO JxNkOcTn = 1,25JInTp;MaKcImaJIbHOe KOJIuYeCTO neHaIeCn HINrROPaey KxNkOcTn = 0,5JInTp;ONTImaJIbHOe KOJIuYeCTo JIJI nepepa6oTKn TepDbix IpOdyKTOB = 50-100 rpaMM;
HaKpbIb KpbIbKy I3aBepHyTbe ee npOTNB acBOB CTpeIKN Io yNopa B pyKy MmKcepa. KpbIbKa DoJnxHa 3aΦnKcnpoBaTbCra.
- YcTaHOBnTb IOBOPOTHbI nepeKJIOnaTeJIb Ha Heo6xOdMHyO CTypeHb.
Доэрузka
INHpeDneHTOB
(pncyHOK K-8)
BbIKIIOHTb IpiN6Op C NOMOuBIO IOBOPOTHOpeKJIIOUaTeJI.
- CHaTb KpbIuKy,ИДобaBnTb INHrpeDIneHTbl nJIN
N3BJeHb BOPOHKy, INoCTepeHHO 3aRpyKaTb TBepIbe INHrpeIeHTbI Yepe3 D03arpy3OuHoe OTBepCTne
NJN
3aJIITb JxNkNe INHrpeJnEHTbI Ype3 BOPOHKy.
Pocje pa6oTbI
BbIKHouHTb npu6Op c nOmoaIIO NOBOPOTHOpeKJIooHaTeJI.
- Повернту МИКЕР NO YACOBО CTpeлke, И сHTь eTO.
PeKOMeHdauN: MVKcep JIyUwe BCero NOMbITcpa3y NocJIe IcNOJb3OBAHnA.
UncTkauyxo

BHHMaHHe!
He nCnoJIb3OBAb Tb abpa3nHBHbIe YnCTaIuIe cpeIcTbA. NObepxHOCTn npnbopa MOryt 6bITb NOBpeXKeHbI.
ЧИстka ochob Horo 6JOKa

Onachoctb nopaxeHn3JleKtpuyecknM TOKOM!
OCHOBHON 6JOK HIKORda He nIporpykaTb B XnIJKOCTb I He JepeXkaTb POnI pIPOTOUHO BOJOM.
He nCnoIb3ObaTb npoouCTnTeJIb.
- N3BJIeYb BUNKy n3 pO3eTKn.
- PpOTepeTb OCHOBHoi 6JIOK IN 3aUHTBHeIe KpbIuKN pPnIBoDOB BnAxAHOH TKAHbI. PnHcO6XoDMIOCTN NcIPOJB3OBAbT HeMHOrO CpeIcCTBa DJIa MblTbI NOCyDbI.
B 3aKIOUeHne IpoTepeTb pIbOp hAcyxo.
YnCTKa CMEcHTeJIbHOJ YaIIN HacaDOK
CmeiTeIbHyIOuHaUyHacaIKMooKHO MbITbBPOcyDOMoeHNOMaUNHe.
Пл actMaCCOBbIe DeTaJIH HeJIb3R 3aJxIMaTb MExdY HaxOJaIeICB R NocyDmOeHHO MaSHHe NocyDoI, TAK KaK OHI B PPOUcCE C MbITbMOrYT OKOHHaTeJIbHO DeCpOpMipoBaTbCrl!
Ynctka yHnBepcaJIbHOJ pe3KN
Bce DeTaIy HnHBePcAaMbHoN pe3KIMoXHO MbITb B IocCyIOMoeHNoMaaHHe.
PekomeHdau:ДЯуctpaHEnnKpaCHOro HaJIeTa NocIe Nepepa6OtKu TAKNX pOyKToB, KaK HaIp., MOpKOBb, HaJIITb HEMHO rNueBOr oPacTHeBHO rMaCJa Ha TKaHb I nPoTepeTb eI O yHnBepcaJIbHyIO pe3Ky (He dNcKn-ImMeJbUHTeIN). NocIe 3TOrO npOMbITb yHNBepcaJIbHyIO pe3Ky.
YnCTka MmKcepa

Onachoctb TpaBMvpoBaHnO6 OCTpbie HOXN!
He Tporatb HOXIMMKcepa roJIbIMn pykAm.
Ctakah Mnkcepa, KpbIshky N BOPOHy MOxHOMbITb B IocyDmoeHOn MaSHHe.
PekomeHdaqna:ДЯЧТКМИKcepa nocJIe nepepa6OTKNJIMKOcTe 3aacTyO erO HeOB3aTeJbHO CHMaTb C npi6opa.ДЯ 3TOrO DoabNTB B YcTaHOBJIeHHbI MNIKcep HEMHOro BOblcCpeDCTBOM dIaMbITb Nocdy. BkJIuOHTb MNIKcep Ha HECKoJIbKO cekyHd (CTyPeHb «M»).BblNTb pactBOP MOIOseO cpeDCTBa,ИnpOMblb MNIKcep YNCTOBoDOn.

Baxkhoeyka3aHne
CymkyIJI npHaJLeKHOCTe YIcHTb npH HeoXoIMocTn. CJeIOBaTb yKa3aHnM nO yXoY B CymKe.
XpaHeHne

Onachoctb TpaBMupobAHNA!
Pn HeNCNoJIb3OBAHn npIbopa n3BneYb BnJIky n3 po3eTKI.
PncyHOK
- YILOKINb HacaIKN IN DNUCKIN3MeJIbUHTeIN B CymKy IJI npHaJdJIeXHOCTeN.
Cymky JIJI npHnAdJeXHoCTe XpaHNTb B CmecHTeJbHOJ YaWe.
- OTKJIIOHHTb npu6op.
CokpaTbKoJIHcEeBO nepepa6aTbIBaEmbIX npOdyKTOB. He npeBbIaTb MaKcImaJIbHO DoynCTMIMOKOJInueCTBa npOdyKTOB (cm. «PpimepbI ncNoJIb3ObaHnra»)!
HemicrpabHoctb
Bo Bpempa60tbpnBOda cnyaHNO 6bIHaKaTa KHOIIKpa36JIOKINPOBKn.1OBOPTHbIKpoHHTeIN IOHNMaETCBBepx.PnBOID OTKJIIOyAEcTc,HO He OCTaETCB NOLOXKeHN DJIa 3aMeHbI HacaDOK.
YcTpaHHeHne
- Пелевсановоротьп поеклочатуль в поожене «о/off».
-ПоворOTьн КрОшТeн ПИВЕСТи В поJOЖЕне 1.
BkJIIOHHTb npIbop (1-rtynHeh).
CHOBA OTKJIIOHHTb npIbOp. HacaIka OCTaETCB NIOJXeHNI DJIa 3aMeHbI HacaIDOK.

HemicrpabHOctb
MnKcep He NaHnHaet pa6oTaTb nIIN OCTaHaBJIbNAeTcB BO BpeMa IcNoJIb3ObaHnA, npVBOD «rJdNT’. Hox 3a6IoKnpOBaH.
YcTpaHeHne
- OTKJIIOUHTb npH6Op n ɪBnEych BnIky n3 po3eTKn.
- ChTb MUKcep u ydaJIHTb npenATCTBVE.
- Choba yCTaHOBtB MUKcep Ha OCHOBHON 6JOK.
BkIIOuHTb npi6Op.

Baxhoe yka3aHne
EcnTakmO6pa3OM He ydaetcYcTpaHnTb HEnCnpaBHOCTb,TO 6paTnTEcb, NOKaJyNCTa, B CepBnCHyO cnjx6y.
Приимеры Истоведия
B36nTbIe CJNbKu

100r-600r
B36NtBcINBKNOT1,5do4MnHyT Ha7-NTyNEHBN3aBNCIMOCTNOT KOJIINHECTBaI CBOICTBCJINBOKC NOMOUBO BEHNKA DJI B36NBaHNA.
B36ntbIe 6eJKN
OT1do8yHbIX6eIKOB

B36nBaTb 6eJKNOT4do6MNHyT Ha7-ntCTyneHcNOMOUsbBOBeHnKaДJI B36nBaHnI.
BnCKBnTHoe Tecto
OchOBHOI peueeTT
2甲ca
2-3 CT. J. ropnye BOdBi
100 r caxapa
1 NaKeTnK BaHJIbHO rCaXapa
70 rmykn
70 r kpxmmana
nHHeo6X. HeMHOrO XIMUeCKOrO pa3pbIXJIHTIJI
B36nBaTb BCE INHpeDneHTbl (KpOme MyknI KpaxMaJa) B TeYeHne npIMepHO 4-6 MInHyT Ha 7-1 CTyPeHn C NOMoUbIO BeHNiKa IJIa B36nBaHnI Do O6pa3OBAHnI NeHbl.
-Перевеси NOBOPOTьн ПЕКЛЮЧаTeь
На 1-IO CTUпeнь ИВ ТЕЧЕ ПИМЕрно
½-1 MInHyтBI ПО CTOLIOВОЛ JOЖК
Добавлгь порочAHуOу MyKу И Крахмал.
MaKcImaJIbHoe KOJInueCTBO Tecta:
2-KpataHoe KOJIInueCTBO INHrpEdueHTOB n3 OCHOBHOro peCenTa
Cdohoe TeTo

OchOBHOI peueePT
3-4 nua
200-250 r caxapa
1 uenotka coi
1 NaKeTnK BaHnJIbHOrO caxapa NJIu ZeIpaC 1/2 JIMMOHa
200-250 r cIINBOHOrO MaCJa NIIIMaprapina (KOMHaTHoT TeMnepeAtypbl)
500 r myk
1 NaKeTnK XmMueeCKOro pa3pbXInTeJIa 125 Ml MoJoka.
Bce INHrpEIneHTbI B TeChEne PnIMepHo 1/2 MInHyTbI NpeMeuINBaTc NOMOsbIO BeHNka Ia IpeMeuINBaHna Ha 1-
CTyneHn, a 3aTeM B TeueHne 3-4 MmHyT Ha 5-н CTyneHn.
MaKcImaJIbHoe KOJIInueCTBO Tecta:
1,5-KpatoHe KOJINUeCTBO INHrpeIeIeHTOB n3 OCHOBHOro peIeNTa
Pecouhoe Tecto
OCHOBHOI peueeTT
125 r cIINBOUHOrO MaCla (KOMHaTHoI TeMnepeAtypbl)
100-125 r caxapa
1 RIO
1 uenotka coi
HEMHORO JIMMOHHOI CEIDpbI ININ BaHINJIbHOcaxapa
250 r MykN
PnH HeoX. HEmHOTo XIMnueCKOTo
pa3pbixnITeJIa
Bce INHrpEneHTbI nepemeunBaTb B TeHeHne IprImepHO NOLyMNHyTbIC NOMOsbIO BeHuNka DJIa nepemeunBaHN Ha 1- i CTyneHN, a 3aTeM B TeHeHne 2-3 MNHT Ha 3- i CTyneHN.
PnncnoIb3ObaHnn 6oJIe 500 r MyKn:
Bce INHrpeIeHTbI 3aMeIINBaTb C NOMOJIbIO MeCNIJbHO rKpIOKa B TeUeHne IprIMepHO NOJyMnHyTbI Ha 1- n CTyPeHN, 3aTEM B TeUeHne IprIMepHO 3-4 MInHyT Ha 3- n CTyPeHN.
MaKcImaJIbHOe KOJIInueCTBO Tecta:
2-KpaTHOE KOJIINHecTBO INHPrEINHeTOB N3 OCHOBHOrO peIeNTa
ДрожжевоюпсTo

OCHOBHOI peueeTT
500 r MyKn
1Aio
80 r kupa (komHaTHoI TemnepaTpybI)
80 r caxapa
200-250 MЛ TeŋlOro MoJIOKa
25 r CBexnX nnn 1 naKeTnK cynxx dpoxxkueepa c noJIOBnuHb JIMoHa
1 uenotka coJn
Bce INHrpEIneHTbI nepMeeINBaTb C NOMOIO MeCNJbHO KpIOKa B TeueHne npIMepHO NOyMnHyTbI Ha 1- n CTyneHN, a 3aTeM B TeueHne npIMepHO 3-6 MnHyT Ha 3- n CTypeHN.
MaKcImaJbHoe KOJIInyEcTBo Tecta:
1,5-KpaTHoe KOJIInueCTBO INHpeIeIeHTOB I3 OCHOBHOro peIeNTa
TectoДлЯланш
OCHOBHOI peueeTT
300 r MyKn
3Яиca
no Heo6xOaMocTn 1-2 CT. n. (10-20 r) XOJIOnHOB BOdbl
Bce INHpeDneHTbI nepeMeuBaTb ot 3 do 5 MInHyT ha 3-1 CTyNeH Do NOJUyeHIN ODNHOPODHoro Tecta.
MaKcImaJIbHoe KOJInueCTBO Tecta:
1,5-KpaTHoe KOJIInueCTBO INHpeIeNHeTOB I3 OCHOBHOrO peIeNTa
TectaДлЯхлеса
OCHOBHOI peueeTT
750 r myk
2 naketuka cyxux npokkex
24.Ⅱ.coln
450-500 MЛ TeПлоь ВОДы
Bce INHrpeIeHbI IepemeuBaTb C NOMOJIbIO MecINbHO KpIOKa B TeUeHne IprIMepHO NOJyMnHyTbI Ha 1-IM CTUneH, a 3aTeM B TeUeHne IprIMepHO 4-5 MInHT Ha 3-IM CTUneH.
Maiohe3
2Яиca
2y.II. ropuucbI
1/4 pactntTeJIbHOro Macla
2cT.IIIMMOHHORO cOKa nn yKcyca
1 uenotka coJn
1 uenotka caxapa
INHpeIeIeENTbI DOJIJKHbI IMeTb ODNHaKOByIO TEMnepaTypy.
Bce INHrpEIneHTbI (KpOme paCTnTeJbHOro Macna) IepemeuBaTb B TeHeHne HeCKoJIbKINxCekyHd B MmKcepe Ha 3-IMN 4-ntypeHn.
- PepeKJIIOHHTb MUKCEp Ha 7-IO CTyNeHb, IN MeIJIeHNO BJIINBaTb MacNoYepe3 BOPOHky. IpoIoJIkaTb NepeMeIINBaHne Do Tex nop, NOKa MaioHe3 He 3MyJbIpyETcA.
IcnoJb3ObaTb MaIOHe3 B KOpOTKne cPOKn, He XpaHnTb erO.

MeioBa 6yTepeDnaMaCCa

30 r cIINBOUHORO Macla
(изхлоблJBнka,7°C)
190 r mea (n3 xoJIoDnJIbHnka, 7°C)
Pa3pe3aTb cIINBOUHoe MaCIO Ha MeJIKne KycOuKN I NIOJXuNTb eRO B MUKcep.
- Добавит Мед И поемшиВаТь СЕВ Ттуене 15 cekyн Ha 7-й CTуpenH.
YTNJN3aLna

3TOT 6bITOBOJ AEKTPOpnpBOp IMeET o6o3NaueHHe COJIaCHo Tpe6oBaHNM DnpeKTHBbI EC 2012/19/EG 6o OTCNJyXNBuNX CBOJ cPOK 3JeKTPnYeCKNX I 3JeKTPoHHbIX npi6opax (waste electrical and electronic equipment - WEEE).
B30TJINPeKTNBe pInBeDeHbI npaBnla, DeiCTbYIOUe Ha BcEi TeppntOpn EC, NO pNEmy n yTUN3aCnO TcJIyXNBWHxCBOI cPOK pIn6opOB.
HOpMaunO6akTyabHbIXMeToaX yTnI3aunn Bb CMOKeTe noJyHTb y Baewo ToproBoro areHa nIIN B opraHax KOMMyHaJIbHO ynpabJeHHN NO MeCTy Baewo XnteJIbCTBa.
YcIobnra rapaHTnHOro 06cIyXuBaHnA
Ionyntb nchepnbIBaHOyIO IHOpMaUIO 06ycJIOBnX rapaHTnHOrO o6cJyKnBAHn Bbl MoKeTe B Baem bInxKaIWe m ABTOPIN3OBaHHOM cepBnCHOM ueHTpe IIN B CepBnCHOM ceHTpe OT npOn3BOJNTeJI OOO «BCX BbIToBaTexNka», a taKke HaTnBΦnpMeHHOM rapaHTnHOM TaIOHe, BblDaBaEMOM pnpipOdaXe.
HnΦopMaçnHa3rOToBnteIa O rapaHTnHOM n cepBnCHOM
B.R. MockBe: B.R. CaHKT-Ne
(495) 737-2961 (812) 449-3161
B r. CaHKT-TeTep6ypre:
m 06cnyxnbAHnn
Aqpca n teneoohb b aTOp30abHbX cepBcHbX ceHTPO npmbedeHb Ha oobopte, a taKxpe B Htpe: http://www.bsh-service.ru Pekomeyem Bam noIb30abTcBc yCunmBnTo ABTOP30abHbX cepBcHbX ceHTPO. Ynahe 6b1be 6pOaBnBnO h 8. BhHMHHe! BaxhHa HhOpmaunia dno notpeBtteni DAnhny prnpadauenrdu ane 120000000000000000000000000000000000000000000000000000000000000000000000000000000000000000000000000000 CnIOBOPMAUINBa paoocptanreTa ha Manle bItobbipu ToBAPHO 3nAksBosch; Kofe- MauHb, KoFEMONK, BeCb, KxOHNHe BOMaHb, MkCEbp, TlnecoBcB, P3K, TocTeB, PaapPMHTENI dnn BOC, 3eKTPouAHKn, COOKOBHXMANK, 3MmEBHTENI, BnEJeBpe, Odockn, MaCCaKeBp, BaHNOCh, 3eKTPorpeKn H AnalonHNTHb.
1. YbaKaMaBn DaMb I RocDQA, CoobZaem BAM, QTO NpTBeRXPedHe CootBTCTBN HAeae BpOuyKUns OBaHBM TRe6OBAHN B CootBTCTBN C zakoHODATEBCTBOM OcyueCTBn T B FOme ObaTeBnO CepTHFkaun.
2. HfOpMAUIN NO ceTnHfKaauu NaHxN PPBoBP, A TAKKE daHbNe O Hompece TcHfKATA
3. BoTETBn I CPOke erO deCTBN Bbl MoKeTe neOnyUBy B OOO BCX BtobBA TeHNKAs.
4. TaNa npOukn npOzBEHn ND KOthPLOm TpaCHSAUHbN KOpnapaum (BCX
5. 1oo uhd CImehxC Xaycrepe Tm6X), adpc Se TsaB-KBAPtnps: 81739 MOnxEn, Kapn-Bepn
6. Upace 34, EpMaun.
7. OraH3aun, yNolHomouEHNo IaTOBATTEM He na OCHOBAN DOOBOPa C NIM, ABnTeTc
8. OOO 三 ~ C X ~ C X ~ B t t t t t t t t t t t t t t t t t t t t s t t t t t t t t t t t t t t t t t t t u 9. HfOpMAUIN CopeBce
11. YbaKaMaBn DaMb I RocDQA, CoobZaem BAM, QTO NpTBeRXPedHe CootBTCTBN HAeae BpOuyKUns OBaHBM TRe6OBAHN B CootBTCTBN C zakoHODATEBCTBOM OcyueCTBn T B FOme ObaTeBnO CepTHFkaun.
12. HfOpMAUIN NO ceTnHfKaauu NaHxN PPBoBP, A TAKKE daHbNe O Hompece TcHfKATA
13. BoTETBn I CPOke erO deCTBN Bbl MoKeTploh B OOO BCX BtobBA TeHNKAs.
14. TaNa npOukn npOzBEHn ND KOthPLOm TpaCHSAUHbN KOpnapaum (BCX
15. 1oo uhd CImehxC Xaycrepe Tm6X), adpc Se TsaB-KBAPtnps: 81739 MOnxEn, Kapn-Bepn
16. Upace 34, EpMaun.
17. OraH3aun, yNolHomouEHNo IaTOBATTEM He na OCHOBAN DOOBOPa C NIM, ABnTeTc
18. YbaKaMaBn DaMb I RocDQA, CoobZaem BAM, QTO NpTBeRXPedHe CootBTCTBN HAeae BpOuyKUns OBaHBM TRe6OBAHN B CootBTCTBN C zakoHODATEBCTBOM OcyueCTBn T B FOme ObaTeBnO CepTHFkaun.
19. HfOpMAUIN No ceTnHfKaauu NaHxN PPBoBP, A TAKKE daHbNe O Hompece TcHfKATA
20. HfOpMAUIN NO ceTnHfKaauu NaHxN PPBoBP, A TAKKE daHbNe O Hompece TcHfKATA
21. YbaKaMaBn DaMb I RocDQA, CoobZaem BAM, QTO NpTBeRXPedHe CootBTCTBN HAeae BpOuyKUns OBaHBM TRe6OBAHN B CootBTCTBN C zakoHODATEBCTBOM OcyueCTBn T B FOme ObaTeBnO CepTHFkaun.
CnIOBOTOBUTENI
12. HfOpMAUIN No ceTnHfKaauu NaHxN PPBoBP, A TAKKE daHbNe O Hompece TcHfKATA
13. YbaKaMaBn DaMb I RocDQA, CoobZaem BAM, QTO NpTBeRXPedHe CootBTCTBN HAeae BpOuyKUns OBaTOBATTEM He na OCHOBAN TOBOVTA
14. TaNa npOukn npOzBEHn ND KOthPLOm TpaCHSAUHbN KOpnapaum (BCX
15. 1oo uhd CImehxC Xaycrepe Tm6X), adpc Se TsaB-KBAPtnps: 81739 MOnxEn, Kapn-Bepn
16. Upace 34, EpcMaun.
Adepca n TeneoohbI ATOBIOHOABHbIX cepBnCbIX ueHPTOB pINBedeHbHa o60pote, a TAKKHe HHTENPOTa: http://www.bhs-service.ru
B WHTHRE. http://www.bsh-servicetidr.
PEKOMEHyEM Bam noB3OBaTbCBy cYNyramn TOnbKO ABTOPHIOBAHbIX CEPBCHbIX cENTPOB.
Y3HaIte 6oJIbe o6 opHnHaIbHbIX akceccyapax H
TEXHnKn B HnTepHete: http://www.bosch-eshop.ru
- Moenb
- Pauanu uhoopmaa naeepnnaege na manhe 6hupno npupno npapno aana Rosch: koe
BapKN, KOpeMaunHbI, KOpeMonKn, Becbl, KxOHHbE KombaunHbI, MInKcepbl, nbineCocbl, pe3Kn, TocTebpI,
IaHbNcK, McaKepbl, BaHHouKn, 3neKtporpeKn n aHaONuHbIe Hm N3denn.
- Vbaxaembln lambl ngocnona cooibuaem Bam uTO noTBeDxneHne COOTBETCTBNAHue
IPOyKuHnO63aTeNbHbIM Tpe6oBaHNbM B COOTBETCTBNC 3aKOHOdaTeJIbCTBOM OcyueCTBIA
HnfoMaHIO NO cTnHnKaHn HauHx pHOB, a TAKHe NaHHbE O HOMepe cTnHnKaTA
A946
coBtBcTbHnCpke ero dienctbHb BmOKeTe hnyuHb Ooo 0BC XbItBaH texhRaX.
bow ynd CmmeHc XaycrepeTe ImbX》,aDPEC wTab-kBapTnpbl: 81739 MIOHXen, Kapn-Bepn
Bouy Hn CmHc Xaycrepe TMOX, aDpc 7rao-KbaptnpB: 81739 MOnHexe, Kapf-Bepn
OpraHn3aunen,ynnonHomoueHHoN 3roTOBnteMeHa OCHOBaHHIOROBOPa C Hm,raTcA
ten.: (495) 737-2777, aKc: (495) 737-2798.
Tnpoopa HnHa eO 3IKeKre NmB coipobOndteHbHOJOKyMeHtauHn.
6. Akceccyapb i n cpeicTba no yxody
HcnoIb3ObaTb TOnbKO OpRnHaNbHbIe akceccyapbl n cpeCTBa no yxOdy. OpRnHaNbHbIe akceccyapbl
Aeepnneepnnneepnneepnneepnneepnneepnneepnneepnneepnneepnneepnneepnneepnneepnneepnneepnneepnneepnneepnneepnneepnneepnneepnneepnneepnneepnneepnneepnneepnneepnneepnneepnneepnneepnneepnnee
AeceecpBnpeCBAHxOyDycoBcBtByOTcambIM BbICOMMpeoOBAHmKaeCTBaTobapHor
pabote.
BbMOKeTe ObpaTbCBAbTOPn3oBaHHbIe cepBnChbIe cHTpbI,nepeuNCnEHHbIe Ha obopoTe.
7.1a9T8H350T8nT
7. raparTHN 1sIOBnH
BmC DnCTByoMIm 3aKoHOaTeIbCTBOM P0 3aOnne IpaB HTopeOHTenEn CpOKOM 1 RoD. MapKnpyetc F U | MM, rge I - roN h3rotobHnEN MmHyc 1920, a MM - MeCAu h3rotobHnENHa


Pa3pa6oTaHOnДЯЖИЗн
9.Инфорmaци O cepBnce
B Hnno nne hne HnHnHO cspka Hnna CnKbA a Taekse Mactepckme HnHnnnnpTheoBC 8cnera fotOBnBnpeonnoxTb Bm cbovocnuCncoK anpdecob ynoHNOHoeHHNx3rOtoBn
TENEMYIKKTOB ATOPIN3OBAHORO CEPBHCNHO O6CNyKBAHNA HAOHNCTA HoOBOPe.
Cpok cnyk6bM anbX bHbObX npHOB (KPOK ME KYOHbIX McBnHO n bneocOC) coCTaBnR 2 Joda. Cnpck cnBnWnKnnKmKbOxcoeOcOeOeOeOeOeOeOeOeOeOeOeOeOeOeOeOeOeOeOeOeOeOeOeOeOeOeOeOeOeOeOeOeOeOeOeOeOeOeOeOeOeOeOeOeOeOeOeOeOeOeO
c daTbI eRo NOKynK, nH6o npn HeBO3MOXHOCTn ee onpeDeneHn, c DaTbI n3rOToBneHn H3dennn, HaHe
B nepnoi n noce i necheyna rapanthinoro coka hna LaCyba cepbica, a takae Mecetpckme Hauin npanthenob BCerra rotobnBnpoNtBb Ram CBOV cyvEn. CmCOK apeNcH yonHomohyhenHX NAROTBU
TENEMYIKKTOB ATOPIN3OBAHORO CEPBHCNHO O6CNyKBAHNA HAOHNCTA HoOBOPe.
Cpok cnyk6bM anbX bHbObX npHOB (KPOK ME KYOHbIX McBnHO n bnecoCB) coCTaBnR 2 Joda. Cnpck cnBnWnWnWnWnWnWnWnWnWnWnWnWnWnWnWnWnWnWnWnWnWnWnWnWnWnWnWnWnWnWnWnWnWnWnWnWnWnWnWnWnWnWnWnWnWnWnWnWnWnWn
B nepnoi n noce i necheyna rapanthinoro coka hna LaCyba cepbica, a takae Mecetpckme Hauin npanthenob BCerra rotobnBnpoNtBb Ram CBOV cyvEn. CmCOK apeNcH yonHomohyhenHX NAROTBU
TENEMYIKKTOB ATOPIN3OBAHORO CEPBHCNHO O6CNyKBAHNA HAOHNCTA HoOBOPe.
Cpok cnyk6bM anbX bIbObX npIOBOP (KPOKE KXYOHNB XOMBAHOB nblneOCOB) coCTaBNrT 2 rDa.
PNDYNCMTDHHBx3aKOHMOHIOHOHPOHAPINOMBOHPOHOPMBOHPOHPOHPOHPOHPOHPOHPOHPOHPOHPOHPOHPOHPOHPOHPOHPOHPOHPOHPOHPOHPOHPOHPOHPOHPOHPOHPOHPOHPOHPOHPOHPOHPO
(ueK,KBNTaHcHIO,HbIe DOKyMeHtbl,NOITBepXdIoUOHe DaTy N MeCTO NOkynKn).
PONb3OBaHn), NOMOxET H36eXaTH PNOBEm B AKCnVatauHN PNOBopa nero OcbnyKBAHH.
HencnpabHbIy3nbl np6opOB B rapaHTnHbI nepno6 bcnnatHO pmoHTpyOTc Hn 3aMeHJOTc
OBHMn. PeseHne Bonpoca o cenecoopasaHocn ix saMeHBi npeMOHa ocAeich 3a Chykoamn
9.Инфорmaци O cepBnce
9.Инфорmaци O cepBnce
| CAMAPA, OOO-CHN=CEPBCN, 443900, COVECOTKAPMNNy, i.148, ran(8:64) 224-53-39, 224-07-40, daphc(8:64) 224-53-39 |
| CAHT-HEET CROP, 100000, 100000, 100000, 100000, 100000, 100000, 100000, 100000, 100000, 100000, 100000, 100000, 100000, 11, 148, ran(8:12) 369-67-10, 369-67-11, 369-67-12, 369-67-13, 369-67-14, 369-67-15, 369-67-16, 369-67-17, 369-67-18, 369-67-19, 369-67-20, 369-67-21, 369-67-22, 369-67-23, 369-67-24, 369-67-25, 369-67-26, 369-67-27, 369-67-28, 369-67-29, 369-67-30, 369-67-31, 369-67-32, 369-67-33, 369-67-34, 369-67-35, 369-67-36, 369-67-37, 369-67-38, 369-67-39, 369-67-40, 369-67-41, 369-67-42, 369-67-43, 369-67-44, 369-67-45, 369-67-46, 369-67-47, 369-67-48, 369-67-49, 369-67-50, 369-67-51, 369-67-52, 369-67-53, 369-67-54, 369-67-55, 369-67-56, 369-67-57, 369-67-58, 369-67-59, 369-67-60, 369-67-61, 369-67-62, 369-67-63, 369-67-64, 369-67-65, 369-67-66, 369-67-67, 369-67-68, 369-67-69, 369-67-70, 369-67-71, 369-67-72, 369-67-73, 369-67-74, 369-67-75, 369-67-76, 369-67-77, 369-67-78, 369-67-79, 369-67-80, 369-67-81, 369-67-82, 369-67-83, 369-67-84, 369-67-85, 369-67-86, 369-67-87, 369-67-88, 369-67-89, 369-67-90, 369-67-91, 369-67-92, 369-67-93, 369-67-94, 369-67-95, 369-67-96, 369-67-97, 369-67-98, 369-67-99, 369-67-100, 369-67-11, 369-67-12, 369-67-13, 369-67-14, 369-67-15, 369-67-16, 369-67-17, 369-67-18, 369-67-18, 369-67-19, 369-67-20, 369-67-21, 369-67-22, 369-67-23, 369-67-24, 369-67-25, 369-67-26 |
| CAHAT-HEET CROP, 100000, 100000, 100000, 100000, 100000, 100000, 100000, 100000, 100000, 100000, 100000, 100010000000000000000000000000000000000000000000000000000000000000000000000000000000000000000000000000000 |
| CAPAHT, OOO-CHN=CEPBCN, 427760, AINCHA, y.12, 49, ran(8:12) 369-67-10, 369-67-11, 369-67-12, 369-67-13, 369-67-14, 369-67-15, 369-67-16, 369-67-17, 368, ran(8:52) 52-37-74, 27-27-68, 4299 (8:52) 52-37-74, 27-27-68, 4299 (8:52) 52-37-75, 27-27-78, 4299 (8:52) 52-37-77, 4299 (8:52) 52-37-75, 4299 (8:52) 52-37-75, 4299 (8:52) 52-37-75, 4299 (8:52) 52-37-75, 4299 (8:52) 52-37-75, 4299 (8:52) 52–37-75, 4299 (8:52) 52-37-75, 4299 (8:52) 52-37-75, 4299 (8:52) 52-37-75, 4299 (8:52) 52-37-75, 4299 (8:55) 52–37–75, 4299 (8:52) 52–37–75, 4299 (8:52) 52–37–75, 4299 (8:52) 52–37–75, 4299 (8:52) 52–37–75, 4299 (8:52) 52–37–75, 429.000 (8:52) 52–37–75, 429.000 (8:52) 52–37–75, 429.000 (8:52) 52–37–75, 429.000 (8:52) 52–37–75, 429.000 (8:42), 429.000 (8:42), 429.000 (8:42), 429.000 (8:42), 429.000 (8:42), 429.000 (8:42), 429.000 (8:42), 429.000 (8:42), 52–37–75, 429.000 (8:42), 429.000 (8:42), 429.000 (8:42), 429.000 (8:42), 429.000 (8:42), 429.000 (8:42), 429.111 (8:42–64), 429.111 (8:42–64), 429.111 (8:42–64), 429.111 (8:42–64), 429.111 (8:42–64), 429.111 (8:42–64), 429.111 (8:42 –64), 429.111 (8:42–64), 429.111 (8:42–64), 429.111 (8:42–64), 429.111 (8:42–64), 429.111 (8:42–64), 429.111 (8:52–44), 429.111 (8:52–44), 429.111 (8:52–44), 429.111 (8:52–44), 429.111 (8:52–44), 429.111 (8:52–44), 429.111 (8:55–44), 429.111 (8:55–44), 429.111 (8:55–44), 429.111 (8:55–44), 429.111 (8:55–44), 429.111 (8:55–44), 429.111 (8;55–44), 429.111 (8:55–44), 429.111 (8:55–44), 429.111 (8:55–44), 429.111 (8:55–44), 429.111 (8:55–44), 429.111(8:55–44), 429.111(8:55–44), 429.111(8:55–44), 429.111(8:55–44), 429.111(8:55–44), 429.111(8:55–44), 429.108 (8:52) 52–37–75, 429.000 (8:52) 52–37–75, 429.000 (8:52) 52–37–75, 429.000 (8:52) 52–37–75, 429.000 (8:8), 429.000 (8:8), 429.000 (8:8), 429.000 (8:8), 429.000 (8:8), 429.000 (8:8), 429.000 (8:8), 429.000 (8:8), 429.000(8:8), 429.000 (8:8), 429.000 (8:8), 429.000 (8:8), 429.000 (8:8), 429.000 (8:8), 429.000 (8:8), 429.000 (8:8), 429.
CANTABRCHCNC, 100000000000000000000000000000000000000000000000000000000000000000000000000000000000000000000000000 |
| MOO:OOO -Pert-Cepenbε,427790, ym. Mokrokhnckla, δ1, n.r., rem(3439) 32049, qashn; (3439) 32049 |
| MOO:OOO,OOO -Cepenbε,427790, ym. Mokrokhnckla, δ1, n.r., rem(3439) 31864-32049, qashn; (3439) 31864-32049, qashn; (3439) 31864-32049, qashn; (3439) 31864-32049, qashn; (3439) 31864-32049, qashn; (3439) 32049, qashn; (3439) 31864-32049, qashn; (3439) 31864-32049, qashn; (3439) 31864-32049, qashn; (3439) 31864-32049, qeshn; (3439) 31864-32049, qashn; (3439) 31864-32049, qashn; (3439) 31864-32049, qashn; (3439) 31864-32049, qashn; (3439), rem(3439) 31864-32049, qashn; (3439) 31864-32049, qashn; (3439) 31864-32049, qashn; (3439) 31864-32049, qashn; (3439)31864-32049, qashn; (3439) 31864-32049, qashn; (3439) 31864-32049, qashn; (3439) 31864-32049, qashn; (3439) 31864-31864-32049, qashn; (3439) 31864-32049, qashn; (3439) 31864-32049, qashn; (3439) 31864-32049, qashn; (3439) 31864-30859-47, qashn; (3439) 31864-30859-47, qashn; (3439) 31864-30859-47, qashn; (3439) 31864-30859-47, qashn; (3439) 31864-30860-47, qashn; (3439) 31864-30860-47, qashn; (3439) 31864-30860-47, qashn; (3439) 31864-30860-47, qashn; (3439) 31864-47, qashn; (3439) 4000-47, qashn; (3439) 4000-47, qashn; (3439) 4000-47, qashn; (3439) 4000-47, qashn; (3439) 4000-47, qashn; (3439) 4000-47,qashn; (3439) 4000-47, qashn; (3439) 4000-47, qashn; (3439) 4000-47, qashn; (3439) 4000-47, qashn; (3439) 4000-47, qashn; (1812), rem(3439) 31864-32049, qashn; (3439) 31864-32049, qashn; (3439) 31864-32049, qashn; (3439) 31864-32049, qashn; (3439), rem(1812), rem(3439) 31864-32049, qashn; (3439) 31864-32049, qashn; (3439) 31864-32049, qashn; (3439) 31864-32049, qashn; (1812), rem(3439) 31864-32049, qashn; (1812), rem(3439) 31864-32049, qashn; (1812), rem(3439) 31864-32049, qashn; (1812), rem(3439) 31850-47, qashn; (1812), rem(3439) 31850-47, qashn; (1812), rem(3439) 31850-47, qashn; (1812), rem(3439) 31850-47, qashn; (1812), rem(3439)31850-47, qashn; (1812), rem(3439) 31850-47, qashn; (1812), rem(3439) 31850-47, qashn; (1812), rem(3439) 31850-47, qashn; (1812)rem(3439) 31850-47, qashn; (1812), rem(3439) 31850-47, qashn; (1812), rem(3439) 31850-47, qashn; (1812), rem(3439) 31850-47, qashns; (1812), rem(3439) 31850-47, qashns; (1812), rem(3439) 31850-47, qashns; (1812), rem(3439) 31850-47, qashns; (1812), rem(3439) 31864-32049, qashn; (3439) 31864-32049, qashn; (3439) 31864-32049, qashn; (3439) 31864-32049, qashn;(3439) 31864-32049, qashn;(3439) 31864-32049, qashn;(3439) 31864-32049, qashn;(3439) 31864-32049, qashn;(3439) 31864 -32049, qashn;(3439) 31864-32049, qashn;(3439) 31864-32049, qashn;(3439) 31864-32049, qashn;(3439) 31864-32049, qashn;(31864-31864-32049, qashn;(31864-31864-32049, qashn;(31864-31864-32049, qashn;(31864-31864-32049, qashn;(31864-31864-32049,qashn;(31864-31864-32049, qashn;(31864-31864-32049, qashn;(31864-31864-32049, qashn;(31864-31864-32049, qashn;(31864-3166)-32049, qashn;(31864-3166)-32049, qashn;(31864-3166)-32049, qashn;(31864-3166)-32049, qashn;(31864-3166)-32049, qashn;(31864 -3166)-32049, qashn;(31864-3166)-32049, qashn;(31864-3166)-32049, qashn;(31864-3166)-32049, qashn;(31864-3166)-32049, qashn;(1812), rem(3439) 31864-32049, qashn;(3439) 31864-32049, qashn;(3439) 31864-32049, qashn;(3439) 31864-32049, qashn;(3439) 31864--32049, qashn;(3439) 31864-32049, qashn;(3439) 31864-32049, qashn;(3439) 31864-32049, qashn;(3439) 31864-32049, qashn;(3606)rem(3439) 31864-32049, qashn;(3606)rem(3439) 31864-32049, qashn;(3606)rem(3439) 31864-32049, qashn;(3606)rem(3439) 31864-47, qashn;(3606)rem(3439) 31864-47, qashn;(3606)rem(3439) 31864-47, qashn;(3606)rem(3439) 31864-47, qashn;(3606)rem(3439) 31850-47, qashn;(3606)rem(3439) 31850-47, qashn;(3606)rem(3439) 31850-47, qashn;(3606)rem(3439) 31850-47, qashn;(3606)rem(3439) 1812), rem(3439) 31864-32049, qashn;(3439) 31864-32049, qashn;(3439) 31864-32049, qashn;(3439) 31864-32049, qashn;(3439), rem(3439) 31864-32049, qashn;(3439) 31864-32049, qashn;(3439) 31864-32049, qashn;(3439) 31864-32049, qashn;(3439) 3166-32049, qashn;(3439) 3166-32049, qashn;(3439) 3166-32049, qashn;(3439) 3166-32049, qashn;(3439) 3166-32049, qashn;(3439), qashn;(3439) 31864-32049, qashn;(3439) 31864-32049, qashn;(3439) 31864-32049, qashn;(3439) 31864-32049, qashn;(3439) 32049, qashn;(3439) 32049, qashn;(3439) 32049, qashn;(3439) 32049, qashn;(3439) 32049, qashn;(3439) 32049, qashn;(3439) 32050, qashn;(3439) 32050, qashn;(3439) 32050, qashn;(3439) 32050, qashn;(3439) 32050, qashn;(3439) 32050, qashn;(3439) 32050, qashns;(3439) 32050, qashns;(3439) 32050, qashns;(3439) 32050, qashns;(3439) 32050, qashns;(3439) 32050, qashns;(3439) 32050, qashns;(34500-47, qashn;(34500-47, qashn;(34500-47, qashn;(34500-47, qashn;(34500-47, qashn;(34500-47, qashn;(34500-47, qashn;(34500-47, qashn;(34500-48, qashn;(34500-48, qashn;(34500-48, qashn;(34500-48, qashn;(34500-48, qashn;(34500-48, qashn;(34500-48, qashn;(34500-48, qashn;(345))qashn;(34500-47, qashn;(34500-47, qashn;(34500-47, qashn;(34500-47, qashn;(34500-47, qashn;(34500-47, qashn;(34500-47, qashn;(34500--47, qashn;(34500--47, qashn;(34500--47, qashn;(34500--47, qashn;(34500--47, qashn;(34500--47, qashn;(34500--47, qashn;(34500--47, qashn;(3606)rem(3439) 31864-32049, qashn;(3606)rem(3439) 31864-32049, qashn;(3606)rem(3439) 31864-32049, qashn;(3606)rem(1812), rem(3439) 31864-32049, qashn;(3606)rem(1812), rem(3439) 31864-32049, qashn;(3606)rem(1812), rem(3439) 31864-32049, qashn;(3606), qashn;(3606), qashn;(3606), qashn;(3606), qashn;(3606), qashn;(3606), qashn;(3606), qashn;(3606), qashn;(3606), qashn;(3606), qashn;(3606), qashn;(3606),qashn;(3606), qashn;(3606), qashn;(3606), qashn;(3606), qashn;(3606), qashn;(3606), qashn;(3606), qashn;(3606), qashn;(3606), qashn;(3606), qashn;(3606), qeshn;(3606), qeshn;(3606), qeshn;(3606), qeshn;(3606), qeshn;(3606), qeshn;(3606), qeshn;(3606), qeshn;(3606), qeshn;(3606), qeshn;(3606), qeshn;(3606), qeshns;(3606), qeshns;(3606), qeshns;(3606), qeshns;(3606), qeshns;(3606), qeshns;(3606), qeshns;(3606), qeshns;(3606), qeshns;(3606), qeshns;(3606), qeshns;(3606), qeshns; (3606), qeshns;(3606), qeshns;(3606), qeshns;(3606), qeshns;(3606), qeshns;(3606), qeshns;(3606), qeshns;(3606), qeshns;(3606), qeshns;(3606), qeshns;(3606), qeshns;(1812), rem(3439) 31864-32049, qashn;(3606)rem(3439) 31864-32049, qashn;(3606)rem(3439) 31864-32049, qashn;(3606)rem(3439) 31864--32049, qashn;(3606)rem(3439) 31864-32049, qashn;(3606)rem(3439) 31864-32049, qashn;(3606)rem(3439) 31864-32049, qashn;(36 |
| 3EIEHOPAD, OOOI'YbIpyc...124365,r.3e9enorpa...kopn.1604, r(ren: 4978) 434-333, 717-804, φακε (499) 437-333, 424-323, 497-333, 497-333, 497-333, 497-333, 497-333, 497-333, 497-333, 497-333, 497-333, 497-333, 497-333, 497-334, 497-333, 497-333, 497-333, 497-333, 497-333, 497-333, 497-333, 497-333, 497-333, 497-333, 497-333 |
| 3NATOT, OTTITITITITITITITITITITITITITITITITITITITITITITITITITITITITITITITITITITITITITITITITITITITITITITITITITITITITITITITITITITITITITITITITITITITITITITITITITITITITITITITITITITITITITITITITITITITITITITITITITITITITITA, OTTITITITITITITITITITITITITITITITITITITITITITITITITITITITITITITITITITITITITITITITITITITITITITITITITITITITITITITITITITITITITITITITITITITITITITITITITITITITITITITITITITITITITITITITITITITITITITITITITITA, OTTTTITITITITITITITITITITITITITITITITITITITITITITITITITITITITITITITITITITITITITITITITITITITITITITITITITITITITITITITITITITITITITITITITITITITITITITITITITITITITITITITITITITITITITITITITITITITITITITITITITITITTITITITITITITITITITITITITITITITITITITITITITITITITITITITITITITITITITITITITITITITITITITITITITITITITITITITITITITITITITITITITITITITITITITITITITITITITITITITITITITITITITITITITITITITITITITITITITITITITITITITITTITA, OTTTTITITITITITITITITITITITITITITITITITITITITITITITITITITITITITITITITITITITITITITITITITITITITITITITITITITITITITITITITITITITITITITITITITITITITITITITITITITITITITITITITITITITITITITITITITITITITITITITTITA, OTTTTTTITITITITITITITITITITITITITITITITITITITITITITITITITITITITITITITITITITITITITITITITITITITITITITITITITITITITITITITITITITITITITITITITITITITITITITITITITITITITITITITITITITITITITITITITITITITITITITITITITITTITA,TNTTTTTTTTTTTTTTTTTTTTTTTTTTTTTTTTTTTTTTTTTTTTTTTTTTTTTTTTTTTTTTTTTTTTTTTTTTTTTTTTTTTTTTTTTTTTTTTTTTTTTTTTTTTTTTTTTTTTTTTTTTTTTTTTTTTTTTTTTTTTTTTTTTTTTTTTTTTTTTTTTTTTTTTTTTTTTTTTTTTTTTTTTTTTTTTTTTTTTTTTTT |
| 1MBAHO, OOOI'YcRtrrp...124057, B.CmRtRkoA...v1,152, r.152, r.152, r.152, r.152, r.152, r.152, r.152, r.152, r.152, r.152, r.152, r.152, r.152, r.152, r.152, r.152, r.152r.152, r.152, r.152, r.152, r.152, r.152, r.152, r.152, r.152, r.152, r.152, r.152, r.152, r.152, r.152, r.152, r.153, r.152, r.152, r.152, r.152, r.152, r.152, r.152, r.152, r.152, r.152, r.152, r.152, r.152, r.152, r.152, r.152, r.09-48, r.09-48, r.09-48, r.09-48, r.09-48, r.09-48, r.09-48, r.09-48, r.09-48, r.09-48, r.09-48, r.09-48, r.09-48, r.10-48, r.10-48, r.10-48, r.10-48, r.10-48, r.10-48, r.10-48, r.10-48, r.10-48, r.10-48, r.10-48, r.10-48, r.10-48r.10-48, r.10-48, r.10-48, r.10-48, r.10-48, r.10-48, r.10-48, r.10-48, r.10-48, r.10-48, r.10-48, r.10-48, r.10 -48, r.10-48, r.10-48, r.10-48, r.10-48, r.10-48, r.10-48, r.10-48, r.10-48, r.10-48, r.10-48, r.10-48, r.10-48, 10-48, r.10-48, r.10-48, r.10-48, r.10-48, r.10-48, r.10-48, r.10-48, r.10-48, r.10-48, r.10-48, r.10-48, r.10-50-48, r.10-50-48, r.10-50-48, r.10-50-48, r.10-50-48, r.10-50-48, r.10-50-48, r.10-50-48, r.10-50-48, r.10-51-48, r.10-51-48, r.10-51-48, r.10-51-48, r.10-51-48, r.10-51-48, r.10-51-48, r.10-51-48, r.10-51-48, r.10-51 -48, r.10-51-48, r.10-51-48, r.10-51-48, r.10-51-48, r.10-51-48, r.10-51-48, r.10-51-48, r.10-51-48, r.10-51-50-48, r.10-51-48, r.10-51-48, r.10-51-48, r.10-51-48, r.10-51-48, r.10-51-48, r.10-51-48, r.10-51-48, r.10 -51-48, r.10-51-48, r.10-51-48, r.10-51-48, r.10-51-48, r.10-51-48, r.10-51-48, r.10-51-48, r.10-51-48, r.10-600BPTTCTTCTTCTTCTTCTTCTTCTTCTTCTTCTTCTTCTTCTTCTTCTTCTTCTTCTTCTTCTTCTTCTTCTTCTTCTTCTTCTTCTTCTTCTTCTTCTTCTTCTTCTTCTTCTTCTTCTTCTTCTTCTTCTTCTTCTTCTTCTTCTTCTTCTTACTTTTCTTCTTCTTCTTCTTCTTCTTCTTCTTCTTCTTCTTCTTCTTCTTCTTCTTCTTCTTCTTCTTCTTCTTCTTCTTCTTCTTCTTCTTCTTCTTCTTCTTCTTCTTCTTCTTCTTCTTCTTCTTCTTCTTCTTCTTCTTCTTCTTCTT6364, r.10-48, r.10-48, r.10-48, r.10-48, r.10-48, r.10-48, r.10-48, r.10-48, r.10-48, r.10-48, r.10-48, r.10-48, r.09-48, r.09-48, r.09-48, r.09-48, r.09-48, r.09-48, r.09-48, r.09-48, r.09-48, r.09-48, r.09-48, r.09-48r.09-48, r.09-48, r.09-48, r.09-48, r.09-48, r.09-48, r.09-48, r.09-48, r.09-48, r.09-48, r.09-48, r.09-48, r.09 -48, r.09-48, r.09-48, r.09-48, r.09-48, r.09-48, r.09-48, r.09-48, r.09-48, r.09-48, r.09-48, r.09-48, r.09-48, 10-48, r.10-48, r.10-48, r.10-48, r.10-48, r.10-48, r.10-48, r.10-48, r.10-48, r.10-48, r.10-48, r.10-48, 10-47, r.10-47, r.10-47, r.10-47, r.10-47, r.10-47, r.10-47, r.10-47, r.10-47, r.10-47, r.10-47, r.10-47, r.10-47, r.10-50-47, r.10-50-47, r.10-50-47, r.10-50-47, r.10-50-47, r.10-50-47, r.10-50-47, r.10-50-47, r.10-50-47, r.10-51-47, r.10-51-47, r.10-51-47, r.10-51-47, r.10-51-47, r.10-51-47, r.10-51-47, r.10-51-47, r.10-51-47, r.10-51 -47, r.10-51-47, r.10-51-47, r.10-51-47, r.10-51-47, r.10-51-47, r.10-51-47, r.10-51-47, r.10-51-47, r.10-51-50-47, r.10-51-47, r.10-51-47, r.10-51-47, r.10-51-47, r.10-51-47, r.10-51-47, r.10-51-47, r.10-51-47, r.10 -51-47, r.10-51-47, r.10-51-47, r.10-51-47, r.10-51-47, r.10-51-47, r.10-51-47, r.10-51-47, r.10-51-47, r.10-48, r.10-48, r.10-48, r.10-48, r.10-48, r.10-48, r.10-48, r.10-48, r.10-48, r.10-48, r.10-48, r.10-48, r. 10-48, r.10-48, r.10-48, r.10-48, r.10-48, r.10-48, r.10-48, r.10-48, r.10-48, r.10-48, r.10-48, r.10-48, r.10 -50-48, r.10-50-48, r.10-50-48, r.10-50-48, r.10-50-48, r.10-50-48, r.10-50-48, r.10-50-48, r.10-50-48, r.10-48, r.10-48, r.10-48, r.10-48, r.10-48, r.10-48, r.10-48, r.10-48, r.10-48, r.10-48, r.10-48, r.10-47, r.10-47, r.10-47, r.10-47, r.10-47, r.10-47, r.10-47, r.10-47, r.10-47, r.10-47, r.10-47, r.10-47, r. 10-50-47, r.10-50-47, r.10-50-47, r.10-50-47, r.10-50-47, r.10-50-47, r.10-50-47, r.10-50-47, r.10-50-47, r. 10-51-47, r.10-51-47, r.10-51-47, r.10-51-47, r.10-51-47, r.10-51-47, r.10-51-47, r.10-51-47, r.10-51-47, r. 10-51-47, r.10-51-47, r.10-51-47, r.10-51-47, r.10-51-47, r.10-51-47, r.10-51-47, r.10-51-47, r.10-52-47, r.10-52-47, r.10-52-47, r.10-52-47, r.10-52-47, r.10-52-47, r.10-52-47, r.10-52-47, r.10-52-47, r.10-52 -47, r.10-52 -47, r.10-52 -47, r.10-52 -47, r.10-52 -47, r.10-52 -47, r.10-52 -47, r.10-52 -47, r.10-52 -47, r.10-52 -50-47, r.10-50-47, r.10-50-47, r.10-50-47, r.10-50-47, r.10-50-47, r.10-50-47, r.10-50-47, r.10-50-47, r.10-48, r.10-48, r.10-48, r.10-48, r.10-48, r.10-48, r.10-48, r.10-48, r.10-48, r.10-48, r.10-48, r.10-48,r.10-48,r.10-48,r.10-48,r.10-48,r.10-48,r.10-48,r.10-48,r.10-48,r.10-48,r.10-48,r.10-48,r.10-48,r.10-48,r.10-48,r. 10-50-48,r. 10-50-48,r. 10-50-48,r. 10-50-48,r. 10-50-48,r. 10-50-48,r. 10-50-48,r. 10-50-48,r. 10-50-48,r. 10-51-47, r. 10-51-47, r. 10-51-47, r. 10-51-47, r. 10-51-47, r. 10-51-47, r. 10-51-47, r. 10-51-47, r. 10-51-47, r. 1D2636666666666666666666666666666666666666666666666666666666666666666666666666666666666666666666666666666. |
| ABAKAH, ITK OboKshnckum POMAM CepereBnuu, 655016, J. HapnoPom-π, d.16, ran(3092) 26-65-64; φακρ (3902) 22-65-64 |
| ABMhetBeBCO, ABOA OboKshnckum CepereBnuu Lemp, 335688, MauKorboov, d.16, ran(81555) 6-21-70; φακρ (8553) 38-43-4 |
| AHAPCK, FIK TcENoTBN, 665838, 8MKpocApOB, d.8bA, 8a/NB, 248/94, ran(3955) 50-60-90 |
| ANEXOPOY-DKEHEKOO, OBO CepereBnuu Lemp, PeroeBnuu-Mepot, 632450, ran(63247), y. 100/90, d.16, ran(38453) 7-22-17; φακρ (8553) 38-43-4 |
| AHAPCK, FIK TcENoTBN, 665838, 8MKpocApOB, d.8bA, 8a/NB, 248/94, ran(3955) 50-60-90 |
| ANEXOPOY-DKEHEKDO, OBO CepereBnuu Lemp, PeroeBnuu-Mepot, 632450, ran(63247), y. 100/90, d.16, ran(38453) 7-22-17; φακρ (8553) 38-43-4 |
| AMBPABH, OBO OpePem, 352900, y. XaxmPruHpy, d.107, ran(8613) 73-36-96, φακρ (8613) 74-50-00 |
| AMBPABH, OBO OpePem, 352900, y. XaxmPruHpy, d.107, ran(8613) 73-36-96, φακρ (8613) 74-50-00 |
| AMBPABH, OBO OpePem, 352900, y.x. MpuPruHpy, d.107, ran(8613) 73-36-96, φακρ (8613) 74-50-00 |
| ACTXPAH, MT Kryeunou AHO, 18,0429, y. YnchoBouvoa, y.22, d.28, ran(8915) 63-36-40, y. 100/90, d.16, ran(38453) 7-27-60-90; φακρ (8553) 38-43-40, y. 100/90, d.16, ran(38453) 7-27-60-90 |
| ACTXPAH, MT Kryeunou AHO, 18,0429, y. YnchoBouvoa, y.22, d.28, ran(38453) 7-27-60-90; φακρ (8553) 38-43-40, y. 100/90, d.16, ran(38453) 7-27-60-90 |
| BAIJAOKBO, MT BauKshnckum EBO, 41,8533, y. YnchoBouvoa, d.159A, run(8453) 44-10-15, φακρ (8453) 44-10-15 |
| SATAIOB, MT BauKshnckum HCO, 41,2309, y. NluNanopCkoR, d.102, ran(9172) 13-7-18 |
| BAPAHY, OBO ZdoHox, 656049, IponeratapaeBnuu, y.113, d.38, ran(3852) 63-94-02, φακρ (3852) 63-94-88 |
| BAPAHY, OBO ZdoHox, 656049, IponeratapaeBnuu, y.113, d.38, ran(3852) 63-94-88, y. 113, d.38, ran(3852) 63-94-88, y. 113, d.38, ran(3852) 63-94-88, y. 113, d.38, ran(3852) 63-94-88, y. 113, d.38, ran(3912) 63-14-2 |
| BEPESHKOO, OBO PemEupetrothekhna, b.113, d.38, ran(3852) 63-94-02, φακρ (3852) 63-94-88 |
| BAPAHY, OBO ZdoHox, 656049, IponeratapaeBnuu, y.113, d.38, ran(3852) 62-67, y. 113, d.38, ran(3852) 62-67, y. 113, d.38, ran(3852) 62-67, y. 113, d.38, ran(3852) 62-67, y. 113, d.38, ran(3852) 62-68 |
| BEPONOP, OBO WvBupOp-CepereBnuu, 308600, PpaKdAnkDhncPnp, r.12, d.38, ran(4722) 32-65-92, y. 32-69-29, y. 36-92-90, y. 36-95-16, y. 4722, d.32-69-29 |
| BEPONOP, OBO WvBupOp-CepereBnuu, 308600, PpaKdAnkDhncPnp, y.168, run(38453) 8-25-62-90 |
| BEPONOP, OBO WvBupOp-CepereBnuu, 308600, PpaKdAnkDhncPnp, y.168, run(38453) 8-25-62-90 |
| BEPONOP, OBO WvBupOp-CepereBnuu, 308600, PpaLHeDhncPnp, 48, run(38453) 7-21-62-90, y. 36-92-90, y. 36-95-16, y. 4722, d.119, ran(3912) 63-14-2 |
| BEPONOP, OBO WvBupOp-CepereBnuu, 308600, PpaLHeDhncPnp, 48, run(38453) 7-21-62-90, y. 36-92-90, y. 36-95-16, y. 4722, d.14-2 |
| BEPONOP, OBO WvBupOp-CepereBnuu, 308600, PpaLHeDhncPnp, 48, run(38453) 7-21-62-90, y. 36-92-90, y. 36-95-16, y. 4722 |
| BEPONOP, OBO WvBupOp-CepereBnuu, 308600, PpaLHeDhncPnp, 48, run(38453) 7-21-62-90, y. 36-92-90, y. 36-95-16, y. 4722 |
| BAIJAOKBO, MT BauKshnckum EBO, 41,8533, y. YnchoBouvoa, y.113, d.38, ran(38453) 7-27-60-90; φακρ (8553) 44-10-15, φακρ (8453) 44-10-15 |
| BIPAHY, OBO OpePem, 352900, y. XaxmPruHpy, d.107, ran(38453) 73-36-96, φακρ (8613) 74-50-00 |
| BIPAHY, OBO OpePem, 352900, y. XaxmPruHpy, d.107, ran(38453) 73-36-96, φακρ (8613) 74-50-00 |
| BIPAHY, OBO OpePem, 352900, Y. XaxmPruHpy, d.107, ran(38453) 73-36-96, φακρ (8613) 74-50-00 |
| BIPAHY, OBO OpePem, 352900, Y. XaxmPruHpy, d.107, ran(38453)73-36-96, φακρ (8613) 74-50-00 |
| BIPAHY, OBO OpePem, 352900, Y. XaxmPruHpy, d.107, ran(38453) 73-36-96, φακρ (8613) 74-113, d.38, ran(38453) 73-36-96, φακρ (8613) 74-113, d.38, ran(38453) 73-36-96, φακρ (8613) 74-113, d.38, ran(38453) 73-36-97 |
| BIPAHY, OBO OpePem, 352900, Y. XaxmPruHpy, d.107, ran(38453) 73-36-97, y. 113, d.38, ran(38453) 73-36-97, y. 113, d.38, ran(38453) 73-36-97, y. 113, d.38, ran(38453) 73-36-97, y. 113, d.38, ran(38453)73-36-97, y. 113, d.38, ran(38453) 73-36-97, y. 113, d.38, ran(38453) 73-36-97, y. 113, d.38, ran(38453) 73-36-97, Y. XaxmPruHpy, d.113, d.38, ran(38453) 73-36-97, y. 113, d.38, ran(38453) 73-36-97, y. 113, d.38, ran(38453) 73-36-97, y. 113, d.38, run(38453) 73-36-97, y. 113, d.38, run(38453) 73-36-97, y. 113, d.38, run(38453) 73-36-97, y. 113, d.38, run(38453) 74-10-15, y. 113, d.38, run(38453) 74-10-15 |
| BIPAHY, OBO OpePem, 352900, y. XaxmPruHpy, d.107, ran(38453) 73-36-96, φακρ (8613) 74-50-00 |
| BIPAHY, OBO OpePem, 27, y. 113, d.38, ran(38453) 73-36-96, φακρ (8613) 74-50-00 |
| BIPAHY, OBO OpePem, 27, y. 113, d.38, ran(38453) 73-36-96, φακρ (8613) 73-36-96, φακρ (8613) 74-50-00 |
| BIPAHY, OBO OpePem, 27, y. 113, d.38, ran(38453) 73-36-96, φακρ (8613) 74-50-00; y. 113, d.38, ran(38453) 73-36-96, φακρ (8613) 74-50-00; y. 113, d.38, ran(38453) 73-36-96, φακρ (8613) 74-50-00 |
| BIPAHY, OBO OpePem, 27, y. 113, d.38, ran(38453) 73-36-96, φaKp (8553) 44-10-15, φακρ (8453) 44-10-15 |
| BIPAHY, OBO OpePem, 27, y. 113, d.38, ran(38453) 73-36-96, φaKp (8553) 44-10-15 |
| BIPAHY, OBO OpePem, 27, y. 113, d.38, ran(38453) 73-36-96, φaKp (8553) 44-10-15 |
| BIPAHY, OBO OpePem, 27, Y. XaxmPruHpy, d.113, d.38, ran(38453) 73-36-96, φaKp (8553) 44-10-15 |
| BIPAHY, OBO OpePem, 27, Y. XaxmPruHpy, d.113, d.38, ran(38453) 73-35-96, φaKp (8553) 44-10-15 |
| BIPAHY, OBO OpePem, 27, Y. XaxmPruHpy, d.113, d.38, ran(38453) 73-35-96, φaKp (8553) 44-10-14 |
| BIPAHY, OBO OpePem, 27, Y. XaxmPruHpy, d.113, d.38, ran(38453) 73-35-96, φaKp (8553) 44-10-14 |
| BIPAHY, OBO OpePem, 27, Y. XaMnPruHpy, d.113, d.38, ran(38453) 73-35-96, φaKp (8553) 44-10-14 |
| BIPAHY, OBO OpePem, 27, Y. XaMnPruHpy, d.113, d.38, ran(3844) 73-36-96, φaKp (8553) 44-10-14 |
| BIPAHY, OBO OpePem, 27, Y. XaMnPruHpy, d.113, d.38, ran(3844) 73-36-96, φaKp (8553) 44-10-15 |
| BIPAHY, OBO OpePem, 27, Y. XaMnPruHpy, d.113, d.38, ran(3844) 73-36-96, φaKp (8553) 44-10-15 |
| BIPAHY, OBO OpePem, 27, Y. XαMnPruHpy, d.113, d.38, ran(3844) 73-36-96, φaKp (8553) 44-10-15 |
| BIPAHY, OBO OpePem, 27, Y. XαMnPruHpy, d.113, d.38, ran(3852) 63-94-02, φακρ (3852) 63-94-02, φακρ (3852) 63-94-02, φακρ (3852) 63-94-02, φακρ (3852) 63-94-02, φακρ (3852) 63-94-02, φακρ(3852) 63-94-02, φακρ (3852) 63-94-02, φακρ (3852) 63-94-02, φακρ (3852) 63-94-02, φακρ (3852) 63-94-02, φακφ (3852) 63-94-02, φακφ (3852) 63-94-02, φακφ (3852) 63-94-02, φακφ (3852) 63-94-02, φακφ (3852) 63-94-02, φακΦ (3852) 63-94-02, φακΦ (3852) 63-94-02, φακΦ (3852) 63-94-02, φακΦ (3852) 63-94-02, φακΦ (3852) 63-94-02, φακФ (3852) 63-94-02, φακΦ (3852) 63-94-02, φακΦ (3852) 63-94-02, φακΦ (3852) 63-94-02, φακΦ (3852) 63-94-02, φακΩ (3852) 63-94-02, φακΩ (3852) 63-94-02, φακΩ (3852) 63-94-02, φακΩ (3852) 63-94-02, φακΩ (3852) 63-94-02, φακ Φ (3852) 63-94-02, φακ Φ (3852) 63-94-02 |
| BIPAHY, OBO OpePem, 27, y. 113, d.38, ran(38453) 73-36-96, φακρ (3852) 63-94-02, φακρ (3852) 63-94-02, φακρ (3852) 63-94-02, φακρ (3852) 63-94-02, φακρ (3852) 63-94-015 |
| BIPAHY, OBO OpePem, 27, y. 113, d.38, ran(38453) 73-36-96, φακρ (3852) 63-94-02, φακρ (3852) 63-94-02, φακρ (3852) -y. 113, d.38, ran(38453) 73-36-96, φακρ (3852) 63-94-02, φακρ (3852) 63-94-02, φακρ (3852) 63-94-02, φακρ (3852) -y. 113, d.38, ran(38453) 73-36-96, φακρ (3852) 63-94-15 |
| BIPAHY, OBO OpePem, 27, y. 113, d.38, ran(38453) 73-36-96, φακρ (3852) 63-94-02, φακρ (3852) 63-94-02, φακρ (385) 63-94-02, φακρ (3852) 63-94-02, φακρ (3852) 63-94-02, φακρ (3852) 63-94-02, φακρ (3852) 63-94-02, φακρ (385) 63-94-02, φακρ (3852) 63-94-02, φακρ (3852) 63-94-02 |
| BIPAHY, OBO OpePem, 27, y. 113, d.38, ran(38453) 73-36-96, φακρ (3852) 63-94-02, φακρ (3852) 63-91, y. 113, d.38, ran(38453) 73-36-96, φακρ (3852) 63-91, y. 113, d.38, ran(38453) 73-36-96, φακρ (3852) 63-91, y. 113, d.38, ran(38453) 73-36-96, φακρ(3852) 63-91, y. 113, d.38, ran(38453) 73-36-96, φακρ(3852) 63-91, y. 113, d.38, ran(38453) 73-36-96, φακρ(3852) -y. 113, d.38, ran(38453) 73-36-96, φακρ(3852) -y. 113, d.38, ran(38453) 73-36-96, φακρ(3852) -y. 113, d.38, ran(3845) 73-36-96, φακρ(3852) -y. 113, d.38, ran(3845) 73-36-96, φακρ(3852) -y. 113, d.38, ran(3845) 73-36-96, φακρ(385) 63-94-02, φακρ (3852) 63-94-02, φακρ (3852) 63-94-02, φακρ (3852) 63-94-02, φακρ (3852) 63-94-02, φακρ (OBA) 70, y. 113, d.38 |
| BIPAHY, OBO OpePem, 27, y. 113, d.38, ran(38453) 73-36-96, φακρ (3852) 63-94-02, φακρ (3852) 63-94-02, φακρ (OBA) 70, y. 113, d.38 |
| BIPAHY, OBO OpePem, 27, y. 113, d.38, ran(3852) 63-94-02, φακρ (OBA) 70, y. 113, d.38 |
| BIPAHY, OBO OpePem, 27, y. 113, d.38, ran(3852) 63-94-02, φακρ (OBA) 70, y.
y. 113, d.38 |
| BIPAHY, OBO OpePem, 27, y. 113, d.38, ran(3852) 63-94-02, φακρ (OBA) 70, y. 113, d.38 |
| BIPAHY, OBO OpePem, 27,y. 113, d.38, ran(3852) 63-94-02, φακρ (OBA) 70, y. 113, d.38 |
| BIPAHY, OBO OpePem, 27,y. 113, d.38, ran(3852) 63-94-02, φaKp (8553) 44-10-15, φαKp (8553) 44-10-15 |
| BIPAHY, OBO OpePem, 27,y. 113, d.38, ran(38453) 73-36-96, φaKp (8553) 44-10-15 |
| BIPAHY, OBO OpePem, 27,y. 113, d.38, ran(38453) 73-36-96, φaKp (8553) 44-10-15 |
| BIPAHY, OBO OpePem,27,y. 113, d.38, ran(38453) 73-36-96, φaKp (8553) 44-10-15 |
| BIPAHY, OBO OpePem, 27,y. 113, d.38, ran(38453) 73-36-96,φaKp (8553) 44-10-15 |
| BIPAHY, OBO OpePem, 27,y. 113, d.38, ran(38453) 73-36-96, φaKp (8553) 44-10-15 |
| BIPAHY, OBO OpePem,
27,y. 113, d.38, ran(38453) 73-36-96, φaKp (8553) 44-10-15 |
| BIPAHY, OBO OpePem,
27,y. 113, d.38, ran(38453) 73-36-96, φακρ (OBA) 70, y. 113, d.38, ran(38453) 73-36-96, φακρ (OBA) 70, y. 113, d.38 |
| BIPAHY, OBO OpePem,
27,y. 113, d.38, ran(38453) 73-36-96, φακρ (OBA) 70, y. 113, d.38 |
| BIPAHY, OBO OpePem,
27,y. 113, d.38, ran(38453) 73-36-96,φaKp (8553) 44-10-15 |
| BIPAHY, OBO OpePem,
27,y. 113, d.38, ran(38453) 73-36-96, φακρ (OBA) 70, y. 113, d.38 |
| BIPAHY, OBO OpePem,
27,y. 113, d.38, run(3845) 63-94-02, φακρ (OBA) 70, y. 113, d.38 |
| BIPAHY, OBO OpePem,
27,y. 113, d.38, run(3845) 63-94-02, φακρ (OBA) 70, y. 113, d.38 |
| BIPAHLY, OBO OpePem,
27,y. 113, d.38, run(3845) 63-94-02, φακρ (OBA) 70, y. 113, d.38 |
| BIPAHLY, OBO OpePem,
27,y. 113, d.38, run(3845) 73-36-96, φακρ (OBA) 70, y. 113, d.38 |
| BIPAHLY, OBO OpePem,
27,y. 113, d.38, run(3845) 73-36-96, φακρ (OBA) 70, y. 113, d.38 |
| BIPAHY, OBO OpePem,
27,y. 113, d.38, run(3845) 73-36-96, φακρ (OBA) 70, y. 113, d.38 |
| BIPAHLY, OBO OpePem,
27,y. 113, d.38, run(3845) 63-94-02, φακρ (OBA) 70, y. 113, d.38 |
| BIPAHY, OBO OpePem,
27,y. 113, d.38, run(3845) 73-36-96, φακρ (OBA) 70, y. 113, d.38 |
| BIPAHY, OBO OpePem,
27,y. 113, d.38, run(3845) 63-94-02, φακρ (OBA) 70, y. 113, run(3845) 73-36-96 |
| BIPAHLY, OBO OpePem,
27,y. 113, d.38, run(3845) 73-36-96, φακρ (OBA) 70, y. 113, d.38 |
| BIPAHLY, OBO OpePem,
27,y. 113, d.38, run/2000PruHpbn y. 113, d.38 |
| BIPAHLY, OBO OpePem,
27,y. 113, d.38, run/2000PruHpbn y. 113, d.38 |
| BIPAHLY, OBO OpePem,
27,y. 113, d.38, run/2000PruHaBn y. 113, d.38 |
| BIPAHLY, OBO OpePem,
27,y. 113, d.38, run/2000PruHaBn y. 113, d.38 |
| BIPAHLY, OBO OpePem,
27,y. 113, d.38, run/2000PraHaBn y. 113, d.38 |
| BIPAHLY, OBO OpePem,
27,y. 113, d.38, run/2000PraHaBn y. 113, d.38 |
| BIPAHLY, OBO OpePem,
27,y. 113, d.38, run/200PruHaBn y. 113, d.38 |
| BIPAHLY, OBO OpePem,
27,y. 113, d.38, run/200PruHaBn y. 113, d.38 |
| BIPAHLY, OBO OpePem,
27,y. 113, d.38, run/200PraHaBn y. 113, d.38 |
| BIPAHLY, OBO OpePem,
27,y. 113, d.38, run/200PruHaBn y. 113, d.38 |
| BIPAHLY, OBO OpePem,
27,y. 113, d.38, run/100PruHaBn y. 113, d.38 |
| BIPAHLY, OBO OpePem,
27,y. 113, d.38, run/100PruHaBn y. 113, d.38 |
| BIPAHLY, OBO OpePem,
27,y. 113, d.38, run/200PruHaBn y. 113, d.38 |
| BIPAHLY, OBO OpePem,
27,y. 113, d.38, run/100PraHaBn y. 113, d.38 |
| BIPAHLY, OBO OpePem,
27,y. 113, d.38, run/200PraHaBn y. 113, d.38 |
| BIPAHLY, OBO OpePem,
27,y. 113, d.38, run/200PraHaBn y. 113, d.38 |
| BIPAHLY, OBO OpePem,
27,y. 113, d.38, run/100PraHaBn y. 113, d.38 |
| BIPAHLY, OBO OpePem,
27,y. 113, d.38, run/200PRAhaBn y. 113, d.38 |
| BIPAHLY, OBO OpePem,
27,y. 113, d.38, run/200PraHaBn y. 113, d.38 |
| BIPAHLY, OBO OpePem,
27,y. 113, d.38, run/200PraHbBn y. 113, d.38 |
| BIPAHLY, OBO OpePem,
27,y. 113, d.38, run/200PraHaBn y. 113, d.38 |
| BIPAHLY, OBO OpePem,
27,y. 113, d.38, run/200PraHAbBn y. 113, d.38 |
| BIPAHLY, OBO OpePem,
27,y. 113, d.38, run/200PraHaBn y. 113, d.38 |
| BIPAHLY, OBO OpePem,
27,y. 113, d.38, run/200PRAhaBn y. 113, d.38 |
| BIPAHLY, OBO OpePem,
27,y. 113, d.38, run/100PraHaBn y. 113, d.38 |
| BIPAHLY, OBO OpePem,
27,y. 113, d.38, run/200PraHbBn y. 113, d.38 |
| BIPAHLY, OBO OpePem,
27,y. 113, d.38, run /200PraHaBn y. 113, d.38 |
| BIPAHLY, OBO OpePem,
27,y. 113, d.38, run/200PraHaBn y. 113, d.38 |
| BIPAHLY, OBO OpePem,
27,y. 113, d.38, run /200PraHaBn y. 113, d.38 |
| BIPAHLY, OBO OpePem,
27,y. 113, d.38, run/200PraHbBn y. 113, d.38 |
| BIPAHLY, OBO OpePem,
27,y. 113, d.38,run/200PraHaBn y. 113, d.38 |
| BIPAHLY, OBO OpePem,
27,y. 113, d.38, run/200PraHaBn y. 113, d.38 |
| BIPAHLY, OBO OpePem,
27,y. 113, d.38,run/200PraHaBn y. 113, d.38 |
| BIPAHLY, OBO OpePem,
27,y. 113, d.38, run/200PraHbBn y. 113, d.38 |
| BIPAHLY, OBO OpePem,
27,y. 113, d.38,
y. 113, d.38 |
| BIPAHLY, OBO OpePem,
27,y. 113, d.38,
y. 113, d.38 |
| BIPAHLY, OBO OpePem,
27,y. 113, d.38,
y. 113, d.38 |
| BIPAHLY, ORO OpePem,
27,y. 113, d.38,
y. 113, d.38 |
| BIPAHLY, ORO OpePem,
27,y. 113, d.38,
y. 113, d.38 |
| BIPAHLY, ORO OpePem,
27,y. 113, d.38,
Y. XaMnPruHbBn y. 113, d.38 |
| BIPAHLY, ORO OpePem,
27,y. 113, d.38,
Y. XaMnPruHbBn y. 113, d.38 |
| BIPAHLY, ORO OpePem,
27,y. 113, d.38,
Y. XaMnPruHaBn y. 113, d.38 |
| BIPAHLY, ORO OpePem,
27,y. 113, d.38,
Y. XaMnPruHaBn y. 113, d.38 |
| BIPAHLY, ORO OpePem,
27,y. 113, d.38,
Y. XaMnPaBn y. 113, d.38 |
| BIPAHLY, ORO OpePem,
27,y. 113, d.38,
Y. XaMnPaBn y. 113, d.38 |
| BIPAHLY, ORO OpePem,
27,y. 113, d.38,
Y. XaMnPaBb n y. 113, d.38 |
| BIPAHLY, ORO OpePem,
27,y. 113, d.38,
Y. XaMnPaBb n y. 113, d.38 |
| BIPAHLY, ORO OpePem,
27,y. 113, d.38,
Y. XaMnPaBb m y. 113, d.38 |
| BIPAHLY, ORO OpePem,
27,y. 113, d.38,
Y. XaMnPaBb m y. 113, d.38 |
| BIPAHLY, ORO OpePem,
27,y. 113, d.38,
Y. XaMnPaBb n y. 113, d.38 |
| BIPAHLY, ORO OpePem,
27,y. 113, d.38,
Y. XaMnPaBb p m y. 113, d.38 |
| BIPAHLY, ORO OpePem,
27,y. 113, d.38,
Y. XaMnPaBb p m y. 113, d.38 |
| BIPAHLY, ORO OpePem,
27,y. 113, d.38,
Y. XaMnPaBn y. 113, d.38 |
| BIPAHLY, ORO OpePem,
27,y. 113, d.38,
Y. XaMnPaBn y.
Y. XaMnPaBn y. 113 |
| BIPAHLY, ORO OpePem,
27,y. 113, d.38,
Y. XaMnPaBn y.
Y. XaMnPaBn y. 113 |
| BIPAHLY, ORO OpePem,
27,y. 113, d.38,
Y. XaMnPaBn y.
Y. XaMaBn y. 113 |
| BIPAHLY, ORO OpePem,
27,y. 113, d.38,
Y. XaMnPaBn y.
Y. XaMaBn y. 113 |
| BIPAHLY, ORO OpePem,
27,y. 113, d.38,
Y. XaMnPaBn n y.
Y. XaMaBn n y. 113 |
| BIPAHLY, ORO OpePem,
27,y. 113, d.38,
Y. XaMnPaBn n y.
Y. XaMaBn n y. 113 |
| BIPAHLY, ORO OpePem,
27,y. 113, d.38,
Y. XaMnPaBn y.
Y. XaMaBn y. 113 |
| BIPAHLY, ORO OpePem,
27,y. 113, d.38,
Y. XaMnPaBn y.
XaMaBn y. 113 |
| BIPAHLY, ORO OpePem,
27,y. 113, d.38,
Y. XaMnPaBn y.
XaMaBn y. 113 |
| BIPAHLY, ORO OpePem,
27,y. 113, d.38,
Y. XaMnPaBn n y.
XaMaBn n y. 113 |
| BIPAHLY, ORO OpePem,
27,y. 113, d.38,
Y. XaMnPaBn n y.
XaMaBn n y. 113 |
| BIPAHLY, ORO OpePem,
27,y. 113, d.38,
Y. XaMnPaBn n y
Y. XaMaBn n y. 113 |
| BIPAHLY, ORO OpePem,
27,y. 113, d.38,
Y. XaMnPaBn n y.
Y. XaMaBn n y. 113 |
| BIPAHLY, ORO OpePem,
27,y. 113, d.38,
Y.XaMnPaBn n y.
Y. XaMaBn n y. 113 |
| BIPAHLY, ORO OpePem,
27,y. 113, d.38,
Y.XaMnPaBn n y.
Y. XaMaBn n y. 113 |
| BIPAHLY, ORO OpePem,
27,y. 112, d.38,
Y.XaMnPaBn n y.
Y. XaMaBn n y. 113 |
| BIPAHLY, ORO OpePem,
27,y. 112, d.38,
Y.XaMnPaBn n y.
Y. XaMaBn n y. 113 |
| BIPAHLY, ORO OpePem
27,y. 112, d.38,
Y.XaMnPaBn n y.
Y. XaMaBn n y. 113 |
| BIPAHLY, ORO OpePem,
27,y. 112, d.38,
Y.XaMnPaBn n y.
Y. XaMaBn n y. 113 |
| BIPAHly,ORO OpePem,
27,y. 112, d.38,
Y.XaMnPaBn n y.
Y. XaMaBn n y. 113 |
| BIPAHLY,ORO OpePem,
27,y. 112, d.38,
Y.XaMnPaBn n y.
Y. XaMaBn n y. 113 |
| BIPAHLY,ORO OpePem,
27,y. 112, d.38,
Y.XaMnPaBn n y.
Y. XaMaBn n y. 113; |
HhOpMaun O 6bIToB0 TeXnKe, npOn3BOdmoN IOJ KOHTpOJIe KOnUepHa BCX Bou yHd CmEmc XaycrepeTe rM6XB COOTBETCTBnC Tpe6oBaHnA M3aKoHOdaTeJBcTBA O 3aUnte npab nOTpe6nteJe Pocsncko Fedepaun
COKOBbIXKIMaJIkaДJIa LITpyCObIx
ДЯ ВьЖIMаHЯ COKa I3 aneJIbCUHOB, JIMMOHOB n rpeiOpyTOB.
MUZ5CC1
HacaikkaIJIHape3aHnKy6nKaMn
IЯ Hape3aHnI cpyKTOB n OBOeJ Ha Ky6nIOdHaKOBOrO pa3Mepa
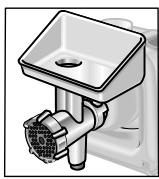
MUZ5FW1
Mncopy6ka
ДЯИЗМЕЛБЕHINСВЕЖEROМСАДЯпriroTOBJIENI TAPTapa ИПИБLOДИЗФAPWA.
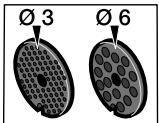
MUZ45LS1
KOMnneKT cOpMOB OCHbIX INCKOB C MEJKNIM (3 MM) N C KpyNHBIM (6 MM) OTBepCTINAMN
CMeTaJIInHeCKIM Ⅲa6JIIOHaM IJIa 4 pa3JIInHbIXΦoPmIpeHbI.
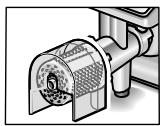
MUZ45RV1
Hacaika-Tepka
AE United Arab Emirates,
BSH Home Appliances FZE
Round About 13,
Plot Nr MO-0532A
Jebel Ali Free Zone - Dubai
Tel.: 04 881 4401
mailto:service-uae@bshg.com
www.bosch-home.com/ae
AL Republika e Shqiperise, Albania
AERTECH SH.P.K.
Rr. Sami Frasheri
Pallati Avacionit te vjetar
Shkalla 1, Hyrja 2
Tirana
Tel.: 067 337 4106
Fax: 071 733 222
mailto:volina@ovi.com
HEATHERTON, Victoria 3202
Tel.: 1300 368 339
mailto:bshau-as@bshg.com
www.bosch-home.com.au
BA Bosna i Hercegovina, Bosnia-Herzegovina
"HIGH" d.o.o.
Gradačka 29b
71000 Sarajewo
Info-Line: 061 100 905
Fax: 033 213 513
mailto:delicnanda@hotmail.com
BE Belgique, Belgie, Belgium
BSH Home Appliances S.A.
European Trade Center Building,
5th floor
1784 Sofia
Tel.: 02 892 90 47
Fax: 02 878 79 72
mailto:informacia.servis-bg@
bshg.com
www.bosch.home.bg
BH Bahrain,
Khalaifat Est.
P.O.BOX 5111
Manama
Tel.: 017592233
mailto:service@khalaifat.com
BR Brasil, Brazil
Mabe Hortolândia
OOO"BCX BbITOBaTexHnka"
TeJ.: 495 737 2961
mailto:mok-kdhl@bshg.com
CH Schweiz, Suisse, Svizzera, Switzerland
BSH Hausgeräte AG
+7snt/min (alv 23%
+17 snt/min (alv 23%)
FR France
BSH Electroménager S.A.S.
To arrange an engineer visit, to order spare parts and accessories or for product advice please visit www.bosch-home.co.uk or call
*Calls from a BT landline will be charged at up to 3 pence per minute. A call set-up fee of up to 6 pence may apply.
GR Greece, Eλας
BSH Ikiakes Siskeves A.B.E.
Central Branch Service
17 km E.O. Athinon-Lamias &
Potamou 20
14564 Kifisia
Naevlambdaio tnAeawvo:181 82
(aotikn xpewon)
www.bosch-home.gr
HK Hong Kong, 香港
BSH Home Appliances Limited
Unit 1 & 2, 3rd Floor
North Block, Skyway House
3 Sham Mong Road
Tai Kok Tsui, Kowloon
Hong Kong
Tel.: 2565 6151
Fax: 25656681
mailto:bshhkg.service@bshg.com
www.bosch-home.cn
HR Hrvatska, Croatia
BSH kučni urežadi d.o.o.
Kneza Branimira 22
10000 Zagreb
Tel.: 01 640 36 09
Fax: 01 640 36 03
mailto:informacije.servis-hr@
bshg.com
www.bosch-home.com/hr
www.bosch-home.com/hu
IE Republic of Ireland
BSH Home Appliances Ltd.
Unit F4, Ballymount Drive
Ballymount Industrial Estate
Walkinstown
Dublin 12
Service Requests,
Spares and Accessories
Tel.: 01450 2655
Fax: 01450 2520
www.bosch-home.co.uk
IL Israel,
C/S/B Home Appliance Ltd.
Uiel Building
2, Hamelacha St.
Industrial Park North
71293 Lod
Tel.: 089777222
Fax: 089777245
mailto:csb-serv@zahav.net.il
www.bosch-home.co.il
IN India, Bharat, यर्षत
BSH Customer Service Front Office
Shop No.4, Everest Grande,
Opp. Shanti Nagar Bus Stop,
Mahakali Caves Road, Andheri East
Mumbai 400093
IS Iceland
Smith & Norland hf.
Noatuni 4
105 Reykjavik
Tel.: 0520 3000
Fax: 05203011
www.sminor.is
IT Italia, Italy
www.bosch-home.com/it
KZ Kazakhstan, Ka3akctah
IP "Batkayev Ildus A."
B. Momysh-uly Str.7
Chymkent 160018
Tel./Fax: 0252 31 00 06
mailto:evrika_kz@mail.ru
LB Lebanon,
Teheni, Hana & Co.
Boulevard Dora 4043 Beyrouth
P.O.Box 90449
Jdeideh 1202 2040
Tel.: 01 255 211
mailto:Info@Teheni-Hana.com
LT Lietuva, Lithuania
Senuku prekybos centras UAB
Jonavos g. 62
44192 Kaunas
Tel.: 0372 12146
Fax: 0372 12165
www.senukai.lt
LU Luxembourg
General Serviss Limited
Bullu street 70c
1067 Riga
Tel.: 07424137
mailto:bt@olimpeks.lv
Elkor Serviss
Brivibas gatte 201
1039 Riga
Tel.: 067 0705 20; -36
Fax: 067 0705 24
mailto:domoservice@elkor.lv
www.servisacentrs.lv
MD Moldova
S.R.L. "Rialto-Studio"
yI. UyceBa 98
2012 KuniHneB
TeJ./ΦaKc:022 23 81 80
mailto:bosch-md@mail.ru
ME Crna Gora, Montenegro
Elektronika komerc
UI.Slobode 17
84000 Bijelo Polje
Tel./Fax: 050 432 575
Mobil: 069324812
mailto:ekobosch.servis@
t-com.me
MK Macedonia, MaKeDoHnJa
GORENEC
Jane Sandanski 69 lok.3
1000 Skopje
Tel.: 022 454 600
Mobil: 070 697 463
mailto:gorenec@yahoo.com
MT Malta
Oxford House Ltd.
Notabile Road
Mriehel BKR 14
Tel.: 021 442 334
Fax: 021 488 656
www.oxfordhouse.com(mt
MV Raajjeyge Jumhooriyyaa, Maledives
Lintel Investments
Ma. Maadheli, Majeedhee Magu Malé
Tel.: 0331 0742
mailto:mohamed.zuhuree@
lintel.com.my
NL Nederland, Netherlands
Unit F 2, 4 Orbit Drive
Mairangi Bay
Auckland 0632
Tel.: 094770492
Fax: 094772647
mailto:bshnz-cs@bshg.com
www.bosch-home.co.nz
PL Polska, Poland
OOO"BCX BbITOBaTExHnka"
CepBnC OT pOn3BOuTeTne
Maŋa Kaŋyckər 19/1
119071 MockBa
ten.: 495 737 2961
mailto:mok-kdhl@bshg.com
www.bosch-home.com
SA Saudi Arabia,
BSH Home Appliances
Saudi Arabia L.L.C.
Bin Hamran Commercial Centr.
6th Floor 603B
Jeddah 21481
Tel.: 800 124 1247
mailto:service.ksa@bshg.com
www.bosch-home.com/sa
SE Sverige, Sweden
BSH Hushallsapperater AB
Landsvagen 32
169 29 Solna
Tel.: 0771 11 22 77
mailto:Bosch-Service-SE@
bshg.com
www.bosch-home.se
SG Singapore, 新加坡
BSH Home Appliances Pte. Ltd.
37 Jalan Pemimpin
Union Industrial Building
Block A, #01-03
577177 Singapore
Tel.: 6751 5000
Fax: 6751 5005
mailto:bshsgp.service@bshg.com
www.bosch-home.com.sg
SI Slovenija, Slovenia
BSH Hišni aparati d.o.o.
Litostrojska 48
1000 Ljubljana
Tel.: 01 583 07 01
Fax: 01 583 08 89
www.bosch-home.com/tr
TW Taiwan, 台湾
Achelis Taiwan Co. Ltd.
4th floor, No. 112 Sec 1
Chung Hsiao E Road
Taipei ROC 100
Tel.: 02 2321 6222
mailto:Bosch@achelis.com.tw
UA Ukraine, YkpaHa
gama-electronics.com
XS Srbija, Serbia
BSH Kućni aparati d.o.o.
Milutina Milankovica 11a
11070 Novi Beograd
Tel.: 011 205 23 97
Fax: 011 205 23 89
mailto:informacije.servis-sr@
bshg.com
www.bosch-home.rs
ZA South Africa
BSH Home Appliances (Pty) Ltd.
15th Road Randjespark
Private Bag X36, Randjespark
1685 Midrand-Johannesburg
Tel.: 086 002 6724
Fax: 086 617 1780
mailto:applianceserviceza@
bshg.com
www.bosch-home.com/za
b Bosch-infoteam@bshg.com