Power Matic-ccino 8000 Touch - Coffee machine CECOTEC - Free user manual and instructions
Find the device manual for free Power Matic-ccino 8000 Touch CECOTEC in PDF.


User questions about Power Matic-ccino 8000 Touch CECOTEC
0 question about this device. Answer the ones you know or ask your own.
Ask a new question about this device
Download the instructions for your Coffee machine in PDF format for free! Find your manual Power Matic-ccino 8000 Touch - CECOTEC and take your electronic device back in hand. On this page are published all the documents necessary for the use of your device. Power Matic-ccino 8000 Touch by CECOTEC.
USER MANUAL Power Matic-ccino 8000 Touch CECOTEC
natural_image
Exterior view of a Cumbia coffee machine with two coffee cups, one open and one closed, against a dark background (no text or symbols visible on the devices themselves)Safety instructions 7
-
Parts and components 42
-
Before use 43
-
Operation 43
-
Warning signals 48
-
Cleaning and maintenance 48
-
Technical specifications 52
-
Disposal of old electrical appliances 52
-
Technical support and warranty 52
-
Copyright 53
SOMMAIRE
Read these instructions thoroughly before using the product. Keep this instruction manual for future reference or new users.
- Make sure that the mains voltage matches the voltage stated on the rating label of the appliance and that the wall outlet is grounded.
- This product is designed for household use only.
- Place the machine on a safe, flat, stable surface, near to a grounded socket.
- Use the device only for the purposes described in this instruction manual, any other use is not recommended by the manufacturer and could have a detrimental effect on the lifespan of the appliance and/or the safety of the user.
- Incorrect or improper use can be dangerous for both the device and the user.
- Do not immerse the cord, plug or any part of the appliance in water or any other liquid, nor expose electrical connections to water. Make sure your hands are completely dry before handling the plug or switching on the appliance.
- When filling the water tank, be careful to avoid spillage, especially on the pipe and electrical parts of the appliance.
- Check the power cord regularly for visible damage. If the cord is damaged, it must be replaced by the official Technical Support Service of Cecotec in order to avoid any type of danger.
- Do not twist, bend, pull or damage the power cord. Protect it from sharp edges and heat sources. Do not allow it to touch hot surfaces. Do not let the cord hang over the edge of the working surface or worktop.
- Do not allow water to come into contact with any of the electrical parts of the machine.
- Do not use outdoors, near a gas or electric hob, in heated
ovens or near open flames.
- Do not expose the machine to extreme temperatures.
- The use of accessories not recommended by Cecotec may result in fire, electric shock or injury to persons.
- Never use hot water to fill the tank, use always fresh water at room temperature.
- Keep your hands and the cord away from the appliance's hot parts during operation.
- Do not use the cord to carry or pull the coffee maker.
- Do not use caramelised or flavoured coffee beans.
- Do not direct hot steam or hot water towards yourself or others in order to avoid burns.
- Do not remove the drip tray during operation, as hot water may cause damage to the machine, and place an empty cup under the coffee spout when the machine is turned on or off.
- Do not operate the machine empty. Make sure there is enough water before each use.
- In case of malfunction or accident, remove the power cord from the wall socket and wait for the machine to cool down before handling it.
- Do not use caramelised or frozen coffee beans. This machine cannot operate with other than fresh coffee beans or ground coffee.
- The use of accessories not recommended by Cecotec may result in fire, electric shock or injury to persons.
- Do not try to repair the device by yourself.
- Turn off and unplug the device from the power socket while not in use and before cleaning. Allow it to cool down before assembling or disassembling it and before carrying out maintenance tasks.
- The surface of the heating element is exposed to residual heat after use.
- The appliance is not intended to be used by children. Keep
this appliance and its power cord out of reach of children.
- This product can be used by children and persons with reduced physical, sensory or mental capabilities or lack of experience and knowledge, as long as they have been given supervision or instruction concerning the use of the appliance in a safe way and understand the hazards involved.
- Cleaning and maintenance tasks should not be carried out by children.
- Supervise children to make sure they do not play with the product. Close supervision is necessary when the appliance is being used by or near children.
- Warning: this product has undergone a quality control previous to its commercialisation with the aim of ensuring its correct operation. After the quality control testing, the appliance is cleaned thoroughly, therefore, although it is unlikely to occur, there could be rests of water drops inside it.
INSTRUCTIONS DE SÉCURITÉ
- Drip tray
- Coffee spout
- Milk frother (cappuccinatore)
- Water tank
- Left-side door
- Power cord
- Control panel
- Funnel lid
- Ground coffee funnel
- Coffee bean tank
- Right-side door
- Brewing unit
- Residues tank
- Coffee grinder knob
- Milk frother knob
- Milk tank
- ON/OFF button
- Switch
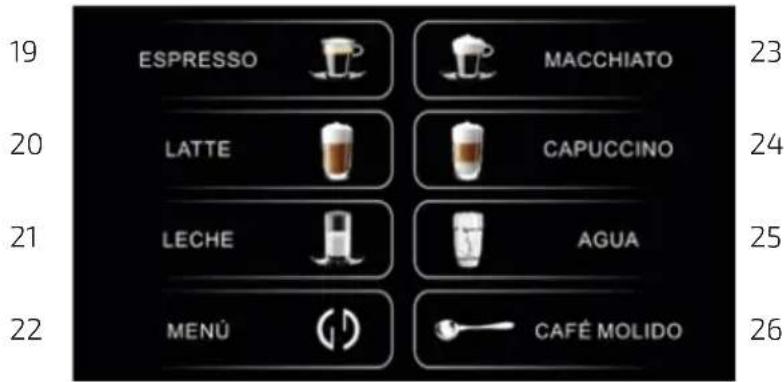
Control panel
Fig. 2
- Espresso
- Latte
- Milk
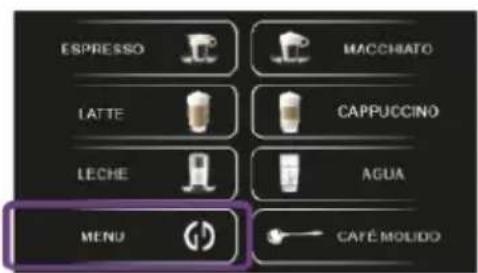
- Menu
- Macchiato
- Cappuccino
- Water
- Ground coffee
NOTE:
The graphics in this manual are schematic representations and may not exactly match the product.
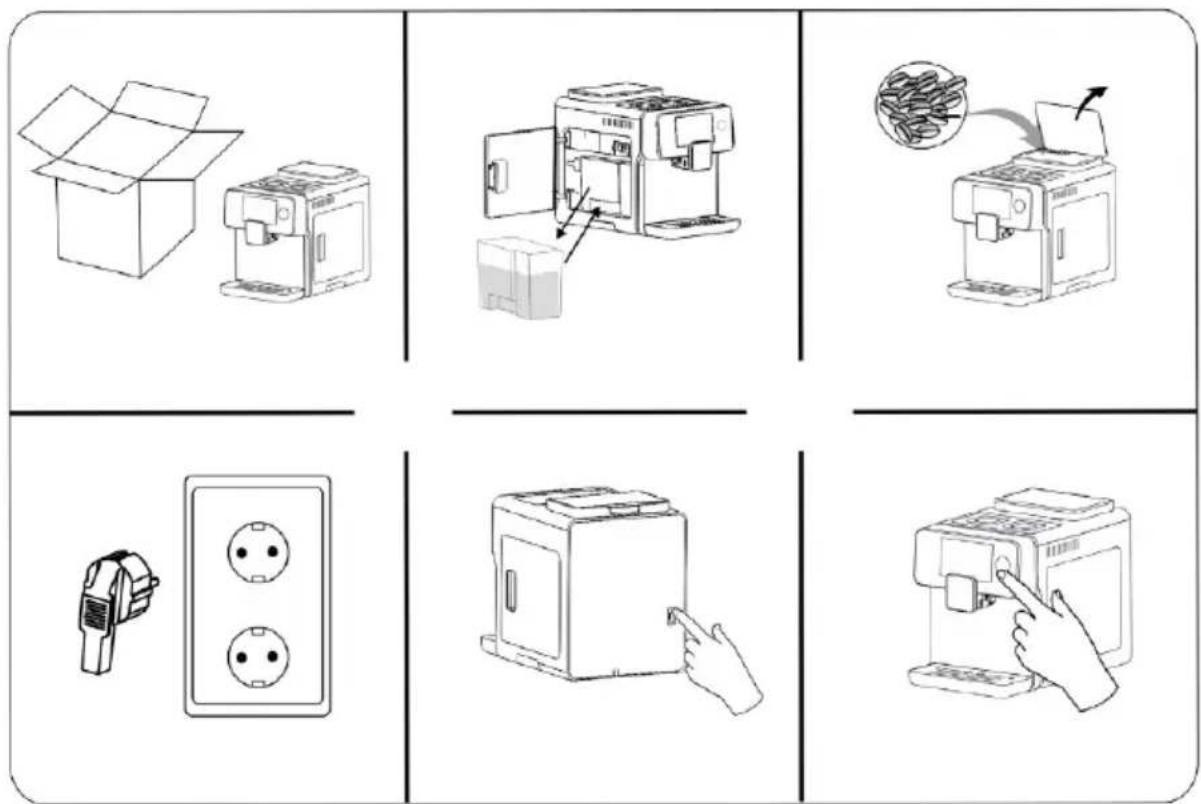
2. BEFORE USE
Fig. 3
- Take the product out of the box and remove all packaging materials.
- Make sure all parts and components are included and in good conditions. If any visible signs of damage are observed, contact the Technical Support Service immediately.
- Remove the water tank from the coffee maker and fill it with fresh water.
- Fill the coffee bean tank with coffee beans.
- Insert the power plug into the power socket.
- Place a cup under the coffee spout.
- Press the power switch one or twice if the display is blank.
- Allow the machine to preheat. The machine will start a self-cleaning.
- The appliance will enter the standby mode and will be ready to brew coffee.
Warning
We recommend using bottled water in order to achieve optimal taste of coffee.
3. OPERATION
Types of coffee
Note:
Do not insert ground coffee, instant coffee or any other substances in the coffee bean tank. NEVER use coffee beans that have been stored in the freezer, that are roasted or sugared. The machine may preheat before starting to use the milk function in the programmes with milk. This preheating takes up about 40 seconds and the display will show a thermometer icon.
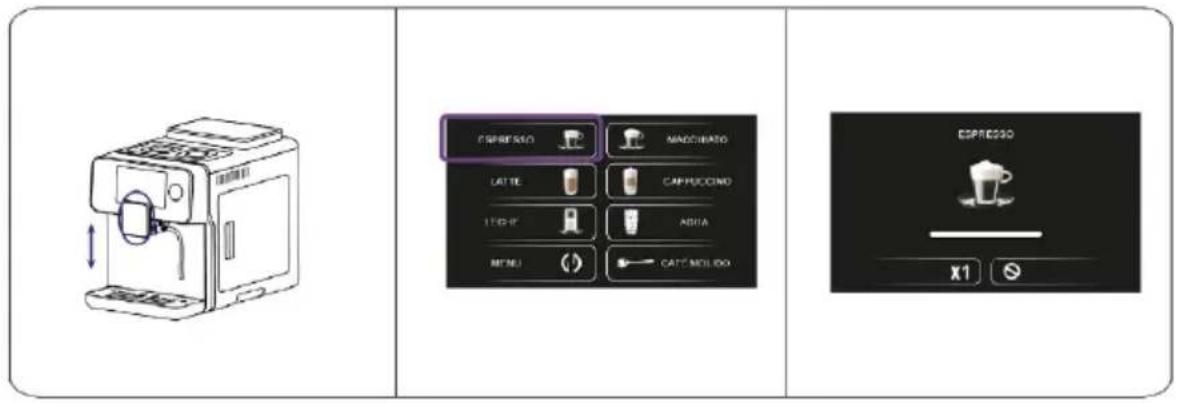
Espresso
- Place a cup under the coffee spout.
- Adjust the coffee spout to the desired height.
- Tap the espresso icon to brew coffee.
- Tap the x1 icon when it appears on the display if you wish to brew a second coffee after the first one has been brewed. The display will show x2.
- You can cancel the process any time by tapping the cancel icon.
Fig. 4
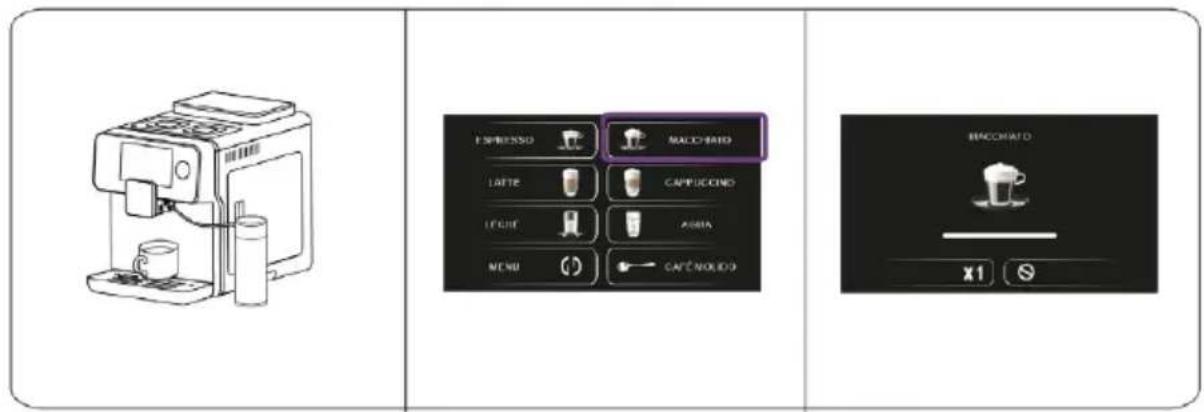
Macchiato
- Add milk to the milk tank. It is recommended to use whole cold milk for best-quality results.
- Connect the transparent tube from the milk tank outlet to the milk frother inlet, located on
ENGLISH
the side of the head.
- Adjust the coffee spout to the desired height and place the cup or cups of coffee.
- Tap the Macchiato icon to automatically brew 1 coffee.
- Tap the x1 icon when it appears on the display if you wish to brew a second coffee after the first one has been brewed. The display will show x2.
- You can cancel the process any time by tapping the cancel icon.
Fig. 5
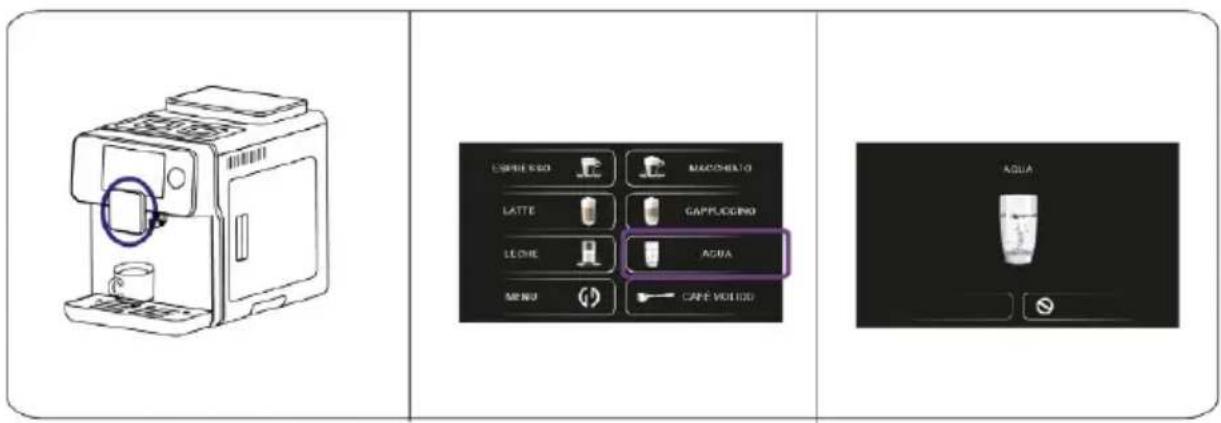
Hot water
- Place a cup under the coffee spout.
- Adjust the coffee spout to the desired height.
- Tap the Water icon. The machine will pour 250 ml of water by default.
- For less quantity, tap the cancel icon.
Fig. 6
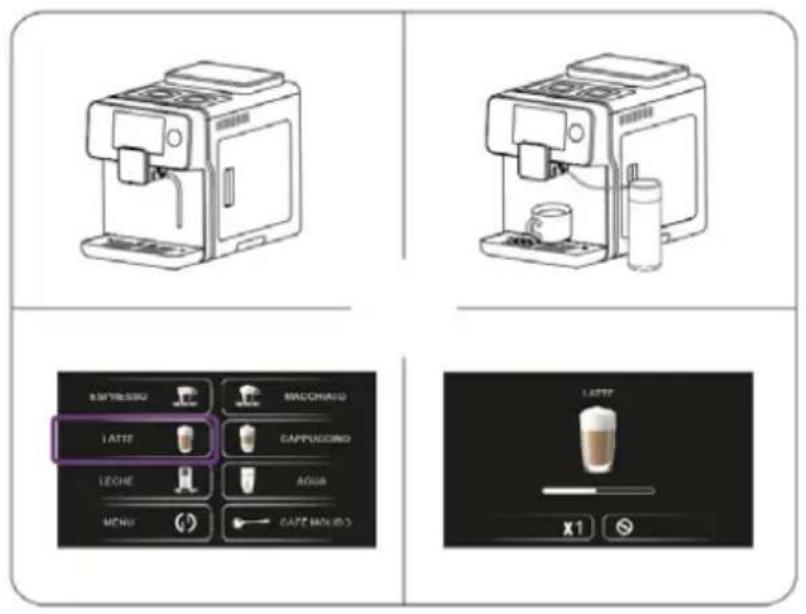
Latte
- Add milk to the milk tank. It is recommended to use whole cold milk for best-quality results.
- Connect the transparent tube from the milk tank outlet to the milk frother inlet, located on the side of the head.
- Adjust the coffee spout to the desired height and place the cup or cups of coffee.
- Tap the Latte icon to automatically brew 1 coffee.
- Tap the x1 icon when it appears on the display if you wish to brew a second coffee after the first one has been brewed. The display will show x2.
- Note: if you wish to dispense less amount than the pre-set one, tap the cancel icon to stop milk from being dispensed when you have the desired amount.
Fig. 7
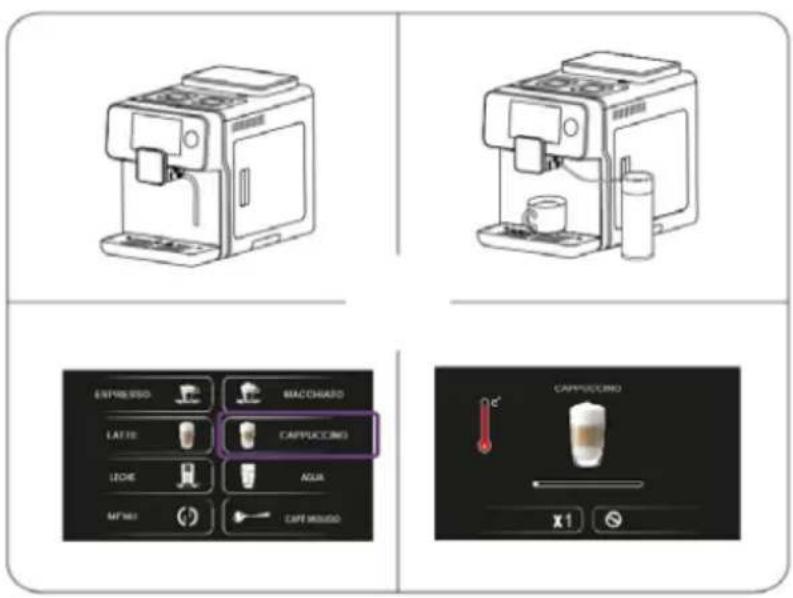
Cappuccino
- Add milk to the milk tank. It is recommended to use whole cold milk for best-quality results.
- Connect the transparent tube from the milk tank outlet to the milk frother inlet, located on the side of the head.
- Adjust the coffee spout to the desired height and place the cup or cups of coffee.
- Tap the Cappuccino icon to automatically brew coffee.
- Tap the x1 icon when it appears on the display if you wish to brew a second coffee after the first one has been brewed. The display will show x2.
Warning
If you wish to dispense less amount than the pre-set one, tap the cancel icon to stop it once you have the desired amount. Fig. 8
Ground coffee
- Remove the lid and add the desired amount of ground coffee through the ground coffee
ENGLISH
funnel.
- Tap the ground coffee icon. The control panel will show a full coffee spoon.
- Select the desired type of coffee.
Warning
It is a single-use inlet. Add a tablespoon of ground coffee every time you wish to prepare a coffee with ground coffee. Fig. 9
Hot milk/Milk froth
- Connect the transparent tube from the milk tank outlet to the milk frother inlet, located on the side of the head.
- Add milk to the corresponding tank. It is recommended to use whole cold milk for best-quality results.
- Adjust the coffee spout to the desired height and place the cup or cups of coffee.
- Press the Milk icon. The machine will pour milk for 60 seconds by default.
- For less quantity, tap the cancel icon.
Fig. 10
Note
The device is suitable for whole milk, low-fat milk, organic, soy milk, etc. However, it is suggested to use cold whole milk for optimum results.
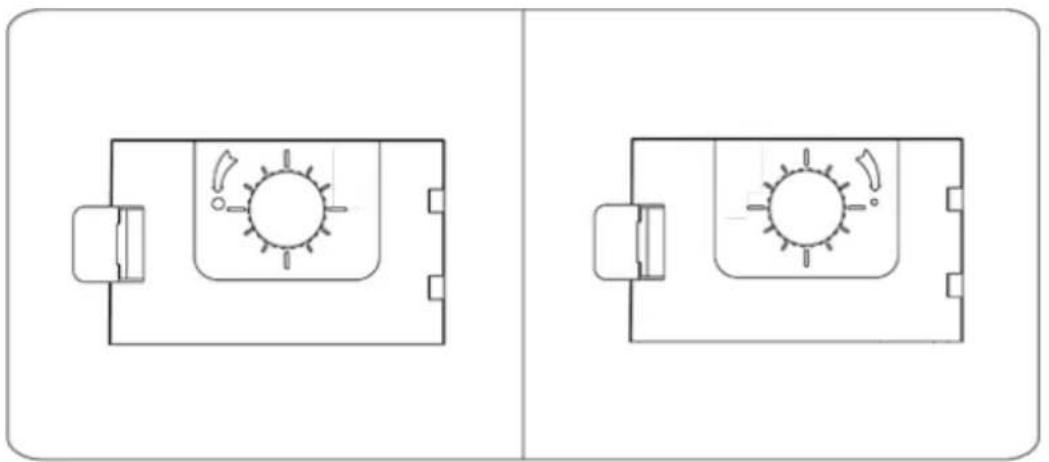
Milk frother knob
- Open the left door. The milk frother knob is located on the upper right corner.
- Turn the knob anticlockwise to increase the amount of froth.
- Turn the knob clockwise to decrease the amount of froth.
Fig. 11
Warning
The quality of the milk froth will depend on the milk type and temperature.
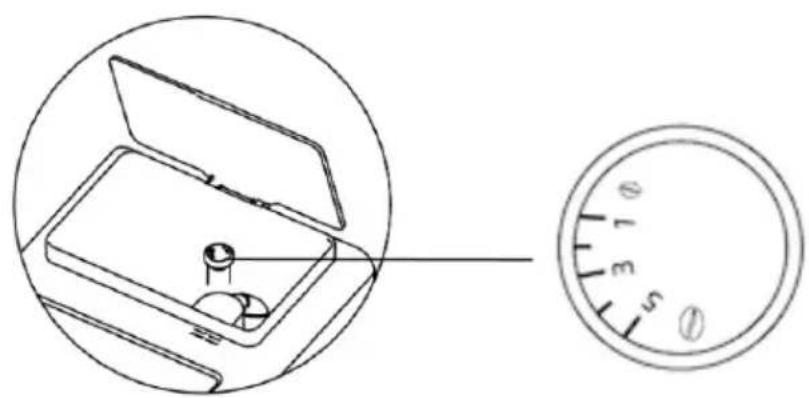
Coffee grinder knob
While the machine is operating, activate the coffee grinder knob located inside the coffee bean tank in order to select the grinding level.
Warning
Do not insert ground coffee, instant coffee or any other substances in the coffee bean tank. NEVER use coffee beans that have been stored in the freezer, that are roasted or sugared. Fig. 12
- Slow coffee flow means the coffee beans have been ground too finely. Turn the coffee grinder knob clockwise in order to select a coarser grinding.
ENGLISH
- Fast and light coffee flow means the coffee beans have been ground too coarsely. Turn the coffee grinder knob anticlockwise in order to select a finer grinding.
- Level 1 - Fine grinding
- Level 5 - Coarse grinding
Recommendation:
- It is suggested to select grinding level 3.
- It is suggested to clean the coffee grinder once a week in order to remove all the rests and impurities.
- To watch the videos: www.soporte.cecotec.es
Coffee customisation
Tap the menu icon, then tap the Settings icon to enter the parameter setting menu and select the type of coffee to customise.
Fig. 13
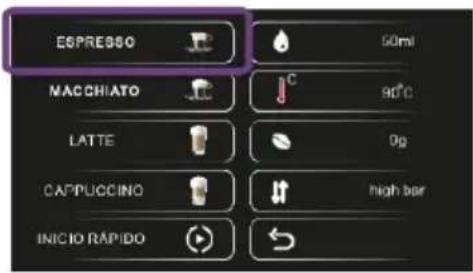
Espresso
- Select the volume of coffee (ml), the coffee brewing temperature (°C), the grams of coffee (g) and the brewing pressure.
- Once all parameters are set, tap the return icon to save them and return to the home screen, or tap the Quick Start icon to automatically brew a coffee with the recently saved parameters. Settings will be saved after brewing the coffee.
Fig. 14
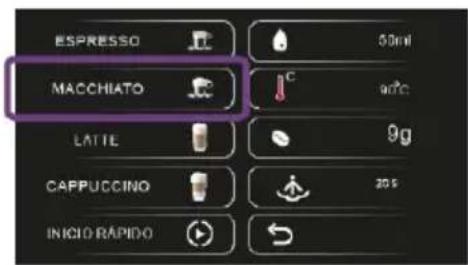
Macchiato
- Select the volume of coffee (ml), the temperature (°C), the grams of coffee (g) and the time in which milk is dispensed (s).
- Once all parameters are set, tap the return icon to save them and return to the home screen, or tap the Quick Start icon to automatically brew a coffee with the recently saved parameters. Settings will be saved after brewing the coffee.
Fig. 15
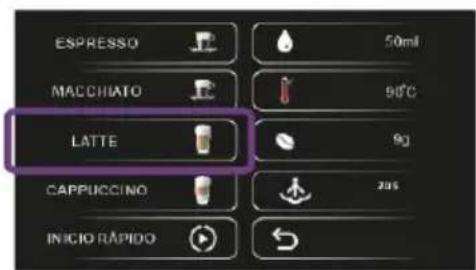
Latte
- Select the volume of coffee (ml), the temperature (°C), the grams of coffee (g) and the time in which milk is dispensed (s).
- Once all parameters are set, tap the return icon to save them and return to the home screen, or tap the Quick Start icon to automatically brew a coffee with the recently saved parameters. Settings will be saved after brewing the coffee.
Fig. 16
Cappuccino
- Select the volume of coffee (ml), the temperature (°C), the grams of coffee (g) and the time
ENGLISH
in which milk is dispensed (s).
- Once all parameters are set, tap the return icon to save them and return to the home screen, or tap the Quick Start icon to automatically brew a coffee with the recently saved parameters. Settings will be saved after brewing the coffee.
Fig. 17
Other settings
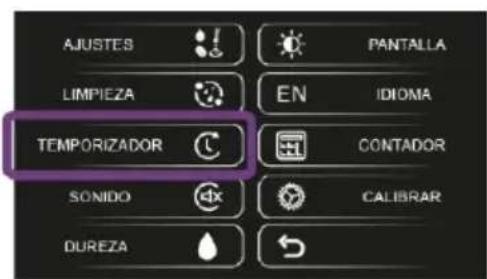
Timer
- The machine can be scheduled to turn automatically off from 30 minutes to 24 hours after operation.
- Tap the Timer icon and select the desired time. If you select the OFF option, the machine will not stop operating.
Fig. 18
Sound
Press the Sound icon to activate the machine sound or to deactivate it.
Fig. 19
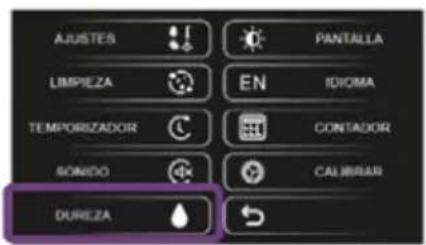
Water hardness
- Press the Hardness icon and select the hardness of the water being used. The machine will automatically suggest running a descaling cycle when it is considered necessary according to the selected hardness.
- 1 water droplet; soft. Descaling is suggested after 880 coffees.
- 2 water droplets: medium. Descaling is suggested after 400 coffees.
- 3 water droplets: hard. Descaling is suggested after 280 coffees.
- 4 water droplets: very hard. Descaling is suggested after 240 coffees.
Fig. 20
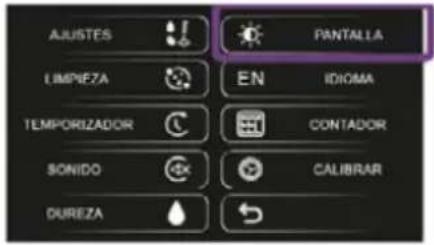
Energy saving
- Tap the Screen icon. Choose from:
- Save mode.
- Medium save mode.
- Standard mode.
- After 60 seconds of no operation, the display will change according to the set parameters:
- Save mode: the display will turn off.
- Medium save mode: the display will turn dark.
- Standard mode: the display will remain lit.
Fig. 21
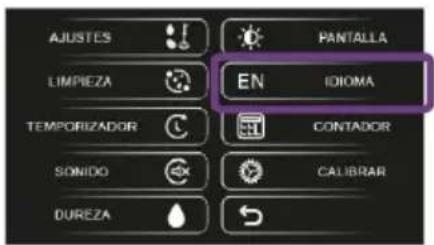
Language
Repeatedly tap the Language icon to select the desired language.
ENGLISH
Fig. 22
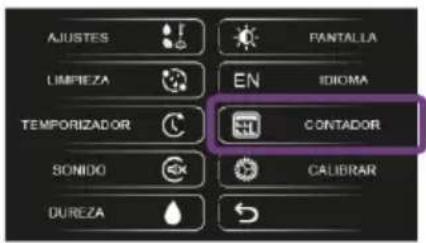
Number of brewed coffees
Press the Counter icon to check how many coffees and which type the coffee maker has brewed.
Fig. 23
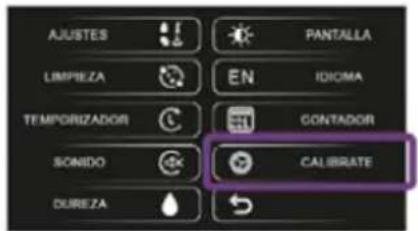
Calibration settings
This function shall only be used by an authorised technician, or you can do it if you specifically follow the instructions provided by Cecotec.
Fig. 24
4. WARNING SIGNALS
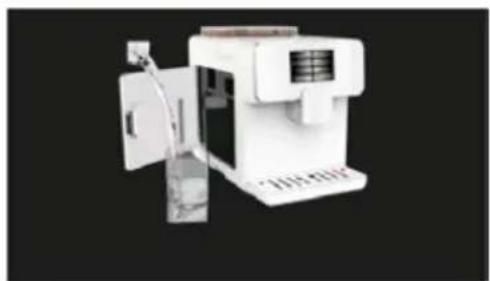
Fill the water tank.
Fig. 25
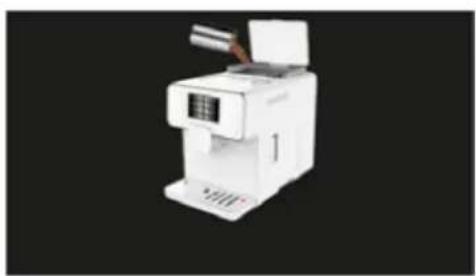
Add coffee beans to the tank.
Fig. 26
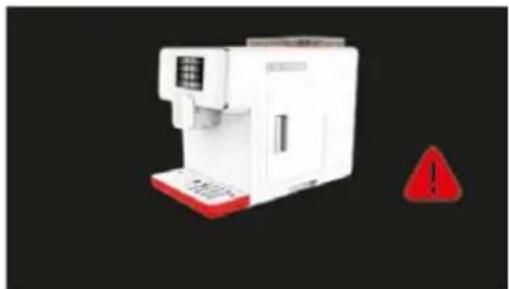
Install the drip tray correctly.
Fig. 27
Install the residues tank correctly.
Fig. 28
Install the brewing unit correctly.
Fig. 29
The residues tank is full, empty it.
Fig. 30
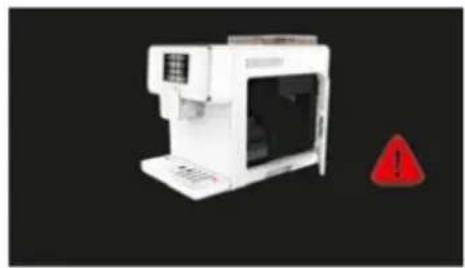
The right door is open, close it.
Fig. 31
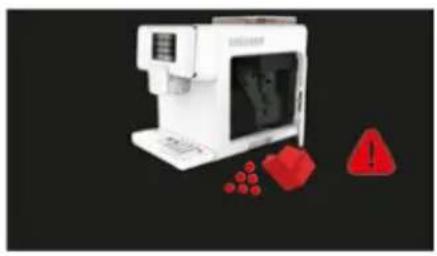
The water tank is not properly assembled. Push it until it fits into the correct position.
Fig. 32
5. CLEANING AND MAINTENANCE
- Disconnect the power cord from the wall socket before cleaning. Do not immerse the product in water or any other fluid during cleaning.
- Use a soft, dampened cloth to clean the exterior part of the device.
- Failure to maintain the product in clean conditions could lead to surface deterioration and could adversely affect the product's shelf life, resulting in possible hazard.
- Never use strong detergents, petrol, abrasive powder or metal brush to clean any part of the product.
ENGLISH
- Store the machine in a safe, dry and clean place if it is not going to be used during long periods of time.
- Clean both the visible parts of the machine and the area beneath it in order to remove all residues.
Milk frother cleaning (Cappuccinatore)
First method
- Add water to the milk tank. Connect the transparent tube from the milk tank outlet to the milk frother inlet, located on the side of the head.
- Place an empty container under the coffee spout.
- Tap the milk icon to start cleaning.
- Once the process has finished, empty the container and repeat the process until no milk rests are observed.
Fig. 33
Second method
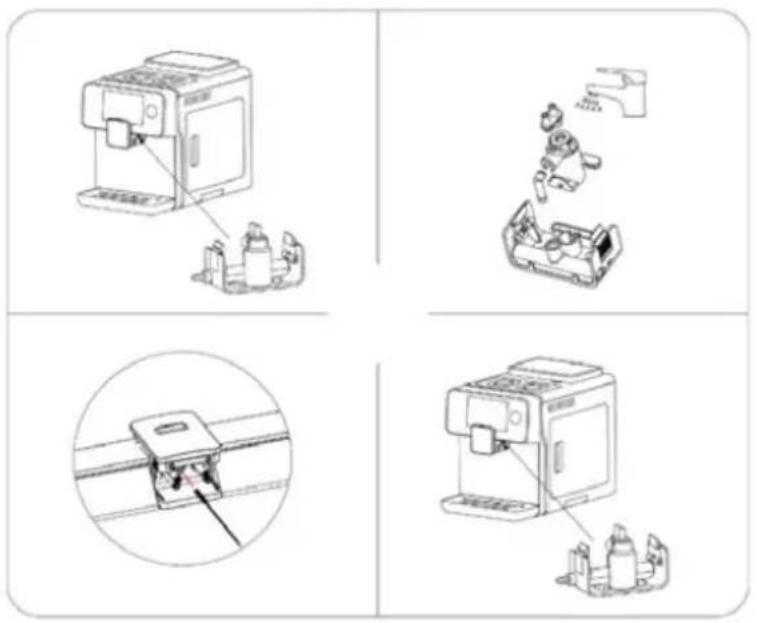
- Press both sides of the milk frother and remove it from the coffee spout.
- Introduce the milk frother in a glass of clean water.
- Introduce the cleaning brush 2 or 3 times in the holes located on the milk frother back part to clean them.
- Insert the steam tube back in the device.
Fig. 34
Third method
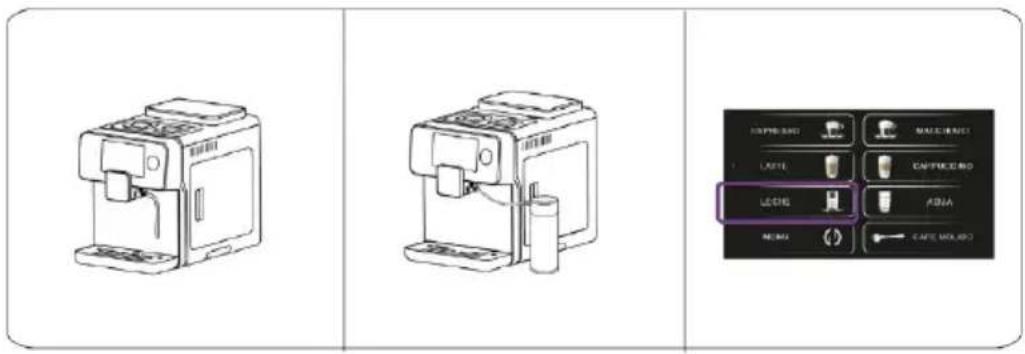
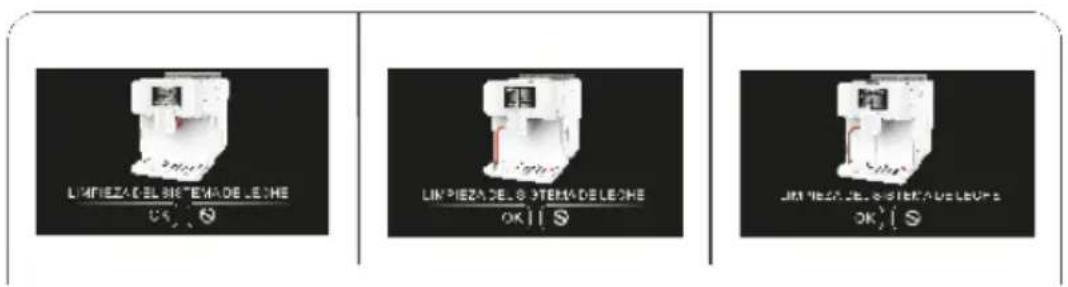
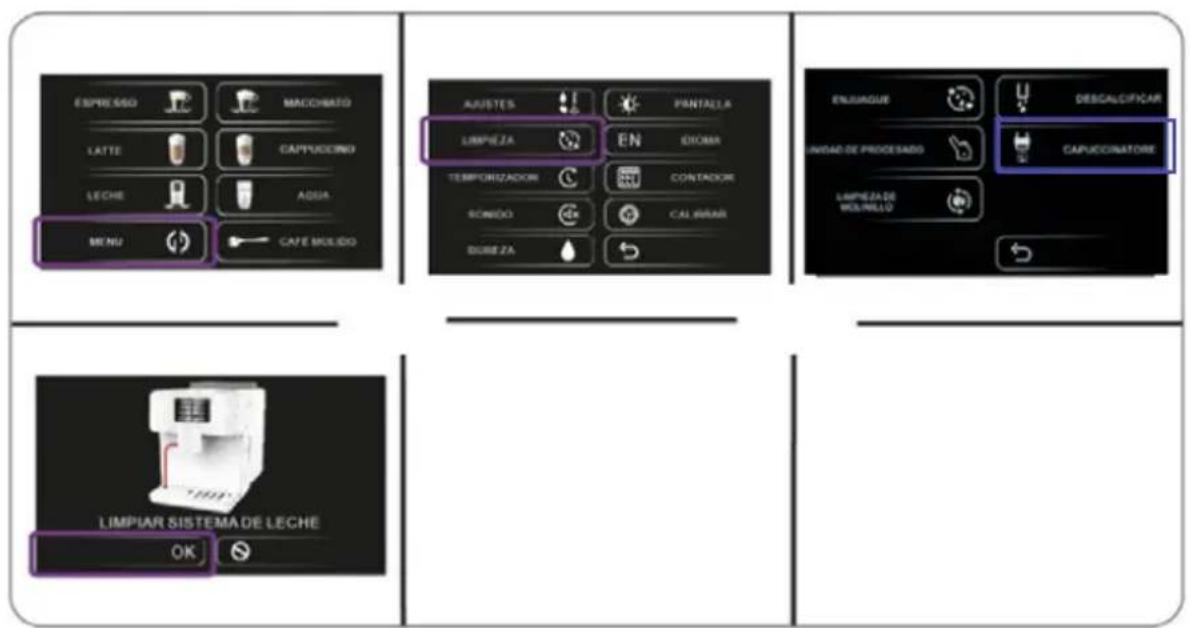
- When the screen displays 'Milk system cleaning', tap OK. This message will be displayed after using the milk function.
- Place the milk frother tube as shown in figure 35, step 2.
- Tap OK to start the automatic cleaning of the milk system.
Fig. 35
Warning
During the cleaning process, both the frother and the coffee outlet will emit hot water and steam. Do not disassemble or remove any of these 2 elements before the cleaning cycle has finished.
Fourth method
- Access the menu and tap the Cleaning icon.
- Tap the Cappuccinatore icon.
- Place the milk frother as shown in figure 36, step 4.
- Tap OK to start the automatic cleaning of the milk system.
ENGLISH
- When the process has been completed, the machine will switch back to standby mode.
Fig. 36
Cleaning the brewing unit
First method
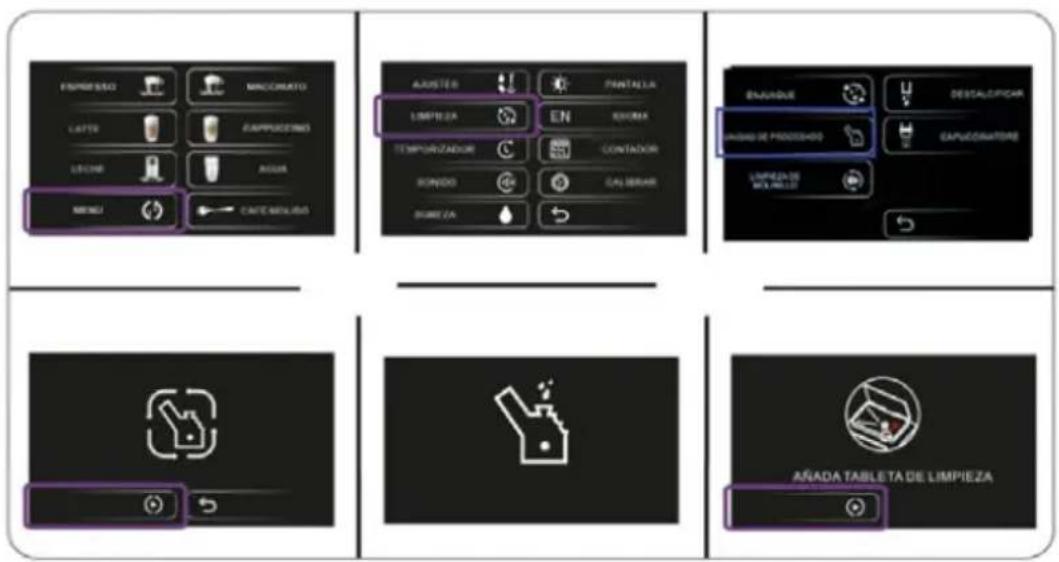
- Access the menu and tap the Cleaning icon.
- Press the BREWING UNIT icon to start the cleaning cycle.
- Press the PLAY icon to rinse the brewing unit.
- Add the cleaning agent to the brewing unit through the ground coffee funnel.
- Tap the Play icon to start the cleaning cycle of the brewing unit.
- When the process has been completed, the machine will switch back to standby mode.
Fig. 37
Second method
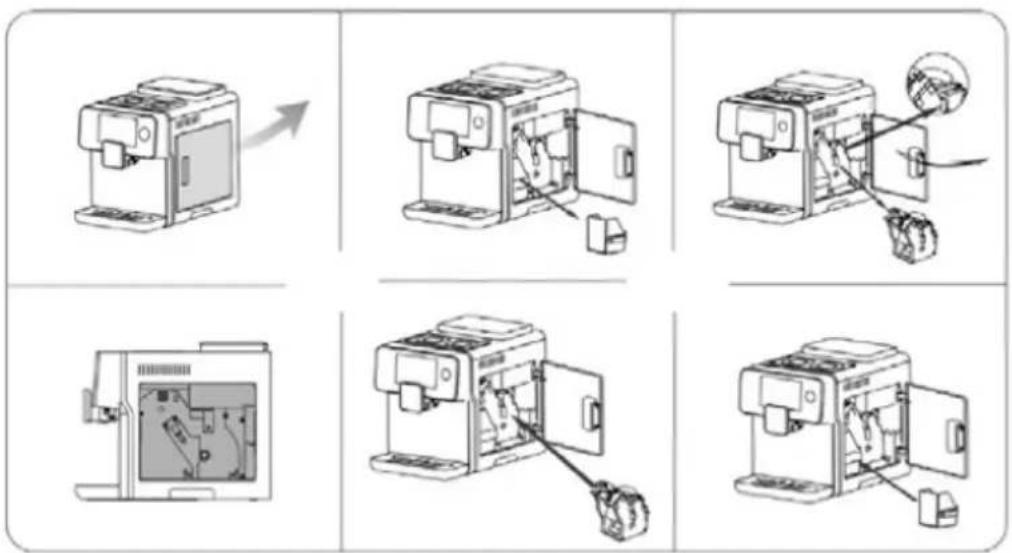
- Open the right-side door.
- Remove the residues tank.
- Remove the brewing unit and rinse it with hot water.
- Insert the brewing unit back in its position. Wait until it clicks into place, and ensure it is properly assembled.
Fig. 38
Warning
The milk tank, the water tank, the residues tank and the drip tray are dishwasher safe.
Descaling
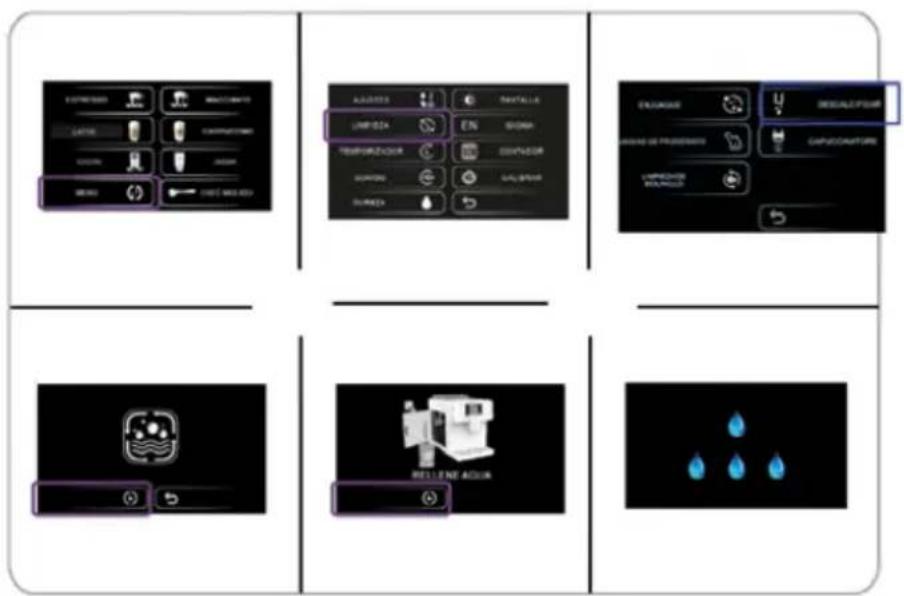
- Access the menu and tap the Cleaning icon.
- Tap Descale.
- Fill the water tank with fresh water and add some descaling product.
- Place an empty container under the coffee spout.
- Tap the Play icon to start the descaling function.
- The descaling solution will be dispensed.
- Once all the water has been used, the machine will finish the descaling process and will show the empty water tank warning.
- Empty the collecting container and place it back again under the coffee spout.
- Remove the water tank and fill it again, the machine will start the rinsing cycle.
- When the process has been completed, the machine will switch back to standby mode.
Fig. 39
Note
- The water tank is suitable and compatible with the Cecotec Matic-ccino filter, which guarantees properly filtered water for a better maintenance, a longer shelf life of the coffee maker and better coffee flavour. For perfect results, we suggest you change the
filter regularly, at least every 2 months, for full effectiveness.
- Filter not included
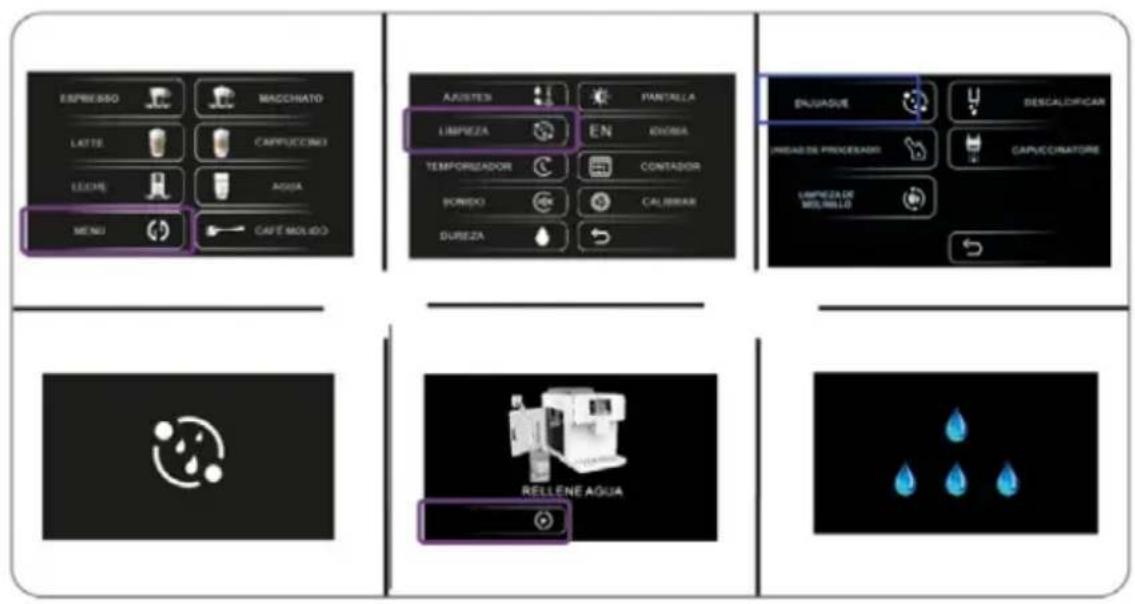
Rinse
- Access the menu and tap the Cleaning icon.
- Place an empty container under the coffee spout.
- Tap the Rinse icon to start the rinsing cycle.
- When the process has been completed, the machine will switch back to standby mode.
Fig. 40
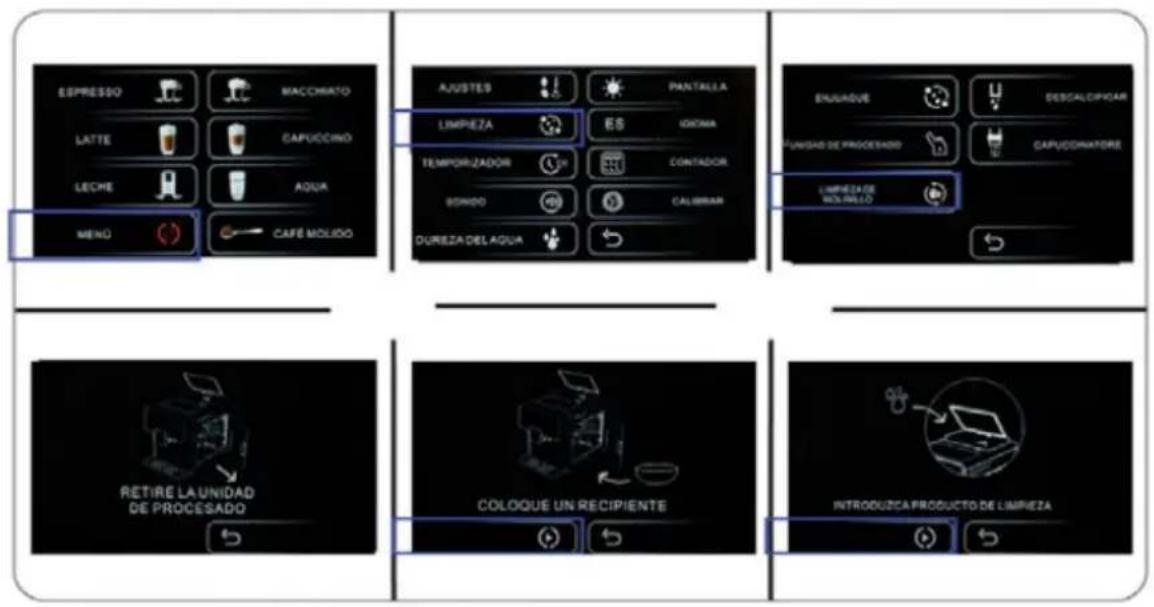
Cleaning the grinder
- Empty the ground coffee tank.
- Access the menu and tap the Cleaning icon.
- Press the Grinder cleaning icon.
- Remove the brewing unit.
- Place a container in the brewing unit gap (where the cleaning residues are collected).
- Tap Play.
- Pour in the grinder cleaning product. Once it is poured, tap Play.
- While the grinder is operating, the display will show 'Cleaning grinder'. When it has finished moving, the display will return to the 'Place a container' screen.
- Tap Play until there is no more cleaning product in the tank (do not add more cleaning product) and no more remains flow out into the container placed in the brewing unit gap. When there are no more remains, tap the icon to return back.
- Fig. 41
- Place the brewing unit in its position again and close the door.
- Fill the coffee bean tank with natural coffee beans. Brew 2 espresso coffees and throw them away.
- You can now use your mega-automatic coffee maker again.
Blocked brewing unit
- Opening the right-hand door of the coffee maker before the return movement of the pressing unit is completed may cause the central gear to stop rotating and, due to this incorrect gear position, the pressing unit may get stuck in position.
- When this happens and the brewing unit cannot be removed, turn the coffee maker off from the panel, switch it off and unplug it from the power supply. Then, turn the machine back on and brew an espresso. Now the brewing unit should have gone back to its original position.
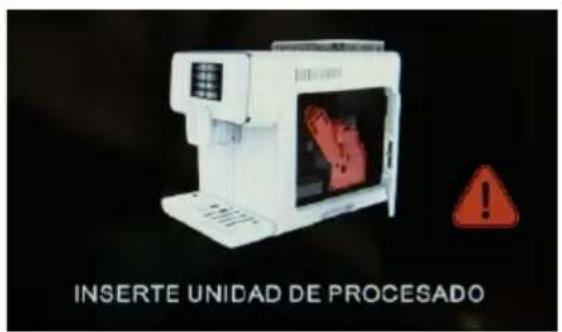
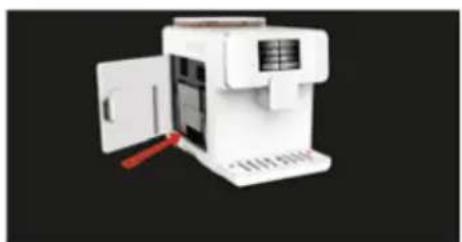
- If the brewing unit is removed while the gear is placed incorrectly, you will not be able to reinstall it. In this case, the coffee maker will warn you that the brewing unit is not properly installed because the gear is not aligned.
- (Fig. 42)
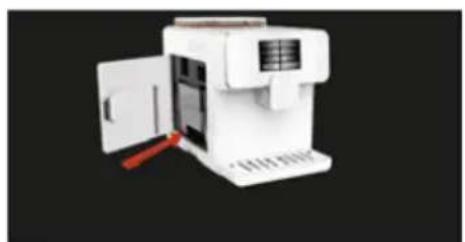
- In this case, in order for the gear to return to its correct position, hold down the red warning
ENGLISH
triangle icon.
- While the gear is being repositioned, you will hear a sound coming from inside the coffee maker. When the sound is no longer heard, the brewing unit can be reinstalled in its position.
- When the gear is properly assembled in its position and the brewing unit is installed, the following warning will be displayed: Close door. (Fig. 43)
- You can now continue using your coffee maker.
6. TECHNICAL SPECIFICATIONS
Model: Power Matic-ccino 8000 Touch Bianca S/ Nera S series
Product reference: 01642/01643
Power: 1300-1500 W (Coffee), 700-760 W (Steam)
Voltage and frequency: 220-240 V\~, 50/60 Hz
Technical specifications may change without prior notification to improve product quality.
Made in China | Designed in Spain
7. DISPOSAL OF OLD ELECTRICAL APPLIANCES
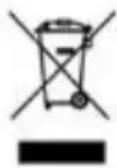
This symbol indicates that, according to the applicable regulations, the product and/or battery must be disposed of separately from household waste. When this product reaches the end of its shelf life, you should dispose of the batteries/accumulators and take them to a collection point designated by the local authorities.
Consumers must contact their local authorities or retailer for information concerning the correct disposal of old appliances and/or their batteries.
Compliance with the above guidelines will help to protect the environment.
8. TECHNICAL SUPPORT AND WARRANTY
Cecotec shall be liable to the end user or consumer for any lack of conformity that exists at the time of delivery of the product under the terms, conditions and deadlines established by the applicable regulations.
It is recommended that repairs be carried out by qualified personnel.
If at any moment you detect any problem with your product or have any doubt, do not hesitate to contact Cecotec official Technical Support Service at +34 963 210 728.
9. COPYRIGHT
The intellectual property rights over the texts in this manual belong to CECOTEC INNOVACIONES, S.L. All rights reserved. The contents of this publication may not, in whole or in part, be reproduced, stored in a retrieval system, transmitted or distributed by any means (electronic, mechanical, photocopying, recording or similar) without the prior authorization of CECOTEC INNOVACIONES, S.L.
1. PIÈCES ET COMPOSANTS
Img. 1
4. WAARSCHUWINGSMELDINGEN
text_image
Technical diagram of a device with numbered components, likely an electrical or mechanical assembly.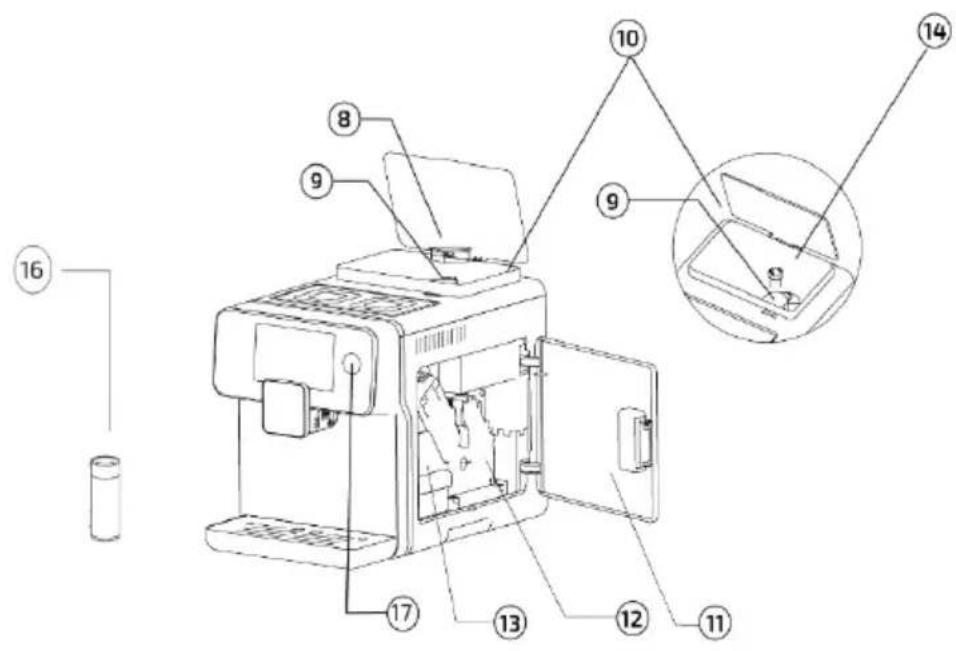
text_image
Technical diagram of a printer with numbered parts and exploded view, likely for assembly or labeling purposes.Fig./Img./Abb./Afb./Rys./Obr.1
text_image
19 ESPRESSO MACCHIATO 23 20 LATTE CAPUCCINO 24 21 LECHE AGUA 25 22 MENÜ CAFÉ MOLIDO 26Fig./Img./Abb./Afb./Rys./Obr.2
text_image
Diagram showing six different household appliances and their corresponding installation steps, including open boxes, open doors, circuit boards, and a hand inserting a device.Fig./Img./Abb./Afb./Rys./Obr.3
text_image
ESPRESSO MAGCIBATO LATTE CAPPUCCINO LED UP ASUA MENU CATC MOLEDO ESPRESSO X1Fig./Img./Abb./Afb./Rys./Obr. 4
text_image
ESPRESSO MALCHANDO LATTE CAPPUCENO L'CHIE ASMA MENU CATCNOLODO BENCORATO x1Fig./Img./Abb./Afb./Rys./Obr.5
text_image
Diagram showing a coffee machine with its control panel and a beverage selection interface, alongside a screen displaying 'AGUA' and a drink.Fig./Img./Abb./Afb./Rys./Obr.6
text_image
Product catalog page for a coffee machine showing front, side, and back views with labeled control buttons.Fig./Img./Abb./Afb./Rys./Obr.7
text_image
Product catalog image showing four types of coffee machine models with control panel and display interfaceFig./Img./Abb./Afb./Rys./Obr. 8
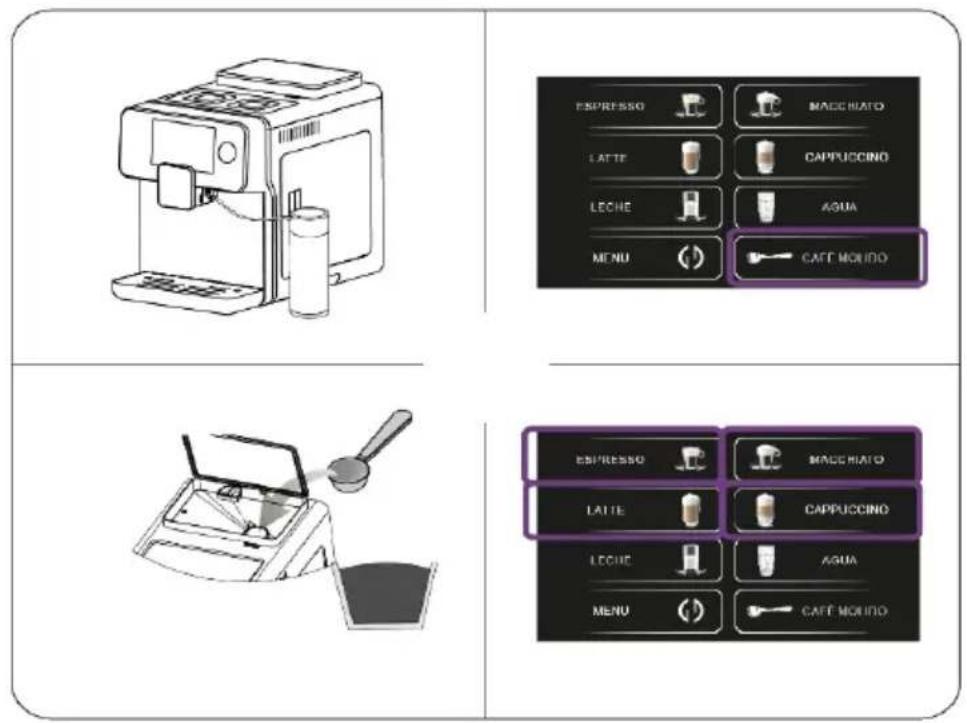
Fig./Img./Abb./Afb./Rys./Obr. 9
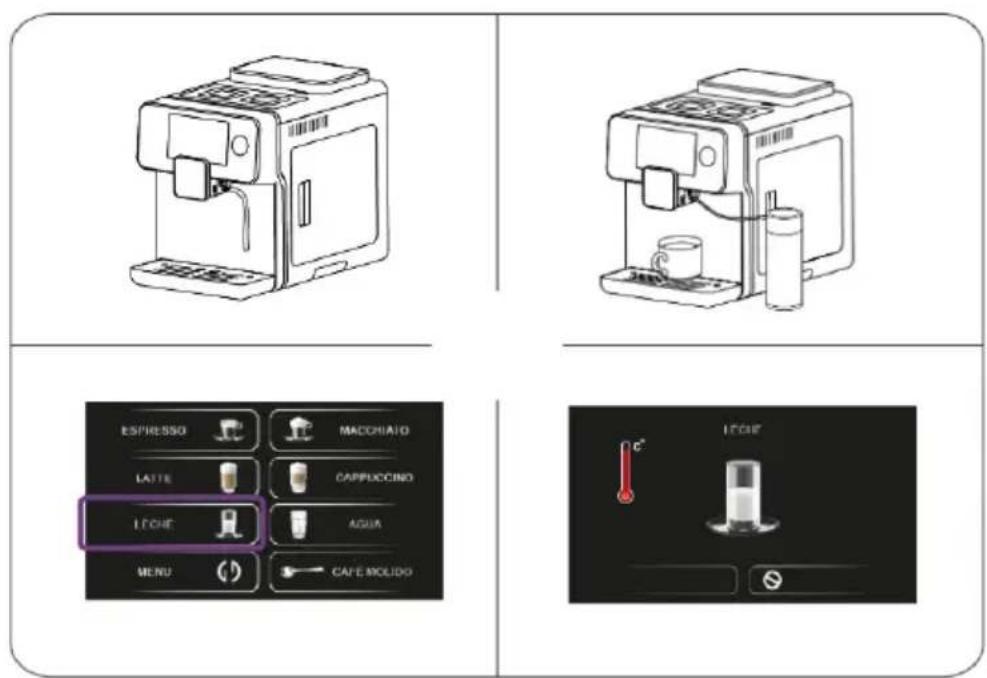
Fig./Img./Abb./Afb./Rys./Obr. 10
natural_image
Two identical line drawings of a room layout with sun icons and directional arrows, no text or symbols present.Fig./Img./Abb./Afb./Rys./Obr.11
natural_image
Technical line drawing of a device with an open lid and a circular dial showing scale (no text or symbols)Fig./Img./Abb./Afb./Rys./Obr.12
text_image
ESPRESSO MACCHIATO LATTE CAPPUCCINO LECHE AGUA MENU CATÉ MOLIDO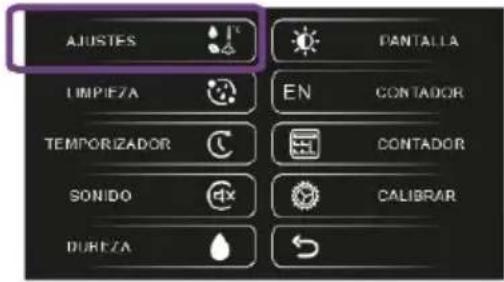
text_image
AJUSTES LIMPIETA TEMPORIZADOR SONIDO DURFZA PANTALLA EN CONTADOR CONTADOR CALIBRARFig./Img./Abb./Afb./Rys./Obr.13
text_image
ESPRESSO MACCHIATO LATTE CAPPUCCINO INICIO RAPIDO 50ml 90°C 0g high barFig./Img./Abb./Afb./Rys./Obr.14
text_image
ESPRESSO MACCHIATO LATTLE CAPPUCCINO INICIO RAPIDO 50ml 9g 20sFig./Img./Abb./Afb./Rys./Obr.15
text_image
ESPRESSO MACCHIATO LATTE CAPPUCCINO INICIO RÁPIDO 50ml 90°C 9g 20sFig./Img./Abb./Afb./Rys./Obr.16

text_image
ESPRESSO MACCHIATO LATTE CAPPUCCINO INICIO RAPIDO 50ml 00°C 9g 20SFig./Img./Abb./Afb./Rys./Obr.17
text_image
AJUSTES LIMPIEZA TEMPORIZADOR SONIDO DUREZA PANTALLA EN IDIONA CONTADOR CALIBRAR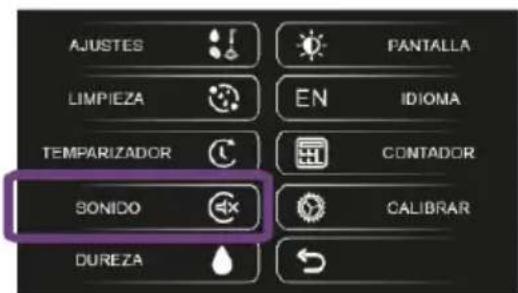
text_image
AJUSTES LIMPIEZA TEMPARIZADOR SONIDO DUREZA PANTALLA EN IDIOMA CONTADOR CALIBRARFig./Img./Abb./Afb./ Rys./Obr. 18 Fig./Img./Abb./Afb./ Rys./Obr. 19
text_image
AJUSTES LIMPIEZA TEMPORIZADOR SONIDO DUREZA PANTALLA EN IDIOMA CONTADOR CALIBRARFig./Img./Abb./Afb. / Rys./Obr. 20
text_image
AJUSTES LIMPIEZA TEMPORIZADOR SONIDO DUREZA PANTALLA EN IDIOMA CONTADOR CALIBRARFig./Img./Abb./Afb. / Rys./Obr. 21
text_image
AJUSTES LIMPIEZA TEMPORIZADOR SONIDO DUREZA PANTALLA EN IDIOMA CONTADOR CALIBRARFig./Img./Abb./Afb. / Rys./Obr. 22
text_image
AJUSTES LIMPIEZA TEMPORIZADOR SONIDO DUREZA PANTALLA EN IDIOMA CONTADOR CALIBRAR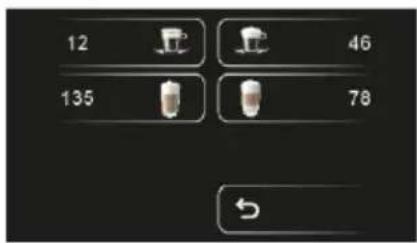
text_image
12 46 135 78Fig./Img./Abb./Afb./Rys./Obr. 23
text_image
AJUSTES LIMPIEZA TEMPORIZADOR SONIDO DUREZA PANTALLA EN IDIOMA CONTADOR CALIBRATEFig./Img./Abb./Afb./Rys./Obr.24
natural_image
3D rendering of a white industrial machine with control panel and ventilation unit (no visible text or symbols)Fig./Img./Abb./Afb./Rys./Obr.25
natural_image
White industrial machine with control panel and paper clip, isolated on black background (no visible text or symbols)Fig./Img./Abb./Afb./Rys./Obr. 26 Fig./Img./Abb./Afb./Rys./Obr. 27
natural_image
White laboratory equipment with red warning symbol and warning triangle (no text or labels visible)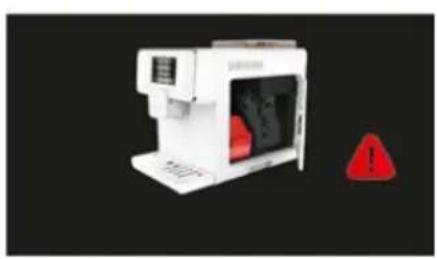
natural_image
White industrial machine with red warning sign and warning triangle (no visible text or symbols)Fig./Img./Abb./Afb. / Rys./Obr. 28
natural_image
White industrial machine with control panel and warning sign (no readable text or symbols)Fig./Img./Abb./Afb. / Rys./Obr. 29
natural_image
3D printer with warning symbols and red warning triangles on black background (no text or labels)Fig./Img./Abb./Afb. / Rys./Obr. 30

natural_image
White industrial machine with ventilation slots and a red warning sign (no text or symbols on device)Fig./Img./Abb./Afb. / Rys./Obr. 31
natural_image
3D model of a white industrial machine with a red handle, showing internal components and no visible text or symbols.Fig./Img./Abb./Afb. / Rys./Obr. 32
natural_image
3D rendering of a white industrial machine with a red tool inserted, against a black background (no text or symbols visible)Fig./Img./Abb./Afb. / Rys./Obr. 33
text_image
Technical diagram showing three types of industrial control unit designs with labeled buttons and a highlighted 'LECH' button.Fig./Img./Abb./Afb./Rys./Obr. 33
text_image
Technical diagram showing four steps of a baby bottle cleaning device installation, with labeled components and directional arrows.Fig./Img./Abb./Afb./Rys./Obr. 34
text_image
L'IMPIEZA DEL SISTEMA DE LECHE OK | S L'IMPIEZA DEL SISTEMA DE LECHE OK | S L'IMPIEZA DEL SISTEMA DE LECHE OK | SFig./Img./Abb./Afb./Rys./Obr. 35
text_image
ESPRESSO MACCHIBATO LATTE CAPPUCCINO LECHE AGUA. MENU CAFE MOLIDO AUSTES PANTACZA LIMPIEZA EN DICOMA TEMPONIZADORE CONTADOR SONIDO CALABARI BURE ZA ENJUAGUE DESCALIFICAR UNIDAD DE PROCESADO CAPPUCCINATORE LIMPIEZA DE MULTIPOLLO LIMPIAR SISTEMA DE LECHE OKFig./Img./Abb./Afb./Rys./Obr. 36
text_image
FIMPRESSO MACOMATO LAPPE CAPPUDDING LEONIO AGUA MONE CATE MELAVA AUSTES PANTALLA LIMPIEZA EN REFURA TEMPORIZADOR CONTADOR SONIDO CALIBAR DUREZA BANJADE DESALOPICAR JASAO DE PROCESADO CAPUCOMATORE LIMPIEZA DE MELAVLO AÑADA TABLETA DE LIMPIEZAFig./Img./Abb./Afb./Rys./Obr. 37
text_image
Diagram showing six different types of industrial equipment with Chinese labels, illustrating a process from device to final packaging.Fig./Img./Abb./Afb./Rys./Obr. 38
text_image
Automotive control panel interface with Chinese labels and function buttons for display settingsFig./Img./Abb./Afb./Rys./Obr. 39
text_image
ESPRESSO MACCHATO LATTE CAPUCIONE LEEHE AGUA MENU CAFE MOLIDO AUSTESI PARTILLA LIMPIEZA EN EXXOSA TEMPORIZADOR CONTADOR SORIDO CALIBARI DUREZA ENJASUE DESCALIDICAR UNIDAD DE PROCESARIO CAPUCIONATORE LIMPIEZA DE MELINDO RELLÈNE AGUAFig./Img./Abb./Afb./Rys./Obr. 40
text_image
ESPRESSO MACCHIATO LATTE CAPVODINO LECHE AQUA MENO CAFE MOLIDAD AJUSTES PANTALLA LIMPIEZA ES LOXIMA TEMPORIZADOR CONTADOR BONDO CALIBAR DUREZA DEL AQUA ENJANDUE DESCALCIPIOAR UNIDAD DE PROCESADO CAPVODINATORE LIMPIEZA DE MINUALDO RETIRE LA UNIDAD DE PROCESADO COLOQUE UN RECIPIENTE INTRODUZCA PRODUCTO DE LIMPIEZAFig./Img./Abb./Afb./Rys./Obr. 41