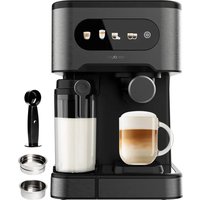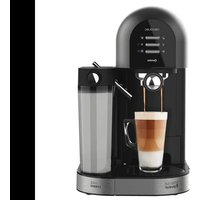
Instant-ccino 20 Chic Serie Nera - Coffee machine CECOTEC - Free user manual and instructions
Find the device manual for free Instant-ccino 20 Chic Serie Nera CECOTEC in PDF.


User questions about Instant-ccino 20 Chic Serie Nera CECOTEC
0 question about this device. Answer the ones you know or ask your own.
Ask a new question about this device
Download the instructions for your Coffee machine in PDF format for free! Find your manual Instant-ccino 20 Chic Serie Nera - CECOTEC and take your electronic device back in hand. On this page are published all the documents necessary for the use of your device. Instant-ccino 20 Chic Serie Nera by CECOTEC.
USER MANUAL Instant-ccino 20 Chic Serie Nera CECOTEC
natural_image
Exterior view of two milk cream machines with control panel and brand name (no signage text in focus)- Safety instructions 19
- Parts and components 22
- Before use 22
- Operation 23
- Cleaning and maintenance 27
- Troubleshooting 29
- Technical specifications 30
- Disposal of old electrical appliances 30
- Technical support and warranty 30
SOMMAIRE
text_image
Technical diagram of a toaster oven with numbered parts for identificationFig./Img./Abb./Afb./Rys./Obr.1
natural_image
Illustration showing a large rock next to a metal bowl with a label 'MAX' (no text or symbols on the rock itself)Fig./Img./Abb./Afb./Rys./Obr.3
natural_image
Illustration of a large rock next to a metal container with a lid and handle, showing an arrow indicating direction (no text or symbols)Fig./Img./Abb./Afb./Rys./Obr. 4

natural_image
Three horizontal gray bars with icons representing coffee cups, beverages, and a coffee cup (no text or symbols)Fig./Img./Abb./Afb./Rys./Obr.2
natural_image
Simple line drawing of a mechanical component with a handle and a container, no text or symbols present.Fig./Img./Abb./Afb./Rys./Obr. 5
text_image
filter.Fig./Img./Abb./Afb./Rys./Obr. 6
natural_image
Simple line drawing of a container with an open lid and a curved arrow indicating rotation (no text or symbols)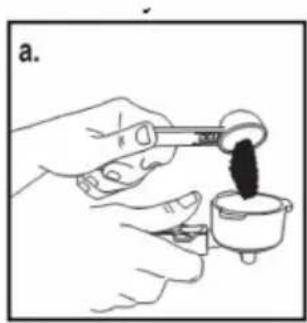
natural_image
Illustration of hands pouring dark liquid into a small container (no text or symbols)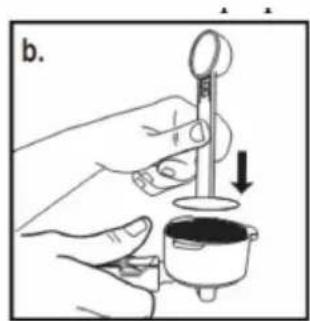
natural_image
Illustration of a hand using a measuring instrument to measure a small container (no text or symbols present)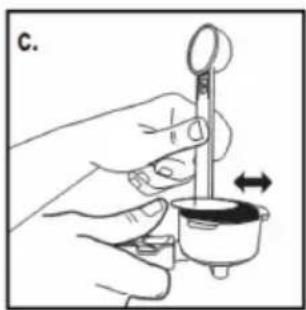
natural_image
Illustration of a hand holding a small container with a measuring tool, showing a rotation arrow (no text or symbols)Fig./Img./Abb./Afb./Rys./Obr. 7
natural_image
Technical line drawing of a mechanical device with no visible text or symbols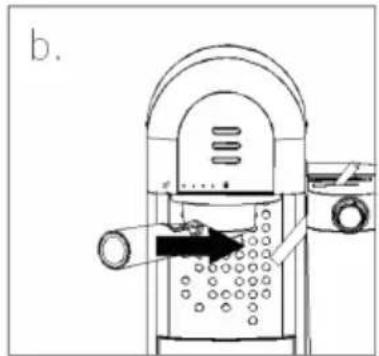
text_image
b.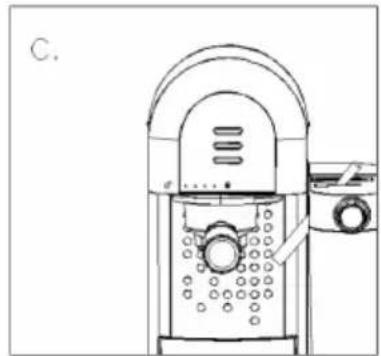
natural_image
Line drawing of a portable water heater with control panel and fan (no text or symbols)Fig./Img./Abb./Afb./Rys./Obr. 8
text_image
Diagram of a refrigerator with directional arrows and labeled parts, likely indicating airflow or movement.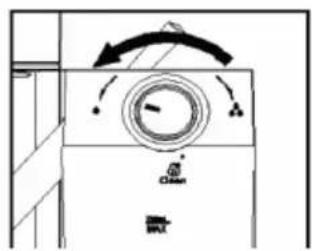
text_image
Diagram of a washing machine with labeled components including fan, dial, and control buttons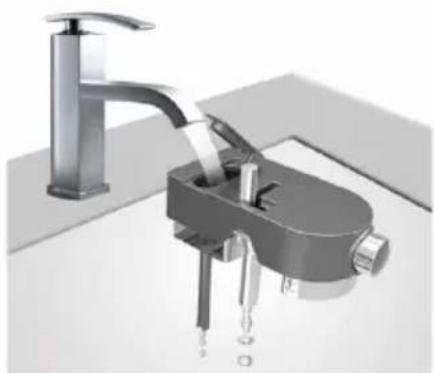
natural_image
3D rendering of a bathroom sink with faucet and shower pump (no text or symbols)Fig./Img./Abb./Afb./Rys./Obr. 9 Fig./Img./Abb./Afb./Rys./Obr. 10
natural_image
Technical line drawing of a mechanical device with no visible text or symbols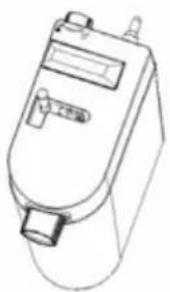
natural_image
Line drawing of a mechanical device with ports and a handle (no text or symbols)
natural_image
Line drawing of a medical or laboratory device with a pipette inserted (no text or symbols)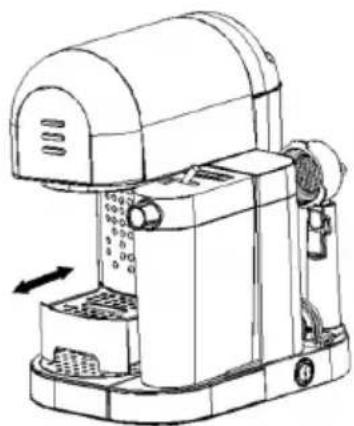
natural_image
Line drawing of a mechanical device with no visible text or symbolsFig./Img./Abb./Afb./ Rys./Obr. 11 Fig./Img./Abb./Afb./ Rys./Obr. 12
text_image
Warning symbol with exclamation mark and steam line inside triangleMade in China | Designed in Spain
8. RECICLAJE DE ELECTRODOMÉSTICOS
1. SAFETY INSTRUCTIONS
Read these instructions thoroughly before using the appliance. Keep this instruction manual for future reference or new users.
All safety instructions should be closely followed when using the appliance.
This product is designed only for household use. It is not suitable for commercial or industrial use. Do not use outdoors. Make sure that the mains voltage matches the voltage stated on the rating label of the appliance and that the wall outlet is grounded.
Do not immerse the cord, plug, or any non-removable part of the appliance in water or any other liquid, nor expose the electrical connections to water. Make sure your hands are dry before handling the plug or switching on the appliance.
Check the power cord regularly for visible damage. If the cord is damaged, it must be replaced by the official Technical Support Service of Cecotec in order to avoid any type of danger.
Turn off and unplug the appliance from the mains supply when not in use and before cleaning it. Pull from the plug, not the cord, to disconnect it from the outlet.
The temperature of accessible surfaces may be high while in use and could cause burns. Do not touch hot surfaces while in use or immediately after. Use gloves.
Do not twist, bend, strain, or damage the power cord in any way. Protect it from sharp edges and heat sources. Do not let
it touch hot surfaces. Do not let the cord hang over the edge of the working surface or countertop.
Place the appliance on a dry and stable surface. Make sure the tank is properly fixed to the device

natural_image
Warning symbol of a triangle with steam lines inside, no text or numbers presentENGLISH
and that the lid is closed before operating it. Do not remove it while the device is turned on.
Do not use sugar roasted ground coffee or sugar roasted coffee beans as these will clog the filter and damage the appliance.
Do not operate the device empty.
Do not use the appliance under the following circumstances:
On or near a gas or electric hob, in heated ovens, or near open flames.
On soft surfaces (such as carpets) or where it may tip over during use.
Outdoors or in areas with high humidity levels.
This appliance is not intended to be operated by means of an external timer or separate remote-control system.
Do not leave the appliance unattended.
Caution should be taken when moving unit with hot liquids.
Do not remove the portafilter while brewing coffee.
Turn off all controls before disconnecting it from the power supply.
Do not use with accessories not recommended or provided by Cecotec, as this could result in fire, electric shock or injury to persons.
Make sure the device is completely turned off before removing any of the parts or accessories.
The appliance is not intended to be used by children under the age of 8. It can be used by children over the age of 8, as long as they are given continuous supervision.
This appliance can be used by children aged 8 and above, and persons with reduced physical, sensory or mental capabilities or lack of experience and knowledge, as long as they have been given supervision or instruction concerning the use of the appliance in a safe way and understand the hazards involved.
Do not allow children to play with the appliance.
Supervise children, they shall not play with the appliance. Close supervision is necessary when the appliance is being used by or near children.
Note: This product has undergone a quality control previous to its commercialization with the aim of ensuring its correct operating. After the quality control testing, the appliance is cleaned thoroughly, therefore, although it is unlikely to occur, there could be rests of water drops in its inner parts.
ENGLISH
2. PARTS AND COMPONENTS
Fig. 1.
- Water tank cover
- Removable water tank
- Latte/auto-cleaning button with light indicator
- Portafilter
- Adjustable cup tray
- Drip tray
- Espresso/customization button with light indicator
- Cappuccino/froth button with light indicator
- Power switch
- Steam tube adjusting lever
- Height-adjustable steam tube
- Milk tank cover
- Removable milk tank
- Portafilter
- Filter for 1 coffee
- Filter for 2 coffees
- Measuring spoon with tamper
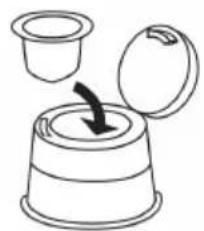
- Filter for coffee capsules
3. BEFORE USE
Warning: Clean the product before using it for the first time to remove all possible manufacturing residues.
Take the product out of the box and remove all packaging materials.
Make sure all parts and accessories are present and in good conditions. If not, contact immediately the Technical Support Service of Cecotec.
Cleaning parts and components
Make sure the device and all the lights are off. Make sure it is unplugged from the power supply.
Remove the water tank, the milk tank, the portafilter, all filters and the measuring scoop and wash them with water and cleaning agent. Rinse all of them thoroughly and dry them completely before placing them back in their position.
Note: Clean the unit after each use to ensure its correct operation.
Cleaning of the unit's inside
Fill the water tank above the Min. mark and below the Max. mark.
Fill the milk tank with water above the Min. mark and below the Max. mark.
Select one of the filters and place it inside the portafilter. Place the portafilter in the unit ensuring it is properly locked and place a cup under it. Make sure the dispensing tube is inside the cup.
Plug the device into a power supply.
Turn the coffee machine on by switching the power button to "I".
The light indicators on the device's panel will start blinking. Once the lights remain steady, press the Cappuccino button twice.
Once this process is over, the coffee machine is clean and ready to brew coffee.
4. OPERATION
Warning: In order to avoid possible burns to body parts and/or other injury from hot steam and water or damages to the unit, never remove the water tank or the portafilter while the device is brewing coffee or frothing. Make sure the three lights are on before you can remove the portafilter to make additional cups of coffee. If you need to add more water or milk to the tank, make sure the 3 light indicators are on and make sure to switch off the unit by pressing the side button. Make sure the power button is switched to the "O" position.
Control panel
Fig. 2.
Coffee
The coffee should be freshly ground and dark roasted. You may want to try a French or Italian roast ground for espresso. Pre-ground coffee will only retain its flavor for 7–8 days, provided it is stored in an airtight container and in a cool, dark area. Do not store in a refrigerator or freezer. Whole beans are recommended to be ground just before use. Coffee beans stored in an airtight container will keep its flavor for up to 4 weeks.
Grind
This is a vital step in the espresso making process if you are grinding your own coffee and takes practice. The coffee must be of a fine grind. The correct grind should look like salt. If the grind is too fine, the water will not flow through the coffee even under pressure. These grinds look like powder and feel like flour when rubbed between fingers.
If the grind is too coarse, the water flows through the coffee too fast, preventing a full-flavored extraction. Be sure to use a quality grinder for uniform consistency.
Filling the water tank
Remove the water tank, fill it up with water. Fill the tank above the "Min." and below the "Max."
ENGLISH
marks on the tank. Then, place the tank back in its correct position and make sure it is properly fixed.
Note: Never use warm or hot water to fill the water tank.
Filling the milk tank
Remove the milk tank and open the cover. Fill it with cold milk above the "Min." and below the "Max." marks on the tank. Once it is full, close it again and place it back in its correct positions making sure it is properly fixed.
Note: The device is suitable for whole milk, low-fat milk, organic, soy milk, etc. Despite this, it is suggested to use whole milk for optimum results.
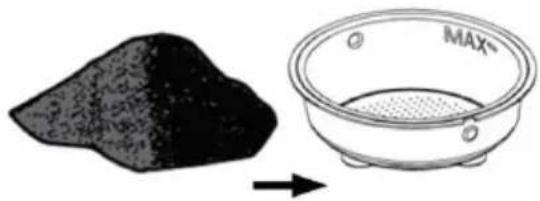
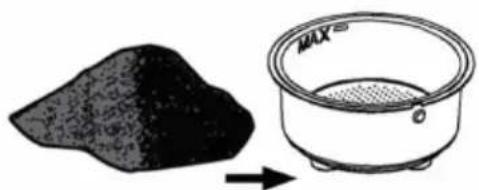
Selecting the filter
Use the small filter for one shot of ground coffee.
Fig. 3.
Use the larger filter for a double shot or two shots of ground coffee.
Fig. 4.
Inserting the filter
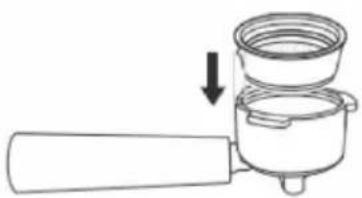
To install the filter, first align the notch on the filter with the groove inside the portafiler.
Fig. 5.
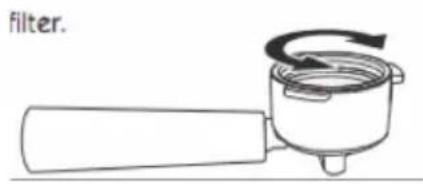
Then, turn the filter to the left or right to lock it in place. This will secure the filter in the portafilter.
Fig. 6.
Filling ground coffee
Use the measuring spoon to pour coffee into the selected filter.
Press it firmly and evenly with the spoon's tamper.
Clean any excess coffee from the rim before placing it in its position.
Fig. 7.
Note: The ground coffee cannot exceed the Max. mark.
Placing the portafilter
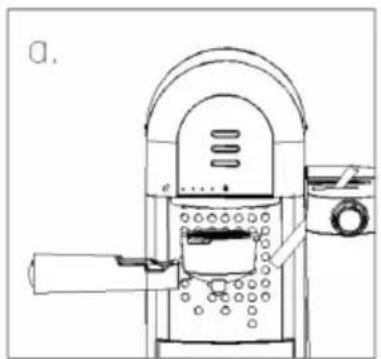
Move the retainer clip back and fix the portafilter in its correct position.
Place the portafilter's handle so that it is aligned with the open-lock icon on the unit and fits into the groove.
Turn it to the right until the retention clip is aligned with the closed lock icon on the device.
Fig. 8.
Placing the cups
ENGLISH
Pull out the height-adjustment tray and set it to the desired height depending if you desire to brew a simple or double espresso.
Keep the height-adjustment tray inside its compartment if you are using a larger cup to brew cappuccino or latte.
Warning: When brewing cappuccino or latte, make sure to adjust the froth-dispensing tube lever so that the tube is inside the cup to be used. The tube can be detached by rotating it in order to clean it.
Turning the device on
Make sure the device is plugged to a power supply.
Turn on the device's power switch. The icons will blink 3 times and the machine will beep. The icons will blink during the preheating process until water reaches the optimal temperature.
Once the icon lights turn steady, the machine is ready to be used.
Functions
Espresso
Press the espresso button once to brew one small espresso.
Press the espresso button twice to brew a large cup of espresso.
Hold down the espresso button for 3 seconds to customize the brewing to your preference.
When done, press the espresso button once again to stop brewing.
The unit will start brewing the espresso according to your selection. The unit will turn off automatically and the lights will stay steady on indicating that the cycle has been completed.
To stop brewing coffee manually, press the button when the desired amount of coffee has been brewed.
Cappuccino
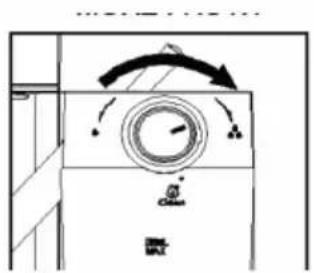
Prior to preparing your cappuccino, adjust the quantity of frothed milk according to your preference by turning the froth knob to the right for more froth and to the left for less froth.
Fig. 9.
Note: The amount of froth can be adjusted during the brewing cycle.
Press the cappuccino button once to brew one small cappuccino.
Press the cappuccino button twice to brew a large cup of cappuccino.
The unit will start brewing the cappuccino according to your settings.
To stop brewing coffee manually, press the button when the desired amount of coffee has been brewed.
Macchiato/latte
Prior to preparing your macchiato, adjust the quantity of frothed milk according to your
ENGLISH
preference by turning the froth knob to the right for more froth and to the left for less froth. Fig. 10.
Note: The amount of froth can be adjusted during the brewing cycle.
Press the macchiato/latte button twice to brew a latte.
To stop brewing coffee manually, press the button when the desired amount of coffee has been brewed.
Hot milk/milk froth
Hold down the cappuccino button for 3 seconds to obtain hot milk or you want to add some more milk froth to the previously prepared coffees.
To stop brewing milk manually, press the button when the desired amount of milk has been poured into the cup.
Once you are done preparing your beverage with milk, store the unit's milk tank directly in the refrigerator (ready to be used for the next time) or dispose of the leftover milk.
Note: The amount of milk froth will vary depending on different factors, such as the type of milk, the quantity, temperature, etc.
Auto-cleaning
Hold down the macchiato/latte button for 3 seconds (approx.) to activate the auto-cleaning function.
Auto-off
The device will automatically enter standby mode after 15 minutes of no operation. Press any of the buttons to start it again.
Descaling
Limescale deposits have an adverse effect not only on the quality of the espresso and the water, but they also cause power losses and shorten the lifespan of the device.
Possible signs that indicate that descaling is required are a large amount of steam being produced and slower brewing.
Note:
It is suggested to descale the device every 80 brew cycles when using filtered water, or every 40 brew cycles when using tap water.
After 500 cycles and with the milk tank in place, the appliance will remind the user to perform descaling by lighting the Cappuccino and Latte indicators alternately. When this happens:
Fill the water tank with 600 ml of water and vinegar: 50 % of each.
Press the espresso and macchiato/latte buttons simultaneously. The 6 indicators will start flashing slowly.
ENGLISH
After 30 minutes approx., the 6 light indicators will start flashing quickly. At this moment, empty the water tank and refill it with another 600 ml of clean water.
Press the espresso and macchiato/latte buttons simultaneously again. The device will repeat the descaling process and will finish after 30 minutes approx.
Once it has finished, the device will enter standby mode.
Discard vinegar inside the tank.
Rinse the water tank thoroughly with tap water. Fill half the tank with water.
Empty water, rinse and empty again.
Note: This process can be carried out manually before reaching 500 cycles.
Note:
Even if the device starts reminding the need to descale, it will operate normally when any of its coffee buttons are pressed.
The descaling process can be stopped at any time by pressing any button. Then, the appliance will continue to remind to perform descaling later on.
It is suggested to descale the machine periodically to ensure proper operation and to keep it in good conditions.
5. CLEANING AND MAINTENANCE
Milk tank and steam tube
Even though the milk tank can be stored in the fridge with leftover milk, it is important to clean the milk tank regularly.
Remove the milk tank from the unit.
Remove the milk tank cover.
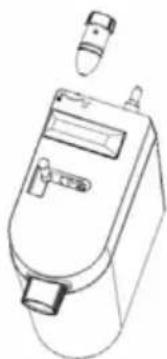
The steam tube connector can be detached by rotating it, and can be cleaned under running water with soap. After cleaning, assemble it onto the milk tank cover by rotating it again.
When cleaning the milk tank, remove the silicone air nozzle (don't pull it out), wash it with tap water and soap, and place it back in its position.
Pour out any milk left, rinse and wash the milk tank and its lid thoroughly with warm soapy water. Rinse again and dry well.
Do not use abrasive cleaners or scouring pads, as they will damage the product. The milk tank is dishwasher safe (top rack). Do not wash the milk tank cover in the dishwasher.
Place a large empty cup under the steam tube.
Turn the froth knob clockwise to the clean position, then press and hold the macchiato/latte button for 3 seconds and release to activate the auto-cleaning function. The unit will start releasing steam through the steam tube. Let it run for a few seconds until no more milk is
ENGLISH
observed. When done, press the macchiato/latte button once to stop the process.
Empty out any water left on the milk tank and place it back in the unit.
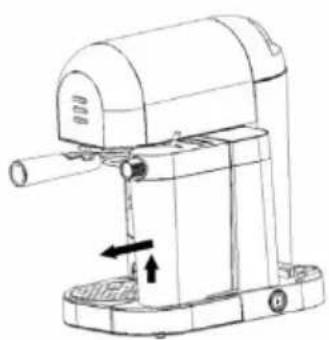
Note: To remove the tank form the unit, lift it slightly up and then pull it out.
Fig. 10.
Fig. 11.
Spout, portafilter and filter
Switch the power button on the side of the unit to the off position "O" and unplug the power cord from the power outlet.
Allow the device to cool completely down before touching it.
Remove the portafilter and discard the coffee grounds. Wash both the portafilter and filter with warm soapy water and rinse them well. Do not wash the portafilter and filters in the dishwasher.
Wipe the lower part of the spout with a damp cloth or paper towel to remove any coffee grounds.
Place the portafilter (without any filter) back in the unit.
Place an empty large cup under the portafilter.
Press the espresso button once and let the unit brew with water only until it stops automatically.
Water tank
Empty the water tank after each use.
Use soapy water to clean it, empty it and then rinse it with clean water. Dry it before installing it back in the device.
The water tank can be washed in the dishwasher.
Coffee machine
Use a soft, damp cloth to clean the device's surface.
Do not use abrasive cleaners or scouring pads.
If the device is not going to be used for some time, store it as is shown on the below image.
Fig. 12.
6. TROUBLESHOOTING
| Problem Causes Solutions | ||
| Coffee does not come out. | No water in tank.Coffee grind is too fine.There is too much coffee in the filter.The appliance was not turned on or plugged in.Coffee has been tamped/compressed too much. | Add water.Grind medium-ground coffee.Fill filter with less coffee.Plug unit and turn it on.Refill filter basket with coffee, do not tamp too much. |
| Coffee comes out around the edge of the portafilter. | Portafilter not rotated to full lock position.Coffee grounds around the filter basket rim.There is too much coffee in the filter. | Rotate filter holder to full lock position.Wipe off the rim.Fill with less coffee. |
| Milk is not foamy after frothing or it is not coming out of the steam tube. | Ran out of steam.Steam tube is blocked. | Ensure there is enough water in the tank.Follow the instructions to clean the milk tank and the steam tube. |
| Coffee comes out too quickly. | Ground coffee is too coarse.Not enough coffee in filter.Coffee is not pressed or tamped down enough. | Use a finer grind.Use more coffee.Tamp coffee a bit harder. |
| Coffee is too weak. Using small filter for double shot of espresso.Ground coffee is too coarse. | Use large filter for double shot of espresso.Use a finer grind. | |
| The 3 panel light indicators flash. | Water tank is out of water. Add water to tank. | |
ENGLISH
7. TECHNICAL SPECIFICATIONS
01590 Power Instant-ccino 20 Chic Serie Nera
01594 Power Instant-ccino 20 Chic Serie Bianca
1230 - 1470 W, 220-240 V\~, 50 Hz
IP XO
Made in China | Designed in Spain
8. DISPOSAL OF OLD ELECTRICAL APPLIANCES
The European directive 2012/19/EU on Waste Electrical and Electronic Equipment (WEEE), specifies that old household electrical appliances must not be disposed of with the normal unsorted municipal waste. Old appliances must be collected separately, in order to optimize the recovery and recycling of the materials they contain, and reduce the impact on human health and the environment.
The crossed out "wheeled bin" symbol on the product reminds you of your obligation to dispose of the appliance correctly. If the product has a built-in battery or uses batteries, they should be removed from the appliance and disposed of appropriately.
Consumers must contact their local authorities or retailer for information concerning the correct disposal of old appliances and/or their batteries.
9. TECHNICAL SUPPORT AND WARRANTY
This product is under warranty for 2 years from the date of purchase, as long as the proof of purchase is submitted, the product is in perfect physical condition, and it has been given proper use, as explained in this instruction manual.
The warranty will not cover the following situations:
- The product has been used for purposes other than those intended for it, misused, beaten, exposed to moisture, immersed in liquid or corrosive substances, as well as any other fault attributable to the customer.
- The product has been disassembled, modified, or repaired by persons, not authorised by the official Technical Support Service of Cecotec.
- Faults deriving from the normal wear and tear of its parts, due to use.
The warranty service covers every manufacturing defects of your appliance for 2 years, based on current legislation, except consumable parts. In the event of misuse, the warranty will not apply.
If at any moment you detect any problem with your product or have any doubt, do not hesitate to contact Cecotec Technical Support Service at +34 963 210 728.
1. INSTRUCTIONS DE SÉCURITÉ
text_image
Warning sign with steam symbol inside a triangle, indicating heat or smoke hazardtext_image
Warning sign with steam symbol inside a triangle, indicating heat or smoke hazardMade in China | Designed in Spanien
natural_image
Warning symbol of a triangle with a steam symbol inside, commonly used to indicate heat or urgency (no text present)Made in China | Designed in Spain
8 RECICLAGEM DE ELETRODOMÉSTICOS
text_image
Warning sign with steam symbol inside a triangle, indicating heat or smoke hazard6. PROBLEEMOPLOSSING
Made in China | Designed in Spain
8. RECYKLING SPRZĘTU

Made in China | Designed in Spain
8. RECYKLACE ELEKTROSPOTŘEBIČŮ
Quart de Poblet, Valencia (Spain)