229224 - Vegetable peeler Hendi - Free user manual and instructions
Find the device manual for free 229224 Hendi in PDF.

| Product type | Professional vegetable peeler |
| Brand | Hendi |
| Model | 229224 |
| Dimensions (L x W x H) | 540 x 622 x 997 mm |
| Net weight | 42.4 kg |
| Power supply | 230 V ~ 50 Hz |
| Rated power consumption | 1100 W |
| Capacity | 18 kg / 28 L |
| Sound pressure level | > 70 dB(A) |
| Protection class | Class I |
| Ingress Protection (IP) rating | IP23 |
| Main material | Stainless steel |
| Main functions | Peeling potatoes, timer 0-8 min, discharge impulse |
| Control panel | Emergency stop, impulse button, indicator lights, timer |
| Safety devices | Magnetic switches on lid and hatch, overload circuit breaker, emergency stop |
| Water connection | Supply hose Ø12.5 mm with valve, drain hose Ø25 mm |
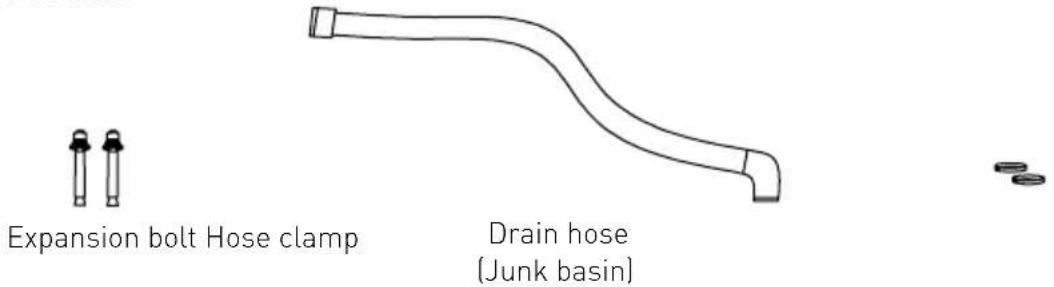
| Included accessories | Drain hose, hose clamp, expansion bolt |
| Intended use | Professional use only, peeling potatoes |
| Maintenance and cleaning | Clean after each use, do not immerse, do not wash in dishwasher |
| Warranty | 12 months |
Frequently Asked Questions - 229224 Hendi
User questions about 229224 Hendi
0 question about this device. Answer the ones you know or ask your own.
Ask a new question about this device
Download the instructions for your Vegetable peeler in PDF format for free! Find your manual 229224 - Hendi and take your electronic device back in hand. On this page are published all the documents necessary for the use of your device. 229224 by Hendi.
USER MANUAL 229224 Hendi
natural_image
Modern stainless steel industrial mixing machine with open lid and control panel (no visible text or symbols)You should read this user manual carefully before using the appliance.
Keep these instructions with the appliance. Diese Gebrauchsanweisung bitte beim Gerät aufbewahren. Bewaar deze handleiding bij het apparaat. Zachowaj instrukcję urządzenia Gardez ces instructions avec cet appareil. Conservate le istruzioni insieme all'apparecchio. Păstrați maualul de utilizare alături de aparat. Хранить руководство вместе с устройством.
Φυλάξτε αυτές τις οδηγίες μαζί με τη συσκευή. Tyto pokyny uschovejte u prístroje. Laikykite šias instrukcijas kartu su jrenginiu.

natural_image
Simple line drawing of a house with an arrow pointing left, labeled 'INDOOR' below (no other text or symbols)For indoor use only. Nur zur Verwendung im Innenbereich. Alleen voor gebruik binnenshuis. Do użytku wewnątrz pomieszczeń. Pour l'usage à l'intérieur seulement. Destinato solo all'uso domestico. Doar pentru uz la interior. Использовать только в помещениях.
natural_image
Symbol of a trash bin crossed with no text or numbers, enclosed in a square frame (no readable text)

CE
Thank you for purchasing this Hendi appliance. Read this manual carefully, paying particular attention to the safety regulations outlined below, before installing and using this appliance for the first time.
Safety regulations
- This appliance is not intended for household use.
- Only use the appliance for the intended purpose it was designed for as described in this manual.
- The manufacturer is not liable for any damage caused by incorrect operation and improper use.
- Keep the appliance and electrical plug away from water and other liquids. In the event the appliance falls into water, immediately remove the power plug from the socket. Do not use the appliance until it has been checked by a certified technician. Failure to follow these instructions will cause life threatening risks.
- Never attempt to open the housing of the appliance by yourself.
- Do not insert objects into the housing of the appliance.
- Do not touch the plug with wet or damp hands.
- Danger of electric shock! Do not attempt to repair the appliance by yourself, repairs are only to be conducted by qualified personnel.
- Never use a damaged appliance! When it's damaged, disconnect the appliance from the socket and contact the retailer.
- Warning! Do not immerse the electrical parts of the appliance in water or other liquids.
- Never hold the appliance under running water.
- Regularly check the power plug and cord for any damage. When damaged it must be replaced by a service agent or similarly qualified person in order to avoid danger or injury.
- Make sure the cord does not come in contact with sharp or hot objects and keep it away from open fire. Never pull the power cord to unplug it from the socket, always pull the plug instead.
- Make sure that the power cord and/or extension cord do not cause a trip hazard.
- Never leave the appliance unattended during use.
- Warning! As long as the plug is in the socket the appliance is connected to the power source.
- Turn off the appliance before unplugging it from the socket.
- Connect the power plug to an easily accessible electrical socket so that in case of emergency the appliance can be unplugged immediately.
- Never carry the appliance by the cord.
- Do not use any extra devices that are not supplied together with the appliance.
- Only connect the appliance to an electrical outlet with the voltage and frequency mentioned on the appliance label.
-
Never use accessories other than those recommended by the manufacturer. Failure to do so could pose a safety risk to the user and could damage the appliance. Only use original parts and accessories.
-
This appliance should not be operated by persons with reduced physical, sensory or mental capabilities, or persons that have a lack of experience and knowledge.
- This appliance should, under any circumstances, not be used by children.
- Keep the appliance and its power cord out of reach of children.
- WARNING: ALWAYS switch off the appliance and unplug from power socket before cleaning, maintenance or storage.
Special Safety Regulations
- This appliance should be operated by trained personnel only.
- Do not place the appliance on a heat source (gasoline, electric, charcoal cooker, etc.) Keep the appliance away from any hot surfaces and open flames.
- Do not use the appliance near explosive or flammable materials, credit cards, magnetic discs or radios.
• Always operate the appliance on a level, stable, clean, heat-resistant and dry surface. - Do not operate this appliance by means of an external timer or remote-control system.
- Never bypass any safety locks and switches on the appliance.
- WARNING: Keep all ventilation openings in the appliance clear of obstruction.
- WARNING: ALWAYS keep hands, hair and clothing away from the moving parts.
- Allow at least 15 cm space around the appliance during use for ventilation purposes.
- Caution! Securely route the power cord in order to prevent unintentional pulling or contact with the heating surface.
- Do not wash the body of appliance with water or a waterjet. Washing with water can cause leakage which increases the risk of electric shock.
- Do not clean or store the appliance until it is completely cooled down.
- Do not move the appliance while in operation. Unplug the appliance when moving and hold it at the bottom.
- Do not operate the appliance without content to avoid overheating.
- Never operate the appliance without the lid and rotating plate installed.
- No parts are dishwasher safe.
Intended use
- This appliance is intended for professional use and can be operated only by qualified personnel.
- This appliance is designed only for peeling potatoes in commercial use. Any other use may lead to damage of the appliance or personal injury.
- Operating the appliance for any other purpose shall be deemed a misuse of the device. The user shall be solely liable for improper use of the device.
Grounding installation
This appliance is classified as protection class
I and must be connected to a protective ground. Grounding reduces the risk of electric shock by providing an escape wire for the electric current. This appliance is fitted with a power cord that has a grounding wire and grounded plug. The plug must be plugged into an outlet that is properly installed and grounded.
Product description
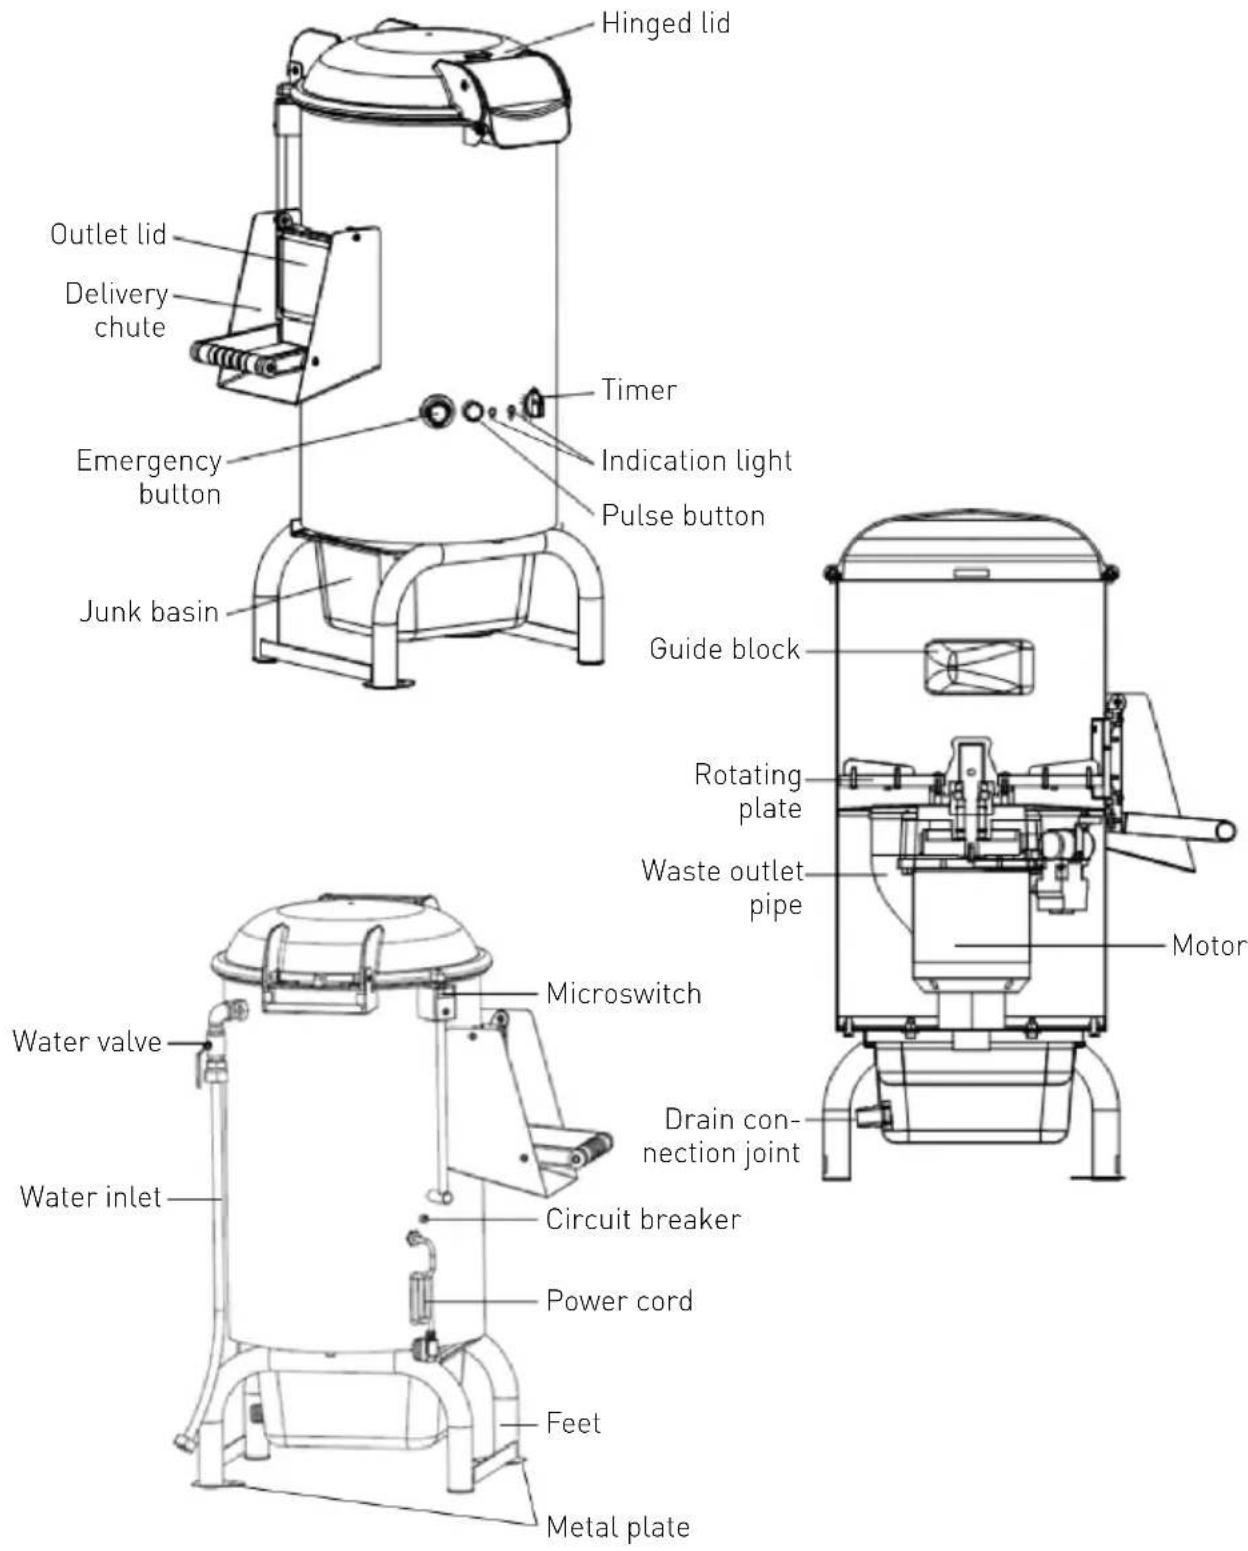
Accessories
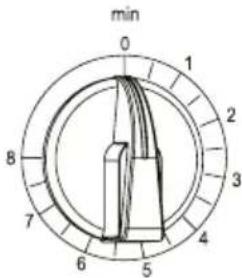
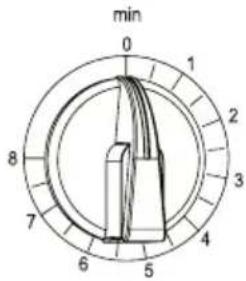
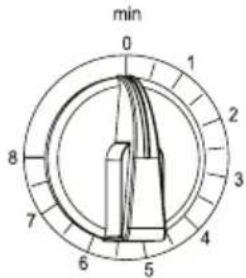
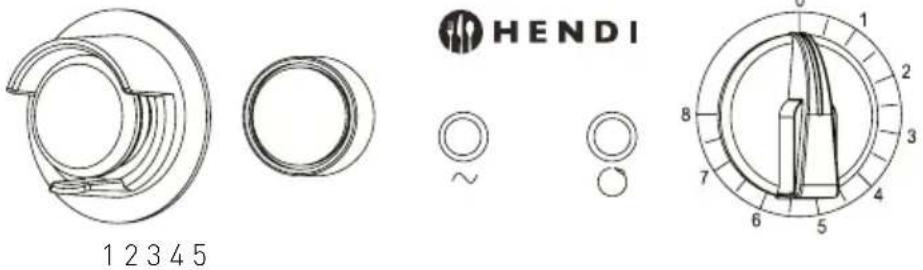
Control panel
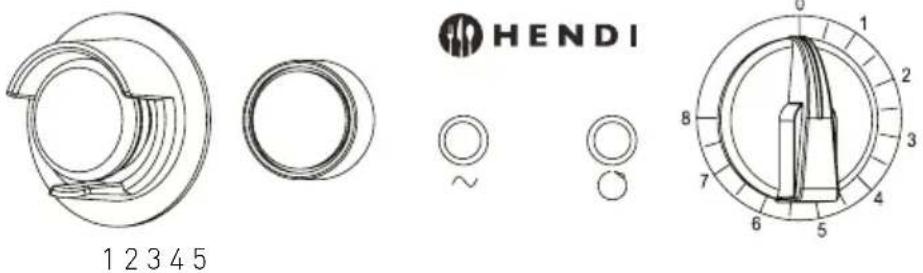
1) Emergency button
- In case of emergency (e.g. blockage, abnormal vibration or noise etc.), press the button immediately. The appliance stops. All the other buttons / switches are deactivated until the emergency button is reset.
Note: To reset the emergency button, rotate it clockwise, until it pops out to the initial position.
2) Pulse button
• Use to discharge the peeled potatoes.
Note: Do not press the pulse button during peeling operation.
3) Power-on indicator
- The indicator is on when the appliance is connected to the mains and power on.
4) Operating indicator
- The indicator is on while the motor is operating.
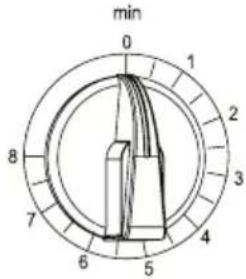
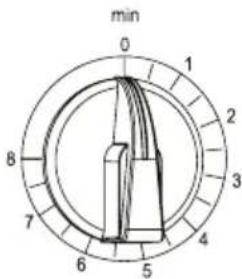
5) Timer knob
- Turn the timer knob to the desired operating time (0-8 minutes) to start the machine.
Preparations before installation
- Remove all protective packaging and wrapping.
-
Check the appliance transport damages. Make sure all the parts are supplied. In case of incomplete delivery (e.g. drain hose, hose clamps, expansion bolts) or damage, contact supplier immediately. DO NOT use the appliance. (See; Warranty).
-
Clean the appliance before use (See; Cleaning and Maintenance).
- Make sure the appliance is completely dry.
- Keep the packaging if you intend to store your appliance in the future.
Installation
- Ensure the machine is placed in a dry area and that surface is level and has sufficient strength to support the machine.
- Ensure that the electrical power supply corresponds with the rating label on the machine.
- Ensure there are no obstructions nearby.
-
CAUTION! Never bypass any safety locks and switches on the appliance.
-
Ensure the expansion bolts (supplied) are installed to the metal plates (on the feet) to fix the appliance.
- In any case, installation should be carried out by taking into account any applicable industrial safety regulations in force.
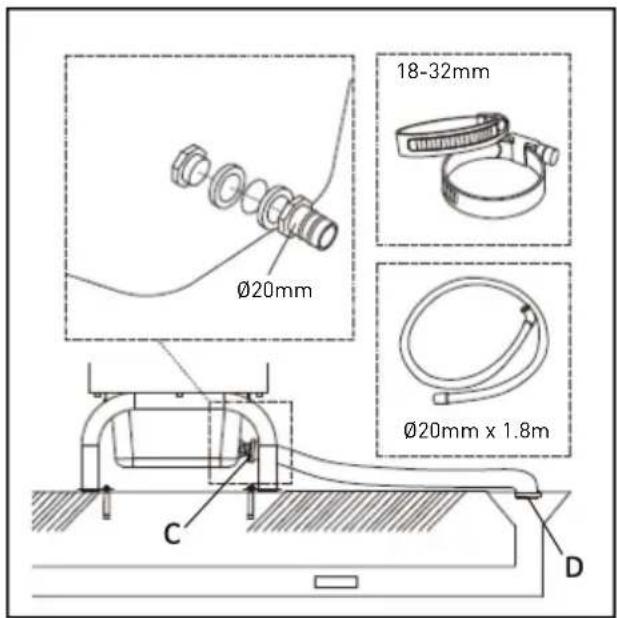
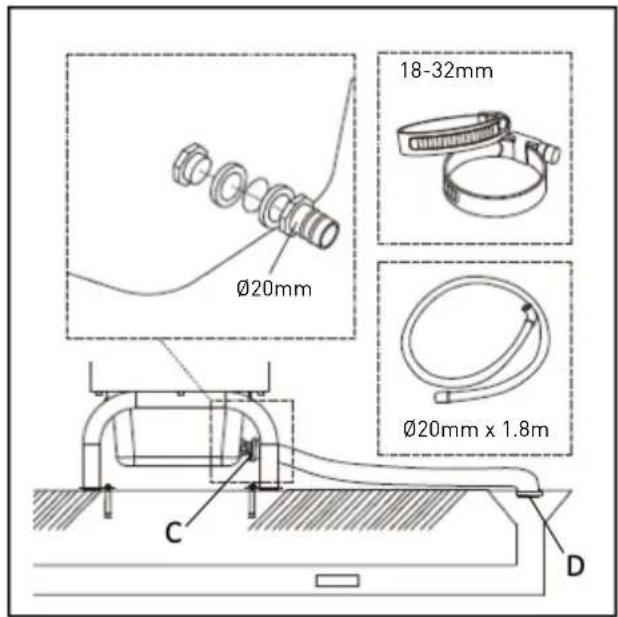
Connection to water supply and drainage system
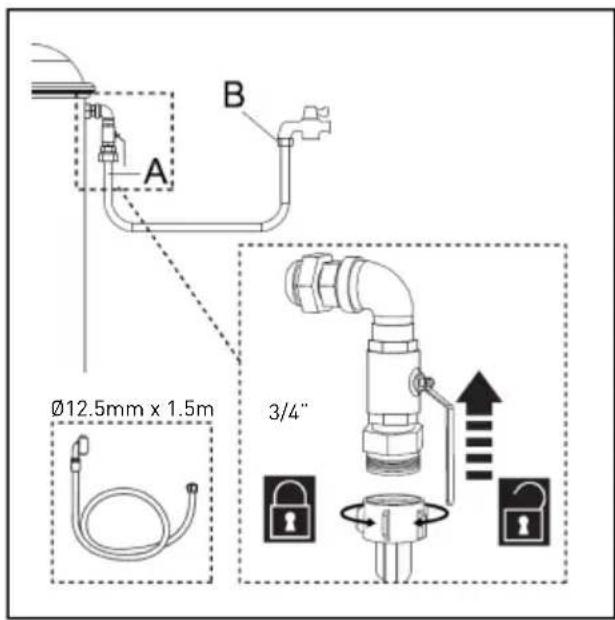
1) Connect to water supply by means of the supplied hose ( 12.5mm x 150cm) and 3/4 " couplings. Proceed as follows:
I. Connect hose to inlet at the back side of the machine (Location A).
II. Connect the other end of the hose to water supply (Location B).
III. The appliance includes a water valve for controlling of water flow conveniently.
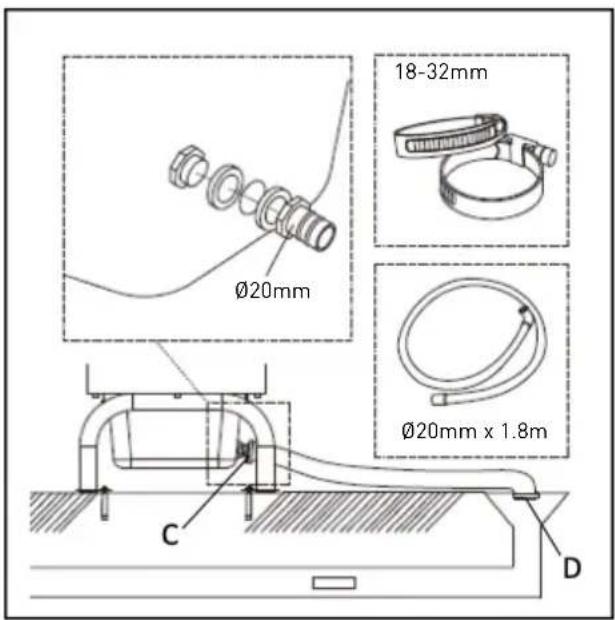
2) Connect to drainage system by means of the supplied hose ( 25mm × 180cm ) and hose clamps. Proceed as follows:
- Put the hose clamps onto the hose.
II. Connect hose to the joint of the junk basin (Location C) and affixed by the hose clamps.
III. The other end of the drain hose is inserted into the drainage system (Location D).
EN
Operation
Attention: This appliance has a safety system which ensures will prevent operation unless the lid is correctly placed.

1) Open the transparent lid by pulling the handle A until it clicks open.
2) Put the rotating plate in and load the tank with the product to be processed.
3) Lock the lid and make sure the outlet door B is locked.
4) Connect the water supply and switch on the water valve. Make sure water is flowing in. (see "Connection to water supply and drainage system").
5) Switch on the mains power. Power-on indicator C will go on.
6) Start the machine by turning the timer F on the required working-cycle time length, the operating indicator D will go on.
7) When the setting time is reached, the machine will stop automatically and the operating indicator will go off.
8) Open the outlet door B after preparing a container. Then press pulse button E to rotate of the disk. Meanwhile hold the outlet door until getting all potatoes.
DANGER — CAUTION: Never put your hand inside the outlet door. If there is any accident occurred, please press the emergency button immediately.
WARNING! The appliance should not be operated without load.
NOTE: Remove the peeling plate and check the waste outlet pipe for blockage for each cycle.
NOTE: The appliance is equipped with two safety switches.
a) The reed-switch is equipped with a magnet mechanism. The appliance stops automatically when the upper lid or the outlet lid is opened during operation.
b) Over current protection switch (Circuit breaker) is designed to protect the electrical circuit from damage caused by excess current as a result of an overload or short circuit. The switch interrupts current flow after a fault is detected.
Note: To reset the switch, press it after the issue is solved.
Important
- WARNING! Never insert your hands in the appliance while in operation.
- Do not use wooden/metal or plastic objects to scrape ingredients.
- Never use frozen potatoes.
Cleaning and Maintenance
Attention: Always unplug the appliance from the electrical socket and let it cool completely before cleaning and storage.
Cleaning
- Clean the appliance before and after each use.
- Never immerse the appliance in water or other liquids.
- Clean the cooled exterior surface with a slightly damp cloth or sponge with some mild soap solution.
-
Make sure to clean the upper lid (incl. the gasket), delivery chute and basins. Dry with a soft dry cloth.
-
Open the upper lid and remove the peeling plate from the peeling chamber. Clean the peeling plate and peeling chamber interior with a suitable brush. Rinse them with clear water afterward.
- Never use abrasive sponges or detergents, steel wool or metallic utensils to clean the interior or exterior parts of the appliance.
- If the appliance is idle for a long time, make sure to lubricate all metal before use.
Storage
- Store the appliance in a cool, clean and dry place.
- Wipe the outside of the machine at least once a month with a soft damp cloth and, if necessary, a little mild detergent.
Troubleshooting
If the appliance does not function properly, check the below table for possible solutions. If your problem isn't solved by one of these solutions, please contact the supplier/service provider.
| Problem Solution | |
| The appliance does not start | Make sure it is plugged in. |
| Make sure the safety circuit breaker is closed. | |
| Make sure the emergency button is not triggered. | |
| If the problem occurs after a long period of intensive use, the motor may have overheated. Wait at least 20 minutes and try again. If you put the appliance in a cool place, this will reduce the waiting time. |
Technical specification
| Item no. 229200 229217 229224 | |||
| Operating voltage & frequency 230V~50Hz | |||
| Rated power consumption 550W | 750W 1100W | ||
| Dimensions 540x622x(h)802mm | 540x622x(h)857mm 540x622x(h)997mm | ||
| Capacity 5kg / 12L 10kg / 22L 18kg / 28L | |||
| A-weighted emission sound pressure level | >70dB(A) | ||
| Protection class Class I | |||
| Waterproof class IP23 | |||
| Net weight | 39,2kg | 39,6kg | 42,4kg |
Remark: Technical specification is subjected to change without notification.
Circuit diagram
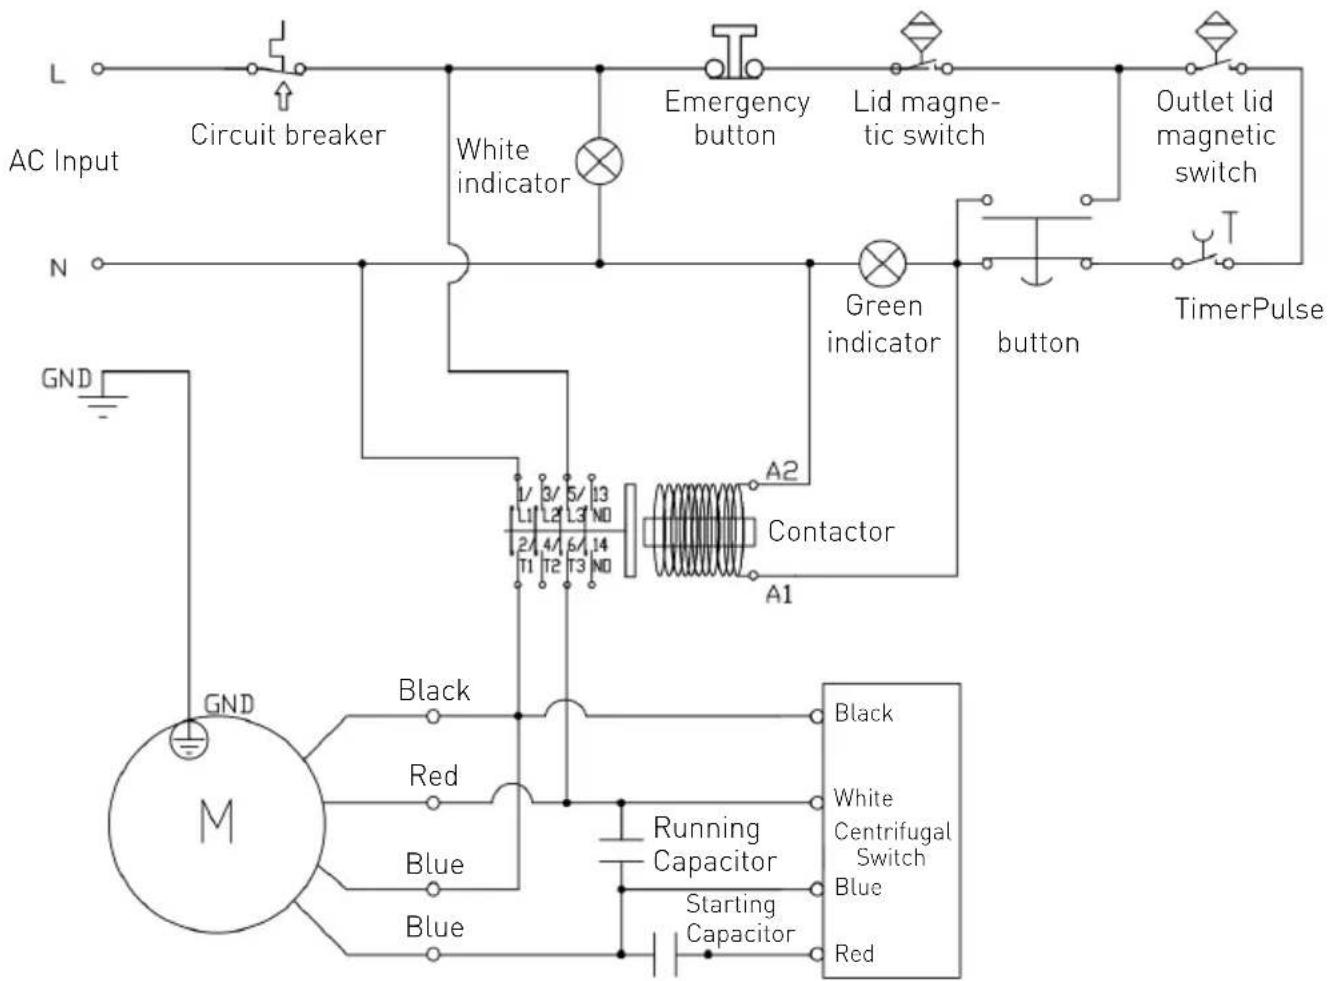
flowchart
graph TD
    A["AC Input"] --> B["Circuit breaker"]
    B --> C["White indicator"]
    C --> D["Emergency button"]
    D --> E["Lid magnetic switch"]
    E --> F["Outlet lid magnetic switch"]
    G["N"] --> H["Ground"]
    I["GND"] --> J["Motor M"]
    K["A2"] --> L["Contactor"]
    M["A1"] --> L
    L --> N["Black"]
    L --> O["Running Capacitor"]
    L --> P["Starting Capacitor"]
    Q["Blue"] --> R["Black"]
    S["Red"] --> T["Black"]
    U["Starting Capacitor"] --> V["Blue"]
    W["Red"] --> X["Black"]
    Y["Green indicator"] --> Z["Button"]
    AA["TimerPulse"] --> AB["Output Line"]
Exploded drawing and part list
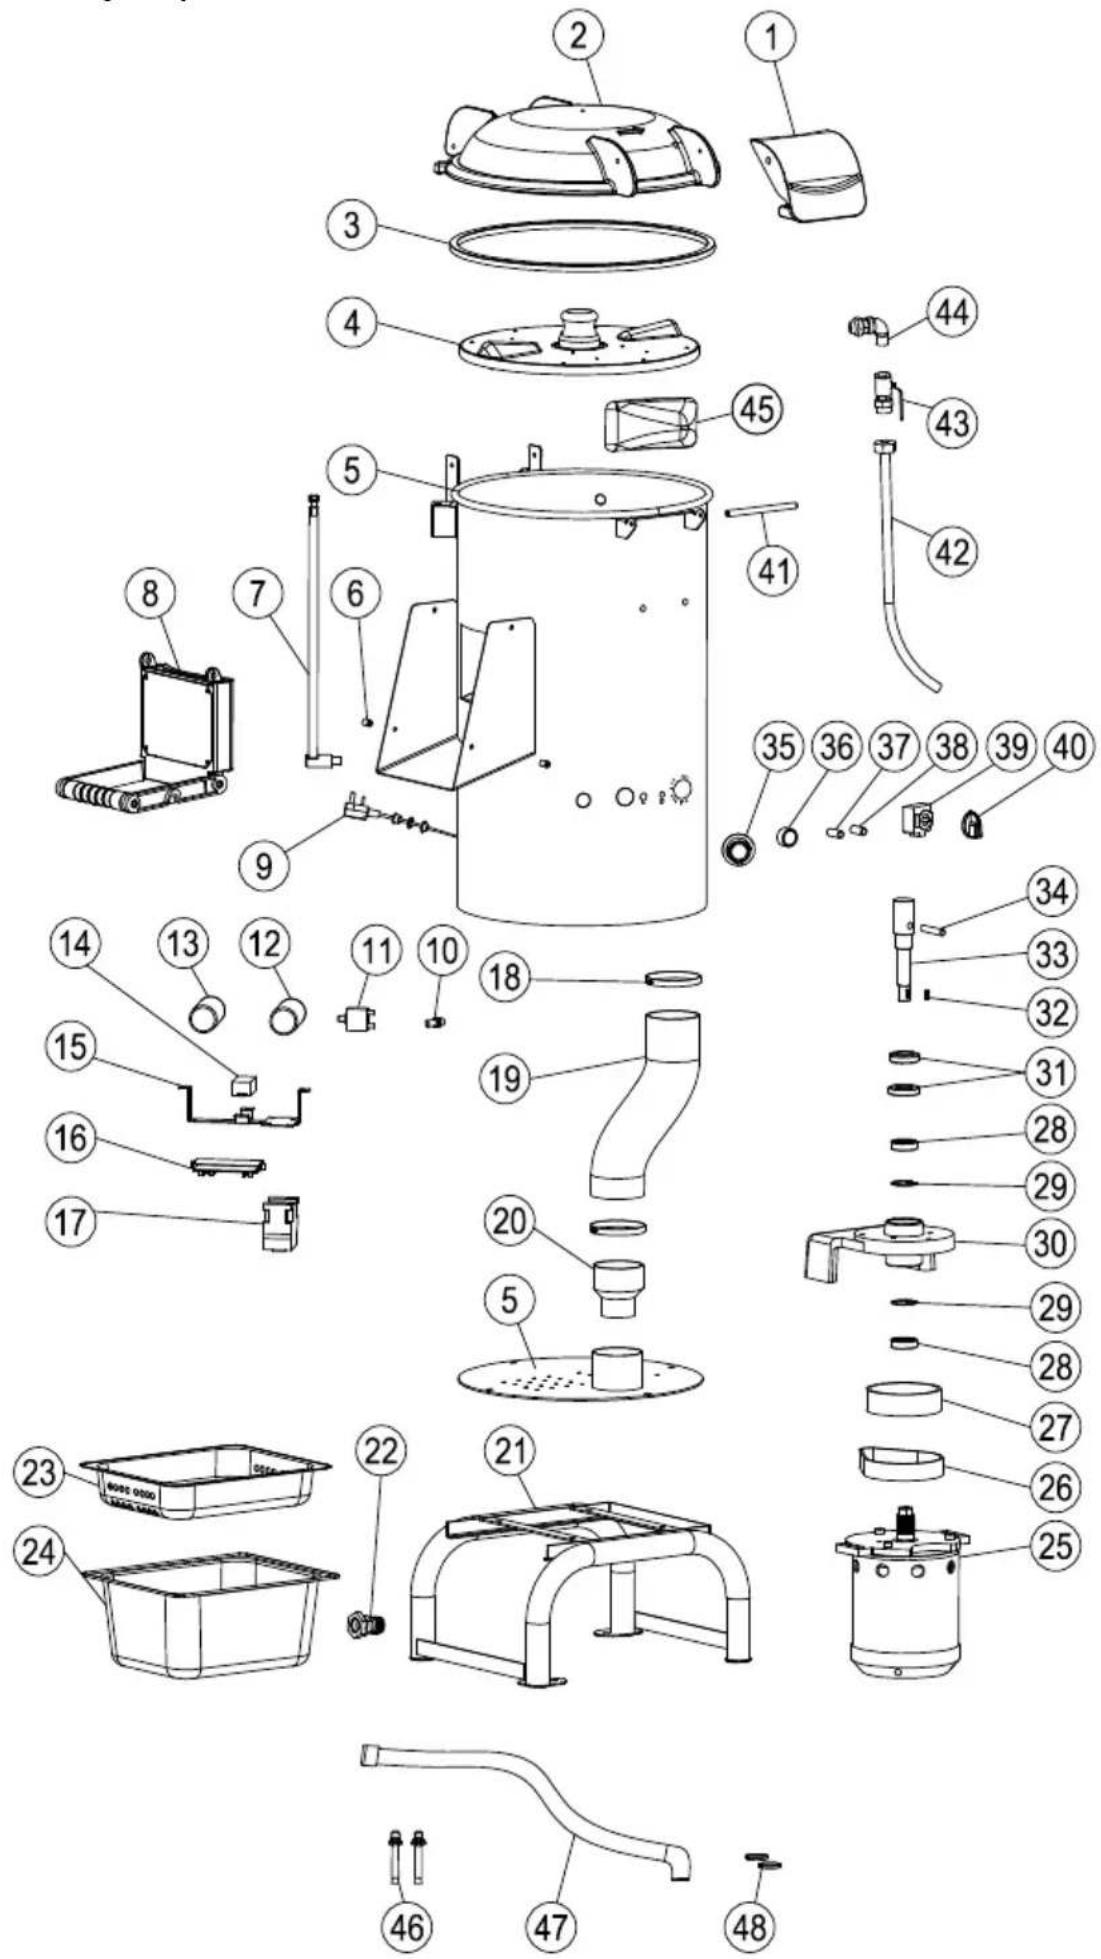
| Part no. | Part name Part no. Part name | ||
| 1 Locking plate 25 Motor | |||
| 2 Hinged lid 26 Belt | |||
| 3 Seal ring 27 Belt wheel | |||
| 4 Abrasive disc 28 6004 Bearing | |||
| 5 S/S Cylinder 29 C-type snap ring | |||
| 6 Protruding pin 30 Motor fixing board | |||
| 7 | Wire pipe | 31 Sealing ring | |
| 8 Outlet lid 32 Flat key | |||
| 9 | Power cord | 33 | Output shaft |
| 10 Microswitch 34 Fixed position pin | |||
| 11 | Circuit breaker | 35 | Emergency button |
| 12 | Running capacitor | 36 Pulse button | |
| 13 | 150uF Starting capacitor | 37 | White indicator |
| 14 | Centrifugal switch | 38 | Green indicator |
| 15 | Bracket of PCB | 39 Timer | |
| 16 | PCB panel | 40 | Knob of timer |
| 17 Contactor | 41 Bayonet pin | ||
| 18 Hose clamp | 42 | Hose | |
| 19 | Waste outlet pipe | 43 | Water valve |
| 20 | Discharge pipe coupling | 44 | L type connector |
| 21 Support bracket | 45 Guide block | ||
| 22 | Drain connection joint | 46 | Expansion bolt |
| 23 | Sieve basin | 47 | Drain hose (Junk basin) |
| 24 Junk basin | 48 Hose clamp | ||
Warranty
Any defect affecting the functionality of the appliance which becomes apparent within one year after purchase will be repaired by free repair or replacement provided the appliance has been used and maintained in accordance with the instructions and has not been abused or misused in any way. Your statutory rights are not affected. If the appliance is claimed under warranty, state where and when it was purchased and include proof of purchase (e.g. receipt).
In line with our policy of continuous product development we reserve the right to change the product, packaging and documentation specifications without notice.
Discarding & Environment
When decommissioning the appliance, the product must not be disposed of with other household waste. Instead, it is your responsibility to dispose to your waste equipment by handing it over to a designated collection point. Failure to follow this rule may be penalized in accordance with applicable regulations on waste disposal. The separate collection and recycling of your waste equipment at the time of disposal will help conserve natural resources and ensure that it is recycled in a manner that protects human health and the environment.
For more information about where you can drop off your waste for recycling, please contact your local waste collection company. The manufacturers and importers do not take responsibility for recycling, treatment and ecological disposal, either directly or through a public system.
natural_image
Simple line drawing of a curved pipe or lever (no text or symbols)natural_image
Technical line drawing of a mechanical component with concentric rings and a central hole (no text or symbols)12345

HENDI


1) Not-Aus-Taste

natural_image
Simple line drawing of a curved pipe or lever (no text or symbols)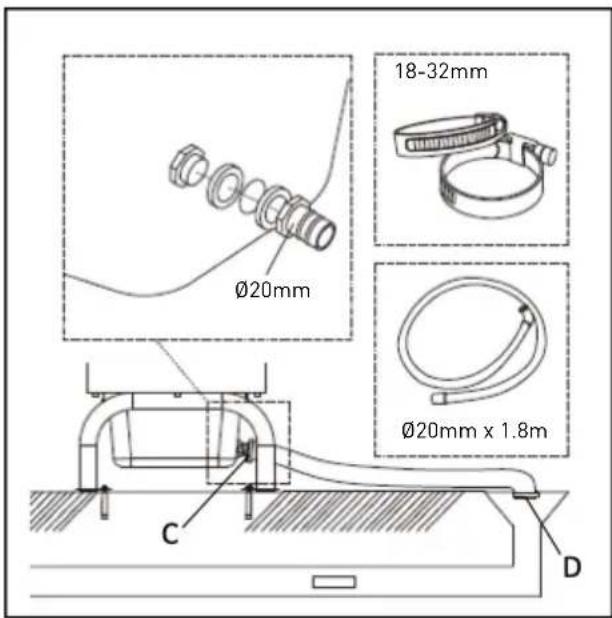
natural_image
Simple line drawing of a curved pipe or lever (no text or symbols)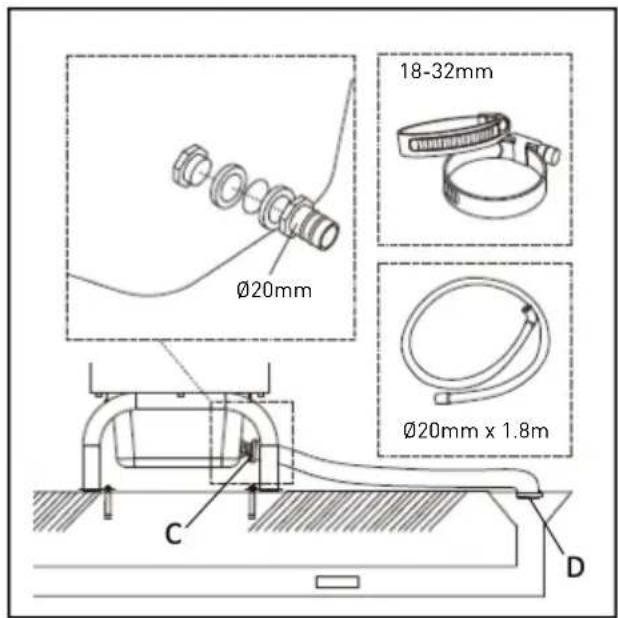
natural_image
Simple line drawing of a curved pipe or branch (no text or symbols)natural_image
Technical line drawing of a mechanical component with concentric rings and a base (no text or symbols)

HENDI


12345

natural_image
Simple line drawing of a curved pipe or lever (no text or symbols)
natural_image
Technical line drawing of a mechanical component with concentric rings and a central shaft (no text or symbols)

HENDI


12345

natural_image
Simple line drawing of a curved pipe or handle (no text or symbols)
natural_image
Technical line drawing of a mechanical component with concentric rings and a central hole (no text or symbols)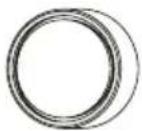

HENDI


12345
1) Buton de urgentă
natural_image
Simple line drawing of a curved pipe or lever (no text or symbols)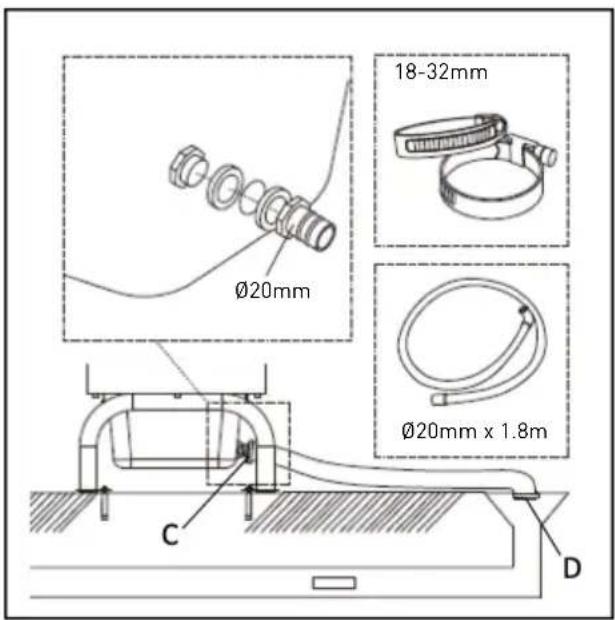
natural_image
Simple line drawing of a curved pipe or lever (no text or symbols)
natural_image
Technical line drawing of a mechanical component with concentric rings and a central hole (no text or symbols)

HENDI


12345
natural_image
Simple line drawing of a curved pipe or branch (no text or symbols)
Panel ovládání
1) Nouzový vypínač

Meets the essential requirements as described in: /
PKS Hendi South East Europe SA
5 Metsovou Str.
18346 Moschato, Athens, Greece
Tel: +30 210 4839700
Email: info@pks-hendi.com
Hendi Polska Sp. z o.o.
ul. Firmowa 12
62-023 Robakowo, Poland
Tel: +48 61 658 7000
Email: info@hendi.pl
Hendi Italia S.R.L.
Via Leonardo da Vinci 4
39100 Bolzano (BZ), Italy
Tel: +39 800 727 438
Email: office.italy@hendi.eu
Hendi Food Service Equipment GmbH
Ehring 15
1208, 12/F Exchange Tower
33 Wang Chiu Road, Kowloon Bay, Hong Kong
Tel: +852 2154 2618
Email: info-hk@hendi.eu
Hendi Food Service Equipment Romania S.R.L.
www.youtube.com/HendiEquipment
- Changes, printing and typesetting errors reserved.