Bolzano - Radio Audizio - Free user manual and instructions
Find the device manual for free Bolzano Audizio in PDF.


| Product Type | Internet Radio / Multifunction Audio (DAB+, FM, CD, USB, Bluetooth, Aux, Optical, Coaxial) |
| Brand | Audizio |
| Model | Bolzano |
| Power Supply | 220-240 VAC, 50 Hz (grounded plug) |
| Reception modes | DAB+, FM, Internet Radio (Wi-Fi) |
| Audio formats | CD, USB (FAT32, up to 16 GB), Bluetooth (reception), Auxiliary, Optical, Coaxial |
| Connectivity | Wi-Fi (802.11 b/g/n), Bluetooth (receiver only) |
| Display | Adjustable backlit display (brightness and timeout) |
| Remote control | Yes, with dedicated buttons (play, navigation, presets, etc.) |
| Special functions | Spotify Connect, UNDOK (remote control app) |
| Equalizer | Multiple presets + customizable (bass/treble) |
| Timers | Dual alarm (snooze) and sleep timer (15/30/45/60 min) |
| Inputs | Line (RCA L/R), Optical (Toslink), Coaxial |
| Outputs | Speakers (connectors), Subwoofer pre-out, Headphone (3.5 mm) |
| USB port | Yes (up to 16 GB, FAT32) |
| CD player | Yes (play, program, repeat, random) |
| Antennas | Built-in Wi-Fi, DAB/FM (cable supplied) |
| Safety | Instructions: do not open the casing, avoid liquids/metal objects, unplug during thunderstorms, indoor use (5-35°C) |
| Maintenance | Dry cloth only; no chemical products |
| Repairability | Only by a qualified technician; original parts mandatory |
| General information | Manual available in multiple languages; weight and dimensions not provided |
Frequently Asked Questions - Bolzano Audizio
User questions about Bolzano Audizio
0 question about this device. Answer the ones you know or ask your own.
Ask a new question about this device
Download the instructions for your Radio in PDF format for free! Find your manual Bolzano - Audizio and take your electronic device back in hand. On this page are published all the documents necessary for the use of your device. Bolzano by Audizio.
USER MANUAL Bolzano Audizio
BOLZANO WIFI DAB+ RADIO
Ref. nr.: 102.274 / 102.275

text_image
Maudizio SpotifyINSTRUCTION MANUAL
GEBRUIKSAANWIJZING
BEDIENUNGSANLEITUNG
MANUEL D'INSTRUCTIONS
INSTRUKCJA OBSŁUGI
NÁVOD K POUŽITÍ
INDEX
ENGLISH....6
UNPACKING INSTRUCTION....7
POWERSUPPLY 7
OVERVIEW 7
REMOTE CONTROL....8
BEFORE YOU START 9
GETTING STARTED....9
MODE SELECTION 9
AUDIO PLAYBACK....9
MENU NAVIGATION....9
PRESETS....9
SETTINGS....9
INTERNET RADIO 11
DAB RADIO....12
FM RADIO 12
CD PLAYER 13
USB 13
AUX IN....13
BT PLAYBACK 13
OPTICAL INPUT (TOSLINK)....13
COAXIAL OUTPUT 13
SUBWOOFER PRE AMP OUT 14
ALARM & SLEEP TIMER....14
UNDOK....14
SPOTIFY CONNECT....14
NEDERLANDS....15
UITPAKKEN 16
AANSLUITSPANNING 16
OVERZICHT 16
AFSTANDSBEDIENING 17
VOORDAT JE BEGINT 18
AAN DE SLAG 18
MODUS SELECTIE 18
AUDIO AFSPELEN....18
MENUNAVIGATIE 18
PRESETS....18
INSTELLINGEN 18
INTERNET RADIO 20
PODCASTS 21
DAB RADIO....21
FM RADIO 22
CD 22
USB 23
AUX In 23
BT STREAMING AUDIO....23
OPTICAL (TOSLINK) 23
COAXIAL OUT 24
SUBWOOFER PRE OUT 24
BT STREAMING AUDIO....33
OPTICAL INPUT (TOSLINK) 33
SUBWOOFER-VORVERSTÄRKERAUSGANG 33
COAXIAL OUTPUT 33
WECKER & SLEEP-TIMER....33
UNDOK....34
SPOTIFY CONNECT 34
ESPAÑOL 35
INSTRUCCIONES DE DESEMBALAJE 36
BT STREAMING AUDIO....53
OPTICAL (TOSLINK) 53
COAXIAL 53
SUBWOOFER PRE AMP OUT 53
ALARM & SLEEP TIMER....53
UNDOK....54
SPOTIFY CONNECT 54
POLSKI....55
INSTRUKCJA ROZPAKOWANIA 56
ZASILANIE 56
PRZEGLĄD....56
ZDALNE STEROWANIE....57
PRZED ROZPOCZĘCIEM....58
ROZPOCZĘCIE 58
WYBOR TRYBU 58
ODTWARZANIE AUDIO 58
NAWIGACJA PO MENU 58
PRESETY 58
USTAWIENIA....58
RADIO INTERNETOWE 60
RADIO DAB....61
RADIO FM....61
ODTWARZACZ CD 62
USB 62
AUX IN....62
ODTWARZANIE BT 63
WEJŚCIE OPTYCZNE (TOSLINK)....63
WYJŚCIE KOAKSJALNE 63
WYJŚCIE PRZEDWZMACNIACZA SUBWOOFERA 63
ALARM I WYŁACZNIK CZASOWY 63
UNDOK....63
SPOTIFY CONNECT 64
ČESKY 65
POKYNY PO VYBALENÍ 66
NAPÁJENÍ 66
PŘEHLED 66
DÁLKOVÉ OVLÁDÁNÍ 67
NEŽ ZAČNETE 68
ZAČÍNÁME 68
VÝBĚR REŽIMU 68
AUDIO PŘEHRÁVÁNÍ 68
NAVIGACE V NABÍDCE 68
PŘEDVOLBY 68
NASTAVENÍ 68
INTERNETOVÉ RÁDIO 70
RÁDIO DAB....71
RÁDIO FM....71
PŘEHRÁVAČ CD 72
USB 72
AUX IN....72
BT PLAYBACK 73
OPTICKÝ VSTUP (TOSLINK) 73
COAXIALNI VYSTUP 73
VÝSTUP PŘEDZESILOVAČE SUBWOOFERU 73
BUDÍK A ČASOVAČ SPÁNKU 73
UNDOK....73
PŘIPOJENÍ KE SLUŽBĚ SPOTIFY 73
TECHNICAL SPECIFICATION / TECHNISCHE SPECIFICATIE / TECHNISCHE DATEN / SPECIFICACIONES TÉCNICAS / SPÉCIFICATIONS
TECHNIQUES /SPECYFIKACJA TECHNICZNA / TECHNICKÁ SPECIFIKACE 75
ENGLISH
Congratulations to the purchase of this Audizio product. Please read this manual thoroughly prior to using the unit in order to benefit fully from all features.
Read the manual prior to using the unit. Follow the instructions in order not to invalidate the warranty. Take all precautions to avoid fire and/or electrical shock. Repairs must only be carried out by a qualified technician in order to avoid electrical shock. Keep the manual for future reference.
- Prior to using the unit, please ask advice from a specialist. When the unit is switched on for the first time, some smell may occur. This is normal and will disappear after a while.
- The unit contains voltage carrying parts. Therefore, do NOT open the housing.
- Do not place metal objects or pour liquids into the unit This may cause electrical shock and malfunction.
- Do not place the unit near heat sources such as radiators, etc. Do not place the unit on a vibrating surface. Do not cover the ventilation holes.
- The unit is not suitable for continuous use
- Be careful with the mains lead and do not damage it. A faulty or damaged mains lead can cause electrical shock and malfunction.
- When unplugging the unit from a mains outlet, always pull the plug, never the lead.
- Do not plug or unplug the unit with wet hands.
- If the plug and/or the mains lead are damaged, they need to be replaced by a qualified technician.
- If the unit is damaged to such an extent that internal parts are visible, do NOT plug the unit into a mains outlet and DO NOT switch the unit on. Contact your dealer. Do NOT connect the unit to a rheostat or dimmer.
- To avoid fire and shock hazard, do not expose the unit to rain and moisture.
- All repairs should be carried out by a qualified technician only.
- Connect the unit to an earthed mains outlet (220-240Vac/50Hz) protected by a 10-16A fuse.
- During a thunderstorm or if the unit will not be used for a longer period of time, unplug it from the mains. The rule is: Unplug it from the mains when not in use.
- If the unit has not been used for a longer period of time, condensation may occur. Let the unit reach room temperature before you switch it on. Never use the unit in humid rooms or outdoors.
-
To prevent accidents in companies, you must follow the applicable guidelines and follow the instructions.
-
Do not repeatedly switch the fixture on and off. This shortens the lifetime.
- Keep the unit out of the reach of children. Do not leave the unit unattended.
- Do not use cleaning sprays to clean switches. The residues of these sprays cause deposits of dust and grease. In case of malfunction, always seek advice from a specialist.
- Do not force the controls.
- This unit is with speaker inside which can cause magnetic field. Keep this unit at least 60cm away from computer or TV.
- If this product has a built-in lead-acid rechargeable battery. Please recharge the battery every 3 months if you are not going to use the product for a long period of time. Otherwise the battery may be permanently damaged.
- If the battery is damaged, please replace with same specifications battery. And dispose the damaged battery environment friendly.
- If the unit has fallen, always have it checked by a qualified technician before you switch the unit on again.
- Do not use chemicals to clean the unit. They damage the varnish. Only clean the unit with a dry cloth.
- Keep away from electronic equipment that may cause interference.
- Only use original spares for repairs, otherwise serious damage and/or dangerous radiation may occur.
- Switch the unit off prior to unplugging it from the mains and/or other equipment. Unplug all leads and cables prior to moving the unit.
- Make sure that the mains lead cannot be damaged when people walk on it. Check the mains lead before every use for damages and faults!
- The mains voltage is 220-240Vac/50Hz. Check if power outlet match. If you travel, make sure that the mains voltage of the country is suitable for this unit.
- Keep the original packing material so that you can transport the unit in safe conditions.

This mark attracts the attention of the user to high voltages that are present inside the housing and that are of sufficient magnitude to cause a shock hazard.

This mark attracts the attention of the user to important instructions that are contained in the manual and that he should read and adhere to.
The unit has been certified CE. It is prohibited to make any changes to the unit. They would invalidate the CE certificate and their guarantee!
NOTE: To make sure that the unit will function normally, it must be used in rooms with a temperature between 5^ C/ 41^ F and 35^ C/ 95^ F.

Electric products must not be put into household waste. Please bring them to a recycling centre. Ask your local authorities or your dealer about the way to proceed. The specifications are typical. The actual values can slightly change from one unit to the other. Specifications can be changed without prior notice.
Do not attempt to make any repairs yourself. This would invalid your warranty. Do not make any changes to the unit. This would also invalid your warranty. The warranty is not applicable in case of accidents or damages caused by inappropriate use or disrespect of the warnings contained in this manual. Audizio cannot be held responsible for personal injuries caused by a disrespect of the safety recommendations and warnings. This is also applicable to all damages in whatever form.
UNPACKING INSTRUCTION
CAUTION! Carefully unpack the box upon receipt. Check the contents to ensure that all parts are present and have been received in good condition. Notify the shipper immediately and retain packaging material if any parts appear damaged from shipping or the package itself shows signs of mishandling. Save the package and all packaging materials. If the product must be returned, it is important that the product is returned in the original factory box and packaging. If the device has been exposed to drastic temperature fluctuation (e.g. after transportation), do not switch it on immediately. The arising condensation water might damage your device. Leave the device switched off until it has reached room temperature.
POWERSUPPLY
The label on the back/under side of the product indicates the mains voltage to which it must be connected. Check that the mains voltage corresponds to this. Any other voltage than the one indicated may cause irreparable damage to the unit. The unit must also be connected directly to the mains voltage and no dimmer or adjustable power supply may be used.

Always connect the device to a protected circuit (circuit breaker or fuse). Make sure the device has an appropriate electrical ground to avoid the risk of electrocution or fire.
OVERVIEW
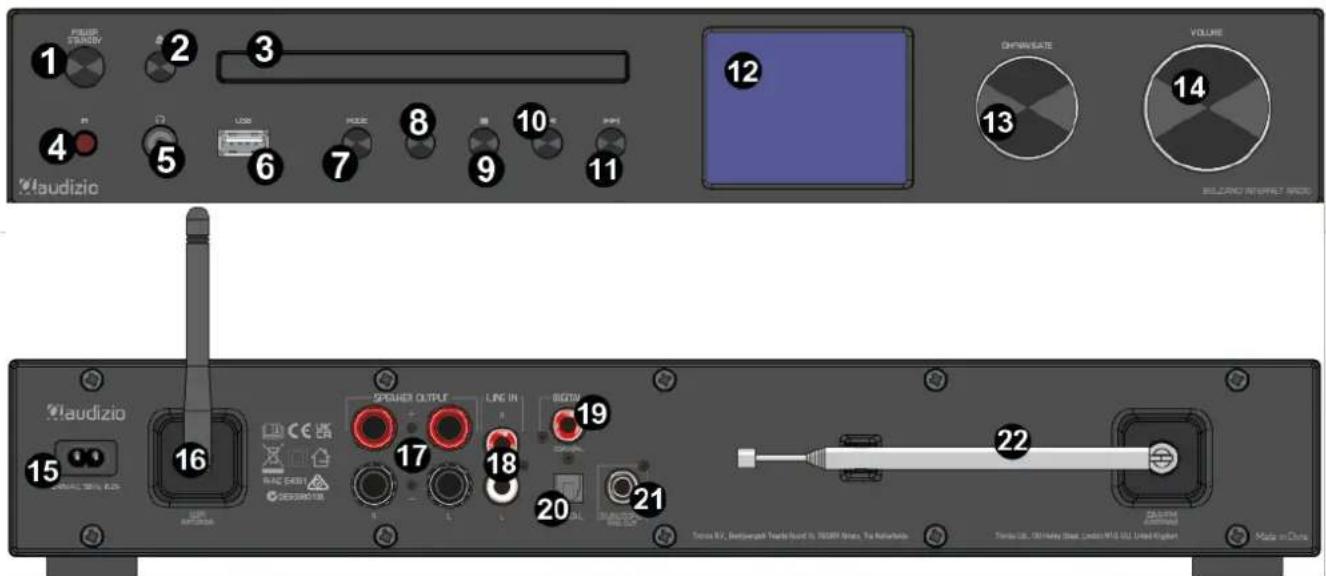
text_image
1 2 3 4 5 6 7 8 9 10 11 laudizio 12 13 VOLUME 14 laudizio 15 16 SPREAD OUTPUT LINE IN BIGDOM 17 18 20 21 22 Tennis N.V. Beetzerpack Tward Sound to 700MHz Brain, The Network Tennis Cat: 50 Hagy (Peak, London M16 U2 United Kingdom) Made in China- Standby/On
Press to change between "on" and "standby" mode
- Eject
Press to open/close CD Tray
-
CD tray
-
Infrared remote control sensor
-
Headphone jack
3.5mm jack for inserting headphones
-
USB-port
-
Mode
Press to change between different modes (internet radio, Podcasts, Spotify, DAB, FM, CD, USB, BT, Aux in, Optical in)
- Play/Pause
Press to play/pause in CD/USB/BT and internet radio
Press for DAB station search/scan
Press and hold for enabling /disabling Wireless
- Stop
Press to stop playing in CD/USB mode
Press for internet/ DAB/FM menu
- Previous
Press to change to the previous station on the list/previous track on media sources/decrease FM frequency
- Next
Press to change to the next station on the list/next track on media sources/increase FM frequency
-
Display screen
-
OK/Navigate
Rotate to navigate the menus. Press to confirm (OK)
- Volume control
Rotate to adjust the volume level
-
AC input
-
Wifi antenna
-
Speaker output connectors
For connecting speakers
- Line in
To connect an external source
- Coaxial output
To connect an external source such as dvd player or TV
- Optical input
To connect an external source such as dvd player or TV
- Subwoofer pre out
To connect an external subwoofer
- DAB/FM antenna
REMOTE CONTROL
- Eject
Press to eject the CD disk
- Standby
Press to Standby/On
- Previous
Press and hold for fast backward in CD
Press to select previous track in CD/USB/BT
Press to display the channel list in DAB, FM and internet radio
Press for fine tuning in FM
Press and hold for FM automatic tuning
- Play/pause:
Press to play/pause in BT/CD/USB and internet radio
- Next
Press and hold for fast forward in CD
Press to select the next track in CD/USB/BT
Press to display channel list in DAB/FM and internet radio
Press for fine tuning in FM
Press and hold for FM auto tuning
- Stop
Press to stop playing in CD/USB mode
- Repeat
Press to select a repeat mode in CD/USB
- Random
Press to select random mode in CD/USB
- Sleep
Press to set sleep timer
- Timer
Press to set timer
- Info
Press to show information
- Back
Press to return to previous menu
- Scan
Press to start DAB/FM scan
- Equaliser
Press to select preset sound characteristics
- Mode
Press to change the modes
- P+
Press to select next preset channel in DAB/FM/Internet radio
Press to select next MP3 Album in CD/USB
- Menu
Press to enter the menu
- P-
Press to select previous preset channel in DAB/FM/Internet radio
Press to select previous MP3 Album in CD/USB
- Volume -
Press to decrease volume
- Volume +
Press to increase volume
- Cursor up
Press to move up (on the menu screen, in channel lists, change mode in main menu)
- Cursor down
Press to move down (on the menu screen, in channel lists, change mode in main menu)
23.0K
Press to confirm
- Num pad
Numeric keys for accurate input
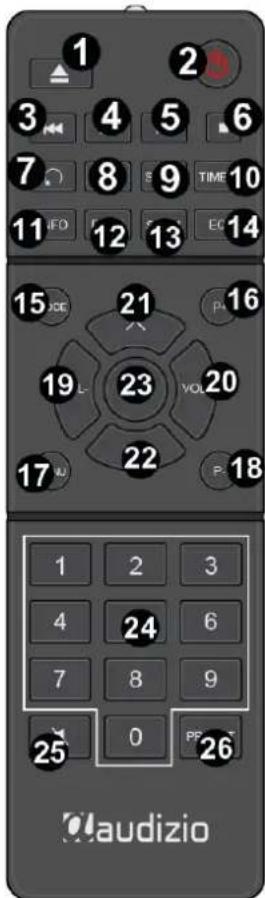
text_image
1 2 3 4 5 6 7 8 9 TIME 10 11 IFO 12 F 13 EC 14 15 JOE 21 P 16 19 L- 23 VOL 20 17 U 22 P 18 1 2 3 4 24 6 7 8 9 25 0 PF 26 Gaudizio25. Mute
Press to (un) mute the device
26. Preset
Press for CD program and preset channel in DAB, FM and internet radio Short press for preset recall menu Long press for preset save menu
BEFORE YOU START
Please ensure the following is ready: You have a broadband internet connection. A wireless broadband router is connected to the internet successfully. You know the Wired Equivalent Privacy (WEP) or Wi-Fi Protected Access (WPA) data encryption code/password. You need to key in the correct code when the radio is connected to the wireless router for network connection. If you do not know the code/password, please contact the person/technician who set up the router/network for you. The radio can work via Wireless network connection (Wi-Fi connection). You may also use the Wifi protected Setup (WPS) function for easy pairing between the network device and the "Audizio Bolzano". Check if the light indicators on the network device are in appropriate status.
GETTING STARTED
- Remove internet radio from the package box.
- Plug in the power lead and press the Standby button on the front.
Note: Before starting, please make sure that the voltage mentioned on the power supply corresponds to the voltage used in your local area. Only use the supplied mains VDE plug to connect the device to a household mains socket. When it is the first time booting up the device, the setup wizard is launched automatically.
MODE SELECTION
From the Main Menu, select a mode and press [OK]. Alternatively, use the navigation knob to switch to different modes. After just a moment, the radio switches to that mode. The last used station or track previously used in that mode is selected. If this is not possible, radio scans for relevant stations, networks, or prompts the user for input.
AUDIO PLAYBACK
The common controls for audio playback are identical across all playback modes. Turn the volume rotary control to increase or decrease the volume level. The general track controls are [PLAY/PAUSE] to start and pause tracks and the [NEXT] and [PREVIOUS] buttons to skip to the next or previous track in the current playlist.
MENU NAVIGATION
The main control for moving through menus and options is the navigation knob. Rotate the knob to move up or down a menu. Once the required option or value is highlighted press the knob to confirm and enter the highlighted sub-menu. All menus and lists act as loops, meaning that turning the control to go beyond the first or last entry in a menu or list takes you to the opposite end of the menu or list. To enter the menu tree in a particular mode press [MENU]. To move back a menu level press [BACK]. Each mode has a unique menu structure, with options specific to that mode. For example, the FM mode menu has two mode specific options: Scan setting and Audio setting. The System setting menu presents system setting functions to allow the user to setup how the unit functions. This includes network, time, language, software parameters and so on.
PRESETS
In DAB-, FM- and Internet radio mode, stations can be stored and recalled. To store the current station as a preset, press and hold [PRESET] until the display shows the Save to Preset screen. Select one preset numbers to save the currently playing station and press [OK] to confirm. To select a preset, press [PRESET], then select one of the listed preset stations.
SETTINGS
All the settings parameters for radio are available on the System settings menu.
EQUALISER
Several predefined EQ settings are available, including a custom, user-defined setting. To choose an EQ setting, select Menu > System settings > Equaliser. You can then choose from a variety of predefined settings and My EQ. The last option 'My EQ profile setup' allows you to define your own settings for the 'My EQ' option, with custom bass and treble settings.
STREAMING AUDIO QUALITY
In this submenu you can select one of the three choices of quality, Low, Normal end High.
NETWORK
Network wizard
This guides you through the necessary steps to join a network. This is also automatically run as part of the Setup wizard. The screens and options presented will depend on the type of network and network protection used.
Selecting a network
When the Network wizard is chosen, the device automatically scans for available wireless networks and presents a list of SSID's (Service Set Identifier) for the networks. The device remembers login details for the last four wireless networks it has connected to and will automatically connect to them when they are available. If connection to a network is temporarily lost, the device will automatically reconnect.
If the wireless network is protected the next screen presents options to enter the network key or password on completion.
To enter the network key, use the front knob to move the cursor trough the characters and then press [OK] to confirm.
The device connects to the selected network. If connecting fails, the device returns to a previous screen to try again.
To exit the process, use the [BACK/MENU] button. If the network connection is lost, the device reconnects automatically.
PBC Wlan setup (Wi-Fi Protected Setup)
The device prompts you to press the connect button on the router and then press the select control. For more information on setting up a PBC Wlan encrypted network, please refer to your PBC Wlan router's instructions.
VIEW SETTINGS
Displays the settings details for the current network setup, including:
• Active connections
- MAC address
- Wlan region
• DHCP
- SSID
- IP Address
- Subnet mask
- Gateway address
- Primary DNS
- Secondary DNS
MANUAL SETTINGS
Choose to enable/disable DHCP.
NETREMOTE PIN SETUP
Allows you to setup a PIN number to be entered before being able to connect to the device remotely over a network.
NETWORK PROFILE
This displays a list of the networks remembered by radio (up to a maximum of 4). You can see the list of registered networks through Menu > System settings > Network > Network profile>. Here, you can delete unwanted networks by selecting them and pressing [OK], confirm deleting by selecting Yes.
CLEAR NETWORK SETTINGS
This option allows for clearing current network settings, allowing you to join an alternative network more easily.
KEEP NETWORK CONNECTED
Choose to keep network connected or not.
TIME/DATE
SET TIME/DATE
The date and time are displayed as dd-mm-yyyy with the first value (dd) flashing. Adjust each value with the navigation knob. As each value is set, press the navigation knob to confirm the value. The next value will flash, ready for adjustment.
AUTO UPDATE
Auto-update works with data sent over DAB, FM or Network,. DAB and FM use time signal broadcast with radio transmissions. Network uses a time signal sent from the internet radio portal when in any network-connected mode.
-
Select "Update from DAB", "Update from FM", "Update from Network" or "No update".
-
When updating set your time zone.
-
If your country uses daylight saving time (DST), the automatically updated time from the network may be wrong.
-
When daylight saving adjustments is in effect, such as British Summer Time (BST), turn on the Daylight savings option to compensate.
Note: if you are updating the time from DAB or FM, the daylight savings option has no effect on the displayed time. The device will auto-update from the selected source if time information is available.
LANGUAGE
The default language is English. To change, navigate to Menu > System settings > Language> to select your preferred language.
FACTORY RESET
Reset all user settings to default values. Time/date, network configuration and presets are lost. However, the radio's current software version is maintained. To perform a factory reset, select Menu > System settings > Factory reset. Confirm by selecting Proceed > Yes.
SOFTWARE UPDATE
From time to time, software updates with bug fixes and/or additional features become available. You can either check manually or set the device to check periodically automatically (this is default setting). If the device detects that newer software is available, it asks if you want to proceed with updating. If so, the new software is then downloaded and installed. After a software update, all user settings are maintained.
CAUTION: Before starting a software update, ensure that radio is plugged into a stable mains power connection.
Disconnecting power during software update may permanently damage the unit.
SETUP WIZARD
This allows you to run the Setup wizard at any time.
INFO
Shows details of the current system including software version number, Radio ID and the name by which the radio is identified on a network.
PRIVACY POLICY
Displays a privacy notice guiding you to our website for full details of the Frontier Smart Technologies Privacy policy.
BACKLIGHT
The display can be set to dim when in Standby mode or after a timeout period. This option allows you to set the timeout period and the brightness settings before (On/Bright level) and after (Dim level) the customized time period.
For the Power-on level, High, Medium, Low are available.
For the Standby level, Medium, Low are available.
INTERNET RADIO
This device can play thousands of radio stations from around the world via a broadband internet connection. Once a station has been selected, the device connects directly to that station.
To enter Internet Radio mode, either press [MODE] and rotate the navigation knob to cycle through the modes until Internet Radio is displayed, press [OK].to confirm.
Note: The station list menu is provided from the Internet radio portal, so it is only accessible when radio is connected to the Internet. Station lists and submenus can change from time to time.
LAST LISTENED
When the internet radio mode (re)starts, the last-listened station is selected. To select another recently used station, select [MENU], then select the station on the last listened list. Most recent stations appear at the top of the list.
SEARCH
You can also search for stations with particular keywords in their title. To search, select Menu > Station list > Search and enter a keyword. Select a broadcast from the list.
LOCATION
To select an internet broadcast from a particular location, select Menu > Station list > Location >. Select a continent from the menu and a list of countries available is presented, select a country and the available internet radio stations are presented.
Choose a radio station from the list to tune to that station.
POPULAR
Presents a list of the most popular internet stations from around the world.
DISCOVER
Allows you to select from a list of stations defined by either their origin (country), genre or language. Navigate through the category options. Once you have made your selection a screen confirms your selected category and the number of stations within that category. To see the list, select the option showing the number of available stations.
NOW PLAYING INFORMATION
While the stream is playing, the display shows its name and description. If any artist and/or track information is available, this is also displayed. To view further information, press [INFO]. Each time you press, another set of information is displayed, cycling through the following details.
- Name/description
- Genre/location
- Reliability
• Codec and sampling rate - Playback buffer
- Date info
DAB RADIO
To enter DAB mode, either press [MODE] and rotate the navigation knob until DAB Radio is displayed, or select Menu > Main menu > DAB with the remote.
STATION LIST
The first time you select DAB radio mode (or if the station list is empty), the device automatically initiates a full scan to see what stations are available.
A station marked with a question mark indicates that this station is currently unavailable. Depending on the cause of the loss of signal this may be only temporary. Stations that unlikely to be available again can be removed from the station list.
SCAN FOR STATIONS
To start a scan, select Menu > Scan. Once the scan is complete, the radio shows a list of available stations. The manual tune menu option allows the user to select a particular channel and display the signal strength of that channel.
REMOVE STATIONS FROM LIST
To remove stations that are listed but unavailable, select Menu > Prune invalid.
SELECTING STATIONS
To listen to- or change a station, select Menu > Station List and press [OK]. Select the station you want to listen to by scrolling the navigation control. Stations marked with a '?' are not available. Once selected, the station starts playing and the screen shows information about the station, track or show broadcast by the station. Alternatively, pressing either the left and right keys, it jumps to the next station up or down in the station list.
'NOW PLAYING' INFORMATION
While the stream is playing, the screen shows its name and DLS (Dynamic Label Segment) information, giving real-time information such as program name, track title and other details. Stereo broadcasts are indicated with an icon at the top of the screen. To view further information, press [INFO]. Each time you press, another set of information is displayed.
DYNAMIC RANGE COMPRESSION (DRC)
Some DAB broadcasts offer Dynamic Range Compression (DRC). This feature allows radios to compress the dynamic range of the output audio stream, so that the volume of quiet sounds is increased, and the volume of loud sounds is reduced. This can be useful if you are listening to music with a high dynamic range in a noisy environment (for example, classical music while centering). To change the DRC setting for this device, select Menu > DRC, and then choose between DRC high, DRC low or DRC off.
Note: The DRC setting does not have any effect if DRC data is not included in the broadcast.
FM RADIO
To enter FM Radio mode, either press [MODE] and rotate the navigation knob until FM Radio is displayed, or select Menu > Main menu > FM.
MANUAL SEARCH
To search manually, press the [PREVIOUS] or [NEXT] button. The unit search in 0.05 MHz steps.
AUTO SEARCH
To initiate the auto search procedure, press and hold [PREVIOUS] or [NEXT] on the main unit, or press scan on the remote control. The radio starts to scan the entire frequency band. It will stop automatically when a strong enough station has been found.
SELECTING STATIONS
To find a station, press [OK]. The display shows a running frequency graphic while the device scans the FM band. Alternatively, you can scan up or down by pressing and holding [PREVIOUS] or [NEXT] buttons or tune manually with short presses.
Note: Scanning can be set to search for strong signals only.
'NOW PLAYING' INFORMATION
While a FM station is playing, the display shows one of the two following sets data.
- If RDS information is available, the service name (i.e. station name) is displayed by default. You can cycle through further RDS information by pressing [INFO]. Each time you press [INFO], another set of information is displayed.
- If no RDS information is available, the current frequency is shown.
SETTINGS
SCAN SETTINGS
By default, FM scans stop at any available station. This may result in a poor signal from weak stations. To only stop at strong stations with good signal strength, select Menu > Scan setting > Strong stations only? > Yes.
AUDIO SETTINGS
By default, all stereo stations are reproduced in stereo automatically. For weak stations, this may result in a poor signal. To play weak stations in mono, select Menu > Audio setting > FM weak reception: Listen in mono only > Yes.
CD PLAYER
To enter CD mode, either press [MODE] button until CD is displayed. Then press [OK]. Open the CD tray with the [EJECT] button. Insert your CD, The display will say "loading". The first track on the CD will now start.
CD FUNCTIONS
- To pause/resume playback of the CD, press the [PLAY/PAUSE] button
- To switch to the next track, press the [NEXT] button once
- To fast forward through a track, press and hold the next button. Continue with [PLAY/PAUSE] button
- To switch to the previous track, press the [PREVIOUS] button once
- To fast backward through a track press and hold the [PREVIOUS] button. Continue with [PLAY/PAUSE] button
- To stop CD playback, press the [STOP] button
CD PROGRAM
It's possible to program the device to play CD tracks in a particular order
- Set the unit in Stop mode
- Press the [PRESET] button on the remote control. The display will show P01, T01 and T01 flash
- Choose with the [PREVIOUS] and [NEXT] button or 0 to 9 on the remote control, the track which should be programmed and confirm the track by pressing the [OK] button on the remote control. The display changes to "P02" To choose more tracks repeat this.
• After you have finished programming your track selection, press [PLAY/PAUSE] to start the programmed playback
- Delete the programmed list by double press the [STOP] button
SHUFFLE
Press the [RANDOM] button on the remote control. The display will show the shuffle indicator.
REPEAT ONE TRACK
During playback press the [REPEAT] button on the remote control once to repeat playback of the song you are listening to.
REPEAT ALL TRACKS
During playback press the [REPEAT] button on the remote control twice to repeat all songs from the CD. To cancel the repeat mode press the [REPEAT] button on the remote control until all symbols in the display has disappeared.
USB
To enter USB mode, either press [MODE] button until USB is displayed. or select Menu > Main menu > USB with the remote Place the USB stick into the USB slot.
USB stick with max 16GB storage and FAT32 format.
The USB playback options are same to the CD playback options.
AUX IN
AUX IN mode plays audio from an external source such as MP3 players.
To avoid sudden loud volume, turn the volume down on both this device and, if adjustable, the source device.
Connect the external audio source to the LINE IN L and R connectors.
To enter AUX IN mode, either press [MODE] and rotate the navigation knob until "Aux in" is displayed, or select Menu > Main menu > Aux in.
Adjust the volume of this device (and, if necessary, the audio source device) as required.
BT PLAYBACK
This device only contains a BT receiver! You cannot connect a BT headset or similar.
When you select the BT mode, the device is starting to pair. The BT icon at the bottom of the screen will flash. Turn on your smartphone, tablet or other BT device to search. The BT pairing name is "Audizio Bolzano".
When pairing is successful, the BT indicator will stop flashing. To release BT pairing, turn off or unpair your smartphone, tablet or other device.
OPTICAL INPUT (TOSLINK)
Use an RCA audio Cable or optical cable to connect the DVD player/TV outputs with the OPTICAL input socket from the device.
COAXIAL OUTPUT
Coaxial mode plays audio from an external source such as a DVD player or TV.
To avoid sudden loud volume, turn the volume down on both this device and, if adjustable, the source device.
Connect the external audio source to the coaxial connector.
SUBWOOFER PRE AMP OUT
To enhances the bass feeling, you can also connect a subwoofer with a built in amplifier. Use a subwoofer cable for connection.
ALARM & SLEEP TIMER
There are two different wake-up alarms with snooze functionality and a sleep timer function to turn the system off after a custom set period/time. Each alarm can be set to start in a particular playback mode.
SLEEP TIMER
To set the sleep timer, press [SLEEP] on remote control repeatedly to cycle through the sleep time options: OFF, 15 min, 30 min, 45 min, 60 min. Stop the input when the required time is displayed, after a moment the screen returns to the screen used before the sleep function was selected. On the now playing screen, the remaining sleep time is displayed at the bottom of the display. Alternatively select Menu > Main menu > Sleep and choose the desired sleep time option. Once you have selected a sleep time period, the system returns to the main menu. Press and hold [MENU] to return to the "now playing" screen. To cancel a selected sleep timer, select Sleep OFF from the sleep options using either of the above methods.
Note: A sleep timer is automatically cancelled in case this device is put into standby mode.
TIMER
To set or change an timer, navigate to Menu > Main menu > timers. Select the timer number (1 or 2), then configure the following parameters:
Enable: Off, Daily, Once, Weekends or Weekdays
Time: 12:00AM (adjust as desired)
Mode: Buzz, Internet radio, DAB, FM, CD or USB
Preset: Last listened or 1-30
Volume: 0-32
To save these settings and set the alarm, scroll down and select save. The screen shows active alarms with an icon at the bottom left.
Note:. At the set time, the alarm will sound. To temporarily silence it, press [OK]. Pressing [OK] repeatedly cycles through the available snooze periods: 5 min, 10 min, 15 min or 30 min. The radio returns to standby for the set period, with the silenced alarm icon flashing and a countdown of the remaining snooze period. To cancel a sounding alarm, or an alarm in snooze, press [STANDBY].
UNDOK
The "Audizio Bolzano" supports remote control .from Apple iPhone, iPad and Android using the UNDOK app. The apps are available in Apple's app store and Google's android play.
The UNDOK app allows you to:
- Adjust volume
• Control all the modes of the Bolzano, including internet radio, Podcasts, Spotify, DAB, FM, CD, USB, BT, Aux in, Optical in - Setting EQ for various audio presets
- Setting sleep timer
• Editing the displayed name of the radio - Store and Recall of radio stations
- Change the volume
SPOTIFY CONNECT
Use your phone, tablet or computer as a remote control for Spotify. Go to spotify.com/connect to learn how.
Licenses
The Spotify Software is subject to third party licenses found here: http://www.spotify.com/connect/third-party-licenses.
Press to stop playing in CD/USB mode
Press for internet/ DAB/FM menu
10. Vorige
-
Line in
-
Coaxial output
PBC Wlan setup (Wi-Fi Protected Setup)
Dynamic Range Compression (DRC)
Modus: Buzzer, Internet radio, DAB, FM, CD of USB
http://www.spotify.com/connect/third-party-licenses
PBC WLAN SETUP (Wi-Fi Protected Setup)
http://www.spotify.com/connect/third-party-licenses.
-
CD tray
-
Infrared Sensor remot control
-
Headphone jack
-
Display screen
-
OK/Navigate
• Active connections
- MAC address
- Wlan region
• DHCP
- SSID
- IP Address
- Subnet mask
- Gateway address
- Primary DNS
- Secondary DNS
Réglages manuels
SUBWOOFER PRE AMP OUT
PBC WLAN SETUP (Wi-Fi Protected Setup)
POLITYKA PRYWATNOŚCI
Note: A sleep timer is automatically cancelled in case this device is put into standby mode.
Wyłącznik czasowy
http://www.spotify.com/connect/third-party-licenses
-
Display screen
-
OK/Navigate
MANUÁLNÍ VYHLEDÁVÁNÍ
SPOTIFY JE K DISPOZICI NA ADRESE: http://www.spotify.com/connect/third-party-licenses.
TECHNICAL SPECIFICATION / TECHNISCHE SPECIFICATIE / TECHNISCHE DATEN / SPECIFICACIONES TÉCNICAS / SPÉCIFICATIONS TECHNIQUES / SPECYFIRACJA TECHNICZNA / TECHNICKÁ SPECIFIRACE
Playback options : BT 5.0 streaming, CD, USB, FM radio, DAB+ radio, Internet radio, Line input
Input connections : Optical, RCA, USB
Output connections : 3.5mm Jack, Screw terminal, Subwoofer Pre Out
Output power : 100W (2× 50W)
Power supply : 100-240VAC 50/60Hz
Dimensions (L x W x H) : 435 x 300 x 75mm
Weight : 2,90kg
The specifications are typical. The actual values can slightly change from one unit to the other. Specifications can be changed without prior notice.
The products referred to in this manual conform to the European Community Directives to which they are subject:
European Union
Tronios B.V.,
7602KR Almelo, The Netherlands
2014/35/EU
2014/30/EU
2011/65/EC
2014/53/EU

United Kingdom
Tronios Ltd.,
130 Harley Street,
London W1G 7JU, United Kingdom
S.I. 2016:1101
S.I. 2016:1091
S.I. 2012:3032
S.I. 2017:1206

Specifications and design are subject to change without prior notice.
www.tronios.com
Copyright © 2024 by Tronios The Netherlands