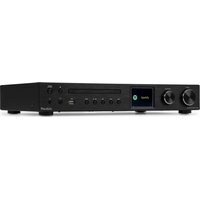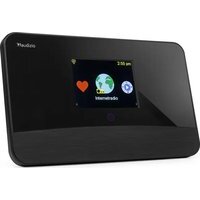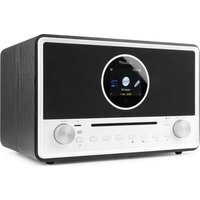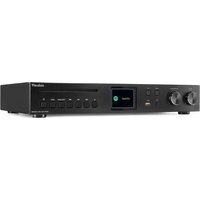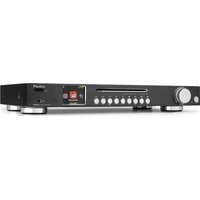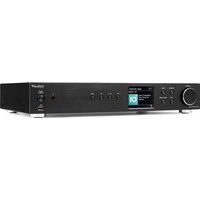
Adria - Radio Audizio - Free user manual and instructions
Find the device manual for free Adria Audizio in PDF.


| Product type | Internet Radio / DAB+ / FM |
| Brand | Audizio |
| Model | Adria |
| Power supply | 220-240 V~, 50 Hz |
| Playback modes | Internet Radio, DAB+, FM, Bluetooth, USB, Spotify Connect |
| Network connectivity | Wi-Fi (b/g/n), built-in DAB/FM antenna |
| Audio outputs | RCA (L/R), optical Toslink, coaxial, AUX 3.5 mm |
| USB port | MP3 playback up to 128 GB, 1 A charging |
| Display | Backlit |
| Remote control | Included |
| Alarms | 2 alarms with snooze and source selection |
| Sleep timer | Yes (15, 30, 45, 60 min) |
| Presets | Up to 30 stations (Internet, DAB, FM) |
| Equalizer | Presets (Jazz, Rock, etc.) and customizable (My EQ) |
| Menu languages | Multilingual (French available) |
| Maintenance | Clean with a dry cloth, no chemicals |
| Safety | Do not open, avoid moisture, unplug during thunderstorms |
| Repairability | Genuine parts recommended, intervention by technician |
| Operating conditions | Indoor, temperature 5-35 °C |
| Package contents | Radio, remote control, power cable, antennas |
Frequently Asked Questions - Adria Audizio
User questions about Adria Audizio
0 question about this device. Answer the ones you know or ask your own.
Ask a new question about this device
Download the instructions for your Radio in PDF format for free! Find your manual Adria - Audizio and take your electronic device back in hand. On this page are published all the documents necessary for the use of your device. Adria by Audizio.
USER MANUAL Adria Audizio
Ref. nr.: 102.238; 102.239

text_image
Iaudizio POWER STANDBY USB MODE HDMI R / R R40 Internet radio 14:27 Radio 10 Justin Timberlake - Can't Stop The Feeling ALARM MOUNTS PROMER METER DATA/STOCK ALARM CURRENT TIMEINSTRUCTION MANUAL GEBRUIKSAANWIJZING BEDIENUNGSANLEITUNG MANUAL DE INSTRUCCIONES MANUEL D'INSTRUCTIONS INSTRUKCJA OBSŁUGI NÁVOD K POUŽITÍ
V1.4
INDEX
ENGLISH....7
UNPACKING INSTRUCTION....8
POWER SUPPLY 8
BEFORE YOU START 8
GETTING STARTED 8
CONTROL 8
REAR PANEL....9
REMOTE CONTROL....9
AUDIO PLAYBACK....10
MENU NAVIGATION....10
FIRST TIME / quick SETUP....10
BT PLAYBACK 10
INTERNET RADIO 11
SPOTIFY 11
DAB & FM 11
PRESETS....12
USB 12
AUX OUT 12
ALARMS 13
SETTINGS....13
NEDERLANDS 15
UITPAKKEN 16
AANSLUITSPANNING 16
VOORDAT JE BEGINT 16
AAN DE SLAG 16
BEDIENING 16
ACHTERPANEEL 17
AFSTANDBEDIENING....17
AUDIO AFSPELEN....18
MENU NAVIGATION....18
EERSTE / SNELLE INSTALLATIE 18
BT PLAYBACK 18
INTERNET RADIO 19
SPOTIFY 19
DAB & FM 19
PRESETS....20
USB 20
AUX UITGANG....21
ALARM (WEKKER) 21
INSTELLINGEN 21
DEUTSCH 24
AUSPACKEN 25
NETZANSCHLUSS 25
Congratulations to the purchase of this Audizio product. Please read this manual thoroughly prior to using the unit in order to benefit fully from all features.
Read the manual prior to using the unit. Follow the instructions in order not to invalidate the warranty. Take all precautions to avoid fire and/or electrical shock. Repairs must only be carried out by a qualified technician in order to avoid electrical shock. Keep the manual for future reference.
- Prior to using the unit, please ask advice from a specialist. When the unit is switched on for the first time, some smell may occur. This is normal and will disappear after a while.
- The unit contains voltage carrying parts. Therefore do NOT open the housing.
- Do not place metal objects or pour liquids into the unit. This may cause electrical shock and malfunction.
- Do not place the unit near heat sources such as radiators, etc. Do not place the unit on a vibrating surface. Do not cover the ventilation holes.
- The unit is not suitable for continuous use.
- Be careful with the mains lead and do not damage it. A faulty or damaged mains lead can cause electrical shock and malfunction.
- When unplugging the unit from a mains outlet, always pull the plug, never the lead.
- Do not plug or unplug the unit with wet hands.
- If the plug and/or the mains lead are damaged, they need to be replaced by a qualified technician.
- If the unit is damaged to such an extent that internal parts are visible, do NOT plug the unit into a mains outlet and DO NOT switch the unit on. Contact your dealer. Do NOT connect the unit to a rheostat or dimmer.
- To avoid fire and shock hazard, do not expose the unit to rain and moisture.
- All repairs should be carried out by a qualified technician only.
- Connect the unit to an earthed mains outlet (220-240Vac/50Hz) protected by a 10-16A fuse.
- During a thunderstorm or if the unit will not be used for a longer period of time, unplug it from the mains. The rule is: Unplug it from the mains when not in use.
- If the unit has not been used for a longer period of time, condensation may occur. Let the unit reach room temperature before you switch it on. Never use the unit in humid rooms or outdoors.
- To prevent accidents in companies, you must follow the applicable guide lines and follow the instructions.
-
Do not repeatedly switch the fixture on and off. This shortens the life time.
-
Keep the unit out of the reach of children. Do not leave the unit unattended.
- Do not use cleaning sprays to clean switches. The residues of these sprays cause deposits of dust and grease. In case of malfunction, always seek advice from a specialist.
- Do not force the controls.
- This unit is with speaker inside which can cause magnetic field. Keep this unit at least 60cm away from computer or TV.
- If this product have a built-in lead-acid rechargeable battery. Please recharge the battery every 3 months if you are not going to use the product for a long period of time. Otherwise the battery may be permanently damaged.
- If the battery is damaged please replace with same specifications battery. And dispose the damaged battery environment friendly.
- If the unit has fallen, always have it checked by a qualified technician before you switch the unit on again.
- Do not use chemicals to clean the unit. They damage the varnish. Only clean the unit with a dry cloth.
- Keep away from electronic equipment that may cause interference.
- Only use original spares for repairs, otherwise serious damage and/or dangerous radiation may occur.
- Switch the unit off prior to unplugging it from the mains and/or other equipment. Unplug all leads and cables prior to moving the unit.
- Make sure that the mains lead cannot be damaged when people walk on it. Check the mains lead before every use for damages and faults!
- The mains voltage is 220-240Vac/50Hz. Check if power outlet match. If you travel, make sure that the mains voltage of the country is suitable for this unit.
- Keep the original packing material so that you can transport the unit in safe conditions.

This mark attracts the attention of the user to high voltages that are present inside the housing and that are of sufficient magnitude to cause a shock hazard.

This mark attracts the attention of the user to important instructions that are contained in the manual and that he should read and adhere to.
The unit has been certified CE. It is prohibited to make any changes to the unit. They would invalidate the CE certificate and their guarantee!
NOTE: To make sure that the unit will function normally, it must be used in rooms with a temperature between 5^ C/41°F and 35^ C/95°F.

Electric products must not be put into household waste. Please bring them to a recycling centre. Ask your local authorities or your dealer about the way to proceed. The specifications are typical. The actual values can slightly change from one unit to the other. Specifications can be changed without prior notice.
Do not attempt to make any repairs yourself. This would invalid your warranty. Do not make any changes to the unit. This would also invalid your warranty. The warranty is not applicable in case of accidents or damages caused by inappropriate use or disrespect of the warnings contained in this manual. Audizio cannot be held responsible for personal injuries caused by a disrespect of the safety recommendations and warnings. This is also applicable to all damages in whatever form.
UNPACKING INSTRUCTION
CAUTION! Carefully unpack the box upon receipt. Check the contents to ensure that all parts are present and have been received in good condition. Notify the shipper immediately and retain packaging material if any parts appear damaged from shipping or the package itself shows signs of mishandling. Save the package and all packaging materials. If the product must be returned, it is important that the product is returned in the original factory box and packaging. If the device has been exposed to drastic temperature fluctuation (e.g. after transportation), do not switch it on immediately. The arising condensation water might damage your device. Leave the device switched off until it has reached room temperature.
POWER SUPPLY
The label on the back/under side of the product indicates the mains voltage to which it must be connected. Check that the mains voltage corresponds to this. Any other voltage than the one indicated may cause irreparable damage to the unit. The unit must also be connected directly to the mains voltage and no dimmer or adjustable power supply may be used.

Always connect the device to a protected circuit (circuit breaker or fuse). Make sure the device has an appropriate electrical ground to avoid the risk of electrocution or fire.
BEFORE YOU START
Please ensure the following is ready: You have a broadband internet connection. A wireless broadband router is connected to the internet successfully. The radio supports Wireless B, G and N connection (Wireless N router can also be used with the setting on B or G). You know the Wired Equivalent Privacy (WEP) or Wi-Fi Protected Access (WPA) data encryption code/password. You need to key in the correct code when the radio is connected to the wireless router for network connection. If you do not know the code/password, please contact the person/technician who set up the router/network for you. The radio can work via Wireless network connection (Wi-Fi connection).
GETTING STARTED
- Remove internet radio from the package box.
- Plug in the power lead and switch on the device.
Note: Before starting, please make sure that the voltage mentioned on the power supply is corresponds to the voltage used in your local area. Only use the supplied mains VDE plug to connect the device to a household mains socket.
CONTROL
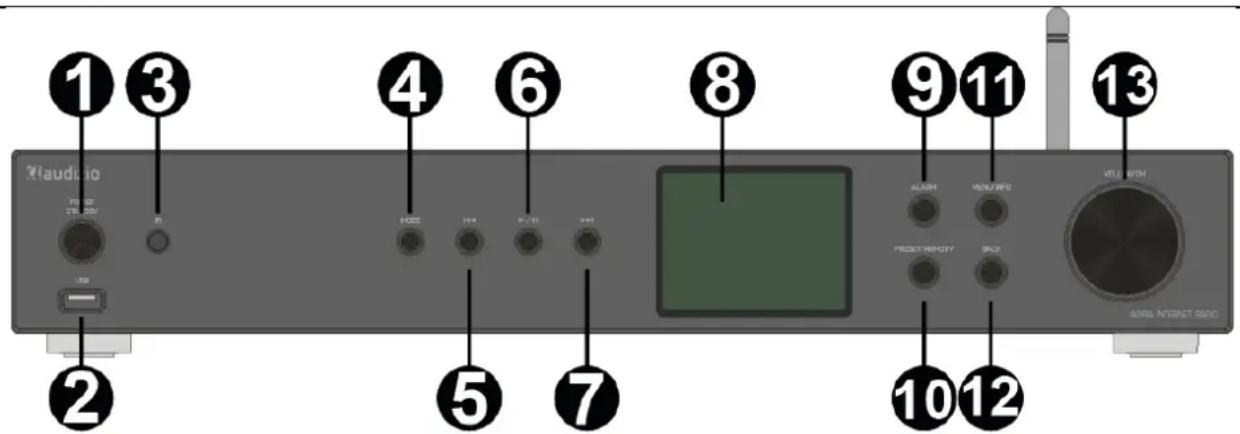
text_image
Claudio 1 3 2 3 4 6 8 9 11 13 5 7 PWM PWM/REF0 PWM/REF0 PWM/REF0 PWM/REF0 PWM/REF0 PWM/REF0 PWM/REF0 PWM/REF0 PWM/REF0 PWM/REF0 PWM/REF0 PWM/REF0 PWM/REF0 PWM/REF0 PWM/REF0 PWM/REF0 PWM/REF0 PWM/REF0 PWM/REF0 PWM/REF0 PWM/REFO PWM/REFO PWM/REFO PWM/REFO PWM/REFO PWM/REFO PWM/REFO PWM/REFO PWM/REFO PWM/REFO PWM/REFO PWM/REFO PWM/REFO PWM/REFO PWM/REFO PWM/REFO PWM/REFO PWM/REFO PWM/REFO PWM/REFO PWM/REF0 PWM/REF0 PWM/REF0 PWM/REF0 PWM/REF0 PWM/REF0 PWM/REF0 PWM/REF0 PWM/REF0 PWM/REF0 PWM/REF0 PWM/REF0 PWM/REF0 PWM/REF0 PWM/REF0 PWM/REF0 PWM/REF0 PWM/REF0 PWM/REF0 PWM/REF1 PWM/REF1 PWM/REF1 PWM/REF1 PWM/REF1 PWM/REF1 PWM/REF1 PWM/REF1 PWM/REF1 PWM/REF1 PWM/REF1 PWM/REF1 PWM/REF1 PWM/REF1 PWM/REF1 PWM/REF1 PWM/REF1 PWM/REF1 PWM/REF1 PWM/REF1 PWM/REF2 PWM/REF2 PWM/REF2 PWM/REF2 PWM/REF2 PWM/REF2 PWM/REF2 PWM/REF2 PWM/REF2 PWM/REF2 PWM/REF2 PWM/REF2 PWM/REF2 PWM/REF2 PWM/REF2 PWM/REF2 PWM/REF2 PWM/REF2 PWM/REF2 PWM/REF2 PWM/REF3 PWM/REF3 PWM/REF3 PWM/REF3 PWM/REF3 PWM/REF3 PWM/REF3 PWM/REF3 PWM/REF3 PWM/REF3 PWM/REF3 PWM/REF3 PWM/REF3 PWM/REF3 PWM/REF3- Power
Press to switch the device in on-/standby mode
- USB slot
To play media files from a USB device
-
Infrared remote control sensor
-
Mode
Press to switch between different modes (Internet radio, podcasts, MP3, DAB, FM, BT)
- Previous
Press to change to previous track
- Play/Pause
Press to start/resume or pause playback
- Next
Press to change to next track
-
Display screen
-
Alarm
Press to initiate alarm setting
- Preset/Memory
Press to access the memory menu (for storing presets)
- Menu/Info
Press to see station information/properties of the station that is playing. Press and hold to enter the menu that corresponds to the currently used mode
- Back
Press to return to previous menu
- Volume/OK
Rotate to adjust volume level. Press to confirm input (OK). Rotate within menus to scroll
REAR PANEL
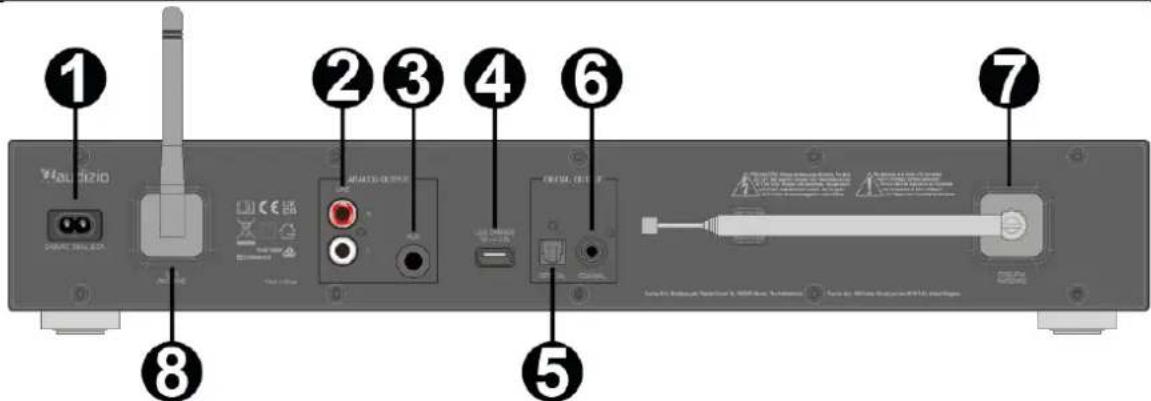
text_image
1 2 3 4 6 7 8 Vaccizio MCC 500.000 MCC 500.000 MCC 500.000 MCC 500.000 MCC 500.000 MCC 500.000 MCC 500.000 MCC 500.000 MCC 500.000 MCC 500.000- AC power input connector
- RCA output
RCA line output connectors - AUX output
Auxiliary 3.5mm jack output - USB charge slot
USB output socket for charging other devices, such as smartphones - Optical output (Toslink)
- Coaxial output
- DAB/FM antenna
- WIFI antenna
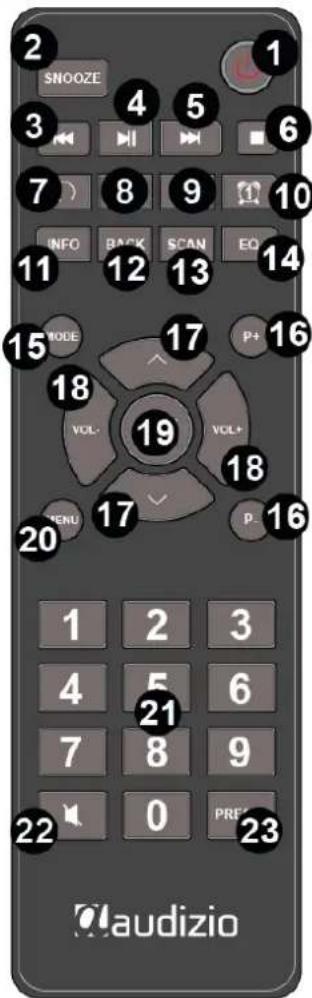
REMOTE CONTROL
- Power
Press to switch the device in on-/standby mode
- Snooze
Press to snooze
- Previous
Press to change to previous track
- Play/Pause
Press to start/resume or pause playback
- Next
Press to change to next track
- Stop
Press to stop play in internet radio-/usb mode
- Repeat
Press to choose repeat modes
- Shuffle
Press to choose shuffle mode
- Sleep
Press to set a sleep timer
- Alarm
Press to set an alarm
- Info
Press to show station/media information
- Back
Press to go to previous menu
- Scan
Press to scan for stations
- EQ
Press to change EQ preset setting
- Mode
Press to change modes
- P+ / P-
Choose previous/next preset channel
- Up/Down
Up and down scrolling buttons
- Volume
Press to increase or decrease output volume
text_image
SNOOZE 1 3 4 5 6 7) 8 9 10 INFO BACK SCAN EQ 11 12 13 14 MODE 15 17 P+ 16 18 VOL- 19 VOL+ 18 MENU 17 p- 16 20 1 2 3 4 5 6 7 8 9 21 22 0 PREF 23 audizio- OK
Press to confirm input
- Menu
Press to enter the menu
- Num pad
Numeric keys for accurate input
- Mute
Press to (un)mute the device
- Preset/Memory
Press to enter the preset/memory list
AUDIO PLAYBACK
The common controls for audio playback are identical across all playback modes:
Rotate [Volume/OK] to increase or decrease the volume level. The general track controls are [Play/Pause] to start and pause tracks and the [Next] and [Previous] buttons to skip to the next or previous track in the current playlist.
MENU NAVIGATION
The main control for moving through menus and options is [Volume/OK]. Rotate the knob to move up or down a menu. Once the required option or value is highlighted press the knob to confirm and enter the highlighted sub-menu. All menus and lists act as loops, meaning that turning the control to go beyond the first or last entry in a menu or list takes you to the opposite end of the menu or list. To enter the menu tree in a particular mode press [Menu/Info]. To move back a menu level press [Back]. Each mode has a unique menu structure, with options specific to that mode.
FIRST TIME / QUICK SETUP
Ensure that the WIFI- and DAB/FM antenna are screwed and tightened onto the unit correctly. Turn on the radio by pressing [Power].
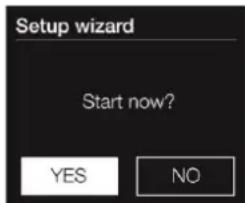
When turned on for the first time, the device starts a setup wizard to configure settings for date/time and network automatically. Once this setup has finished, the system is ready to use in most modes. Note: To change these settings later, enter Menu>System settings> and select the required setting. To run the setup wizard again, select Menu>System settings>Setup wizard.
text_image
Setup wizard Start now? YES NOThe Network settings can be reset by manually running the Network wizard, select Menu>System
settings>Network >Network wizard. Choose [Yes] to start the setup wizard. When [No] is chosen, the device asks if you would like to run the wizard next time, select [Yes] or [No]. The system then starts without configuring time/date and network settings and enters the main menu.
Note: If the power supply is interrupted while the wizard is in progress, the wizard will run again next time.
To connect the device with your network, you need a Wi-Fi wireless router (and corresponding password key, if set).
Password protected network
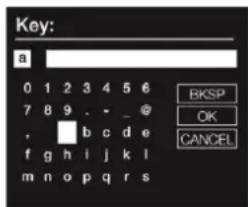
To enter a network password key, rotate [Volume/OK] to highlight the desired character and press [Volume/OK] to confirm the selected character.
"Backspace", "OK" and "Cancel" are located on the right side of the password screen. These can be accessed with rotating [Volume/OK], by pressing [Menu/Info] the selection (un)highlights the Back Space option.
text_image
Key: a 0 1 2 3 4 5 6 7 8 9 . - _ @ , □ b c d e f g h i j k l m n o p q r s BKSP OK CANCELIf connecting fails, the device returns to a previous screen automatically. To exit the process use the [Back]- or [Menu] button.
Note: The device remembers the last four wireless networks it has connected to and automatically tries to connect to whichever one it can find. You can access the list with registered networks through Menu>System settings>Network>Network profile> from here you can delete unwanted networks by rotating and pressing [Volume/OK], then confirm delete: [Yes].
There are also other options for viewing and manually altering network settings: Menu>System settings>Network. Users experienced with networking may find these options useful for diagnosing and fixing network problems.
BT PLAYBACK
Before transmission between your BT device and the radio is possible, both devices must be coupled. This process is called "pairing". The radio is served as a receiver, to receive the music stream to be played on the radio. If you have already coupled to a BT device before, this connection will be restored automatically when both devices are in range and BT operation has been selected on the radio. "Pairing" does not have to be repeated. This function may need to be activated in your BT device, however.
- Press [Mode] to enter BT mode.
- Turn on BT streaming on your device. The device will scan for pairable BT devices in the reception range.
- Select "Audizio Adria" from the list with found devices.
Start playback on your BT device. Playback now takes place emitting sound from the radio (connected loudspeakers).
You can connect with your network to access a multitude of internet radio stations and podcasts from around the world.
Listening to internet content
Thousands of radio stations around the world broadcast online. To listen to an internet radio station or podcast:
- Press [Mode].
- Rotate and press [Volume/OK] to select 'Internet radio'.
- Press and hold [Menu/Info] to enter the internet radio main menu.
- Rotate and press [Volume/OK] to select one of the following options:
Last Listened
When Internet radio mode is (re)started, the last-listened station is selected. To select another recently used station, select Menu>Last listened, then one of the stations listed. Most recent stations appear at the top of the list.
Station list >
Country
This menu item is unique for every country, for example, 'UK'. Selecting 'UK' presents a sub-menu with a location based selection of stations using a variety of categories, for example, local stations, BBC stations, Genres or stations from a specific city.
Choose the required category and either a further list of sub categories is shown, or (if there are no further sub-categories) the available stations for the chosen category are listed.
Search
You can also search for Internet broadcasts or stations by searching on particular keywords in their title. To search, select Menu>Station List>Search. Enter a keyword by selecting characters by rotating and pressing [Volume/OK], then "OK".
Location
To select an Internet broadcast from a particular location, select Menu>Station List>Location>. Select a continent from the menu and a list of available countries is presented. Select a country and the available internet radio stations are shown.
Popular
Presents a list of the most popular internet stations from around the world.
Discover
Discover allows you to select from a list of stations defined by either their origin, genre or language. Navigate through the category options; once you have made your selection, a screen confirms your selected category and the number of stations within that category. To show the list, select the option showing the number of available stations.
Now playing information
While the device is playing a station, the display shows its name and description. If any artist and/or track information is available, this is also shown. To view further information, press [Menu/Info]. Each time you press [Menu/Info], another set of information is displayed:
Artist
Slogan (default; where available)
Language/Location
Codec and sampling rate
Playback buffer
Today's Date
SPOTIFY
Use your phone, tablet or computer as a remote control for Spotify. Go to spotify.com/connect to learn how.

Spotify ^®
DAB & FM
Changing DAB stations
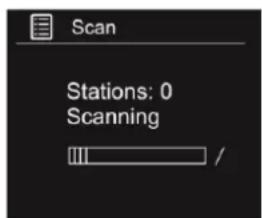
Press [Mode], rotate and press [Volume/OK] to select 'DAB radio'. During the scan, the display will show "Scanning...". The first time you select DAB radio, the device will automatically perform a scan to find all available stations and will tune into one when finished.
Changing FM stations
Seek tuning
- Press [Mode] and rotate and press [Volume/OK] to select 'FM radio'.
- Press [Volume/OK] to seek the next FM radio station that has a strong signal.
Manual tuning
- Press [Mode] and rotate and press [Volume/OK] to select 'FM radio'.
- Press [Next] or [Previous] on main unit or remote control to step up or down 0.05 MHz.
Station list
- Press and hold [Menu/Info] to view the main DAB menu.
- Rotate and press [Volume/OK] to select 'Station list'.
- A list of DAB stations will appear on the display.
text_image
Scan Stations: 0 ScanningScan
- Press and hold [Menu/Info] to view the main DAB menu.
- Rotate and press [Volume/OK] to select 'Scan'.
- All the stations that have been found will be stored automatically.
Manual tune
As well as the auto tune function, you can manually tune the receiver. This can be helpful when aligning your aerial or for adding stations that were missed during auto tuning.
- Press and hold [Menu/Info] to view the main DAB menu.
- Rotate and press [Volume/OK] to select 'Manual Tune'.
Prune invalid
To remove all unavailable stations from the list.
- Press and hold [Menu/Info] to view the main DAB menu.
- Rotate and press [Volume/OK] to select 'Prune invalid'.
- Press [Volume/OK] to select 'YES' and press [Volume/OK] to confirm. Select 'NO' to cancel.
DRC (Dynamic Range Compression)
When listening to music with high dynamic range in a noisy environment, you can compress the audio dynamic range.
- Press and hold [Menu/Info] to view the main DAB menu.
- Rotate and press [Volume/OK] to select 'DRC'.
- Press [Volume/OK] to select DRC high/low/off. Press [Volume/OK] to confirm the setting.
PRESETS
You can store up to 30 Internet-, DAB- and FM stations for quick access. To store a station to as preset:
- Tune into the station you want to store as a preset.
- Press and hold [Preset/Memory] to view the numerical list of stored presets, then rotate and press [Volume/OK] to choose any preset. You can overwrite existing presets.
To recall a preset when listening to digital radio or FM radio:
- Press [Preset/Memory] on the front panel and rotate [Volume/OK] to scroll through the list of presets. Press [Volume/OK] to tune into the selected preset channel.
USB
- Press [Mode] to display the 'function' menu.
- Rotate and press [Volume/OK] to select 'Music Player'.
Press [Play/Pause] to pause the track that is playing. When a track is paused, press [Play/Pause] again to resume playback. During play or pause state, press [Next] or [Previous] to skip to the next track or go back to the beginning of the current track. NOTE: The device can only play MP3 file format in USB operation and supports USB version 2.0 and 3.0 (with up to 128GB of memory). It may not compatible with all USB devices; this is not an indication of a problem of the unit.
Repeat playback
- Press [Repeat] on the remote control, “☐” will appear on the display. It will play the current folder repeatedly.
- Press [Repeat] once again, the repeat function will turn off.
Random playback
All tracks on the USB can be played in a random order.
- During playback, press [Random] on the remote control. The "X" indicator will show on the display. All tracks will be played in random order.
- Press [Previous] or [Next] to playback the next random track.
• After all the tracks have been played, the playback will stop automatically.
- To cancel random playback, press [Random] during random mode playback. Normal playback will resume.
Charge Your Device
You can charge your device through the USB socket on the rear of this device with a USB cable (not supplied).
NOTE:
The maximum current for USB charging is 1A. Devices used for USB charging are not under warranty. The USB charging is supported only during 'Power ON' state, not supported during 'Standby' state.
AUX OUT
You can connect an external amplifier with the radio through 3.5 mm aux-out jack on the rear of the device.
Use a cable with 3.5 mm pins at both ends, one end connected to the aux-out jack of the radio, the other end connected to the external amplifier. Set the volume level on the radio to minimum before connecting.
ALARMS
Setting an alarm
- Press and hold [Menu/Info] and enter 'main menu'.
- Rotate and press [Volume/OK] to select 'Alarms'.
- Rotate and press [Volume/OK] to select 'Alarm 1' or 'Alarm 2'.
- Rotate [Volume/OK] to scroll through each alarm setting. If you want to change a setting, press [Volume/OK]. You can set the following alarm options:
Enable: Rotate and press [Volume/OK] to choose when you want the alarm to repeat. The available options are 'Off', 'Daily', 'Once', 'Weekends' or 'Weekdays'.
Time: Rotate and press [Volume/OK] to adjust the hour of the alarm.
Note: If you have set your radio to use the 12 hour time format, make sure that you select 'AM' or 'PM' before pressing [Volume/OK].
Repeat to set the minutes of the alarm.
Mode: Rotate and press [Volume/OK] to choose between 'Buzzer', 'Internet radio', 'DAB', 'FM'.
Volume: Rotate and press [Volume/OK] to set the volume of evoke when the alarm sounds.
Save: Rotate and press [Volume/OK] to save the alarm.
Snooze
To initiate snooze function, press [Volume/OK]. The display will show a countdown timer to show how long the alarm will snooze for. To adjust the amount of time the alarm will be snoozed by, press [Volume/OK] to change the snooze duration in 5 minute intervals up to 15 minutes, and then 30 minutes. To cancel the snoozing interval alarm, press [Power/Standby].
Sleep mode
This function allows programming the device to switch into standby mode by itself after a set period of time.
- To activate the sleep mode function, press [Sleep] repeatedly. The time will change with below interval on every press: Sleep off - 15mins - 30mins - 45mins - 60mins.
- Stop pressing [Sleep] once your desired sleep time appears on the display. The sleep function will be activated after two seconds. A sleep icon will appear on the display. The remaining time until the switch to standby mode is initiated, is displayed next to the icon in the display.
- Once the sleep timer has counted down to zero, the unit will turn into standby mode automatically. To turn the sleep mode function off whilst the sleep timer is still counting down, press [Sleep] repeatedly to select "SLEEP OFF". The sleep icon will disappear from the display.
- Press [Sleep] once to show the sleep timer status on the display when turned on.
SETTINGS
Equalizer settings
This device features different EQ sound effect modes. Follow below steps to change EQ settings:
- Press and hold [Menu/Info] on main unit or remote control. Rotate and press [Volume/OK] to select "System settings".
- Rotate and press [Volume/OK] or use the [VOL+] or [VOL-] buttons on the remote control to select the "Equalizer".
- Press [Volume/OK] on main unit or remote control to select.
- Rotate and press [Volume/OK] or use the [VOL+] or [VOL-] buttons on the remote control to choose among 'Normal', 'Flat', 'Jazz', 'Rock', 'Movie', 'Classic', 'Pop', 'News', 'My EQ', 'My EQ profile setup'.
Manually setting the bass and treble value
- Press and hold [Menu/Info] to view the main menu.
- Rotate and press [Volume/OK] to select System settings>Equalizer>My EQ profile setup.
- Rotate and press [Volume/OK] to choose 'Bass' or 'Treble'.
- Rotate and press [Volume/OK] to set the level from '-14dB' (low) to '+14dB' (high).
Time and date settings
The clock will automatically set itself using your network, DAB or FM radio signal. If the time or date does not update automatically, you can manually set it using this option.
Note: Any time or date updates received by a digital broadcast will override manual settings.
Setting the time and date manually:
- Press and hold [Menu/Info] and enter 'main menu'.
- Rotate and press [Volume/OK] to select 'System settings' > 'Time/Date'.
- Rotate and press [Volume/OK] to choose 'Set Time/Date'.
- Rotate and press [Volume/OK] to set the day of the month. Repeat to set the month and year.
- Rotate and press [Volume/OK] to set the hour. Repeat to adjust the minutes.
Note: If you have set the 12 hour time format, make sure that you select the 'AM' or 'PM' version of the hour before pressing [Volume/OK].
Time and date synchronization
You can synchronize the time and date via FM, DAB or network signal.
To specify the clock synchronization options:
- Press and hold [Menu/Info] and enter 'main menu'.
- Rotate and press [Volume/OK] to select 'System settings' > 'Time/Date'.
- Rotate and press [Volume/OK] to choose 'Auto update'.
- Rotate and press [Volume/OK] to choose between 'Update from DAB', 'Update from FM', 'Update from Network' and 'No Update' synchronization options.
Changing the time format
- Press and hold [Menu/Info] and enter 'main menu'.
- Rotate and press [Volume/OK] to select 'System settings' > 'Time/Date'.
- Rotate and press [Volume/OK] to choose 'Set format'.
- Rotate and press [Volume/OK] to choose between '12' or '24' hours.
Changing the time zone
- Press and hold [Menu/Info] and enter 'main menu'.
- Rotate and press [Volume/OK] to select 'System settings' > 'Time/Date'.
- Rotate and press [Volume/OK] to choose 'Set time zone'.
- Rotate and press [Volume/OK] to choose your Time zone.
Daylight saving time options
- Press and hold [Menu/Info] and enter 'main menu'.
- Rotate and press [Volume/OK] to select 'System settings' > 'Time/Date'.
- Rotate and press [Volume/OK] to choose 'Daylight savings'.
- Rotate and press [Volume/OK] to choose 'On' if you want to enable daylight savings time. Rotate and press [Volume/OK] to choose 'Off' if you want to disable daylight savings time.
Changing language
- Press and hold [Menu/Info] and enter 'main menu'.
- Rotate and press [Volume/OK] to choose 'System settings' > 'Language'.
- Rotate and press [Volume/OK] to select the desired menu language.
Inactive standby
Use Inactive Standby to turn off (standby) the unit after a certain time in play state.
- Press and hold [Menu/Info] and enter 'main menu'.
- Rotate and press [Volume/OK] to select 'System settings' > 'Inactive Standby'.
- Rotate and press [Volume/OK] to choose 'Inactive Standby'.
- Rotate and press [Volume/OK] to choose between the Off > 2 hours > 4 hours > 5 hours > 6 hours.
Backlight
To adjust the screen backlight duration before dimming automatically:
- Press and hold [Menu/Info] and enter 'main menu'.
- Rotate and press [Volume/OK] to choose 'System settings' > 'Backlight'.
- Rotate and press [Volume/OK] to choose 'Timeout'.
- Rotate and press [Volume/OK] to choose a timeout setting.
On level
- Press and hold [Menu/Info] and enter 'main menu'.
- Rotate and press [Volume/OK] to choose 'System settings' > 'Backlight'.
- Rotate and press [Volume/OK] to choose 'On Level'.
- Rotate and press [Volume/OK] to choose between 'High', 'Medium' or 'Low'.
Dim level
- Press and hold [Menu/Info] and enter 'main menu'.
- Rotate and press [Volume/OK] to choose 'System settings' > 'Backlight'.
- Rotate and press [Volume/OK] to choose 'Dim Level'.
- Rotate and press [Volume/OK] to choose between 'Medium', 'Low' or 'Off'.
Factory reset
Note: Initiating a factory reset removes all presets, stored stations, alarms and resets all other options to default settings.
- Press and hold [Menu/Info] and enter 'main menu'.
- Rotate and press [Volume/OK] to choose 'System settings' > 'Factory Reset'.
- Rotate and press [Volume/OK] to select 'Yes'. The device will be reset to factory settings. Select 'No' if you do not want to reset to factory settings.
text_image
Setup wizard Start now? YES NONow playing information
text_image
Scan Stations: 0 ScanningLijst met stations
DRC (Dynamic Range Compression)
text_image
1 2 3 4 6 7 8 audio AUDIO Digital Output Digital Output Audio/Computer/Instrument 10.0000000000000000000000000000000000000000000000000000000000000000000000000000000000000000000000000000text_image
Setup wizard Start now? YES NONow playing information
text_image
Scan Stations: 0 ScanningListe der Sender
DRC (Dynamic Range Compression)
text_image
1 3 2 4 6 8 9 11 13 Vlaudio AUXIN PRODUCTION RPG AIRE PRODUIT MILE- Power
text_image
Setup wizard Start now? YES NOtext_image
Scan Stations: 0 Scanning /DRC (Dynamic Range Compression)
text_image
Setup wizard Start now? YES NOChanger de station DAB
Changer de station FM
Chercher l'accord
text_image
Scan Stations: 0 ScanningStation list
DRC (Dynamic Range Compression)
Niveau allumé (on level)
text_image
Setup wizard Start now? YES NOtext_image
Scan Stations: 0 ScanningStation list
DRC (Dynamic Range Compression)
text_image
Setup wizard Start now? YES NOtext_image
Scan Stations: 0 Scanning /Seznam stanic
DRC (Dynamic Range Compression)
Playback options : BT 5.0 streaming, DAB+ tuner, FM radio, Internet radio, Spotify Connect, USB, WiFi play
Input connections : USB
Output connections : COAX, Optical, RCA
Power supply : 100-240VAC 50/60Hz
Dimensions (L x W x H) : 434 x 310 x 75mm
Weight : 2,30kg
The specifications are typical. The actual values can slightly change from one unit to the other. Specifications can be changed without prior notice.
The products referred to in this manual conform to the European Community Directives to which they are subject:
European Union
Tronios B.V.,
7602KR Almelo, The Netherlands
2014/35/EU
2014/30/EU
2011/65/EC
2014/53/EU

United Kingdom
Tronios Ltd.,
130 Harley Street,
London W1G 7JU, United Kingdom
S.I. 2016:1101
S.I. 2016:1091
S.I. 2012:3032
S.I. 2017:1206

The Spotify Software is subject to third party licenses found here:
https://www.spotify.com/connect/third-party-licenses

Spotify®
Specifications and design are subject to change without prior notice.
www.audizio.com
Copyright © 2025 by Tronios The Netherlands