AirPro AP100 - Air purifier Venta - Free user manual and instructions
Find the device manual for free AirPro AP100 Venta in PDF.

| Brand | Venta |
| Model | AirPro AP100 |
| Product type | Air purifier with heating and cooling function |
| Color | White (not specified, common estimate) |
| Power supply | 220-240 V, 50 Hz (standard wall outlet) |
| Maximum power | 2000 W (estimate for heating + fan) |
| Number of speeds | Cooling: 9; Heating: 4 |
| Timer | 1 to 8 hours |
| Adjustable temperature range (heating) | 1 to 30 °C (via remote control) |
| Functions | Cooling, heating, oscillation, UV sterilization, sleep mode, max mode, timer |
| Remote control | Yes (AAA 1.5 V batteries × 2, range 4 m) |
| Filter | Yes, replacement recommended every 720 hours of operation |
| Filter replacement alarm | Yes, triggers after 720 h, resettable via remote control |
| Connectivity | Smart Life – Smart Living (mobile app) |
| Certifications | CE (implicit) |
| Maintenance | Clean ventilation grilles with a soft dry cloth; vacuum air inlets/outlets |
| Safety | Overheat sensor, automatic shut-off in case of tipping over |
| Usage | Stable horizontal surface, at least 1.5 m away from ignition sources |
| Warranty | 2 years (terms on www.venta-air.com) |
| Repairability | Repairs by an authorized specialist |
| Package contents | Unit, remote control, user manual, filter installed |
Frequently Asked Questions - AirPro AP100 Venta
User questions about AirPro AP100 Venta
0 question about this device. Answer the ones you know or ask your own.
Ask a new question about this device
Download the instructions for your Air purifier in PDF format for free! Find your manual AirPro AP100 - Venta and take your electronic device back in hand. On this page are published all the documents necessary for the use of your device. AirPro AP100 by Venta.
USER MANUAL AirPro AP100 Venta
natural_image
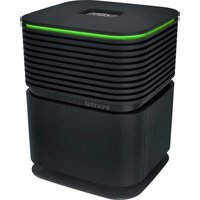
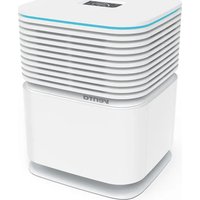
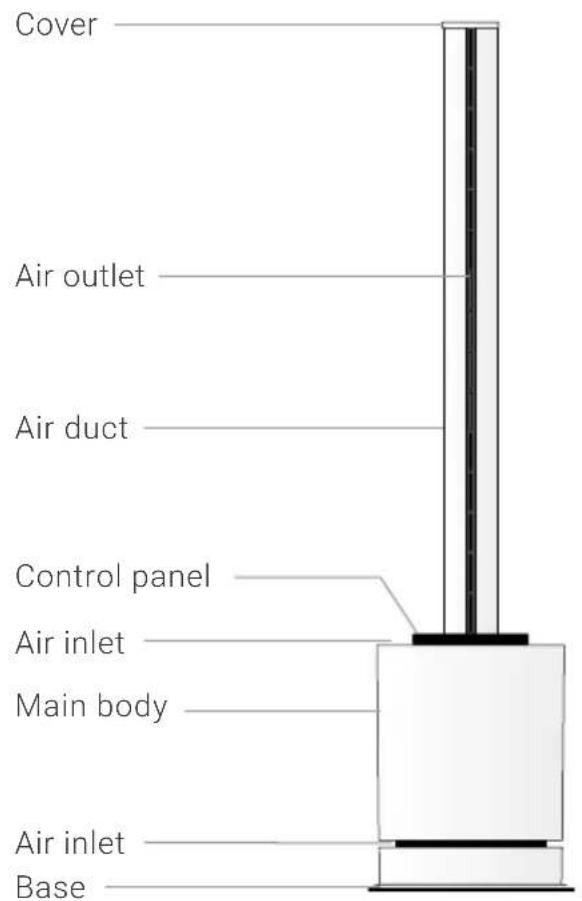
White cylindrical device with black and white sections, no visible text or symbols on the body3-IN-1
natural_image
Diagram of a mechanical device with a central shaft and two opposing arrows indicating flow or movement (no text or symbols present)This product is only suitable for well insulated spaces or occasional use

SAFETY INSTRUCTIONS
Before use make sure to read all of the below instructions in order to avoid injury or damage, and to get the best results from the appliance. Make sure to keep this manual in a safe place. If you give or transfer this appliance to someone else make sure to also include this manual.
In case of damage caused by user failing to follow the instructions in this manual the warranty will be void. The manufacturer/importer accepts no liability for damages caused by failure to follow the manual, a negligent use or use not in accordance with the requirements of this manual.
1 This appliance can be used by children aged from 8 years and above and persons with reduced physical, sensory or mental capabilities or lack of experience and knowledge if they have been given supervision or instruction concerning use of the appliance in a safe way and understand the hazards involved.
2 Children shall not play with the appliance.
3 Cleaning and user maintenance may not be performed by children under the age of 8 years or without supervision.
4 If the supply cord is damaged, it must be replaced by the manufacturer, its service agent or similarly qualified persons in order to avoid a hazard.
5 Keep the appliance and its power cable out of the reach of children under the age of 8 years.
6 Improper use can damage the appliance and cause physical injuries Children aged from 3 years and less than 8 years shall not plug in, regulate and clean the appliance or perform user maintenance.
7 CAUTION – Some parts of this product can become very hot and cause burns. Particular attention has to be given where children and vulnerable people are present.
8 WARNING: In order to avoid overheating, do not cover the appliance.
9 The appliance must not be located immediately below a socket outlet.
10 The appliance should only be operated when it is completely assembled.
11 Do not use this appliance in the immediate surroundings of a bath, a shower or a swimming pool.
12 WARNING: This appliance is not equipped with a device to control the room temperature. Do not use this appliance in small rooms when they are occupied by persons not capable of leaving the room on their own, unless constant supervision is provided.
13 Prior to cleaning or other maintenance, the appliance must be disconnected from the supply mains.
Means "DO NOT COVER".
15 Do not use this appliance if it has been dropped.
16 Do not use if there are visible signs of damage to the appliance.
17 Use this appliance on a horizontal and stable surface. Place the appliance on a stable surface which is flat and dry.
18 Before inserting the plug into the mains socket, please check that the voltage and frequency comply with the specifications on the rating label.
19 Disconnect the mains plug from the socket when the appliance is not in use and before cleaning.
20 Ensure that the mains cable is not hung over sharp edges and keep it away from hot objects and open flames.
21 Do not immerse the appliance or the mains plug in water or other liquids. There is danger to life due to electric shock!
22 To remove the plug from the plug socket, pull the plug. Do not pull the power cord.
23 Do not plug or unplug the appliance from the electrical outlet with a wet hand.
24 Electrical appliances should only be repaired by professional specialists. Amateur repairs could result in considerable danger to the user.
25 Never leave the appliance unattended during use.
26 This appliance is not designed for commercial use.
27 Do not use the appliance for other than intended use.
28 Do not wind the cord around the appliance and do not bend it.
29 Do not place any objects on the air inlet or outlet. Make sure that the ventilation openings are free of dust, lint, hair and other obstacles that could impair the air flow.
30 Set up the appliance so that it cannot be knocked over, and so that no one can trip over it or the cable.
31 Do not put any foreign objects into the appliance.
32 Keep the appliance at least 1.5 meters away from the fire source or tinder, and avoid direct sunlight.
33 The appliance must not be switched off by pulling out the mains plug.
34 Do not use the appliance against the power outlet or under the power outlet. The appliance should be positioned so that the socket is behind the appliance when the heating function is used.
35 Do not share the socket with other high-power appliances.
36 This product must be equipped with a CE-approved fixed socket that is consistent with the rated working current. Do not use a mobile multi-purpose socket.
Safety system
This appliance is equipped with an overheat protection sensor and an automatic fail-safe that cuts power to the unit if it is accidentally tipped over or overheat. If this sensor is triggered, unplug the machine and allow it to cool. Check and remove any obstructions before restarting the appliance and be sure to place it on a hard and level surface.
CLEANING AND MAINTENANCE
- Unplug the appliance before cleaning and maintenance.
- Please do not put the appliance on the water or splash it, which may cause damage to the machine.
- Do not use banana oil, benzine, alcohol, bleach or metal objects to wipe the surface of the appliance, which may cause discoloration of the surface.
- Wipe the surface with a soft, dry cloth. If especially dirty, dilute with a mild detergent and wipe with a soft cloth. Then wipe with a dry cloth.
- Use a soft brush or a vacuum cleaner to clean the dust at the air inlet and outlet. Please clean it when there is less dust. Too much dust will reduce the efficiency.
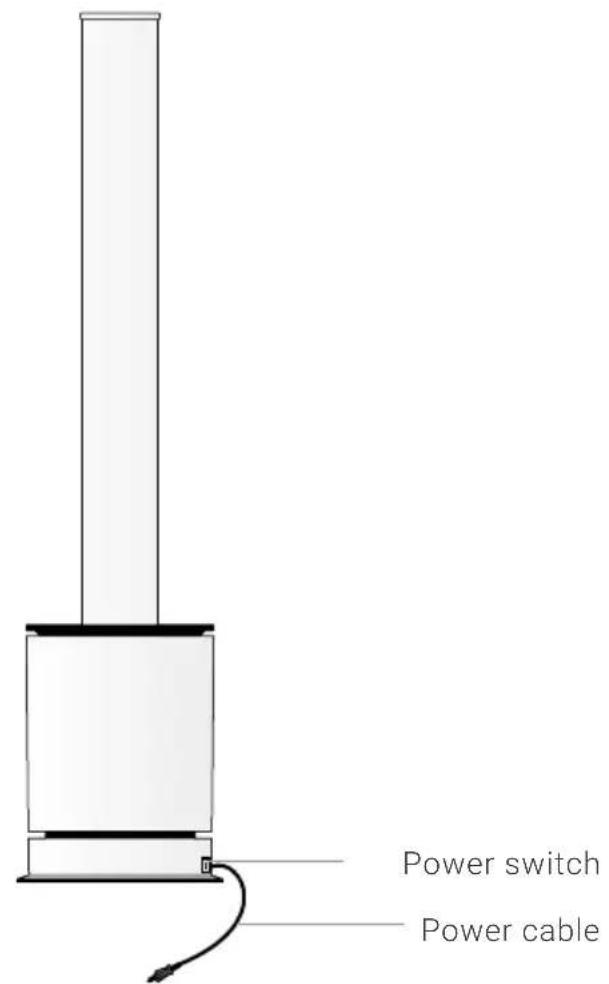
PARTS DESCRIPTION
CONTROL PANEL

Digital display
* can also be used to control the air volume and swing function
OPERATION
1 Insert the plug into a suitable power outlet. Press the power switch to position "I". The appliance is in standby mode.
2 To turn on and off: Press the on/off button on the control panel the buzzer will beep once and the appliance will start running. Press and hold the on/off button for 2 seconds the buzzer will beep twice and the appliance will stop running after you release your hand.
3 To switch to the warm mode: The appliance starts working in cool mode by default; it sends out the cool air. Press the warm mode button on the control panel to enter the warm mode; the appliance starts sending out the warm air. The digital display shows the ambient temperature. Press the button again to exit the warm mode.
4 To set the air volume: When the appliance is in operation press the on/off button on the control panel to adjust the air volume from 1 to 9 under cool mode; adjust the air volume from 1 to 4 under warm mode.
5 To set the oscillation function: Press and hold the on/off buton on the control panel for 1 second the buzzer will beep once and the appliance will start oscillating. Press and hold the on/off button for 1 second again the buzzer will beep once and the appliance will stop oscillating."
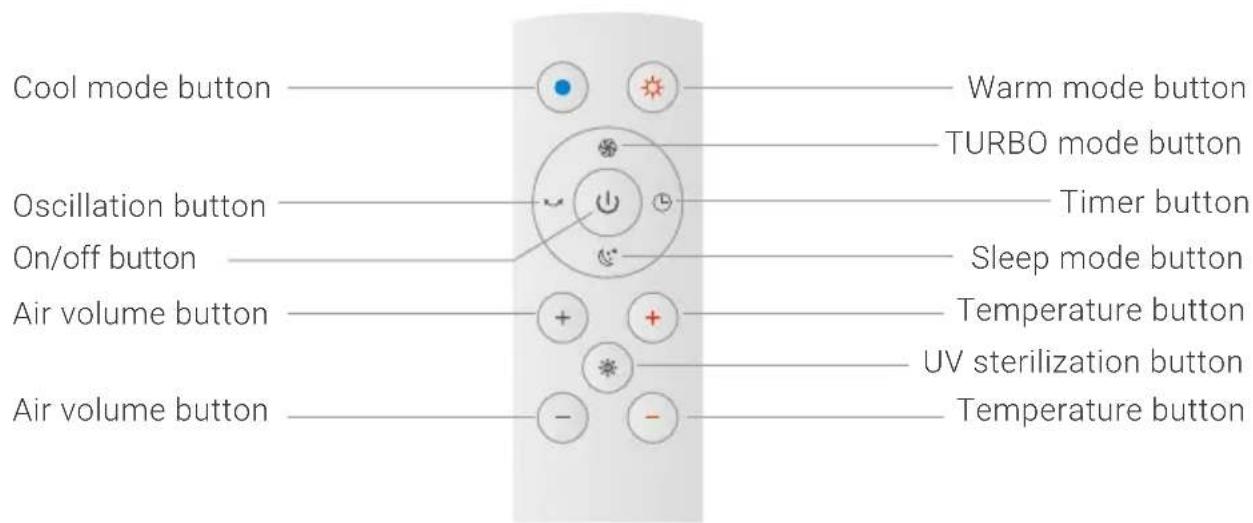
TO USE THE REMOTE CONTROL
This unit has a remote control. Please use 2x1.5V AAA batteries for this remote control. Please insert the batteries to the remote control tightly. If it is not in use for a long time, please take the batteries out of the remote control.
Note: Most functions of the appliance can only be controlled by remote control. If you have lost the remotecontrol or if it is damaged, please contact our customer service. The remote control should be pointed at the signal receiver on the digital display to maximize the remote control signal. Effective distance: 4 m.
Function Setting
 | On/off buttonPress the on/off button to turn on the appliance. Press the button again to turn off the appliance. |
 | Sleep mode buttonPress the sleep mode button the digital display will show "LL" and the wind speed will become minimum. Press the button again to exit the mode. (You can also exit the mode by pressing the air volume button "+"/"-.) |
 | TURBO mode buttonPress the max mode button the digital display will show "HH" and the wind speed will become maximum. Press the button again to exit the mode. (You can also exit the mode by pressing the air volume button "+"/"-.) |
 | Oscillation buttonPress the oscillation button to turn on the oscillation function. Press the button again to stop oscillating. |
 | UV sterilization buttonPress the UV sterilization button to turn on the UV sterilization function. The digital display will show "U". The UV lamp inside the appliance will effectively kill bacteria/virus in the air. Press the button again to turn the function off. This function will automatically shut down after 1 hour. The device starts in UV mode by default |
 | Cool mode buttonPress the cool mode button to enter the cool mode. You can adjust the air volume under this mode. Note: cool mode is the default mode when the appliance is turned on. |
Function Setting
 | Air volume buttonPress the button “+” on the left side of the remote control to increase the air volume. Press the button “-” on the left side of the remote control to decrease the air volume. There are 9 level settings for cool mode. There are 4 level settings for warm mode. |
 | Warm mode buttonPress the warm mode button to enter the warm mode. The digital display will show the ambient temperature. The temperature display goes out after approx. 40 seconds. You can adjust the air volume and the temperature under this mode.* Note: under warm mode, max mode and sleep mode are not available. |
 | Temperature buttonUnder warm mode, press the button “+”/“-” on the right side of the remote control to set the temperature between 1-30°C / 33,8-86°F.Note: buttons do not work under cool mode. |
 | Timer buttonPress the timer button to set the working time from 1 to 8 hours. A small “-” will flash on the lower right corner of the digital display to indicate the timer is under setting/operation." |
* The set temperature should be higher than the ambient temperature so that the warm mode function will be turned on. When the ambient temperature reaches the set temperature the warm mode function will stop. The appliance will send out a cool breeze for approx. 40 seconds and then turn into standby mode. When the ambient temperature is lower than the set temperature the warm mode function will automatically activate.
Under warm mode, the default set temperature is 25^ C / 77^ F. When the ambient temperature is below 0^ C / 32^ F the digital display will only show "01" instead of negative temperature value. After running over 9 hours under the warm mode, the appliance will automatically stop running. Restart by pressing the on/off button on the control panel or by using the remote control. Note: the temperature can only be set by the remote control. The control panel does not support this operation.
POSSIBLE PHENOMENON
1 This appliance may respond to the remote control of other devices.
2 If you use the remote control of this appliance, other devices may respond. This is due to the overlapping frequencies of the remote control. There is no quality problem in the product itself. To avoid misuse, keep the remote control away from other electrical devices during operation.
Note:
1 The digital display will extinguish in approx. 20 seconds with no operations. If you want to do further operations, firstly press any button (except for the on/off button) on the remote control or the buttons on the control panel to turn on the digital display and then press your desired buttons to choose your desired functions.
2 The on/off button on the remote control will turn the appliance to standby mode, not complete shutdown. Please press the power switch on the main body to completely power off when this appliance is not in use. If this appliance is not in use for a long time, please unplug the power cord.
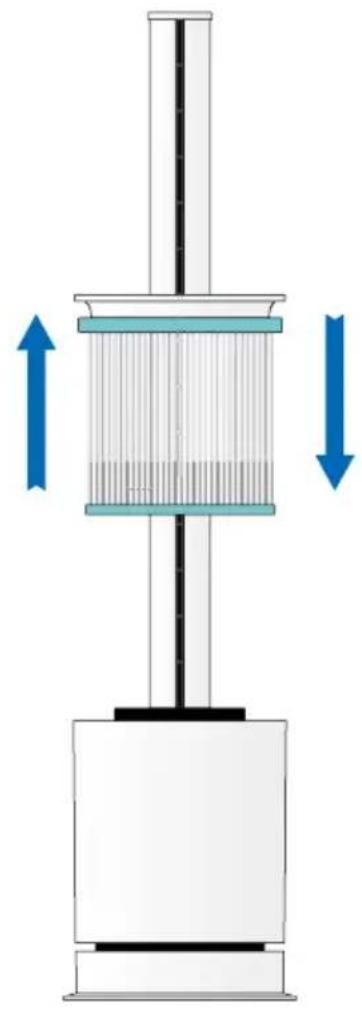
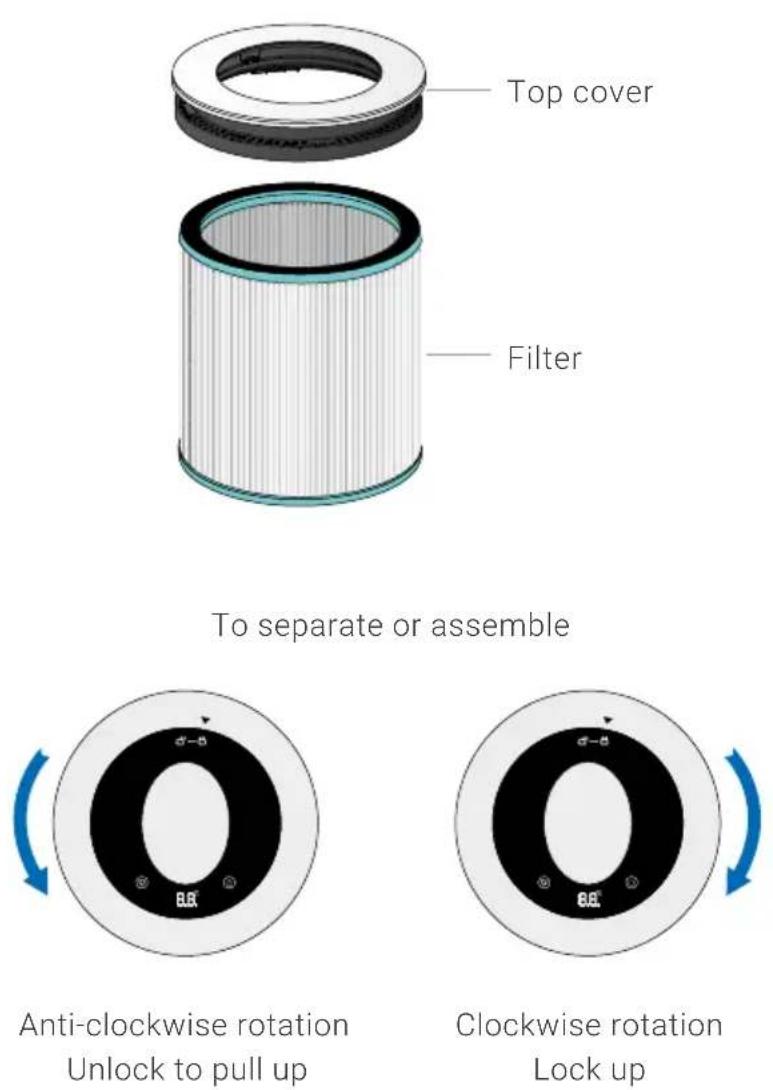
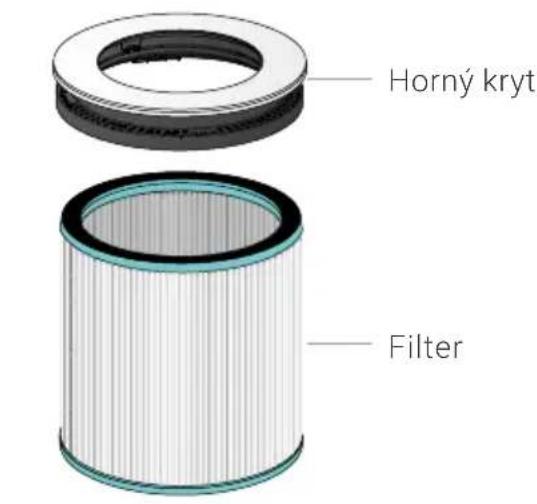
FILTER REPLACEMENT
This appliance is equipped with a purifying air filter which can purify the air.
Replacement method:
1 Rotate the top cover anti-clockwise and pull out the filter after unlocking;
2 Separate the assembled top cover from the filter;
3 Assemble the new filter with the top cover;
4 Put the assembled filter back into the appliance and rotate it clockwise to fix it.
natural_image
Diagram of a mechanical device with a central shaft and two opposing arrows indicating flow or movement (no text or symbols present)To take out the filter To install the filter down
REPLACING THE FILTER ALARM CLOCK
The appliance has a memory function. After a total of 720 hours of operation, the digital display (as shown in the figure) will light up for about 5 seconds with the indicator light cycling when the appliance is turned on. After replacing the filter, press and hold the on/off
button on the remote control for 5 seconds to clear the alarm and the operating time of the filter reclocks again.
LOCATION
Please place the appliance in a vertical position. Please do not use the appliance in high temperature and humidity (bathroom, kitchen).
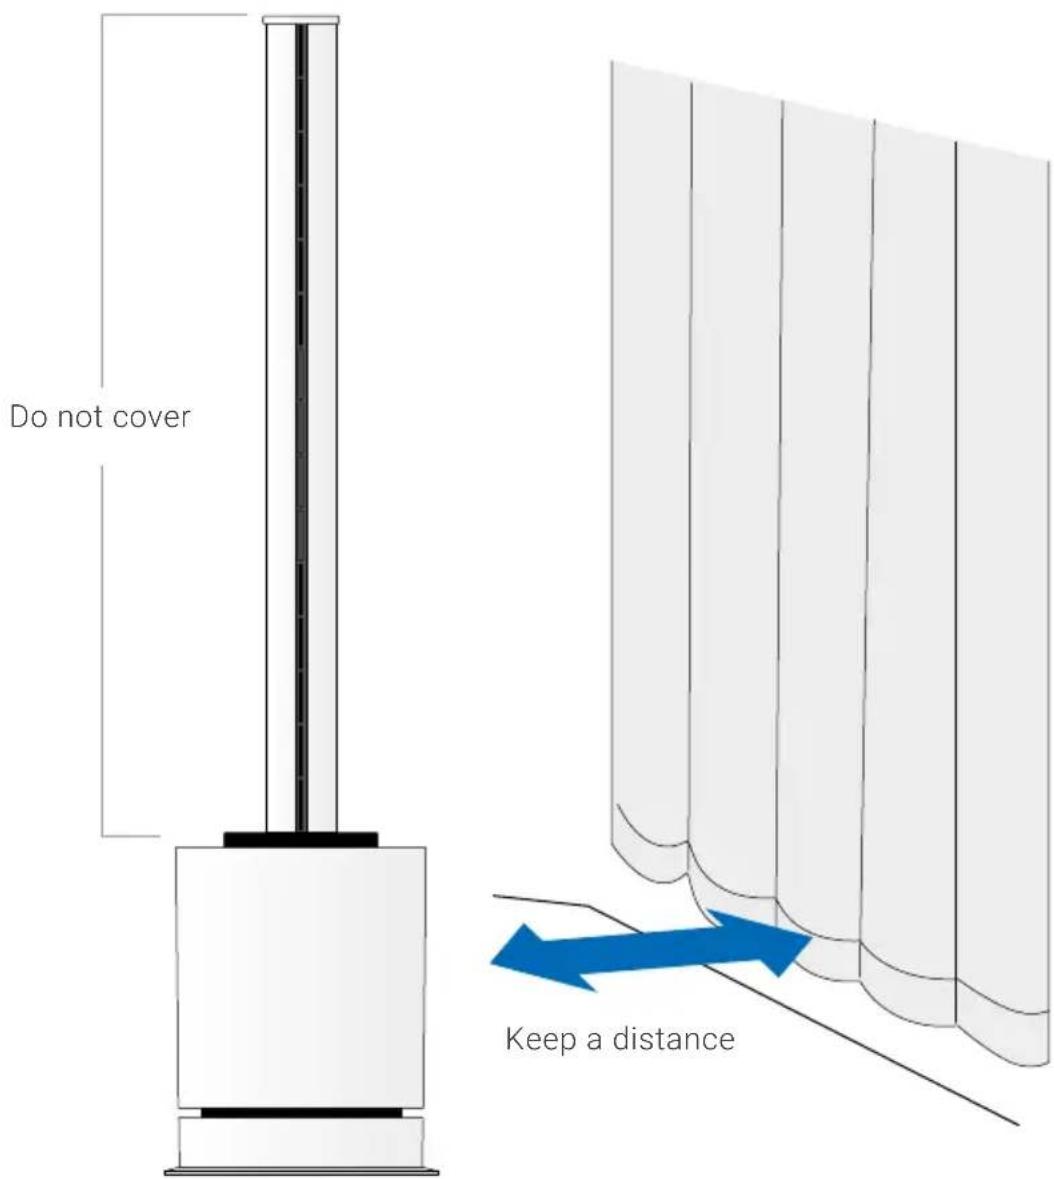
Do not place anything within 1 meter.
CONFIGURATION & SMART LIFE-APP


1 Install the „Smart Life - Smart Living“ app
Install the free „Smart Life -Smart Living“ app on your smartphone.
Create a user account and log in.

Please make sure that...
- the device is assigned a wireless network in the 2.4 GHz band by your router. Wireless networks in the 5 GHz band are not supported.
- Your router supports 802.11b/g/n.
- iOS version 11.0 or higher or Android version 6.0 or higher is installed. If necessary, update the operating system of your smartphone or tablet.
2 Activate WLAN
Make sure that your smartphone or tablet is connected to your home Wi-Fi network and that the Bluetooth function is activated.
3 Activate hotspot mode
Press and hold the on/off button on the device for 5 seconds until the device beeps three times and an „F“ flashes on the display.
4 Set up WiFi
Once you have downloaded and installed the „Smart Life - Smart Living“ app, please open the app.
- Tap on „Add device“ if your device appears in the app. Otherwise, tap on Activate Bluetooth
• As soon as the device has been recognized, click on Add device - Select your WLAN and enter the WLAN password
• The device is added
• The device beeps three times when it has been successfully added.
DATA PROTECTION
Your data will be treated confidentially by Venta Luftwäscher GmbH. For more information on how we protect your privacy, please see our privacy policy on www.venta-air.com
GUARANTEE
Due to the high quality of our products, Venta-Luftwäscher GmbH guarantees that this product will remain defect-free for two years as from the purchase date, provided it is used correctly. If a material or processing error should occur anyway, please contact the Venta Service Team or your dealer. Venta's general guarantee conditions also apply: www.venta-air.com/en_de/Service/Warranty/
RECYCLING & DISPOSAL

The “crossed-out bin” symbol indicates that you must dispose of waste electrical and electronic equipment (WEEE) and waste batteries separately. Such equipment may contain dangerous and environmentally hazardous substances. These products should be disposed of at an appropriate collecting point for recycling electrical and electronic equipment and may not be disposed of in unsorted household waste. Do not dispose of used batteries in household waste. Hand them in to collection points or retailers. This way you can help to protect resources and the environment. For more information, please contact your local authorities.
Children must not be allowed to play with plastic bags and packaging material as there is a danger of injury or suffocation. Store such materials safely or dispose of them in an environmentally friendly way. The filters can be disposed of with household waste.
UTILISATION CONFORME
natural_image
Diagram of a mechanical device with a central shaft and two opposing arrows indicating flow or movement (no text or symbols present)natural_image
Circular device with black and white casing, marked with 'O' and 'E', and blue curved arrow indicating rotation (no text or symbols)Create a user account and log in.

Please make sure that...
- the device is assigned a wireless network in the 2.4 GHz band by your router. Wireless networks in the 5 GHz band are not supported.
- Your router supports 802.11b/g/n.
- iOS version 11.0 or higher or Android version 6.0 or higher is installed. If necessary, update the operating system of your smartphone or tablet.
2 Activate WLAN
Make sure that your smartphone or tablet is connected to your home Wi-Fi network and that the Bluetooth function is activated.
3 Activate hotspot mode
Press and hold the on/off button on the device for 5 seconds until the device beeps three times and an „F“ flashes on the display.
4 Set up WiFi
Once you have downloaded and installed the „Smart Life - Smart Living“ app, please open the app.
- Tap on „Add device“ if your device appears in the app. Otherwise, tap on Activate Bluetooth
• As soon as the device has been recognized, click on Add device - Select your WLAN and enter the WLAN password
• The device is added
• The device beeps three times when it has been successfully added.
VIE PRIVÉE
natural_image
Diagram of a mechanical device with a central shaft and two opposing arrows indicating flow or movement (no text or symbols present)natural_image
Circular device with black and white casing, marked with 'O' and 'E', and blue curved arrow indicating rotation (no text or symbols)Create a user account and log in.

Please make sure that...
- the device is assigned a wireless network in the 2.4 GHz band by your router. Wireless networks in the 5 GHz band are not supported.
- Your router supports 802.11b/g/n.
- iOS version 11.0 or higher or Android version 6.0 or higher is installed. If necessary, update the operating system of your smartphone or tablet.
2 Activate WLAN
Make sure that your smartphone or tablet is connected to your home Wi-Fi network and that the Bluetooth function is activated.
3 Activate hotspot mode
Press and hold the on/off button on the device for 5 seconds until the device beeps three times and an „F“ flashes on the display.
4 Set up WiFi
Once you have downloaded and installed the „Smart Life - Smart Living“ app, please open the app.
- Tap on "Add device" if your device appears in the app. Otherwise, tap on Activate Bluetooth
• As soon as the device has been recognized, click on Add device - Select your WLAN and enter the WLAN password
• The device is added
• The device beeps three times when it has been successfully added.
PRIVACY BELEID
natural_image
Diagram of a mechanical device with a central shaft and two opposing arrows indicating flow or movement (no text or symbols present)Create a user account and log in.

Please make sure that...
- the device is assigned a wireless network in the 2.4 GHz band by your router. Wireless networks in the 5 GHz band are not supported.
- Your router supports 802.11b/g/n.
- iOS version 11.0 or higher or Android version 6.0 or higher is installed. If necessary, update the operating system of your smartphone or tablet.
2 Activate WLAN
Make sure that your smartphone or tablet is connected to your home Wi-Fi network and that the Bluetooth function is activated.
3 Activate hotspot mode
Press and hold the on/off button on the device for 5 seconds until the device beeps three times and an „F“ flashes on the display.
4 Set up WiFi
Once you have downloaded and installed the „Smart Life - Smart Living“ app, please open the app.
- Tap on „Add device“ if your device appears in the app. Otherwise, tap on Activate Bluetooth
• As soon as the device has been recognized, click on Add device - Select your WLAN and enter the WLAN password
• The device is added
• The device beeps three times when it has been successfully added.
PRIVACY
natural_image
Diagram of a mechanical device with a central shaft and two opposing arrows indicating flow or movement (no text or symbols present)natural_image
Circular device with black center and white ring, showing 'O' and '8.2' labels, with blue curved arrow indicating rotation (no text or symbols beyond labels)Create a user account and log in.

Please make sure that...
- the device is assigned a wireless network in the 2.4 GHz band by your router. Wireless networks in the 5 GHz band are not supported.
- Your router supports 802.11b/g/n.
- iOS version 11.0 or higher or Android version 6.0 or higher is installed. If necessary, update the operating system of your smartphone or tablet.
2 Activate WLAN
Make sure that your smartphone or tablet is connected to your home Wi-Fi network and that the Bluetooth function is activated.
3 Activate hotspot mode
Press and hold the on/off button on the device for 5 seconds until the device beeps three times and an „F“ flashes on the display.
4 Set up WiFi
Once you have downloaded and installed the „Smart Life - Smart Living“ app, please open the app.
- Tap on „Add device“ if your device appears in the app. Otherwise, tap on Activate Bluetooth
• As soon as the device has been recognized, click on Add device - Select your WLAN and enter the WLAN password
• The device is added
• The device beeps three times when it has been successfully added.
PROTECCIÓN DE DATOS
natural_image
Diagram of a mechanical device with a central shaft and two opposing arrows indicating flow or movement (no text or symbols present)natural_image
Circular device with black and white casing, labeled 'O', and a blue curved arrow indicating rotation (no text or symbols beyond labels)Create a user account and log in.

Please make sure that...
- the device is assigned a wireless network in the 2.4 GHz band by your router. Wireless networks in the 5 GHz band are not supported.
- Your router supports 802.11b/g/n.
- iOS version 11.0 or higher or Android version 6.0 or higher is installed. If necessary, update the operating system of your smartphone or tablet.
2 Activate WLAN
Make sure that your smartphone or tablet is connected to your home Wi-Fi network and that the Bluetooth function is activated.
3 Activate hotspot mode
Press and hold the on/off button on the device for 5 seconds until the device beeps three times and an „F“ flashes on the display.
4 Set up WiFi
Once you have downloaded and installed the „Smart Life - Smart Living“ app, please open the app.
- Tap on „Add device“ if your device appears in the app. Otherwise, tap on Activate Bluetooth
• As soon as the device has been recognized, click on Add device - Select your WLAN and enter the WLAN password
• The device is added
• The device beeps three times when it has been successfully added.
DATABESKYTTELSE
natural_image
Diagram of a mechanical device with a central shaft and two opposing arrows indicating flow or movement (no text or symbols present)natural_image
Circular device with black and white casing, marked with 'O' and 'E', and blue curved arrow indicating rotation (no text or symbols)Create a user account and log in.

Please make sure that...
- the device is assigned a wireless network in the 2.4 GHz band by your router. Wireless networks in the 5 GHz band are not supported.
- Your router supports 802.11b/g/n.
- iOS version 11.0 or higher or Android version 6.0 or higher is installed. If necessary, update the operating system of your smartphone or tablet.
2 Activate WLAN
Make sure that your smartphone or tablet is connected to your home Wi-Fi network and that the Bluetooth function is activated.
3 Activate hotspot mode
Press and hold the on/off button on the device for 5 seconds until the device beeps three times and an „F“ flashes on the display.
4 Set up WiFi
Once you have downloaded and installed the „Smart Life - Smart Living“ app, please open the app.
- Tap on „Add device“ if your device appears in the app. Otherwise, tap on Activate Bluetooth
• As soon as the device has been recognized, click on Add device - Select your WLAN and enter the WLAN password
• The device is added
• The device beeps three times when it has been successfully added.
SKYDD AV PERSONUPPGIFTER
natural_image
Diagram of a mechanical device with a central shaft and two opposing arrows indicating flow or movement (no text or symbols present)natural_image
Circular device with black and white casing, marked with 'O' and 'E', and blue curved arrow indicating rotation (no text or symbols)Create a user account and log in.

Please make sure that...
- the device is assigned a wireless network in the 2.4 GHz band by your router. Wireless networks in the 5 GHz band are not supported.
- Your router supports 802.11b/g/n.
- iOS version 11.0 or higher or Android version 6.0 or higher is installed. If necessary, update the operating system of your smartphone or tablet.
2 Activate WLAN
Make sure that your smartphone or tablet is connected to your home Wi-Fi network and that the Bluetooth function is activated.
3 Activate hotspot mode
Press and hold the on/off button on the device for 5 seconds until the device beeps three times and an „F“ flashes on the display.
4 Set up WiFi
Once you have downloaded and installed the „Smart Life - Smart Living“ app, please open the app.
- Tap on „Add device“ if your device appears in the app. Otherwise, tap on Activate Bluetooth
• As soon as the device has been recognized, click on Add device - Select your WLAN and enter the WLAN password
• The device is added
• The device beeps three times when it has been successfully added.
OCHRONA DANYCH
natural_image
Diagram of a mechanical device with a central shaft and two opposing arrows indicating flow or movement (no text or symbols present)natural_image
Circular device with black and white casing, marked with 'O' and 'E', and blue curved arrow indicating rotation (no text or symbols)Create a user account and log in.

Please make sure that...
- the device is assigned a wireless network in the 2.4 GHz band by your router. Wireless networks in the 5 GHz band are not supported.
- Your router supports 802.11b/g/n.
- iOS version 11.0 or higher or Android version 6.0 or higher is installed. If necessary, update the operating system of your smartphone or tablet.
2 Activate WLAN
Make sure that your smartphone or tablet is connected to your home Wi-Fi network and that the Bluetooth function is activated.
3 Activate hotspot mode
Press and hold the on/off button on the device for 5 seconds until the device beeps three times and an „F“ flashes on the display.
4 Set up WiFi
Once you have downloaded and installed the „Smart Life - Smart Living“ app, please open the app.
- Tap on „Add device“ if your device appears in the app. Otherwise, tap on Activate Bluetooth
- As soon as the device has been recognized, click on Add device
- Select your WLAN and enter the WLAN password
• The device is added
• The device beeps three times when it has been successfully added.
ADATVÉDELEM
www.venta-air.com/Service/Guarantee/
RECIKLAŽA I ODLAGANJE
Simbol "prekrižene kante za smeće" zahtijeva odvojeno odlaganje otpadne električne i elektroničke opreme (WEEE) i iskorištenih baterija. Takvi uređaji mogu sadržavati opasne tvari i tvari opasne po okoliš. Ovi proizvodi moraju se odlagati na određenom sabirnom mjestu za recikliranje električnih i elektroničkih uređaja i ne smiju se odlagati s nerazvrstanim kućnim otpadom.
natural_image
Diagram of a mechanical device with a central shaft and two opposing arrows indicating flow or movement (no text or symbols present)natural_image
Circular device with black and white casing, marked with 'O' and 'E', and blue curved arrow indicating rotation (no text or symbols)KONFIGURACE A APLIKACE SMART LIFE


1 Nainstalujte si aplikaci „Smart Life – Smart Living“.
RECYKLACE A LIKVIDACE
natural_image
Diagram of a mechanical device with a central shaft and two opposing arrows indicating flow or movement (no text or symbols present)natural_image
Circular device with black and white casing, marked with 'O' and 'E', and blue curved arrow indicating rotation (no text or symbols)natural_image
Diagram of a mechanical device with internal components and directional arrows indicating movement (no text or symbols)natural_image
Circular device with black and white casing, marked with 'O' and 'E', and blue curved arrow indicating rotation (no text or symbols)natural_image
Diagram of a mechanical device with a central shaft and two opposing arrows indicating flow or movement (no text or symbols present)natural_image
Circular device with black and white casing, marked with 'O' and 'E', and blue curved arrow indicating rotation (no text or symbols)natural_image
Diagram of a mechanical device with a central shaft and two opposing arrows indicating flow or movement (no text or symbols present)natural_image
Circular device with black and white casing, marked with 'O' and 'E', and blue curved arrow indicating rotation (no text or symbols)natural_image
Diagram of a mechanical device with a central shaft and two opposing arrows indicating flow or movement (no text or symbols present)Vybratie filtra Inštalácia filtra dole
natural_image
Circular device with black and white casing, marked with 'O' and 'E', and blue curved arrow indicating rotation (no text or symbols)www.venta-air.com/Service/Service-Support/
VENTA WORLD WIDE
www.venta-air.com/en_de/Venta-worldwide/
BENELUX
Venta Benelux B.V.
1952 McDowell Rd, Suite 204
Naperville IL 60563
No. 27, Jalan PP 11/4,
Alam Perdana Industrial Park,
Taman Putra Perdana, 47130
Puchong, Selangor, Malaysia
Tel.: +603-8322 6628
Fax: +603-8322 6066
info@gasales.com.my
RUSSIA
Venta Russia TSK IMPORT
Nihonbashi Daiei Building 7F
1-2-6 Muromachi Nihonbashi
Chuo-ku, Tokyo 103-0022
090-4129-0399
venta_support@kikuyalogi.com
www.venta-air.jp
MONGOLIA
AERIS LLC, SUITE 316, Barilga
Architecture Building, Chinggis
Avenue, Oron Suuts Street,
2nd horoo, Khan-Uul district,
Ulaanbaatar, Mongolia 17032
Tel.: +976-99101185,
+976-99096696
sales@aeris.mn
www.aeris.mn
SOUTH AFRICA
EUROCARE Wellness
5 Star Business Park, Unit 2,
Persimmon Close, Honeydew,
Johannesburg
Südafrika
Tel.: +27 11 888 3255
Fax: +27 11 888 9874
info@eurocarewellness.co.za
KROATIEN
MR servis d.o.o.
Dugoselska cesta 5
10370 Rugvica, Kroatien
Tel.: +385060535355
info@mrservis.hr
www.mrservis.hr
SOUTH KOREA
VENTA KOREA CO., LTD.
3/F., Seojin Bldg., 754,
Seolleung-ro, Gangnam-Gu,
Seoul 135-948, Korea
Tel.: +82 22 03 40 114
Fax: +82 22 03 40 119