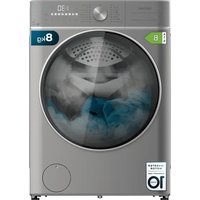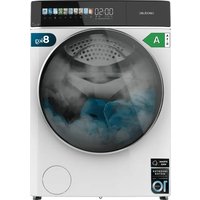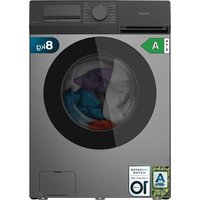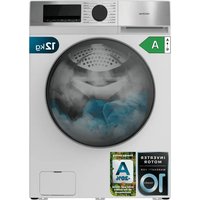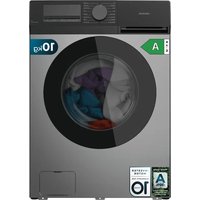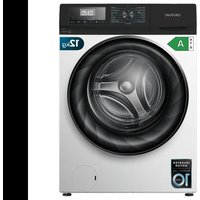
Bolero DressCode 120700 A - Washing machine CECOTEC - Free user manual and instructions
Find the device manual for free Bolero DressCode 120700 A CECOTEC in PDF.


User questions about Bolero DressCode 120700 A CECOTEC
0 question about this device. Answer the ones you know or ask your own.
Ask a new question about this device
Download the instructions for your Washing machine in PDF format for free! Find your manual Bolero DressCode 120700 A - CECOTEC and take your electronic device back in hand. On this page are published all the documents necessary for the use of your device. Bolero DressCode 120700 A by CECOTEC.
USER MANUAL Bolero DressCode 120700 A CECOTEC
natural_image
Front view of a Cocotec washing machine with digital display and circular fan (no visible text or symbols on the device itself)Safety instructions 10
-
Parts and components 84
-
Before use 84
-
Installation 85
-
Operation 89
-
Cleaning and maintenance 106
-
Technical specifications 111
-
Disposal of old electrical and electronic appliances 112
-
Technical support and warranty 112
-
Copyright 112
SOMMAIRE
Read these instructions thoroughly before using the device. Keep this instruction manual for future reference or new users.
- Ensure that the mains voltage matches the voltage specified on the device rating label and that the plug is earthed.
- The installation of an earthed socket must be carried out by a qualified electrician. Make sure that the electrical installation complies with current regulations.
- If the power cord is damaged, it must be replaced by the official Cecotec Technical Support Service or by a similarly qualified person to prevent hazards.
- If the product is damaged, it must not be used. Contact the official Cecotec Technical Support Service. Risk of electric shock!
- Do not use an extension cord or multiple sockets.
- Do not use external switching devices such as timers.
- This appliance is for indoor use only.
- Keep the device away from heat sources and direct sunlight to prevent the plastic and rubber pieces from getting damaged.
- Make sure the device is installed in places where the temperature is above 5°C. Lower temperatures may cause damage to internal components. If the device should freeze, be sure to drain the water completely to avoid further damage.
- In case of leaks or splashes of water, dry the device as soon as possible.
-
The device is not designed for built-in installation.
-
Use the hose set supplied with the appliance. Do not reuse old hoses.
- Check the hose connections and the tap to avoid problems due to pressure changes. If the connections loosen or leak, turn off the water tap. Do not operate the washer before the hoses have been properly installed.
- Do not remove the filter from the drain pump while there is water left in the machine. Hot water spillage may occur.
- Before carrying out any maintenance in the device, unplug the appliance from the mains.
- As a safety measure, we advise you to unplug the appliance and cut the water supply after every use. Maximum water-inlet pressure: 1 MPa. Minimum water-inlet pressure: 0.05 MPa.
- Use the new hoses supplied with the equipment.
- Never unplug the appliance with wet hands.
- Unplug the power cord before cleaning or repairing the product.
- For safety reasons, the appliance must be properly earthed.
- Water channelling and electrical devices must be connected by a qualified technician in accordance with the local and national safety regulations specified by the manufacturer.
- The glass door may reach high temperatures during operation. Keep children and pets away from the glass door.
- Do not use the device in rooms where water, moisture, explosives, or caustic gases are present.
-
If the room where the washing machine is located has any type of device that generates fumes from the burning of fuels, make sure that there is proper ventilation, as the accumulation of these fumes may cause a fire hazard.
-
Never use sprays or flammable substances near the device.
- Do not wash items that have been soiled with substances such as cooking oil, acetone, alcohol, petrol, kerosene, spot removers, turpentine, waxes, and wax removers.
- Items such as foam rubber, shower caps, waterproof textiles, rubber backed articles, and clothes, or pillows fitted with foam rubber pads should not be washed in the machine.
- Fabric softeners or similar products should be used as specified by manufacturer.
- Do not wash articles that have been cleaned in, washed in, soaked in, or stained with flammable or explosive substances, like wax, oil, paint, petrol, degreasers, dry-cleaning solvents, kerosene, etc., which may result in fire or explosion.
- When washing fabrics that contain vegetable or cooking oil or have been contaminated by haircare products, they should first be washed in hot water with extra detergent. This will reduce, but not eliminate, the hazard.
- Do not install the equipment on a carpeted floor.
- The air openings must not be obstructed by a carpet.
- Appliances with a single inlet valve can only be connected to a cold-water supply.
- The plug must be accessible after installation.
- The appliance must not be installed behind a lockable door, a sliding door, or a door with a hinge on the opposite side to that of the device.
- The appliance shall not be installed in a humid place.
- The product is exclusive for household use and is only designed for the textiles suitable for machine washing.
-
Do not use it for commercial purposes.
-
Do not stand or sit on the appliance.
- Do not lean against appliance door.
- Flammable and explosive or toxic solvents are forbidden. Do not use detergents containing petrol, alcohol, etc. Use only detergents suitable for machine washing, especially those which are dosed directly in the drum.
- Do not stop the device before ending the washing cycle. In any case, if this should happen, remove the garments with caution, as they may reach high temperatures.
- Once the washing cycle has finished, we recommend removing the laundry as soon as possible to prevent creases.
- This appliance can be used by children aged 8 and above and persons with reduced physical, sensory, or mental capabilities or lack of experience and knowledge, as long as they have been given supervision or instruction concerning the use of the appliance in a safe way and understand the hazards involved. Do not allow children to play with the device. The cleaning and maintenance of the appliance should not be carried out by children without supervision.
- Children should be supervised to make sure that they do not play with the device.
- Children under 3 years old must stay away from the washing machine, unless they are constantly supervised.
- Make sure that children and animals do not climb on the washing machine while it is in operation.
- All cleaning, washing or similar products must be stored in a safe place, out of the reach of children.
- Do not place heavy objects on top of the washer.
Cautions during the handling of the machine
- If you wish to change the location of the washing machine, make sure you install the transport bolts again in the device, as they will ensure the interior of the product is not damaged during transport.
- Water accumulated inside the appliance must be drained out.
- Handle the machine carefully. Never hold each protruded part on the machine while lifting. Do not use the door of the device as a handle during transport.
- The device is heavy. Transport it with care.
- Secure the drain and water-supply hose correctly.
- Do not close the door with excessive force. If it is found difficult to close the door, please check if the clothes are put in or distributed well.
- Never try to force the door open. The door will unlock shortly after the end of a cycle.
- It is forbidden to wash carpets.
- Never pour water manually during washing.
INSTRUCTIONS DE SÉCURITÉ
• (UE) 2021/340, (UE) 2021/341,
| Consumo energético (kWh/ciclo) | Consumo de agua (litros/ciclo) | Contenido de humedad residual (%) | Velocidad máxima alcanzada rpm | |
| 1.250 | 79.0 | 51.90 | 1400 | |
| 0.550 | 60.0 | 51.90 | 1400 | |
| 0.250 | 44.0 | 52.40 | 1400 | |
| 0.150 | 96.0 | 53.00 | 1400 | |
| 2.055 | 130,8 | 53.00 | 1400 | |
| 0.940 | 81.5 | 45.00 | 1400 | |
| 0.440 | 27.0 | 65.00 | 800 |
ESPAÑOL
- Upper part
- Control panel
- Detergent dispenser drawer
- Door
- Drain pump access cover
- Adjustable feet
Figure 2
A. Programme knob
B. Display
C. Temp. button
D. Spin button
E. Favourite button
F. Options button
G. Delay End button
H. Start/Pause button
I. Child lock function
J. Mute function
NOTE:
the graphics in this manual are schematic representations and may not exactly match the device.
The design and appearance of the control panel may vary depending on the model of the washing machine.
2. BEFORE USE
- This appliance is packaged in a way as to protect it during transport. Take the device out of its box and remove all packaging materials. You can keep the original box and other packaging elements in a safe place. This will help you prevent damage to the device when transporting it in the future. In case the original packaging is disposed of, make sure all packaging materials are recycled accordingly.
- Make sure all parts and components are included and in good conditions. If there is any piece missing or in bad conditions, contact the official Cecotec Technical Support Service immediately.
- If in doubt, do not use the washing machine, please contact the official Cecotec Service Centre.
- Keep packaging materials (plastic bags, polystyrene parts, etc.) out of the reach of children, as they are potentially dangerous.
Box content
- Package of small items
- Washing machine
- Instruction manual
- Bag of small items
- Plastic protective caps (x4)
- Spanner
- Cold water supply hose
- Bottom plate with acoustic foam (optional - depending on model)
3. INSTALLATION
- Move the washing machine without lifting it from the top. Install the washing machine on a solid, level surface, preferably in a corner of the room.
- Make sure that the ventilation openings in the base of the washer (if present on your model) are not obstructed by carpet or other material.
NOTE:
The washing machine is equipped with transport screws to prevent possible damage to the interior during transport. Before using the washing machine, it is essential to remove the transport screws. Once removed, cover the openings with the 4 plastic protective caps supplied.
If the transport screws are not removed, they may damage the device.
- Unscrew the 4 transport screws by approx. 30 mm in the direction of the arrow using the spanner provided. Fig.3
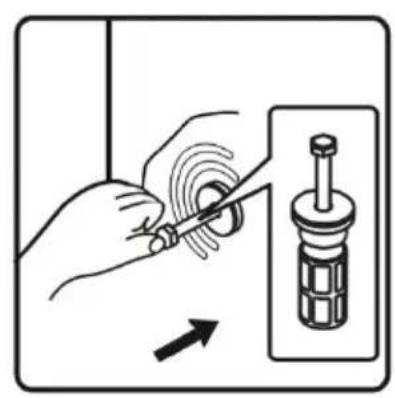
- Push the 4 transport screws horizontally inwards and loosen them. Fig. 4
- Take the transport screws out together with the rubber part and the plastic part. Fig. 5
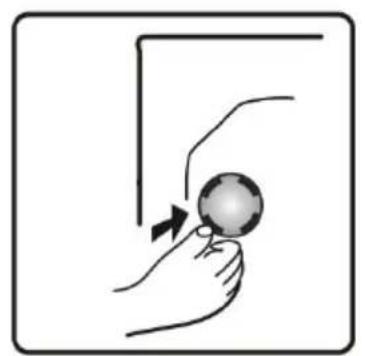
- To ensure safety and reduce noise, you should install the supplied plastic protective caps. Support and place the cap in the hole and press down until it "clicks". Fig. 6
Important: keep the transport screws and the spanner for future transport of the device and, in this case, replace the transport screws in reverse order.
ENGLISH
Feet adjustment
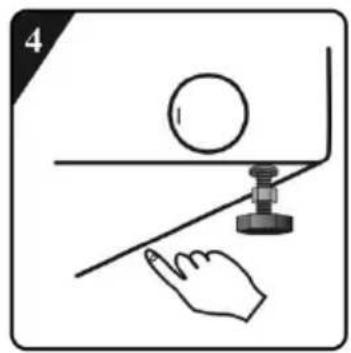
The appliance must be installed on a solid, level surface (if necessary, use a spirit level, not included). If the appliance is to be installed on a wooden floor, distribute the weight by placing it on a 60×60 cm plywood board at least 3 cm thick and fix it to the floor. If the floor is uneven, adjust the 4 levelling feet as necessary. Do not insert pieces of wood, etc. under the feet.
- Loosen the safety nut clockwise (according to the arrow) using the spanner. Fig. 7
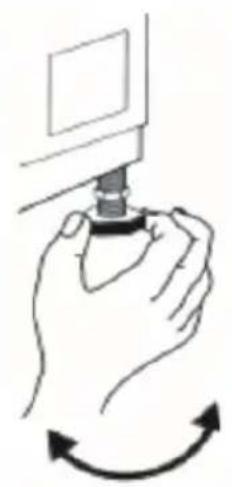
- Raise the machine slightly and adjust the height of the foot by turning it. Fig. 8
- Clockwise > up
- Counterclockwise > down
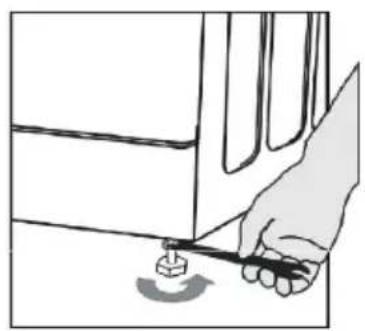
- Tighten the safety nut by turning it counterclockwise. Fig. 9
Make sure that all four feet are stable and flat on the ground.
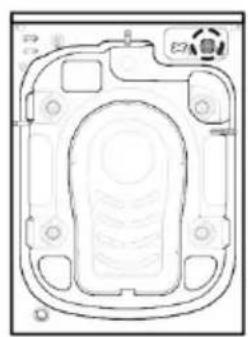
Bottom plate installation (optional - only on certain models)
For quieter operation, a bottom plate is supplied with the unit (some models only). After installing the plate on the bottom of the washing machine, the noise level will be reduced considerably. The washing machine can be used without the bottom plate.
Instructions for the bottom plate installation:
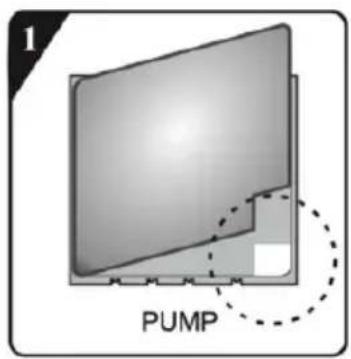
A: Attach the acoustic foam to the side of the bottom plate with the word PUMP.
Tilt the washer 30°-40° and fix the bottom plate so that the word PUMP on the bottom plate is in the corner of the washer, where the drain pump is located. Fig. 10
B:
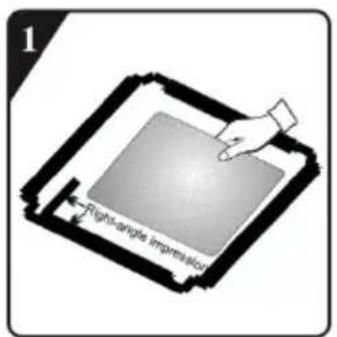
- Before installing the bottom plate, align and glue the acoustic foam along its edge (this procedure is not necessary for some washing machine models, since they do not have acoustic foam). Fig. 11
- Remove the paper from the surface of the double-sided tape on all four sides of the bottom plate. Fig. 12
- Tilt the machine at an angle of 40^ and let the side with the right-angled notch face the front of the machine, as shown in Figure 13. Insert the side with the slot at an oblique angle between the two feet screws at the back of the washing machine. Then install the bottom plate and make sure that it contacts the bottom of the washing machine. Fig. 13
- Manually press the double-sided tape on all four sides to fix the bottom plate firmly to the machine body. Fig. 14
Connection of the inlet hose to the water supply
If the water inlet hose is not installed, it must be screwed to the appliance. The hose marked blue is for cold water only. Hot water hose marked red must also be connected, for models with double inlet.
- Screw the hose by hand into the rear connector of the washing machine by tightening the nut. Fig. 15
Legend Fig. 15:
-
Hot water (depending on the model)
-
Cold water
Warning:
- Do not kink the hose!
- The appliance must not be connected to the mixer tap of a non-pressurised water heater.
- Check the tightness of the connections by opening the tap fully.
- If the hose is too short, replace it with a hose of suitable length, with a minimum pressure resistance of 1000 kPa.
- Check regularly if the inlet hose is broken or cracked and replace it if necessary.
- The washing machine can be connected without a check valve.
Connect the water supply inlet hose in accordance with Local Regulations.
Water tap: threaded 34 " hose connector
Drain hose connection
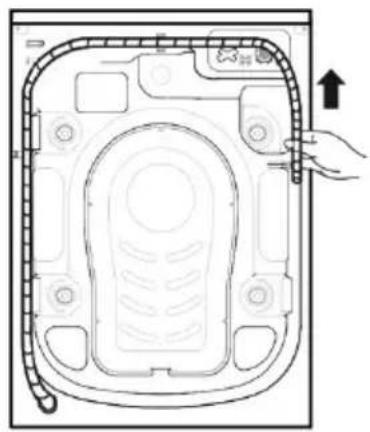
If the hose is installed as shown in figure 16, release it only from the right clip (according to the arrow). Fig. 16
There are 3 ways to connect the drain hose:
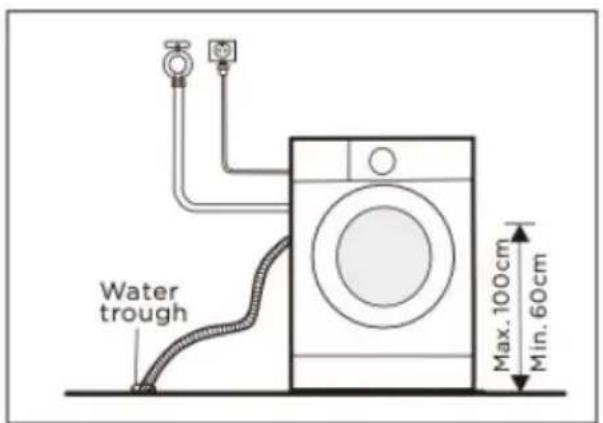
- In a drainpipe. It is recommended to use a vertical tube. Fig. 17
- In a sink's drainpipe, over the trap. Fig. 18
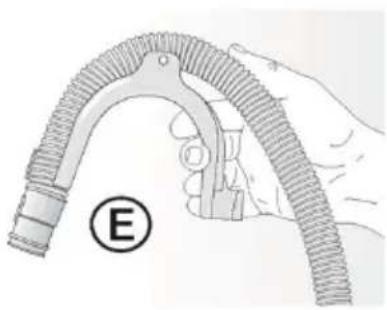
- Hook it over the edge of a sink using the U-bend. Fig. 19
NOTE: bend included only in certain models.
Place the U-shaped elbow, if it is not installed, in the end of the drain hose. Fig. 20
ENGLISH
Note:
- Make sure the drain hose is not twisted.
- Secure the hose so it does not fall. After the washing phase, the washing machine will drain the hot water.
- Small sinks are not suitable.
- To make an extension use a hose of the same type and secure the connections with clips.
- Max. Total length of drain hose: 2.50 m.
Secure the drain hose to prevent scalding when draining hot water.
Electric connection
- Electrical connections must be carried out by a qualified technician in accordance with the instructions in the manual and the safety regulations in force.
- Information on voltage, power consumption and protection requirements can be found on the inside of the door. The appliance must be connected to the mains power supply via an earthed socket in accordance with the regulations in force.
- The washing machine must be earthed by law. Cecotec shall not be liable for any damage to property or injury to people or animals resulting from failure to comply with the above instructions.
- Make sure that the capacity of the socket is powerful enough to power the machine (10 A).
- Before performing any cleaning or maintenance operations on the appliance, disconnect it from the mains.
- After installation, access to the mains socket or disconnection from the mains must be possible at all times by means of a two-pole switch. Do not operate the machine if it has been damaged during transport, please inform Cecotec Technical Support.
- The replacement of the mains cable must only be carried out by Cecotec's Technical Support Service or by a qualified and authorised electrician.
Minimum dimensions of the space where the washing machine is to be installed:
Width 615 mm.
Height: 855 mm.
Carrying
Never lift the device by grabbing the surface during transport.
- Disconnect the plug.
- Close the tap.
- Disconnect the drain and inlet hoses.
- Remove the water from the hoses and the device.
-
Place the transport screws.
-
The machine weighs more than 55 kg. Two people are needed to move it.
NOTE:
INCORRECT INSTALLATION CAN CAUSE NOISE, EXCESSIVE VIBRATION AND WATER LEAKAGE. NEVER MOVE THE APPLIANCE BY LIFTING IT FROM THE TOP.
4. OPERATION
Emergency door opening
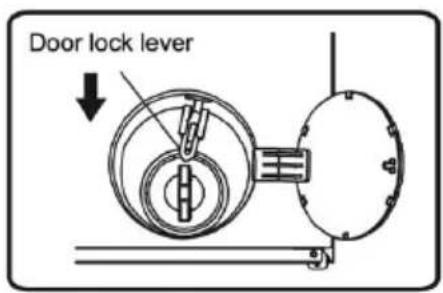
In case the door cannot be opened due to a power failure or other special circumstances, the locking lever of the drain pump door can be used for emergency opening.
Note:
- Do not trigger it when the machine is in normal operation.
- Before operating, make sure that the drum has stopped rotating, is not at high temperature and there is no water inside. If water remains in the interior, drain it out through the drain hose located next to the drain filter (depending on model) or by slowly unscrewing the drain filter.
- Method of use: Open the drain pump door cover, pull down the locking lever using a tool and then the door can be opened. Fig. 21
Before the first washing cycle
To remove any water residue used during the quality control carried out at the factory, we recommend that you perform a short wash cycle without laundry.
- Open the main water tap.
- Close the washing machine door.
- Pour a little detergent (about 30 ml) into the compartment drawer (l).
- Select and start a short programme.
ENGLISH
Washing preparation
- Separate clothes according to:
- Fabric type / Label symbol / Cottons, mixed fibres, easy care/synthetics, wool, hand wash.
- Separate coloured and white garments. Wash new coloured items separately.
- Wash different sizes of laundry in the same load to improve washing efficiency and drum distribution.
- Wash small items such as socks, handkerchiefs, etc., and items with hooks, e.g., bras, in a mesh laundry bag or pillowcase with a zip. Always remove the rings from the curtains or wash the curtains with the rings in a cotton bag.
- Empty every pocket
Coins, safety pins, etc. can damage your laundry as well as the drum and drawer of the appliance.
- Zips
Close zips, fasten buttons or hooks, tie loose belts or straps.
Remove stains
- Stains from blood, milk, eggs, etc. are usually removed by the automatic enzymatic phase of the programme.
- To remove stains from red wine, coffee, tea, grass, fruit, etc., add a stain remover in the compartment of the detergent dispenser drawer .
- Pre-treat heavily soiled areas with a stain remover if necessary.
Dyes
- Only use dyes suitable for washing machines.
- Follow the manufacturer's instructions.
- Plastic and rubber parts of the washing machine can be stained by dyes.
Loading the washing machine
-
Open the door.
-
Insert the items into the drum all at once without over-tightening them. Respect the loading volume; a maximum of 34 of the drum is recommended. Overload may result in unsatisfactory washing and wrinkled clothes. Distribute the laundry evenly in the drum.
-
Close the door.
Detergents and additives
Always use a high-efficiency, low-foaming detergent.
The choice of detergent depends on:
- Type of fabric (cottons, easy care/synthetics, delicates, wool). Use only specific detergents to wash wool.
- Colour of the clothes.
- Wash cycle temperature.
- Degree and type of soiling.
Note:
Any whitish residue on dark fabrics is due to the insoluble compounds used in today's phosphate-free powder detergents. If this occurs, shake or brush the fabric or use liquid detergents. Use only specific detergents and additives for household washing machines. When using descalers, dyes or bleaches for pre-washing, make sure that they are suitable for use in domestic washing machines. Descalers may contain products that could damage your washing machine. Do not use solvents in the washing machine (e.g. turpentine, benzine). Do not wash fabrics that have been treated with solvents or flammable liquids.
Dosage
Follow the dosage recommendations of your detergent. The amount will depend on:
- Degree and type of soiling.
- Follow detergent manufacturer's instructions for a full load. Half load: 3/4 of the amount used for a full load. Minimum load (approx. 1 kg): 1/2 of the amount used for a full load.
- Water hardness in your area. Soft water needs less detergent than hard water.
Note:
Too much detergent can lead to excessive foaming, which reduces the effectiveness of the wash. If the machine detects too much foam, it can stop spinning.
Insufficient detergent can cause the laundry to turn grey over time and also calcify the heating element, drum, and hoses.
Where to put detergent and additives
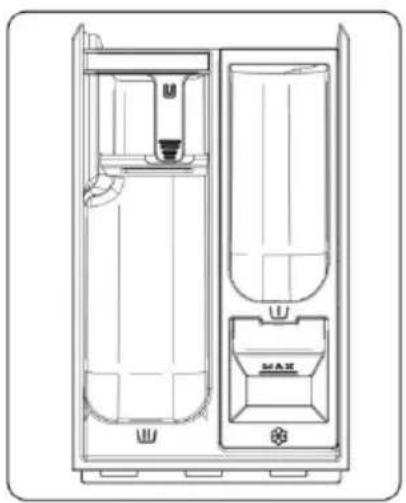
The detergent dispenser drawer has three compartments.
- Prewash compartment
- Detergent for pre-washing/soaking

- Washing compartment

- Detergent for main wash
- Water softener (water hardness class 4)
- Softener compartment

- Softener:
Figure 22 (depending on models)
ENGLISH
Note:
- Keep detergents and additives in a safe and dry place, out of the reach of children.
- Liquid detergents can be used for prewash programmes. However, in this case, a powder detergent should be used for the main wash. Do not use liquid detergents when activating the Delay start function (depending on model).
- To avoid dosing problems when using highly concentrated liquid and powder detergents, use the special detergent ball or bag supplied with the detergent and place it directly into the drum.
- When using descalers, dyes or bleaches, make sure that they are suitable for use in washing machines. Softeners may contain compounds that can damage the parts of your washing machine.
- Do not use solvents in the washing machine (e.g., turpentine, benzine).
- Never exceed the MAX level.
Washing machine programmes
Off
Allergy Steam (Steam - sterilisation)
Baby Steam Care
Dark Wash
Sportswear
Down (Bed linen)
20°C
Drum Clean
Spin Only
Rinse&Spin
Quick 15'
Wool
Mix
Eco 40-60
Cotton Colour
Cotton
Programme table legend:
Detergent dispenser drawer:
Prewash
Main Wash
Softener
Washing programme functions
Delay End
Prewash
Extra Rinse
Default Rinse Time
Intensive
Spin speed
Temp
Maximum spin speed rpm
| Programmes Care labels | Material/soiling levelWash temperature selected according to care label instructions | Maximum load (Kg) | Detergent compartment | ||
| Prewash M | Main wash Softener | ||||
| Cotton-,20°C, 30°C,40°C.60°C.90°C | Heavily or moderately soiled cotton; linen.For heavily soiled laundry, select the "Prewash" function. | 12 | * | Yes | * |
| Cotton Colour--,20°C,30°C,40°C.60°C | Programme for lightly or moderately soiled laundry.The temperature can be adjusted separately, so please observe the instructions on the garment.Wash clothes worn directly on the skin at 60°C.The less soiled laundry will be cleaned thoroughly at 40°C. The spin speed can also be freely selected. The default setting is the maximum spin speed. | 12 | * | Yes | * |
| Washing programme functions | Max. spin speed rpm | ||||||||
| Delay end | Prewash Extra Rinse | Extra Rinse | Default rinse time | Intensive Spin Temp | |||||
| 3 | *** | 1400 | |||||||
| 2 | - | ** | 1400 | ||||||
| Allergy Steam (2)40°C. 60°C | It is suitable for high temperature resistant and less fading fabrics, to remove allergens such as pollen, dust mites and parasites by using high temperature steam. | 2.0 | * | Yes | * | |
| ECO 40-60(1) | - | Cotton clothes with normal soiling. | 12 | - | Yes | * |
| Wool-.20°C. 30°C.40°C | Machine washable wool(check garment label). | 2.0 | - | Yes | * | |
| Baby Steam Care (2)40°C 60°C900C | Suitable for baby clothes, underwear, etc.Sterilises and disinfects by high temperature steam. | 2.0 | * | Yes | * | |
| Dark Wash.-20°C 30°C.40°C.60°C | - | Dark cotton fabrics and dark easy-care fabrics | 4.0 | * | Yes | * |
| Quick 15’--,20°C,30°C. 40°C | Cotton, mixed fabrics. Items with little use or recently purchased. | 1.0 | - | Yes | * | |
| Mix-,20°C, 30°C,40°C | Mixed loads of moderately soiled cotton and synthetic fabrics. | 6.0 | * | Yes | * |
| 4 | *** | 1400 | |||||||
| 2 | - * - | 1400 | |||||||
| 2 | - ** | 600 | |||||||
| 3 | *** | 1400 | |||||||
| 2 | *** | 1000 | |||||||
| 1 | - ** | 800 | |||||||
| 2 | *** | 1400 |
| Sportswear20°C 30°C40°C | 30° | Sports and leisurewear made from microfibre fabrics. | 2.0 | * | Yes | * |
| Down--.20°C.30°C. 40°C | 30° | Machine washable articles filled with synthetic fibres, such as pillows, quilts and bedspreads. Also suitable for down-filled items. | 2.0 | - | Yes | * |
| 20°C | - | This programme is suitable for lightly stained, cotton laundry, with energy saving. | 12 | * | Yes | * |
| Drum clean:90°C | - | Programme to remove dirt and bacterial residues that may breed in the machine after a period of use, especially when low temperature washings are used regularly. | - | - | Yes | - |
| Rinse + Spin | - | This programme carries out two spinnings and rinses by default. | 12 | -- * |
| 2 | *** | 1000 | |||||||
| 2 | -** | 600 | |||||||
| 2 | ** - | 1400 | |||||||
| 1 | --- | 800 | |||||||
| 2 | - * - | 1400 |
| Spin | - | Select the spinning time and speed manually. | 12 | --- |
*Optionalfunctions
Yes: Required detergent
—: it cannot be selected
--: unheated water temperature
(3) The wash performance test programmes are as follows: Eco 40-60.
(4) Allergy Steam and Baby Steam Care are suitable for sterilising coloured laundry. When the door glass fogs up, do not put your hand on the door glass or open the dispenser to avoid burns.
Starting a washing cycle:
Add detergent, close the door, and select the programme.
Load the laundry into the drum and close the door.
Add detergent to the compartments corresponding to the programme type to be selected.
Add detergent as described in the Detergent and Additives section.
Turn the device on.
- Turn the programme knob to the desired programme. Must be set to OFF if the initial position of the dial is not "OFF". The start is then given place.
- Select the washing temperature and spin speed by pressing the Temp and Spin buttons.
- Press the Options button to select additional functions.
- After starting the programme, the display will show the programme duration (hours: minutes) and the additional function options in sequence.
Selection of additional functions
In idle state, press the Options button to select an additional function for the current programme. Select only one function per press and then the corresponding icon will flash.
After starting the wash, you cannot change the programme. You can choose the following additional functions:
1. Prewash
Select this function to carry out a prewash to improve the washing effects and better remove stains. This function is ideal for heavily soiled laundry.
Before filling, detergent or washing powder can be added to the prewash compartment.
Powder detergent should be added to the main wash compartment.
| 0 | - * - | 1400 |
2. Extra Rinse
After setting the Extra Rinse function, the programme will run the rinsing process once more before applying the softener. Therefore, the total execution time of the programme will increase.
3. Intensive
This function can be selected to extend the washing time, enhance the washing effects, and improve stain removal.
Note:
Water inlet warning
If the general tap is not open or the pressure is too low, the display will indicate "F01" to warn the user.
Drainage warning
If the pipe is kinked or clogged, the water will not drain smoothly. In case it does not drain completely for a long time, the display will indicate "F03" to warn the user.
Door lock icon
- Once the programme has started, the door lock icon will flash, and the door will lock.
- After completing the programme, the door is automatically unlocked.
- During the pause, if the safety conditions (internal temperature, amount of water, etc.) allow the door to be opened, the door will unlock, and the indicator light will go out.
- When the door lock indicator light flashes, the door must not be forced open to avoid personal injury.
Delay End
- The delay end function allows the machine to be used according to the user's needs, e.g., during the night.
- You can only press this button during standby mode to select the time.
- Once the delay end function is selected, the time will increase by 1 hour each time the button is pressed.
- Before programming, if the programme time is less than 1h, it will be completed by pressing the button for the first time. Then the time will increase by 1h each time the button is pressed. If you select this option before the programme runs, you can cancel the selected time by turning the programme knob and selecting another programme.
ENGLISH
- The deferred time must be longer than the washing programme time, as the deferred time is the time at which the programme will end. For example, if the selected programme is 2:28 (h: min) long, the selected deferred time must be between 3:00 and 24:00 (hours).
- When the process is running, the Delay End icon will light up. When the process is finished, the Delay End icon will turn off.
Favourite
- After selecting the programme, adjusting each parameter if necessary (temperature, spin speed, options, etc.) and starting the wash, long press the Favourite button for 3s to memorise the selected programme, temperature, spin speed and other related settings. Then the Favourite symbol light will come on.
- If the Favourite indicator is not lit, press the Favourite button briefly and the programme will change to the programme memorised last time. In the meantime, temperature, spin speed and other parameters will automatically change to the parameters memorised last time.
- At this point, if you change programmes or press other buttons, the panel will display a new programme and parameters, and the Favourite symbol light will go out.
- When using this mode for the first time, if you have never pressed the Favourite button for a long time to memorise programmes, you can briefly press the Favourite button and then the linen and cotton programme and its default setting will be memorised by default.
Mute
- When the machine is in standby, pause or run mode, press and hold the Spin and Favourite buttons for about 2 seconds. The Mute icon will light up. All audible warnings shall be turned off, with the exception of alerts.
- When the machine is in Mute, press and hold the Spin + Favourite buttons for 2 seconds until the Mute icon turns off. All audible warnings shall be activated.
Automatic weighing
The machine displays “---” after start-up, indicating that it is weighing automatically. It will adjust the programme duration (hours: minutes) automatically according to the weight of the laundry.
Child Lock
- To reinforce the safety of children, this machine is equipped with a child lock function.
- When the programme starts, press the Temp + Spin buttons for 2 seconds. The Child Lock icon will light up and the child lock will be activated. Repeat the same operation and the child lock will be released.
-
When the child lock is set, all function buttons will be protected.
-
When the machine is switched off by turning the programme selector to the Off position, the child lock is deactivated.
- After completing the programme, the child lock is automatically unlocked.
Starting a programme
Once you have selected the options and placed detergent in the detergent drawer, open the main water tap and press the Start/Pause button. The display will show the progression of the current programme with icons from left to right. It also displays the remaining programme time.
Cancelling the programme or changing the options
- Turn the programme knob back to OFF to turn the machine off.
- Select the desired programme and options.
- Press the Start/Pause button to start the machine without adding extra detergent.
Programme completion
The machine displays END at the end of the programme. The door is unlocked. If the knob is turned to Off, the power will be cut off. If no button is pressed and the knob is not turned for about 2 minutes, the machine will switch off automatically.
Reloading process
- If you want to add more laundry during the washing process, press the Start/Pause button.
- If the reload icon lights up, you can open the door. On the display the remaining time and lock will flash. Then the door lock icon will turn off and you can open the door.
- If the reload icon does not light up and the door lock icon does not flash, the current temperature in the drum is higher than 50^ C or the reloading time in the programme has been exceeded, i.e., laundry cannot be loaded into the machine.
Programme instructions
- The ECO 40-60 programme is able to clean normally soiled cotton laundry that can be washed in the washing machine between 40^ and 60^ in the same cycle. This programme is used to assess compliance with EU eco-design legislation.
- The power consumption in off mode is 0.49 W.
- The most efficient programmes in terms of energy consumption are generally those that are carried out at lower temperatures and longer duration.
- Loading the washing machine to the capacity indicated for the respective programmes will help to save energy and water.
- Detergent, fabric softeners and other additives must be used correctly. Do not use too much detergent. This could negatively affect the wash results.
- Carry out regular cleanings, at an optimum frequency and with prevention and treatment
ENGLISH
of limescale.
- Noise and residual moisture content are influenced by the spin speed: the higher the spin speed, the higher the noise and the lower the residual moisture content.
- The product information and QR code appear on the energy label. The product registration information can be obtained by scanning the QR code.
- Standard programme information.
| Programmes | Selectable temperature (°C) | Rated capacity (kg) | Maximum drum temperature (°C) | Programme length (h: min) |
| Eco 40-60 full load | — | 12.0 | 38 | 3:57 |
| Eco 40-60 medium load | — | 6.0 | 27 | 3:00 |
| Eco 40-60 1/4 load | — | 3.0 | 25 | 3:00 |
| 2°C | 20 | 12.0 | 20 | 1:50 |
| Cotton | 60 | 12.0 | 58 | 3:49 |
| Mixed | 40 | 6.0 | 43 | 2:18 |
| Quick 15' | 40 | 1.0 | 39 | 0:30 |
- The information above are just references and can change according to the different use conditions.
- The information given for programmes other than the ECO 40-60 programme is indicative only.
- 20°C is capable of cleaning lightly soiled cotton linen, at a nominal temperature of 20°C, which complies with regulation (EU) 2019/2023.
- In relation to EN 60456:2016/A11:2020 with (EU) 2019/2014, (EU) 2019/2023,
- (EU) 2021/340, (EU) 2021/341,
- The EU energy efficiency class is A
| Energy consumption (kWh/cycle) | Water consumption (litres/cycle) | Residual moisture content (%) | Maximum speed achieved rpm | |
| 1.250 | 79.0 | 51.90 | 1400 | |
| 0.550 | 60.0 | 51.90 | 1400 | |
| 0.250 | 44.0 | 52.40 | 1400 | |
| 0.150 | 96.0 | 53.00 | 1400 | |
| 2.055 | 130,8 | 53.00 | 1400 | |
| 0.940 | 81.5 | 45.00 | 1400 | |
| 0.440 | 27.0 | 65.00 | 800 |
ENGLISH
- Energy test programme: ECO 40-60. Other preset. Half load for 12.0 kg machine: 6 kg.
- Quarter load for 12.0 kg machine: 3 kg.
5. CLEANING AND MAINTENANCE
Device exterior and control panel
- You can wash it with a soft, damp cloth.
- A little neutral (non-abrasive) detergent can also be used.
- Use a soft cloth to dry it.
Door gasket
- Clean it with a damp cloth if necessary. Remove any remaining dirt and inspect that there are no small objects inside.
- Check the condition of the gasket regularly.
Detergent dispenser drawer:
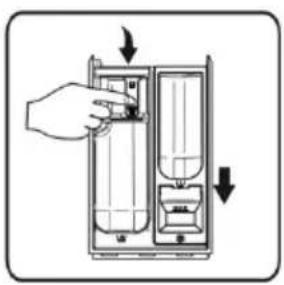
- Press down the washing compartment release lever and pull out the drawer (Fig. 24).
- Remove the siphon cap in the softener compartment slot.
- Wash all parts under running water.
- Replace the siphon cap in the detergent drawer and put the detergent drawer back in place.
Filter
It is recommended to check and clean the filter regularly, at least two or three times a year, especially if the filter is used:
- If the appliance does not drain properly or if it does not perform spin cycles.
- If the pump is blocked by a strange body (for example, buttons, coins, or pins).
IMPORTANT: make sure that the water has cooled down before draining the device.
- Stop the appliance and unplug it from the mains.
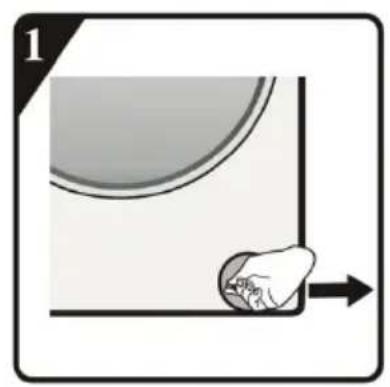
- Insert a removal tool, such as a flat-blade screwdriver, into the small opening in the bottom cover, press the bottom cover firmly to the right and open it.
- Place a container under the filter door and then drain with the emergency drain hose (depending on model). Then loosen the filter by turning it anticlockwise, unscrew it completely and remove the filter.
- Clean the filter and its compartment.
- Check that the pump rotor moves freely.
- Reinsert the filter and screw it in clockwise until it stops.
- Refit the cover.
Fig.
Water inlet hose
Check the inlet hose frequently for cracks and tears and replace it with a new hose of the same type if necessary.
Mesh filter for the water connection
- Check and clean the mesh filter regularly.
- For washing machines with an inlet hose as shown in figure 25:
- Turn off the main water tap and loosen the hose from the tap.
- Clean the internal mesh filter and screw the water inlet hose back onto the tap.
- Then unscrew the inlet hose at the back of the washing machine.
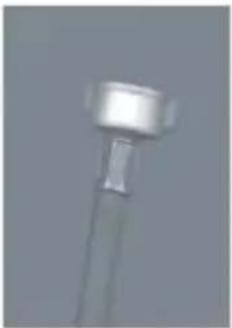
- Remove the mesh filter from the connector at the back of the washing machine with universal pliers and clean it.
- Place the mesh filter again and tighten it again to the inlet hose.
- Open the tap and make sure that the connections are completely watertight and there are no water leaks.
Fig. 26
Troubleshooting
Depending on the model, your washing machine is equipped with various automatic safety functions. In this way, faults are detected early and the security system can react appropriately. These faults are often so minor that they can be quickly resolved.
1.- The washing machine does not turn on; no indicator light is on.
Make sure of the following:
- The power cord is connected to a power outlet.
- The socket is working properly (use another electrical appliance to check this).
2.- The washing machine does not start, and the Start/Pause indicator light is flashing.
Make sure of the following:
- The door is properly closed (child lock).
- You have pressed the Start/Pause button.
- Turn on the water tap and press the Start/Pause button.
3.- The machine stops during the programme (depending on the model).
Check if:
- The door has opened and the Start/Pause indicator light is flashing. Cierre la puerta y pulse de nuevo el botón Inicio/Pausa.
- There is not much foam inside. Otherwise, the machine would activate a programme to remove the foam. The machine will work again automatically after some time.
- The washing machine safety system has been activated.
4.- There are traces of detergent or additives in the detergent drawer after the end of the wash.
Make sure of the following:
- The softener compartment lid grille and the washing compartment divider are correctly installed in the detergent dispenser and all parts are clean (see "Cleaning and maintenance").
- There is enough water entering. The mesh filters from the water supply may be blocked.
- The position of the separator in the washing compartment is adapted to the use of powder or liquid detergent.
5.- The machine vibrates during the spin cycle.
Make sure of the following:
- The washing machine is level and stands on its 4 legs.
- Before using the washing machine, it is necessary to remove the transport screws.
6.- The results of the final spin are not good.
- The washing machine is equipped with an imbalance detection and correction system. If heavy single items (e.g., bathrobes) are loaded, this system can automatically reduce the spin speed or even stop spinning completely if it detects too large an imbalance even after several spin starts, in order to protect the washing machine.
- If the laundry is still too wet at the end of the cycle, remove some items and repeat the spin cycle.
- Excessive foam formation may prevent spinning. Use the right amount of detergent.
- Check that the spin speed selector is not in the "O" position.
7.- If your washing machine has a time indicator: the initially displayed programme time is lengthened/shortened by a period of time.
It is normal for the washing machine to adapt to factors that may influence the washing programme time, for example:
- Excessive foaming.
- Load imbalance due to heavy garments.
- Longer heating time due to reduced inlet water temperature.
Due to such factors, the remaining programme cycle time is recalculated and, if necessary, updated. In addition, during the filling phase, the machine determines the load and, if necessary, adjusts the initial programme time displayed accordingly. During these update periods, an animation appears on the screen.
8.- Water inlet failure
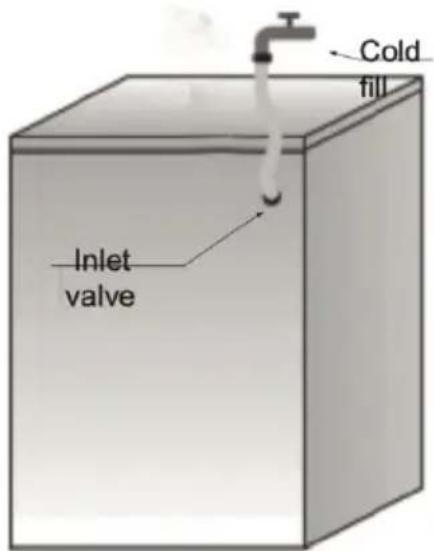
Attach the inlet hose to the cold water tap and the inlet valve with the blue filter at the rear of the machine. Fig. 27
Make sure that:
- Connections are fixed.
- Do not allow children near or inside the washer.
- Please note that during wash cycles, the door surface temperature may increase.
- Strictly supervise children if they use or are near the appliance.
| Error code list | |
| Error on the display Error description | |
| F01 Water inlet fault | |
| F03 Drain failure | |
| F13 Door lock fault | |
| F14 Door unlock fault | |
| F24 Overflow or too much foam. | |
| Another error F04-F98 PCB electronic module failure | |
| Unb Unbalance warning | |
F01 appears on the display
The machine does not have enough water. Make sure of the following:
- The tap is fully open and has sufficient water pressure.
- The water inlet pipe is connected.
- The filter net of the water inlet pipe is blocked (see "Cleaning and maintenance").
- The water pipe is frozen.
- Press the Start/Pause button after fixing the error.
- If the error still appears, contact the Cecotec Customer Service.
F03 appears on the display
The washing machine is not drained. Stop the programme. Turn off the washing machine and disconnect it from the power supply. Make sure of the following:
- The draining pipe is connected.
- The draining pump filter is not blocked.
IMPORTANT: make sure the device has completely cooled down before draining it.
If the drain hose is frozen:
- Plug the device again into a power supply.
ENGLISH
- Select and start the Spin programme (Spin speed) or press and hold the Start/Pause button for 3 seconds and restart the desired programme.
- If the error still appears, contact the Cecotec Customer Service.
Error codes
The washing machine stops when the programme is running. The display shows the fault code F13, F14, F24, F04 to F98 or Unb.
F13 appears on the display
- The door lock does not work properly. Start the programme for 20 s and unlock the door of the washing machine (PTC) to check if the door is closed.
- Open it and close it again.
- Press the Start/Pause button after fixing the error. If the error occurs again, disconnect the appliance from the mains and contact the Cecotec Customer Service.
F14 appears on the display
- Door opening error
- Solution: press the Start/Pause button. The washing machine will try to open the door.
- The error will not disappear until you do not unlock the door. Turn the programme knob back to OFF to turn the machine off. Select the desired programme to start the washing machine. The alarm shall be deactivated.
F24 appears on the display
- The water level reaches the overflow level.
- Press the Start/Pause button to remove the warning and drain the water.
- Select and start the desired programme. If the error occurs again, disconnect the appliance from the mains and contact the Cecotec Customer Service.
Error F04 to F98 appears on the display
- PCB electronic module failure.
- Turn the programme knob back to OFF to turn the machine off.
- Press the Start/Pause button after fixing the error. If the error occurs again, disconnect the appliance from the mains and contact the Cecotec Customer Service.
Unb appears on the display
The unbalance error can be solved with the following methods.
- Clothing entanglement.
Press and hold the Start/Pause button for 2 seconds to switch off the machine, open the door, shake out the laundry and put it back into the machine, then select the spin programme for re-drying. - Clothes too light.
Press and hold the Start/Pause button for 2 seconds to switch off the machine, open the door, insert one or two towels, and select the spin programme for re-drying.
Before contacting the Service:
- Try to solve the problem yourself.
- Restart the programme to check if the problem has been resolved.
- If the washing machine still does not work properly, contact the Customer Service.
6. TECHNICAL SPECIFICATIONS
You can find more information on this model by scanning the QR code on the energy label.
| Product Bolero DressCode 120700 A | |
| Reference: 02474 | |
| QR code |  |
| Rated capacity 12,0 kg | |
| Voltage 220-240 V~ | |
| Rated power 1750 W | |
| Rated frequency 50 Hz | |
| Water pressure 0,05 MPa~1 MPa | |
| Maximum power 10 A | |
| Protection rating IPX4 | |
| Approx. dimensions 600 x 660 x 850 mm | |
Technical specifications may change without prior notification to improve product quality.
Made in China | Designed in Spain
7. DISPOSAL OF OLD ELECTRICAL AND ELECTRONIC APPLIANCES
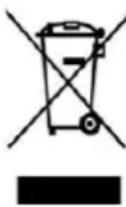
This symbol indicates that, according to the applicable regulations, the product and/or batteries must be disposed of separately from household waste. When this product reaches the end of its shelf life, you should dispose of the cells/batteries/accumulators and take them to a collection point designated by the local authorities.
Consumers must contact their local authorities or retailer for information
concerning the correct disposal of old appliances and/or their batteries.
Compliance with the above guidelines will help protecting the environment.
8. TECHNICAL SUPPORT AND WARRANTY
Cecotec shall be liable to the end user or consumer for any lack of conformity that exists at the time of delivery of the product under the terms, conditions, and deadlines established by the applicable regulations.
It is recommended that repairs be carried out by qualified personnel.
If at any moment you detect any problem with your product or have any doubt, do not hesitate to contact the official Cecotec Technical Support Service at +34 963 210 728.
9. COPYRIGHT
The intellectual property rights over the texts in this manual belong to CECOTEC
INNOVACIONES, S.L. All rights reserved. The contents of this publication may not, in whole or in part, be reproduced, stored in a retrieval system, transmitted, or distributed by any means (electronic, mechanical, photocopying, recording or similar) without the prior authorization of CECOTEC INNOVACIONES, S.L.
1. PIÈCES ET COMPOSANTS
Image 1
Compartiment principal (Main Wash)
Adoucissant (Softener)
FRANÇAIS
Intensif (Intensive)
3. Intensif (Intensive)
Symbol "Door lock" (Türschloss)
- (UE) 2021/340, (UE) 2021/341,
Desporto (Sportswear)
Roupa de cama/Penugem (Down)
20 °C
Limpeza do tambor (Drum Clean)
Centrifugar (Spin)
Favorite (Favourite)
Dark Wash (Donkere kleding)
Sportwear (Sport kleding)
Down (Beddengoed/veren)
20 °C
Drum Clean (Trommel reiniging)
Spin (Centrifugeren)
Rinse+Spin (Spoelen+Centrifugeren)
Quick 15' (Snel 15 minuten)
Wool (Wol)
Mix (Synthetische vezels)
Eco 40-60
Cotton Color (Gekleurde katoenen kleding)
Cotton (Katoenen kleding)
Legenda van de programmatabel:
- Wasmiddeldispenser:
Prewash (Voorwas)
Main Wash (Hoofdcompartment)
Softener (Wasverzachter)
- Beknelling van kleding.
- (UE) 2021/340, (UE) 2021/341,
text_image
CIDJEGH 3 sec. save FFig. / Img. / Rys. / Obr. 2
natural_image
Technical line drawing of a mechanical component with no visible text or symbols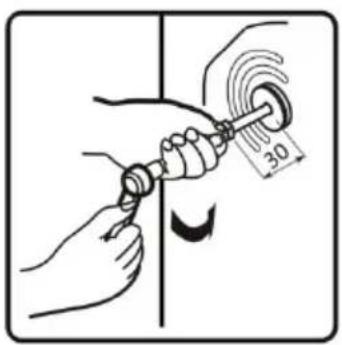
text_image
Diagram showing a hand using a tool to measure a 30-unit radius measurement, with directional arrows indicating motion.Fig. / Img. / Rys. / Obr. 3
natural_image
Illustration of hands using a screwdriver to adjust a mechanical component (no text or symbols present)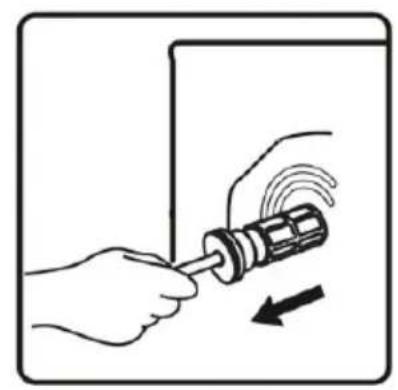
natural_image
Illustration of hands using a screwdriver to adjust a mechanical component (no text or symbols present)Fig. / Img. / Rys. / Obr. 4 Fig. / Img. / Rys. / Obr. 5
natural_image
Illustration of a hand holding a ball with an arrow indicating motion (no text or symbols)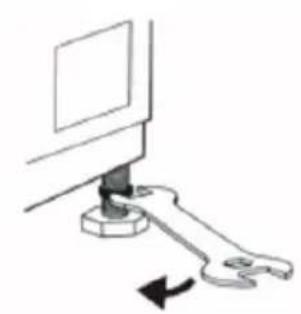
natural_image
Simple line drawing of a computer monitor with a wrench inserted, showing no text or symbolsFig. / Img. / Rys. / Obr. 6 Fig. / Img. / Rys. / Obr. 7
natural_image
Illustration of a hand holding a small electronic device with a scroll wheel, showing rotational motion (no text or symbols)Fig. / Img. / Rys. / Obr. 8
natural_image
Illustration of a hand using a tool to mark a small object on a surface, with no visible text or symbols.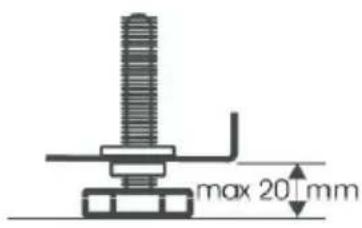
text_image
max 20 mmFig. / Img. / Rys. / Obr. 9
text_image
1 PUMP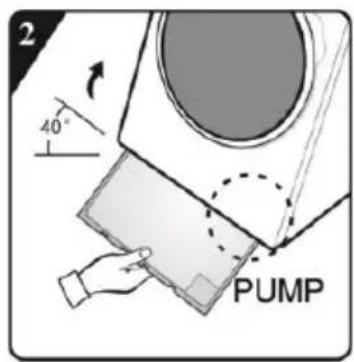
text_image
2 40° PUMPFig. / Img. / Rys. / Obr. 10
text_image
1 Right-angle impression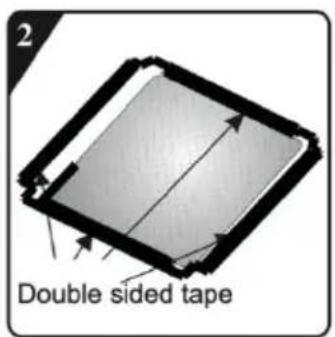
text_image
2 Double sided tape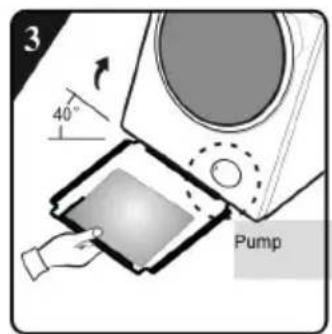
text_image
3 40° PumpFig. / Img. / Rys. / Obr. 11 Fig. / Img. / Rys. / Obr. 12 Fig. / Img. / Rys. / Obr. 13
natural_image
Simple line drawing of a hand reaching toward a ball on a horizontal surface, with a knob and ruler nearby (no text or symbols)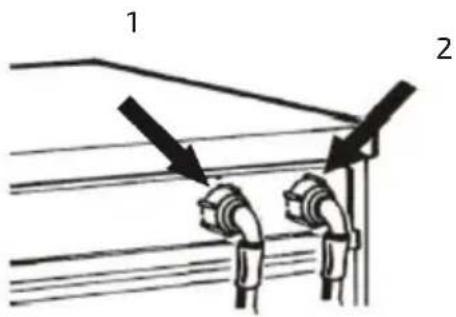
text_image
1 2Fig. / Img. / Rys. / Obr. 14 Fig. / Img. / Rys. / Obr. 15
natural_image
Diagram of a device interior with a hand pointing to a button and arrow indicating direction (no text or symbols)Fig. / Img. / Rys. / Obr. 16
text_image
Water trough Max. 100cm Min. 60cm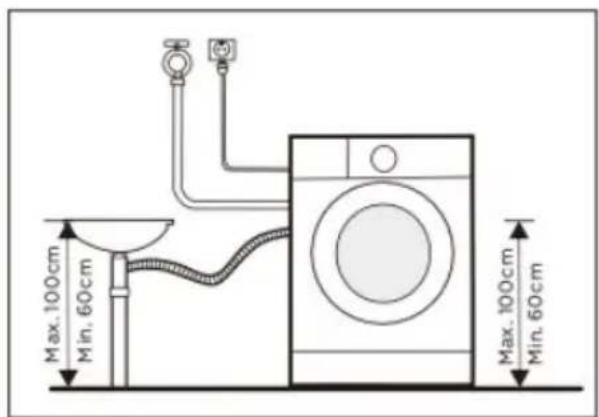
text_image
Max. 100cm Min. 60cm Max. 100cm Min. 60cmFig. / Img. / Rys. / Obr. 17 Fig. / Img. / Rys. / Obr. 18
natural_image
Illustration of a hand holding a flexible hose with threaded ends, labeled 'E' (no text or symbols on the diagram itself)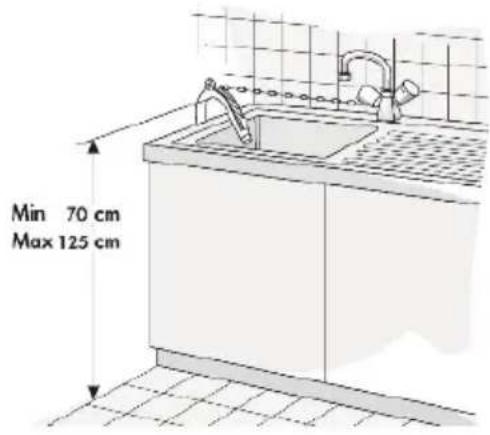
text_image
Min 70 cm Max 125 cmFig. / Img. / Rys. / Obr. 19 Fig. / Img. / Rys. / Obr. 20
text_image
Door lock leverFig. / Img. / Rys. / Obr. 21
natural_image
Technical line drawing of a dual-chamber water heater unit with internal components (no text or symbols)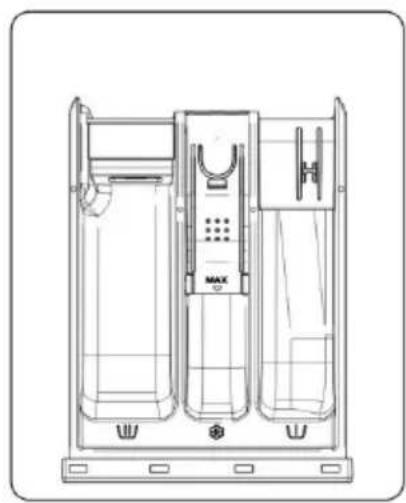
natural_image
Technical line drawing of a three-tiered air purifier unit with no visible text or symbolsFig. / Img. / Rys. / Obr. 22
natural_image
Illustration of a hand inserting a component into a device with arrows indicating direction (no text or symbols)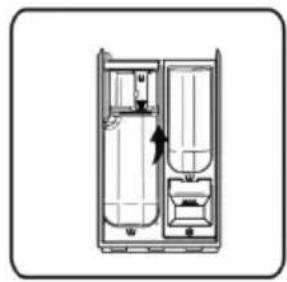
natural_image
Cross-sectional diagram of a refrigerator interior showing internal compartments and doorways (no text or labels)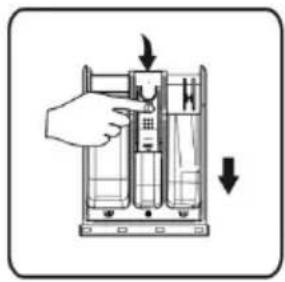
natural_image
Illustration of a hand operating a device with arrows indicating action (no text or symbols)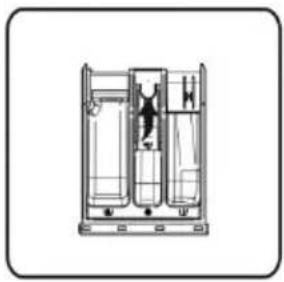
natural_image
Technical line drawing of a multi-tiered industrial equipment unit (no text or symbols visible)Fig. / Img. / Rys. / Obr. 23
natural_image
Simple diagram showing a curved object and a hand holding a small object with an arrow, no text or symbols present.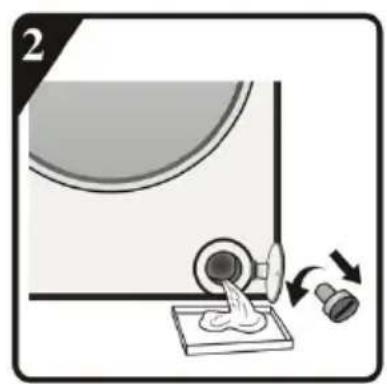
natural_image
Diagram showing a mechanical device with fluid flow and two directional arrows indicating motion (no text or symbols)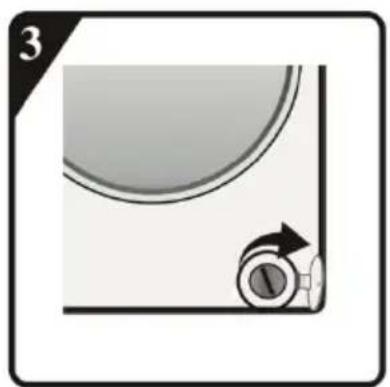
natural_image
Simple diagram showing a circular object with an arrow pointing to a circular component, no text or symbols present.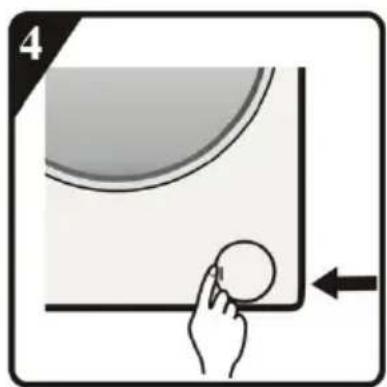
natural_image
Illustration of a hand pressing a ball on a curved surface, with an arrow indicating direction (no text or symbols)Fig. / Img. / Rys. / Obr. 24
natural_image
Close-up of a metallic cylindrical object with a flanged tip, possibly a mechanical or electronic component (no visible text or symbols)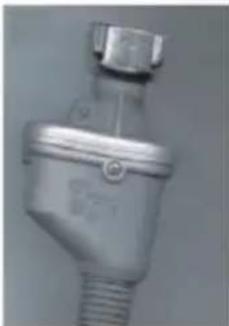
natural_image
Close-up of a metallic electrical plug with threaded end (no visible text or symbols)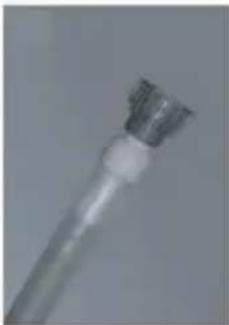
natural_image
Close-up of a metallic wire or plug with a bulbous tip (no text or symbols visible)Fig. / Img. / Rys. / Obr. 25
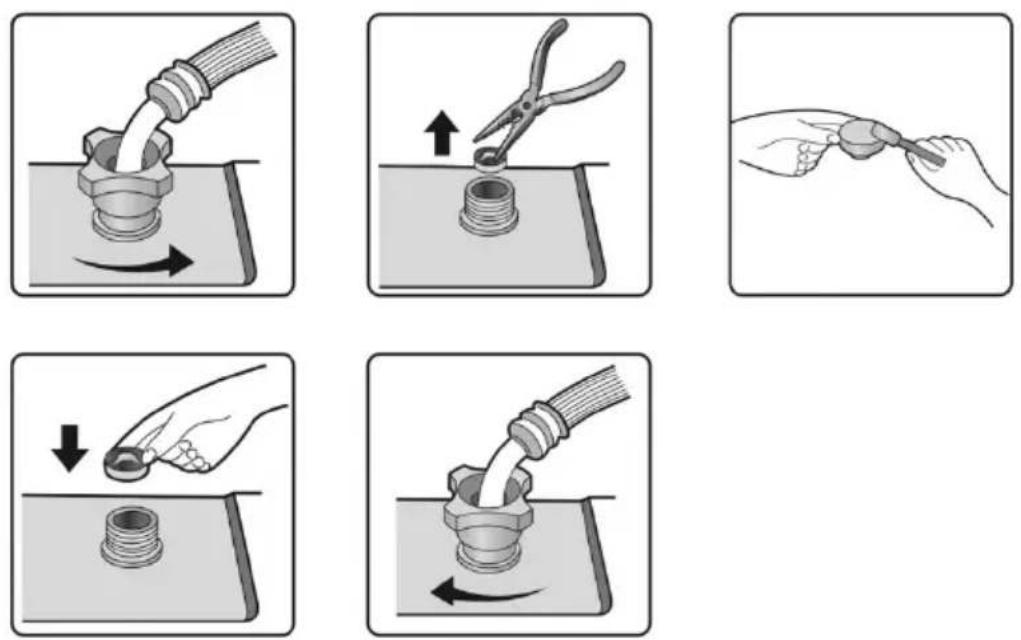
Fig. / Img. / Rys. / Obr. 26
text_image
Cold fill Inlet valveFig. / Img. / Rys. / Obr. 27
www.cecotec.es