HKS 66-01 - Saw EINHELL - Free user manual and instructions
Find the device manual for free HKS 66-01 EINHELL in PDF.

User questions about HKS 66-01 EINHELL
0 question about this device. Answer the ones you know or ask your own.
Ask a new question about this device
Download the instructions for your Saw in PDF format for free! Find your manual HKS 66-01 - EINHELL and take your electronic device back in hand. On this page are published all the documents necessary for the use of your device. HKS 66-01 by EINHELL.
USER MANUAL HKS 66-01 EINHELL
Description, technical data,
safety instructions page 8
Operating and maintenance
instructions page 9-10

Congratulations on buying this FAUST product. Like all articles from FAUST, this product was developed on the basis of the latest technical know-how and was manufactured with the most reliable and modern components
Before you use the appliance for the first time, please spend a few minutes reading the following operating instructions.
Thank you very much!

Gehörschutz / Ear muffs / Protection acoustique /
Gehoorbescherming / Dispositivo protegiudito /
Ochronas法律法规 / Zajcsökkentő fulvédő /
Fonoprotectie pentru urechi / Protector dos ouvidos /
Kulaklik

Augenschutz / Goggles / Protection des yeux / Oogbescherming / Dispositivo proteggiocchi / Ochrona wzroku / Szemvédó / Ochelari de protectie / Oculos de proteção / Koruyucu gozluk

Atemschutz / Dust mask / Protection des voies respiratoires / Adembescherming / Dispositivo proteggivie respiratoria / Ochrona dróg oddechowych / Légzésvédó / Mască pentru proteția respirației / Măscara respiratória / Ažiz maskesi /
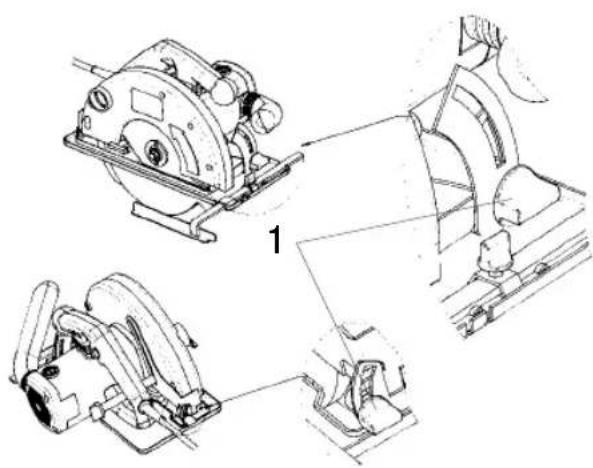
Beschreibung:
- Handle
- Nameplate
- On/Off switch
- Interlock button for On/Off switch
- Lock screw for the depth of cut setting
- Power cable
- Splitter
- Hinged guard hood
- Allen screw
- Shoe
- Flange
- Saw blade
- Parallel stop
- Lock screw for the parallel stop
- Lock screws for litre cuts
- Dust extractor connection
- Additional handle
- Actuator for the hinged guard hood
Please read these instructions carefully and pay particular attention to the safety regulations. Keep the instructions together with the circular saw.
Technical data
Voltage 230V 50Hz
Power rating 1100 W
Idle speed 4000 rpm
Cutting depth at 0^66mm
Cutting depth at 45^42mm
Saw blade 180 mm dia.
Saw blade mount 20mm dia.
Saw blade thickness 2,5 mm
Sound pressure level LPA 98 dB(A)
Sound power level LWA 101 dB(A)
Vibration a_W 3.2 m/s²
Weight 4.4kg
Dimensions 35 × 23 × 23 cm
Totally insulated
Accessories supplied
Parallel stop
Applications
The hand-held circular saw is designed for sawing straight cuts in wood, in materials similar to wood, and in plastics.
Safety regulations
Adjust the splitter so that it is no more than 5mm from the tooth rim of the saw blade and its lowest point is not retracted more than 5mm relative to the tooth rim.
-Do not use cracked or misshapen saw blades.
- Do not use saw blades made of high-alloy, high-speed steel (HSS).
- Never use saw blades which do not conform with the specifications quoted in these instructions.
Make sure that all the moving parts of the blade guard work properly without jamming.
Make sure that all devices which play a role in covering the saw blade are in proper working order.
The splitter must be properly adjusted and used at all times except for plunge-cuts.
- Do not use the saw near fumes or combustible liquids.
- Use only sharp blades and suitable accessories.
Always pull the plug out of the socket before converting, cleaning or adjusting the saw.
- Keep the power cable safe from damage. Oil and acid can cause damage to the cable.
- Never use saw blades with plates that are thicker or with sets that are smaller than the thickness of the splitter.
- Never remove the plug from the socket by pulling on the power cable and do not carry the saw by its cable.
- Have repairs carried out only by specialists.
If you use a cable reel, the complete cable must be drawn off the reel. The conductor must have a minimum cross section of 1.5mm^2 . Maximum fuse rating 16 A.
- Secure all workpieces sufficiently and do not overload the machine.
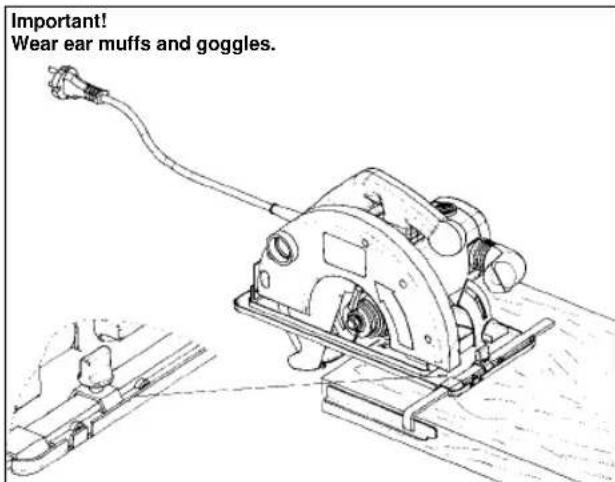
Wear suitable clothing and goggles and use a dust mask on dusty jobs.
Wear ear muffs to protect your ears!
- For lengthy jobs on wood and when cutting materials which produce a great deal of dust, the circular saw should be connected to a suitable dust extractor (observe you country's regulations regarding wood dust extraction).
GB
Working with the hand-held circular saw
Always hold the circular saw firmly.
The hinged guard hood will be pushed back automatically by the workpiece.
- Never apply force! Advance the circular saw gently and steadily.
The off-cut piece should be to the right of the circular saw so that the wide part of the base plate is supported over its entire surface.
- When sawing along a marked line, guide the circular saw along the corresponding groove.
- Clamp small pieces of wood securely before sawing. Never hold them in your hand.
Always observe the safety regulations! Wear goggles!
- Do not use defective saw blades or blades with cracks or flaws.
Do not use flanges or flange nuts with a hole which is larger or smaller than that of the saw blade used.
- Do not try to stop the saw blade with your hand or by applying pressure to the side of the blade.
The hinged guard must not jam and must return to its original position once work is completed.
Before plugging in the circular saw, check that the hinged guard is functioning properly.
Before each use, always check that the safety devices - the hinged guard, splitter, flanges and adjustment devices - are functioning properly and have been adjusted and secured correctly.
- You can connect a suitable dust extractor to the guard hood. Check that the dust extractor is fitted securely and properly.
The hinged guard hood is not to be wedged in the retracted guard hood when sawing.
Maintenance
- Keep the cooling vents on the motor housing clean and unobstructed at all times. Blow out any dust and dirt at regular intervals.
- Have a specialist workshop check the carbon brushes in the event of excessive sparking.
Worn carbon brushes are to be replaced only by a specialist workshop or by our Customer Service Centre. - Keep the machine clean at all times.
- Never use any caustic agents to clean the plastic parts.
If ever you discover any damage, consult the exploded drawing and parts list to determine exactly which replacement parts you need to order from our Customer Service Centre.
Parallel cuts
- Release the lock screw 1.
- For 90^ cuts, adjust the parallel stop 2 using the scale on groove A, for 45^ cuts adjust the parallel stop 2 using the scale on groove B. Observe the saw blade width.
- Tighten the lock screw.
Important!
First make a trial cut.
Adjustment of the cutting depth
- Release the lock screw.
- Swing the shoe downwards.
- Adjust the cutting depth using the scale. The saw teeth must project approx. 2 mm out of the wood.
- Tighten the lock screw.
GB
Adjustment of the shoe (cutting angle)
- Release the 2 lock screws 1
- Adjust the shoe to the desired angle between 0 and 45^
- Tighten the lock screws 1.
Important!
Pull out the plug before making any changes to the circular saw!
Switching on
Before pressing the On/Off switch, check that the saw blade is properly fitted, that the moving parts run smoothly and that the clamping screws are tight.
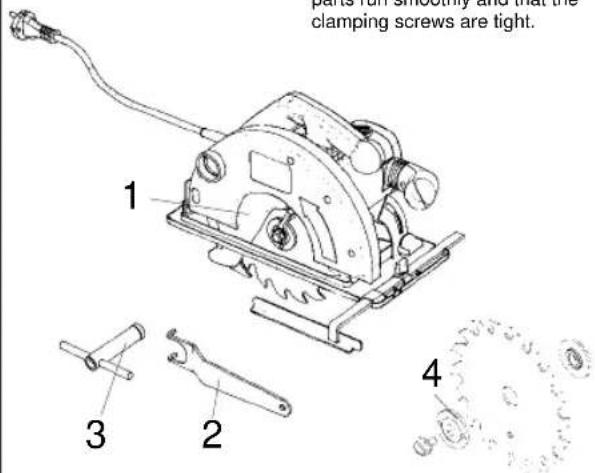
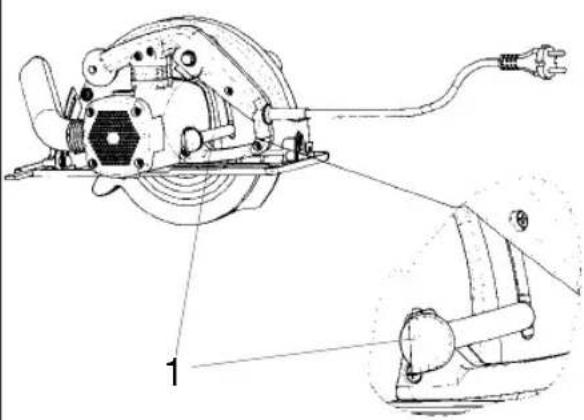
Changing the saw blade
- Open the hinged guard hood 1 and hold.
- Use the face spanner 2 to stop the saw blade from moving.
- Undo the screw with the socket wrench 3
- Remove the flange 4 and the saw blade by dropping down and out.
- Clean the flange and insert a new blade. Note the direction of rotation (see arrow on the guard hood).
- Tighten the screw and check for concentricity.
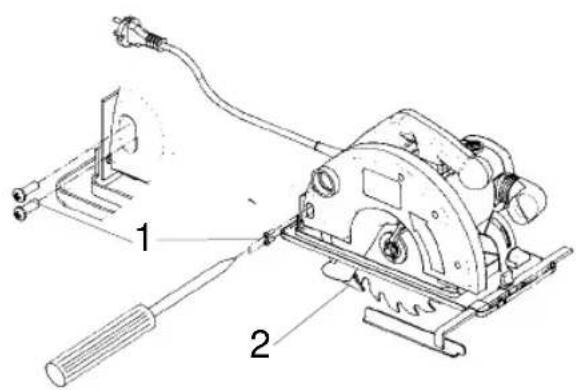
Fitting and removing the splitter
- Undo the recessed head screws 1 and remove.
- Pull the splitter down and out.
- Fit in reverse order.
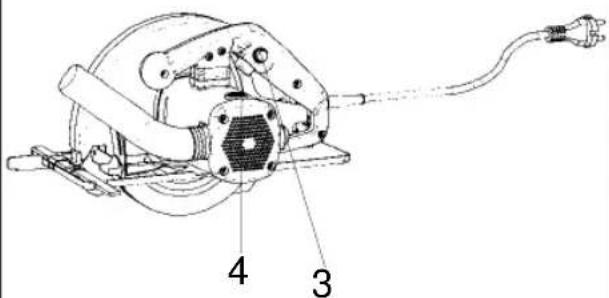
Switching on and off
To switch on: Press the interlock button 3 and the switch 4 simultaneously.
To switch off: Release the interlock button and the switch.
Description:
Vagomelyseg 0^ -nal: 66 mm
Vagomelyseg 45^ -nal: 42 mm
Fureszlap: 180 mm Ø