Crescendo Up - High chair CHICCO - Free user manual and instructions
Find the device manual for free Crescendo Up CHICCO in PDF.

| Product type | Evolutive high chair |
| Brand | Chicco |
| Model | Crescendo Up |
| Category | High chair |
| Configurations | High chair (6–36 months, 15 kg max), child chair (36 months+, 40 kg max), adult chair (110 kg max) |
| Materials | Plastic, metal, fabric (cover) |
| Maximum weight (high chair) | 15 kg |
| Maximum weight (child chair) | 40 kg |
| Maximum weight (adult chair) | 110 kg |
| Age range (high chair) | 6 to 36 months |
| Safety harness | 5-point with crotch strap |
| Removable tray | Yes, max capacity 2 kg (included in UP version) |
| Adjustable footrest | Yes, upper on 2 positions, lower fixed |
| Additional legs (high version) | Included in Crescendo Up |
| Cleaning | Plastic/metal: damp cloth; fabric: hand wash cold water, no bleach, no machine drying, no ironing, no dry cleaning |
| Maintenance | Regularly check for wear and cracks |
| Warranty | Against defects in conformity according to national conditions |
| Included accessories (UP) | Tray, fabric cover, additional legs, Allen key |
| Repairability | Only use parts approved by the manufacturer |
Frequently Asked Questions - Crescendo Up CHICCO
User questions about Crescendo Up CHICCO
0 question about this device. Answer the ones you know or ask your own.
Ask a new question about this device
Download the instructions for your High chair in PDF format for free! Find your manual Crescendo Up - CHICCO and take your electronic device back in hand. On this page are published all the documents necessary for the use of your device. Crescendo Up by CHICCO.
USER MANUAL Crescendo Up CHICCO
natural_image
Line drawing of a baby boom chair with seat, legs, and tray (no text or symbols)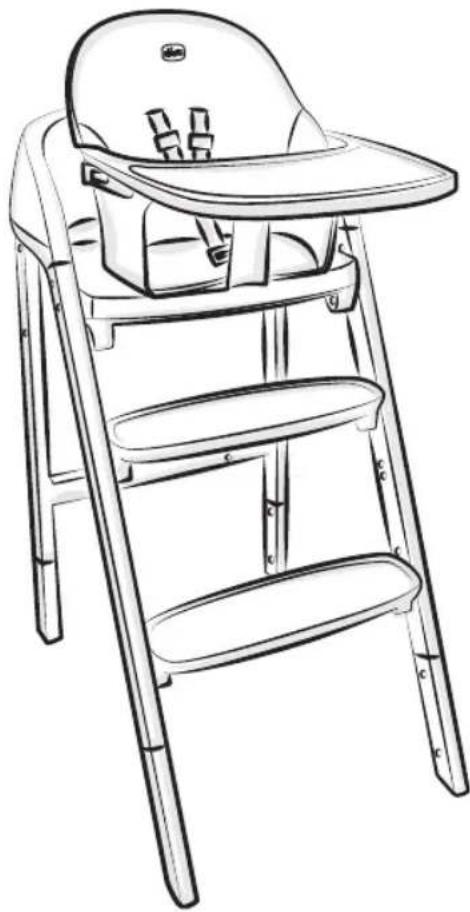
natural_image
Line drawing of a baby boom chair with seat, legs, and side panels (no text or symbols)


natural_image
Two identical cylindrical electronic components labeled SXDX, shown with mounting brackets and a red circular indicator B1 (no text or symbols on the components themselves)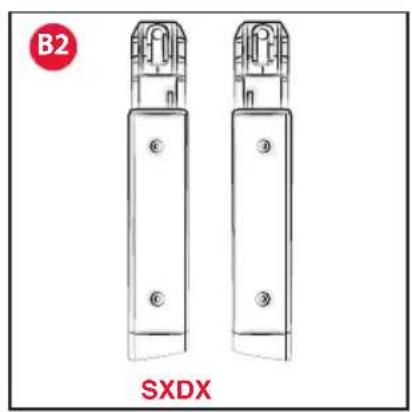
natural_image
Two identical cylindrical electronic components labeled SXDX, shown with mounting holes and mounting holes (no text or symbols on the components themselves)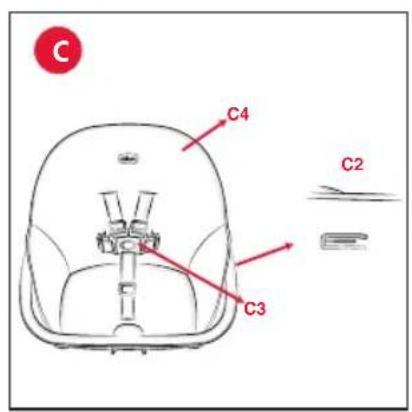

natural_image
Simple line drawing of a U-shaped object with a circular label 'D' in the top-left corner (no text or symbols on the object itself)
natural_image
Simple line drawing of a right-angle pipe fitting with a base, labeled 'E' in the top-left corner (no text or symbols on the object itself)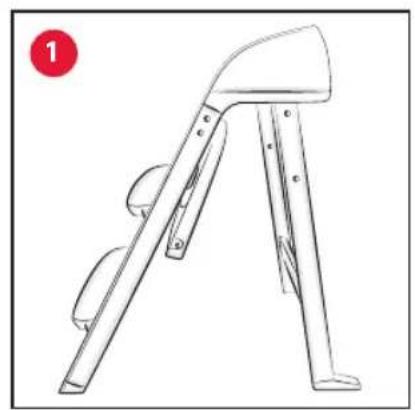
natural_image
Line drawing of a mechanical device with a handle and legs, no text or symbols present
natural_image
Line drawing of a hand holding a car with various tools and components (no text or symbols)
natural_image
Hand holding a smartphone with a red arrow pointing to it, surrounded by mechanical parts and a red circle (no text or symbols)
natural_image
Line drawing of a simple chair with legs and seat, no text or symbols present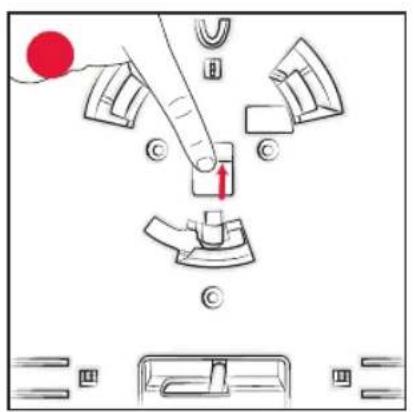

natural_image
Line drawing of a hand pressing down on a car seatbelt, showing the finger and arm positioning (no text or symbols)
natural_image
Line drawing of a car's front and side panels showing the wheel, nose, and dashboard (no text or symbols)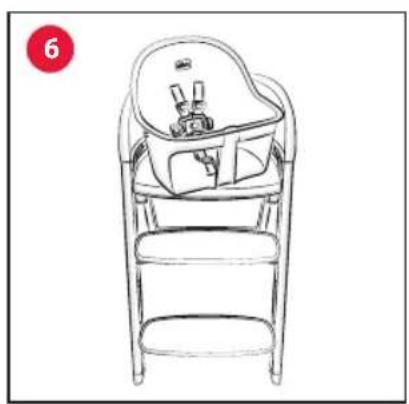
natural_image
Line drawing of a baby seat with a blanket and seatbelt, no text or symbols present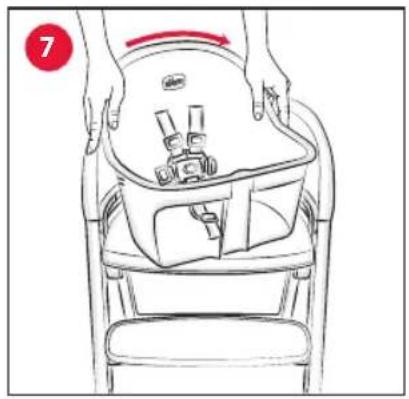
natural_image
Line drawing of a person using a backpack seatbelt device, no text or symbols present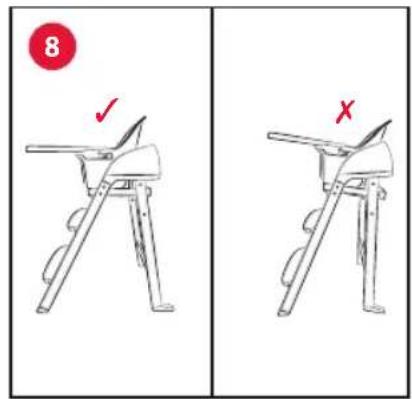


natural_image
Line drawing of a car interior showing hand positioning and seatbelt mechanism (no text or symbols)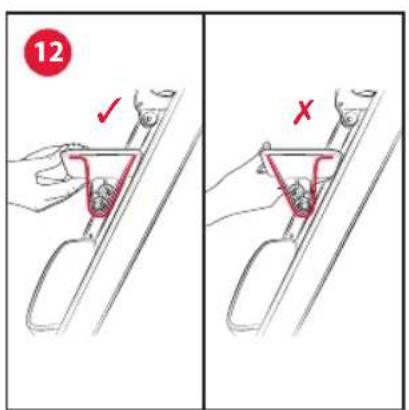
natural_image
Line drawing of a hand holding a baby seat cover, with no text or symbols present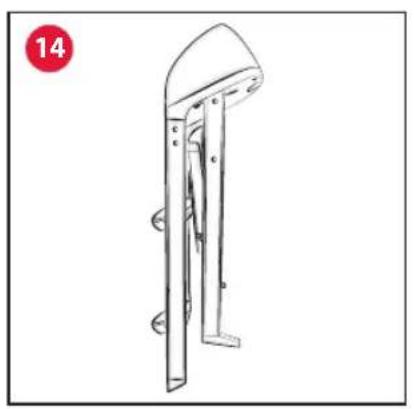
natural_image
Line drawing of a mechanical lever or support structure with no visible text or symbols
natural_image
Line drawing of a baby chair with a red circular icon on the left (no text or symbols)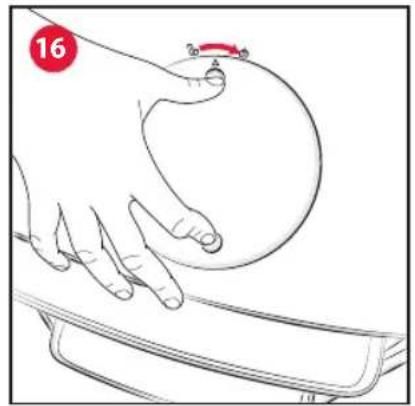
natural_image
Line drawing of a hand pressing down on a curved object, with a red circular badge labeled '16' in the top-left corner (no text or symbols on the object itself)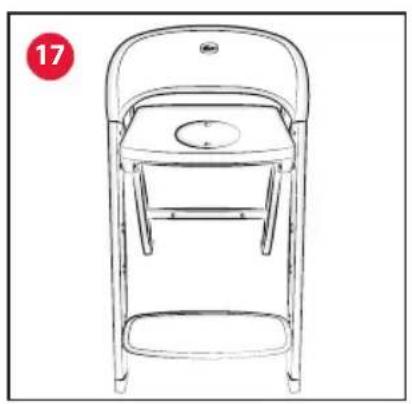
natural_image
Line drawing of a simple chair with a seat and handle, no text or symbols present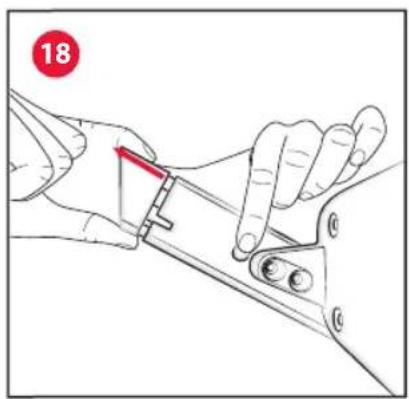
natural_image
Illustration of a hand using a tool to adjust or install a mechanical component, with no visible text or symbols.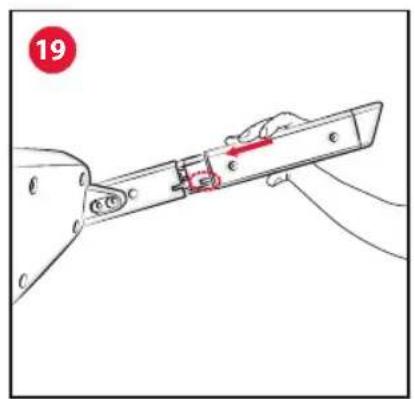
natural_image
Technical line drawing of a mechanical support structure with two views (top and side), no text or symbols present.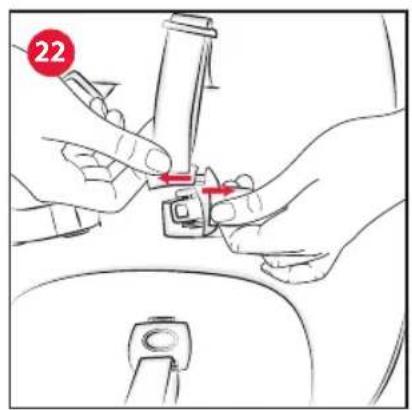
IT ISTRUZIONI D'USO
IMPORTANTE - LEGGERE ATTENTAMENTE E CONSERVARE PER FUTURO RIFERIMENTO.
ATTENZIONE: PRIMA DELL'USO RIMUOVERE ED ELIMINARE EVEN- TUALI SACCHETTI DI PLASTICA E TUTTI GLI ELEMENTI FACENTI PARTE DELLA CONFE- ZIONE DEL PRODOT- TO O COMUNQUE TE- NERLI LONTANI DALLA PORTATA DEI BAMBINI.
C4. Tessile (solo UP)
D. Vassoio (solo UP)
E. Brugola
MODALITÀ SEGGIOLONE
MODALITÀ SEDIA ADULTO (max 110 kg)
IMPORTANT! - READ CAREFULLY AND KEEP FOR FUTURE REFERENCE.
WARNING: BEFORE USE, REMOVE AND DISPOSE OF ALL PLASTIC BAGS AND PACKAGING MATERIALS AND KEEP THEM OUT OF REACH OF CHILDREN.
This product is only suitable for household use.
The product can take on 3 configurations:
• High chair. Age range: from 6 months to 36 months not beyond 15 kg.
• Baby chair. Age range: from 36 months up to a maximum weight of 40 kg.
- Adult chair. Age range: up to a maximum weight of 110 kg. The CRESCENDO UP includes the tray, the additional feet, and the fabric covering.
For the CRESCENDO LITE, the components listed above can be purchased separately.
COMPONENTS
A. Frame
A1. Seat area
A2. Seat cover
A3. Cover/Seat Release
A4. Button for opening/closing seat
A5. Lever for opening/closing seat
A6. Upper footrest
A7. Lower footrest
A8. Sites for adjusting upper footrest
A9. R-L front foot
A10. R-L rear foot
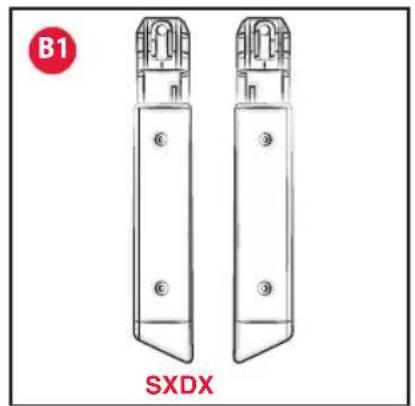
B1. Additional R-L front foot (UP only)
B2. Additional R-L rear foot (UP only)
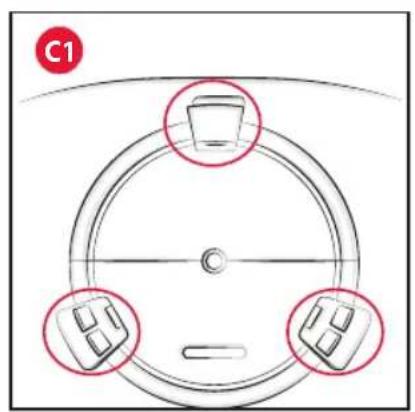
C. Baby chair
C1. Seat area attachments
C2. Tray attachments
C3. Child safety harness with 5-point buckle
C4. Fabric (UP only)
D. Tray (UP only)
E. Allen key
HIGH CHAIR CONFIGURATION
The product may be used as a highchair from an age at which the child can sit up unaided (6 months) until the child is 36 months (max 15 kg).
WARNING:
• Never leave the child unattended.
• Always use the restraint system.
- Falling hazard: Prevent your child from climbing on the product.
- Do not use the product unless all components are correctly fitted and adjusted.
- Be aware of the risk of open fire and other sources of strong heat in the vicinity of the product.
- Be aware of the risk of tilting when your child can push its feet against a table or any other structure.
- WARNING: Always check the safety and the stability of the highchair before use.
- WARNING: Before using, ensure that all the safety devices are fitted and working correctly. In particular, make sure that the highchair is locked in the open position.
- WARNING: Make sure that the baby chair is correctly fastened to the seat area before placing the child on it.
- WARNING: Make sure that any harness is correctly fitted before using.
- Do not use the highchair until the child can sit up unaided.
• The highchair is intended for use for children between 6 and 36 months of age, weighing up to 15 kg.
- Do not use the highchair if any part is broken, torn or missing.
• Before assembling, ensure that the product and its components have
not been damaged during transportation. In this case, do not use and keep out of reach of children.
• The highchair shall only be opened, adjusted and closed by an adult.
• Make sure that the person using the highchair knows exactly how it functions.
• Make sure your child is at a safe distance when opening and closing the product.
- To avoid crushing, ensure that the child's hands are far from interlocking components while the tray is being attached to the seat.
- Never move the highchair with your child seated in it.
- Do not allow other children to play unsupervised near the highchair, or allow them to climb it.
- Do not use the highchair for more than one child at a time.
- Do not leave small objects on the highchair that can be swallowed by children.
- Do not place the highchair near windows or walls where strings, curtains or other objects could be used by the child to climb or pose choking or strangling hazards.
- Do not place the highchair near windows or walls to prevent your child from affecting the stability of the highchair by pushing their feet against the wall and causing it to topple over.
- Always place the highchair on a horizontal, stable surface when the child is seated in it. Never place the highchair near stairs or steps or on carpets.
- Bags or weights must not be placed on the tray or hung on the high-
chair frame, as they might affect the stability of the highchair.
- If the highchair is exposed to direct sunlight for a long time, allow it to cool down before placing your child in it.
- Prolonged exposure of the high-chair to direct sun light may cause the colour of the materials and fabric to fade.
- When not in use, the highchair must be kept out of reach of children.
- Do not use components, replacement parts or accessories that have not been supplied or approved by the manufacturer.
- Do not open or close the highchair when your child is sitting in it.
- WARNING! Keep the tray out of reach of children when it is not in use.
ASSEMBLY
- Open the frame, distancing the rear legs until the end position is reached (Fig. 1).
- Turn the lever "A5" and press the button "A4" to withdraw the pins located on the sides of the seat (Fig. 2A-2B).
- Keeping the lever and the button pressed, position the horizontal plane then release the lever and the release button allowing the pins to connect to the appropriate holes on the rear leg (Fig. 3).
WARNING: Having completed this step, press lightly on the seat area to ensure it is properly fastened.
- Press the release button "A3" located under the seat and, at the same time, turn the cover "A2" anticlockwise (Fig. 4A-4B). Next, remove the cover, placing your fingers through the underlying holes for leverage (Fig. 5).
- Position the chair "C" as in the figure, inserting the attachments "C1" in the appropriate sites on the seat area "A1" (Fig. 6).
- Next, turn the chair clockwise so that it locks to the seat area until you hear a "click" (Fig. 7).
WARNING: Make sure that the chair is properly fastened to the base and that the seat area is properly attached before using the product (Fig. 8).
WARNING: The safety harnesses and the crotch strap must be used to guarantee the child's safety.
The chair has a 5-point safety harness ("C3").
- Release the safety harnesses by pressing on the central button found on the crotch strap (Fig. 9).
-
Insert the baby's legs into the two leg openings found on the chair.
-
Secure the baby with the safety harnesses, using the sliders to adjust the length of the harnesses so they fit the child.
If used as highchair, it is possible to:
- Adjust the footrests;
- Use the tray.
To perform the above mentioned operations, refer to the corresponding paragraphs.
POSITIONING THE TRAY (FOR THE CRESCENDO UP)
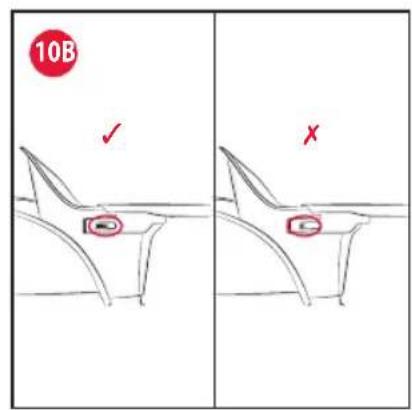
- To fasten the tray "D", insert it into the sides of the chair until the end position is reached, being to sure to confirm proper attachment (Fig. 10A-10B).
WARNING: To avoid crushing, ensure that the child's hands are far from interlocking components while the tray is being attached to the seat.
Before use, always check that the tray has been properly fastened to the chair.
WARNING: Do not subject the tray to a load of more than 2 kg.
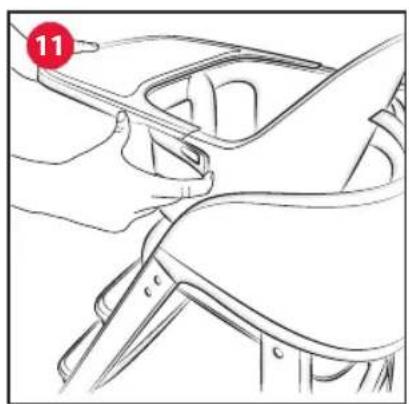
- To remove the tray, act on the tabs provided, moving them outwards while pulling the tray free (Fig. 11).
FOOTREST
The highchair is equipped with an upper footrest "A6" that can be adjusted to 2 different heights.
- To change the position of the upper footrest, move it and connect it to the appropriate sites "A8" using the Allen wrench "E" provided. When carrying out this step, make sure that the footrest is facing the right direction as indicated in Figure 12.
WARNING: Check that the footrest screws have been tightened properly before use.
WARNING: The lower footrest "A7" must not be removed in the highchair configuration.
CLOSURE
WARNING: The child must never be seated in the product when this operation is carried out. When performing this operation, ensure that your child, or other children, are at a safe distance.
-
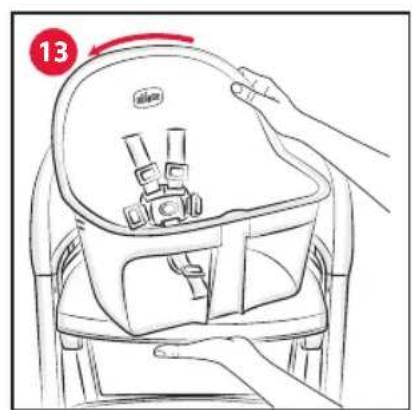
Disconnect the chair by pressing button "A3" and rotating the chair anticlockwise (Fig. 13). Lift the chair to remove it completely from the seat area "A1".
-
Continue closing the seat area by rotating the lever "A5" and pressing button "A4" as described in point 2. Then fold the rear legs onto the front legs (Fig. 14).
WARNING: When in the closed position, the product does not stand up on its own. Lean the product against a surface.
BABY CHAIR CONFIGURATION (36m+)
The product can be used as a baby chair from 36 months of age and up to a maximum weight of 40 kg.
WARNING:
• DO NOT place this product near a window where cords from blinds or curtains may strangle a child.
• DO NOT place this product near a window, as the child may climb onto the product and fall out the window.
- Be aware of the risk of open fire and
other sources of strong heat in the vicinity of the product.
- Age range intended for use: from 36 months up to a maximum weight of 40 ~kg .
- Do not use the product if any part is broken, torn or missing.
- Do not use components, replacement parts or accessories that have not been supplied or approved by the manufacturer.
- Before use, check that all the components of the chair have been assembled correctly.
WARNING: In the baby chair configuration (Fig. 15), the lower footrest "A7" must always be present and used.
The position of the upper footrest "A6" can be adjusted to suit the height of the child by using the sites "A8" as indicated in the "FOOTRESTS" paragraph.
WARNING! After adjusting the position of the footrest, check that the footrest screws have been tightened properly before use.
WARNING: Check that the frame has been fastened properly as described in point 3.
WARNING: Check that the seat cover is present and has been fastened properly. To fasten the seat cover, insert it into the appropriate section and rotate clockwise until a click is heard (Fig. 16).
ADULT CHAIR CONFIGURATION (max 110 kg)
The product can be used as an adult chair by people who weigh no more than 110 kg
WARNING:
- Use permitted: up to a maximum weight of 110 kg.
- Do not use this product if any part is broken, torn or missing.
- Do not use components, replacement parts or accessories that have not been supplied or approved by the manufacturer.
WARNING: In the adult chair configuration (Fig. 17), the lower footrest "A7" must always be present and used.
The upper footrest "A6" may be removed in this configuration.
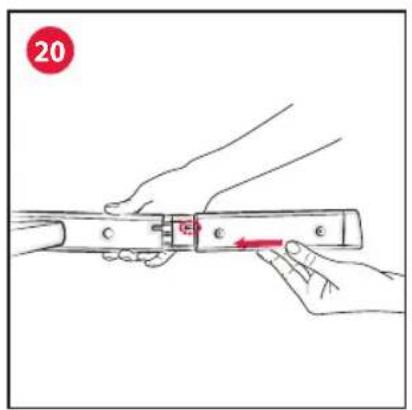
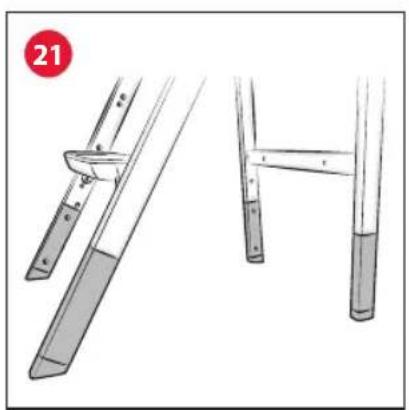
ADDITIONAL FEET (FOR THE CRESCENDO UP)
In the CRESCENDO UP version, the 3 configurations (highchair, baby chair, adult chair) can also be used in the high configuration, replacing the feet on the product.
-
Remove the feet "A9" and "A10" by pressing on each foot button and pulling the foot free (Fig. 18).
-
Insert the front feet "B1" (Fig. 19) and rear feet "B2" (Fig. 20), making sure that they are inserted on the correct side as indicated in Fig. 21.
TIPS FOR CLEANING AND MAINTENANCE
Cleaning and maintenance operations must only be carried out by an adult.
Cleaning
Clean the plastic and metal parts with a soft damp cloth. Never use abrasive products, solvents, or overly aggressive cleaning products. If the highchair comes into contact with water, dry the metal parts to prevent the formation of rust.
Maintenance
Regularly inspect the product for signs of wear and damage. In the case of damage, do not use and keep out of reach of children.
REMOVING THE FABRIC (FOR THE CRESCENDO UP)
The steps for removing the fabric cover and putting it back on the product must only be carried out by an adult.
- Release the safety harnesses by pressing the central button found on the crotch strap.
- Separate the abdominal harnesses from the shoulder straps by pulling the plastic components away from each other (Fig. 22).
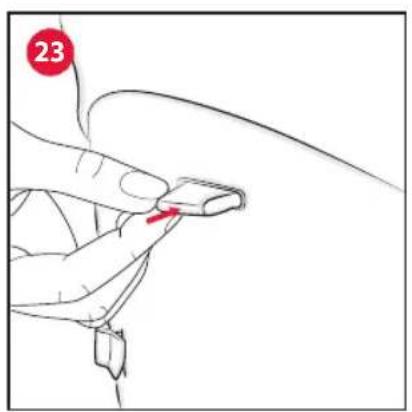
- Remove the abdominal harnesses, the shoulder straps and the central crotch strap from the slots in the plastic section of the chair (Fig. 23).
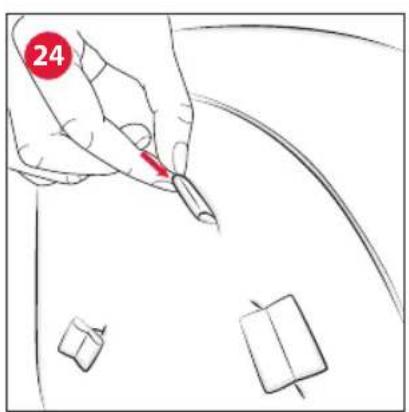
- Remove the abdominal harnesses, the shoulder straps and the central crotch strap from the slots in the fabric (Fig. 24).
The fabric can now be washed according to the instructions provided in the following paragraph. - To reinsert the safety harnesses, repeat the steps in the opposite direction.
WARNING: After removing the safety harness (e.g. to wash it), ensure that the harness is reassembled correctly using the anchorage points. After installation, tug on the harness to verify that it holds well.
WASHING THE FABRIC (FOR THE CRESCENDO UP)
When washing the fabrics pay close attention to the instructions on the label.

Hand wash in cold water

Do not bleach

Do not tumble dry

Do not iron

Do not dry clean
WARNING: When covering or removing the cover, take care when handling the fabric parts to avoid accidental tears or damage.
WARNING: After each wash cycle check the product to rule out breakage or loose seams.
WARRANTY
The product is guaranteed against any lack of conformity under normal use as specified in the instructions.
The warranty shall not therefore apply in the case of damage caused by improper use, wear or accidental events.
For the duration of the warranty on conformity defects please
refer to the specific provisions of applicable national laws in the country of purchase, where appropriate.
FR NOTICE D'EMPLOI
IMPORTANT À LIRE ATTENTIVEMENT ET À CONSERVER POUR RÉFÉRENCE ULTÉ- RIEURE.
AVERTISSEMENT : AVANT EMPLOI, ENLE- VER ET RETIRER TOUS LES SACS EN PLAS- TIQUE ET ÉLÉMENTS QUI FONT PARTIE DE L'EMBALLAGE DU PRODUIT ET LES TENIR HORS DE PORTÉE DES ENFANTS.
ABNEHMEN DES BEZUGS (BEI CRESCENDO UP)
WASCHEN DES BEZUGS (BEI CRESCENDO UP)
D. Bandeja (solo UP)
E. Llave Allen
MODO TRONA
PŘÍDAVNÉ NOŽKY (U VERZE CRESCENDO UP)
DODATKOWE NOGI (DLA CRESCENDO UP)
Handwas in koud water

Niet bleken

Niet in de droger drogen

Niet strijken

EXTRAFÖTTER (FÖR CRESCENDO UP)
RÅD FÖR RENGÖRING OCH SKÖTSEL
ARTSANA GERMANY GMBH
Borsigstrasse 1-3
28923 Alcorcon (Madrid)-Spain
902 117 093
www.CHICCO.es

ARTSANA PORTUGAL S.A.
ARTSANA POLAND Sp.zo.o.
Aquarius, Ul. Połczyńska 31 A
01-377 Warszawa
+48 22 290 59 90
www.CHICCO.com

ООО "Артсана Рус"
ARTSANA BRASIL LTDA.
Dec V. Ruben Dario 1015
Colonia Lomas De Providencia 44647
Guadalajara, Jalisco-Mexico
01800 702 8983
www.CHICCO.com.mx

ARTSANA ARGENTINA S.A.
Av. Santa Rita 2731 Piso 1 Of 5,
1609 Boulogne, Buenos Aires.
Argentina.
Phone: (011) 5254-3030
www.CHICCO.com.ar

ARTSANA INDIA PRIVATE LIMITED,
7Th Floor, Tower B, Paras Twin Towers,
Golf Course Road, Sector 54
Gurgaon - 122002 - Haryana, India
(+91)(124)(4964500)
www.CHICCO.in

ARTSANA S.p.A.
22070 Grandate (CO) - Italy
Tel. (+39) 031 382 111
Fax (+39) 031 382 400
www.CHICCO.com
NOTE

NOTE


EN17191:2021
ARTSANA S.p.A. - Via Saldarini Catelli, 1 - 22070 Grandate (CO) - Italy Tel. (+39) 031 382 111 - Fax (+39) 031 382 400 - www.chicco.com