
Polly 2in1 - High chair CHICCO - Free user manual and instructions
Find the device manual for free Polly 2in1 CHICCO in PDF.


| Product type | 2-in-1 evolving high chair |
| Brand | Chicco |
| Model | Polly 2in1 |
| Category | Baby high chair |
| Recommended age | From 6 months up to about 3 years |
| Maximum child weight | 15 kg |
| Dimensions (L x D x H) | Approximately 56 x 70 x 88 cm (assembled as high chair) |
| Product weight | Approximately 9 kg |
| Main materials | Plastic, fabric (seat and harness) |
| Color | Varies by version (gray, blue, pink, etc.) |
| Power supply | None (mechanical product) |
| Main functions | High chair with removable tray, height adjustment (multiple positions), backrest reclining (sitting and semi-reclined positions), 5-point safety harness, adjustable footrest |
| Instruction manual | Manual included in packaging or available online |
| Care and cleaning | Tray and plastic parts: clean with a damp cloth. Fabric seat: machine washable at 30°C (check label) |
| Safety | Complies with EN 14988 standards, stable base, anti-tip system, 5-point harness, wheel brakes (if equipped) |
| Spare parts | Available via Chicco customer service or authorized retailers |
| Repairability | Some parts (upholstery, harness) can be replaced by the user |
| Warranty | 2 years (according to applicable legislation) |
| Origin | Manufactured by Artsana S.p.A., Italy |
Frequently Asked Questions - Polly 2in1 CHICCO
User questions about Polly 2in1 CHICCO
0 question about this device. Answer the ones you know or ask your own.
Ask a new question about this device
Download the instructions for your High chair in PDF format for free! Find your manual Polly 2in1 - CHICCO and take your electronic device back in hand. On this page are published all the documents necessary for the use of your device. Polly 2in1 by CHICCO.
USER MANUAL Polly 2in1 CHICCO
natural_image
Line drawing of a baby boom chair with seat, tray, and seatbelt (no text or symbols)- Istruzioni d'uso
- Notice d'emploi
- Gebrauchsanleitung
- Instructions for use
- Instrucciones de uso
- Instruções de utilização
- Gebruiksaanwijzing
- Brugsanvisning
• Käyttöohjeet
GB IMPORTANT: KEEP FOR FUTURE REFERENCE
E IMPORTANTE: CONSERVAR PARA FUTURAS CONSULTAS
P IMPORTANTE: GUARDE-O PARA CONSULTAS FUTURAS.
NL BELANGRIJK: VOOR LATERE RAADPLEGING BEWAREN
DK VIGTIGT: OPBEVARES MED HENBLIK PÅ AL FREMTIDIG REFERENCE.
FIN TARKEÄÄ: SÄILYTÄ OHJEET TULEVAA TARVETTA VARTEN.
s VIKTIGT: SPARA FÖR FRAMTIDA BRUK
N VIKTIG: OPPBEVAR DEN TIL ALLE
SENERE INFORMASJONER.
CZ DŮLEŽITÉ: USCHOVEJTE PRO
PŘÍPADNÉ DALŠÍ POUŽITÍ
PL WAŻNE: ZACHOWAĆ NA PRZYSZŁOŚĆ.
GR ΣΗΜΑΝΤΙΚΟ: ΚΡΑΤΗΣΤΕ ΙΣ ΟΔΗΓΙΕΣ ΓΙΑ ΝΑ ΤΙΣ ΣΥΜΒΟΥΛΕΥΕΣΤΕ ΣΤΟ ΜΕΛΛΟΝ
TR ONEMLİ: ILERDE REFERANS
OLMAK UZERE SAKLAYINIZ
RUS ОЧЕНЬ ВАЖНО: СОХРАНИТЕ ДЛЯ ПОСЛЕДУЮЩИХ КОНСУЛЬТАЦИЙ
UA ВАЖЛИВО: ЗБЕРЕЖІТЬ ІНСТРУКЦІЮ
ДЛЯ ПОДАЛЬШИХ КОНСУЛЬТАЦІЙ -
УВАЖНО ПРОЧИТАЙТЕ
POLLY double phase

natural_image
Line drawing of a baby boom chair with seat, tray, and legs (no text or symbols)POLLY
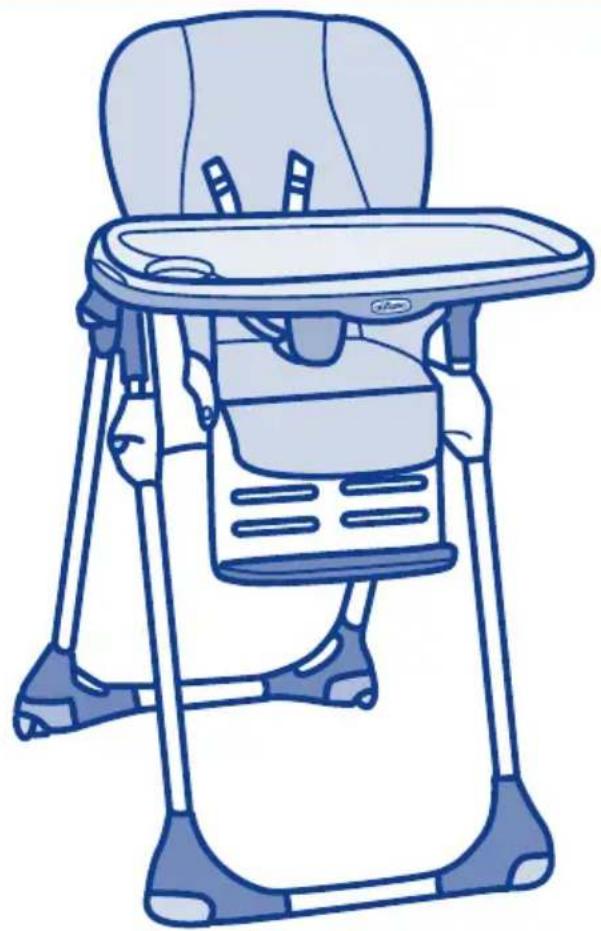
natural_image
Line drawing of a baby boom chair with seat, legs, and front panel (no text or symbols)







natural_image
Illustration of a hand using a tool to adjust or install a mechanical component, with no visible text or symbols.
natural_image
Illustration of a hand using a blue tool to cut a pair of scissors, with a red arrow indicating the process (no text or symbols present)
natural_image
Diagram of a car seatbelt with two vertical bars and a circular base, no text or symbols present
natural_image
Illustration of a car seatbelt with hands adjusting straps and a red circular badge showing '7B 7C' (no text or symbols on the diagram itself)
natural_image
Illustration of a person adjusting a blue belt buckle, with a red dot nearby (no text or symbols)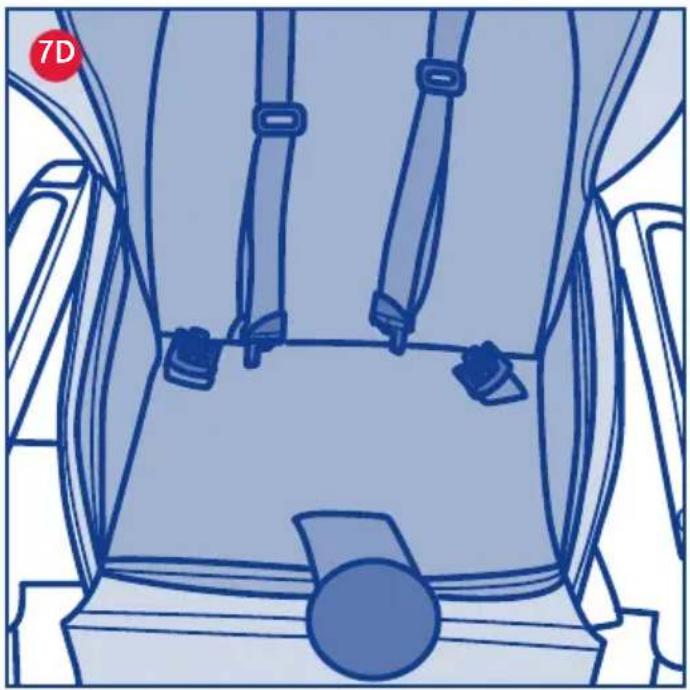
natural_image
Line drawing of a car seat with four seats and three straps, no text or symbols present
natural_image
Illustration of a car seat assembly with hands adjusting the seatbelt (no text or symbols present)
natural_image
Illustration of a hand adjusting a seatbelt with a red circular button, no text or symbols present


natural_image
Medical illustration of a human torso with a blue medical harness and red circular marking on the chest (no text or symbols)
natural_image
Illustration of a hand holding a device with a red dashed circle highlighting the component (no text or symbols)


natural_image
Illustration of a person using a blue plastic tray to lift a seatbelt, with a red arrow indicating the motion (no text or symbols present)
natural_image
Illustration of a blue folding chair with legs and seat, showing a red downward arrow indicating motion (no text or symbols)




natural_image
Illustration of a blue bicycle seat lift with a red arrow indicating motion, no text or symbols present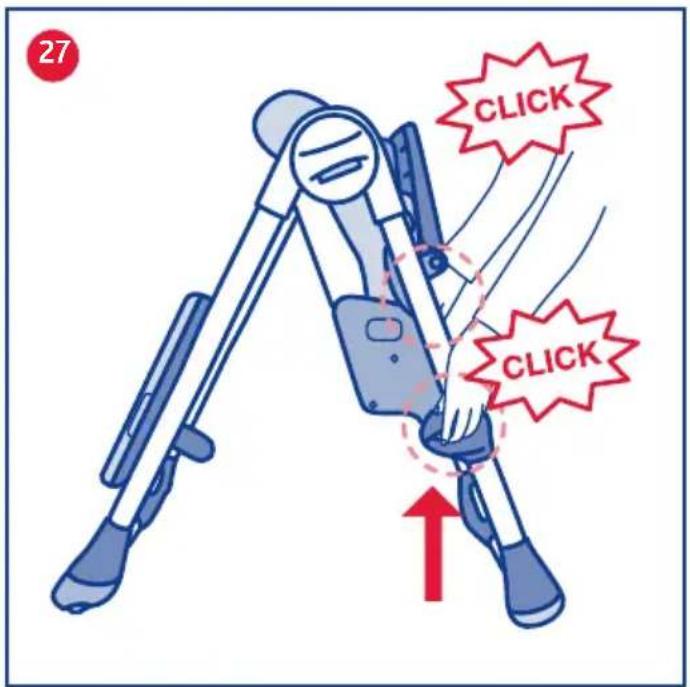

natural_image
Illustration of a stylized human figure with limbs and torso, no text or symbols presentCOMPONENTI
A. Schienale
B. Seduta
D. Backrest adjustment rear button
E. Joint fixtures
F. Highchair open / close button
G. Seat height adjustment button
H. Armrest
I. Leg rest
J. Leg rest adjustment button
O1-O2 . Double padded fabric cover
P. Safety harness
Q. Rings used to fasten the harness straps to the backrest
R. Buckle
S1. Lap belt connector
S2. Upper harness belt connector
T. Fabric crotch strap
U. D-Rings
V. Activity tray
W. Slots for fitting the tray
X. Tray locking button
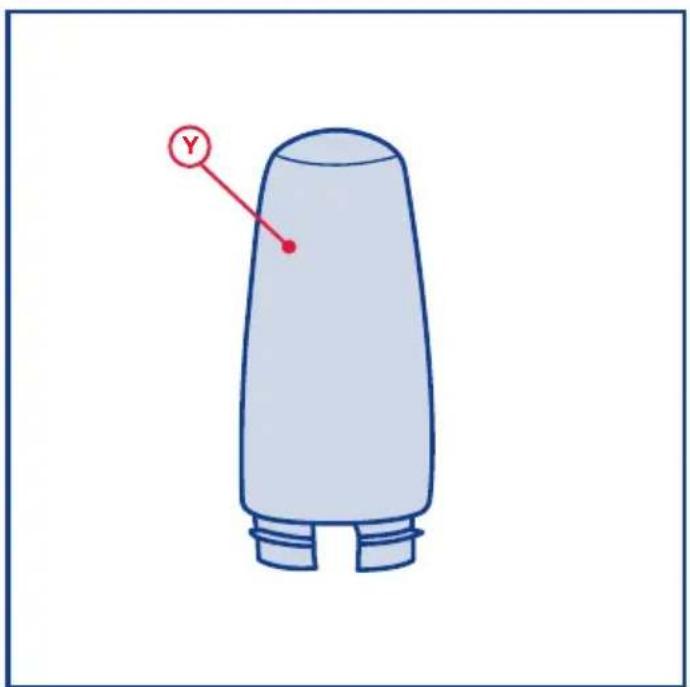
Y. Rigid crotch strap
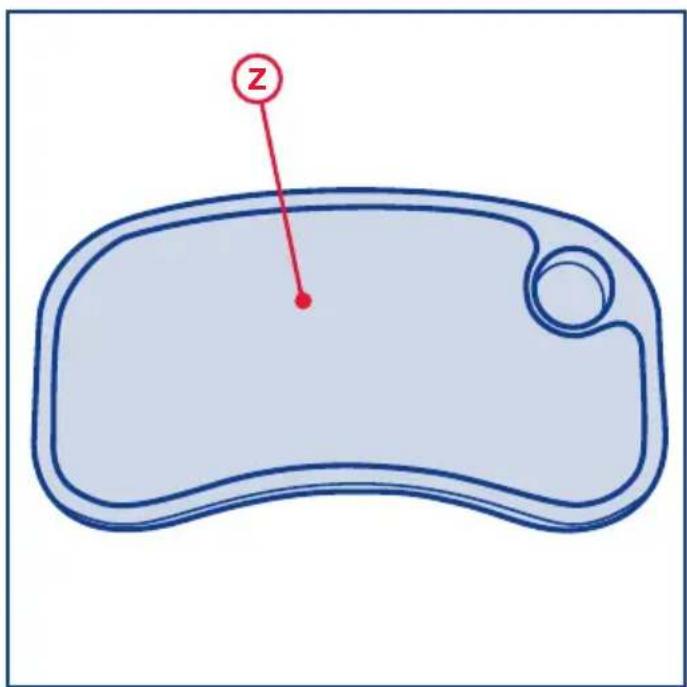
Z. Activity tray cover
BB. Footrest
CC. Rear legs
DD. Rear leg locking buttons
EE. Wheel
GG. Front legs
HH. Locking button holes
WARNING: The Highchair comes in different versions: the type and number of wheels fitted to the highchair varies depending on the country of use.
INSTRUCTIONS FOR USE
IMPORTANT: RETAIN FOR FUTURE REFERENCE - READ CAREFULLY - YOUR CHILD'S SAFETY MAY BE AFFECTED IF YOU DO NOT FOLLOW THESE INSTRUCTIONS CAREFULLY.
WARNING: TO AVOID DANGER OF SUFFOCATION REMOVE PLASTIC COVER BEFORE USING THIS ARTICLE. THIS COVER SHALL BE DESTROYED OR KEPT AWAY FROM BABIES AND CHILDREN.
WARNINGS
- WARNING: Do not use the high chair until the child can sit up unaided.
- WARNING: This highchair is intended for use for children between 6 and 36 months of age, weighing up to 15kg .
- WARNING: Ensure that the person using the highchair knows how to use it safely.
- WARNING: Before assembly, check that the product and all its components have not been damaged during transportation. Should any part be damaged, do not use and keep out of reach of children.
- WARNING: Do not use the highchair if some of its parts are broken, torn or missing.
- WARNING: The highchair must be opened, adjusted and closed only by an adult.
- WARNING: When opening, adjusting or closing the highchair, ensure that your child is at a safe distance. Ensure that during the adjustment operations (reclining the backrest, adjusting the activity tray), the movable parts of the highchair do not come into contact with your child.
- WARNING: Do not use the highchair unless all the parts and components are correctly fitted and adjusted.
- WARNING: Do not use accessories, spare parts, or any component not supplied or approved by the manufacturer, as they may make the highchair unsafe.
- WARNING: Before use, ensure that all the safety devices are correctly fitted and working. In particular, ensure that the high-chair is locked in the open position.
- WARNING: Do not leave the child unattended. It could be dangerous.
- WARNING: The use of the safety harness and crotch strap is necessary to guarantee the safety of your child.
- WARNING: the activity tray alone does not guarantee the safety of your child. Always use the safety harness. Make sure that any harness is correctly fitted before use.
- WARNING: The child should at all times wear a safety harness correctly fitted and adjusted.
- WARNING: IMPORTANT FOR YOUR CHILD'S SAFETY - Always fix the rigid crotch strap to the activity tray before fitting the tray to the Highchair. Once the rigid crotch strap has been fixed, it must never be removed.
- WARNING: Even with the brakes applied, an active child may cause the highchair to “creep” on carpeted surfaces.
- WARNING: Always place the highchair on a horizontal, stable surface. Never place the highchair near stairs or steps.
- WARNING: Do not let other children playing unattended close to the highchair or climb on it.
- WARNING: Do not seat more than one child at a time in the highchair.
- WARNING: Bags or weights must not be placed on the activity tray or hung on the highchair frame, as they might affect the stability of the highchair.
- WARNING: Never use the highchair without its cover.
- WARNING: Always be aware of the risk of open fire and other sources of strong heat, such as electric bar fires, gas fires etc. in the vicinity of the high chair.
- WARNING: Do not place the highchair near windows or walls, where strings, curtains or other objects may be used by the child to climb out of the highchair, and to prevent the risk of suffocation and/or chocking.
- WARNING: Do not place the highchair near windows or walls, to prevent the child from affecting the stability of the highchair, making it topple over, by pushing with its feet against the wall.
- WARNING: If the highchair is left exposed to direct sunlight
for a long time, allow it to cool before placing your child into it.
- WARNING: Do not leave the highchair under the sun for a long time: prolonged exposure to direct sunlight may cause the fabric cover to fade.
- WARNING: When it is not used, the highchair must be kept away from the reach of children.
- WARNING: When not in use, keep the activity tray out of the reach of children.
CLEANING AND MAINTENANCE
The cleaning and maintenance of the highchair must only be carried out by an adult.
Cleaning
Clean the fabric cover with a soft damp cloth or a neutral detergent. To remove the fabric cover from the highchair repeat, in the reverse order, the operations described to fix the fabric cover to the frame (Polly versions: operations 7A-7C, Polly Double Phase version: operations 7D-7F). For the Polly Double Phase version, the same operations carried out for the upper padded must be carried out for the lower padded.
Clean the plastic parts with a soft damp cloth.
Do not use abrasive detergents or solvents.
If the highchair comes into contact with water, dry the metal parts
to prevent the formation of rust.
Maintenance
Keep the highchair in a dry place.
To avoid friction that may prevent the correct operation of the Highchair, ensure that all the movable plastic parts located along the metal frame are free from dust, dirt or sand.
Lubricate only if necessary, with a light application of a silicone based lubricant between the components
INSTRUCTIONS FOR USE
HOW TO ASSEMBLE / OPEN THE HIGHCHAIR
WARNING: When opening the highchair, ensure that your child, or other children, are at a safe distance. Ensure that during these operations, the movable parts of the highchair do not come into contact with your child.
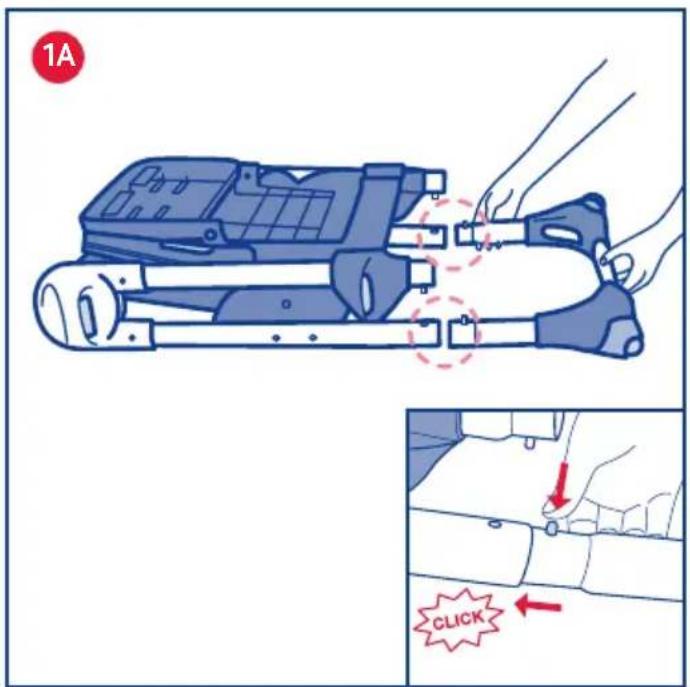
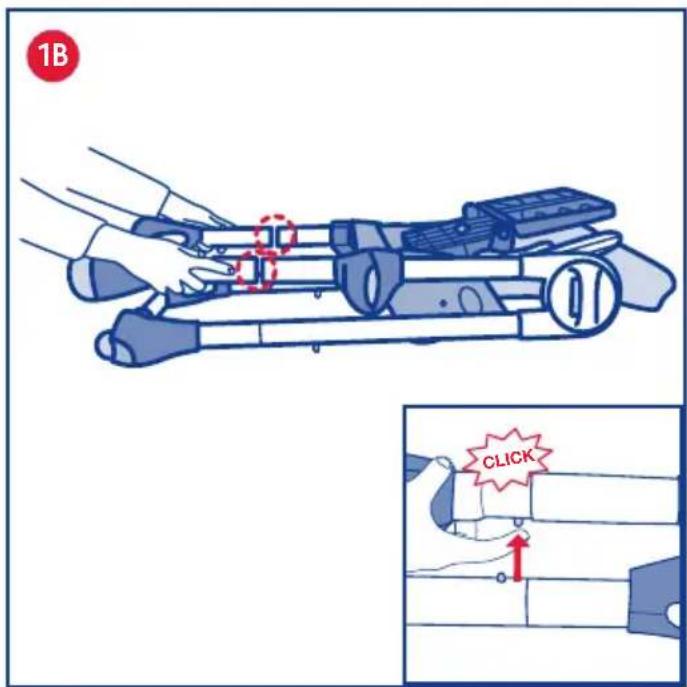
- Fix the legs to the highchair frame as shown in the diagram (diagram 1A - diagram 1B). WARNING: the ends of the front and rear legs have a different shape to avoid errors in the assembly phase. Rear legs: keep the two locking buttons, located at the base of the frame, pressed down and insert the legs into the structure. The parts are locked only when the two locking buttons come out from the holes on the legs, and an audible click is heard, signalling that the legs are securely fitted (diagram 1A).
Front legs: keep the two locking buttons located at the base of the frame pressed down and insert the legs. The parts are correctly locked only when the two locking buttons come out from the holes on the legs, and an audible click is heard, signalling that the legs are securely fitted (diagram 1B).
-
Stand at the back of the Highchair and hold the two joints, then press the open/close buttons. At the same time, open the High-chair legs using your foot, until an audible click is heard, signalling that the legs are locked in the open position (diagram 2).
-
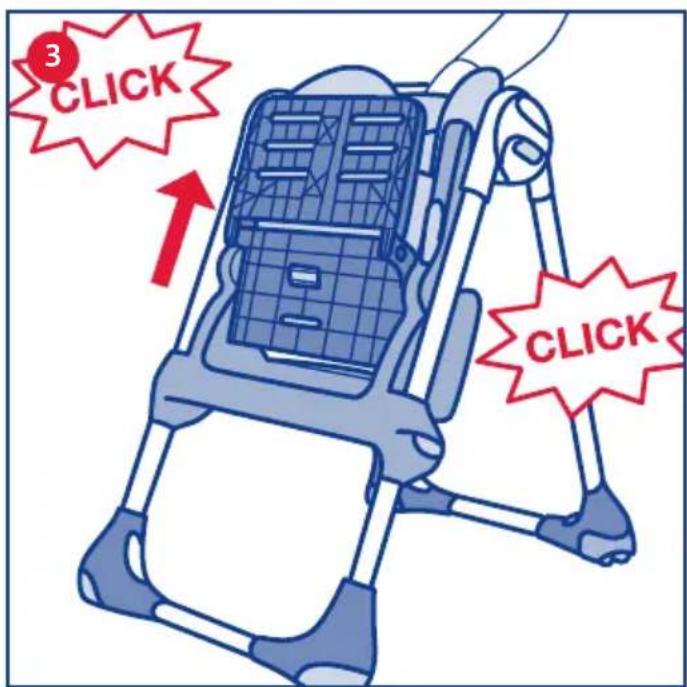
Raise the seat by holding the upper part of the backrest and pull it upward, until the desired height is reached (diagram 3). The Highchair can be adjusted to 7 height positions.
-
Lower the seat and leg rest with your hands (diagram 4). The seat is fixed to the frame by a fastening device.
-
Press the side adjustment buttons and lower the leg rest in a vertical position (diagram 5).
-
Lower the armrests by pressing the two buttons located at the rear of the armrests (diagram 6)
WARNING: The armrests must always be maintained in a horizontal position. The armrests can be maintained in a vertical position only when closing the Highchair.
- Fix the fabric covers to the Highchair frame:
Polly Version
A. Fit the fabric cover to the Highchair frame by sliding the safety harness and D-Rings into the appropriate loops (diagram 7A).
B. Slide the lap belt through the D-Rings and insert the clips into the buckle (diagram 7B)
C. Fit the spring catches (diagram 7C).
Polly Double Phase Version:
D. Fit the upper fabric cover to the Highchair frame by sliding the safety harness and D-Rings in the appropriate loops (diagram 7D).
E. Slide the lap belt through the D-Rings and insert the clips into the buckle (diagram 7E)
F. Fit the spring catches (diagram 7F).
-
Insert the footrest, turn it until the use position is reached, and lock it (diagram 8). The footrest can be adjusted to 3 positions. The child can now be seated in the Highchair.
-
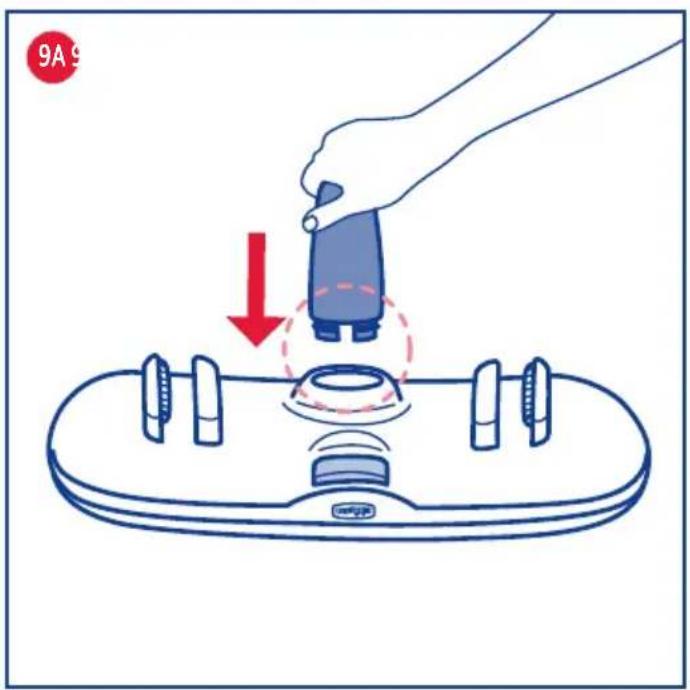
Fit the rigid crotch strap to the activity tray (diagram 9A, diagram 9B). The design of the crotch strap attachment only allows one type of assembly operation.
WARNING: IMPORTANT FOR YOUR CHILD'S SAFETY - Always fit the rigid crotch strap to the activity tray before fitting the tray to the Highchair. Once the rigid crotch strap has been fitted, it must
never be removed.
The activity tray can now be fitted to the Highchair.
FABRIC COVER
The Polly Highchair version comes with a single padded cover, while the Polly Double Phase version has a double padded cover. The fabric covers of both Highchair versions are padded, and can be removed and washed.
To remove the cover from the Highchair, repeat, in the reverse order, the operations described to fit the fabric cover to the frame (Polly: 7A-7C version, Polly Double Phase version: 7D-7F). With the Polly Double Phase version, the same operations carried out with the upper padding must be carried out also with the lower padding.
WARNING: Never use the highchair without the fabric cover. WARNING: When using the Polly Double Phase Highchair, never use the Highchair only with the upper fabric cover or with the padding fitted to the frame in the reverse order.
SAFETY HARNESS
WARNING: The use of the safety harness and fabric crotch strap is necessary to guarantee the safety of your child. WARNING: The activity tray alone does not guarantee the safety of your child. Always use the SAFETY HARNESS!
The highchair has a 5-point safety harness.
-
Release the safety harness (diagram 10)
-
Place the child in the highchair and fasten it with the safety harness (diagram 11)
The safety harness can be adjusted to two height positions.
FITTING / ADJUSTING THE ACTIVITY TRAY
WARNING: IMPORTANT FOR YOUR CHILD'S SAFETY - Always fit the rigid crotch strap to the activity tray before fitting the tray to the Highchair. Once the rigid crotch strap has been fitted, it must never be removed.
The activity tray can now be fitted to the Highchair. The activity tray can be adjusted to 4 positions.
-
Hold the activity tray in your hands (diagram 12).
-
Press and hold the bottom button (X), lower the activity tray into place checking that the armrests (H) slot into the guides located under the activity tray (diagram 13).
-
Move the activity tray until the desired position is reached and release the button. If the activity tray is not automatically locked on the armrests, move the activity tray until a click is heard, signalling that the tray is locked (diagram 14).
WARNING: Always ensure that the tray is locked correctly to the armrests before use.
WARNING: Never leave the tray fitted in a position in which the danger signs are visible on the armrests: IT IS NOT safe!
-
To remove the tray, pull it in an outward direction while keeping the lower button pressed.
-
The Highchair has an activity tray cover. This can be fixed / removed from the activity tray by a pressure device (diagram 15). WARNING: Always ensure that the activity tray cover is correctly fitted to the tray during use.
-
The activity tray cover can be used as a convenient “table cloth saving tray” if the child eats sitting directly at the table with its parents (diagram 16).
ADJUSTING THE HEIGHT OF THE HIGHCHAIR
The Highchair can be adjusted to 7 height positions.
-
To raise the seat: Hold the upper part of the backrest and pull it upward, until the desired height is reached (diagram 17).
-
To lower the seat: Press the two side buttons simultaneously and lower the seat, until the desired height is reached (diagram 18). WARNING: Do not carry out this operation with the child sitting in the Highchair.
RECLINING BACKREST ADJUSTMENT
The backrest of the Highchair can be adjusted to 3 positions.
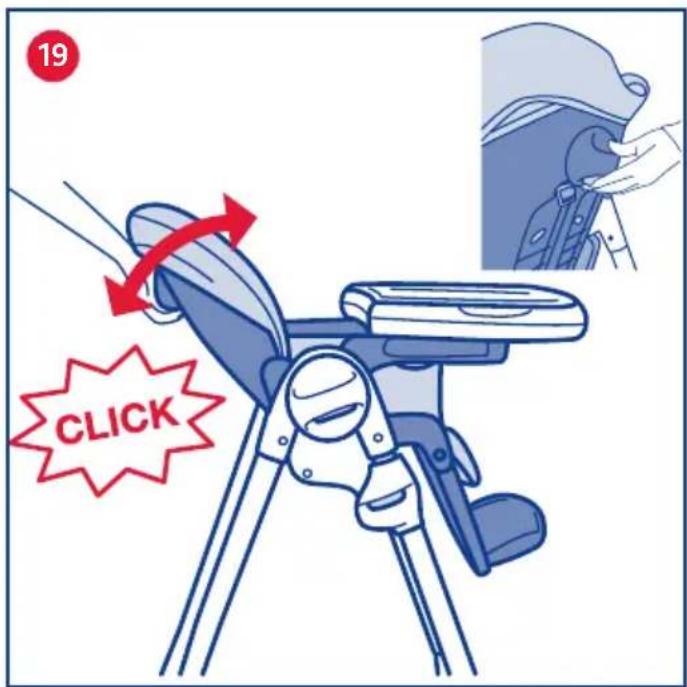
- To adjust the inclination of the backrest, press the button located at the rear top, recline the backrest until the desired position is reached and release the button, the backrest will lock automatically and an audible click is heard, signalling that it is locked into position (diagram 19). The operation can be carried out also with the child sitting in the Highchair, although it can be more difficult.
LEG REST
The leg rest of the Highchair can be adjusted to 3 positions.
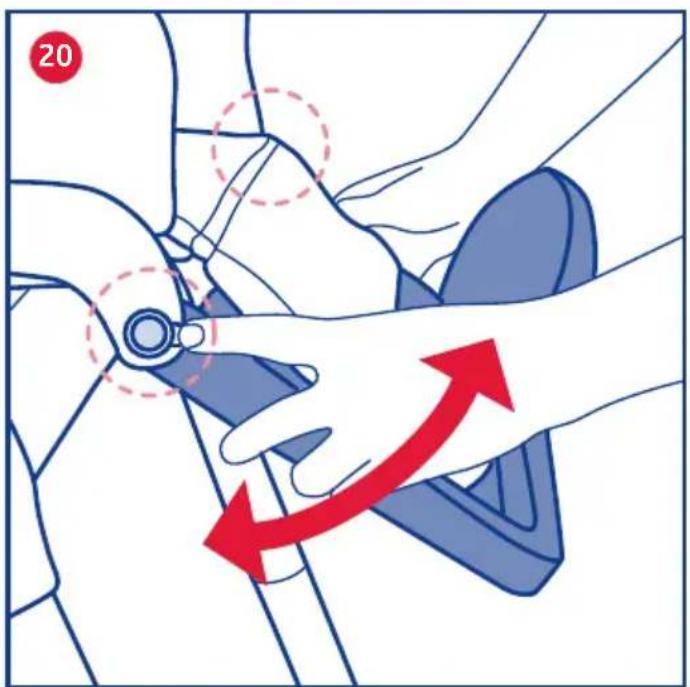
- Press the two side adjustment buttons and recline the leg rest, until the desired position is reached (diagram 20).
FOOTREST
The footrest of the Highchair can be adjusted to 3 height positions.
-
From the use position, turn the footrest until it is parallel to the leg rest, and unlock it (diagram 21).
-
Remove the footrest and fit it at the desired height (diagram 22).
-
Turn the footrest until the new desired use position is obtained, and lock it into position (diagram 23).
WHEELS AND LOCK SYSTEM (if installed)
WARNING: Always place the Highchair on a horizontal, stable surface. Never place the Highchair near stairs or steps.
NOTE: for some markets, the number and type of wheels may differ from those shown in this instructions booklet.t.
CLOSING THE HIGHCHAIR
WARNING: When opening the highchair, ensure that your child, or other children, are at a safe distance. Ensure that during these operations the movable parts of the highchair do not come into contact with your child.
WARNING: if it is fitted, remove the activity tray before closing the high chair, and store it away at the rear of the frame using the two designated fixtures.
-
Put the backrest in a vertical position and the leg rest in a horizontal position (diagram 24).
-
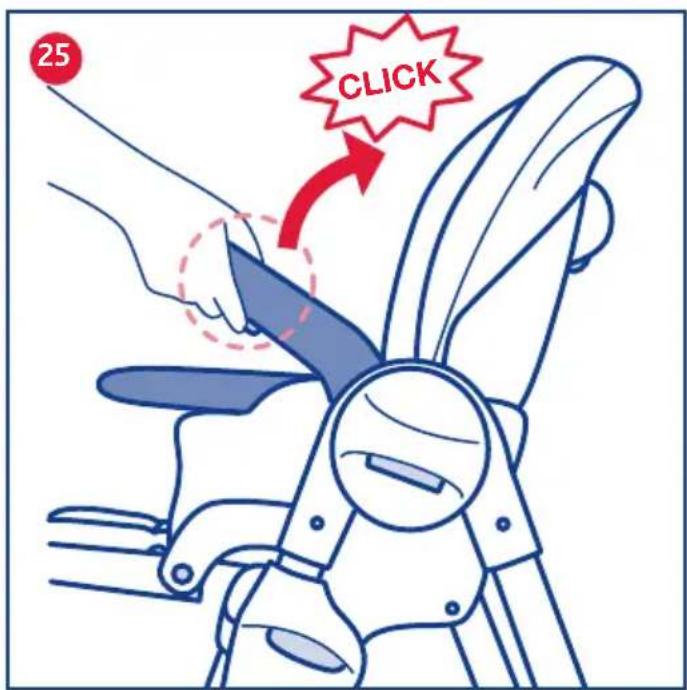
Raise the armrest in a vertical direction by pressing the buttons located on the lower part of the arm rests, until an audible click is heard (diagram 25).
-
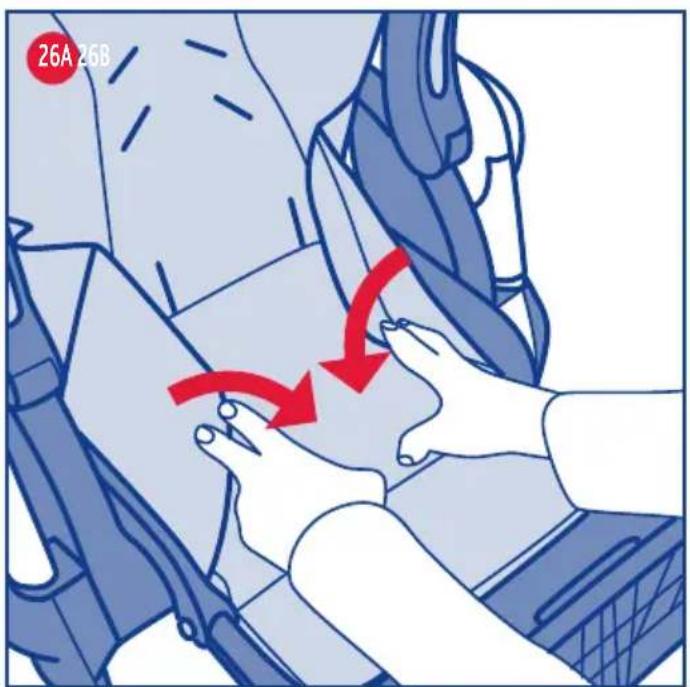
Fold the side fabric cover flaps inside (diagram 26A) and lift the leg rest and seat in a vertical position (diagram 26B), a fastening system maintains the frame compact and closed.
-
Lower the seat by pressing the two side buttons at the same time, as shown in the diagram (diagram 27).
-
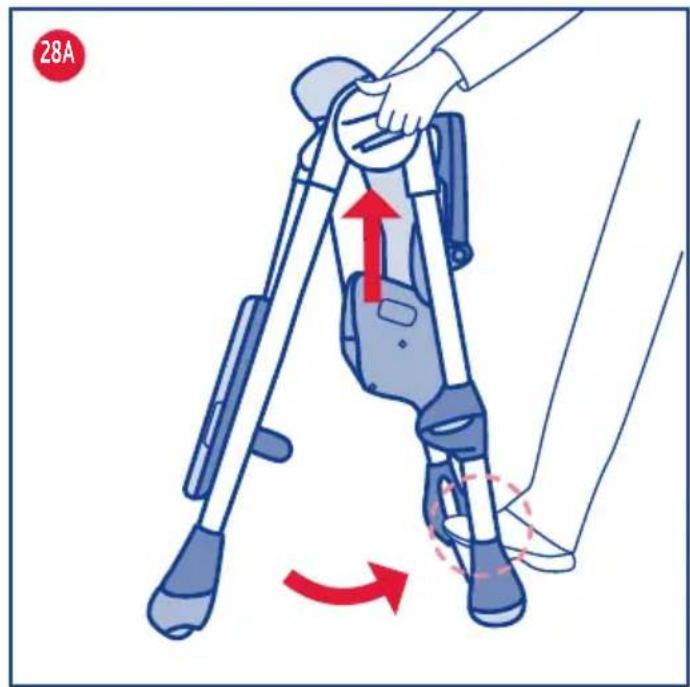
Press the buttons at the centre of the joints and, at the same time, close the legs of the Highchair using your foot (diag. 28 A), until an audible click signals that the Highchair is locked in the closed position. WARNING: Check that the frame is closed and the wheels are positioned in a way that the frame can stand upright on its own (diagram 28B).
Accessory: HYGIENIC SEAT COVER (optional, not included in the price)
The hygienic seat cover can only be used over the normal highchair fabric cover.
WARNING: Never use the hygienic seat cover without the high-chair fabric cover.
Polly Double Phase Version: It has two hygienic covers: one to be fitted to the Highchair if the double padding is used, the other to be used with the single padding.
To fit / remove the hygienic seat cover from the highchair; follow the same instructions given for the highchair fabric cover (Polly version: 7A-7C, Polly Double Phase version: 7D-7F). With the Polly Double Phase version, the same operations carried out with the upper hygienic cover must be carried out also with the lower cover.
COMPONENTES
A. Respaldo
B. Asiento
U. "D-formede" ringe
V. Bordplade
W. Innsettingsspor for palett
X. Festetast for palett
Y. Stiv benseparering
Z. Lokkbrett til palett
BB. Fotstøtte
CC. Bakben
DD. Hektepinner til bakben
EE. Hjul
GG. Forben
RÅD TIL RENGJ∅RING OG VEDLIKEHOLD
ÚPRAVA NAKLOPENÍ OPĚRKY ZAD
ARTSANA UK Ltd. Prospect Close - Lowmoor Road Business Park Kirkby In Ashfield Nottinghamshire - Ng17 7Lf England U.K. 01623 750870 (office hours) www.chicco.co.uk

ARTSANA SPAIN S.A.U. C/Industria 10 Pol. Industrial Urtinsa Apartado De Correos 212 - E 28923 Alcorcon (Madrid)-Spain 902 117 093 www.chicco.es

ARTSANA PORTUGAL S.A. Rua Humberto Madeira, 9 2730-097 Queluz De Baixo Barcarena Portugal 21 434 78 00 800 20 19 77 www.chicco.pt

ARTSANA BELGIUM N.V. Temselaan 5 B-1853 Strombeek - Bever Belgium +32 23008240 www.chicco.be

ARTSANA TURKEY BEBEK VE SAGLIK URUNLER A.S. Eski Uskudar Yolu, Erkut Sokak Uner Plaza No. 4/1 Kat 12 Kozyatagi - Kadikoy 34710 Istanbul – Turkey 0214 444 2444 www.chicco.com

ARTSANA POLAND Sp.zo.o. Aquarius, Ul. Połczyńska 31 A 01-377 Warszawa +48 22 290 59 90 www.chicco.com

Dec V. Ruben Dario 1015
Colonia Lomas De Providencia 44647
Guadalajara, Jalisco-Mexico
01800 702 8983
www.chicco.com.mx

ARTSANA ARGENTINA S.A.
Uruguay 4501
Victoria Cp(1644)
San Fernando- Buenos Aires-Argentina
0810-888-2442
www.chicco.com.ar

ARTSANA INDIA PRIVATE LIMITED,
7Th Floor, Tower B, Paras Twin Towers,
Golf Course Road, Sector 54
Gurgaon - 122002
Haryana, India
(+91)(124)(4964500)
www.chicco.in

ARTSANA S.p.A.
22070 Grandate (CO) - Italy
Tel. (+39) 031 382 111
Fax (+39) 031 382 400
www.chicco.com
NOTE
NOTE


- COMPONENTI
- INSTRUCTIONS FOR USE
- WARNINGS
- CLEANING AND MAINTENANCE
- Cleaning
- Maintenance
- HOW TO ASSEMBLE / OPEN THE HIGHCHAIR
- Polly Version
- Polly Double Phase Version:
- FABRIC COVER
- SAFETY HARNESS
- FITTING / ADJUSTING THE ACTIVITY TRAY
- ADJUSTING THE HEIGHT OF THE HIGHCHAIR
- RECLINING BACKREST ADJUSTMENT
- LEG REST
- FOOTREST
- WHEELS AND LOCK SYSTEM (if installed)
- CLOSING THE HIGHCHAIR
- Accessory: HYGIENIC SEAT COVER (optional, not included in the price)
- COMPONENTES
- RÅD TIL RENGJ∅RING OG VEDLIKEHOLD
- ÚPRAVA NAKLOPENÍ OPĚRKY ZAD
- NOTE
Brand : CHICCO
Model : Polly 2in1
Category : High chair