
67450 - Grill plate Lund - Free user manual and instructions
Find the device manual for free 67450 Lund in PDF.

| Brand | Lund |
| Model | 67450 |
| Product type | Electric grill plate |
| Use | Domestic, indoor |
| Cooking plate dimensions | 290 × 230 mm |
| Net weight | 2.9 kg |
| Rated voltage | 220-240 V ∼ |
| Rated frequency | 50/60 Hz |
| Rated power | 2000 W |
| Insulation class | I |
| Maximum temperature | 230 °C |
| Temperature setting | Continuous, with integrated thermostat |
| Automatic programs | Steak, Chicken, Fish, Sandwich, Hamburger |
| Timer | Yes, adjustable in minutes and seconds |
| Automatic shutdown | Yes, after 60 minutes of inactivity |
| Protection | Shutdown in case of sensor anomaly |
| Lid lock | Yes, LOCK/OPEN and LOW/HIGH positions |
| 180° opening | Yes, for double cooking surface |
| Removable plates | Yes, dishwasher safe |
| Drip tray | Yes, retractable and removable, dishwasher safe |
| Control type | Touch |
| Operating conditions | Ambient temperature +10 °C to +38 °C, humidity < 90 % |
Frequently Asked Questions - 67450 Lund
User questions about 67450 Lund
0 question about this device. Answer the ones you know or ask your own.
Ask a new question about this device
Download the instructions for your Grill plate in PDF format for free! Find your manual 67450 - Lund and take your electronic device back in hand. On this page are published all the documents necessary for the use of your device. 67450 by Lund.
USER MANUAL 67450 Lund
natural_image
Modern stainless steel grater with digital display and control buttons (no visible text or symbols)CE
PL EN DE RU UA LT LV CZ SK HU RO ES FR IT NL GR BG
natural_image
Close-up of mechanical components with no visible text or symbols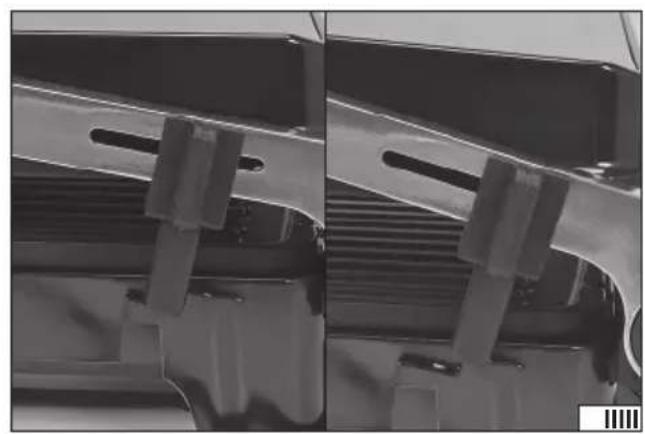
natural_image
Close-up of a metallic mechanical component with ribbed structure and clamping clips (no visible text or symbols)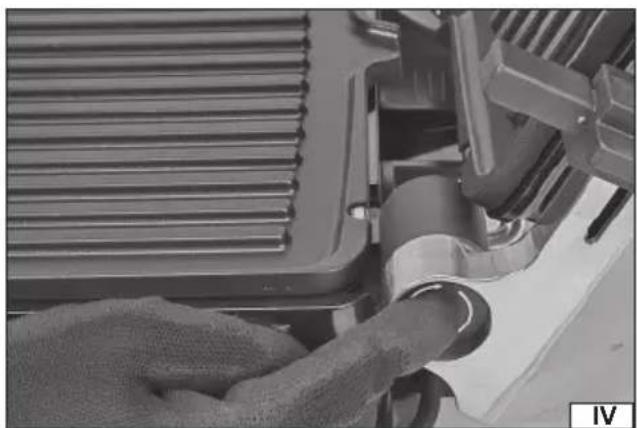
natural_image
Close-up of a mechanical component with meshed surfaces and a hand adjusting a pipe (no visible text or symbols)
natural_image
Black grater with two side grilles and a flat plate, no visible text or symbols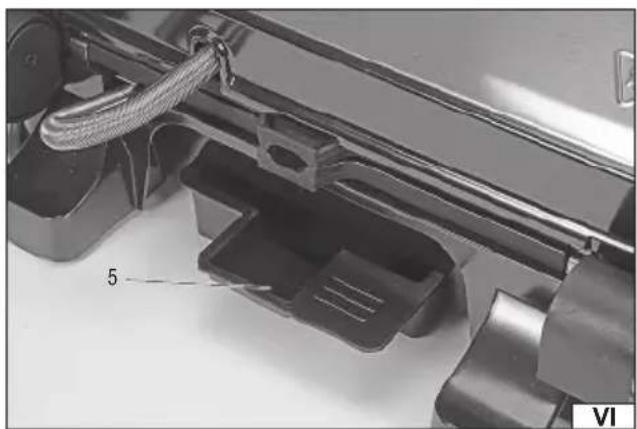
natural_image
Mechanical assembly diagram showing a bracket with labeled component '5' and part identifier VI (no readable text or symbols beyond labels)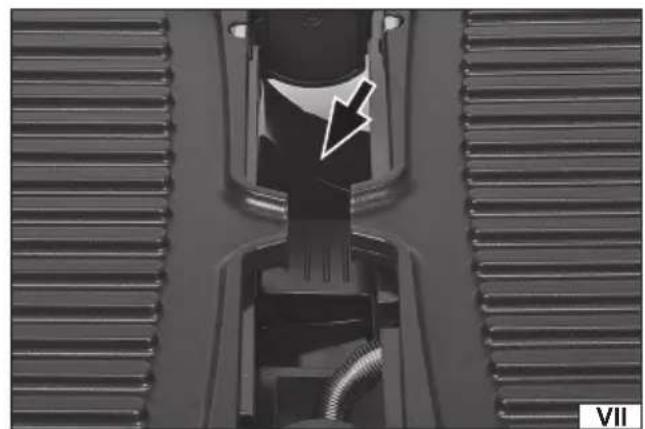
natural_image
Close-up of a mechanical component with a highlighted arrow and label VII (no readable text or symbols)natural_image
Close-up of a mechanical component with visible wiring and arrows indicating direction (no text or symbols)PL
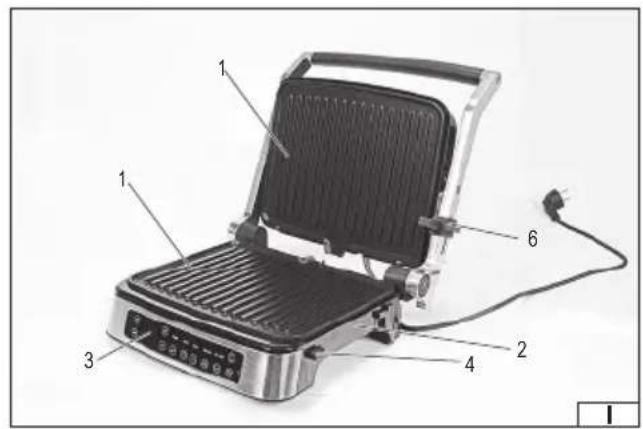
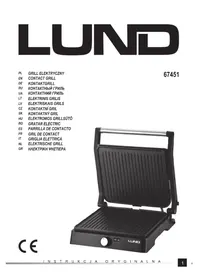
- cooktop
- base
- control panel
- cooktop latch
- drip tray
- open lock
- power switch
DE
Read the operating instruction
Safe contact with food
Caution! Hot surface
Attention! Surface chaude.
This symbol indicates that waste electrical and electronic equipment (including batteries and storage cells) cannot be disposed of with other types of waste. Waste equipment should be collected and handed over separately to a collection point for recycling and recovery, in order to reduce the amount of waste and the use of natural resources. Uncontrolled release of hazardous components contained in electrical and electronic equipment may pose a risk to human health and have adverse effects for the environment. The household plays an important role in contributing to reuse and recovery, including recycling of waste equipment. For more information about the appropriate recycling methods, contact your local authority or retailer.
The electric grill grill is an appliance designed for heating, cooking and preparing dishes requiring heat processing. Thanks to the wide range and smooth adjustment of the temperature control over you can adjust the operating parameters of the appliance to your needs. The appliance is not intended for commercial use. Proper, reliable and safe operation of the appliance depends on appropriate use, that is why you should
Read the entire instructions manual before the first use of the appliance, and keep it for future reference.
The supplier should not be held liable for any damage or injury resulting from improper use of the appliance or failure to observe the safety regulations and recommendations of this manual. Use of the appliance for purposes other than those for which it was intended should cause the loss of the user's rights to the guarantee and also under warranty.
EQUIPMENT
The appliance is supplied complete and does not require assembly. However, before using the appliance, remove all packaging and transport protection elements. Preparations described later in this manual are also required.
GENERAL INSTRUCTIONS FOR USE
The appliance has been designed for domestic use and it is not allowed to use it for commercial applications, e.g., in catering facilities. The appliance is intended for indoor use only. Do not expose the appliance to rain or other precipitation. The appliance can be used only for heat processing of food placed directly on the cooktop. It is forbidden to use the appliance in any other way, for example as a heater for the products inside a dish. It is forbidden to repair, disassemble, or modify the appliance by yourself. All repairs to the appliance must be carried out by an authorised service centre. Keep the appliance under constant supervision during operation. WARNING! During operation, the device heats up to a high temperature, do not touch the cooktop and the walls of the appliance during operation, as this may cause severe burns. The appliance is not intended for use by children under at least 8 years of age and by persons with reduced physical or mental abilities and by persons without experience in or understanding of the operation of the appliance, unless they will be supervised or instructed to use the appliance safely, in a manner ensuring that the risks involved are understood. Children should not play with the appliance. Unattended children should not be allowed to perform the cleaning and maintenance of the appliance.
Recommendations for transporting and installing the appliance
The appliance may only be placed on a hard, flat, level, and non-flammable surface. The surface should withstand the weight of the appliance itself and the food placed on it. Ensure that there is a minimum distance of 10 cm around the appliance's side walls and do not place non-high temperature resistant materials above the appliance. This will allow for the proper ventilation of the appliance. Do not place near edges of, e.g., a table. Do not place the appliance near flammable materials, e.g., curtains or drapes. Do not place any electrical equipment above the appliance. During operation, water vapour is released, which can cause a short circuit in the electrical system and lead to electric shock. It is forbidden to drill any holes in the product, as well as make any other modifications to the appliance not described in the manual. Move the appliance only when cooled, grasping the housing. Do not move the appliance by pulling on the power cord. The temperature at the place of installation and use of the appliance must be within the range of +10°C ÷ +38°C, and the relative humidity must
be below 90% without condensation.
Recommendations for connecting the appliance to the power supply
Before connecting the appliance to the power supply, make sure that the voltage, frequency and performance of the mains correspond to the values shown on the appliance's rating plate. The plug must fit into the socket. It is forbidden to modify the plug in any way. The appliance must be connected directly to a single socket of the mains. It is forbidden to use extension cords, adapters or double sockets. The mains circuit must be equipped with a protective cable and 16 A protection. Avoid contact between the power cord and sharp edges and hot objects and surfaces. During operation, the power cord must always be fully extended and the position of the power cord must be set so that it does not become an obstacle during operation. The power cord should not be placed in a manner which would pose a risk of tripping. The power socket should be located in a place where it is always possible to quickly remove the appliance's power cord plug. Always pull the power cord by the plug housing when unplugging it, never by the cord. If the power cord or the plug is damaged, immediately disconnect it from the mains and contact an authorised service centre of the manufacturer for replacement. Do not use the appliance with a damaged power cord or plug. The power cord or plug cannot be repaired and must be replaced with a new one that is free of defects if these components are damaged. Replacement of the power cord and plug must be carried out by an authorised service centre of the manufacturer.
Recommendations for the appliance use
WARNING! The cooktop surface can be hot after use. Do not touch it, as it may cause severe burns. Allow the cooktop to cool down. When preparing dishes that may spread hot food fragments, personal protective equipment should be worn to protect from burns. Make sure that the floor near the appliance is not slippery. This will prevent slipping, which can cause serious injuries. Observe the food at all times and prevent it from burning during its preparation. Food left unattended can burn, which can cause fire and serious burns. When preparing dishes, touch the cooktop surface only with utensils made of wood or plastic. The utensils should be able to withstand the temperature generated by the cooktop. It is forbidden to remove and distribute food using hands. If any food is left on the cooktop during or after preparation, remove the food remains before preparing another dish. Food remains can be burned, causing smoke, unpleasant smell, and affect the taste of the prepared food. They may also be the cause of fire. Use utensils made of wood or plastic able withstand the temperature generated by the cooktop. Do not use sharp or metal utensils. Such utensils can damage the cooktop surface. If the preparation of a dish requires the use of oil, spread it on the surface of the cooktop with a soft brush. The appliance cannot be used for preparing dishes by deep-frying.
OPERATING THE APPLIANCE
Installation, start-up and operation of the appliance
The appliance must be unpacked, and all parts of the packaging completely removed. It is recommended to keep the packaging, as it can be helpful for further transport and storage of the appliance.
Prepare the appliance according to the instructions specified in the "Appliance maintenance" section.
EN
The appliance has a lid lock. If the lock is moved to the LOCK (II) position when the lid is closed, this indicates that the lid is locked in the closed position. Setting the lock to the OPEN (II) position allows it to open and close freely.
If the lock is set to the LOW or HIGH (III) position when the lid is open, it will not close completely and the upper cooktop will remain at a certain distance from the lower one. Lower for LOW and higher for HIGH.
After pressing and holding the lid opening lock button (IV), it is possible to open the lid at an angle of 180 degrees, which makes it possible to double the area of the cooktop (IV). The lid handle then acts as the base of the lid.
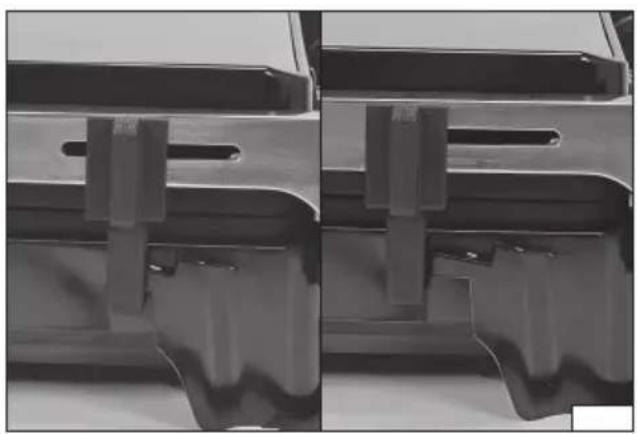
The grill has a pull-out drip tray, which allows for temporary storage of e.g. fat melted from food during heating. The tray is slid into a special place in the base of the appliance (VI). The cooktop has a gap in the edge (VII), which allows fat to flow from the cooktop to the tray. If the lid is fully opened, make sure that the drip tray is under the gap of both cooktops.
WARNING! Special care should be taken when opening the heated lid. Use gloves which protect against high temperatures.
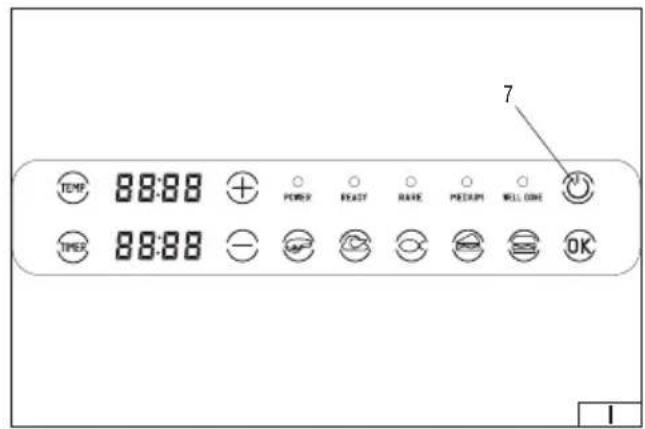
When the power cord plug is plugged into the socket, all the control panel lights will be illuminated for a short time, then the light will go off, except for the switch light and the power indicator light marked POWER, which will flash. This means that the appliance is powered.
The control panel is touch-sensitive, with a slight touch of a button to start or stop the function for which the selected button is responsible.
Another pressing of the power switch will set off its permanent backlight. The temperature (TEMP) indicators and the indicators marked with the food symbols: steak, chicken, fish, sandwich, hamburger will also light up. The appliance is ready to enter the operating parameters.
You can use the programs or set the parameters manually.
When using the programs, press the button with the selected type of food, then press the OK button or wait a few seconds for the automatic start of operation in the given mode. Only the button of the selected operating program will be highlighted and the temperature assigned to the given operating mode will be displayed. Close the grill lid, the grill will start heating, which can take up to 8 minutes depending on the set temperature and ambient temperature.
The POWER indicator light will flash red. When the heating is complete, the POWER indicator light will be lit continuously, the READY indicator light will be lit green. The time will also appear on the display. Open the lid of the appliance and carefully place the foodstuffs on it. Close the lid and use the buttons marked “+” and “-” to select the degree of frying: RARE – mildly fried, MEDIUM – moderately fried, WELL DONE – intensely fried. Press the OK button, the grill will start preparing food according to the set parameters. The timer will start timing. When the cooking is finished, the appliance will emit an acoustic signal three times, stop heating and switch to a standby mode. The POWER indicator light starts flashing red and the other lights go out. Open the lid and carefully remove the food from the cooktop.
The table shows the parameters of each program.
| Type of food Temperature | Time (minutes:seconds) | ||
| RARE MEDIUM | WELL DONE | ||
| Steak 230 °C 2 | 30 03:30 05:00 | ||
| Chicken 220 °C | 3:20 05:00 07:00 | ||
| Fish 200 °C - 4 | 30 06:00 | ||
| Sandwich 210 °C | 2:30 03:30 04:30 | ||
| Hamburger 220 °C | 3:00 04:00 05:00 | ||
In the case of manual settings, use the buttons marked “+” and “-” to set the operating temperature, then press the OK button or wait a few seconds until the heating starts automatically. Close the grill lid, the grill will start heating, which can take up to 8 minutes depending on the set temperature and ambient temperature. If you need to change the temperature, press the button marked TEMP and set the temperature using “+” and “-” buttons.
The POWER indicator light will flash red. When the heating is complete, the POWER indicator light will be lit continuously, the READY indicator light will be lit green. Open the lid of the appliance and carefully place the foodstuffs on it. Close the lid and press the TIMER button, then use the "+" and "-" keys to set the operating time in minutes and seconds. After setting the time, press the OK button to start frying the food. The timer will start timing. To change the time, press the TIMER button again and use the "+" and "-" keys to adjust the time. When the cooking is finished, the appliance will emit an acoustic signal three times, stop heating and switch to a standby mode. The POWER light starts flashing red and the other lights go out. Open the lid and carefully remove the food from the cooktop.
The appliance is activated by means of the temperature adjustment knob. Turning the knob until it stops in the direction of the minimum temperature mark, "Min", and setting it in the position marked with "0" means that the cooktop heating is switched off.
When the product is connected to the power supply, the indicator light marked "Power" will come on, which means that the appliance is properly powered. Rotate the temperature control knob in the direction of the maximum temperature mark - "Max". It will start the heating of the cooktop, which will be indicated by the "ready" indicator light. When the cooktop is heated to the set temperature, the "Ready" indicator light will go out.
EN
The appliance has a built-in thermostat, which allows to automatically maintain the set temperature. Each time the cooktop begins heating up, the "Ready" indicator light turns on.
The frequency at which the heater switches on is determined by the set temperature and the ambient temperature. The higher the set temperature and the lower the ambient temperature, the more often the heater will be switched on.
The cooktop heats up to a high temperature, contact with unprotected body can lead to serious burns. When preparing food, care should be taken not to touch the cooktop, and the cooked food should check using appropriate utensils, e.g. pliers or paddles made of plastic or wood.
When selecting utensils, it is important to take into account whether they can withstand the temperature generated by the cooktop.
Do not use metal utensils or utensils with sharp edges. Such utensils can damage the cooktop surface.
The appliance has two types of protection. If the user does not press any button, the appliance switches off automatically 60 minutes after the last pressing of the button. The switch-off will be indicated by the illumination of all buttons and lights and a sound signal repeated three times.
The appliance will also switch off automatically if it detects irregularities coming from the temperature sensors. In this case, all the buttons will be highlighted and a continuous sound will be heard.
Appliance maintenance
CAUTION! All maintenance activities must be performed with the appliance's power supply disconnected. To do this, unplug the power cord plug from the socket.
The appliance is used to prepare food placed directly on the cooktop, therefore care must be taken to maintain proper hygiene so that the preparation of food is safe.
Both cooktops can be removed from the base and lid. Pressing the cooktop latch button allows it to be removed from the base. Both cooktops are dishwasher safe. The cooktops should be mounted on a completely dried appliance. The back edge of the plate has indentations that should be inserted into the hooks in the housing and lid (VIII). Then press down on the front edge to activate the latch. The cooktop cannot be removed in any other way than by releasing the latch when properly installed.
The cooktop can be protected with a preservative agent for transport and storage. Before first use, after cleaning, heat the cooktop to its maximum temperature and allow all residues of the preservative agent to evaporate. The evaporating preservative agent can cause smoke, which is a normal phenomenon. Therefore, evaporation should be carried out in a place with efficient ventilation. Do not inhale the vapours of the preservative agent.
After the evaporation is finished and the smoke stops flowing, disconnect the appliance from the power supply, wait until the cooktop cools down completely and clean it again with a cleaning agent. Only then can the cooktop be used for food preparation. Clean the cooktop and other parts of the appliance with a cloth soaked in a water solution of a mild dishwashing detergent. Remove any residues of the solution with a cloth soaked in water. After cleaning, wipe the appliance dry. The cooktop should be cleaned after each use, once it cooled down completely. Clean any food residue remaining on the cooktop to prevent it from burning when used again, and to prevent the machine's performance from being impaired.
Do not use solvents, corrosive agents, alcohol, petrol or abrasives for cleaning.
Clean the ventilation openings with a vacuum cleaner.
Caution! Never immerse the appliance in water or any other liquid.
The drip tray should be removed from the unit and cleaned with dishwashing liquid under running water or in a dishwasher.
Storage
If the appliance will not be used for an extended period of time, disconnect it from the power supply.
During storage, keep the appliance indoors, and make sure it is not exposed to dust, dirt, or moisture. It is recommended to store the appliance in its original packaging.
Store the appliance in its working position. Do not stack products in layers. Do not place anything on the product during storage.
TECHNICAL DATA
| Parameter Unit Value | ||
| Part no. 67450 | ||
| Rated voltage [V~] 220 – 240 | ||
| Rated frequency [Hz] 50/60 | ||
| Rated power [W] 2000 | ||
| Insulation class I | ||
| Cooktop size | [mm] | 290 × 230 |
| Net weight | [kg] | 2.9 |
GERÄTEBESCHREIBUNG
Brand : Lund
Model : 67450
Category : Grill plate