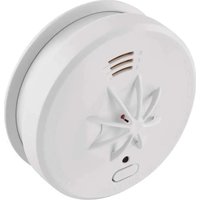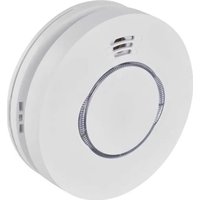
TSS890B-HI - Door/window sensor Emos - Free user manual and instructions
Find the device manual for free TSS890B-HI Emos in PDF.


User questions about TSS890B-HI Emos
0 question about this device. Answer the ones you know or ask your own.
Ask a new question about this device
Download the instructions for your Door/window sensor in PDF format for free! Find your manual TSS890B-HI - Emos and take your electronic device back in hand. On this page are published all the documents necessary for the use of your device. TSS890B-HI by Emos.
USER MANUAL TSS890B-HI Emos
text_image
HONOL LION 00 HONOL LION 00 1 2 32
text_image
8.1 ±0.15 cm 1 2 DO NOT TOUCH 4 33
natural_image
Technical line drawing of a battery module assembly (no text or symbols)4
text_image
LE N WARNING JUSTBEI TAI QUAUI D L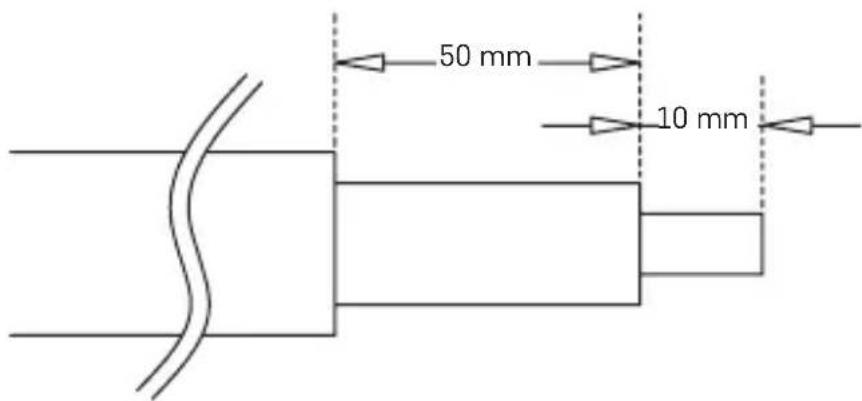
text_image
50 mm 10 mm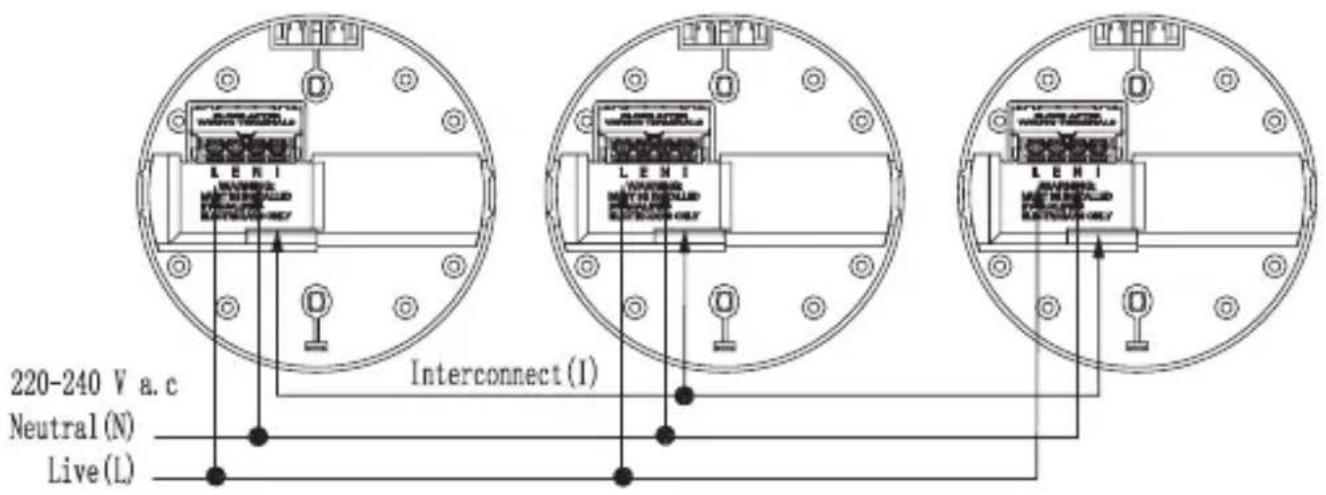
text_image
LEMI 220-240 V a. c Neutral (N) Live (L) Interconnect (I)6
text_image
Ceiling 30 cm Best here Never hereDiagram 1
text_image
Any where in this area 200 cm Not in this area 50 cm Never hereDiagram 2
7
GB | Smoke Detector
This manual contains important safety information regarding the installation and operation of the detector. Carefully read this manual and store it safely for future use. Familiarise other residents of the building with the operation of the detector.
Create an evacuation plan in case of fire and perform a drill every month. All residents of the building should be familiar with the detector signals in order to be able to immediately react to them. The detector allows the detection of smouldering flames accompanied by thick black smoke, which can take hours before they turn into a large fire.
Warning:
If construction work causing a large amount of dust is taking place on your premises, you should remove the detector to protect it from dirt. If you cannot do so for any reason, cover the openings of the detector for the duration of work, by e.g. a plastic bag. A covered detector will not detect smoke.
Uncover it every day after work is finished.
Technical information:
Sensor type: photoelectric cell
In accordance with standard EN 14604:2005/AC:2008
Service life: 10 years
Operating temperature and humidity: 0 °C to +40 °C, 5 % to 93 % (without condensation)
Enclosure rating: IP20
Acoustic signalisation: > 85 dB at a distance of 3 m
Power supply: 220–240 V/50–60 Hz, back-up battery 1× 9 V (5-year battery life)
Power consumption: < 8 μA in standby mode, < 28 mA in alarm mode
Smoke detection sensitivity: 0.10 to 0.16 dB/m
Dimensions: 45 × 140 × 140 mm
Weight: 246 g
Detector Description (See Fig. 1)
| 1 - TEST/SILENCE button | 3 - loud siren |
| 2 - red LED | 4 - green LED |
Back - Mounting Housing (See Fig. 2)
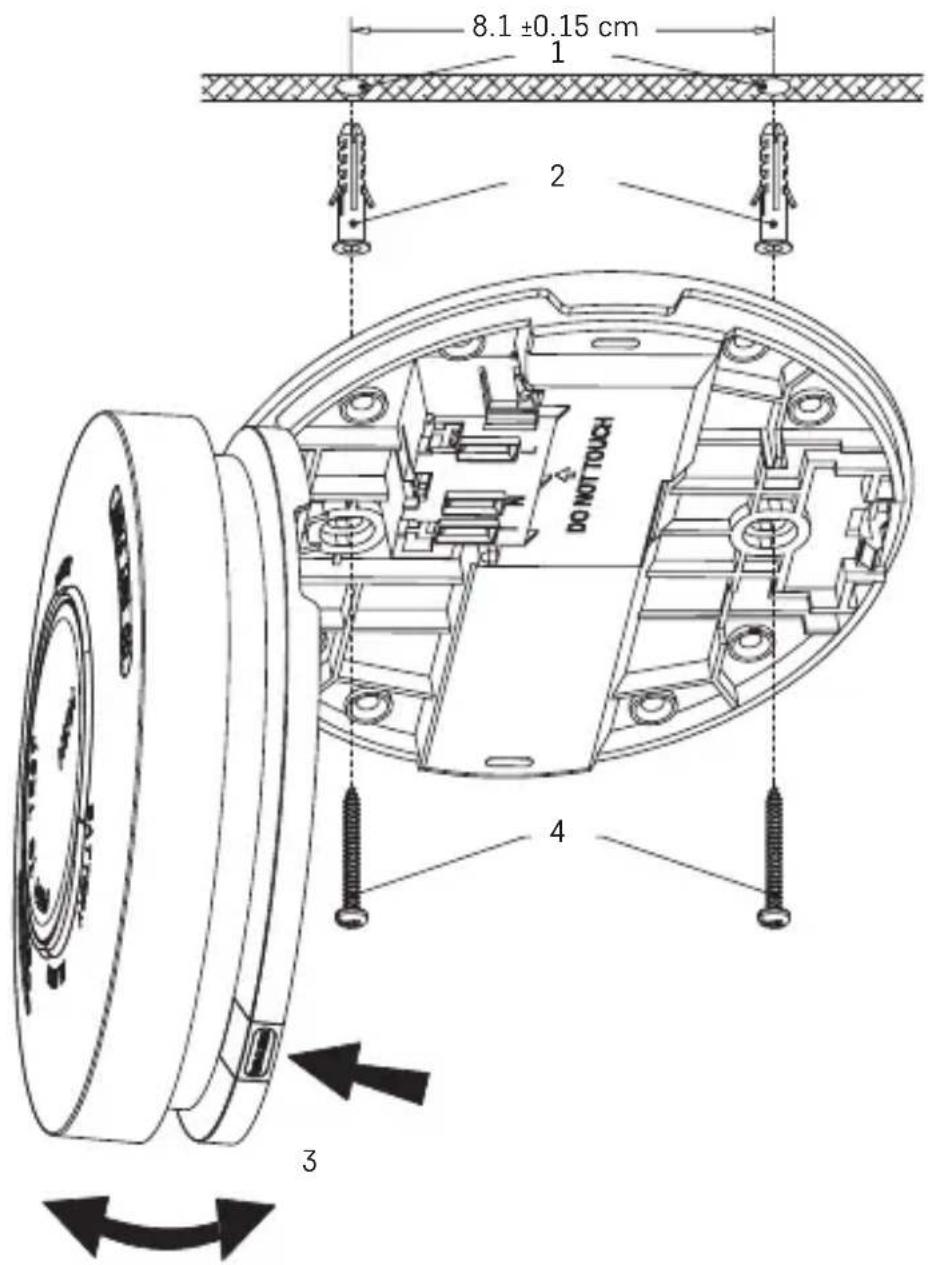
Mounting the Detector (See Fig. 3)
| 1 – holes in the ceiling | 3 – front housing |
| 2 – wall plugs | 4 – screws |
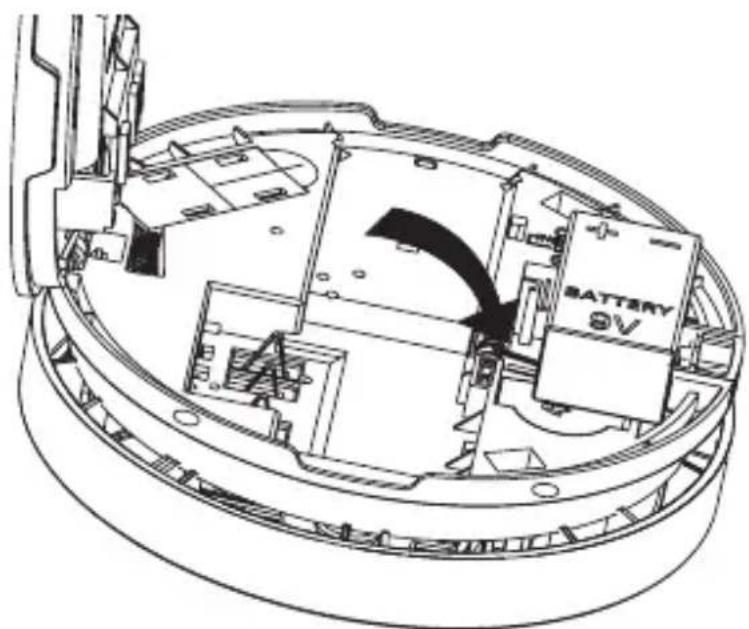
Inserting Batteries (See Fig. 4)
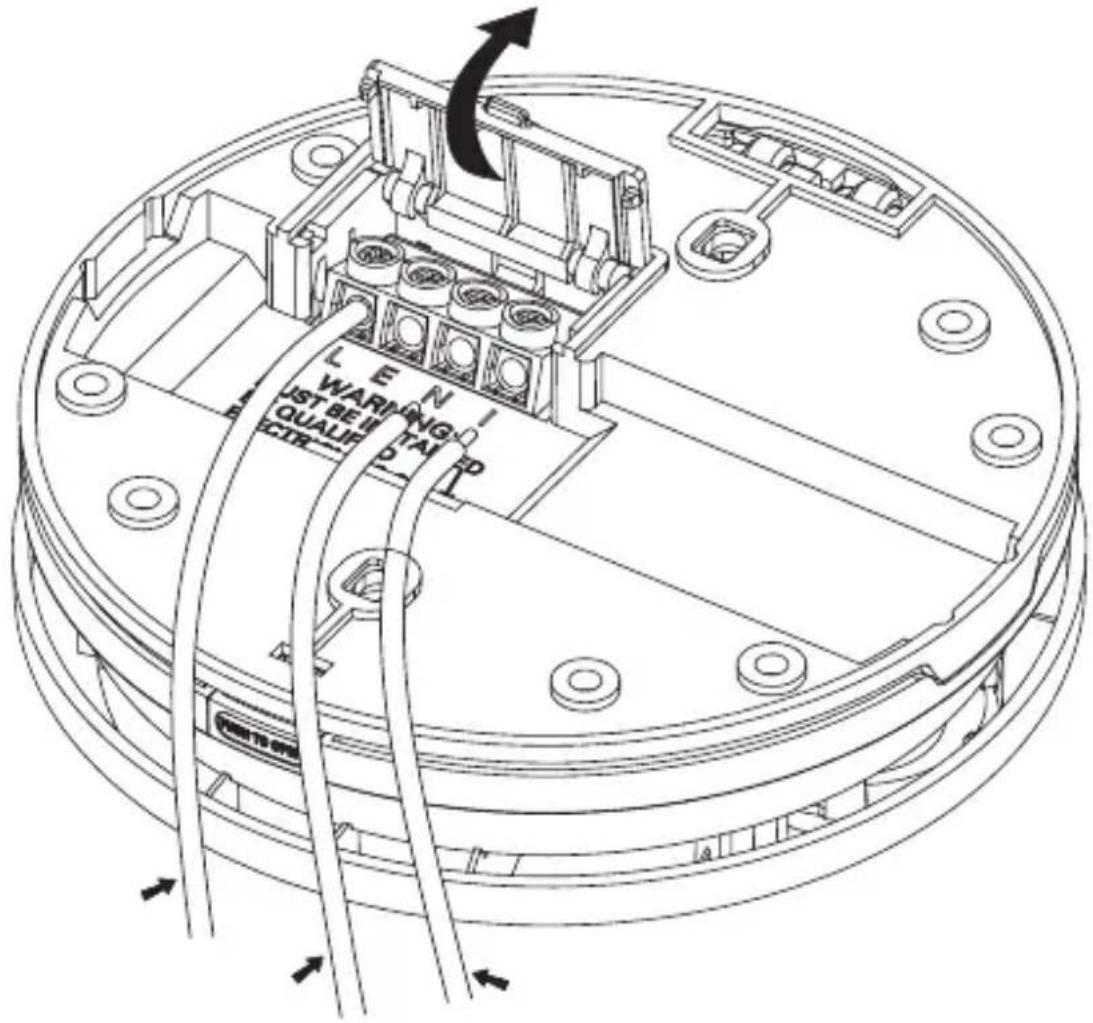
Wiring Diagram (See Fig. 5)
| L - phase | N - neutral |
| E - earth | I - Interconnect |
Interconnect Wiring Diagram (See Fig. 6)
Mounting – Placement
The installation must be performed by a qualified person.
The person performing the installation is responsible for installing the product in accordance with valid regulations.
When in doubt, leave the installation to a qualified professional.
Ideally, a smoke detector should be installed in every room of the house with the exception of kitchens, bathrooms and garages.
Each floor of the house, including the stairs, should have at least one smoke detector installed.
The smoke detector should be located in a place where you can hear it even when you are sleeping, e.g. in the hall in front of the bedroom.
Install the detector on the ceiling of each bedroom and the hall in front of the bedroom.
If the hall is longer than 9 m, install a detector on both ends.
If you have a multi-storey house, install the detector in the same manner on each floor.
You will be protected even against smoke rising up the stairs from the bottom floor.
In the cellar, install the detector on the ceiling at the bottom of the stairs.
Do not install the detector in bathrooms or kitchens; the steam from water or food could cause false alarms.
In the garage, the alarm could be triggered by the exhaust from your car.
The ventilation openings of the warning device must not be covered up.
Do not spray aerosol agents in the vicinity or onto the warning device.
Do not paint the warning device.
Mounting the Device on the Ceiling – Description (See Fig. 3)
Turn off power supply before installing the detector!
Installation must be done by a qualified professional!
- Remove the back of the mounting housing of the detector (see fig. 2).
- Mark the spots for holes.
- Drill two holes ( 5 mm) in the ceiling; the distance between the holes should be 81 mm. Insert the enclosed wall plugs into the holes.
- Connect the wires to the labelled terminals according to the wiring diagram found under the terminal cover on the back (see fig. 5). It is recommended to use a 3-wire flat CYKY cable.
- Close the terminal cover so that the contacts are protected and mount the back of the housing with two screws.
- Insert a 9 V battery into the detector (see fig. 4). Use only 9 V alkaline batteries; never use a rechargeable battery. Turn the red plastic protrusion to the inside of the battery compartment and secure it in place by inserting the battery. Make sure to insert the battery properly and with the right polarity! If the battery is inserted incorrectly, you will not be able to click the housings together and the detector will not function!
- Complete the installation by fitting the detector onto the mounted back housing and closing the front housing.
Note: National regulations vary in terms of the number and location of smoke detectors. When in doubt, contact for example the fire brigade in your country.
Wired Interconnection of Detectors
TSS890B-HI smoke detectors can be mutually interconnected by wire. This interconnection allows the loud acoustic alarm (85 dB) to spread between the devices if one of the detectors detects smoke.
This feature is especially useful for larger, multi-storey buildings.
Connect in accordance with figure 6.
A single circuit (max. 150 m) can have a maximum of 40 devices connected.
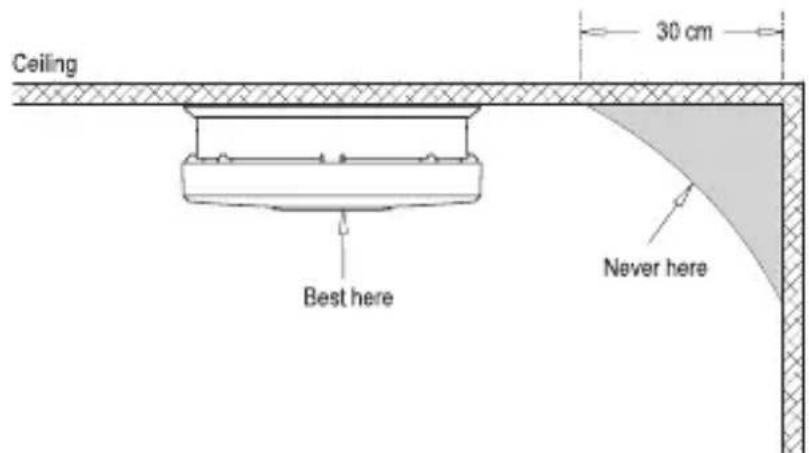
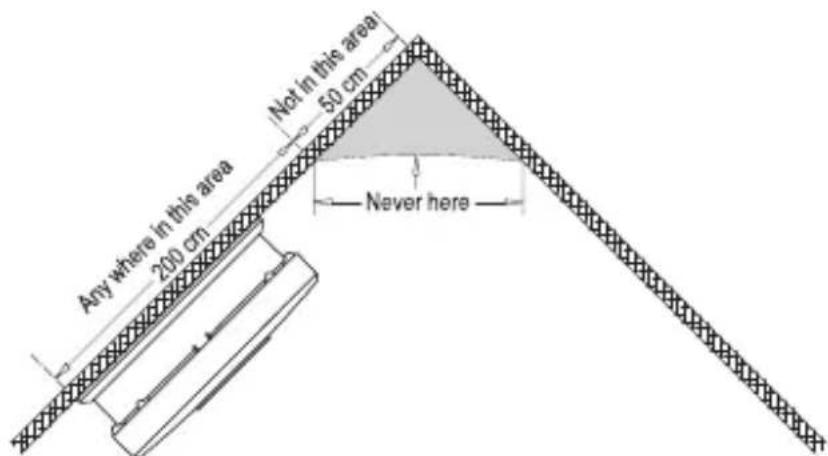
Diagram for proper placement of the detector
Plug in the detector's contacts in line with the wiring diagram and insert a 9 V battery.
Turn on power – the green LED will light up and stay on.
Do a check – long-press the TEST button. You should hear 3× short beeps at a 1.5 second interval repeatedly while the button is held; the red LED will be flashing.
That means the detector is working correctly.
If the detector is operational you will see 1× flash of the red LED every 40 seconds, while the green LED will be permanently lit up.
If no beep plays after pressing the test button, check that the detector is connected properly. If it is, either the battery is low or the detector is malfunctioning, in which case you should contact a service centre.
TEST MODE
You can test the functioning of the detector whenever needed or during every battery replacement.
Long-press the TEST button; the detector will beep 3× in a row (followed by a 1.5 second pause) and the red LED will be flashing. The green LED will stay on.
If you are using the Interconnect feature, the detectors will beep and flash 2× a second.
If the detector does not emit an acoustic signal, check the battery and the correctness of assembly.
Use test mode 1× a week to make sure the detector is functional.
Note: The acoustic and optical alarm during testing is only used as indication that the detector is operational. It does not mean that the presence of smoke has been detected.
FAULT STATE
If the detector is in fault state, it is not functional.
Fault state is indicated every 40 s by 1× beep with the green LED constantly lit.
Immediately replace the battery and check that the detector is undamaged; clean the openings of the detector by e.g. a vacuum cleaner. Do a function test.
If the fault state persists even after the battery has been replaced, contact a service centre.
LOW BATTERY
A low battery in the detector is indicated by a single simultaneous beep and flash of the red LED every 40 s at least 30 days before the battery runs out. Immediately replace the battery. Use alkaline batteries only; do not use rechargeable batteries.
Do a function test.
It is recommended to replace the battery 1× a year as a precaution.
END OF LIFE OF THE DETECTOR
The detector has a service life of 10 years since production.
After expiration, the detector must no longer be used and must be replaced with a new device. The replacement date for the detector is listed on the label on the back, next to „Replace device“. If you are using multiple detectors, remember to check their replacement dates!
ALARM WARNING
If smoke is detected, the detector will start emitting an acoustic + optical signal.
The detector will start beeping continuously 1× a second, with the red LED flashing and the green LED constantly lit up.
If you are using the Interconnect feature, the detectors will beep and flash 2× a second.
The alarm will be active until the air clears.
The acoustic signal of the alarm can be temporarily silenced by pressing the TEST button.
The acoustic signal will be silenced for 8 minutes; the red LED will continue flashing.
When using the Interconnect feature, each detector has to be silenced individually.
After 8 minutes, the acoustic signal will reactivate until the air clears.
If an alarm triggers, immediately evacuate the building and make sure all other people have left as well.
Do not stop to call help or pick up your belongings.
Contact the corresponding emergency service.
Wait until the air clears.
Do not remove or disconnect the battery to silence the alarm – that deactivates the detector!
Overview of Possible Fault States of the Detector
| State Solution | |
| Test mode not functioning. | 1. Check that the battery is connected correctly.2. If the fault reappears, return the device. |
| Alarm indication by a simultaneous 1× beep/1× flash of the red LED. | 1. The battery is low, replace it. |
| The alarm beeps every 40 seconds (the detector is in fault mode). | 1. Clean the detector.2. Return the device or replace it with a new one. |
| The device triggers random alarms during cooking of showering. | 1. Silence the alarm using the TEST button.2. Clean the detector.3. Move the detector to a more suitable location and do a function test using the TEST button. |
| The device randomly emits a different alert sound than usual. | 1. Clean the detector.2. Return the device or replace it with a new one. |
Upkeep and Maintenance
The product is designed to serve reliably for many years if used properly. Here are some tips for proper operation:
- Read the manual carefully before using this product.
- The product must be replaced with a new one after 10 years; see replacement date on the back.
- Regularly clean the product – at least 1× a month. Carefully clean any dirt and dust from ventilation openings of the product with a vacuum cleaner.
- The product must not be painted.
- Do not expose the product to direct sunlight, extreme cold or humidity, and sudden changes in temperature. This would reduce measuring accuracy.
- Do not place the product in locations prone to vibrations and shocks – these may cause damage.
- Do not expose the product to excessive force, impacts, dust, high temperatures or humidity – these may cause malfunction, shorter battery life, damage to batteries and deformation of plastic parts.
- Do not expose the product to rain or high humidity, dropping or splashing water.
- Do not place any open flame sources on the product, e.g. a lit candle, etc.
- Do not put the product in places with inadequate air flow.
- Do not insert any objects in the product's vents, do not cover up the product.
- Do not tamper with the internal electric circuits of the product – doing so may damage the product and will automatically void the warranty. The product should only be repaired by a qualified professional.
- To clean the product, use a slightly moistened soft cloth. Do not use solvents or cleaning agents – they could erode the plastic parts and cause corrosion of the electric circuits.
- Do not immerse the product in water or other liquids.
- In the event of damage or defect of the product, do not make any repairs by yourself. Bring it for repair to the shop where you bought it.
- This device is not intended for use by persons (including children) whose physical, sensory or mental disability or lack of experience and expertise prevents safe use, unless they are supervised or instructed in the use of the appliance by a person responsible for their safety. Children must always be supervised to ensure they do not play with the device.
Do not dispose with domestic waste. Use special collection points for sorted waste. Contact local authorities for information about collection points. If the electronic devices would be disposed on landfill, dangerous substances may reach groundwater and subsequently food chain, where it could affect human health.
A declaration of conformity has been issued for this product.
You can find the manual at: http://www.emos.eu/download.
Service centre:
EMOS spol. s r.o.
Lipnická 2844
Přerov
750 02
Plant:
Zhejiang Jiaboer Electronic Technology Co., Ltd NO.606 South Daqiao Road, Dayuan Town,
Fuyang District, Hangzhou City, Zhejiang Province, China.
CZ | Detektor kouře
Zhejiang Jiaboer Electronic Technology Co., Ltd NO.606 South Daqiao Road, Dayuan Town,
Fuyang District, Hangzhou City, Zhejiang Province,
China.
SK | Detektor dymu
UPOZORNENIE NA ALARM
Zhejiang Jiaboer Electronic Technology Co., Ltd NO.606 South Daqiao Road, Dayuan Town, Fuyang District, Hangzhou City, Zhejiang Province, China.
PL | Detektor dymu
KONIEC ŻYWOTNOŚCI DETEKTORA
Zhejiang Jiaboer Electronic Technology Co., Ltd NO.606 South Daqiao Road, Dayuan Town,
Fuyang District, Hangzhou City, Zhejiang Province, Chiny.
HU | Füstérzékelő
Zhejiang Jiaboer Electronic Technology Co., Ltd NO.606 South Daqiao Road, Dayuan Town,
Fuyang District, Hangzhou City, Zhejiang Province,
China.
SI | Detektor dima
Zhejiang Jiaboer Electronic Technology Co., Ltd NO.606 South Daqiao Road, Dayuan Town, Fuyang District, Hangzhou City, Zhejiang Province, Kitajska.
RS|HR|BA|ME | Detektor dima
Ovaj priručnik sadrži važne sigurnosne informacije za ugradnju i rukovanje detektorom. Pažljivo pročitajte ovaj priručnik i pohranite ga na sigurno mjesto za buduću upotrebu. Upoznajte ostale stanare zgrade s radom detektora.
Zhejiang Jiaboer Electronic Technology Co., Ltd NO.606 South Daqiao Road, Dayuan Town, Fuyang District, Hangzhou City, Zhejiang Province, Kina.
DE | Rauchmelder
Zhejiang Jiaboer Electronic Technology Co., Ltd
NO.606 South Daqiao Road, Dayuan Town,
Fuyang District, Hangzhou City, Zhejiang Province,
China.
Zhejiang Jiaboer Electronic Technology Co., Ltd NO.606 South Daqiao Road, Dayuan Town,
Fuyang District, Hangzhou City, Zhejiang Province, China.
RO|MD | Detector de fum
Zhejiang Jiaboer Electronic Technology Co., Ltd NO.606 South Daqiao Road, Dayuan Town,
Fuyang District, Hangzhou City, Zhejiang Province, China.
Zhejiang Jiaboer Electronic Technology Co., Ltd NO.606 South Daqiao Road, Dayuan Town, Fuyang District, Hangzhou City, Zhejiang Province, Kinija.
LV | Dūmu detektors
Anywhere in this area – Siia sobib alati
Not in this area – Siia ei sobi
SEADME KASUTUSELEVÖTT
Zhejiang Jiaboer Electronic Technology Co., Ltd NO.606 South Daqiao Road, Dayuan Town, Fuyang District, Hangzhou City, Zhejiang Province, Hiina.
BG | Датчик за дим
Zhejiang Jiaboer Electronic Technology Co., Ltd NO.606 South Daqiao Road, Dayuan Town,
Fuyang District, Hangzhou City, Zhejiang Province, Китай.
Zhejiang Jiaboer Electronic Technology Co., Ltd NO.606 South Daqiao Road, Dayuan Town,
Fuyang District, Hangzhou City, Zhejiang Province, Chine.
Zhejiang Jiaboer Electronic Technology Co., Ltd NO.606 South Daqiao Road, Dayuan Town, Fuyang District, Hangzhou City, Zhejiang Province, China.
NL | Rookmelder
Anywhere in this area – overal in deze ruimte
Zhejiang Jiaboer Electronic Technology Co., Ltd NO.606 South Daqiao Road, Dayuan Town,
Fuyang District, Hangzhou City, Zhejiang Province, China.
ES | Detector de humo
Zhejiang Jiaboer Electronic Technology Co., Ltd NO.606 South Daqiao Road, Dayuan Town,
Fuyang District, Hangzhou City, Zhejiang Province, China.