
42PG1000 - Television LG - Free user manual and instructions
Find the device manual for free 42PG1000 LG in PDF.
| Product type | Plasma television |
| Screen size | 42 inches (diagonal) |
| Weight with stand | 26.6 kg |
| Weight without stand | 24.6 kg |
| Power supply | AC (alternating current) |
| Power consumption | Not specified |
| Resolution | HD (1366 x 768 pixels) |
| Connectivity | HDMI, SCART (AV1/AV2), RGB (PC), Component, S-Video, optical digital audio, RS-232C |
| Main functions | Teletext, program guide, on-screen menu (OSD), Home/Store mode, automatic channel search |
| Safety | Wall mounting recommended, grounding mandatory, do not disassemble |
| Care and cleaning | Soft cloth for screen, do not use abrasive cleaners |
| Spare parts and repairability | Contact technical service, do not attempt to repair yourself |
| General information | Full manual on CD-ROM (PDF format), user manual included |
Frequently Asked Questions - 42PG1000 LG
User questions about 42PG1000 LG
0 question about this device. Answer the ones you know or ask your own.
Ask a new question about this device
Download the instructions for your Television in PDF format for free! Find your manual 42PG1000 - LG and take your electronic device back in hand. On this page are published all the documents necessary for the use of your device. 42PG1000 by LG.
USER MANUAL 42PG1000 LG
| User's Guide Specification | ddy | KIM JO 08.02.18 | |||||
| CHOI MJ 08.02.18 | |||||||
| 1. Model Description | |||||||
| MODEL | 42/50PG1000-ZA, 42/50PG3000-ZA | BRAND | LG | MFL34441625 (0802-REV01) | |||
| SUFFIX | EU | Product Name | 42/50PG10**, 42/50PG30** | ||||
| 2. Printing Specification | |||||||
| 1. Trim Size (Format): 185 mm x 260 mm 2. Printing Colors: 1 Color (BLACK) 3. Stock (Paper) - Cover: Coated paper, S/W 150 g/m² - Inside: Uncoated paper, darkenzi 60 g/m² 4. Printing Method: Off-set 5. Bindery: Perfect bind 6. Language: EN/ GE/ FR/ IT/ SP/ PO/ NE/ GR/ HU/ PL/ CZ/ SK/ RO/ BU/ SW/ NO/ FI/ DA/ ES/ LI/ LA/ SV (22) 7. Number of pages: 312 pages | |||||||
| NOTES | “This part contain Eco-hazardous substances (Pb, Cd, Hg, Cr6+, PBB, PBDE, etc.) within LG standard level, Details should be followed Eco-SCM management standard[LG(56)-A-2524]. Especially, Part should be followed and controlled the following specification. (1)Eco-hazardous substances test report should be submitted when Part certification test and First Mass Production. (2)Especially, Don't use or contain lead(Pb) and cadmium(Cd) in ink. | ||||||
| 3. Special Instructions | |||||||
| (1)Origin Notification * LGEIN: Printed in Indonesia * LGEWA: Printed in U.K. * LGEMA: Printed in Poland * LGESP: Printed in Brazil * LGEMX: Printed in Mexico * LGEND: Printed in China * LGEIL: Printed in India * Other Oversea Factories: NON | |||||||
| Changes | |||||||
| 10 | |||||||
| 9 | |||||||
| 8 | |||||||
| 7 | |||||||
| 6 | |||||||
| 5 | |||||||
| 4 | |||||||
| 3 | |||||||
| 2 | |||||||
| 1 | 02/28/08 | CHOI MJ | S8-11537 | Added a sentence to the cover for Italian. | |||
| REV. NO. | MM/DD/YY | SIGNATURE | CHANGE NO. | CHANGE CONTENTS | |||
Pagination sheet
| Front Cover (EN) P/NO. | 2 | 3 | 4 | ... | 15 | UK only |
| Front Cover (GE) | 2 | 3 | 4 | ... | 14 | |
| Front Cover (FR) | 2 | 3 | 4 | ... | 14 | |
| Front Cover (IT) | 2 | 3 | 4 | ... | ... | Back Cover (IT) |
| Front Cover (SP) | 2 | 3 | 4 | ... | 14 | |
| Front Cover (PO) | 2 | 3 | 4 | ... | 14 | |
| Front Cover (NE) | 2 | 3 | 4 | ... | 14 | |
| Front Cover (GR) | 2 | 3 | 4 | ... | 14 | |
| Front Cover (HU) | 2 | 3 | 4 | ... | 14 | |
| Front Cover (PL) | 2 | 3 | 4 | ... | 14 |
Pagination sheet
| Front Cover (CZ) | 2 | 3 | 4 | ... | 14 |
| Front Cover (SK) | 2 | 3 | 4 | ... | 14 |
| Front Cover (RO) | 2 | 3 | 4 | ... | 14 |
| Front Cover (BU) | 2 | 3 | 4 | ... | 14 |
| Front Cover (SW) | 2 | 3 | 4 | ... | 14 |
| Front Cover (NO) | 2 | 3 | 4 | ... | 14 |
| Front Cover (FI) | 2 | 3 | 4 | ... | 14 |
| Front Cover (DA) | 2 | 3 | 4 | ... | 14 |
| Front Cover (ES) | 2 | 3 | 4 | ... | 14 |
| Front Cover (lith) | 2 | 3 | 4 | ... | 14 |
Pagination sheet


PLASMA TV OWNER'S MANUAL
PLASMA TV MODELS
42PG10**
50PG10**
42PG30**
50PG30**
Please read this manual carefully before operating your TV.
Retain it for future reference.
Record model number and serial number of the TV.
Refer to the label on the back cover and quote this information.
To your dealer when requiring service.
Extended Owner's Manual that contains advanced features of these LG TV-sets is located on CD-ROM in electronic version.
To read it You need to open chosen files by using
Personal Computer (PC) equipped with CD-ROM drive.

ENERGY STAR

Digital Video
Broadcasting
Trade Mark of the DVB Digital Video
Broadcasting Project (1991 to 1996)
ID Number(s): 5107:42PG1000-ZA
5109:42PG3000-ZA
5106:50PG1000-ZA
5108: 50PG3000-ZA
P/NO:MFL34441625 (0802-REV01)
Printed in Korea
CONNECTING YOUR UNIT
Image shown may differ from your TV.
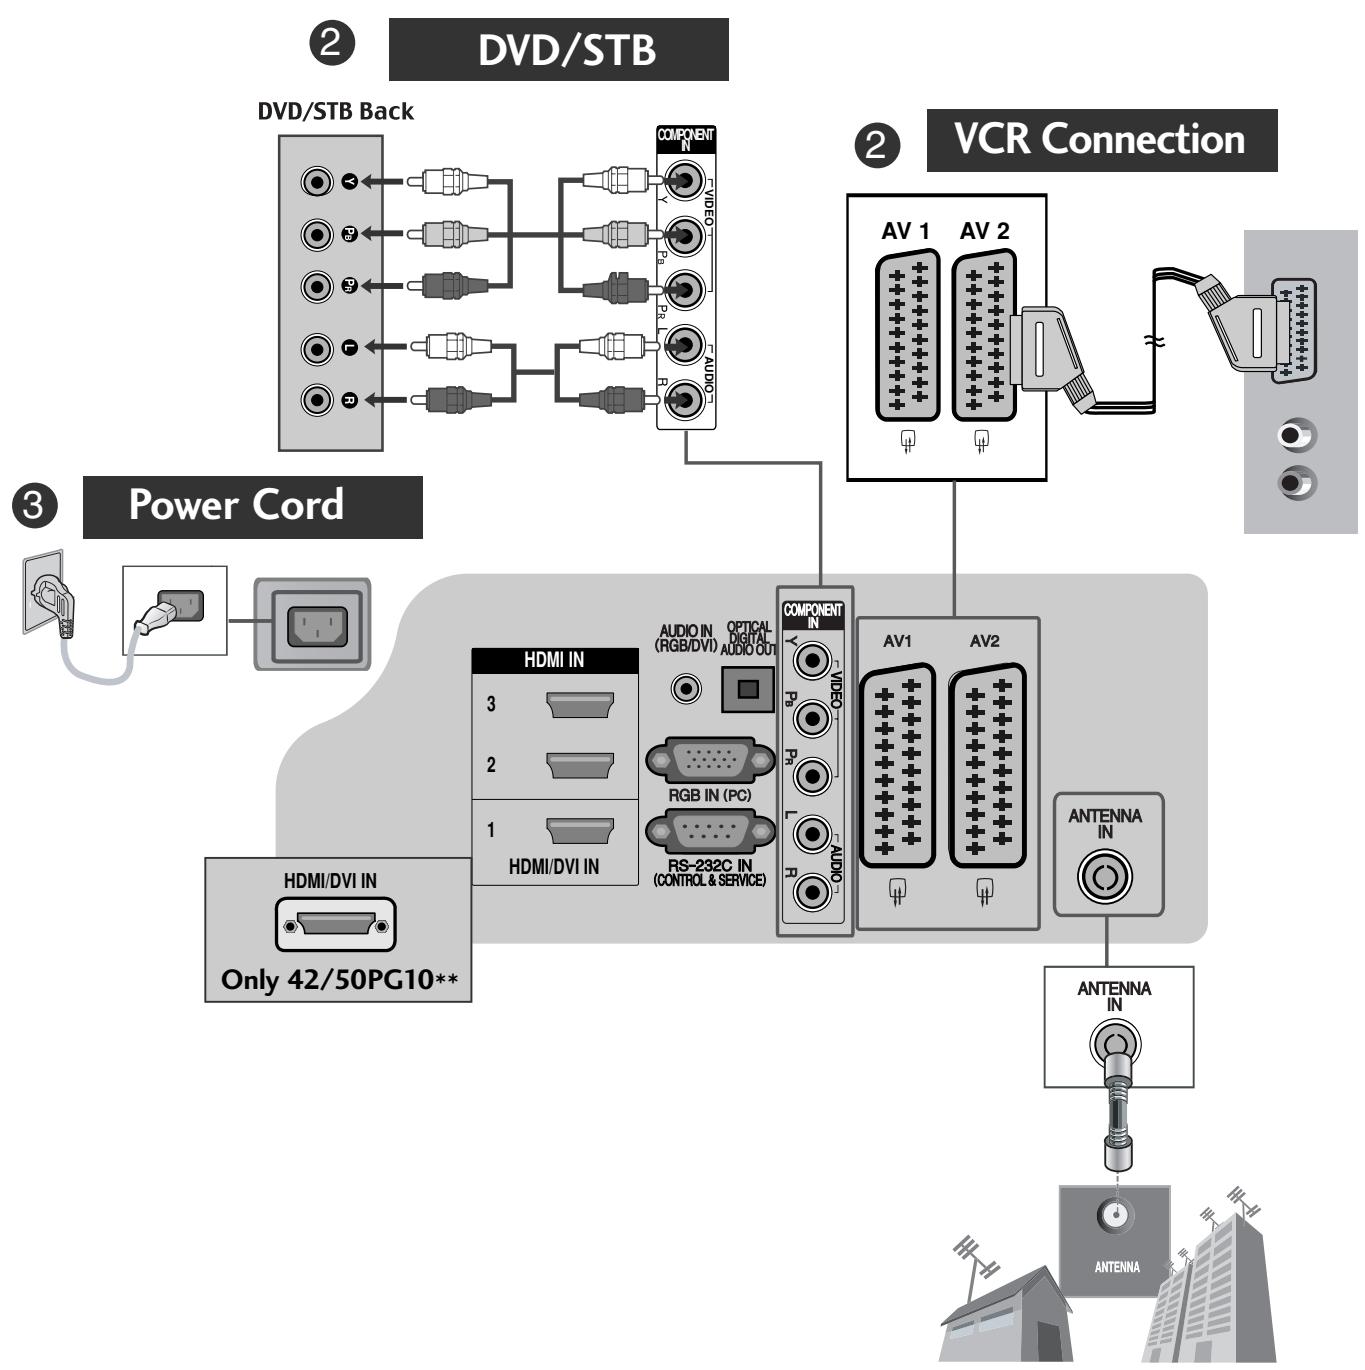
1 Antenna Connection
- To connect an additional equipment, see the External equipment Setup section in CD Manual.
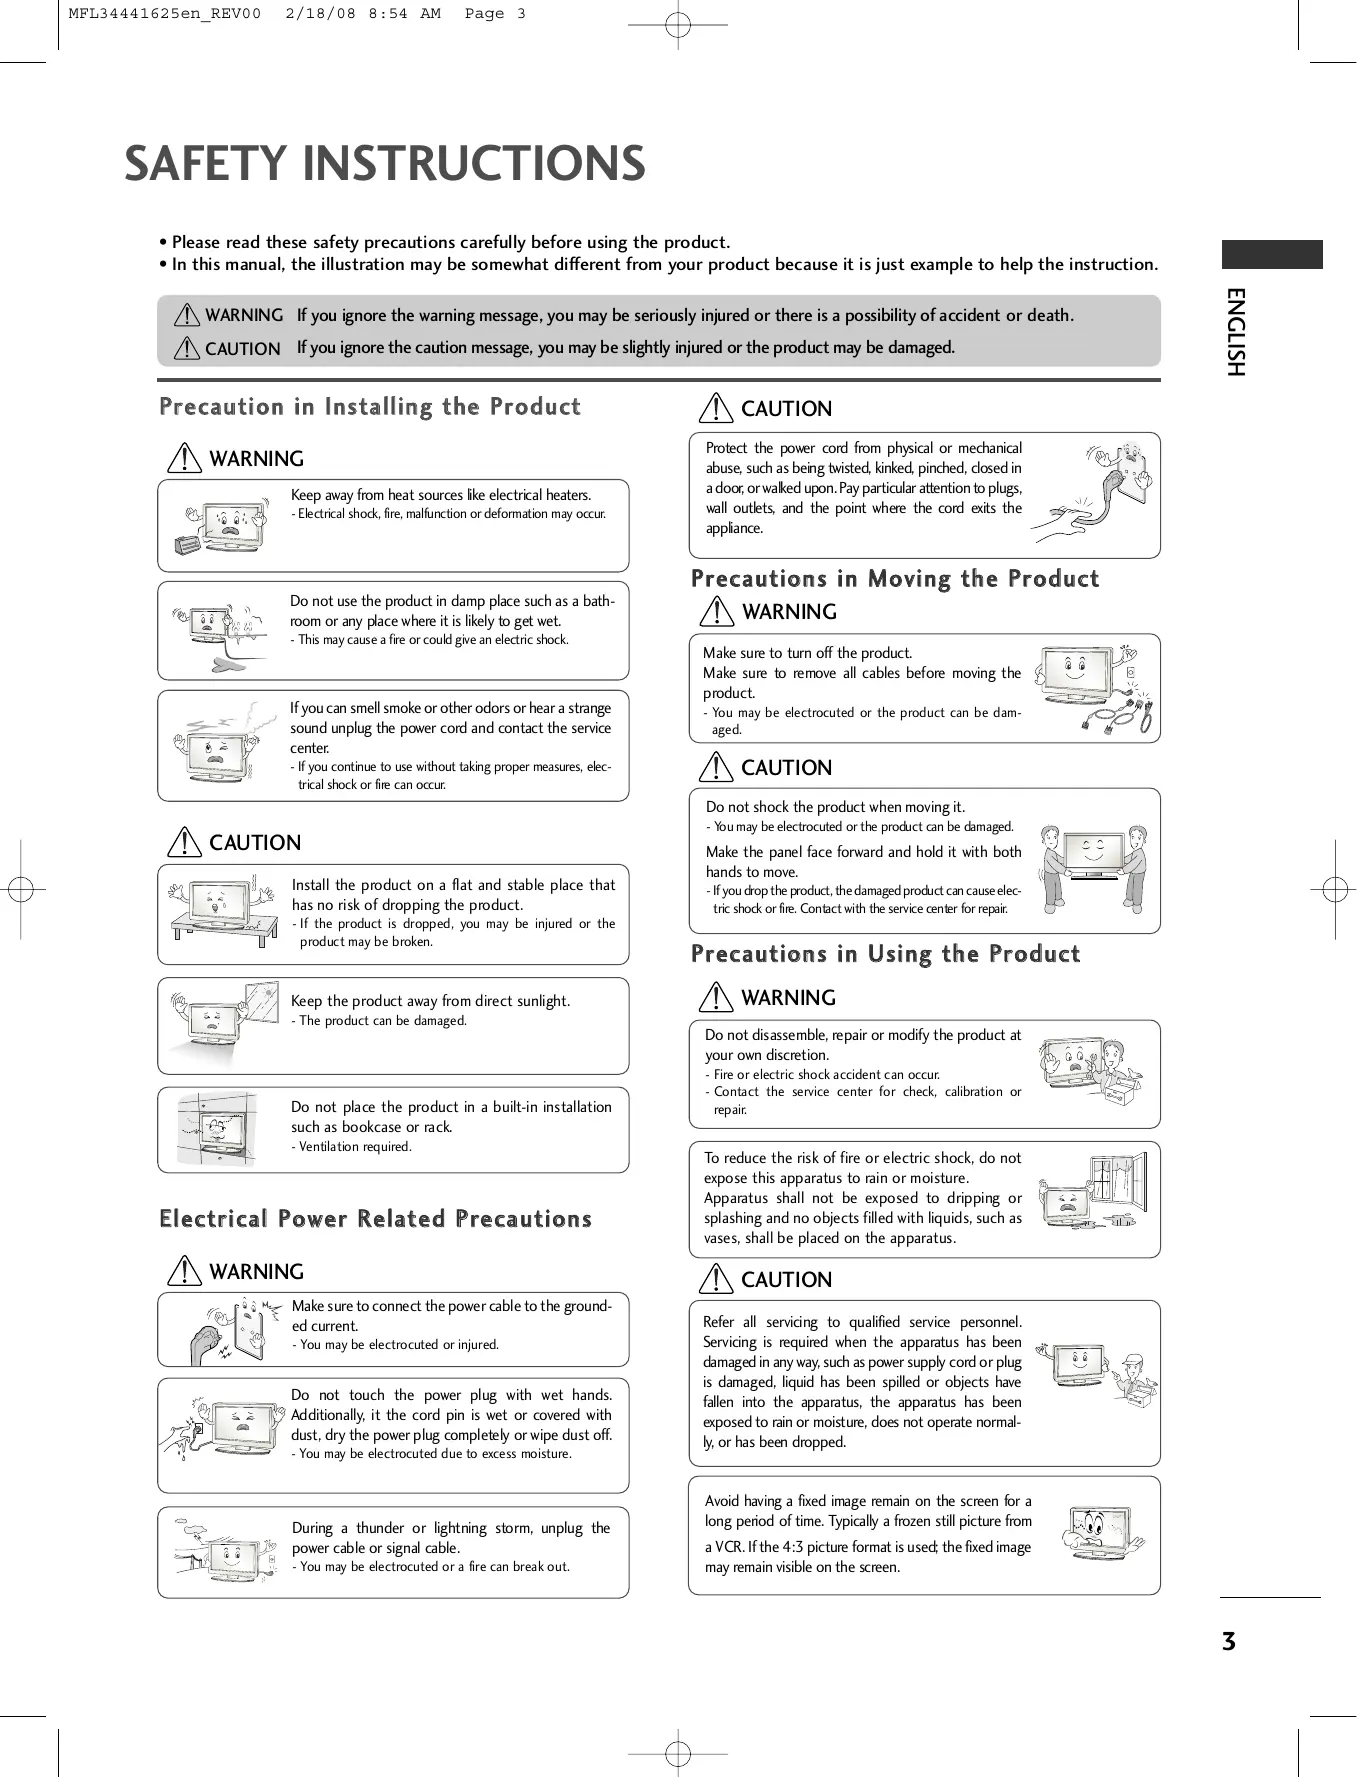
SAFETY INSTRUCTIONS
- Please read these safety precautions carefully before using the product.
- In this manual, the illustration may be somewhat different from your product because it is just example to help the instruction.

WARNING If you ignore the warning message, you may be seriously injured or there is a possibility of accident or death.

CAUTION If you ignore the caution message, you may be slightly injured or the product may be damaged.
Precaution in Installing the Product

WARNING

Keep away from heat sources like electrical heaters.
- Electrical shock, fire, malfunction or deformation may occur.

Do not use the product in damp place such as a bathroom or any place where it is likely to get wet.
- This may cause a fire or could give an electric shock.

If you can smell smoke or other odors or hear a strange sound unplug the power cord and contact the service center.
- If you continue to use without taking proper measures, electrical shock or fire can occur.

CAUTION

Install the product on a flat and stable place that has no risk of dropping the product.
- If the product is dropped, you may be injured or the product may be broken.

Keep the product away from direct sunlight.
- The product can be damaged.
Do not place the product in a built-in installation such as bookcase or rack.
- Ventilation required.
Electrical Power Related Precautions

WARNING
Make sure to connect the power cable to the grounded current.
- You may be electrocuted or injured.

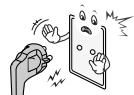
Do not touch the power plug with wet hands. Additionally, it the cord pin is wet or covered with dust, dry the power plug completely or wipe dust off.
- You may be electrocuted due to excess moisture.

During a thunder or lightning storm, unplug the power cable or signal cable.
- You may be electrocuted or a fire can break out.

CAUTION
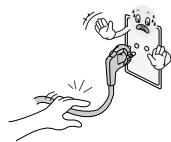
Protect the power cord from physical or mechanical abuse, such as being twisted, kinked, pinched, closed in a door, or walked upon. Pay particular attention to plugs, wall outlets, and the point where the cord exits the appliance.
Precautions in Moving the Product

WARNING
Make sure to turn off the product.
Make sure to remove all cables before moving the product.
- You may be electrocuted or the product can be damaged.


CAUTION
Do not shock the product when moving it.
- You may be electrocuted or the product can be damaged.
Make the panel face forward and hold it with both hands to move.
- If you drop the product, the damaged product can cause electric shock or fire. Contact with the service center for repair.

Precautions in Using the Product

WARNING
Do not disassemble, repair or modify the product at your own discretion.
- Fire or electric shock accident can occur.
- Contact the service center for check, calibration or repair.

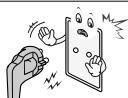
To reduce the risk of fire or electric shock, do not expose this apparatus to rain or moisture.
Apparatus shall not be exposed to dripping or splashing and no objects filled with liquids, such as vases, shall be placed on the apparatus.


CAUTION
Refer all servicing to qualified service personnel. Servicing is required when the apparatus has been damaged in any way, such as power supply cord or plug is damaged, liquid has been spilled or objects have fallen into the apparatus, the apparatus has been exposed to rain or moisture, does not operate normally, or has been dropped.

Avoid having a fixed image remain on the screen for a long period of time. Typically a frozen still picture from a VCR. If the 4:3 picture format is used; the fixed image may remain visible on the screen.

PREPARATION
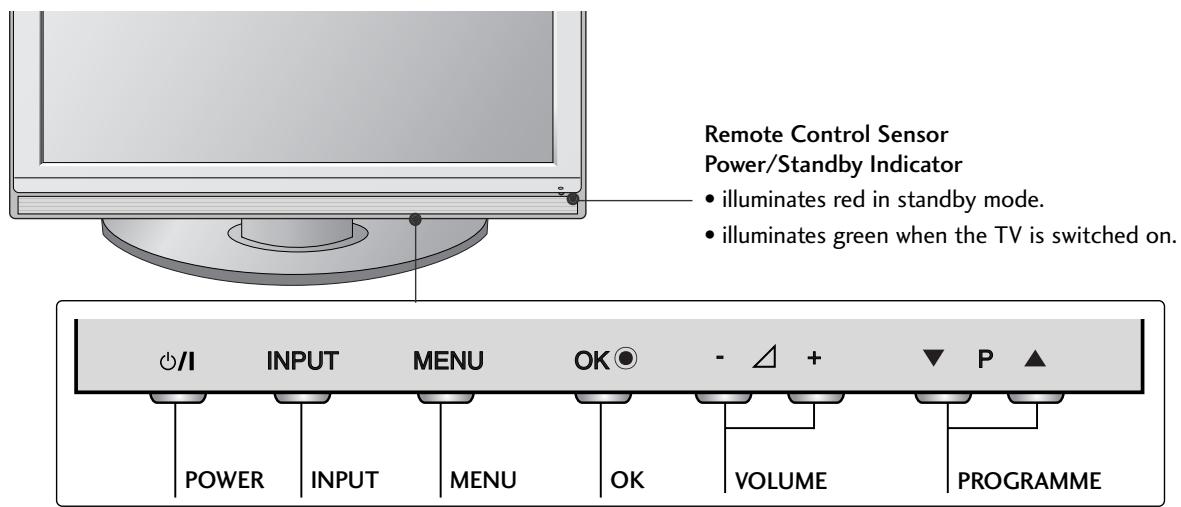
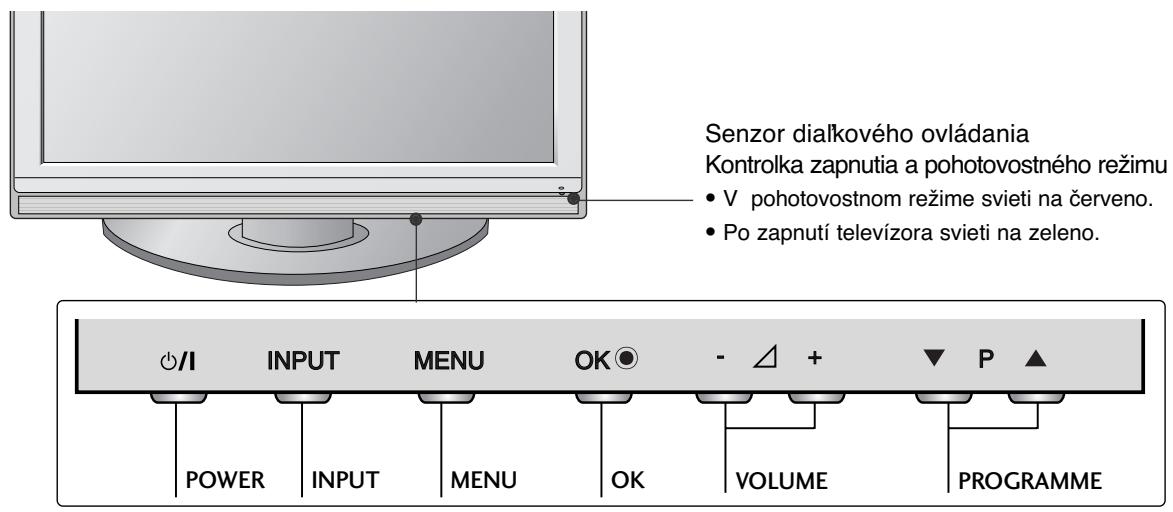
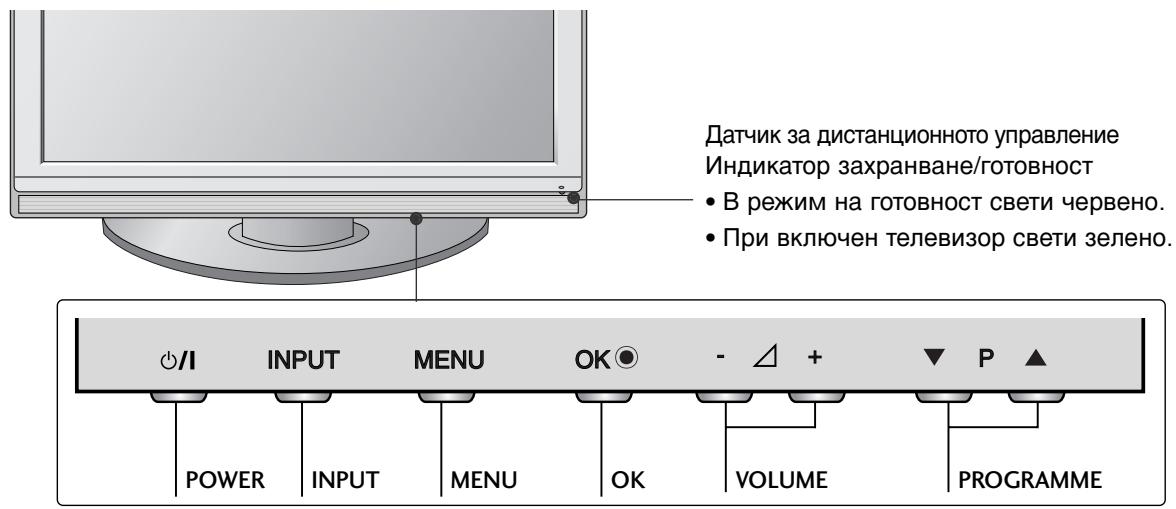
FRONT PANEL CONTROLS
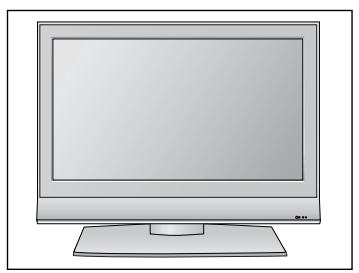
Image shown may differ from your TV.
If your TV has a protection film attached, remove the film and then wipe the TV with a polishing cloth.
PLASMA TV Models : 42/50PG30**
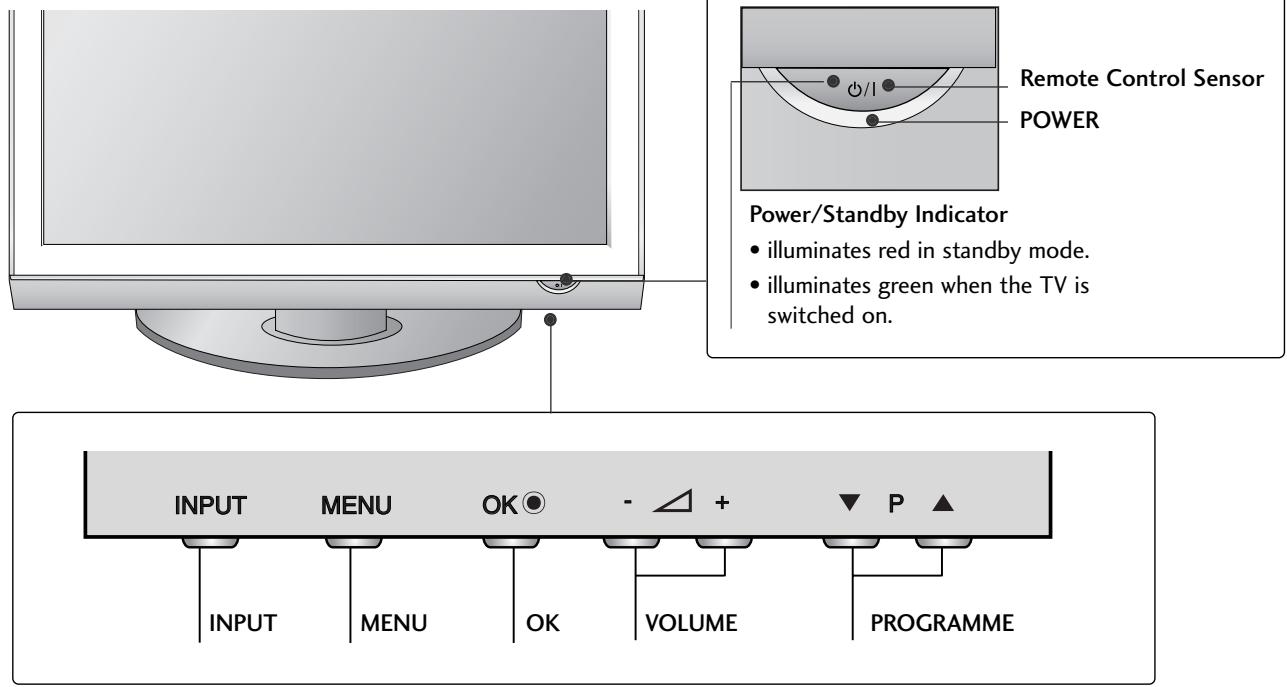
PLASMA TV Models : 42/50PG10**
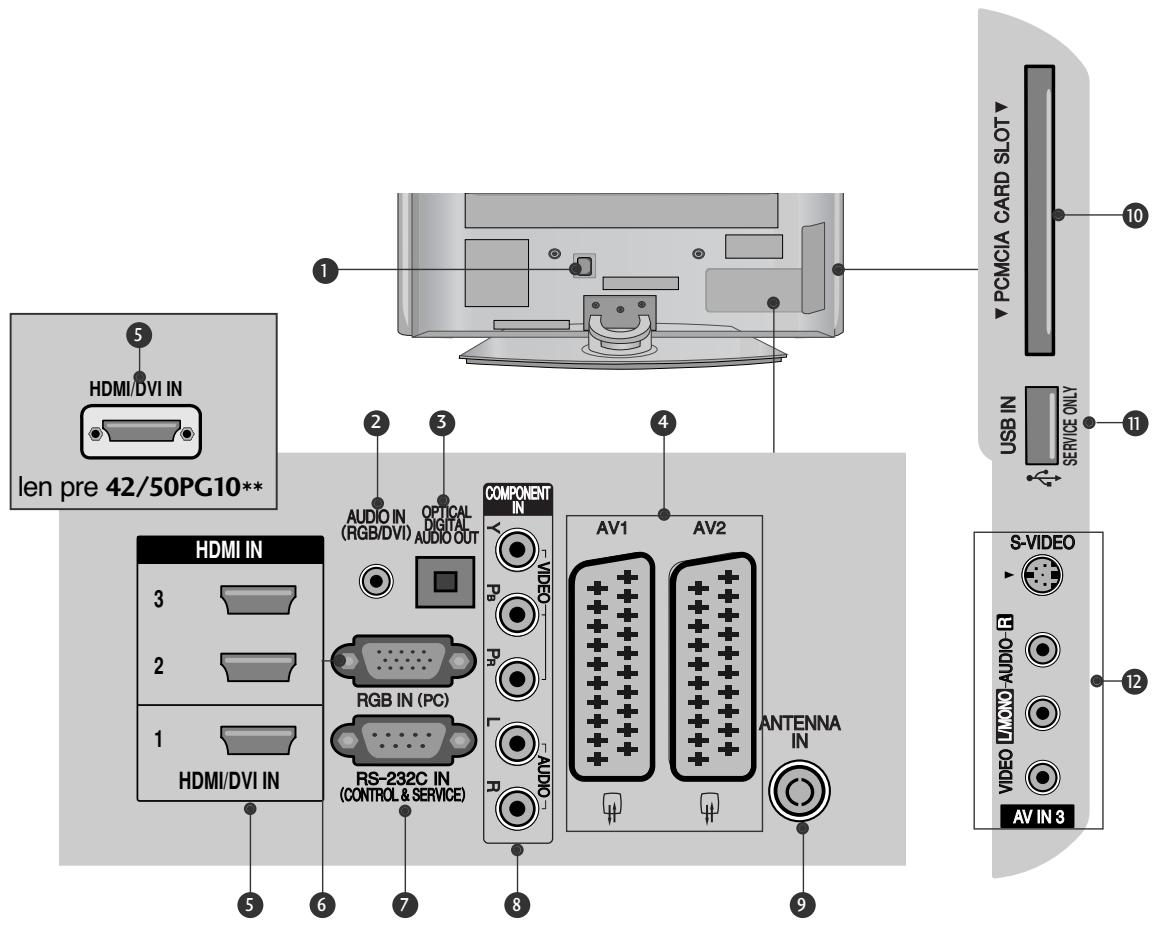
BACK PANEL INFORMATION
■ Image shown may differ from your TV.
Power Cord Socket
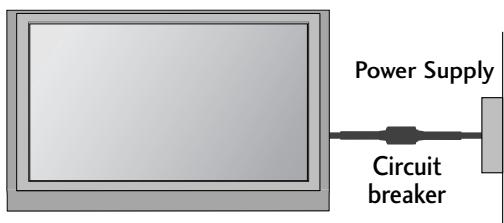
This TV operates on an AC power. The voltage is indicated on the Specifications page. Never attempt to operate the TV on DC power.
RGB/DVI Audio Input
Connect the audio from a PC or DTV.
3 OPTICAL DIGITAL AUDIO OUT
Connect digital audio from various types of equipment.
Note: In standby mode, these ports do not work.
Euro Scart Socket (AV1/AV2)
Connect scart socket input or output from an external device to these jacks.
HDMI Input
Connect a HDMI signal to HDMI IN. Or DVI (VIDEO) signal to HDMI/DVI port with DVI to HDMI cable.
RGB Input
Connect the output from a PC.
RS-232C IN (CONTROL & SERVICE) PORT
Connect to the RS-232C port on a PC.
Component Input
Connect a component video/audio device to these jacks.
Antenna Input
Connect RF antenna to this jack.
10 PCMCIA (Personal Computer Memory Card International Association) Card Slot
(This feature is not available in all countries.)
SERVICE ONLY PORT
Audio/Video Input (Only 42/50PG30**)
Connect audio/video output from an external device to these jacks.
S-Video Input (Only 42/50PG30**)
Connect S-Video out from an S-VIDEO device.
PREPARATION
STAND INSTALLATION
1 Carefully place the TV screen side down on a cushioned surface to protect the screen from damage.
2 Assemble the TV as shown.
Fix the 4 bolts securely using the holes in the back of the TV.
PLEASE SET IT UP CAREFULLY SO THE PRODUCT DOES NOT FALL OVER.
- You should purchase necessary components to fix the TV to the wall on the market.
Position the TV close to the wall to avoid the possibility of it falling when pushed. - The instructions shown below are a safer way to set up the TV, which is to fix it to the wall, avoiding the possibility of it falling forwards if pulled. This will prevent the TV from falling forward and causing injury. This will also prevent the TV from damage. Ensure that children do not climb or hang from the TV.
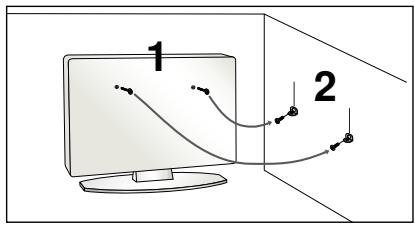
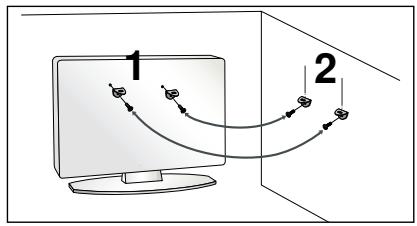
Use the eye-bolts or TV brackets/bolts to fix the TV to the wall as shown in the picture. (If your TV has bolts in the eyebolts, loosen these bolts.)
* Insert the eye-bolts or TV brackets/bolts and tighten them securely in the upper holes.
Secure the wall brackets with the bolts on the wall. Match the height of the bracket that is mounted on the wall.
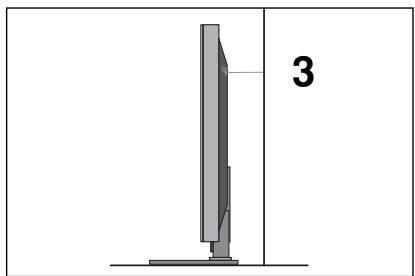
3 Use a sturdy rope to tie the TV. It is safer to tie the rope so it becomes horizontal between the wall and the TV.
NOTE
When moving the TV undo the cords first.
▶ Use a platform or cabinet strong and large enough to support the size and weight of the TV.
To use the TV safely make sure that the height of the bracket on the wall and on the TV is the same.
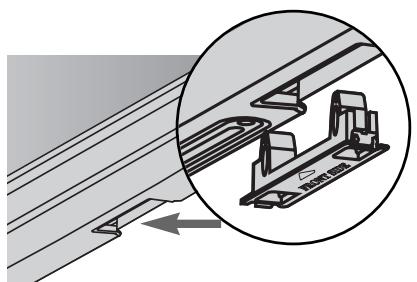
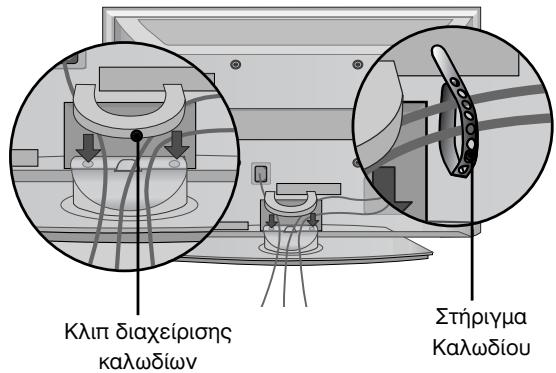
BACK COVER FOR WIRE ARRANGEMENT
1 Connect the cables as necessary.
To connect additional equipment, see the External Equipment Setup section.
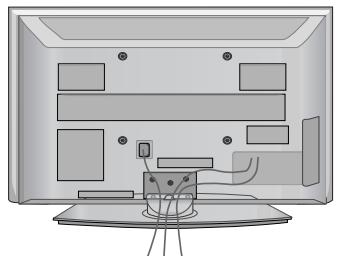
Install the CABLE MANAGEMENT CLIP as shown.
If your TV has the CABLE HOLDER, install it as shown and bundle the cables.
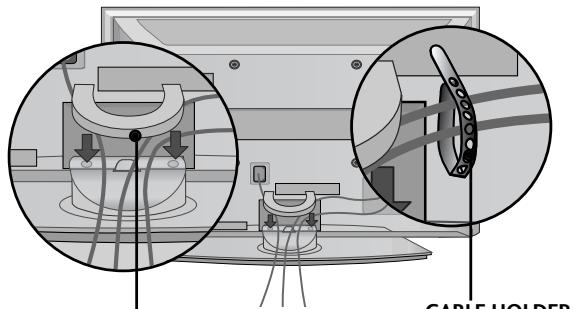
(Only 42/50PG10**)
CABLE MANAGEMENT CLIP
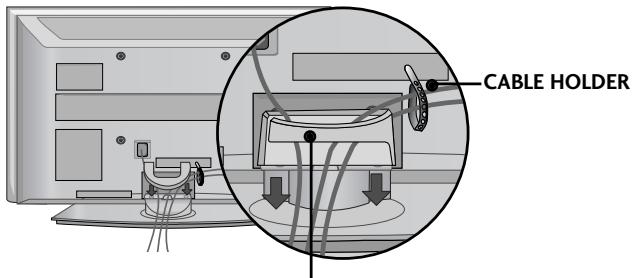
(Only 42/50PG30**)
CABLE MANAGEMENT CLIP
How to remove the cable management clip
Hold the CABLE MANAGEMENT CLIP with both hands and pull it upward.
- For the 42PG10** model, press the center of the CABLE MANAGEMENT CLIP and then lift up it.
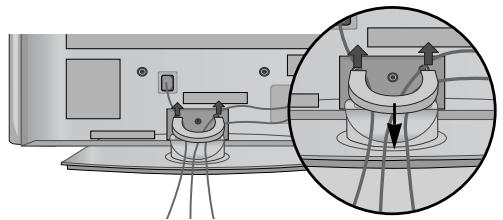
(Only 42/50PG10**)
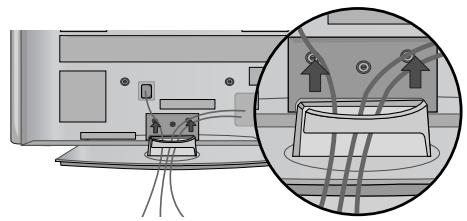
(Only 42/50PG30**)
PREPARATION
The TV can be installed in various ways such as on a wall, or on a desktop etc.
The TV is designed to be mounted horizontally.
EARTHING
Ensure that you connect the earth wire to prevent possible electric shock. If grounding methods are not possible, have a qualified electrician install a separate circuit breaker.
Do not try to earth the TV by connecting it to telephone wires, lightening rods or gas pipes.
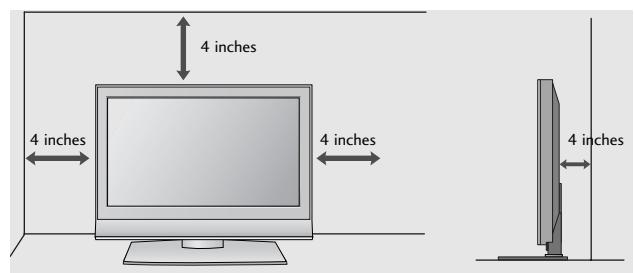
DESKTOP PEDESTAL INSTALLATION
For adequate ventilation allow a clearance of 4^ (10cm) all around the TV.
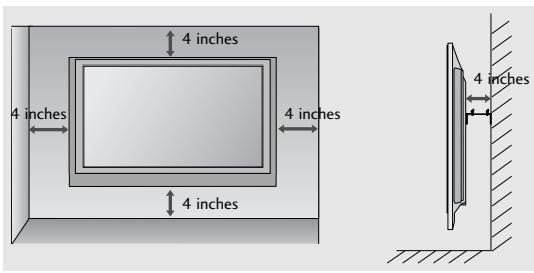
WALL MOUNT: HORIZONTAL INSTALLATION
For adequate ventilation allow a clearance of 4" (10cm) all around the TV. Detailed installation instructions are available from your dealer, see the optional Tilt Wall Mounting Bracket Installation and Setup Guide.

Not using the desk-type stand
When installing the wall-mounted unit, use the protection cover for desk-type stand installation. Insert the PROTECTION COVER into the TV until clicking sound.
To prevent damage do not connect to the mains outlet until all connections are made between the devices.
ANTENNA CONNECTION
For optimum picture quality, adjust antenna direction.
An antenna cable and converter are not supplied.
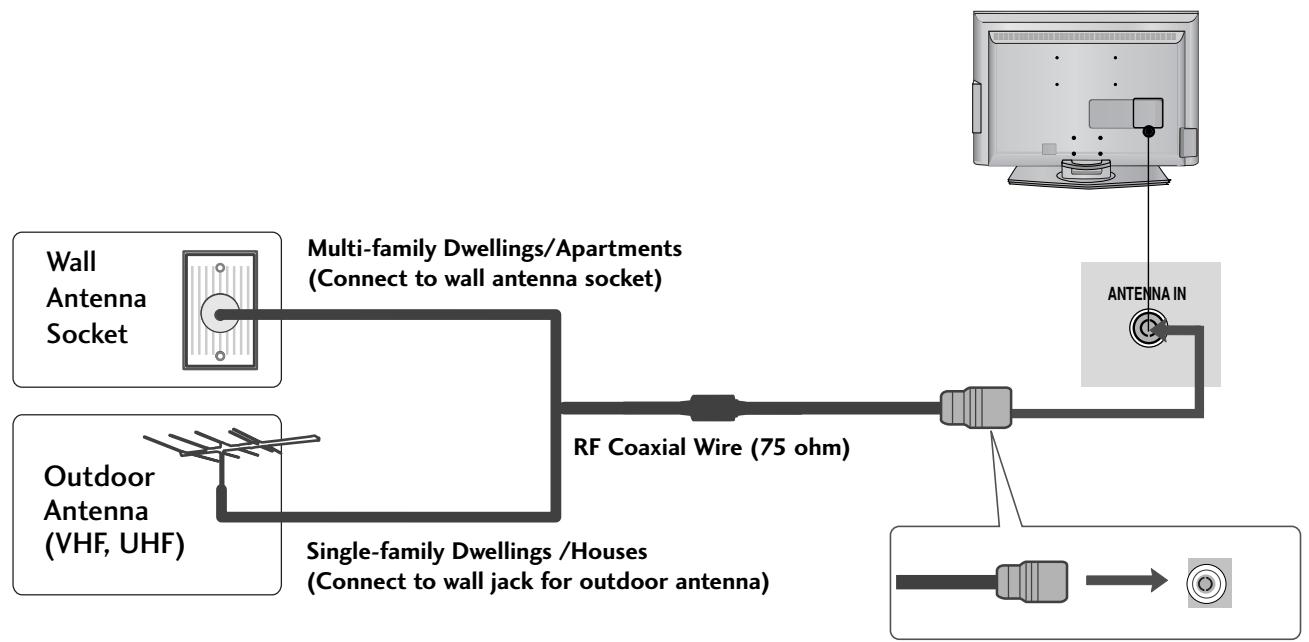
Take care not to bend the bronze wire when connecting to an antenna port.

In poor signal areas, to achieve better picture quality it may be necessary to install a signal amplifier to the antenna as shown above.
If signal needs to be split for two TVs, use an antenna signal splitter for connection.
WATCHING TV /PROGRAMME CONTROL
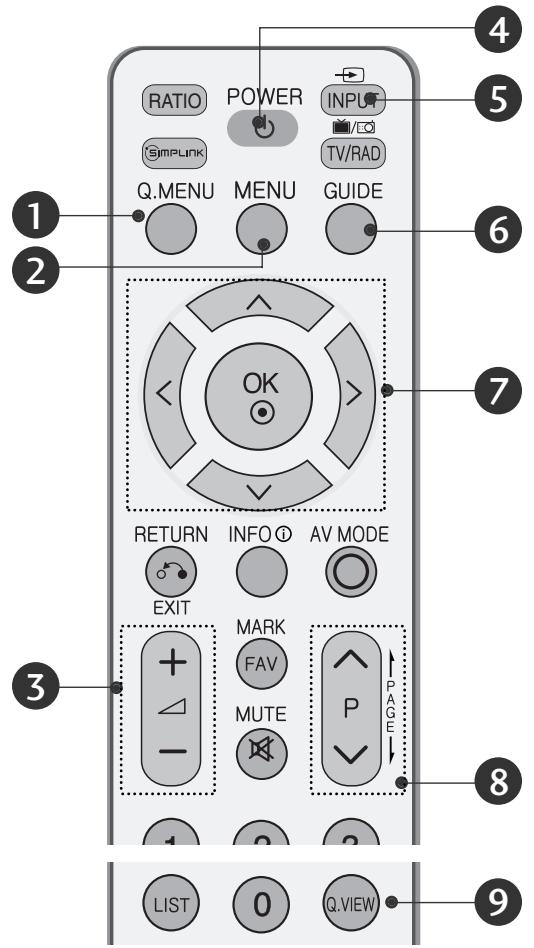
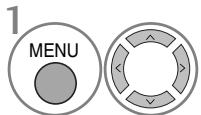
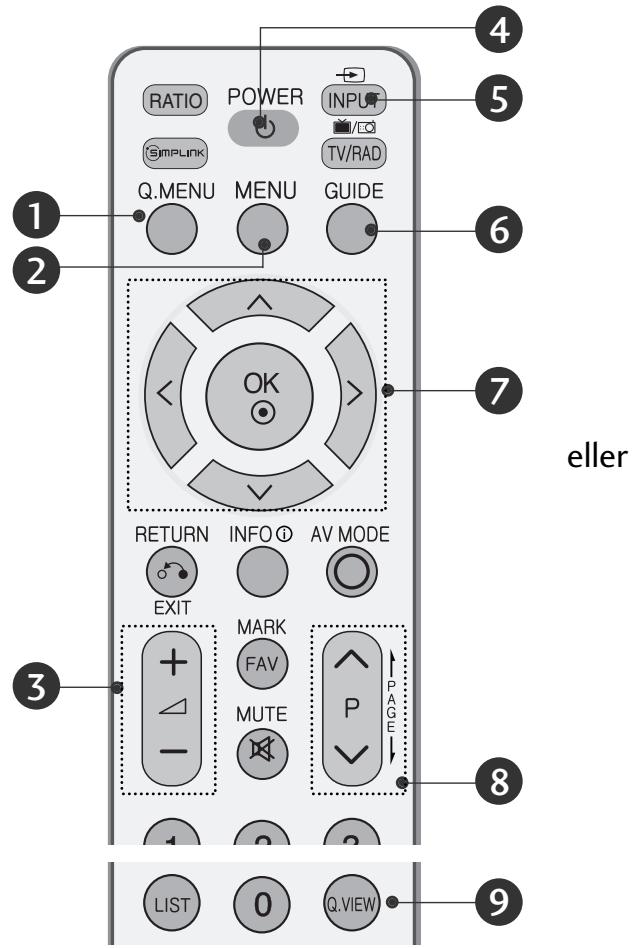
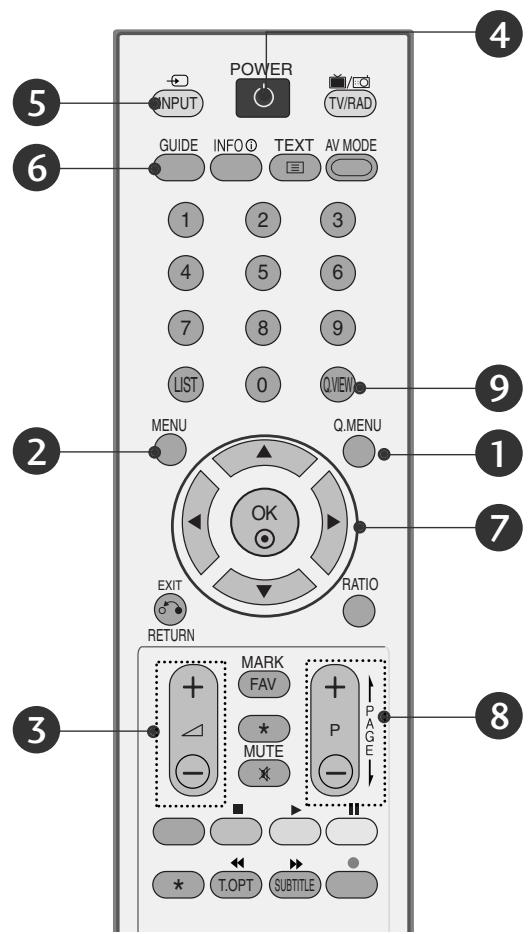
REMOTE CONTROL KEY FUNCTIONS
When using the remote control, aim it at the remote control sensor on the TV.
or

Q.MENU
Select the desired quick menu source.
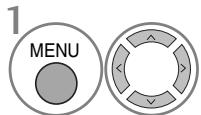
2 MENU
Selects a menu.
Cleared all on-screen displays and returns to TV viewing from any menu.
VOLUME UP /DOWN
Adjusts the volume.
4 POWER
Switches the TV on from standby or off to standby.
5 INPUT
External input mode rotate in regular sequence.
Switches the TV on from standby.
GUIDE
Shows programme schedule.
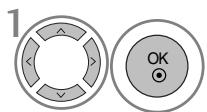
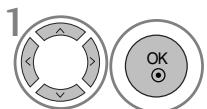
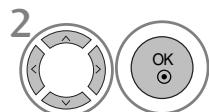
THUMBSTICK(Up/Down/Left/Right)
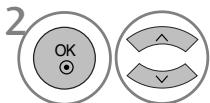
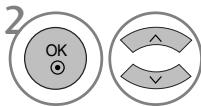
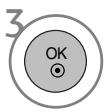
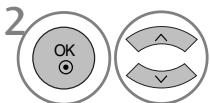
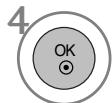
Allows you to navigate the on-screen menus and adjust the system settings to your preference. OK
Accepts your selection or displays the current mode.
Programme UP/DOWN
Selects a programme.
Q.VIEW
Returns to the previously viewed programme.
Installing Batteries
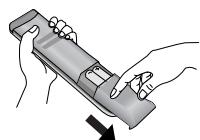
- Open the battery compartment cover on the back and install the batteries matching correct polarity (+with +,-with -).
Install two 1.5V AAA batteries. Do not mix old or used batteries with new ones.
Close cover.
TURNOING ON THE TV
- When your TV is turned on, you will be able to use its features.
1 Firstly, connect the power cord correctly.
At this stage, the TV switches to standby mode.
In standby mode to turn TV on, press the / I , INPUT or P (or PR ) button on the TV or press the POWER, INPUT, D/A, P (or (PR + - or P + -)) or NUMBER button on the remote control and the TV will switch on.
Initializing setup
If the OSD (On Screen Display) is displayed on the screen after turning on the TV, you can adjust the Language, Select Mode, Country, Time Zone, Auto programme tuning.
Note:
a. It will automatically disappear after approx. 40 seconds unless a button is pressed.
b. Press the BACK or RETURN button to change the current OSD to the previous OSD.
c. For those countries without confirmed DTV broadcasting standards, some DTV features might not work, depending on the DTV broadcasting environment.
d. "Home" mode is the optimal setting for home environments, and is the TV's default mode.
e. "In Store" mode is the optimal setting for store environments. "If a user modifies image quality data, "In Store" mode initializes the product to the image quality set by us after a certain period of time.
f. The mode (Home, In Store) can be changed by executing Factory Reset in the OPTION menu.
ON-SCREEN MENU LANGUAGE / COUNTRY SELECTION
The installation guide menu appears on the TV screen when it is switched on for the first time.
Select your desired language.

Select your country.
- If you want to change Language/ Country selection
Select OPTION.
Select Menu Language or Country.

Select your desired language or country.

Save it.
NOTE
If you do not finish the set-up Installation Guide by pressing EXIT or RETURN or if you time out on the OSD (On Screen Display) the installation menu will continuously appear until the set up is completed whenever the TV is switched on
If you select the wrong local country, teletext may not appear correctly on the screen and some problems may occur during teletext operation.
The CI (Common Interface) function may not be applied based on country broadcasting circumstances.
DTV mode control buttons may not function based on country broadcasting circumstances.
In country that Digital broadcasting regulation isn't fixed, some DTV function may not work depending on digital broadcasting circumstances.
WATCHING TV /PROGRAMME CONTROL
ON SCREEN MENUS SELECTION AND ADJUSTMENT
Your TV's OSD (On Screen Display) may differ slightly from what is shown in this manual.
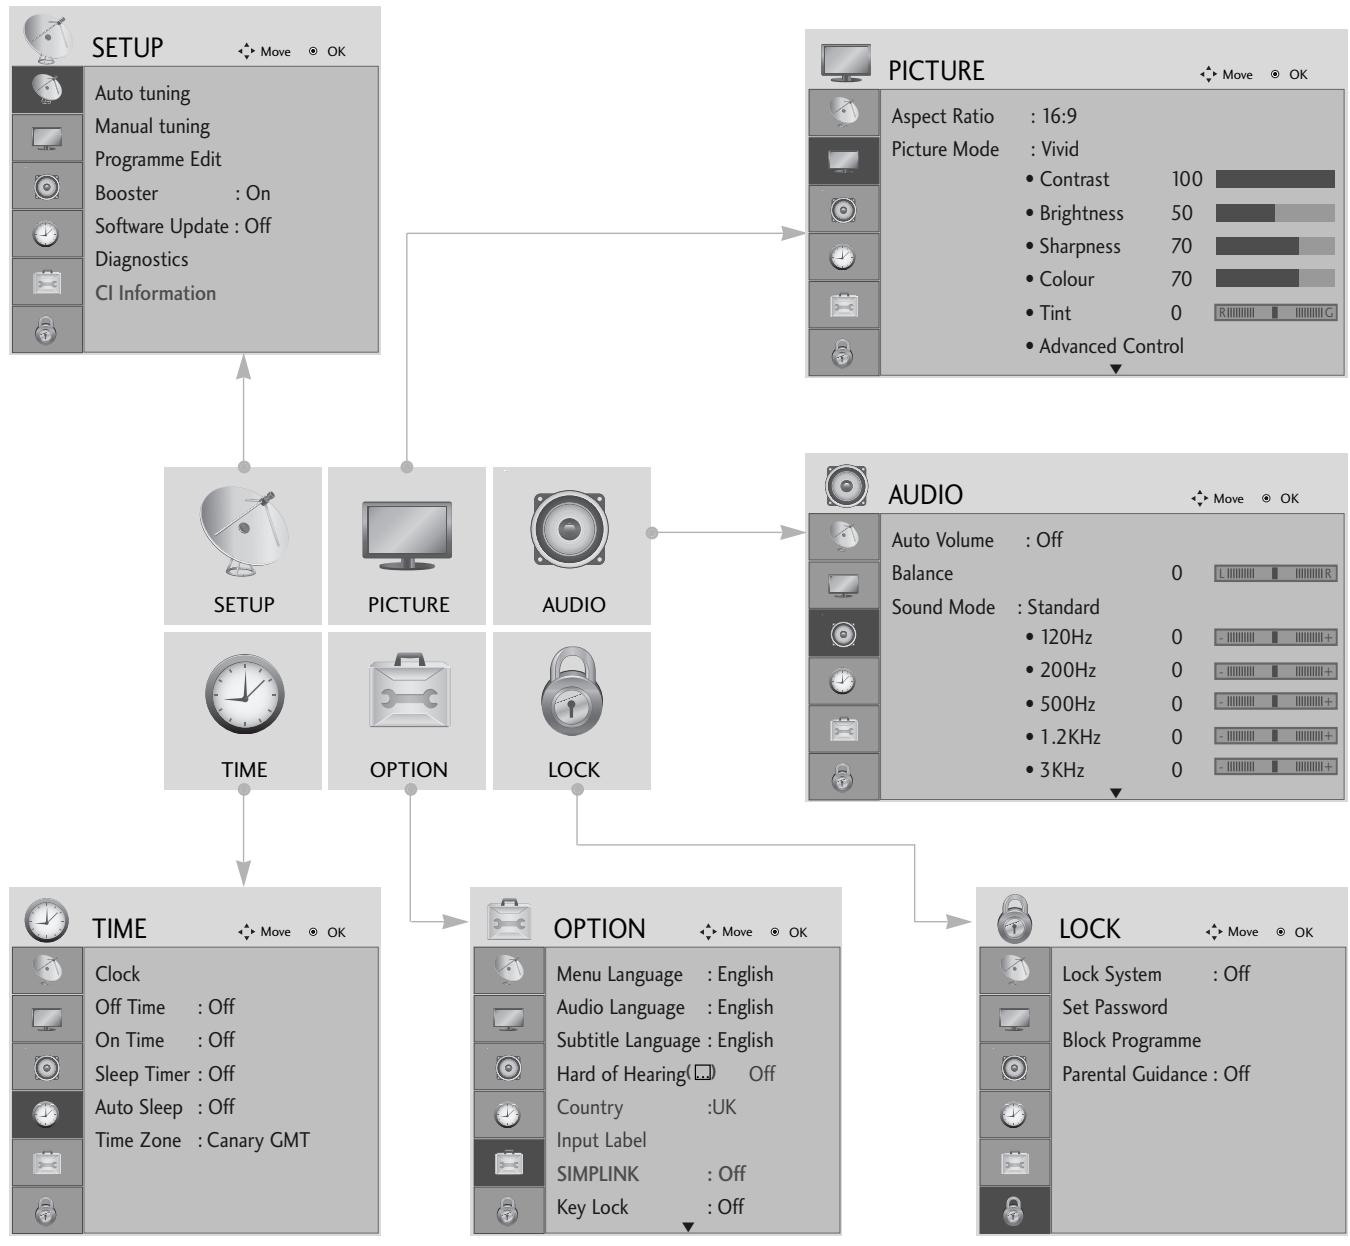

Display each menu.
Select a menu item.
Move to the pop up menu.
- Press the MENU or EXIT button to return to normal TV viewing.
- Press the BACK or RETURN button to move to the previous menu screen.
AUTO PROGRAMME TUNING
Use this to automatically find and store all available programmes.
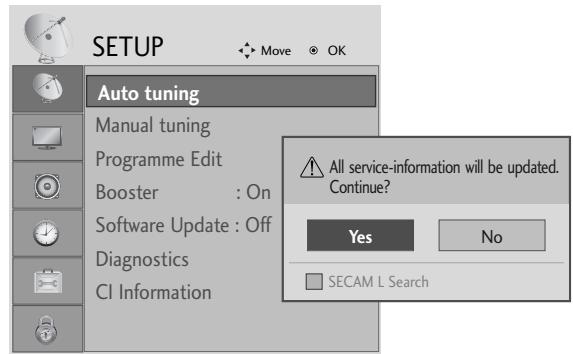
When you start auto programming in digital mode, all previously stored service information will be deleted.
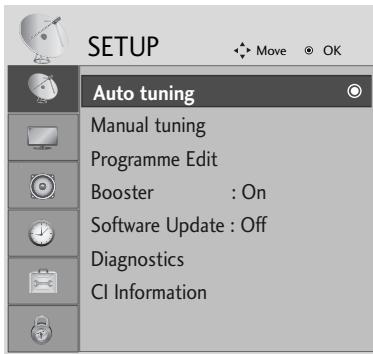


Select SETUP.


Select Auto Tuning.
- Use NUMBER buttons to input a 4-digit password in Lock System 'On'.
- If you wish to keep on auto tuning select YES using the < button. Then, press the OK button. Otherwise select NO.

Select Yes.
Run Auto tuning.
- Press the MENU or EXIT button to return to normal TV viewing.
- Press the BACK or RETURN button to move to the previous menu screen.
APPENDIX
MAINTENANCE
Early malfunctions can be prevented. Careful and regular cleaning can prolong the life of your new TV. Caution: Be sure to switch the power off and unplug the power cord before you begin any cleaning.
Cleaning the Screen
A good way to keep the dust off your screen for a while is to wet a soft cloth in a mixture of lukewarm water and a little fabric softener or dish washing detergent. Wring the cloth until it is almost dry, and then use it to wipe the screen.
2 Ensure there is no excess water on the screen. Allow any water or dampness to evaporate before switching on.
Cleaning the Cabinet
To remove dirt or dust, wipe the cabinet with a soft, dry, lint-free cloth.
Do not to use a wet cloth.
Extended Absence
CAUTION
If you expect to leave your TV dormant for prolonged periods (such as a holiday), unplug the power cord to protect against possible damage from lightning or power surges.
TO VIEW THE USER'S GUIDE ON THE CD-ROM
To view the User's guide on the CD-ROM, Adobe Acrobat Reader must be installed on your PC.
The "ACRORD" folder on the CD-ROM contains the installation program for Acrobat Reader.
If you want to install Acrobat Reader, Open "My Computer" Open the folder "LG" Open the folder "ACRORD"
double-click your language.
To view the User's guide
The User's guide files are included in the supplied CD-ROM.
Load the supplied CD-ROM into the CD-ROM drive of your PC.
After a while, the web page of the CD-ROM will open automatically.(Windows users only)
If the web page does not appear automatically, open the User's guide file directly.
Open "My computer" Open the folder "LG" Double click the "index.htm" file.
WEIGHT
| MODELS | 42PG10** | 50PG10** | 42PG30** | 50PG30** | |
| 42PG1000-ZA | 50PG1000-ZA | 42PG3000-ZA | 50PG3000-ZA | ||
| Weight | with stand | 26.6 kg / 58.7 lbs | 41.5 kg / 91.5 lbs | 28.0 kg / 61.8 lbs | 42.3 kg / 93.3 lbs |
| without stand | 24.6 kg / 54.3 lbs | 38.1 kg / 84.0 lbs | 25.0 kg / 55.1 lbs | 38.3 kg / 84.5 lbs | |
The specifications shown above may be changed without prior notice for quality improvement.
TROUBLESHOOTING
| The TV does not operate properly. | |
| The remote control does not work | ■Check to see if there is any object between the TV and the remote control causing an obstruction. Ensure you are pointing the remote control directly at the TV.■Ensure that the batteries are installed with correct polarity (+ to +, - to -).■Ensure that the correct remote operating mode is set: TV, STB etc.Install new batteries. |
| Power is suddenly turned off | ■Is the sleep timer set?■Check the power control settings. Has the Power supply been interrupted.Is Auto sleep activated on this station? |
| The video function does not work. | |
| No picture & No sound | ■ Check whether the TV is switched on. ■ Try another channel. The problem may be with the broadcast. ■ Is the power cord inserted correctly into the mains? ■ Check your antenna direction and/or location. ■ Test the mains outlet by plugging another product into the same outlet. |
| Picture appears slowly after switching on | ■ This is normal, the image is muted during the TV startup process. Please contact your service centre, if the picture has not appeared after five minutes. |
| No or poor color or poor picture | ■ Adjust Colour in menu option. ■ Allow a sufficient distance between the product and the VCR. ■ Try another channel. The problem may be with the broadcast. ■ Are the video cables installed properly? ■ Activate any function to restore the brightness of the picture. |
| Horizontal/vertical bars or picture shaking | ■ Check for local interference such as an electrical appliance or power tool. |
| Poor reception on some channels | ■ Station or cable channel experiencing problems, tune to another station. ■ Station signal is weak, reposition the antenna to receive weaker stations. ■ Check for sources of possible interference. |
| Lines or streaks in pictures | ■ Check antenna (Change the position of the antenna). |
| The audio function does not work. | |
| Picture OK & No sound | Press the VOLUME button. Sound muted? Press MUTE button. Try another channel. The problem may be with the broadcast. Are the audio cables installed properly? |
| No output from one of the speakers | Adjust Balance in menu option. |
| Unusual sound from inside the product | A change in ambient humidity or temperature may result in an unusual noise when the product is switched on or off and does not indicate a fault with the product. |
(UK only)
Keep this important information about how to re-tune your TV during the digital TV switchover
Keep this leaflet and your instruction manual safe - you'll need them

get set for digital
When does switchover happen?
*Copeland switches on October 17, 2007
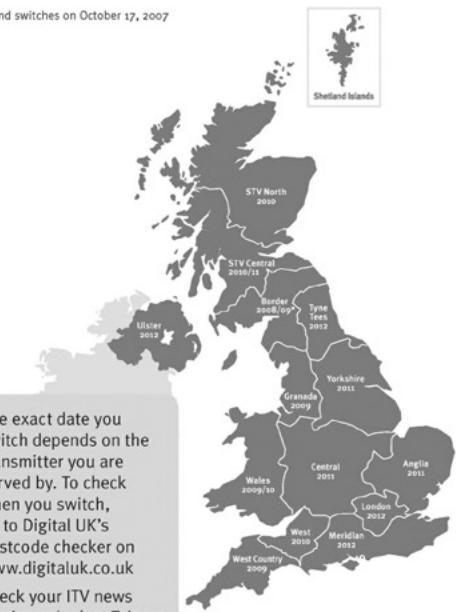
The exact date you switch depends on the transmitter you are served by. To check when you switch, go to Digital UK's postcode checker on www.digitaluk.co.uk Check your ITV news service or look at Teletage page 106 to see what TV region you're in.
Visit us at digitaluk.co.uk call us on 0845 6 50 50 50†
^ Calls charged at BT rate of 3p per minute daytime and sp per minute evenings and weekends. Rates may vary for calls from non-BT lines.
Television in the UK is going digital, bringing us all more choice and new services. Starting in late 2007 and ending in 2012, television services in the UK will go completely digital, TV region by TV region.
Please see overleaf to find out when your area switches to digital.
Digital UK is the independent, non-profit organisation leading the process of digital TV switchover in the UK. Digital UK provides impartial information on what people need to do to prepare for the move to digital, and when they need to do it.
How the switchover affects your TV equipment:
Your new TV has a digital tuner built in, which means it is ready to receive the Freeview signal by simply plugging it into your aerial socket (check if you can get digital TV through your aerial now, or whether you'll have to wait until switchover, at www.digitaluk.co.uk).
When the TV switchover happens in your area, there are at least two occasions when you will need to re-tune your TV in order to continue receiving your existing TV channels, and also to pick up new ones. Digital UK, the body leading the digital TV switchover, will advise you when you need to re-tune during the switchover.
If you choose to connect your TV to satellite or cable with a digital box then it will not be affected by switchover, and you won't need to re-tune.
How to re-tune:
To find out how to re-tune your TV, check your manufacturer's instructions for details. Or see below for a typical sequence:
-
With your TV in digital TV mode, press 'Menu' on your remote control. (Some TVs will ask you for a code. If you have not already changed it, the default code is usually 0000, or check your instruction book.)
-
From the Menu options on screen, select 'SETUP'. Select 'Auto Tuning' to re-tune your digital TV (not 'add channels'). You may have to wait a couple of minutes for the re-tune to complete.
*Also sometimes referred to as 'Update', 'Rescan', 'Replace', 'Auto-Tuning', 'Channel Search', 'First Time Install', or 'Store Channels'.
- If you do not re-tune your channels when advised to do so by Digital UK, you may lose some or all of your channels until you do re-tune. You should re-tune your TV every few months to check for any new channels.
If you are missing any channels, it may be that they are not available in your area, or that your aerial needs upgrading.
If you have any questions, please contact your equipment supplier or call Digital UK on 0845 6 50 50 50 or visit www.digitaluk.co.uk
TV PLASMA MANUAL DE INSTRUÇÉS
MODELOS DE TV PLASMA
42PG10**
50PG10**
42PG30**
50PG30**
Extended Owner's Manual that contains advanced features of these LG TV-sets is located on CD-ROM in electronic version.
To read it You need to open chosen files by using
Personal Computer (PC) equipped with CD-ROM drive.
Oδηγίες ασφάλειας
(Móvo yia to μovtéλo 42/50PG10) (Móvo yia to μovtéλo 42/50PG30)

CYFROWE WYJSCIE AUDIO (OPTYCZNE)
Modely plazmovych TV
42PG10**
50PG10**
42PG30**
50PG30**
Modely plazmovych TV : 42/50PG10**
PRIPRAVA
INFORMÁCIE O ZADNOM PANELI
Nakres sa moze mierne lišit' od vasho televízor.
3 OPTICAL DIGITAL AUDIO OUT (OPTICKY DIGITALNY VYSTUPNY AUDIOOKEKTOR)
Ako yceuate Mnpnc Ha NIMn HnHa HeUO npyTo nIyBATE CTPAHNI UWMOBE, I3BaTeTe 3axpaHbua KabeI ON KOtAKTa I Ce ObaTeBe BceOpN3a.
Ako npoIbIbnKInTe da nOJI3BATE npOlyktra, 6e3 da B3eMeTE CbOTBETHnTE MePKN, MOKe Da IocneBa TOKOB YdAp INJ NOpKaP.
BHIMMAHNE

HCTaIpaIte npOdykTa Ha paBHo n CTa6nHO MRCTO, KbDETo HMA ONaCHO T NaHaHe.
-AknoPOnyKbTb6bIeN3nPyChaT,MOKeJaCeHapaHInTe mIN DaTo CuyInTe.

He n3naarTe npOyKta Ha npKa cNbHueBa CBETnHa.
-TaMOKe DaTo NOBpei.
He noctabraIte npoaykta BvB BrpaedHa HnCTaJIauH, HanpImep 6n6nOTeka nn CekUHa.
- Heo6xOaMa e BHTnlaun.
ПредпаЗн Меркп NO OTHошенье на щелекtpo3axpaHbaHeto
!PPEyPExKDEHME
3axpaHbauT Ka6e Tp6Ba da 6bJe Cbbp3aH KbM 3a3eMeHa Bepira.
He pa3rIIO6BaIte, He peMOHTnpaIte n He npaBETe IPOIN3BOJHn N3MeHEHn NO PpOvKTA.
- Toba MoKe Da npEiN3BnKa ToKap Nm 3IOnOlyka OT KToKoB yIap.
CbPekTeCe cBc CepBn3a 3a npObePkA kAnOpBpaHne nI pEMOT.

3a Da HamaJIne ToaCHOCTTa OT NOxKap IIN TOKOB yUap, He N3IaraiTe TOBa yCTPoICTBO Ha IbJxN IIN BILA.
YctpoMCTBOTO He 6bMa da 6bIe I3naraHo Ha kanKn H npBcKn H NkakBn PbHn C TeHocTn PpeMeTn, Ba3n Hapmep, He 6bMa da 6bDat NoCTABAHn Bbpxy Hero.

BHIMAHNE
3a BCaKaBn peMOHTH DeHocTn Ce o6pbUaIte KbM KBaINΦuIpaH cepBuaH nepcoHaI. C cepB3HO 0cNyKBaHe e Heo6xOIMo, KOrato anaparbt e bIn NpOBpeH NO HKAkbB HaunH, HApimep NobpeH 3axpaBaUa Ka6en IIn UeCen, INTEKNe THeHOCN iIN NaDHaN InpeMeTN B anapara, anaparbt e bIn INLIOJKeH Na DbXd, INI Blara, He pa60Tu HopMaJIHo INI e bIN IN3pyCKaH.

N36BraIte aocTabaTe HEnoDBrJxHO N36bpaXeHne Ha ekpHa 3a dIbIbr nepIOO OT BpeM. OSeKHOBeHO TOBa e BInDEkAcTeTOPOHOTAOBHe HA Na3ya.AKOeNoJI3Ba bOPMAT HA KapTINHata 4:3, ToBa HEnoDBrJxHO N36bpaXeHne MoKe Da IpoDbJnxI da c OToEJIa3Ba Ha ekpHa.

ПОДГOTOBKA
OPRAHn 3A UYPABJIeHne HA JIuCEBnY IaHEJ
Ioka3aHOTOMOKeJacepa3nUaBAOTBaunTeJeBn3Op.
Ako Bbpxy Baunu ypei nMa NoctabeHo npedna3HO fOJIO,OTCTpaHete fOJNOTO u CneI TOBa n36bpwe Te ypea c Kbpna 3a NOUcTbaHe.
MOДЕЛТЕЛЕВИЗОПС ПЛАЗМЕн ДИСПЛЕŠ : 42/50PG30**

MOДЕЛТЕLEВ3OPNСПАЗМEHДИСПЛЕ:42/50PG10**
ПОДГOTOBKA
IHHuNaJIu3npaHe He HacTpoiKaTa
Ако след Вьлочане на телевизора на ekpaна ce пожке OSD (On Screen Display, ekpaно Meно), можete заhaltponite Language (Eзик), Select Mode (Избор на реким), Country (Страна), Time Zone (Часова зона), Auto programme (АвTomатчнаhaltpoяка на пограми).
BEJEXKKA
a. EKpaHHOTo MeHIO aBtOMaTHUHO Ⅲe I3ue3He OT eKpaHa cIeI OKOJI O40 ceKyHnI, aKO He 6bJe HATNCHaT 6yTOH.
6. Hatuchete oytoHa RETURN. 3a da CMeHnte TEKVLIOTo EKpaHHo MeHIO Ha IpeDNIHO ekpaHHO MeHIO.
c. 3a cTpaHnte 6e3 nOTBbPdEHN cTaNdApTN 3a DTV n3NbUbaHe, hKoN DTV fynKuIn MoKe n da He pa6OTr, KOEtO 3aBnCn OT HaunHa Ha DTV n3NbUbaHe.
d. Pekim Home (Y doma) e ontimaHata hactpoika 3a domaSHA o6taHOBka u TOBa e pekmbT no npda3bnpaHe 3a TeneBu3opa.
e. Pekim In Store (B Mara3nHa) e onTmAlHaTa HacToKa 3a n3no3BaHe B Mara3nH. Ako daennotpe6ntel npomeH daHHnte 3a KaueCTBOTo Ha o6pa3a, cnei n3BeCTeH nepNOd OT BpeMe peKIM In Store (B Mara3nHa) BpbUa KaueCTBOTo Ha o6pa3a Ha n3JeJIeTeO KbM HAcToKaTa, 3aJaDeHa ot Hac.
f. Pekimblr (Home (Ydoma), In Store (B mara3nha)) MOxte da bde npomehn ype3 Factory Reset (Bb3ctahOBBAhe Ha fa6pnHnte HactpoK) B MeHIO OPTION (OPLM).
E3nk Ha ekpaHHOTO MeHIO/ N36Op Ha nbpXkaBa
Korato TeLeBn3OpbT Ce BkHOnu 3a IIpbN IbT, Ha ekpaHa Ce NOBRA Ba MeHOTo Ha p'koBOJCTBOTO 3a IHCTaJIIPAhe.
I36epete JeklaHnO T BAc e3NK.
I36epe TaWata CTpaHa.
- Ako peшпто за поменITE ИЗБОРа на e3ик / Дьржава:
U36epere ONLNA.
I36epeTe E3nk Ha MeHIOTo IJI NCTpaHa.

I36epTe JeklaHnO T BaceNk nIe CTpaHa.
3aONMHeTe.
BEJIEXKKA
Ako nHCTaJaunTa Ha Installation guide (PbKOBOIDCTBOTO 3a nHCTaJnpaHe) He 6bJe 3aBbpSeHa ype3 HaTnCKaHe Ha 6byTOH EXIT nIIN CNeI d N3TNuAHe Ha BpeMeTo 3a N3uaKBAHe Ha ekpaHHN DaCJIeI, To Ie Ce NOBBA BCEKn nT, KOraTO BKJIIOUHTe ypeDa.
Ako cTe n36paJIHn IORpeUHO cTpaHaT, TeJeTEKCTbT MOKe Ja He Ce NOKa3Ba IpaBUNHO Ha ekpaHa n IO BpeMe Ha pa6Ota C TeJeTEKCT MOKe Da CE NOBRT HAKON pO6JIeMn.
HK TAta Cl (O6u, nHTeppeic) MoKe Da He e npJIOXkMa B 3aBnCmOcT OT yCJIOBnTa Ha N3JIbYBaHe B CTPaHaTa.
ByToHnTe 3a ynpabJeHne Ha peKm DTV MoKe Ja He pa6OT B 3aBncMoCT OT ycJIOBnTa Hn N3JIbUbaHe B CTpaHaT.
B ctpaHn, B KOnTo He ca npneTn pa3npope6n 3a LcΦpOBO n3JIbYBaHe, HraKoN DTV cyHKcIMMOKe Da He pa60rT B 3aBNCIMOCCT OT KOHKpeTHNe YcIobn Ha LcΦpOBO To n3JIbYBaHe.
TEXHINUÇECKO OBCNJYKBAHE
PaHHnTe NOBpeDi MoRat Da 6bDat PpeOToBpaTeHn. BHIMaTeJHOTo I peoBHO NOUcTBaHe MoKe da yIbJIxN BpeMeTO, Ppe3 KOeTO Ue NOJ3BaTe HOBn Cn TeJeBn3Op. PpOBepTe DaJI N CTe N3KJIIOuHInneEkeKtp03axpaHbAHeTo n CTe N3BaDnIN KaBena PpeDi Da 3aNoChte NoUcTBAHeTo.
YctpoiCTBOTO He pa6OTn HopmaJIHO.
XOpH3OHTaJIH INI BepTnKaJIHIN IBNlU, INI TpENTHe Ha KapTHata
IpoBepTe DaJIH Na6JIH3O IMa CMyUaBaUu yCTpOJcTBA - eJIeKTpOpyeI, 6OpMaUHH N IpyrN POnObHn IHCTpyMeHTN.
KaptnHaTa e do6pe, HO HAma 3ByK
HaTnchTe 6yToHa VOLUME.
Ja He u3KJIIOueH 3ByKbT? HaTnCHete 6yToH MUTE.
OnntaTe npyr kaHaJI. PpObJeMbT MoKe Ja e B n3JbYBaHTo.
IpaBnHNo IIn ca nocTaBeHN ayDnOka6eIte?
HacptoTe Balance (BaJiaHc) B MeHIOTo.
Пюмяна В OKолнота Влжноct Или Temпература може за довец до HeобиuaehшуМ, KORATO npodukta 6bde BKluoyeh Или n3Kluoyeh, HO TOBa He O3Haayaba NOBpeHa Na npodukta.
PLASMA-TV BRUKSANVISNING
PLASMA-TV, MODELLER
42PG10**
50PG10**
42PG30**
50PG30**
3 OPTICAL DIGITAL AUDIO OUT (OPTISK DIGITAL LYD UT)
SE PÅ TV / PROGRAMSTYRING
TASTEFUNKSJONER PÅ FJERNKONTROLLEN
Fjernkontrollen rettes mot fjernkontrollsensoren på TV-en.
er
Q.MENU
Velg onsket hurtigmenykilde.
2 MENU
SE PÅ TV / PROGRAMSTYRING
SLÅ PÅ TV-EN
SE PÅ TV / PROGRAMSTYRING
AUTOMATISK KANALSØKING OG LAGRING
Brukdentilafinneoglagreallekanalerautomatisch.
Kjør Aut. innstilling.
KAUKOSÄÄTIMEN NÄPPÄINTOIMINNOT
Shows programme schedule.
GUIDE (OPAS)
SE TV/PROGRAMSTYRING
FJERNBETJENINGSKNAPPERNES FUNKTION
SE TV/PROGRAMSTYRING
TÄENDE TV'ET
SE TV/PROGRAMSTYRING
AUTOMATISK PROGRAMINDSTALLING
Brugdenne indstillingtilatfindeog gemmealleprogrammerne.
Abn "My computer" → abn "LG" → abn filen "index.htm".
VAEGT (NETTO)
| MODELLER | 42PG10** | 50PG10** | 42PG30** | 50PG30** | |
| 42PG1000-ZA | 50PG1000-ZA | 42PG3000-ZA | 50PG3000-ZA | ||
| Vægt (netto) | med sukkel | 26.6 kg / 58.7 lbs | 41.5 kg / 91.5 lbs | 28.0 kg / 61.8 lbs | 42.3 kg / 93.3 lbs |
| uden sukkel | 24.6 kg / 54.3 lbs | 38.1 kg / 84.0 lbs | 25.0 kg / 55.1 lbs | 38.3 kg / 84.5 lbs | |
Ovenstaende specifikationer kan ændres utden forudgående varsel, for sá vidth angár kvalitetsforbedringer.
APPENDIKS
FEJLFINDING
Avage "My computer" -> avage "LG" -> avage"index.htm" fail.
KAAL
| MUDELID | 42PG10** | 50PG10** | 42PG30** | 50PG30** | |
| 42PG1000-ZA | 50PG1000-ZA | 42PG3000-ZA | 50PG3000-ZA | ||
| Kaal | koos alusega | 26.6 kg / 58.7 lbs | 41.5 kg / 91.5 lbs | 28.0 kg / 61.8 lbs | 42.3 kg / 93.3 lbs |
| ilma aluseta | 24.6 kg / 54.3 lbs | 38.1 kg / 84.0 lbs | 25.0 kg / 55.1 lbs | 38.3 kg / 84.5 lbs | |
SUMONTUOKITE ATIDžIAI, KAD GAMINYS NEAPVIRSTU.
- Pagination sheet
- PLASMA TV OWNER'S MANUAL
- CONNECTING YOUR UNIT
- SAFETY INSTRUCTIONS
- Precaution in Installing the Product
- WARNING
- CAUTION
- Electrical Power Related Precautions
- Precautions in Moving the Product
- Precautions in Using the Product
- PREPARATION
- FRONT PANEL CONTROLS
- PLASMA TV Models : 42/50PG30**
- PLASMA TV Models : 42/50PG10**
- BACK PANEL INFORMATION
- STAND INSTALLATION
- PLEASE SET IT UP CAREFULLY SO THE PRODUCT DOES NOT FALL OVER.
- NOTE
- BACK COVER FOR WIRE ARRANGEMENT
- Connect the cables as necessary.
- Install the CABLE MANAGEMENT CLIP as shown.
- How to remove the cable management clip
- EARTHING
- DESKTOP PEDESTAL INSTALLATION
- WALL MOUNT: HORIZONTAL INSTALLATION
- Not using the desk-type stand
- ANTENNA CONNECTION
- WATCHING TV /PROGRAMME CONTROL
- REMOTE CONTROL KEY FUNCTIONS
- Installing Batteries
- TURNOING ON THE TV
- Initializing setup
- Note:
- ON-SCREEN MENU LANGUAGE / COUNTRY SELECTION
- ON SCREEN MENUS SELECTION AND ADJUSTMENT
- AUTO PROGRAMME TUNING
- APPENDIX
- MAINTENANCE
- Cleaning the Screen
- Cleaning the Cabinet
- Extended Absence
- TO VIEW THE USER'S GUIDE ON THE CD-ROM
- WEIGHT
- TROUBLESHOOTING
- (UK only)
- Keep this important information about how to re-tune your TV during the digital TV switchover
- When does switchover happen?
- Visit us at digitaluk.co.uk call us on 0845 6 50 50 50†
- How the switchover affects your TV equipment:
- How to re-tune:
- TV PLASMA MANUAL DE INSTRUÇÉS
- Oδηγίες ασφάλειας
- PRIPRAVA
- INFORMÁCIE O ZADNOM PANELI
- BHIMMAHNE
- ПредпаЗн Меркп NO OTHошенье на щелекtpo3axpaHbaHeto
- !PPEyPExKDEHME
- BHIMAHNE
- ПОДГOTOBKA
- OPRAHn 3A UYPABJIeHne HA JIuCEBnY IaHEJ
- MOДЕЛТЕЛЕВИЗОПС ПЛАЗМЕн ДИСПЛЕŠ : 42/50PG30**
- MOДЕЛТЕLEВ3OPNСПАЗМEHДИСПЛЕ:42/50PG10**
- IHHuNaJIu3npaHe He HacTpoiKaTa
- BEJEXKKA
- E3nk Ha ekpaHHOTO MeHIO/ N36Op Ha nbpXkaBa
- BEJIEXKKA
- TEXHINUÇECKO OBCNJYKBAHE
- YctpoiCTBOTO He pa6OTn HopmaJIHO.
- PLASMA-TV BRUKSANVISNING
- SE PÅ TV / PROGRAMSTYRING
- TASTEFUNKSJONER PÅ FJERNKONTROLLEN
- SLÅ PÅ TV-EN
- AUTOMATISK KANALSØKING OG LAGRING
- KAUKOSÄÄTIMEN NÄPPÄINTOIMINNOT
- SE TV/PROGRAMSTYRING
- FJERNBETJENINGSKNAPPERNES FUNKTION
- TÄENDE TV'ET
- AUTOMATISK PROGRAMINDSTALLING
- VAEGT (NETTO)
- APPENDIKS
- FEJLFINDING
- KAAL
- SUMONTUOKITE ATIDžIAI, KAD GAMINYS NEAPVIRSTU.
Brand : LG
Model : 42PG1000
Category : Television