
Pixma TR4540 - Printer CANON - Free user manual and instructions
Find the device manual for free Pixma TR4540 CANON in PDF.

| Product type | Inkjet multifunction printer |
| Brand | Canon |
| Model | Pixma TR4540 |
| Functions | Print, copy, scan, fax |
| Print technology | Inkjet (FINE cartridges) |
| Included cartridges | Color and black FINE cartridges |
| Connectivity | Wi-Fi, USB 2.0 |
| Mobile app | Canon PRINT Inkjet/SELPHY |
| Input tray | Cassette (standard capacity) |
| Output tray | Yes, with extension |
| Display | Monochrome LCD |
| Menu languages | Multilingual (including French) |
| Power supply | Mains (power cord included) |
| Dimensions (approx.) | 445 x 330 x 135 mm (W x D x H) |
| Weight (approx.) | 5.4 kg |
| Maintenance | Print head alignment and cleaning |
| Safety | Keep at least 5 cm distance from wall |
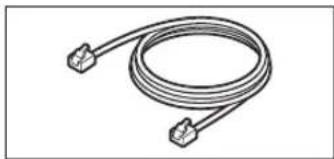
| Box contents | Printer, FINE cartridges (black and color), power cord, installation CD-ROM, phone cable, quick start guide |
| Repairability | Spare parts available via Canon, replaceable cartridges |
Frequently Asked Questions - Pixma TR4540 CANON
User questions about Pixma TR4540 CANON
0 question about this device. Answer the ones you know or ask your own.
Ask a new question about this device
Download the instructions for your Printer in PDF format for free! Find your manual Pixma TR4540 - CANON and take your electronic device back in hand. On this page are published all the documents necessary for the use of your device. Pixma TR4540 by CANON.
USER MANUAL Pixma TR4540 CANON
Read Safety and Important Information (addendum) first.
natural_image
Icon showing a printer with a paper airplane and a document, symbolizing file transfer or receipt (no text present)Installing the Printer......page 1
natural_image
Two white devices on a solid red background: a laptop and a smartphone (no text or symbols)Connecting with Computer and Smartphone/Tablet ...... page 4
natural_image
Illustration of two hands holding a rectangular device with a red prohibition symbol (no text or labels)
Instructional Videos
Instructions vidéo
Anleitungsvideos
Instructievideo's
Video informativi
Setting up the printer

Web Setup
http://ij.start.canon

1. Box Contents
natural_image
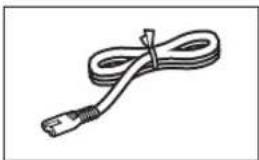
Line drawing of a USB cable with connectors (no text or symbols)Power cord

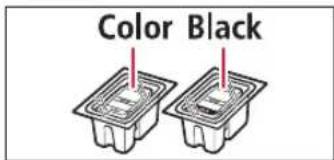
• FINE cartridges

natural_image
Simple line drawing of a CD or DVD disc with no text or symbols- Setup CD-ROM

natural_image
Coiled electrical connector with two terminal connectors (no text or symbols)- Modular cable
• Safety and Important Information
• Getting Started (this manual)
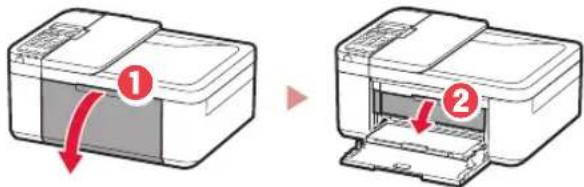
2. Removing Packing Materials

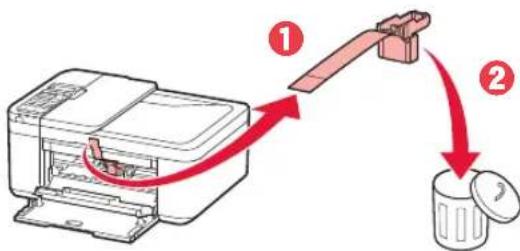
1 Remove and dispose of the packing materials from the device.
- Be sure to remove any orange tape.
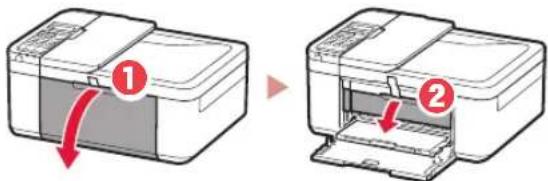
2 Open the front cover and paper output cover.
3 Remove and dispose of the protective materials.
- Pull the orange tape to remove the protective material.
4 Close the paper output cover and front cover.
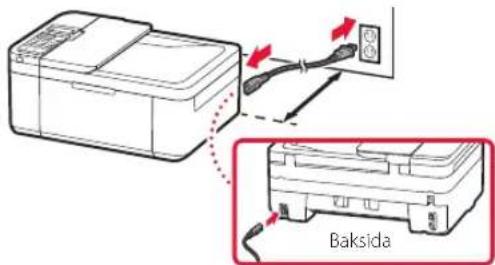
3. Turning on the Printer

1 Connect the power cord.
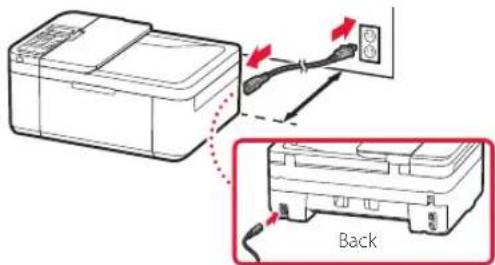

Important
- Place the printer so it is at least 5 cm away from the wall. - At this time, do not connect any other cables.
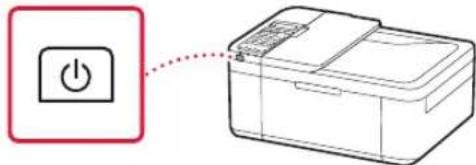
2 Press the ON button.

Important
If the following screen appears, press the ON button to turn off the power, and redo the procedure from step 2 in "2. Removing Packing Materials".
Open the cover and 1890 Discard the material
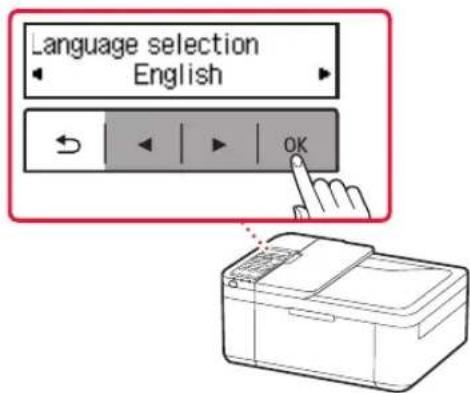
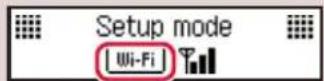
3 When the following screen appears, use the ◀ and ▶ buttons to select a language, and then press the OK button.
Setting up the printer
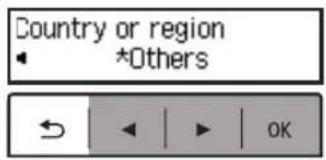
4 If the following screen appears, select your country or region, and then press the OK button.
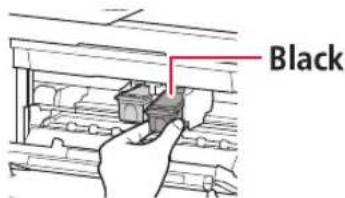
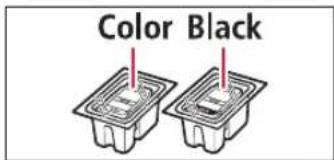
4. Installing the FINE Cartridges
1 Open the front cover and paper output cover.
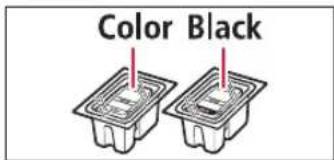
2 Remove the color FINE cartridge from the container and remove the protective tape.
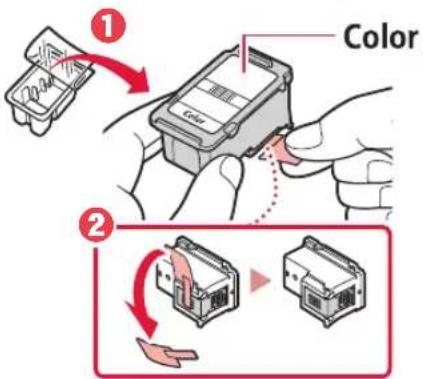
Important
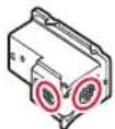
- Do not touch the ink on the protective tape. It could stain your hands or surrounding objects.
- Do not touch the areas shown in the figure. Otherwise, the printer may not print correctly.
3 Install the color FINE cartridge.
- The color FINE cartridge goes on the left. - Tilt the FINE cartridge upward at an angle and insert it into the FINE cartridge holder.
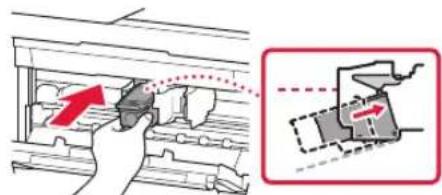
- Insert it all the way and press it upward until it clicks.
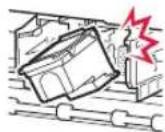
Important
Do not bump the FINE cartridge. Doing so may cause a malfunction.
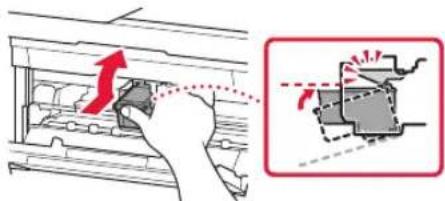
4 Confirm that the FINE cartridge is straight and level.
natural_image
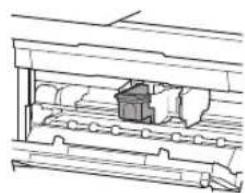
Technical line drawing of a mechanical assembly or housing with no visible text or symbols5 Repeat steps 2 to 4 to install the black FINE cartridge.
• The black FINE cartridge goes on the right.
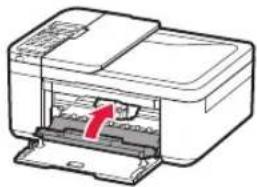
6 Close the paper output cover.
natural_image
Diagram of a printer with a red arrow indicating the paper's front cover (no text or symbols present)Important
If the following screen appears, return to step 3 in "4. Installing the FINE Cartridges" and confirm that the color and black FINE cartridges are positioned correctly.
Install the cartridges pro 168A
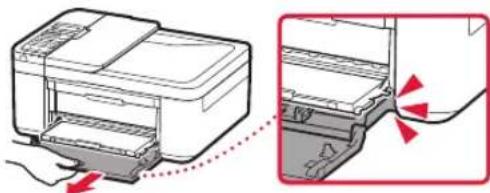
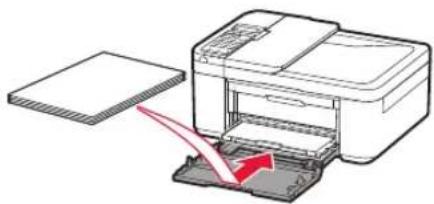
5. Loading Paper

1 Pull out the cassette until it stops.
natural_image
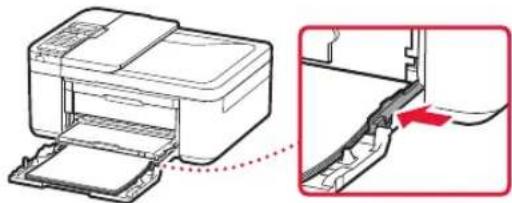
Diagram showing a printer with internal structure and a close-up view of its internal components (no text or symbols)2 Slide apart the paper guides.
- Grip the right paper guide and move it to the right edge.
natural_image
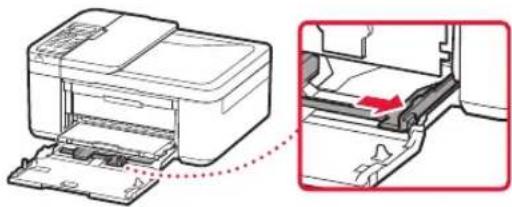
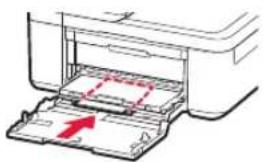
Diagram showing a printer being inserted into a paper holder, with an inset highlighting the printer's internal structure (no text or symbols present)3 Load paper.
- Load plain LTR or A4 size paper with the print side facing down.
natural_image
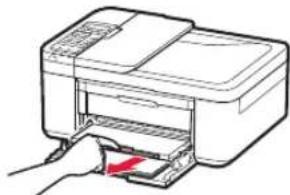
Illustration of a printer being inserted into a stack, with a red arrow indicating the process (no text or symbols present)- Push the paper all the way into the cassette, and then slide the right paper guide against the edge of the paper stack.
natural_image
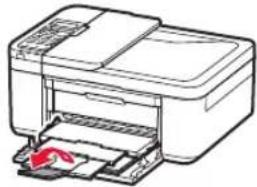
Diagram showing a printer being inserted into a cable, with a close-up view of the cable being inserted (no text or symbols present)4 Push in the cassette.
- The arrow (▶) on the front cover should align with the front edge of the printer.

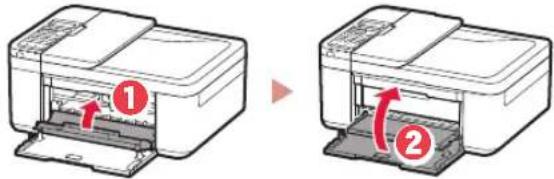
5 Pull out the paper output support of the paper output tray.
natural_image
Illustration of a hand inserting a card into a printer (no text or symbols visible)6 Open the output tray extension.
natural_image
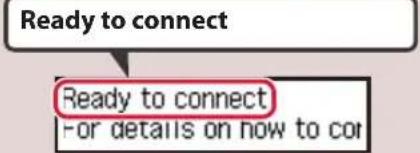
Illustration of a printer with a paper feed into the print (no text or symbols visible)7 Check that the following screen appears, and then press the OK button.
Prepare for connection [OK]Next

Ready to connect For details on how to cor
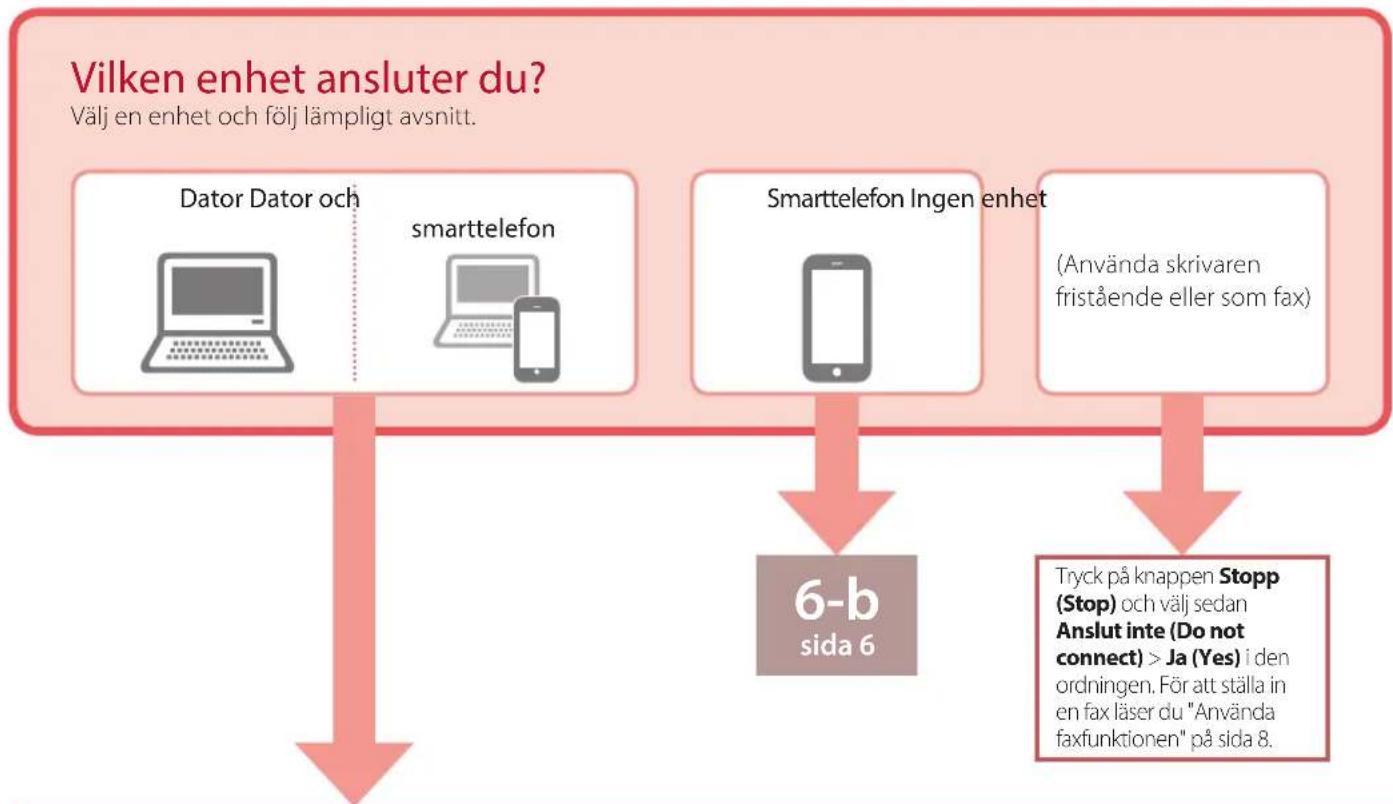
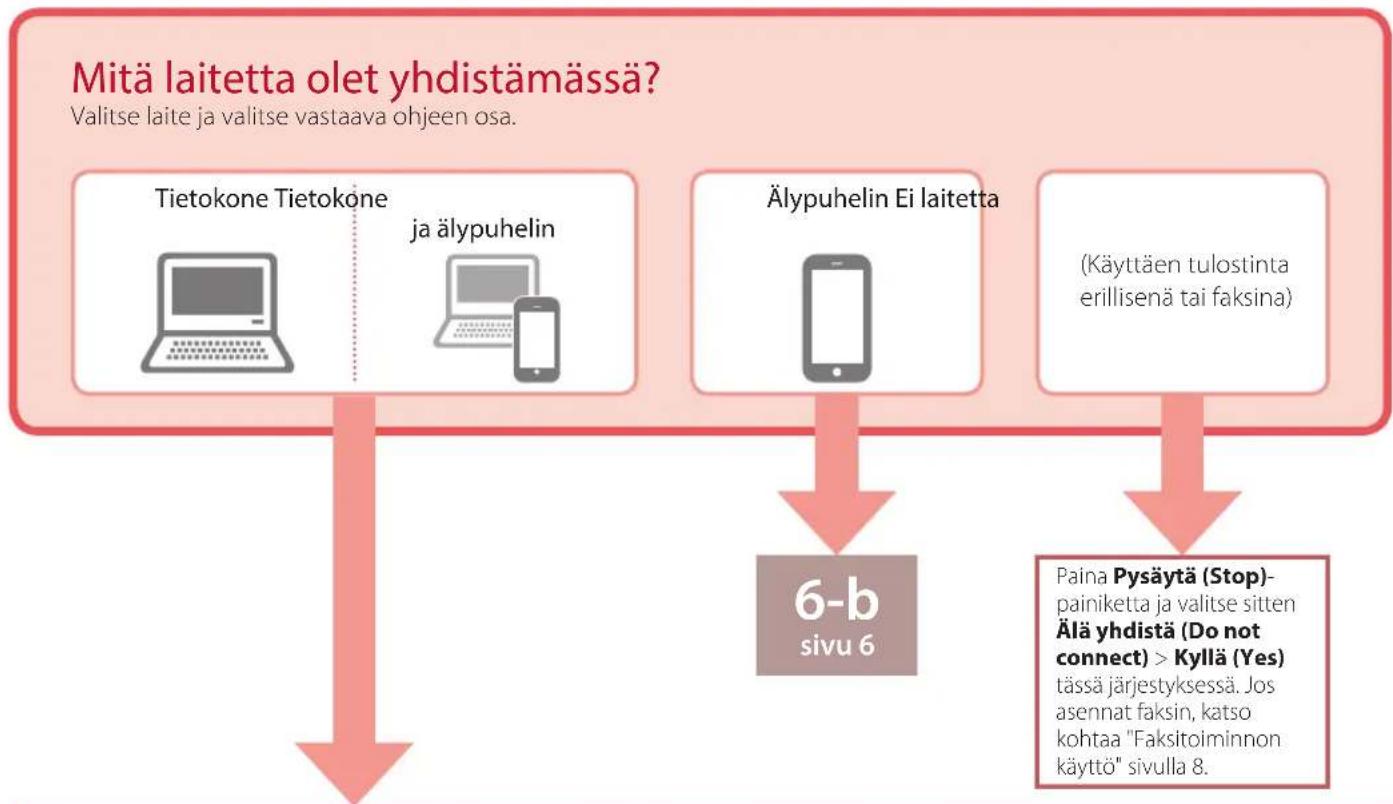
What device are you connecting?
Select a device and follow the relevant section.
Computer Computer and

smartphone

Smartphone No device

(Using your printer standalone or as a fax)
6-b
page 6
Press the Stop button, and then select Do not
connect > Yes, in this order. To set up a fax see "Using Fax Function" on page 8.
6-a
Connecting to a Computer
If you are using multiple computers, perform these steps on each computer. There are two methods, "Online Setup" and "Bing the Setup CD-ROM (Windows Only) Provided".


Online Setup
1 Access the Canon website from a computer.
http://ij.start.canon

2 Select Set Up.
3 Enter your printer's model name and click Go.
4 Click Start.
5 Click If you have already prepared your printer, go to Connect.
Note
When you are using a computer with Windows (except for Windows 10 S) or macOS, proceed to the next step. When you are using a computer with another OS, continue the setup by following the on-screen instructions.
6 Click Download.
- The setup file is downloaded to your computer.
7 Run the downloaded file.
8 Proceed to step 9 on page 5.

Using the Setup CD-ROM (Windows Only) Provided
1 Insert the Setup CD-ROM into your computer.

2 Follow the instructions for your version of Windows.
Windows 10/Windows 8.1
1 Click on the following message when it appears on the right-hand side of your computer screen.

Note
If the message does not appear (or is no longer visible), click the File Explorer icon in the taskbar. On the left-hand side of the window, click This PC. Double click the CD icon that is displayed on the right-hand side (when the content of the CD is displayed, and then double click Msetup4.exe). Proceed to 3.
② Click Run Msetup4.exe.
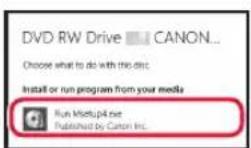
3 If the User Account Control dialog box appears, click Yes.
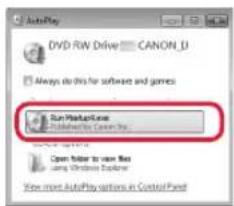
Windows 7
1 Click Run Msetup4.exe.
- When the AutoPlay screen appears, click Run Msetup4.exe.
Note
If the AutoPlay screen does not appear, in the Start menu, click Computer. On the right-hand side of the window, double click the CD icon (when the content of the CD is displayed, double click Msetup4.exe).
2 If the User Account Control dialog box appears, click Continue.
3 Proceed to step 9 below.
9 Click Start Setup.
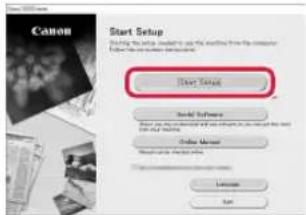
10 Follow the on-screen instructions.
• These operations may take some time.
11 When the following screen appears, click Exit.
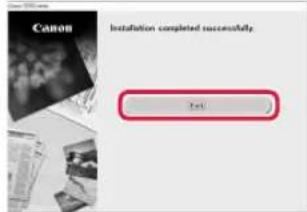
- Your printer is now connected to your computer. To connect a smartphone as well, see "6-b. Connecting to a Smartphone" on page 6. - To set up a fax, see "Using Fax Function" on page 8.
6-b
Connecting to a Smartphone
If you are using multiple smartphones, perform these steps on each smartphone.

Prepare the following before starting.
1 Enable the Wi-Fi setting on your smartphone*.
2 Connect your smartphone to the wireless router* (if you have a wireless router).
* See your smartphone and wireless router manuals regarding these procedures for more details.
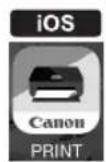
1 Install the "Canon PRINT Inkjet/SELPHY" app on your smartphone.

ios
Search for "Canon PRINT" in the App Store.
Android
Search for "Canon PRINT" in Google Play.

Note
You can also access the Canon website by scanning the QR code shown on the right to download the app.

2 Check the printer's screen as you proceed through the steps.
If the following screen appears
Press the Setup button and check the screen that appears.
• If appears,

- If does not appear,

If the following screen appears


Note
- The printer's screen turns off when the printer is idle for 10 minutes. Press a button (except the ON button) on the operation panel to turn on the screen.
- If Xappears, the printer cannot communicate by Wi-Fi connection. For details, see "Frequently Asked Questions" at "http://ij.start.canon".

3 Open the installed app.
4 Follow the on-screen instructions to add your printer.
5 Check that the following screen appears.

- Your printer is now connected to your smartphone. To print photos, see "Loading Photo Paper" on page 8.
- To set up a fax, see "Using Fax Function" on page 8.

Procedures vary for iOS and Android. Follow the instructions for your operating system.
iOS
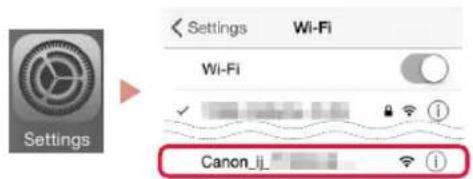
3 Tap Settings on your smartphone's home screen, and tap Canon_ij_XXXX in the Wi-Fi settings.
Note
If Canon_ij_XXXX does not appear, follow the procedure in E, and then search for Canon_ij_XXXX again.
4 Open the installed app.
• The printer is registered with the most appropriate connection method for the environment you are using.
5 Check that the following screen appears.

- Your printer is now connected to your smartphone. To print photos, see "Loading Photo Paper" on page 8.
• To set up a fax, see "Using Fax Function" on page 8.

3 Press and hold the Menu/Wireless connect button for about 3 seconds.

Android
3 Open the installed app.
- The printer is registered with the most appropriate connection method for the environment you are using.

Note
If a message saying "No printer has been added. Perform printer setup?" does not readily appear after starting the application, follow the procedure in E and then return to smartphone operations.
4 Check that the following screen appears.

4 When "Follow the instructions on the PC or smartphone, etc." appears on the printer's screen, proceed to
Loading Photo Paper
1 Pull out the cassette until it stops.
2 Slide apart the paper guides.
- Grip the right paper guide and move it to the right edge.
3 Load photo paper.
- Load photo paper in portrait orientation with the print side facing down, and place it in the center of the cassette.
- Push the paper all the way into the cassette, and then slide the right paper guide against the edge of the paper stack.
natural_image
Diagram of a printer's internal structure showing paper feeding into a tray with a red arrow indicating the page direction (no text or symbols present)
4 Push in the cassette.
- The arrow (▶) on the front cover should align with the front edge of the printer.
5 Pull out the paper output support of the paper output tray.
6 Open the output tray extension.
7 When the following screen appears, press the OK button.
Register the cassette pa [OK]Next
8 Select the paper size and type, and press the OK button.
Size: *L Type: *Glossy
Using Fax Function
The fax function of your printer requires setup. Refer to either of the following manuals.
Online Manual
① Access the Canon website.

http://ij.start.canon
②Click.
③ Enter your printer's model name and click Go.
④Click FAX Setup Guide
■ On-screen Manual (installed on your computer)
The following is an example using Windows 10.
① Click the Start button.
② Click All apps > Canon TR4500 series On-screen Manual in this order, and then open the User's Manual.
③ClickFAX Setup Guide.
If Print Results Are Unsatisfactory
Perform Print Head Alignment if straight lines are crooked or colors are inconsistent, or print results are otherwise not what you expected.
For details, click the Maintenance on the Online Manual and refer to If Printing Is Faint or Uneven > Aligning the Print Head.
Refer to the back cover for how to open the Online Manual.
■ Lines Are Misaligned
■ Uneven or Streaked Colors
Configuration de l'imprimante
Configuration Web
http://ij.start.canon

natural_image
Line drawing of a USB cable with a connector (no text or symbols)natural_image
Simple line drawing of a CD or DVD disc with no text or symbolsnatural_image
Coiled electrical connector with two terminal connectors (no text or symbols)Important
Configuration de l'imprimante
Important
Important
natural_image
Technical line drawing of a mechanical assembly or lifting mechanism (no text or symbols)natural_image
Illustration of a printer with a red arrow indicating the paper's front cover (no text or symbols present)Important
natural_image
Diagram showing a printer with internal structure and a close-up view of its internal components (no text or symbols)natural_image
Diagram showing a printer being inserted into a device, with an inset highlighting the internal structure (no text or symbols present)natural_image
Illustration of a printer being inserted into a stack, with a red arrow indicating the process (no text or symbols present)natural_image
Diagram showing a printer being inserted into a cable, with an inset close-up highlighting the cable's edge detail (no text or symbols present)natural_image
Diagram showing a printer being inserted into a device, with an inset close-up highlighting the component (no text or symbols present)natural_image
Illustration of a hand inserting a printer into a paper airplane (no text or symbols visible)natural_image
Line drawing of a printer with paper feed and paper clip (no text or symbols)Android
natural_image
Diagram of a printer's internal structure showing paper feeding into a tray with a red arrow indicating direction (no text or symbols present)
natural_image
Simple line drawing of a USB cable with a connector (no text or symbols)Netzkabel

• FINE-Patronen

natural_image
Simple line drawing of a CD or DVD disc with no text or symbols• Installations-CD-ROM

natural_image
Coiled electrical connector with two terminal connectors (no text or symbols)Wichtig
Open the cover and 1890 Discard the material
Wichtig
Wichtig
natural_image
Technical line drawing of a mechanical assembly or housing with no visible text or symbolsnatural_image
Diagram of a printer with a red arrow indicating a component, showing no text or symbols.Wichtig
natural_image
Diagram showing a printer being inserted into a device, with arrows indicating the process (no text or symbols present)natural_image
Diagram showing a printer being inserted into a paper holder, with a magnified inset highlighting the printer's internal structure (no text or symbols present)natural_image
Diagram of a printer with a paper sheet being inserted, showing the printer's internal structure and a red arrow indicating the process (no text or symbols present)natural_image
Diagram showing a printer being inserted into a cable, with a close-up view of the cable being inserted (no text or symbols present)natural_image
Illustration of a hand inserting a card into a printer (no text or symbols visible)natural_image
Illustration of a printer with paper feed and paper clip (no text or symbols)flowchart
graph TD
    A["Prepare for connection [OK"]Next] --> B["OK"]
    B --> C["Ready to connect For details on how to cor"]

Hinweis

Hinweis
Android
natural_image
Diagram of a printer's internal structure showing paper feeding into a tray with a red arrow indicating the page direction (no text or symbols present)
Register the cassette pa [OK]Next
natural_image
Simple line drawing of a USB cable with a connector (no text or symbols)- Netsnoer

• FINE-cartridges

natural_image
Simple line drawing of a CD or DVD disc with no text or symbolsnatural_image
Coiled electrical connector with two terminal connectors (no text or symbols)3. De printer inschakelen

Belangrijk
Open the cover and 1890 Discard the material
De printer instellen
Belangrijk
Belangrijk
natural_image
Technical line drawing of a mechanical assembly or housing with no visible text or symbolsnatural_image
Illustration of a printer with a red arrow indicating the paper's front cover (no text or symbols present)Belangrijk
natural_image
Diagram showing a printer being inserted into a device, with arrows indicating the process (no text or symbols present)natural_image
Diagram showing a printer being inserted into a paper holder, with an inset highlighting the printer's internal structure (no text or symbols present)3 Plaats papier.
natural_image
Diagram of a printer with a paper sheet being inserted, showing the printer's base and paper plane (no text or symbols present)natural_image
Diagram showing a printer being inserted into a cable, with a close-up view of the cable being inserted (no text or symbols present)4 Duw de cassette erin.
natural_image
Illustration of a hand inserting a card into a printer (no text or symbols visible)natural_image
Illustration of a printer with paper feed and paper clip (no text or symbols)Prepare for connection [OK]Next

Ready to connect For details on how to cor
Opmerking
Opmerking
Zoek "Canon PRINT" in Google Play.

Opmerking
Android
natural_image
Diagram of a printer's internal structure showing paper feeding into a tray with a red arrow indicating direction (no text or symbols present)
Register the cassette pa [OK]Next
natural_image
Line drawing of a USB cable with a connector (no text or symbols)natural_image
Simple line drawing of a CD or DVD disc with no text or symbolsnatural_image
Coiled electrical connector with two terminal connectors (no text or symbols)• Cavo modulare

Importante
Open the cover and 1890 Discard the material
Importante
Importante
natural_image
Technical line drawing of a mechanical assembly or housing with no visible text or symbolsnatural_image
Diagram of a printer with a red arrow indicating the paper's front cover (no text or symbols present)Importante
natural_image
Diagram showing a printer being inserted into a device, with arrows indicating the process (no text or symbols present)natural_image
Diagram showing a printer being inserted into a device, with an inset close-up highlighting the process (no text or symbols present)3 Caricare la carta.
natural_image
Illustration of a printer being inserted into a stack, with a red arrow indicating the process (no text or symbols present)natural_image
Diagram showing a printer being inserted into a cable, with a close-up view of the cable being inserted (no text or symbols present)natural_image
Illustration of a hand inserting a card into a printer (no text or symbols visible)natural_image
Illustration of a printer with paper feed and paper clip (no text or symbols)Prepare for connection [OK]Next

Ready to connect For details on how to cor
connect) > Si (Yes),
Nota
Nota

Nota

natural_image
Diagram of a printer's internal structure showing paper feeding into a tray with a red arrow indicating direction (no text or symbols present)
Register the cassette pa [OK]Next
natural_image
Line drawing of a USB cable with a connector (no text or symbols)- Cabo de alimentação
- Cartuchos FINE

natural_image
Simple line drawing of a CD or DVD disc with no text or symbolsnatural_image
Coiled electrical connector with two terminal connectors (no text or symbols)3. Ligando a Impressora

Importante
Open the cover and 1890 Discard the material
Configurando a impressora
Importante
Importante
natural_image
Technical line drawing of a mechanical assembly or lifting mechanism (no text or symbols)natural_image
Diagram of a printer with a red arrow indicating the paper's front cover (no text or symbols present)Importante
natural_image
Diagram showing a printer being inserted into a device, with arrows indicating the process (no text or symbols present)2 Deslize as guias do papel.
natural_image
Diagram showing a printer being inserted into a paper holder, with an inset highlighting the printer's internal structure (no text or symbols present)3 Coloque o papel.
natural_image
Diagram of a printer being inserted into a stack, showing paper and printer components (no text or symbols)natural_image
Diagram showing a printer being inserted into a cable, with a close-up view of the cable being inserted (no text or symbols present)4 Insira o cassete.
natural_image
Illustration of a hand inserting a card into a printer (no text or symbols visible)natural_image
Illustration of a printer with paper feed and paper clip (no text or symbols)Prepare for connection [OK]Next

Ready to connect For details on how to cor
Nota
① Clique em Executar Msetup4.exe (Run Msetup4.exe).
Nota

Nota
E
natural_image
Diagram of a printer's internal structure showing paper feeding into a tray with a red arrow indicating direction (no text or symbols present)
Register the cassette pa [OK]Next
natural_image
Simple line drawing of a USB cable tied with a strap (no text or symbols)natural_image
Simple line drawing of a CD or DVD disc with no text or symbolsnatural_image
Coiled electrical connector with two terminal connectors (no text or symbols)3. Encender la impresora

Importante
Open the cover and 1890 Discard the material
Importante
Importante
natural_image
Technical line drawing of a mechanical assembly or lifting mechanism (no text or symbols)natural_image
Diagram of a printer with a red arrow indicating the paper's front cover (no text or symbols present)Importante
natural_image
Diagram showing a printer with internal structure and a close-up view of its internal components (no text or symbols)natural_image
Diagram showing a printer being inserted into a paper holder, with an inset highlighting the printer's internal structure (no text or symbols present)3 Cargue el papel.
natural_image
Illustration of a printer being inserted into a stack, with a red arrow indicating the process (no text or symbols present)natural_image
Diagram showing a printer being inserted into a cable, with a close-up view of the cable being inserted (no text or symbols present)natural_image
Illustration of a hand inserting a card into a printer (no text or symbols visible)natural_image
Illustration of a printer with a paper feed into the print (no text or symbols visible)Prepare for connection [OK]Next

Ready to connect For details on how to cor

Nota

Nota
Android
natural_image
Diagram of a printer's internal structure showing paper feeding into a tray with a red arrow indicating the page direction (no text or symbols present)
Register the cassette pa [OK]Next
natural_image
Simple line drawing of a USB cable with a connector (no text or symbols)- Καλώδιο τροφοδοσίας

• Φυσίγγια FINE

natural_image
Simple line drawing of a CD or DVD disc with no text or symbolsnatural_image
Coiled electrical connector with two terminal connectors (no text or symbols)Σημαντικό
Open the cover and 1890 Discard the material
Σημαντικό
Σημαντικό
natural_image
Technical line drawing of a mechanical assembly or housing with layered components (no text or symbols)natural_image
Diagram of a printer with a red arrow indicating the paper's front cover (no text or symbols present)Σημαντικό
natural_image
Diagram showing a printer with internal structure and a close-up view of its internal components (no text or symbols)natural_image
Diagram showing a printer being inserted into a paper holder, with a magnified inset highlighting the printer's internal structure (no text or symbols present)natural_image
Diagram of a printer with a paper strip inserted into the base, showing a red arrow indicating compression or disassembly (no text or symbols present)natural_image
Diagram showing a printer being inserted into a device, with an inset highlighting the insertion area (no text or symbols present)natural_image
Illustration of a hand inserting a red arrow into a printer (no text or symbols)natural_image
Illustration of a printer with a paper feed and paper clip (no text or symbols)flowchart
graph TD
    A["Prepare for connection [OK"]Next] --> B["OK"]
    B --> C["Ready to connect For details on how to con"]
Σημείωση
Σημείωση
Android
natural_image
Diagram of a printer's internal structure showing paper feeding into a plastic tray (no text or symbols)
Register the cassette pa [OK]Next
natural_image
Line drawing of a USB cable with a connector (no text or symbols)Strömkabel
• FINE-kassetter

natural_image
Simple line drawing of a CD or DVD disc with no text or symbols• Installations-CD

natural_image
Coiled electrical connector with two terminal connectors (no text or symbols)- Modularkabel
3. Slå på skrivaren

1 Anslut strömkabeln.
Viktigt!
Viktigt!
Open the cover and 1890 Discard the material
Ställa in skrivaren

Viktigt!

Viktigt!
natural_image
Technical line drawing of a mechanical assembly or housing with no visible text or symbolsnatural_image
Diagram of a printer with a red arrow indicating the paper's front cover (no text or symbols present)
Viktigt!
natural_image
Diagram showing a printer with internal structure and a close-up view of its internal components (no text or symbols)natural_image
Diagram showing a printer being inserted into a paper holder, with an inset highlighting the printer's internal structure (no text or symbols present)3 Fyll på papper.
natural_image
Illustration of a printer being inserted into a stack, with a red arrow indicating the process (no text or symbols present)natural_image
Diagram showing a printer being inserted into a cable, with a close-up view of the cable being inserted (no text or symbols present)4 Tryck in kassetten.
natural_image
Illustration of a hand inserting a card into a printer (no text or symbols visible)natural_image
Illustration of a printer with paper feed and paper clip (no text or symbols)Prepare for connection [OK]Next

Ready to connect For details on how to cor
Obs!
Obs!
Android
natural_image
Diagram of a printer's internal structure showing paper feeding into a tray with a red arrow indicating the page direction (no text or symbols present)
Register the cassette pa [OK]Next
Size: ▶ *L ▶ Type: *Glossy
natural_image
Simple line drawing of a USB cable with a connector (no text or symbols)• Strømledning

• FINE-kassetter

natural_image
Simple line drawing of a CD or DVD disc with no text or symbols• Installerings-CD-ROM
natural_image
Coiled electrical connector with two terminal connectors (no text or symbols)3. Slå på skriveren

Viktig!
Open the cover and 1890 Discard the material
Konfigurere skriveren
Viktig!
Viktig!
natural_image
Technical line drawing of a mechanical assembly or lifting mechanism (no text or symbols)natural_image
Illustration of a printer with a red arrow indicating the paper's front cover (no text or symbols present)
Viktig!
natural_image
Diagram showing a printer with internal structure and a close-up view of its internal components (no text or symbols)natural_image
Diagram showing a printer being inserted into a paper holder, with a magnified inset highlighting the printer's internal structure (no text or symbols present)3 Legg i papir.
natural_image
Illustration of a printer being inserted into a base, with a red arrow indicating the process (no text or symbols present)natural_image
Diagram showing a printer being inserted into a cable, with an inset close-up highlighting the cable attachment (no text or symbols present)natural_image
Illustration of a printer with a hand inserting a paper into the cover (no text or symbols visible)natural_image
Line drawing of a printer with paper feed and paper clip (no text or symbols)Prepare for connection [OK]Next

Ready to connect For details on how to cor

Merk
Merk
E
natural_image
Diagram of a printer's internal structure showing paper feeding into a slot (no text or symbols)
Register the cassette pa [OK]Next
natural_image
Line drawing of a USB cable tied with a strap (no text or symbols)Netledning
• FINE-patroner

natural_image
Simple line drawing of a CD or DVD disc with no text or symbols• Installations-cd-rom

natural_image
Coiled electrical connector with two terminal connectors (no text or symbols)flowchart
graph TD
    A["Printer"] -->|Step 1| B["Recycle Bin"]
    B -->|Step 2| C["Recycle Bin"]
3. Tænd printeren

Vigtigt
Open the cover and 1890 Discard the material
Konfiguration af printeren
Vigtigt
Vigtigt
natural_image
Technical line drawing of a mechanical assembly or lifting mechanism (no text or symbols)5 Gentag trin 2 til 4 for at installere den sorte FINE-patron.
natural_image
Illustration of a printer with a red arrow indicating the paper's front cover (no text or symbols present)Vigtigt
natural_image
Diagram showing a printer with internal structure and a close-up view of its internal components (no text or symbols)natural_image
Diagram showing a printer being inserted into a paper holder, with a magnified inset highlighting the printer's internal structure (no text or symbols present)3 llæg papir.
natural_image
Illustration of a printer being inserted into a stack, with a red arrow indicating the process (no text or symbols present)natural_image
Diagram showing a printer being inserted into a cable, with an inset close-up highlighting the cable attachment (no text or symbols present)4 Skub kassetten ind.
natural_image
Illustration of a printer with a hand inserting a paper into the cover (no text or symbols visible)natural_image
Line drawing of a printer with paper feed and paper clip (no text or symbols)Prepare for connection [OK]Next

Ready to connect For details on how to cor

Bemærk

Bemærk
For details on how to cor

Bemærk
Android
3 Åbn den installerede app.
- Printeren registreres med den mest relevante forbindelsesmetode for det miljø, som du bruger.

Bemærk
natural_image
Diagram of a printer's internal structure showing paper feeding into a tray with a red arrow indicating the page direction (no text or symbols present)
4 Skub kassetten ind.
Register the cassette pa [OK]Next
natural_image
Line drawing of a USB cable with a connector (no text or symbols)• Virtajohto

• FINE-kasetit

natural_image
Simple line drawing of a CD or DVD disc with no text or symbols• Asennus-CD

natural_image
Coiled electrical connector with two terminal connectors (no text or symbols)
Tärkeää
Open the cover and 1890 Discard the material
Tulostimen asennus
Tärkeää
Tärkeää
natural_image
Technical line drawing of a mechanical assembly or housing with layered components (no text or symbols)5 Toista vaiheet 2 - 4 asentaessasi musta FINE-kasetti.
natural_image
Diagram of a printer with a red arrow indicating the paper's front cover (no text or symbols present)Tärkeää
natural_image
Diagram showing a printer with internal structure and a close-up view of its internal components (no text or symbols)natural_image
Diagram showing a printer being inserted into a paper holder, with an inset highlighting the printer's internal structure (no text or symbols present)3 Lisää paperia.
natural_image
Illustration of a printer being inserted into a stack, with a red arrow indicating the process (no text or symbols present)natural_image
Diagram showing a printer being inserted into a cable, with a close-up view of the cable being inserted (no text or symbols present)natural_image
Illustration of a hand inserting a card into a printer (no text or symbols visible)natural_image
Illustration of a printer with paper feed and paper clip (no text or symbols)Prepare for connection [OK]Next

Ready to connect For details on how to cor
Tulostimen asennus
Huomautus
Huomautus
Android
natural_image
Diagram of a printer's internal structure showing paper feeding into a slot (no text or symbols)
Register the cassette pa [OK]Next
From the "Canon TR4500 series Online Manual" desktop shortcut
- Setting up the printer
- Web Setup
- http://ij.start.canon
- Box Contents
- Removing Packing Materials
- Turning on the Printer
- Important
- Installing the FINE Cartridges
- Close the paper output cover.
- Loading Paper
- Pull out the cassette until it stops.
- Slide apart the paper guides.
- Load paper.
- Push in the cassette.
- Pull out the paper output support of the paper output tray.
- Open the output tray extension.
- Check that the following screen appears, and then press the OK button.
- What device are you connecting?
- 6-a
- Connecting to a Computer
- Online Setup
- Using the Setup CD-ROM (Windows Only) Provided
- Windows 10/Windows 8.1
- Note
- Windows 7
- Click Start Setup.
- When the following screen appears, click Exit.
- 6-b
- Connecting to a Smartphone
- Install the "Canon PRINT Inkjet/SELPHY" app on your smartphone.
- Check the printer's screen as you proceed through the steps.
- Open the installed app.
- Follow the on-screen instructions to add your printer.
- Check that the following screen appears.
- iOS
- Android
- Loading Photo Paper
- Using Fax Function
- If Print Results Are Unsatisfactory
- Configuration de l'imprimante
- Configuration Web
- Wichtig
- Hinweis
- De printer inschakelen
- Belangrijk
- De printer instellen
- Plaats papier.
- Duw de cassette erin.
- Opmerking
- Importante
- Caricare la carta.
- Nota
- Ligando a Impressora
- Configurando a impressora
- Deslize as guias do papel.
- Coloque o papel.
- Insira o cassete.
- E
- Encender la impresora
- Cargue el papel.
- Σημαντικό
- Σημείωση
- Slå på skrivaren
- Viktigt!
- Ställa in skrivaren
- Fyll på papper.
- Tryck in kassetten.
- Obs!
- Slå på skriveren
- Viktig!
- Konfigurere skriveren
- Legg i papir.
- Merk
- Tænd printeren
- Vigtigt
- Konfiguration af printeren
- llæg papir.
- Skub kassetten ind.
- Bemærk
- Tärkeää
- Tulostimen asennus
- Lisää paperia.
- Huomautus
Brand : CANON
Model : Pixma TR4540
Category : Printer