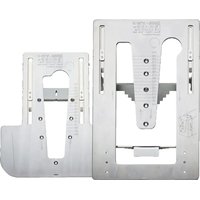
A12 - Screwdriver Mafell - Free user manual and instructions
Find the device manual for free A12 Mafell in PDF.


| Product type | Cordless drill driver |
| Brand | Mafell |
| Model | A12 |
| Nominal voltage | 12 V |
| No load speed (1st gear) | 0 – 510 rpm |
| No load speed (2nd gear) | 0 – 1710 rpm |
| Max torque (soft) | 18 Nm |
| Max torque (hard) | 45 Nm |
| Max drilling diameter (steel) | 10 mm |
| Max drilling diameter (wood) | 25 mm |
| Max chuck diameter | 10 mm |
| Weight (with battery, without chuck) | 1 kg |
| Battery type | Li-ion CAS 12 V, 4.0 Ah |
| Charger included | Yes (model varies by version) |
| Standard equipment | 2 batteries, charger, angle adapter, belt clip, quick-change chuck |
| Intended use | Drilling metal, wood, plastic; screwing and threading |
| Sound pressure level | 75 dB(A) |
| Sound power level | 83 dB(A) |
| Typical hand-arm vibration | < 2.5 m/s² |
| Maintenance | Clean regularly; store dry and frost-free |
| Safety | Wear ear protection and safety glasses; do not look directly at LED |
| Optional accessories | Additional batteries, fast chargers, eccentric adapter, quick-bit holder |
Frequently Asked Questions - A12 Mafell
User questions about A12 Mafell
0 question about this device. Answer the ones you know or ask your own.
Ask a new question about this device
Download the instructions for your Screwdriver in PDF format for free! Find your manual A12 - Mafell and take your electronic device back in hand. On this page are published all the documents necessary for the use of your device. A12 by Mafell.
USER MANUAL A12 Mafell
natural_image
Black and white photo of a power tool with a cylindrical head and base (no visible text or symbols)MAF02307/a
WARNUNG
Please read all safety instructions and directions. Failure to comply with the safety instructions and directions can cause electric shock, fire and/or serious injuries. Please retain all safety instructions and directions for future reference.
AVERTISSEMENT
natural_image
Close-up of a drill bit with labeled component (13), no visible text or symbols beyond the number and arrow indicatorMAF02306/a
natural_image
Close-up of a black mechanical component with a curved hook and arrow indicating a detail (no text or symbols visible)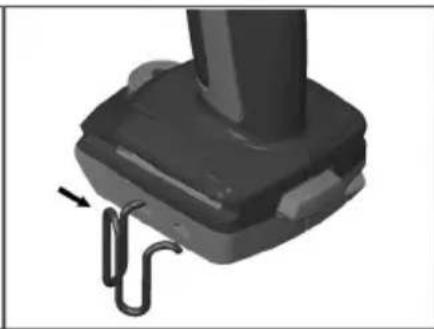
natural_image
Close-up of a black mechanical component with a hook and arrow indicator (no text or symbols)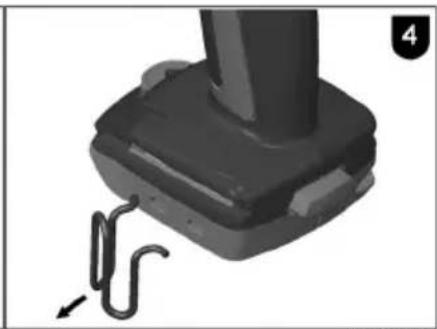
natural_image
Close-up of a black mechanical component with a coiled spring attached, no visible text or symbolsMAF02090/b
GB - EC Declaration of Conformity
We herewith confirm that the machine A12 complies with the EU directives quoted. The standards listed were used for design and construction. Empowered person for the configuration of the technical documents: Mafell AG
| 1 | Signs and symbols | 16 |
| 2 | Product information | 16 |
| 2.1 | Manufacturer's data | 16 |
| 2.2 | Rechargeable battery specifications | 16 |
| 2.3 | Machine identification | 16 |
| 2.4 | Technical data | 17 |
| 2.5 | Emissions | 17 |
| 2.6 | Scope of supply | 18 |
| 2.7 | Use according to intended purpose | 18 |
| 3 | Safety instructions | 18 |
| 3.1 | Safety instructions for all types of work | 18 |
| 3.2 | Safety instructions for the use of long drill bits | 18 |
| 3.3 | Additional safety instructions | 19 |
| 4 | Layout | 19 |
| 4.1 | Depicted components | 19 |
| 4.2 | Symbols | 19 |
| 5 | Operation | 19 |
| 5.1 | Rechargeable battery, capacity and signal display | 19 |
| 5.2 | Removing and inserting the rechargeable battery | 19 |
| 5.3 | Sense of rotation, transport lock | 19 |
| 5.4 | Selecting the gear speed | 20 |
| 5.5 | Setting the torque | 20 |
| 5.6 | Switching on/off, setting the speed | 20 |
| 5.7 | Tool change | 20 |
| 5.8 | Switching the LED light on/off | 21 |
| 5.9 | Belt clip | 21 |
| 5.10 | Bit adapter | 21 |
| 6 | Service and maintenance | 21 |
| 6.1 | Storage | 21 |
| 6.2 | Transport | 21 |
| 6.3 | Disposal of rechargeable batteries/batteries | 21 |
| 7 | Troubleshooting | 22 |
| 8 | Optional accessories | 23 |
| 9 | Exploded drawing and spare parts list | 23 |
1 Signs and symbols

This symbol is found in all places where you will find information for your safety.
Non-compliance with these instructions may result in very serious injuries.
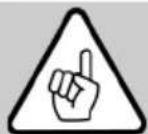
This symbol indicates a potentially hazardous situation.
If this situation is not avoided, the product or objects in its vicinity may get damaged.

This symbol indicates tips for the user and other useful information.
2 Product information
for machines with product no. 91D001, 91D021
2.1 Manufacturer's data
MAFELL AG, Beffendorfer Straße 4, D-78727 Oberndorf / Neckar, Phone +49 (0)7423/812-0, Fax +49 (0)7423/812-218, e-mail: mafell@mafell.de
2.2 Rechargeable battery specifications
The CE Declaration of Conformity with regard to the rechargeable batteries can be found on our website www.mafell.com in the footer area under the header Legal Matters, Declaration of Conformity.
2.3 Machine identification
All details required for machine identification are available on the attached rating plate.

CE symbol to document compliance with the basic safety and health requirements according to Appendix I of the Machinery Directive.
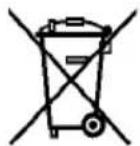
For EU countries only
Do not dispose of electrical tools together with domestic waste!
In accordance with the European directive 2002/96/EC on waste electrical and electronic equipment and transposition into national law, obsolete electrical tools must be collected separately and recycled in an environmentally-compatible manner.

Read the operating instructions. This reduces the risk of injury.

Protect the rechargeable battery from heat, excessive solar radiation, fire, frost, water and humidity.
Protect rechargeable battery packs from humidity!

Protect rechargeable battery packs from fire!
There is danger of explosion!

Cordless Alliance System (=CAS) is a cross-manufacturer battery pack system.
Further information is available at www.cordless-alliance-system.com
2.4 Technical data
Model: A12
| Voltage | V | 12 |
| Speed level 1 | rpm | 0-510 |
| Speed level 2 | rpm | 0-1710 |
| Torque (soft) | Nm | 18 |
| Torque (hard) | Nm | 45 |
| Max. diameter chuck | mm | 10 |
| Min. diameter chuck | mm | 1.5 |
| Max. bore diameter: | ||
| Steel | mm | 10 |
| Wood | mm | 25 |
| Weight kg | 1 (with rechargeable battery, without chuck) |
2.5 Emissions
The declared noise emission values have been measured in accordance with DIN EN 62841-1 and DIN EN 62841-2-1 and may be used for comparing the tool with another and also in a preliminary assessment of exposure.

Danger
The noise emissions during actual use of the power tool can differ from the declared values depending on the ways in which the tool is used especially what kind of workpiece is processed.
Always wear hearing protection, even when the power tool is running idle in addition to the trigger time!
2.5.1 Noise emission specifications
Noise emission values determined according to EN 62841-1 and EN 62841-2-1:
| Sound pressure level (LpA) | Sound power level (LWA) | |
| A12 | 75 dB (A) | 83 dB (A) |
| Uncertainty (KWA) | 3 dB (A) | 3 dB (A) |
2.5.2 Vibration value specification
The typical hand-arm vibration is less than 2.5 m/s ^4 .
The measuring inaccuracy is 1.5 m/s^2
2.6 Scope of supply
Cordless drill driver A12 complete with:
1 cordless screwdriver
1 quick-release chuck
2 rechargeable batteries 12 M 43 (4.0 Ah)
1 charger
1 angle attachment
1 belt clip
1 operating manual
1 folder "Safety instructions"
2.7 Use according to intended purpose
The drill driver A12 M is suitable for drilling in metal, wood, plastic and similar materials as well as for screwing and tapping.
Any other use than described above is not permissible. The manufacturer cannot be held liable for any damage arising from such other use.
In order to use the appliance as intended, you must comply with the operating, maintenance and repair instructions specified by MAFELL.
Corrective maintenance work must be carried out by MAFELL authorised dealers or MAFELL customer service stations.
The safety instructions applicable in the respective country of use as well as other generally recognised rules pertaining to safety and occupational health must be observed.
Unauthorized changes to the appliance shall rule out any manufacturer liability for damages resulting thereof.
Only use original Mafell / CAS rechargeable batteries and accessories.
3 Safety instructions

Danger
Electrical appliances may be dangerous if used incorrectly.
Therefore, always observe the safety instructions summarised in this chapter and the safety regulations applicable in the respective country of use!
Please also read the safety information in the enclosed folder 070500 "Safety instructions" (according to standard 62841-1).
3.1 Safety instructions for all types of work
- Wear ear protectors during the use of drill drivers. Exposure to noise can cause loss of hearing.
- Always hold the appliance by the insulated gripping surfaces when carrying out work during which the bit may hit concealed power lines. Cutting accessory contacting a "live" wire may make exposed metal parts of the power tool "live" and could give the operator an electric shock.
3.2 Safety instructions for the use of long drill bits
- Always start drilling at low speed and with the drill bit in contact with the workpiece.
- On no account may you work at a speed that exceeds the maximum speed permitted for the drill bit. At higher speeds, the drill bit can easily bend if allowed to turn freely (without contact with the workpiece); this can lead to injuries.
- Do not apply excessive pressure and only apply pressure in the longitudinal direction to the drill bit. Drill bits can bend and thus break or lead to a loss of control and injuries.
3.3 Additional safety instructions
- Ensure that the machine is switched off when you push in the rechargeable battery.
- Remove the rechargeable batteries from the machine before carrying out any setting, retooling, maintenance or cleaning tasks.
- Dust originating from materials such as leaded paint, some types of wood, minerals and metal can be harmful to health. Touching or inhaling these dusts can cause allergic reactions and/or respiratory disorders in the user or persons staying in the vicinity.
- As far as possible, make use of a dust extraction system.
- Provide for good ventilation of the workplace.
- It is recommended to wear a respirator mask with filter class P2.
- Observe the regulations valid in your country for the materials to be machined.
- Secure the workpiece against shifting, e. g. by means of fastening devices.
- LED light (Fig. 1, 10): Do not directly look at the LED radiation with optical instruments.
- Always wear protective goggles during work.
4 Layout
4.1 Depicted components
(see Fig. 1)
(1) Exchangeable attachment (chuck)
(2) Adjusting ring - torque preselection
(3) Gear change slide - first or second gear
(4) Sense of rotation selector switch, double sided
(5) Bit adapter
(6) Belt clip, can be used on both sides
(7) Button - capacity display
(8) Rechargeable battery
(9) Capacity and signal display
(10) LED light
(11) Switch trigger
4.2 Symbols
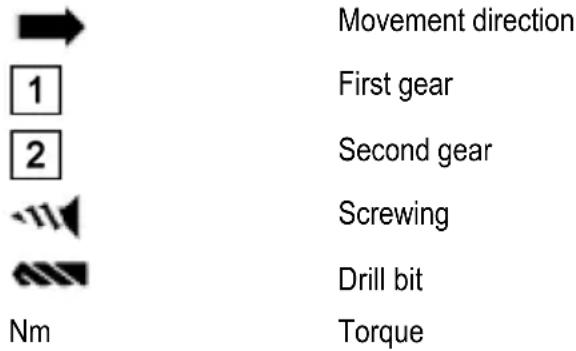
5 Operation
5.1 Rechargeable battery, capacity and signal display
(see Fig. 1)
- Charge the rechargeable battery prior to use.
- Recharge the rechargeable battery in case of loss of power.
- Press the button (7) to query the charge condition of the rechargeable battery. The capacity can be read off the LED lights (9).
- If a LED light (9) flashes, the rechargeable battery is almost empty. Recharge the rechargeable battery.
- The optimum storage temperature is between 10 °C and 30 °C.
5.2 Removing and inserting the rechargeable battery
(see Fig. 2)
Removing: Press the unlocking mechanism (12) and pull the rechargeable battery (8) out to the front.
Inserting: Push on the rechargeable battery until it clicks into place.
5.3 Sense of rotation, transport lock
(see Fig. 1)
R = Clockwise rotation
L = Anti-clockwise rotation
0 = Centre position: Transport lock
(Switch-on lock)
5.4 Selecting the gear speed
(see Fig. 1)

Actuate the switch slider (3) only when the motor is standing still!
1
First gear: low speed, high torque; preferably for screwing
2
Second gear: high speed; preferably for drilling
5.5 Setting the torque
(see Fig. 1)
Set the torque by turning the adjusting ring (2).
1...10 = Torque limiting (setting range 0.5 - 5 Nm)
= Adjusting the drill setting (max. torque, without torque control). Do not block the spindle to avoid overloading the motor.
5.6 Switching on/off, setting the speed
(see Fig. 1)
Switching on: Press the switch trigger (11) and keep it depressed. The speed at the switch trigger can be changed by the depth to which it is depressed.
Switching off: Release the switch trigger (11).
5.7 Tool change

Only use high-grade tools, which are suitable for the forces and torques occurring! Broken tools will lead to a machine defect. If repairs are necessary, contact the customer service stations for MAFELL electrical tools.
The spindle enables a quick change between the accessory attachments and a direct 14 " hexagonal adapter.
Demounting the attachment: (see Fig. 3) Pull the locking ring (13) forward and pull off the attachment to the front.
Mounting the attachment: Pull the locking ring (13) forward and push the attachment onto the spindle up to the limit stop. (If necessary, turn the attachment slightly to and fro.)
Turning the attachment: With the angle and eccentric attachment (optional accessories) you can adjust the angle of the attachment in 30^ steps to the screwdriver axis.
Pull the locking ring (13) forward and push the attachment onto the spindle into the desired position until it clicks into place again.
5.7.1 Quick-release chuck
(see Fig. 1)
Opening the chuck: Turn the chuck (1) in direction of rotation
Place the bit as deeply as possible into the open chuck.
Turn the chuck (1) in direction of rotation until the tool is firmly mounted.
5.7.2 Angle attachment
The angle attachment can be used to work at right angles to the screwdriver axle.
Mount the bits directly by means of the 14 " hexagon adapter or by attaching the chuck or bit holder.
5.7.3 Quick-release bit holder (optional accessories)
Inserting the bit: Push the bit into the bit holder until it audibly clicks into place.
Removing the bit: Pull the sleeve at the bit adapter forward until it clicks into place and remove the bit.
5.7.4 Eccentric attachment (optional accessories)
With the eccentric attachment it is possible to work close to the edge of inside corners.
Inserting the tool: Pull the sleeve at the adapter backwards and insert the tool up to the stop into the 14 " hexagon adapter.
Removing the tool: Pull the sleeve at the adapter backwards and remove the tool.
5.8 Switching the LED light on/off
(see Fig. 1)
- Press the switch trigger (11) to switch on the LED light (10).
- After releasing the switch trigger (11), the LED light (10) still glows for approx. 5 sec. and then switches off.
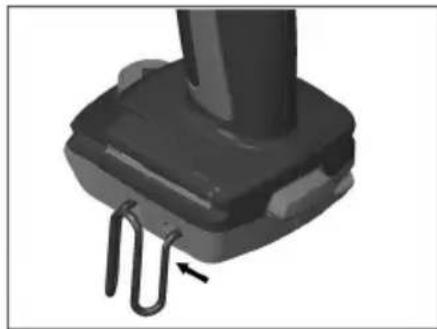
5.9 Belt clip

For an easier handling of the belt clip, remove the rechargeable battery (see chapter 5.2)
(see Fig. 4)
Detaching:
- Press the belt clip (6) together at the rear.
- Swivel it out of the rear opening.
- Slacken the belt clip and remove it from the front opening.
Attaching:
- Press the belt clip (6) together and insert it into the openings provided.
- The belt clip (6) can be attached on both sides.
5.10 Bit adapter
(see Fig. 1)
A screw bit can be fitted in the bit adapter (5) on both sides.
6 Service and maintenance

Danger
Unplug the rechargeable battery for all service work.
MAFELL machines are designed to be low in maintenance.
Always keep the appliance clean.
Should the appliance fail despite thorough manufacturing and testing procedures, the repair must be carried out by an authorised customer service station for MAFELL electrical tools.
Store the appliance in a dry and frost-proof place.
Only use MAFELL accessories and spare parts. Have components, the replacement of which has not been described, replaced at a MAFELL customer service station.
6.1 Storage
Clean the machine thoroughly if the machine is not used for a longer period of time. Spray blank metal parts with a rust-proofing agent.
6.2 Transport
The included Li-ion rechargeable batteries are subject to the requirements of dangerous goods legislation. The rechargeable batteries can be transported by the user on the road without any further requirements.
For the dispatch by third parties (e.g.: air transport or forwarding agent), special requirements for packaging and labelling must be observed. In this case, a dangerous goods expert must be consulted when preparing the package.
Only dispatch rechargeable batteries if their housing is undamaged. Tape open contacts and pack the rechargeable battery so that it does not move in the packaging.
Please also observe any further national regulations.
6.3 Disposal of rechargeable batteries/batteries

Electrical tools, rechargeable batteries, accessories and packaging should be recycled in an environmentally friendly manner.
Do not dispose of electrical tools together with domestic waste!
For EU countries only:
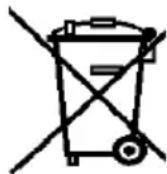
According to the European Directive 2002/96/EC, power tools that are no longer serviceable, and according to the European Directive 2006/66/EC, defective or used rechargeable batteries/batteries must be collected separately and recycled in an environmentally sound manner.
Return unusable rechargeable batteries/batteries directly to:
Germany
Stiftung
GRS Batterien
Heidenkampsweg 44
20097 Hamburg
Germany
Rechargeable batteries/batteries:

Li-lon:
Please comply with the information in Section "Transport", page 21.
Subject to changes.
7 Troubleshooting

Danger
Determining the causes for existing defects and eliminating these always requires increased attention and caution.
If the machine switches off automatically, the electronic system has activated self-protection mode. Despite this protective function, overload and as a consequence damage to the machine may occur during certain applications.
Some of the most frequent defects and their causes are listed in the following chart. In case of other defects, please contact your dealer or the MAFELL customer service directly.
| Defect | Cause | Remedy |
| Machine switches off and an LED on the capacity display (9) flashes. | Rechargeable battery is almost empty.The electronic system protects the rechargeable battery from deep discharge. | Charge the rechargeable battery. |
| The machine switches off and cannot be switched on again. A warning signal sounds and the LED light (10) flashes. | OverloadA sustained load has overheated the machine or the rechargeable battery. | Signal goes out after releasing the switch trigger (11).Allow the machine and the rechargeable battery to cool down.Note: The machine cools down faster when it is allowed to idle after it is switched on again. |
| Machine switches off. A warning signal sounds and the LED light (10) flashes.Machine restarts when it is switched on again. | Excessive current rating.This leads to the machine being switched off, e.g. in the event of prolonged blockage. | Switch off the machine by releasing the switch trigger (11). Afterwards, you can switch the machine back on again and resume work.Try to avoid further blockages. |
8 Optional accessories
- Rechargeable battery 12 M 43 LiHD Order No. 094508
- APS M charger - GB Order No. 094493
- APS M charger Order No. 094492
- APS M + quick-charger Order No. 094509
- APS M + quick-charger - GB Order No. 094511
- Angle attachment A-SWV 10 Order No. 206773
- Chuck A-SBF 10 Order No. 209338
- Quick bit holder A-SBH Order No. 206766
- Eccentric attachment A-SEV Order No. 209339
9 Exploded drawing and spare parts list
The corresponding information in respect of spare parts can be found on our homepage: www.mafell.com
Sommaire
0 = midterstilling: Transportsikring
(indkoblingsspærre)
5.4 Geartrin vælges
(se Fig. 1)

MAFELL AG
Beffendorfer Straße 4, D-78727 Oberndorf / Neckar
Telefon +49 (0)7423/812-0
Internet:
E-Mail:
Fax +49 (0)7423/812-218
www.mafell.de
mafell@mafell.de
- WARNUNG
- AVERTISSEMENT
- GB - EC Declaration of Conformity
- Signs and symbols
- Product information
- Manufacturer's data
- Rechargeable battery specifications
- Machine identification
- Cordless Alliance System (=CAS) is a cross-manufacturer battery pack system.
- Further information is available at www.cordless-alliance-system.com
- Technical data
- Emissions
- Danger
- Noise emission specifications
- Vibration value specification
- Scope of supply
- Use according to intended purpose
- Safety instructions
- Safety instructions for all types of work
- Safety instructions for the use of long drill bits
- Additional safety instructions
- Layout
- Depicted components
- (see Fig. 1)
- Symbols
- Operation
- Rechargeable battery, capacity and signal display
- Removing and inserting the rechargeable battery
- Sense of rotation, transport lock
- Selecting the gear speed
- Setting the torque
- Switching on/off, setting the speed
- Tool change
- Quick-release chuck
- Angle attachment
- Quick-release bit holder (optional accessories)
- Eccentric attachment (optional accessories)
- Switching the LED light on/off
- Belt clip
- Detaching:
- Attaching:
- Bit adapter
- Service and maintenance
- Storage
- Transport
- Disposal of rechargeable batteries/batteries
- For EU countries only:
- Germany
- Rechargeable batteries/batteries:
- Subject to changes.
- Troubleshooting
- Optional accessories
- Exploded drawing and spare parts list
- Sommaire
- Geartrin vælges
Brand : Mafell
Model : A12
Category : Screwdriver