Gardenboy PLUS 400 W - Electric garden tool GLORIA - Free user manual and instructions
Find the device manual for free Gardenboy PLUS 400 W GLORIA in PDF.

| Product Type | Electric garden tiller/cultivator |
| Brand | GLORIA |
| Model | Gardenboy PLUS 400 W |
| Power Supply | Electric, 400 W |
| Rated Voltage | 230 V ~ 50 Hz |
| Max Working Depth | 80 mm |
| Rotations per minute | 760 oscillating rotations (forward and reverse) |
| Rotation Angle | 90° |
| Max Extension Cord | 20 m (3 x 1.5 mm² H05 VV-F or H05 RN-F) or 50 m (3 x 2.5 mm²) |
| Main Functions | Soil cultivation, tilling, hoeing, weeding, incorporation of compost/fertilizer, border maintenance |
| Tine Material | Steel |
| Motor Type | Electric motor with torque limiter |
| Safety Devices | Start button, cable strain relief, protective cover |
| Weather Protection | Protect from rain and humidity |
| Maintenance | Dry cleaning (cloth or brush), do not use water |
| Wear Parts | Tine discs |
| Warranty | 24 months for private use |
| Intended Use | Crusted and compact soil on small to medium areas, private garden |
Frequently Asked Questions - Gardenboy PLUS 400 W GLORIA
User questions about Gardenboy PLUS 400 W GLORIA
0 question about this device. Answer the ones you know or ask your own.
Ask a new question about this device
Download the instructions for your Electric garden tool in PDF format for free! Find your manual Gardenboy PLUS 400 W - GLORIA and take your electronic device back in hand. On this page are published all the documents necessary for the use of your device. Gardenboy PLUS 400 W by GLORIA.
USER MANUAL Gardenboy PLUS 400 W GLORIA
Gardenboy PLUS 400 W
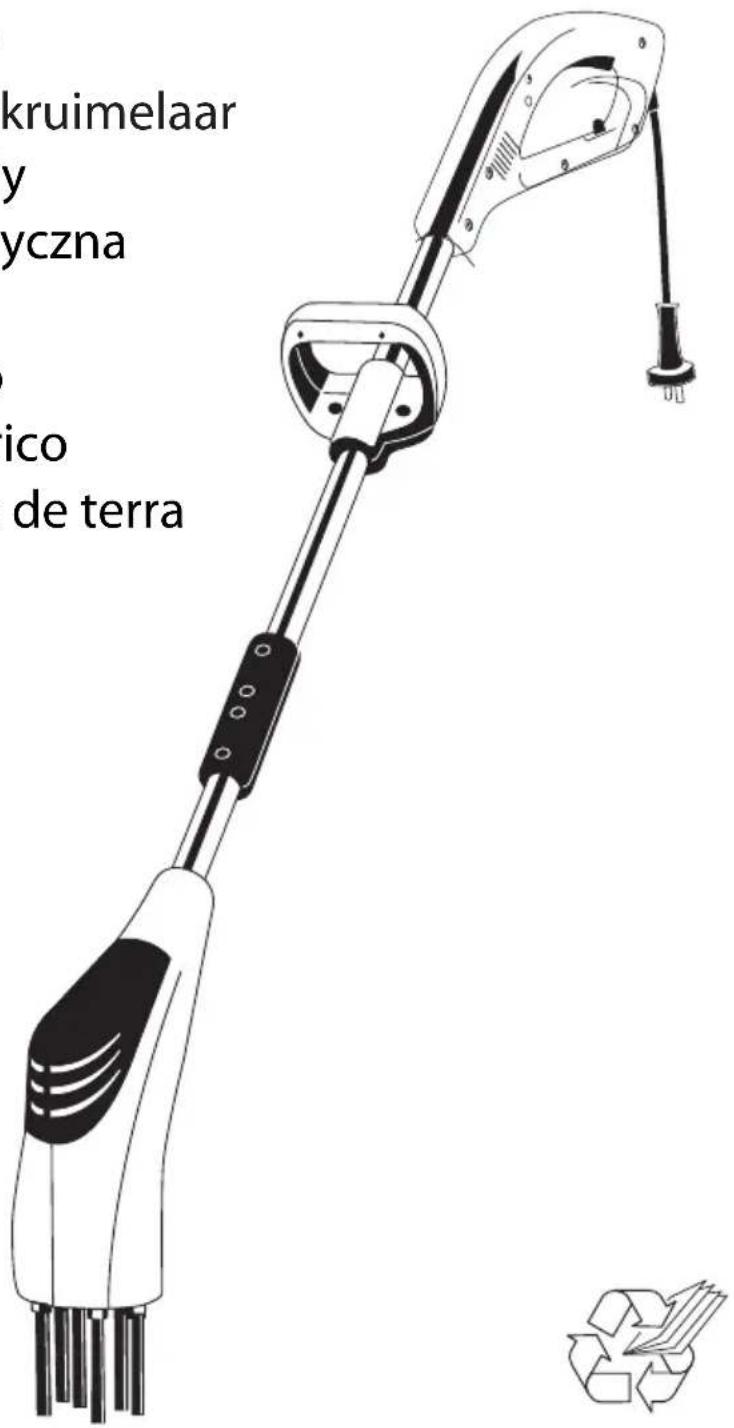
DE Elektro-Bodenkrümler
GB Electric Soil Crumbler
FR Emietteur électrique
NL Elektrische grondverkruimelaar
cz Elektrický kypřič půdy
PL Rozdrabniarka elektryczna
SE Elektrisk jordfräs
IT Dissodatore elettrico
ES Desterronador eléctrico
PT Esboroador eléctrico de terra
Inhaltsverzeichnis – Contents – Contenu – Inhoudsopgave – Obsah – Spis treści
DE
Please read these operating instructions carefully before assembling and using your machine.
-
Operating parts 4
-
Technical data 8
-
Notes on Safety 10
-
Notes on these operating instructions 18
-
Proper Use 18
-
Assembly 19
-
Putting into operation 19
-
Working Correctly 20
-
Maintenance / care / storage 21
-
Troubleshooting 21
-
Instructions for correct use / safety instructions 22
Warranty 23
EU Certificate of Conformity 71
FR
DE
1 Work handle
2 On / off switch
3 Safety cable grip
4 Power cable
5 Additional handle
6 Handle
7 Housing
8 Motor cover
9 Steel tines
10 Handle connector
PL
natural_image
Person using a cleaning tool on a surface, with a black arrow pointing downward (no text or symbols visible)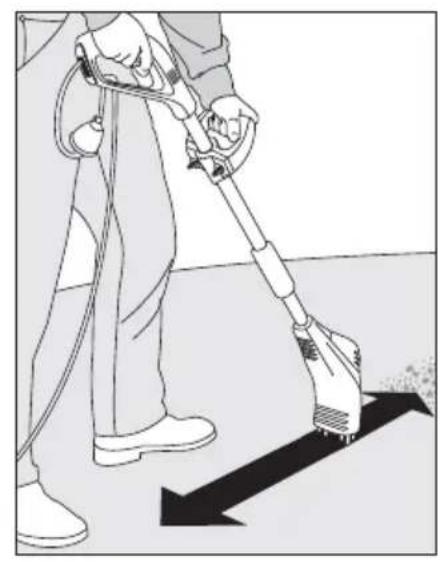
natural_image
Illustration of a person using a cleaning power tool on a tiled floor (no text or symbols)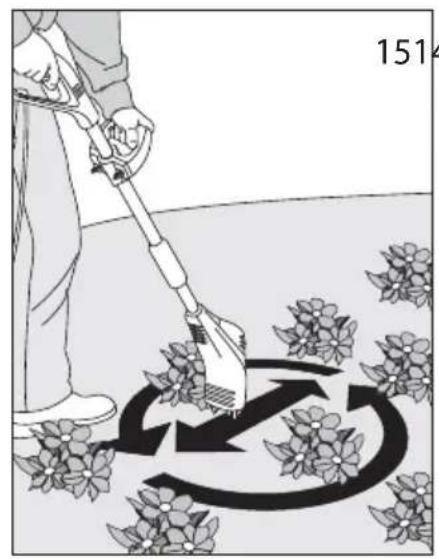
natural_image
Illustration of a person using a shoveling machine to clean flowers, with a circular arrow indicating rotation (no text or symbols)13
natural_image
Diagram of a hairdryer tool spraying water onto two plants, with a downward arrow indicating the process (no text or symbols present)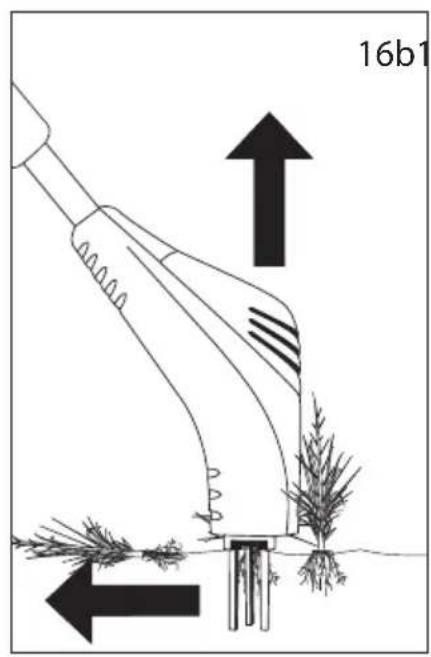
natural_image
Diagram of a manual sprinkler spraying crops with a downward arrow indicating compression (no text or symbols present)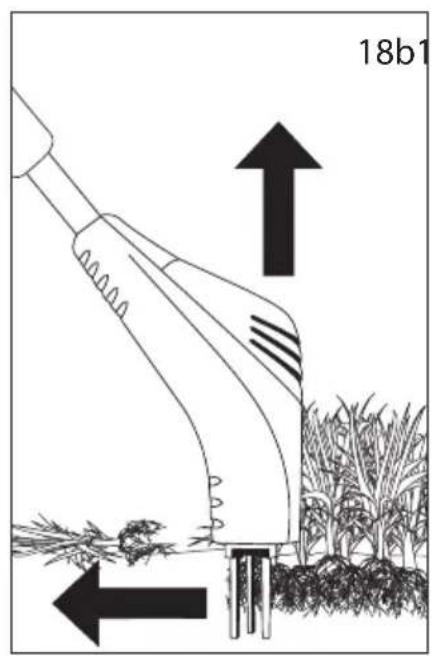
8a
2. Technische Daten – Technical Data – Caractéristiques techniques – Technische gegevens – Technické údaje – Dane techniczne – Tekniska data – Dati tecnici – Datos técnicos – Dados Técnicos
Modell - Model - Modèle - Model - Model - Model - Modell - Modello - Modelo - Modelo
Gardenboy PLUS 400 W
Motor – Motor – Moteur – Motor – Motor – Silnik – Motor – Motore – Motor – Motor
Elektromotor – Electric motor – Amoteur électrique – Elektromotor – Elektromotor – Silinik elektryczny – Elmotor – Motore elettrico – Motor eléctrico – Motor eléctrico
Leistung – Capacity – Puissance – Vermogen – Výkon – Moc – Effekt – Potenza – Potencia – Potência
400 W
Netzspannung – Supply voltage – Tension – Netspanning – Jmenovité napětí– Napięcie sieciowe – Nätspänning – Tensione di rete – Tensión de alimentación – Tensão de alimentação da rede
230 V (AC)
Frequenz – Cycles – Fréquence – Frequentie – Frekvens – Frequenza – Frekvens – Frequenza – Frecuencia – Frequência
50 Hz
Absicherung – Fuse – Protection par fusibles – Beveiliging – Jištění – Bezpiecznik – Säkring – Fusibili – Fusible – Protecção por fusível
16 A
Schutzklasse – Protection class – Classe de protection – Beschermklasse – Trída ochrany – Klasa ochronna – Skyddsklass – Classe di protezione – Clase de protección – Classe de protecção
||
Prüfdrehzahl – Rotational speed – Vitesse de rotation – Testtoerental – Zkušební otáčky – Liczba – Provningsvartal – Velocità di rotazione (in prova) – Velocidad – N° de rotações testados
Please adhere to the following safety instructions on the appliance:
Read instruction handbook before starting!
Warning! Disconnect the mains plug immediately if the power cable / extension cable is damaged or severed!
Warning! Disconnect the mains plug before carrying out all maintenance work!
Keep bystanders away from the danger zone!
Caution! Keep hands and feet away from the working tool!
Keep the mains lead away from the working tool!
Danger of damage to equipment: never clean electrical equipment under running water, in particular, do not use water under high pressure on it.
Keep away from rain, water and moisture.
4. Notes on these Operating Instructions
Please carefully read the operating instructions and adhere to the general and safety instructions enclosed therein. Use this operat-
ing manual and the safety instructions in order to familiarise yourself with the implement, the adjusting parts and the correct use.
Keep these operating instructions in a safe place.
5. Proper Use
The appliance is designed for the working of smaller to
medium-sized rough clod or crusted soil surfaces in private
house or hobby gardens but not for use in public areas, parks,
sport venues, on roads and in agriculture and forestry.
The adherence to the instructions manual enclosed by GLORIA is a requirement for the correct usage of the appliance. The instructions for use include the operating maintenance and repair conditions.

Caution! To avoid injury, do not use the appliance
for the crushing of earthenware, the turning over of lawns or
for the stirring or mixing of liquids.

The appliance is only to be used in soil which does not in stones.

Caution! Never allow children or other people who not familiar with these oper-instructions to use this unit.
Local regulations may specify a minimum age for users of this type of gardening equipment.
Remember that the user or operator is responsible for all accidents that occur involving other people or their property.
Only use approved PVC extension cables with the H05 VV-F symbol or rubber with the H05 RN-F symbol and a maximum cable length of 20 m and a cross section of 3 x 1.5 mm ^2 or a cross section of 3 x 2.5 mm ^2 when using a cable length of between 20 m and 50 m.
6. Assembly
Checking all the Parts are Included
The box contains the following parts:
• Gardenboy (two parts)
- Handle connector with screws, nuts and spanner pin
- Instruction manual
Environmental protection, disposal
(pursuant to RL 2002 /96 EC)
The packaging material is made of recyclable materials. Dispose of packaging materials in accordance with regu-
lations. Electrical appliances are not to be disposed of in the normal household waste, they must be professionally disposed of.
Important for Germany:
electrical appliances are to be disposed of through your local disposal sites.
Mounting the handle connector (Fig. 1 to 3)
The enclosed handle connector, the spanner pin, the screws and the nuts for the handle connector are in the insert in the lower part of the packaging. Place the half-pipes of the handle connector into the holes of the opposite placed handle ends as shown in figure 1. (Ensure that the appliance parts
are correctly positioned!). Put the screws and nuts into the receptions of the connector half-pipes (Fig. 3). Tighten the screws with the spanner pin enclosed so that it is hand-screwed (Fig. 3).
Afterwards mount the additional handle as shown in figures 4-7.
After each use, ensure that the screws are firmly seated.
Ensure that all of the screws and nuts are firmly tightened so that the appliance is in a safe operational condition.
Caution! Only start the appliance after it has been fully assembled!
7. Putting into operation
Suspend the extension cable in the mains lead strain relief (Figs. 8 and 9). This avoids an unintentional loosening of the plug. Insert the extension cable in the mains socket. Always fully unreel the cable reserve from the cable drum and remove it from the working area.
Hold the appliance with one hand on the guide handle and
the other on the intermediate handle (Fig. 10).
To switch on, press the start button and keep it pressed (Fig. 11). The appliance is switched off by the start button being released (Fig. 12).
A blocking of the motor results in the clutch slipping. The appliance can be immediately restarted
after the cause of the blocking has been removed. If the clutch slips too often, you should alter you working method as the mechanical components could otherwise be damaged.

Risk of injury if the appliance does not switch off automatically! Do not remove or bypass safety devices on the appliance
(e.g. by tying the start button to the guide handle).


Caution! The tool coasts. Never lift or carry the
appliance when the motor is running. When starting, ensure that the steel tongs are at a sufficient distance from your feet!
Caution! Working position Always guide the appliance with both hands (one hand on the guide handle, the other on the intermediate handle (Fig.10).
8. Working Correctly
General instructions on the working method
The appliance is a diversified appliance which enables you to work the soil very comfortably. With the appliance, you can break out, crumble and loosen the soil, weed, mix compost under and fertilise a fruit and vegetable garden in addition to caring for the edges of your lawn. The following instructions for use should provide you with tips and ideas with regard to the correct handling of the appliance. The appliance's steel tongs work with oscillating rotational movements at an angle of 90°. It achieves 760 of these rotational movements forwards and backwards in one minute. The maximum working depth amounts to 80 mm. It can be led in the direction of plants and between them without damaging their roots.
Please ensure that you only use the appliance to work soil which does not contain any stones.
Breaking the soil out
(Fig. 13)
In spring, the soil must be broken out if it is too compact. To do so, the appliance is led in a drawing motion. Insert the switched on appliance in the soil away from the body and pull it slowly in your direction. If necessary, repeat this working movement until you have reached the required working depth and loosening extent. Air, water and nutrients can penetrate the soil once more and the soil biology is activated.
Note:
If the soil has become extremely hard so that you can only work with great effort (including with other commercially available appliances), we recommend that you initially loosen the soil with the bar spade. To do so, insert the bar spade in the soil and move it slowly back and forth. In order to thoroughly loosen the soil, continue with the appliance as described under Breaking the soil out.
Crumbling the soil
(Fig. 14)
You can use the appliance to easily and quickly prepare your bed for the seeds. To do this, the switched on appliance is slowly moved back and forth. The seed bed can be easily structured and is provided with a fine, loose consistency. The best precondition for a successful development of your sowings.
Note:
If the soil is heavily compacted, it must be broken out before crumbling. To do so, guide the appliance in pulling working movements as described under
Breaking the soil out.
Loosening the soil
(Fig. 15)
A regular loosening of the soil reduces the development of weeds and promotes the healthy development of your plants.
Guide the switched on appli- ance in your bed and around your plants. The appliance can be easily led in forwards, circu- lar or pulling movements. Also comfortably loosen under- neath the shrubs. The appliance works in a manner which cares for the roots.
Note:
If the soil is compacted due to it not being regularly loosened in the past, it must be broken out first. To do so, guide the appliance in pulling working movements as described under Breaking the soil out.
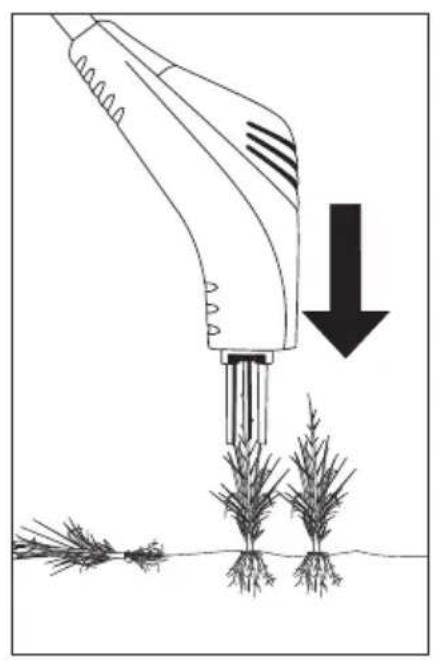
Weeding
(Fig. 16 a/b)
Weeds divest your useful plants of space. A regular removal of weeds is important in order to ensure that your plants can develop magnificently. Take the switched on appliance, guide it directly to above the weed which is to be removed and slightly submerge into the soil with the appliance. Now pull the appliance in your direction. Remove the appliance again and repeat the action if necessary. Repeat this until the weed has been loosened together with its root. You now only have to collect the removed weeds.
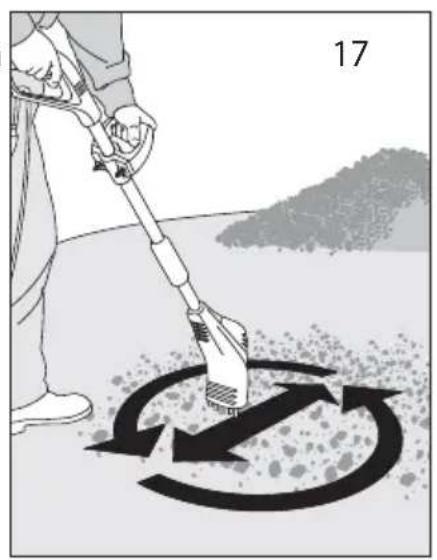
Mixing fertiliser and compost under
(Fig. 17)
In order to ensure that your plants receive nutrition, it is necessary to regularly work fertiliser or
compost into the soil. Loosen the soil first. Evenly apply compost or fertiliser to your useable surface and work it in evenly with the appliance. To do so, the appliance can be moved loosely in forwards, circular or pulling movements.
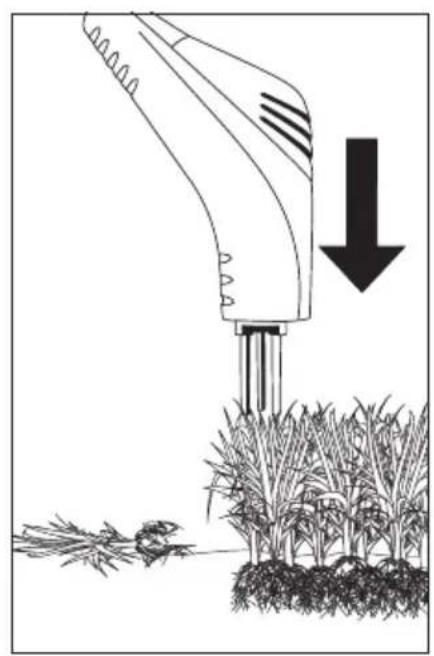
Caring for lawn edges (Fig. 18 a/b)
The appliance quickly and comfortably removes lawn sods together with the roots, thereby bringing your lawn and bed edges in top form. To do so, hold the appliance in the working position, slowly insert it on the lawn sod from above and pull the appliance in your direction. Remove the appliance and repeat the action until the lawn has become loose. You now only have to collect the removed grass. To easily clean bed edges and borders, guide the appliance along g the lawn edge. Working in pulling movements or slowly guide the appliance back and forth.
9. Maintenance / care / storage
Accidents and appliance mal- functions can be avoided by car- rying out regular inspections (firm seating of screwed connections, cracks, damage) and by replay- ing damaged or worn parts.
The appliance is mainly maintenance-free. Switch the appliance off if clods of earth or plant residue should become trapped in the tines when working with the appliance. Hold the appliance as close to the soil as possible and allow it to start up briefly. The soiling loosens itself as a result of the oscillating rotational movement. Remove residue manually if necessary.
Caution! Before carrying out any work, inspection, cleaning and repair work, switch the appliance off and remove the plug. Risk of injury!
Ensure that the air ports in the motor cover and in the guide handle are free from soiling.
Remove soil and dirt residue with a dry cloth or brush.
Repairs are only to by carried out by GLORIA-Service or by authorised GLORIA dealers.
Due to the risk of personal injury and material damage: do not clean the appliance under flowing water; especially not under high pressure.
Store the appliance in a dry place whereit is protected from frost. The storage place should not be accessible by children.
10. Troubleshooting
General
Faults usually occur if the unit has not been handled, cared for or maintained properly. The following table contains the most common faults and remedies to eliminate these faults. If you have any other problems, please contact your nearest service centre authorised by the manufacturer, or your nearest authorised specialist dealer.
Caution! Repairs that require specialist knowledge must only be carried out by an authorised specialist.
Caution! For safety reasons, only use original spare parts supplied by the manufacturer or parts that have been authorised by the manufacturer.
We expressly point out that in accordance with product liability
laws, we are not liable for any damage caused by our units if this damage is due to improper repair or if parts exchanged are not our original parts or parts approved by us, and if the repairs were not carried out at service centre authorised by the manufacturer or by an authorised specialist. The same applies to spare parts and accessories.
Fault Remedy
The appliance is switched on, the spike-tooth discs do not rotate.
Check whether the power supply is interrupted, the extension cable is fully in order and the mains socket conducts electricity. Please contact your stockist or GLORIAService direct if this does not solve the problem.
Fault Remedy
| The appliance is switched on but the spike-tooth discs come to a halt when making soil contact. | Inspect the screwed connections and the retainer of the spike-tooth disc. Please contact your stockist or GLORIAService direct if this does not solve the problem. |
| The appliance blocks when in use. | A blocking of the motor results in the clutch slipping.The appliance can be immediately restarted after the cause of the blocking has been removed. If the clutch slips too often, you should alter you working method as the mechanical components could otherwise be damaged. |
| The tines of the spike-tooth discs are loose, bent, worn. | The spike-tooth discs can wear. For a safe use of the appliance and a good working result, it is important that they be replaced when they are worn. For the replacement of the spike-tooth discs please contact your stockist or GLORIAService direct. |
11. Instructions for correct use, safety instructions

Check each time you use the equipment
Inspect the equipment each time before you use it. Do not use the equipment if safety devices (switch handle, safety covers) and/or if the cutting device is damaged or worn. Never disable safety devices.
Always carry out a visual inspection before use in order to determine whether the working tool is worn or damaged or whether screws are loose.
Inspect the surfaces to be worked before commencing work. Remove any foreign bodies (e.g. \$ones, branches or bones). Watch out for foreign bodies during work.
Always wear sturdy footwear and long trousers when working with the appliance. Do not use it when barefooted or only wearing light sandals.
The working tools are to be regularly inspected for signs of damage and if necessary, professionally repaired.
Only have working tools replaced by GLORIA-Service or the authorised stockists.

Use/ Responsibility

Caution! The safety devices installed on the appliance
by the manufacturer are neither to be removed nor bypassed as this can result in injury.
Make sure that there are no other people (especially children) or animals within or near the working area.
Powered equipment can cause serious injuries! You are responsible for safety in the area where you are working. Never start the equipment whilst tilted – risk of injury!
Always use the equipment solely for the purpose described in the operating instructions.
Only use this unit in daylight or when the area where you are working is lit by ample artificial lighting.
Make sure that the air vents are free of dirt.
Ensure that you are standing safely and on firm ground, even on a slope.
If the mains cable should become caught in the working tool, switch the appliance off and remove the plug.
Be careful if you are going backwards, risk of stumbling!
Work at an angle to the slope, never upwards and downwards.
Do not work on excessively steep slopes.
Only use the appliance at a walking pace. Take special care when turning the appliance around or pulling it closer to you.
Turn the motor off if the equipment has to be tilted when transporting it over surfaces other than grass and if you are transporting the equipment backwards and forwards to the work area.
Never use the appliance if the protective devices are not mounted or if they are damaged.
Start or activate the start button with care, in accordance with the manufacturer's instructions. Ensure that there is sufficient clearance between the feet and the tool.
When starting or switching on the equipment for any damage and motor, the machine should not have it repaired if necessary.
be tilted unless the machine has to be raised during the process. In this case only tilt it as far as absolutely necessary and only raise the side away from you.
Keep the gingers and feet out of the ways of the tool.
Never lift or carry a machine with the motor running.
Stop the tool if the appliance has to be tilted for transportation over surfaces other than grass and of the appliance is moved to and from the surface to be worked on.
Switch the motor off each time before you work on the appliance or leave it unattended.
If you strike an obstacle when working, please disable the machine. Unplug from themains. Remove the obstacle, check the
If the equipment begins to vibrate strongly, unplug from the mains and ascertain the cause.
Should the power cable be damaged during use, the plug must be immediately pulled out of the socket. Under no circumstances should the power cable be touched before the plug has been pulled out.
Taking aBreak
Never leave the equipment unattended. If you stop work, unplug the equipment from the mains and store the equipment in a safe place.
If you stop work to go to a different work area, it is essential to turn the equipment off and unplug from the mains.

Beware of Environmental Influences
Never use the equipment in the rain or in damp, wet conditions.
Never work immediately adjacent to a swimming pool or garden pond with electrical equipment.
Comply with local quiet periods in your community!

Electrical safety
Check the power cable regularly for damage and signs of wear.
Only use permitted extension cables.
Unplug the mains plug immediately if the mains cable/extension cable is damaged or severed.
As a user of the appliance, you are responsible for Third parties in your range of action.
Warranty
The manufacturer warrants its products for exclusively non-commercial use for a period of 24 months from the date of original purchase. This warranty does not affect statutory warranty claims. The warranty covers all substantial faults of the product, which are caused by defects in material and workmanship. If a product exhibits such a defect we will, at our option, repair or replace it without cost for parts and labour provided the following requirements are fulfilled:
- The product must have been sold to the customer in a legally correct way.
- The original receipt with the customer's address, date of purchase, model and product designation is presented as proof of purchase. The product
must have been purchased within the EC.
- The product was handled properly and according to the recommendations in the operating instructions. It is essential that the product has been maintained and cleaned according to the information in the operating instructions. No attempt to disassemble or repair the product has been made by either the buyer or an unauthorised third party.
- It must be ensured that only original replacement parts and original accessories approved by the manufacturer are used. There may be an increased risk of consequential damage and accidents if non-original parts or non-original accessories are used. This warranty
does not cover consequential damages.
- The product must be either taken directly or sent with postage paid to an authorised service centre. The original receipt must be sent with the product.
- The warranty does not cover damage from misuse, abuse, use of unsuitable, non-original or unauthorised interchangeable parts, replacement parts or accessories, as well as improper maintenance and cleaning.
The products contain various components that are subject to normal or use-related wear.
The warranty does not extend to these wearing parts.
In particular the following components relating to this product are excluded:
Blades / blade bar /drive belt / care roller /blade roller /
lower blade / cutting plate / cutting line / cutting head cover / saw blade /nickel-cadmium-cell (battery) / brush / aerator cylinder / Spike-tooth discs.
The manufacturer warranty does not affect existing warranty claims between the customer and the dealer / seller.
hereby certifies that on leaving our factory, the unit indicated below is in accordance with the harmonised EU guidelines, EU standards of safety and product specific standards. This certificate becomes void if the units are modified without our approval.
Gloria Service Center
www.gloriagarten.de