
WG184E.9 - Grass trimmer WORX - Free user manual and instructions
Find the device manual for free WG184E.9 WORX in PDF.

| Product Type | Cordless Grass Trimmer |
| Brand | Worx |
| Model | WG184E.9 |
| Nominal Voltage | 40 V (2 x 20 V max) |
| Cutting Width | 33 cm |
| Line Diameter | 2 mm |
| Battery Type | Lithium-Ion |
| Battery Model | WA3551 (2.0 Ah) |
| Charger Model | WA3876 |
| Charging Time (2 batteries) | 60 minutes |
| Weight | 3.1 kg |
| Sound Pressure Level (LpA) | 78 dB(A) |
| Sound Power Level (LwA) | 95.4 dB(A) |
| Vibration | < 4 m/s² |
| Main Functions | Grass cutting, edging, pivoting head (upper shaft rotation) |
| Line Feed | Automatic (button) and manual |
| Battery Indicator | LED (5 levels) |
| Auxiliary Handle | Adjustable |
| Protections | Protective cover, line cutter, edging wheels |
| Safety | On/off switch, safety lock, overload and temperature protection |
| Maintenance and Cleaning | Clean with a dry cloth, visually inspect before use, store in a dry place |
| Available Spare Parts | Spool (WA0014), protective cover, wheels, battery, charger |
| Recommended Use | Light lawns and edges; avoid bad weather and proximity of children |
Frequently Asked Questions - WG184E.9 WORX
User questions about WG184E.9 WORX
0 question about this device. Answer the ones you know or ask your own.
Ask a new question about this device
Download the instructions for your Grass trimmer in PDF format for free! Find your manual WG184E.9 - WORX and take your electronic device back in hand. On this page are published all the documents necessary for the use of your device. WG184E.9 by WORX.
USER MANUAL WG184E.9 WORX
natural_image
Technical line drawing of a mechanical device with articulated arms and a handle (no text or symbols)
| 2-in-1 Grass Trimmer/Edger | EN | P09 |
| 2-in-1 Rasentrimmer/Kantenschneider | D | P16 |
| Coupe bordure/taille-haies 2 en 1 | F | P23 |
| Tosaerba/tagliabordi 2-in-1 | I | P31 |
| Cortacésped/recortadora de bordes 2 en 1 | ES | P38 |
| 2-in-1 grasrandsnijder | NL | P45 |
| Przycinarka/podkaszarka do trawy 2-w-1 | PL | P52 |
| 2 funkciós fúkasza/szegélyvágó | HU | P59 |
| Instrument 2 în 1 pentru prelucrarea produselor din sticlă/tăierea muchiilor pentru produsele din sticlă | RO | P66 |
| 2-v-1 sekačkou/zastřihovačkou okrajů | CZ | P73 |
| Vyžínač trávy/Zastrihávač trávnikov 2 v 1 | SK | P80 |
| Aparador/corta-relvas 2 em 1 | PT | P87 |
| 2-n-1 Grästrimmer/kantklippare | SV | P94 |
| Obrezovalnik trate/kotni obrezovalnik, 2-v1 | SL | P101 |


flowchart
graph TD
    A["Step 1: Lock"] --> B["Step 2: Connection"]
    B --> C["Step 3: Lock Padlock"]
    C --> D["End: Device with Lock Mechanism"]
    style A fill:#f9f,stroke:#333
    style B fill:#ccf,stroke:#333
    style C fill:#cfc,stroke:#333


PRODUCT SAFETY GENERAL SAFETY WARNINGS

WARNING: Read all safety warnings and all instructions. Failure to follow the
warnings and instructions may result in electric shock, fire and/or serious injury.
Save all warnings and instructions for future reference.
The appliance is only to be used with the power supply unit provided with the appliance.
IMPORTANT READ CAREFULLY BEFORE USE KEEP FOR FUTURE REFERENCE
SAFE OPERATING PRACTICES
1. TRAINING
a) Read the instructions carefully. Be familiar with the controls and the correct use of the machine.
b) Never allow children, persons with reduced physical, sensory or mental capabilities or lack of experience and knowledge or people unfamiliar with these instructions to use the machine, local regulations may restrict the age of the operator.
c) Keep in mind that the operator or user is responsible for accidents or hazards occurring to other people or their property.
2. PREPARATION
a) Before use, always visually inspect the machine for damaged, missing or misplaced guards or shields.
b) Never operate the machine while people, especially children, or pets are nearby.
3. OPERATION
a) Wear eye protection, long trousers and stout shoes at all times while operating the machine.
b) Avoid using the machine in bad weather conditions especially when there is a risk of lightning.
c) Use the machine only in daylight or good artificial light.
d) Never operate the machine with damaged guards or shields or without guards or shields in place.
e) Switch on the motor only when the hands and feet are away from the cutting means.
f) Always disconnect the machine from the power supply (e.g. remove the battery pack from the machine)
1) whenever the machine is left unattended;
2) before clearing a blockage;
3) before checking, cleaning or working on the machine;
4) after striking a foreign object;
5) whenever the machine starts vibrating abnormally.
g) Take care against injury to feet and hands from the cutting means. h) Always ensure that the ventilation openings are kept clear of debris.
i) Never fit metal cutting elements.
j) Always be sure of your footing on slopes.
k) Walk, never run.
I) Not overreach and keep the balance at all times.
m) Not to touch moving hazardous parts before removing the battery pack from the machine and the moving hazardous parts have come to a complete stop.
4. MAINTENANCE AND STORAGE
a) Disconnect the machine from the power supply (e.g. remove the battery pack from the machine) before carrying out maintenance or cleaning work.
b) Use only the manufacturer's recommended replacement parts and accessories.
c) Inspect and maintain the machine regularly.
Have the machine repaired only by an authorized repairer.
d) When not in use, store the machine out of the reach of children.
SAFETY WARNINGS FOR BATTERY PACK
a) Do not dismantle, open or shred cells or battery pack.
b) Do not short-circuit a battery pack. Do not store battery packs haphazardly in a box or drawer where they may short-circuit each other or be short-circuited by conductive materials. When battery pack is not in use, keep it away from other metal objects, like paper clips, coins, keys, nails, screws or other small metal objects, that can make a connection from one terminal to another. Shorting the battery terminals together may cause burns or a fire.
c) Do not expose battery pack to heat or fire.
Avoid storage in direct sunlight.
d) Do not subject battery pack to mechanical shock.
e) In the event of battery leaking, do not allow the liquid to come into contact with the skin or eyes. If contact has been made, wash the affected area with copious amounts of water and seek medical advice.
f) Seek medical advice immediately if a cell or battery pack has been swallowed.
g) Keep battery pack clean and dry.
h) Wipe the battery pack terminals with a clean dry cloth if they become dirty.
i) Battery pack needs to be charged before use. Always refer to this instruction and use the correct charging procedure.
j) Do not maintain battery pack on charge when not in use.
k) After extended periods of storage, it may be necessary to charge and discharge the battery pack several times to obtain maximum performance.
I) Battery pack gives its best performance
when it is operated at normal room temperature (20°C ± 5°C).
m) When disposing of battery packs, keep battery packs of different electrochemical systems separate from each other.
n) Recharge only with the charger specified by WORX. Do not use any charger other than that specifically provided for use with the equipment. A charger that is suitable for one type of battery pack may create a risk of fire when used with another battery pack.
o) Do not use any battery pack which is not designed for use with the equipment.
p) Keep battery pack out of the reach of children.
q) Retain the original product literature for future reference.
r) Remove the battery from the equipment when not in use.
s) Dispose of properly.
SYMBOLS
 | Read operator's manual |
 | Keep bystanders away |
 | Wear eye and ear protection |
 | Do not expose to rain |
 | Waste electrical products must not be disposed of with household waste. Please recycle where facilities exist. Check with your local authorities or retailer for recycling advice. |
 | Do not dispose of batteries. Return exhausted batteries to your local collection or recycling point. |
 | |
 | Do not expose to rain or water |
 | Do not burn |
 | Make sure the battery is removed prior to changing accessories. |
 | Trimming |
 | Edging |
 | Lock |
 | Unlock |
 | High speed |
 | Low speed |
 | Correct |
 | Incorrect |
-
HANDLE ADJUSTMENT KNOB
-
AUXILIARY HANDLE
-
UPPER SHAFT ROTATION BUTTON
-
COMMAND FEED BUTTON
-
BATTERY INDICATOR LIGHT
-
BATTERY PACK *
-
ON/OFF SWITCH
-
LOCK OFF SWITCH
-
UPPER SHAFT
-
LOCKING COLLAR
-
LOWER SHAFT
-
WHEEL STORAGE POSITION
-
SAFETY GUARD
-
LINE CUTTER
-
EDGER WHEELS
-
LINE FEED BUTTON
-
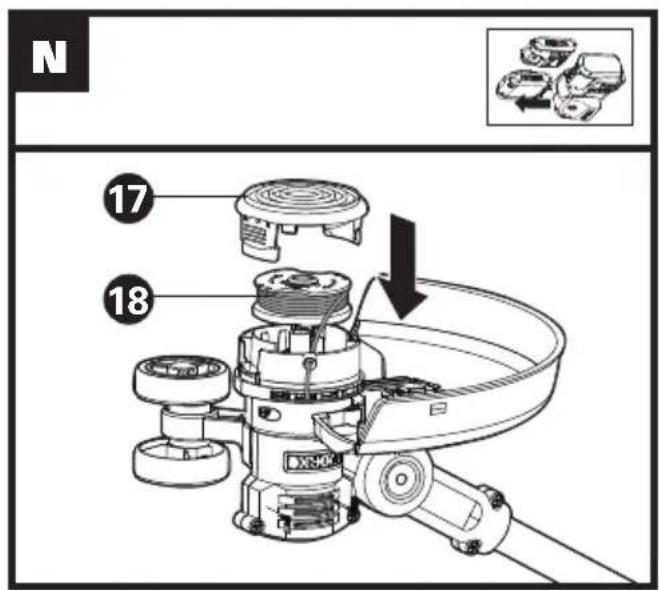
SPOOL CAP (SEE FIG. N)
-
SPOOL (SEE FIG. N)
* Not all the accessories illustrated or described are included in standard delivery.
TECHNICAL DATA
| WG184E WG184E.9 | ||
| Voltage | 40V MAX (2x20V MAX) * | |
| Cutting Diameter | 33cm | |
| Line Diameter | 2mm | |
| Battery type | Lithium-ion / | |
| Battery Model | WA3551 (2.0Ah) / | |
| Charger Model | WA3876 / | |
| Charger rating | Input: 100-240V~50/60Hz, 100W Output: 20V=4.0A | / |
| Charging time (approx.) | / | |
| Battery pack: 2.0Ah (1pc) | 60min. | |
| 2.0Ah (2pcs) | 60min. | |
| Machine Weight | 3.9kg 3.1kg | |
*Voltage measured without workload. Initial battery voltage reaches maximum of 20 volts. Nominal voltage is 18 volts.
ACCESSORIES
| WG184E W | G184E.9 | |
| Battery pack (WA3551) 2 / | ||
| Charger (WA3876) 1 / | ||
| Spool (WA0014) 1 | 1 | |
| Safety guard | 1 | 1 |
| Edger wheels | 1 | 1 |
We recommend that you purchase your accessories listed in the above list from the same store that sold you the lawn trimmer. Refer to the accessory packaging for further details. Store personnel can assist you and offer advice.
NOISE DATA
| A weighted sound pressure | L_pA = 78 dB(A) |
| K_pA | 3 dB(A) |
| A weighted sound power | L_wA = 95.4 dB(A) |
| K_wA | 3 dB(A) |
| Wear ear protection |
VIBRATION INFORMATION
| Typical weighted vibration | ah < 4 m/s2 |
| Uncertainty | K = 1.5 m/s2 |
The declared vibration total value may be used for comparing one tool with another, and may also be used in a preliminary assessment of exposure.
WARNING! The vibration emission value during actual use of the power tool can differ
from the declared value depending on the ways in which the tool is used dependant on the following examples and other variations on how the tool is used: How the tool is used and the materials being cut or drilled.
The tool being in good condition and well maintained. The use the correct accessory for the tool and ensuring it is sharp and in good condition.
The tightness of the grip on the handles and if any anti vibration accessories are used.
And the tool is being used as intended by its design and these instructions.
This tool may cause hand-arm vibration syndrome if its use is not adequately managed.

WARNING! To be accurate, an estimation of exposure level in the actual conditions of use should also take account of all parts of the operating cycle such as the times when the tool is switched off and when it is running idle but not actually doing the job. This may significantly reduce the exposure level over the total working period.
Helping to minimise your vibration exposure risk.
ALWAYS use sharp chisels, drills and blades Maintain this tool in accordance with these instructions and keep well lubricated (where appropriate) If the tool is to be used regularly then invest in anti vibration accessories.
Plan your work schedule to spread any high vibration tool use across a number of days.
| Action Figure | |
| Assembly | |
| Assembling the Main Handle See Fig. A | |
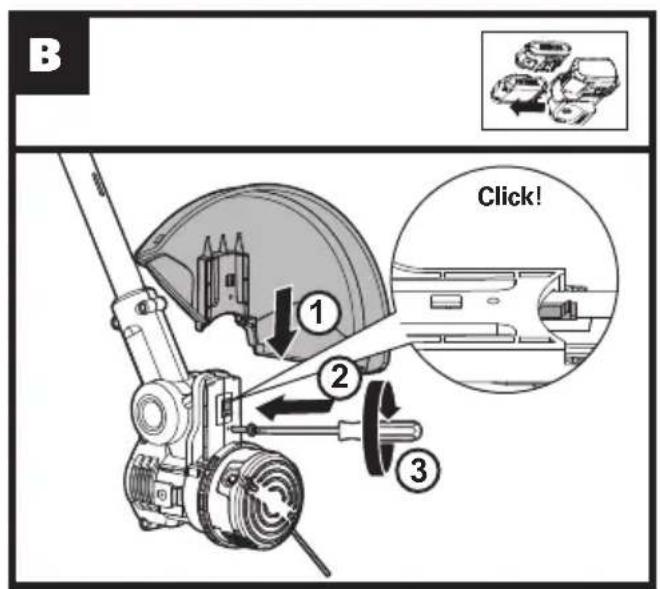
| Assembling the Safety Guard See Fig. B | |
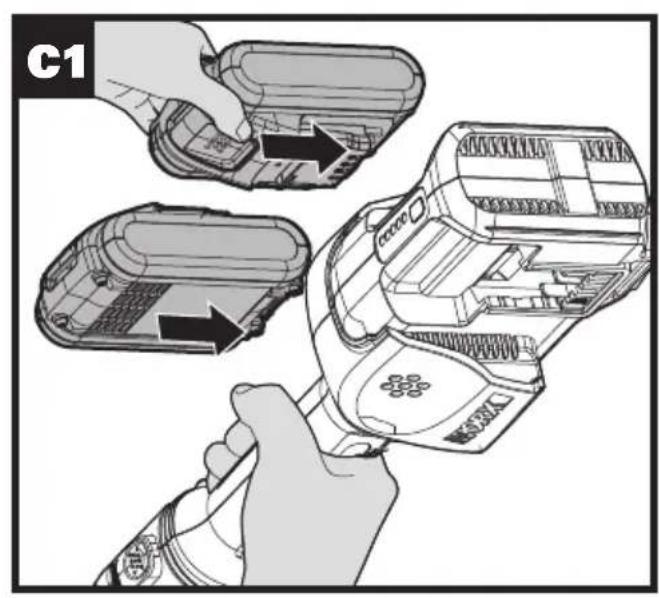
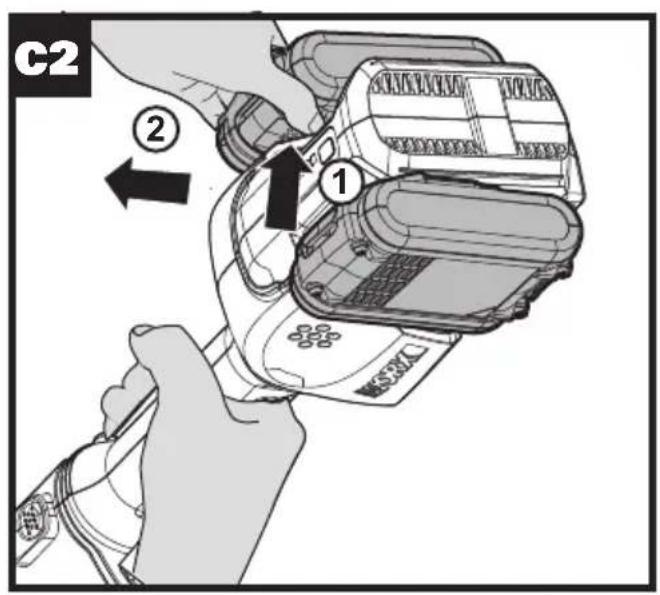
| Installing and Removing the Battery PackNOTE:This machine will only run when 2 batteries are installed. It is recommended to use the same two batteries and charge the two batteries at the same time.Using two different sized batteries or if one battery isn't fully charged then the machine will only run to the lowest common denominator. | See Fig. C1, C2 |
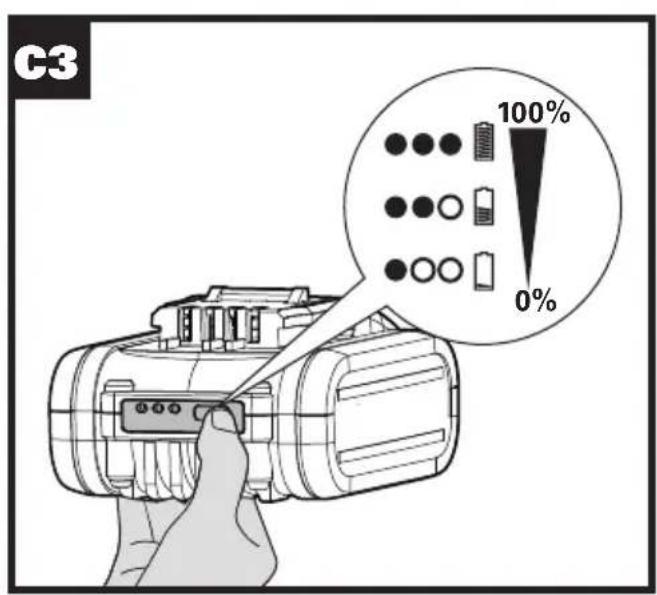
| Checking the battery charge conditionNOTE: Fig. C3 only applies for the battery pack with battery indicator light. | See Fig. C3 |
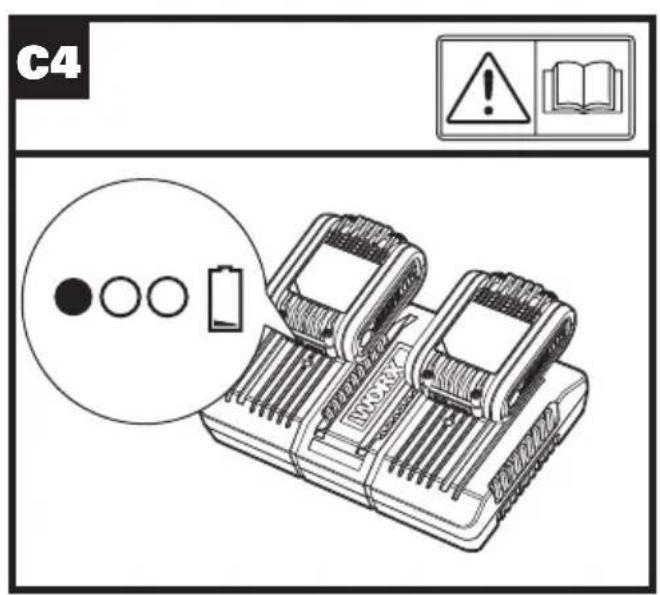
| Charging the battery packNOTE:The batteries are shipped uncharged. Each battery must be fully charged before the first use.Always fully charge the two batteries at same time. More details can be found in charger's manual. | See Fig. C4 |
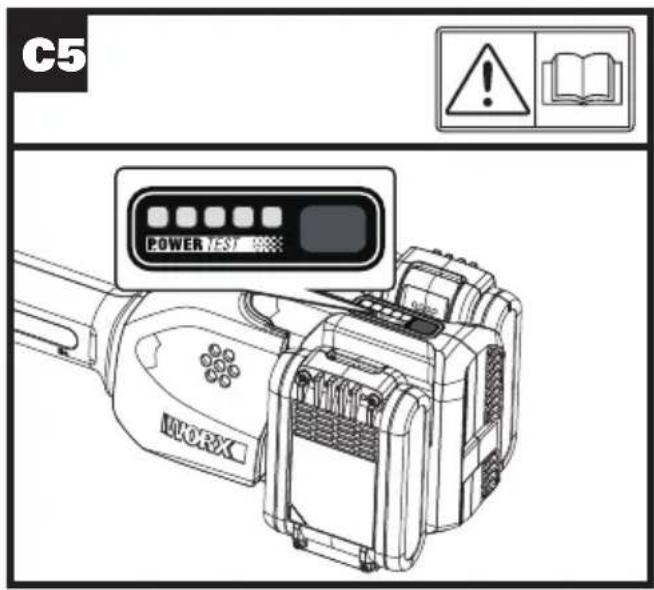
| Battery power indicator on the machineSee details in BATTERY STATUS section | See Fig. C5 |
| Operation |
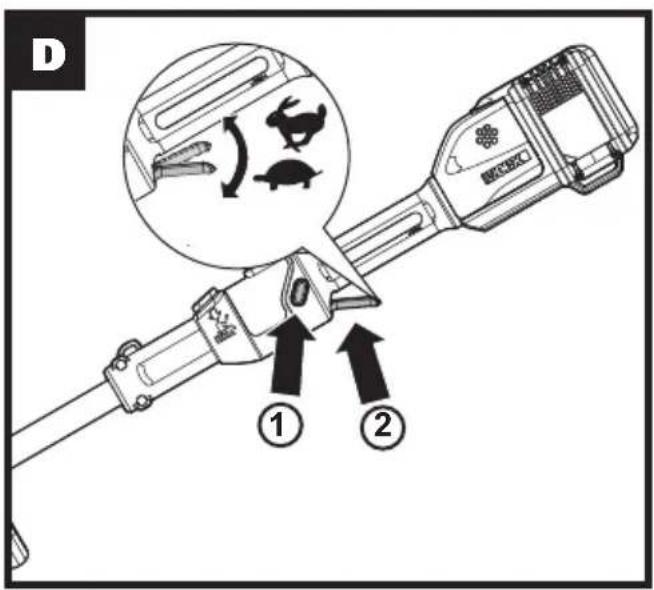
| On/Off SwitchWarning! The cutting head continues to rotate after the trimmer has been switched off; wait until it has completely stopped then lay down the tool. | See Fig. D |
| Trimming See Fig. E | |
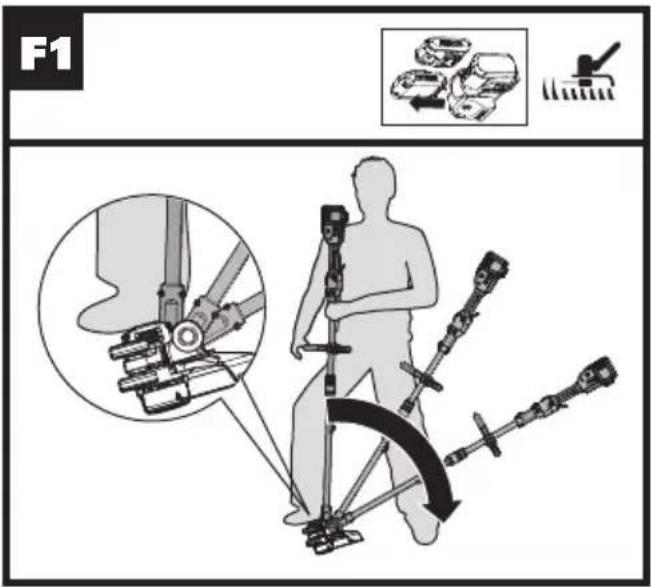
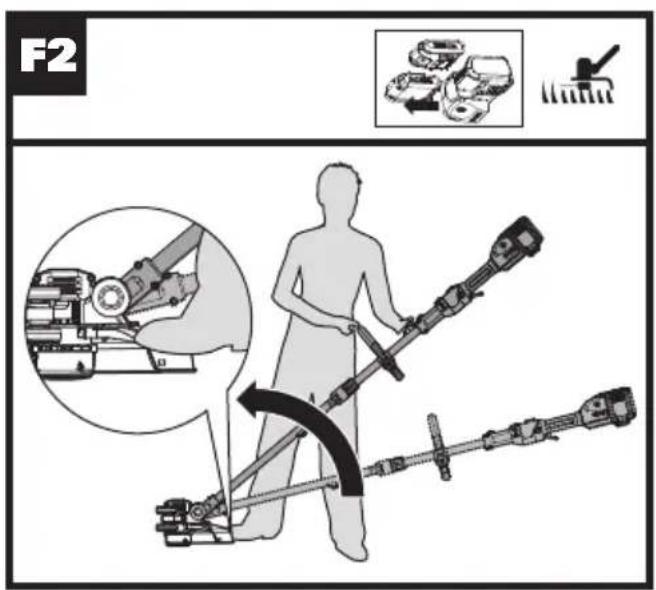
| -Adjusting the Trimmer Head | See Fig.F1, F2 |
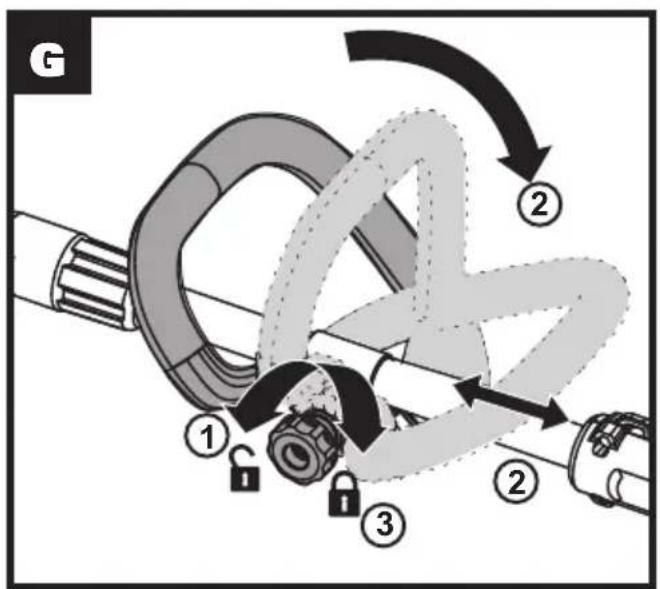
| -Adjusting the Auxiliary handle See Fig. G | |
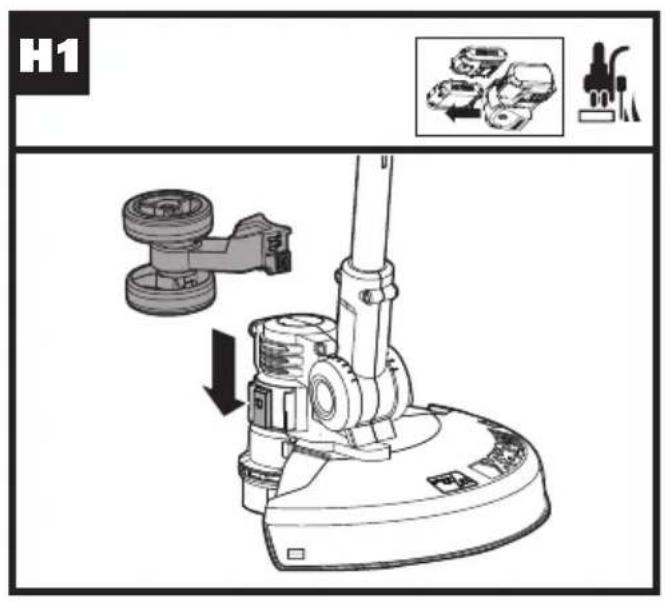
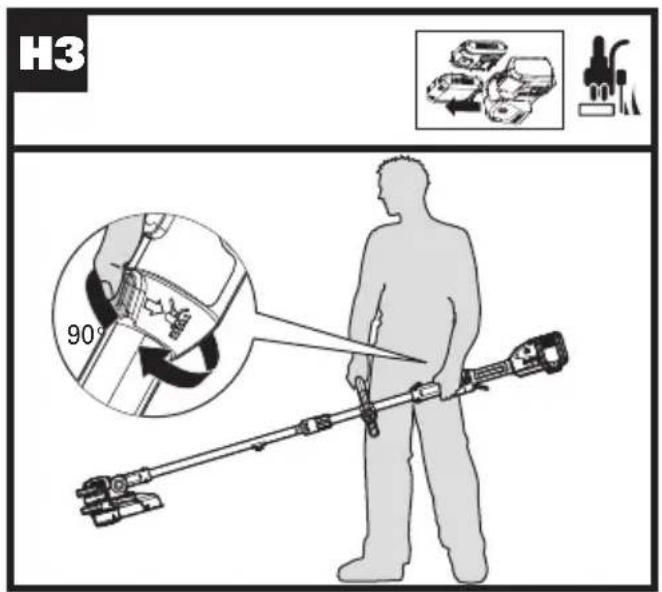
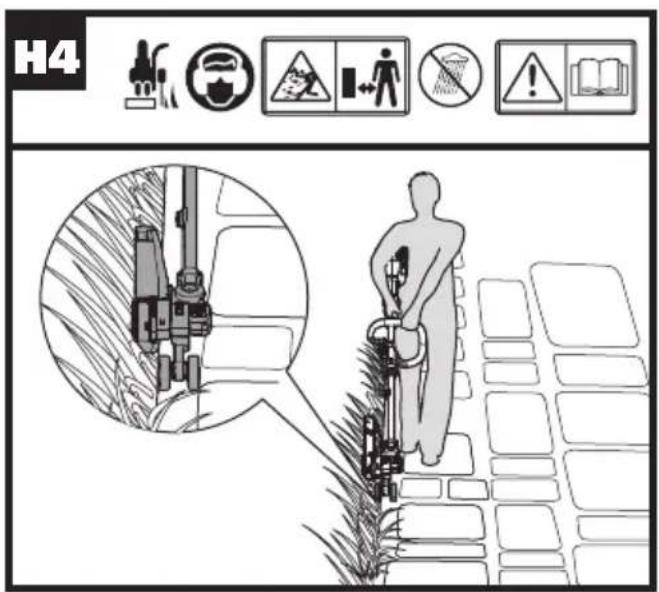
| Edging | See Fig.H1-H4 |
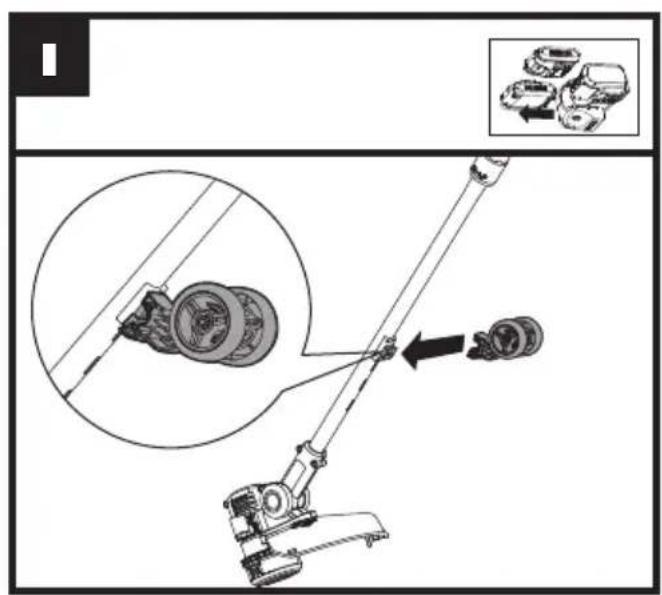
| -Edger wheel storage See Fig. I | |
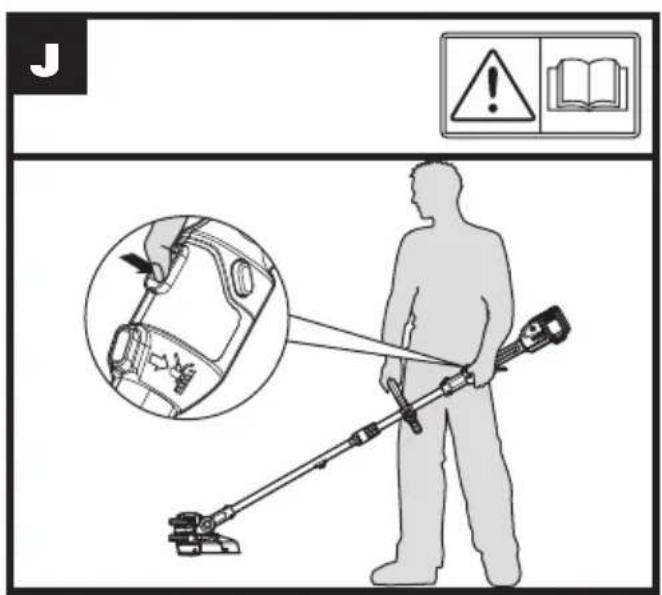
| Command feeding the line See Fig. J | |
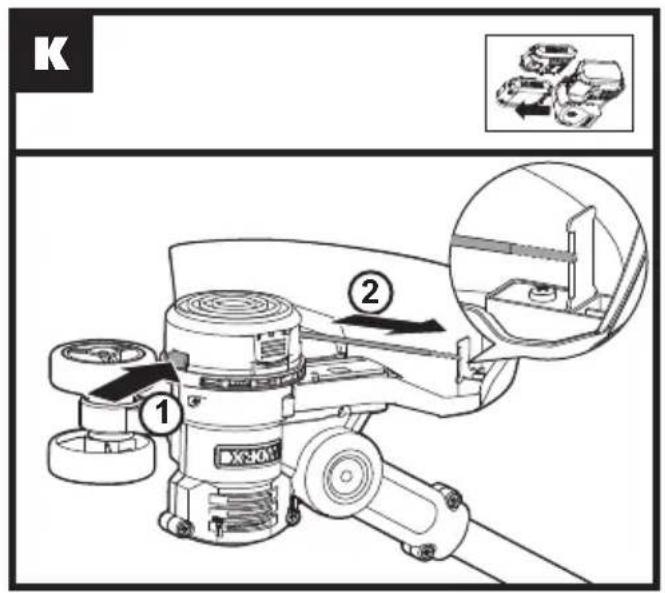
| Manually feeding the line See Fig. K | |
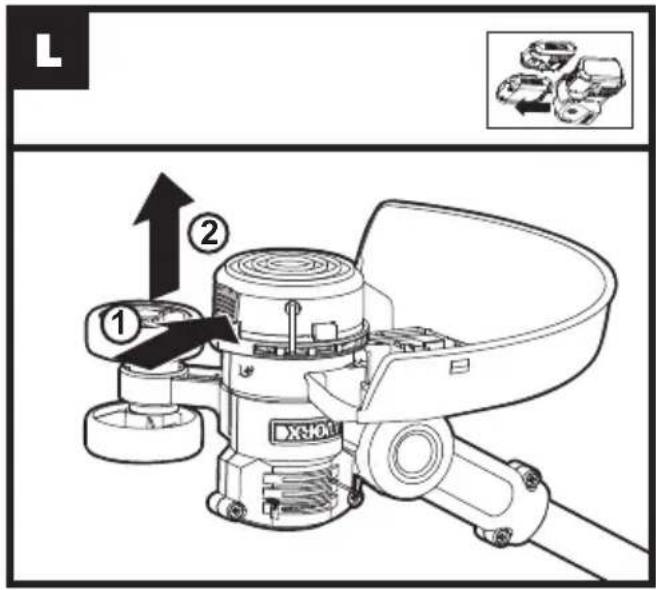
| Replacing the trimmer line and spool | See Fig. L,M, N |
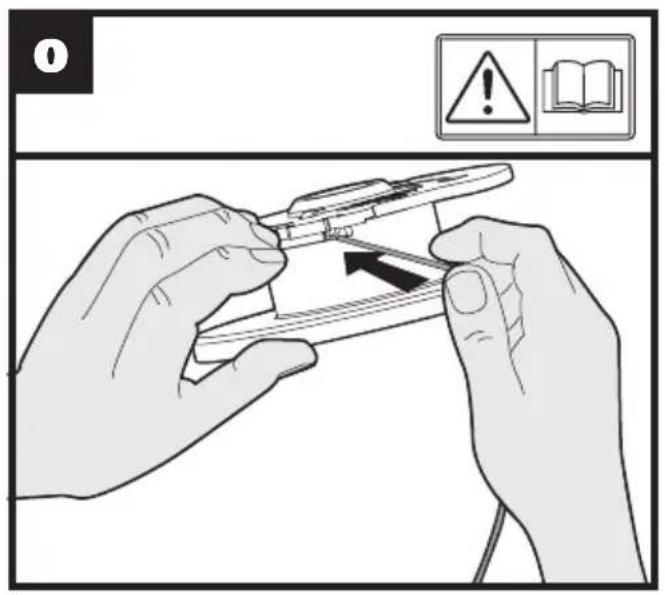
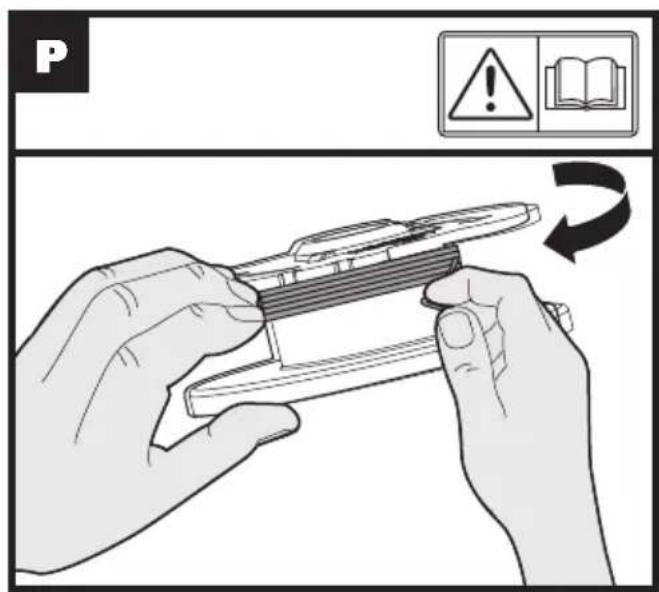
| Manually winding the line | See Fig. O,P, Q, R |
BATTERY STATUS (See Fig. C5)
Before starting or after use, press the button beside the power indicator light on the machine to check the battery capacity. The indicator lights displays the battery condition as follows:
| Battery power indicator status | Battery condition |
| Five green lights (■) illuminated. | The two batteries are in a highly charged condition. |
| Two, three or four green lights are illuminated. | The two batteries have a remaining charge. The more lights are illuminated, the more battery capacity. |
| Only one green light (■) illuminated. | At least one battery is depleted and needs to be charged. |
| No light is illuminated. | At least one battery is not fully installed or battery may be defective. |
| Only one light is flashing twice per cycle. | At least one battery is over discharged (please refer to the battery charge condition), please recharge the two batteries at once before use again or storage. |
| Only one light is flashing three times per cycle. | At least one battery is hot, wait for them cool down before start again. |
| Only one light is flashing four times per cycle. | The machine is over load. Raise the cutting height or push slowly. |
OPERATION INSTRUCTIONS

WARNING! The charger and battery pack are specially designed to work together so do not attempt to use any other devices. Never insert or allow metallic objects into your charger or battery pack connections because of an electrical failure and hazard will occur.
1. COMMAND FEEDING THE LINE (See Fig. J)
Your grass trimmer is equipped with a Command Feed System. Just press the button while the machine is running, new line will feed out and then stop when you hear the 'clattering' noise of the new line being cut. The motor stops briefly when the Command Feed button is pressed, and restarts when released. This process enables the machine to automatically feed out new line.
2. MANUALLY FEEDING THE LINE (See Fig. K)
Turn off the trimmer and remove the battery. If required, line can be fed out manually. To operate, press and release manual Line Feed Button, while gently pulling out the line until it is long enough to reach the Line Cutter. If the line extends past the Line Cutter, too much line has been fed out. If too much line is fed out, remove the Spool Cap and turn Spool counter-clockwise until the line is at the desired length.
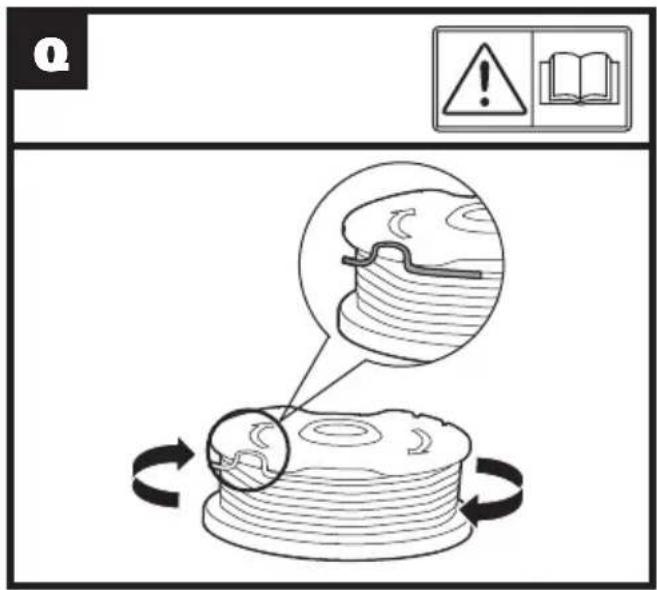
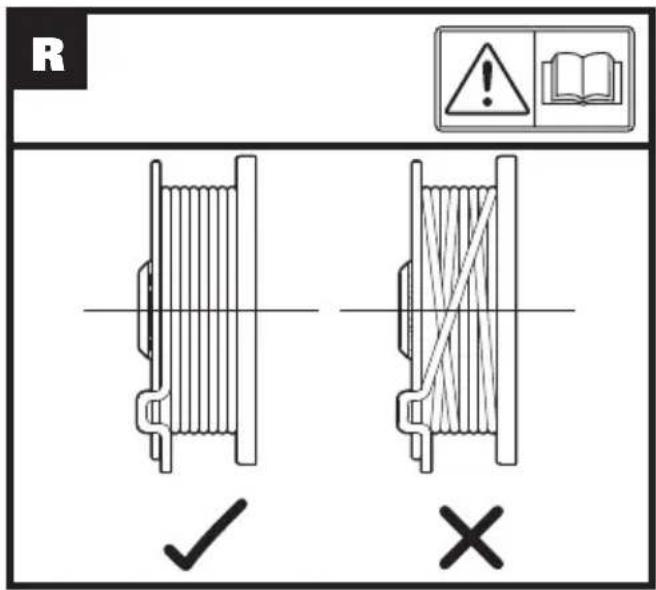
3. MANUALLY WINDING THE LINE (See Fig. 0, P, Q, R)
Take approximately 20ft (6m) of line. Insert 0.080 inches (2mm) of line into the Spool holes and wind line in the direction of the arrows on the top of the Spool. Leave approximately 4 inches (100mm) of line unwound and place into the cleat. Ensure that the line is neatly coiled on the Spool. Failure to do so will impair the efficiency of the automatic line feed. Then fit the Spool as described above in "Replacing the trimmer line and Spool"
STORING YOUR GRASS TRIMMER

Always remove the battery pack from your trimmer after use.
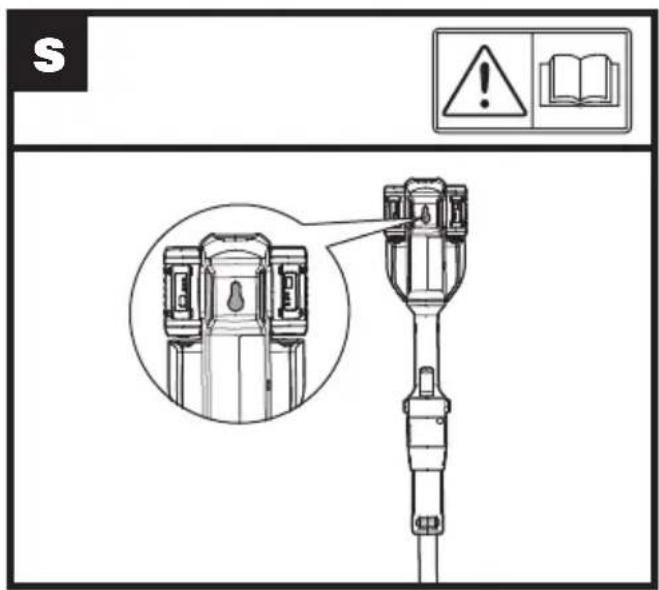
TO STORE YOUR GRASS TRIMMER
The trimmer is provided with a hanging slot for storing the trimmer on the wall. (See Fig. S) Store in a dry place where the trimmer and battery can be protected from damage.
MAINTENANCE

Always remove the battery pack from your trimmer after use.
Always check the product prior to being used for any damage.
After use, disconnect the battery from the tool and check for damage.
Your power tool requires no additional lubrication or maintenance. There are no user serviceable parts in your power tool. Never use water or chemical cleaners to clean your power tool. Wipe clean with a dry cloth. Always store your power tool in a dry room temperature location. Keep the motor ventilation slots clean. Keep all working controls free of dust.
TROUBLESHOOTING
The following table gives problems and actions that you can perform if your machine does not operate correctly.

WARNING: Switch the machine off and remove the battery prior to any troubleshooting.
| Problems Possible Causes Corrective Action | ||
| Trimmer fails to operate. | Battery discharged.Battery too hot/cold.Motor is broken.Internal wiring of machine damaged. | Recharge battery; also see the content in charger manualAllow to cool/warm.Contact Service Agent.Contact Service Agent. |
| Trimmer runs intermittently. | Motor is broken.Battery not fully charged.On/Off switch defective. | Contact Service Agent.Recharge battery.Contact Service Agent. |
| Excessive vibrations/noise. | Machine defective.Line spool is not wound well. | Contact Service Agent.Rewind the line. See “ To fit spool and line assembly.” |
| Cutting time per battery charge too short. | Battery has not been used for long period or only charged for short term.Grass too high.Battery defective. | Fully charge battery; also see the content in charger manual Cut in stages.Replace the battery. |
| Machine does not cut. | Line broken.Battery not fully charged.Motor is broken (speed is too low).Grass entangled around cutting head. | Replace the lineRecharge battery; also see the content in charger manualContact Service Agent.Remove grass. |
| Continuous lighting of the battery charge indicator.No charging procedure possible. | Battery not (properly) inserted.Battery contacts contaminated.Battery defective. | Properly insert battery into battery charger.Clean the battery contacts or replace the battery.Replace the battery. |
| Battery charge indicator does not light up. | Plug of battery charger not plugged in (properly).Socket outlet, mains cable or battery charger defective. | Insert mains plug (fully) into the socket outlet.Check the mains voltage; have the battery charger checked by an authorized after-sales service agent. |
| Command feed does not work | Cutting line is not wound well.The line is tangled.Line is used up. | Manually feed the line, if still can not feed out, remove the Spool out and rewind the line.Replace with a new spool of line. |
ENVIRONMENTAL PROTECTION

Waste electrical products must not be disposed of with household waste. Please recycle where facilities exist. Check with your local authorities or retailer for recycling advice.
DECLARATION OF CONFORMITY
We,
POSITEC Germany GmbH
Grüner Weg 10, 50825 Cologne, Germany
Declare that the product
Description Cordless Grass Trimmer
Type WG184E WG184E.9 (1-designation of machinery, representative of Cordless Grass Trimmer)
Function Cutting grass and similar soft vegetation and for trimming grass edges
Complies with the following Directives:
2006/42/EC, 2014/30/EU, 2011/65/EU,
2000/14/EC amended by 2005/88/EC
2000/14/EC amended by 2005/88/EC:
- Conformity Assessment Procedure as per Annex V
- Measured Sound Power Level 95.4 dB (A)
- Declared Guaranteed Sound Power Level 96 dB(A)
The notified body involved
Name: Intertek Testing & Certification Ltd (notified body 0359)
Address: Davy Avenue, Knowlhill, Milton Keynes, MK5 8NL
Standards conform to
EN 60335-1, EN 50636-2-91, EN 62233, EN
ISO 3744, EN 55014-1, EN 55014-2
The person authorized to compile the technical file, Name Marcel Filz
Address Positec Germany GmbH
Grüner Weg 10, 50825 Cologne, Germany


2017/12/04
Allen Ding
Deputy Chief Engineer, Testing & Certification
Positec Technology (China) Co., Ltd
18, Dongwang Road, Suzhou Industrial
Park, Jiangsu 215123, P. R. China
18, Dongwang Road, Suzhou Industrial
Park, Jiangsu 215123, P. R. China
SÉCURITÉ DU PRODUIT AVERTISSEMENTS DE SÉCURITE GENERAUX

INFORMATIONS RELATIVES AU BRUIT
INFORMATIONS RELATIVES AUX VIBRATIONS
DECLARATION OF CONFORMITY
Nous,
Positec Germany GmbH
Grüner Weg 10, 50825 Cologne, Germany
Adresse: Davy avenue, knowlhill, milton keynes, mk5 8nl
Et conforme aux normes,
EN 60335-1, EN 50636-2-91, EN 62233, EN ISO 3744, EN 55014-1, EN 55014-2
18, Dongwang Road, Suzhou Industrial
Park, Jiangsu 215123, P. R. China
SICUREZZA DEL PRODOTTO AVVISI GENERALI PER LA SICUREZZA

18, Dongwang Road, Suzhou Industrial
Park, Jiangsu 215123, P. R. China
18, Dongwang Road, Suzhou Industrial
Park, Jiangsu 215123, P. R. China
PRODUCTVEILIGHEID ALGEMENE VEILIGHEIDSWAARSCHUWINGEN

Adres: Davy Avenue, Knowlhill, Milton Keynes, MK5 8NL
Standaards in overeenstemming met,
EN 60335-1, EN 50636-2-91, EN 62233, EN
ISO 3744, EN 55014-1, EN 55014-2
18, Dongwang Road, Suzhou Industrial
Park, Jiangsu 215123, P. R. China
BEZPIECZEŃSTWÓ PRODUKTU OGÓLNE OSTRZEŻENIA DQTYCZĄCE BEZPIECZEŃSTWA

Adres: Davy Avenue, Knowlhill, Milton Keynes, MK5 8NL
Normy są zgodne z,
EN 60335-1, EN 50636-2-91, EN 62233, EN ISO 3744, EN 55014-1, EN 55014-2
18, Dongwang Road, Suzhou Industrial
Park, Jiangsu 215123, P. R. China
BIZTONSÁGOS TERMÉKHASZNÁLAT ÁLTALÁNOS FIGYELMEZTETÉSEK

Cím: Davy Avenue, Knowlhill, Milton Keynes, MK5 8NL
18, Dongwang Road, Suzhou Industrial
Park, Jiangsu 215123, P. R. China
SECURITATEA PRODUSULUI AVERTISMENTE GENERALE DE SIGURANTĂ

Tip WG184E WG184E.9 (1-denumirea
Nume: Intertek Testing & Certification Ltd (organism notificat 0359)
Adresa: Davy Avenue, Knowlhill, Milton Keynes, MK5 8NL
18, Dongwang Road, Suzhou Industrial
Park, Jiangsu 215123, P. R. China
BEZPEČNOST VÝROBKU VŠEOBECNÉ BEZPEČNOSTNÍ POKYNY

INFORMACE TÝKAJÍCÍ SE HLUČNOSTI
Adresa: Davy Avenue, Knowlhill, Milton Keynes, MK5 8NL
Použité normy,
EN 60335-1, EN 50636-2-91, EN 62233, EN ISO
3744, EN 55014-1, EN 55014-2
18, Dongwang Road, Suzhou Industrial
Park, Jiangsu 215123, P. R. China
BEZPEČNOST VÝROBKU VŠEOBECNÉ BEZPEČNOSTNÉ POKYNY

Adresa: Davy Avenue, Knowlhill, Milton Keynes, MK5 8NL
18, Dongwang Road, Suzhou Industrial
Park, Jiangsu 215123, P. R. China
SEGURANÇA DO PRODUTO AVISOS GERAIS DE SEGURANÇA

Endereço: Davy Avenue, Knowlhill, Milton Keynes, MK5 8NL
18, Dongwang Road, Suzhou Industrial
Park, Jiangsu 215123, P. R. China
PRODUKTSÄKERHET GENERELLA SÄKERHETSVARNINGAR

Adress: Davy Avenue, Knowlhill, Milton Keynes, MK5 8NL
18, Dongwang Road, Suzhou Industrial
Park, Jiangsu 215123, P. R. China
VARNOST IZDELKA SPLOŠNA VARNOSTNA NAVODILA

Naslov: Davy Avenue, Knowlhill, Milton Keynes, MK5 8NL
18, Dongwang Road, Suzhou Industrial
Park, Jiangsu 215123, P. R. China
WORX
it's your nature
www.worx.com
Copyright © 2017, Positec. All Rights Reserved. AR01341200