BHX50 - Electric twister RAPID - Free user manual and instructions
Find the device manual for free BHX50 RAPID in PDF.

| Product Type | Battery-powered Tying Tool |
| Brand | RAPID |
| Model | BHX50 |
| Dimensions (H x W x D) | 240 x 75 x 310 mm |
| Weight (with battery) | 1.065 kg |
| Power Supply | Lithium-ion battery 14.4 V, 2500 mAh, charger 100-240 V AC, 50-60 Hz |
| Battery Capacity | 2500 mAh, 100 W (max 500 W) |
| Charging Time | 120 minutes per battery |
| Magazine Capacity | Up to 100 m of twine |
| Maximum Tying Diameter | 25 mm |
| Maximum Tying Speed | 12 ties/minute continuous |
| Number of Ties per Charge | ≈ 9000 ties |
| Twine Type | Paper or plastic |
| Main Functions | Training of vines and branches; twist level adjustment (2 to 5 twists) |
| Sound Level (LpA) | 70.5 dB(A) (uncertainty K=3 dB(A)) |
| Recommended Protection | Safety glasses, gloves, hearing protection |
| Operating Conditions | +4°C to +40°C |
| Battery Storage Conditions | -20°C to +50°C |
| Maintenance and Cleaning | Wipe with a damp cloth; lubricate moving parts with multigrade oil after each day; do not use cleaning products |
| Safety | Do not use in rain; disconnect power before maintenance; keep hands away from tying mouth |
| Spare Parts and Repairability | Available kits: cutting (5001601), feed (5001602), twist & hook (5001603), braking (5001604), scissors (5001605) |
| Warranty | 3 years manufacturer (5 years after online registration); batteries and chargers 2 years |
| Recycling | Batteries and device must be deposited at a collection point (WEEE) |
Frequently Asked Questions - BHX50 RAPID
User questions about BHX50 RAPID
0 question about this device. Answer the ones you know or ask your own.
Ask a new question about this device
Download the instructions for your Electric twister in PDF format for free! Find your manual BHX50 - RAPID and take your electronic device back in hand. On this page are published all the documents necessary for the use of your device. BHX50 by RAPID.
USER MANUAL BHX50 RAPID

GB BATTERY TYING MACHINE
DE AKKU-BINDEGERÄT
FR LIEUR ELECTRIQUE SUR BATTERIE
NL ACCUBINDMACHINE
IT LEGATRICE A BATTERIA
ES ATADORA A BATERÍA
PT ATADORA A BATERIA
cz AKUMULÁTOROVÝ VÁZACÍ STROJ
SK AKUMULÁTOROVÝ VIAZACÍ STROJ
SI BATERIJSKA VEZALKA
HR BATERIJSKA VEZAČICA
GR MHXANH ΔΕΣΙΜΑΤΟΣ ΜΕ ΜΠΑΤΑΡΙΑ
HU AKKUMULÁTOROS KÖTÖZÖGÉP
RO MAŞINĂ DE LEGAT PE ACUMULATORI
BG АКУМУЛАТОРНА МАШИНА ЗА ВРЪЗВАНЕ
natural_image
Line drawing of a battery connected to an electrical terminal (no text or symbols)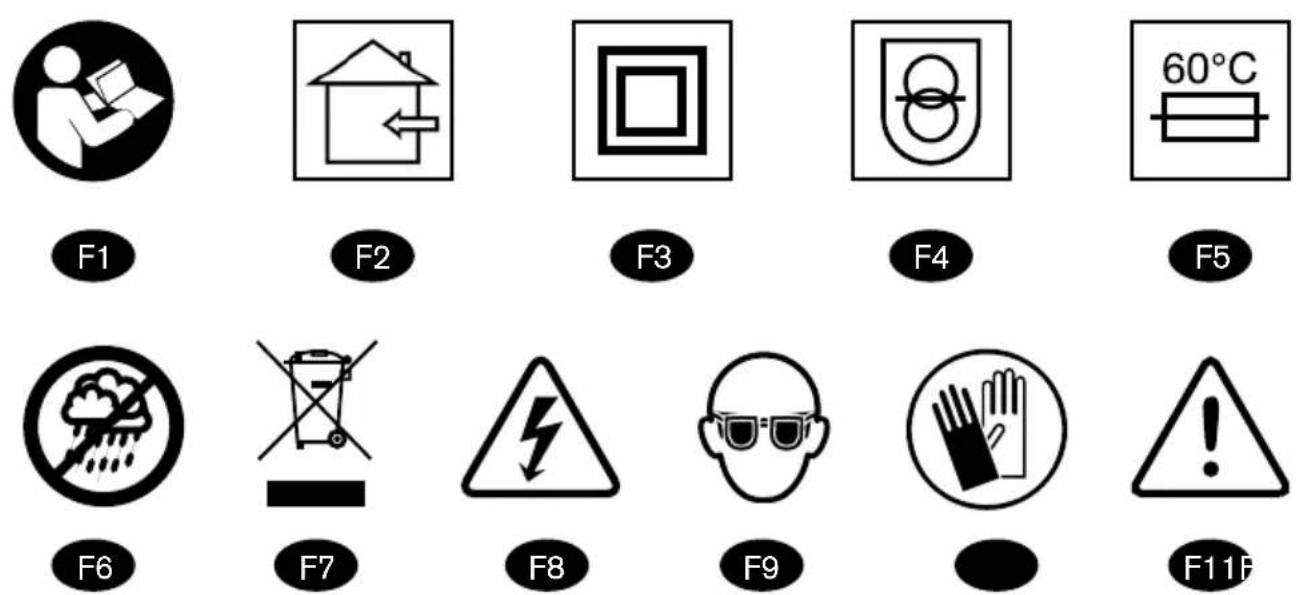
GB Operating instructions - Original 7
DE Betriebsanleitung - Übersetzung der ursprünglichen 11
FR Notice technique - Traduction de l'original 17
NL Bedieningsvoorschriften - vertaling van het origineel 23
IT Istruzioni per l'uso - traduzione dell'originale 28
ES Manual de instrucciones - traducción del original 34
PT Instruções de utilização - tradução do original 39
cz Návod k obsluze - překlad originálu 45
SK Návod na použitie - preklad originálu 50
SI Navodila za uporabo - Prevod izvirnika 55
HR Upute za uporabu - prijevod izvornika 60
GR Οδηγίες λειτουργίας - μετάφραση του πρωτοτύπου 65
HU Használati útmutató - az eredeti dokumentum fordítása 71
RO Manual tehnic - traducere a originalului 76
BG инструкции за експлоатация - превод от оригинала 82
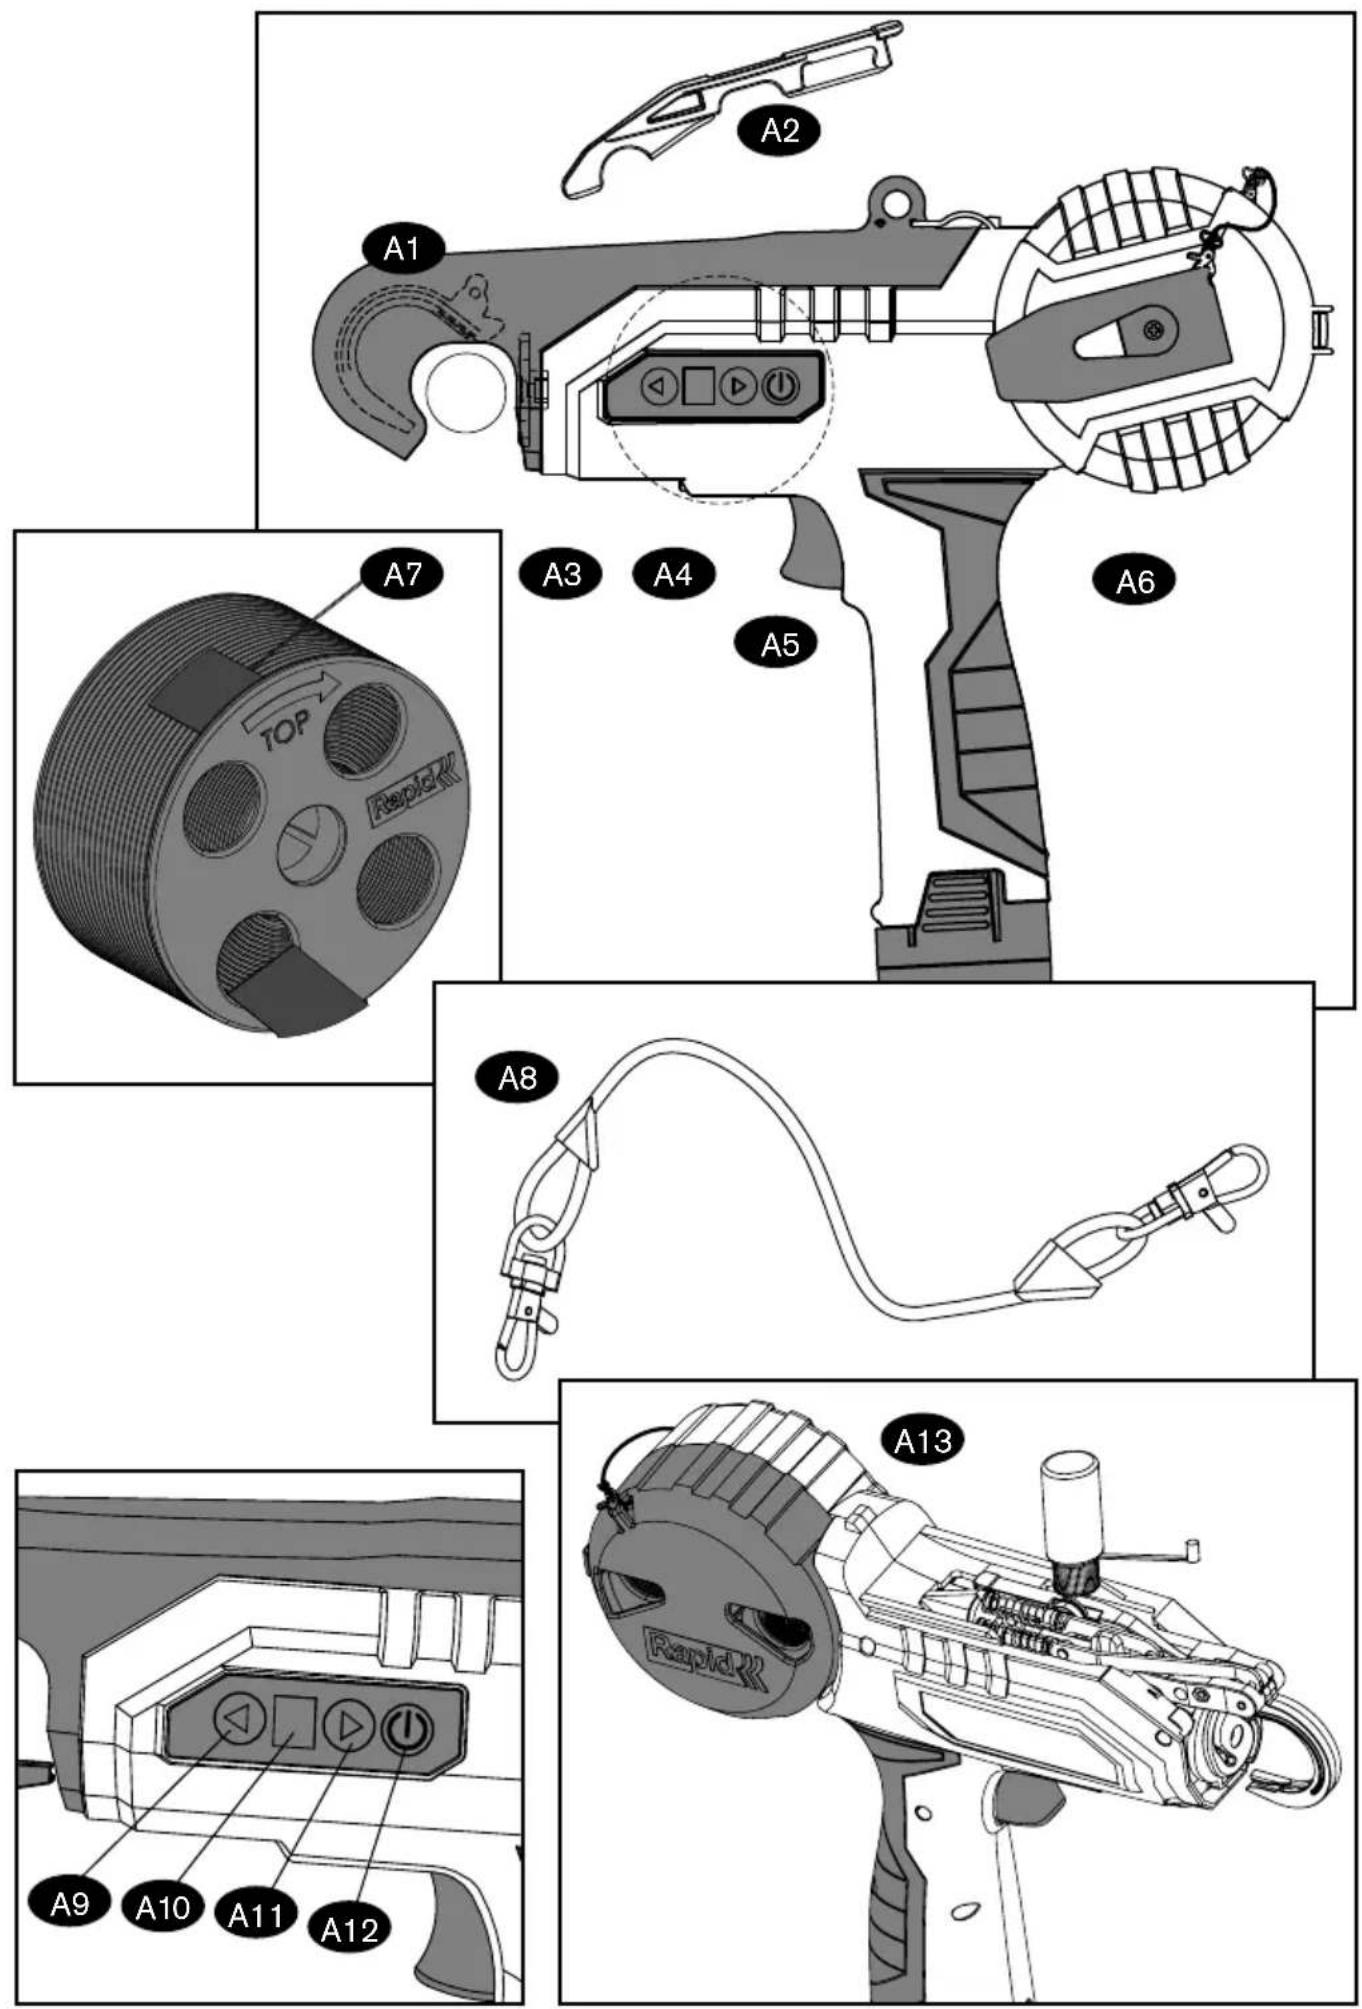
TOOL PARTS DESCRIPTION
A. Tying machine
A1. Guiding hook
A2. Tie pressing plate
A3. Twisting wheel
A4. LED light
A5. Trigger
A6. Feeding tray
A7. Spool
A8. Elastic strap
A9. Twist selector- minus
A10. Display screen
A11. Twist selector- plus
A12. Power button
A13. Lubrication
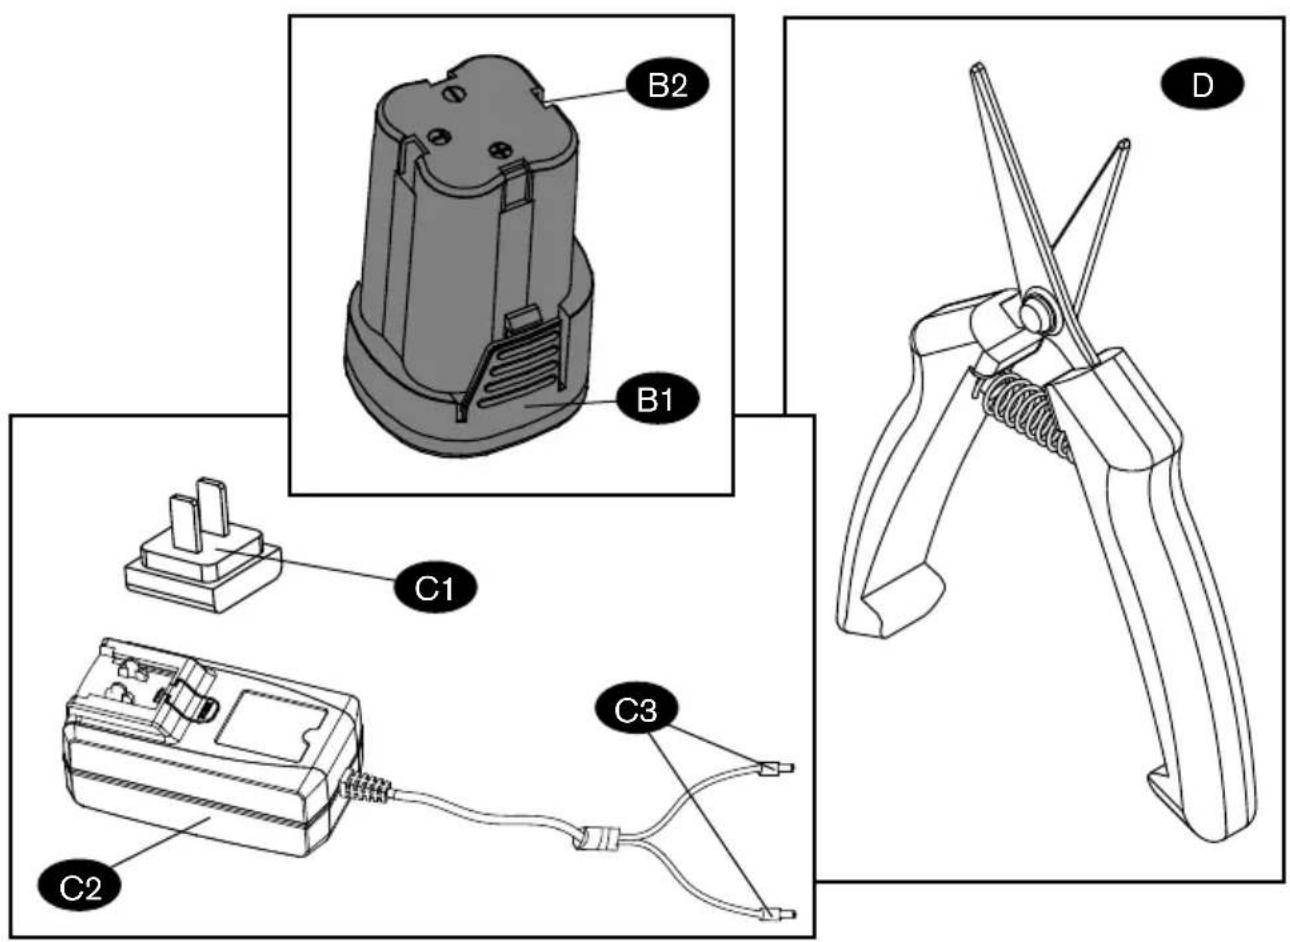
B. Lithium Battery
B1. Battery release button
B2. Battery input connector
C. Battery charger
C1. Power input connector
C2. Charger LED light indicator
C3. Charging jack
D. Scissors
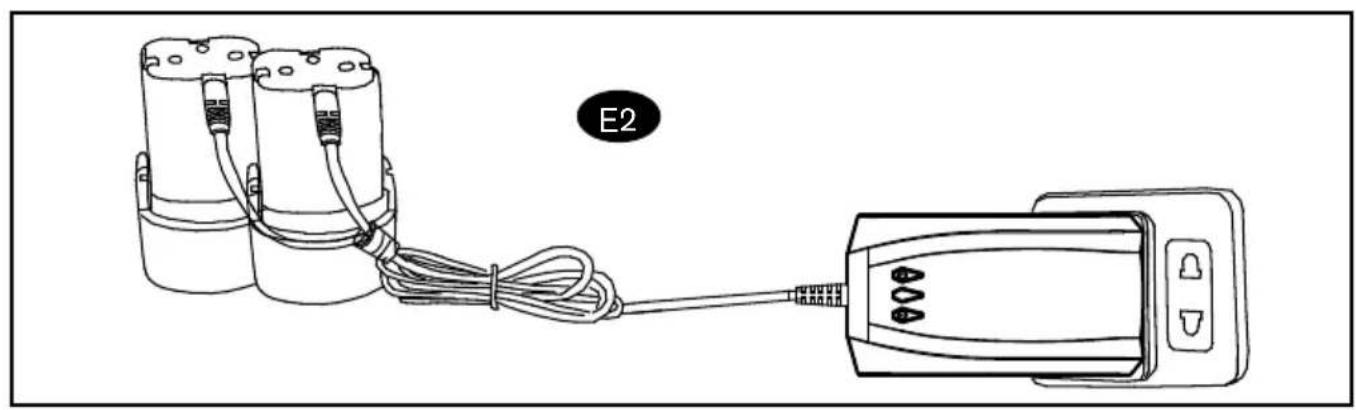
E2. Battery charging
F. Symbols
F1. Please read through all safety warnings and instructions carefully.
F2. Battery can only be charged indoors
F3. Double insulation; grounding not required.
F4. Fail-safe transformer charger.
F5. Battery charging will automatically cut off when overheating occurs.
F6. Do not use or expose the tying machine in rainy conditions.
F7. Electrical equipment cannot be disposed of with household waste.
F8. Never touch charged objects with electric scissors.
F9. Wear eye and ear protection.
F10. Wear protective gloves.
F11. Warning symbol, with information about personal injury
INTRODUCTION
This tool is intended for tying vine shoots in vineyards with a maximum diameter of 25mm.
The tying machine should be used only for the intended purposes.
If this tool is used for other unapproved purposes, it may cause damage to the tool and cause harm to the user.
This tool shall only be used by adults or by young people under the supervision of adults.
The operator or the user shall assume full responsibil-
ity for any harm to others or any damage to property caused by any accident occurring during use.
The manufacturer shall not be liable for any damage caused by non normal or improper use.
TECHNICAL SPECIFICATION
| Battery binding machine, model number | BHX50 |
| Roll type | Paper tie or Plastic tie |
| Magazine capacity, max | 100 m |
| Max tying capacity | 25 mm |
| Tool dimensions H x W x L | 240 x 75 x 310 mm |
| Weight | 1.065 kg (incl. battery) |
| Battery model, type, voltage | Detachable model KH-B1A168X, Li-Ion, 14.4V |
| Battery capacity, power, max power | 2500 mAh, 30W, 50W |
| Battery charging conditions | +4°C to +40°C |
| Battery storage conditions | -20°C to +50°C |
| Battery charger | 100-240V A.C, 50-60Hz, 0.5A input16.8V D.C, 1.42A, terminals for twobatteries, sequence charging |
| Charging time | 120 minutes/each battery |
| Ties per charge, max | ≈ 9000 ties |
| Tying speed, max continuous | 12 ties/ min |
| Operation conditions | +4°C to +40°C |
GENERAL POWER TOOLS SAFETY WARNINGS

WARNING!! Read all safety warnings, instructions, illustrations and specifications provided with this power tool.
Failure to follow all instructions listed below may result in electric shock, fire and/or serious personal injury.
Save all warnings and instructions for future reference.
The term "power tool" in the warnings refers to your mains-operated (corded) power tool or battery-operated (cordless) power tool.
1) WORK AREA SAFETY
a) Keep your work area clean and well lit. Cluttered benches and dark areas invite accidents.
b) Do not operate power tools in explosive atmospheres, such as in the presence of fl ammable liquids, gases, or dust. Power tools create sparks which may ignite the dust or fumes.
c) Keep bystanders, children, and visitors away while operating a power tool. Distractions can cause you to lose control.
2) ELECTRICAL SAFETY
a) Power tool plugs must match the outlet. Never
modify the plug in any way. Do not use any adapter plugs with earthed (grounded) power tools. Unmodified plugs and matching outlets will reduce risk of electric shock.
b) Avoid body contact with earthed or grounded surfaces, such as pipes, radiators, ranges and refrigerators. There is an increased risk of electric shock if your body is grounded.
c) Do not expose power tools to rain or wet conditions. Water entering a power tool will increase the risk of electric shock.
d) Do not abuse the cord. Never use the cord for carrying, pulling or unplugging the power tool. Keep cord away from heat, oil, sharp edges or moving parts. Damaged or entangled cords increase the risk of electric shock.
e) When operating a power tool outdoors, use an extension cord suitable for outdoor use. Use of a cord suitable for outdoor use reduces the risk of electric shock.
f) If operating a power tool in a damp location is unavoidable, use a residual current device (RCD) protected supply. Use of an RCD reduces the risk of electric shock.
3) PERSONAL SAFETY
a) Stay alert, watch what you are doing and use common sense when operating a power tool. Do not use a power tool while you are tired or under the influence of drugs, alcohol or medication. A moment of inattention while operating power tools may result in serious personal injury.
b) Use personal protective equipment. Always wear eye protection. Protective equipment such as a dust mask, non-skid safety shoes, hard hat or hearing protection used for appropriate conditions will reduce personal injuries.
c) Prevent unintentional starting. Ensure the switch is in the off-position before connecting to power source and/or battery pack, picking up or carrying the tool. Carrying power tools with your finger on the switch or energizing power tools that have the switch on invites accidents.
d) Remove any adjusting key or wrench before turning the power tool on. A wrench or a key left attached to a rotating part of the power tool may result in personal injury.
e) Do not overreach. Keep proper footing and balance at all times. This enables better control of the power tool in unexpected situations.
f) Dress properly. Do not wear loose clothing or jewellery. Keep your hair and clothing away from moving parts. Loose clothes, jewellery or long hair can be caught in moving parts.
g) If devices are provided for the connection of dust extraction and collection facilities, ensure these are connected and properly used. Use of dust collection can reduce dust-related hazards.
h) Do not let familiarity gained from frequent use of tools allow you to become complacent and ignore tool safety principles. A careless action can cause severe injury within a fraction of a second.
4) POWER TOOL USE AND CARE
a) Do not force the power tool. Use the correct
power tool for your application. The correct power tool will do the job better and safer at the rate for which it was designed.
b) Do not use the power tool if the switch does not turn it on and off. Any power tool that cannot be controlled with the switch is dangerous and must be repaired.
c) Disconnect the plug from the power source and/or remove the battery pack, if detachable, from the power tool before making any adjustments, changing accessories, or storing power tools. Such preventive safety measures reduce the risk of starting the power tool accidentally.
d) Store idle power tools out of the reach of children and do not allow persons unfamiliar with the power tool or these instructions to operate the power tool. Power tools are dangerous in the hands of untrained users.
e) Maintain power tools and accessories. Check for misalignment or binding of moving parts, breakage of parts and any other condition that may affect the power tool's operation. If damaged, have the power tool repaired before use. Many accidents are caused by poorly maintained power tools.
f) Keep cutting tools sharp and clean. Properly maintained cutting tools with sharp cutting edges are less likely to bind and are easier to control.
g) Use the power tool, accessories and tool bits etc. in accordance with these instructions, taking into account the working conditions and the work to be performed. Use of the power tool for operations different from those intended could result in a hazardous situation.
h) Keep handles and grasping surfaces dry, clean and free from oil and grease. Slippery handles and grasping surfaces do not allow for safe handling and control of the tool in unexpected situations.
5) BATTERY TOOL USE AND CARE
a) Recharge only with the charger specified by the manufacturer. A charger that is suitable for one type of battery pack may create a risk of fire when used with another battery pack.
b) Use power tools only with specifi cally designated battery packs. Use of any other battery packs may create a risk of injury and fi re.
c) When battery pack is not in use, keep it away from other metal objects, like paper clips, coins, keys, nails, screws or other small metal objects, that can make a connection from one terminal to another. Shorting the battery terminals together may cause burns or a fire.
d) Under abusive conditions, liquid may be ejected from the battery; avoid contact. If contact accidentally occurs, fl ush with water. If liquid contacts eyes, additionally seek medical help. Liquid ejected from the battery may cause irritation or burns.
e) Do not use a battery pack or tool that is damaged or modified. Damaged or modified batteries may exhibit unpredictable behaviour resulting in fi re, explosion or risk of injury.
f) Do not expose a battery pack or tool to fire or excessive temperature. Exposure to fire or temperature above 130 °C/265 °F may cause explosion.
g) Follow all charging instructions and do not charge the battery pack or tool outside the temperature range specified in the instructions. Charging improperly or at temperatures outside the specified range may damage the battery and increase the risk of fi re.
6) SERVICE
a) Have your power tool serviced by a qualified repair person using only identical replacement parts. This will ensure that the safety of the power tool is maintained.
b) Never service damaged battery packs. Service of battery packs should only be performed by the manufacturer or authorized service providers.
TYING MACHINE SAFETY WARNINGS

WARNING!
- Do not remove the front cover while operating. To avoid personal injury keep the front end tying mouth away from any part of the body.
- After tying operation is completed, move the tool to the next operating position carefully. Careful handling of the tool will protect the operator and extend the service life of the tying machine.
- Do not use the tying machine in rain, water inside the tool may damage it.
- The product is designed to tie grape vines and other branches within the effective range of 25 mm maximum diameter. Operation out of the range may damage the tool or reduce service life.
- Turn off power before any attempt to remove the feeding hook or tying wire.
- Make sure there is enough space for the feeding hook to move, if there is any movement interference the tying result may be poor.
- Do not use the tool near any fl ammable liquids or gases. If a short circuit occurs, it may cause an explosion or fire.
- The feeding system must be checked and cleaned frequently. If foreign materials accumulate in the feeding track, it will affect tying operation and increase load to the equipment. Product warranty does not cover damage caused by poor maintenance.
- Do not attempt to repair the tool yourself, unless you have been trained. Repair operations not mentioned in this manual should only be performed by personnel at our service center.
■ A-weighted sound pressure level LpA= 70.5 dB(A), uncertainty K=3 dB(A). A-weighted sound power level LwA= 81.5 dB(A), uncertainty K=3 dB(A). Recommendation for the operator to wear hearing protection.
■ Vibration total value = 1.125 m/s ^2 , uncertainty K=1.5 m/s ^2 The declared vibration total value has been measured in accordance with a standard test method and may be used for comparing one tool
with another.
The declared vibration total value may also be used in a preliminary assessment of exposure.

WARNING!
The vibration emission during actual use of the power tool can differ from the declared total value depending on the ways in which the tool is used.
It's necessary to identify safety measures to protect the operator that are based on an estimation of exposure in the actual conditions of use (taking into account all parts of the operating cycle, such as the times when the tool is switched off and when it is running idle, in addition to the trigger time).
TUTORIALS
Scan the QR code on the front of the manual or go to www.rapid.com to benefit from a 2-year warranty extension and to access our tutorial videos:
- How to change the spools
- How to handle the tool
- How to replace wearing parts
OPERATION AND USE
TURN ON TYING MACHINE
Make sure the tool is in good working condition.
Insert a charged battery into the power connector of the tying machine
Press power button, the display lights up and you will hear one long, 3 short and one long beep.
TYING OPERATION
Place branches inside the tying mouth
Press trigger to make a tie
Release the trigger and remove the tool from the branch
Repeat to make next tie
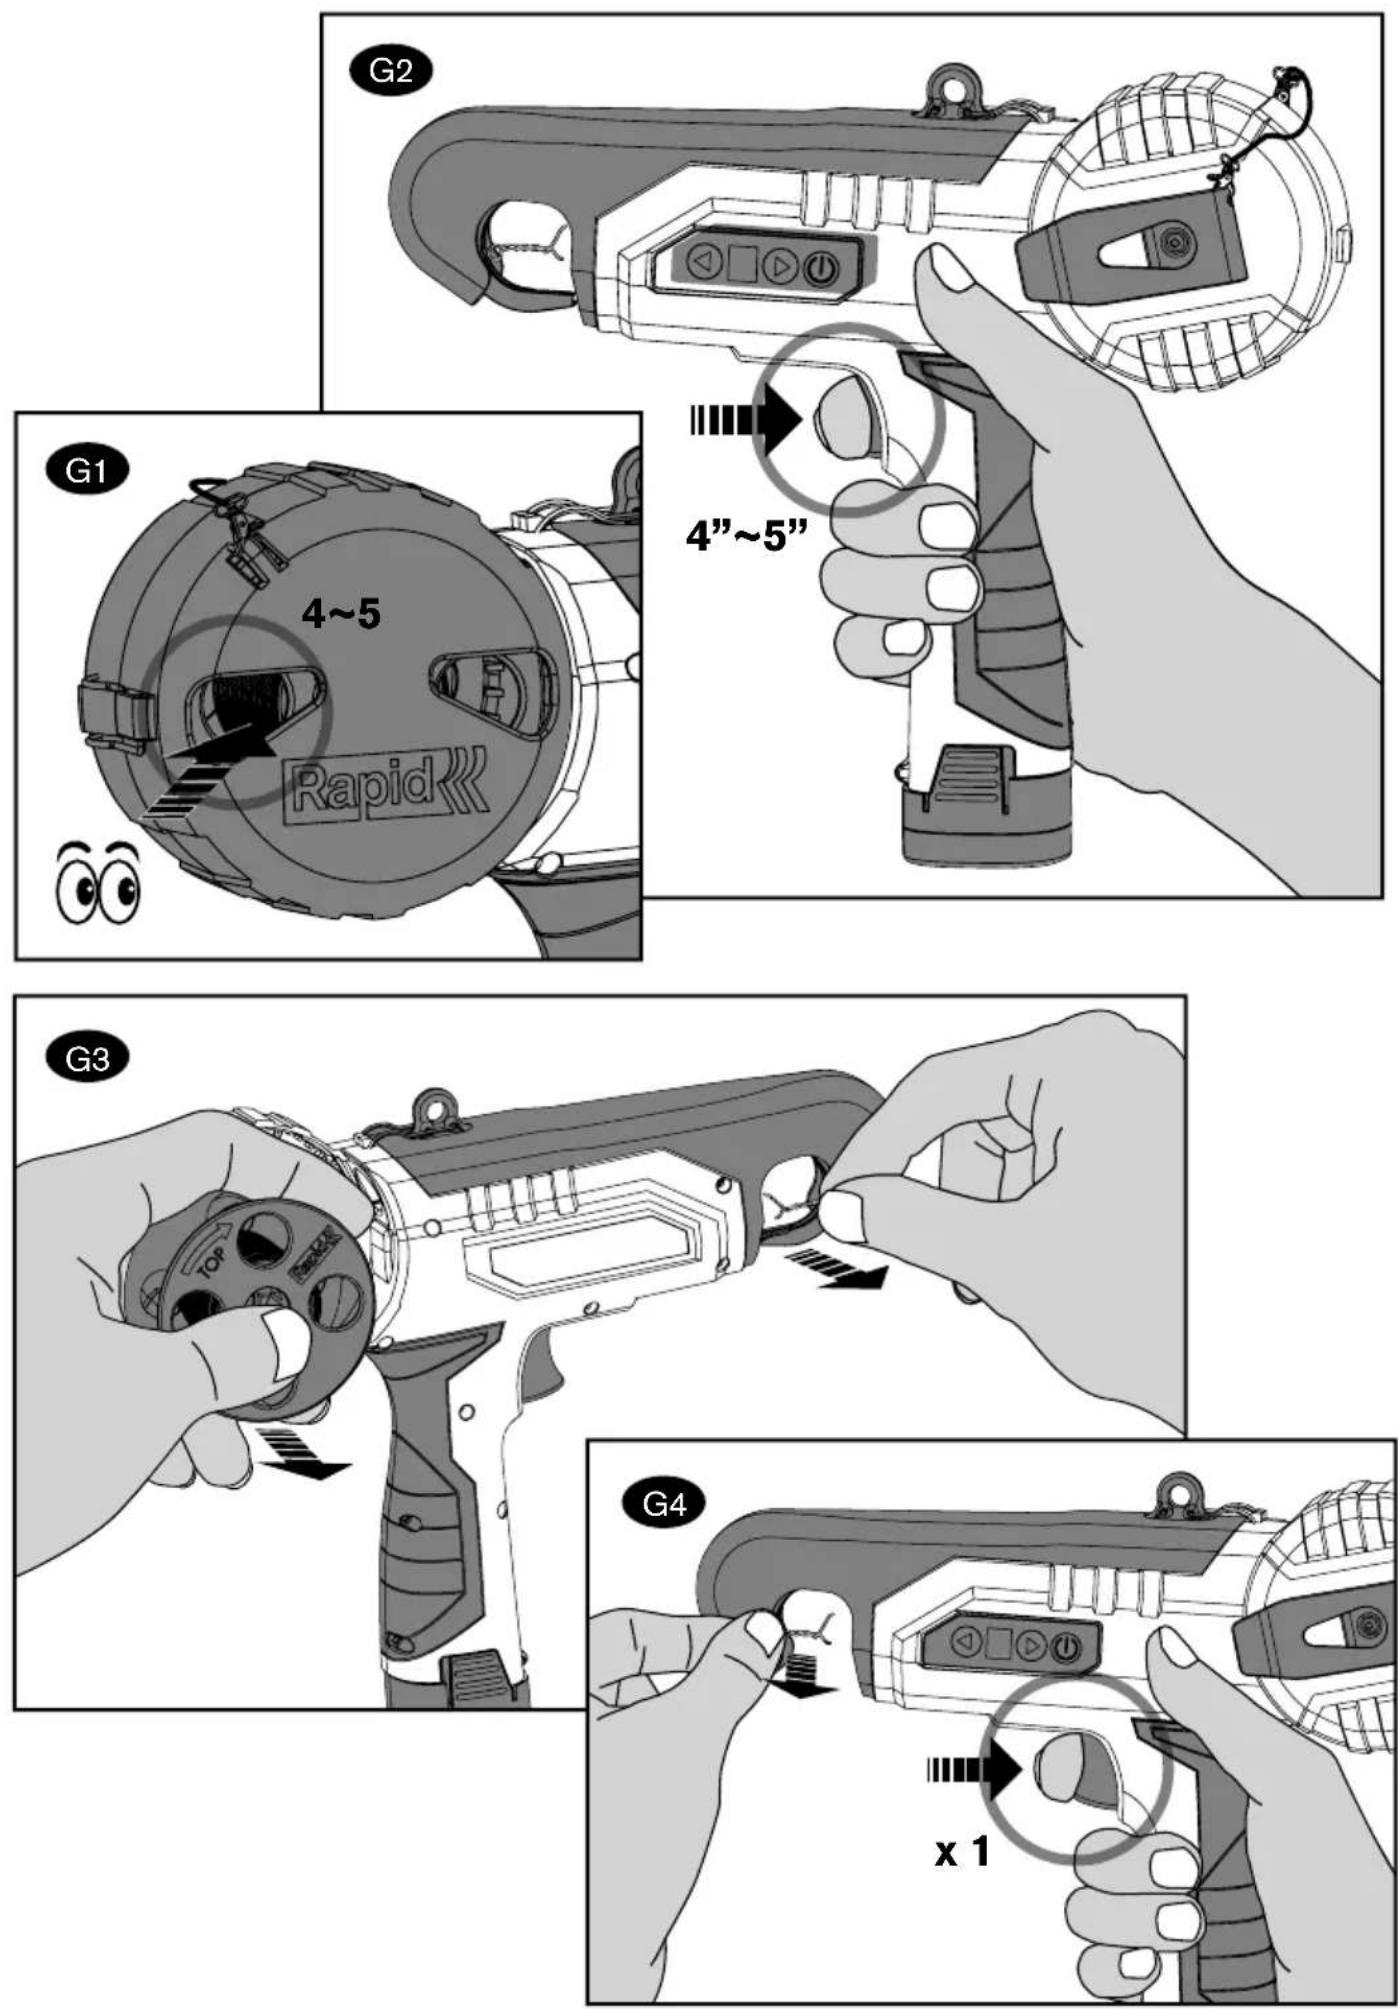
LOAD NEW SPOOL USING SMART CUT

ATTENTION!! FOLLOW THOSE 8 STEPS TO EFFECTIVELY RELOAD THE TOOL
- Stop tying when you have 4-5 turns of remaining wire on spool; see picture G1
- Hold trigger 4-5s until guiding hook locks in active position then release. Smart cut is activated; see picture G2
! Do not turn off the machine and do not press the trigger yet. Open pull buckle and remove outer cover.
- Remove used spool with remaining wire and tie in hook mouth; see picture G3
- Now press trigger once to deactivate smart cut and remove tie from hook mouth; see picture G4
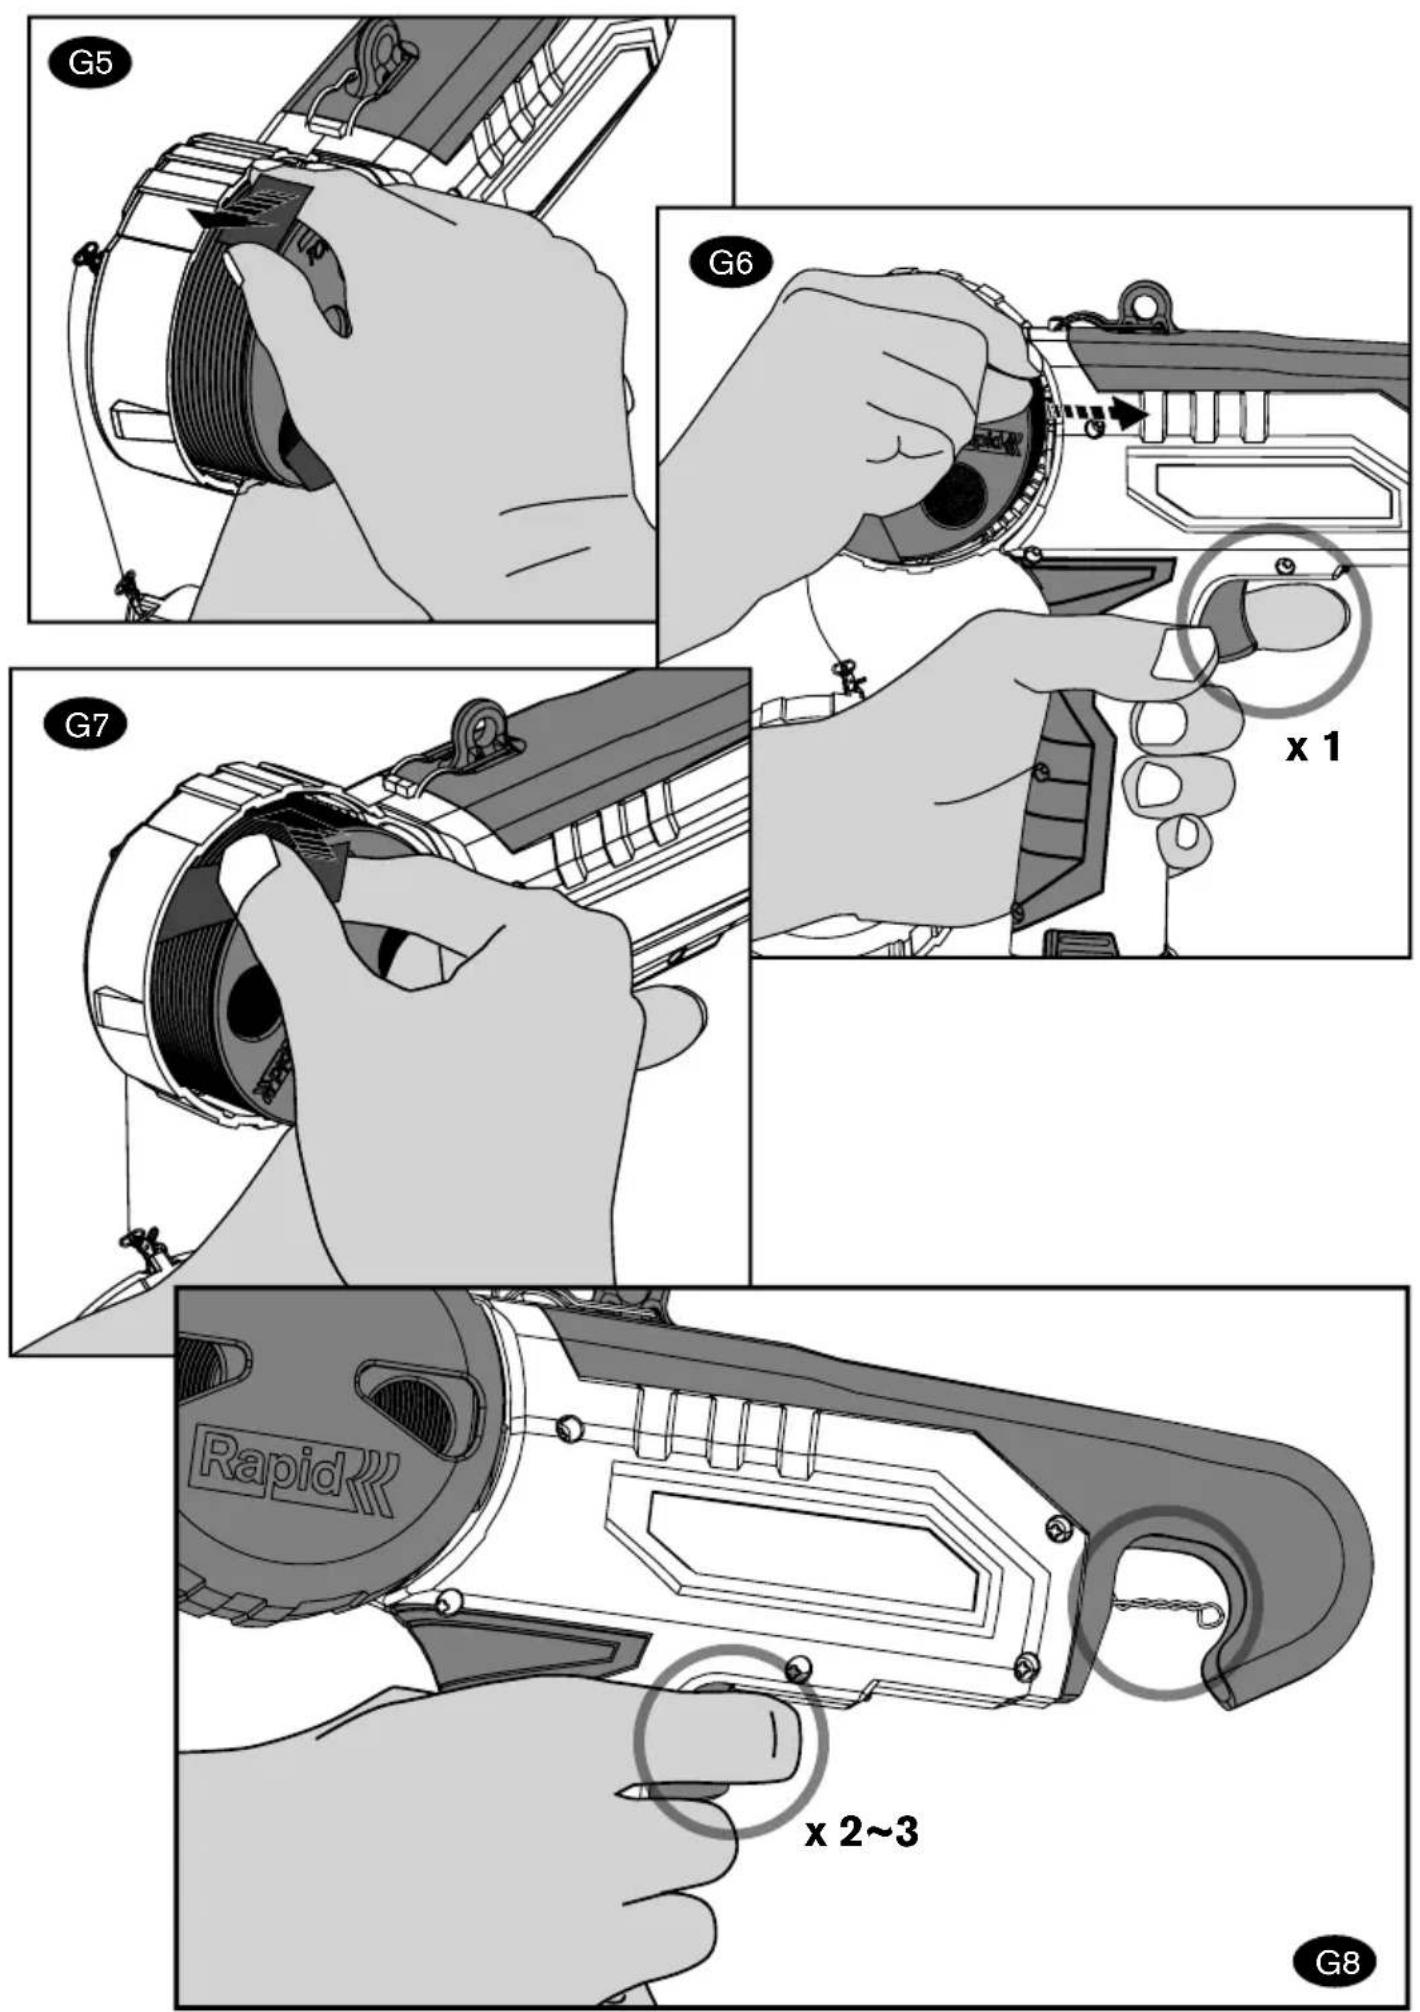
- Place the new spool directly into the magazine. Remove "end fi xing tape"; see picture G5.
- Insert the wire fl at into the feed nozzle until the wire reaches the end stop and press trigger to feed the inserted wire; see picture G6

! Make sure the wire is inserted from above and not from below, also make sure the wire is not twisted and knotted.
- Remove main fixing tape; see picture G7
- Put reel-holder cover back and press trigger until you have an acceptable tie; see picture G8
To make the knots optimal for the type of branches you tie, you can adjust the number of twists by selecting "Twist level".
| Twist selector | ||||
| Twist level 234 | ||||
| Number of twists 2345 | ||||
FAILURE BEEP INDICATIONS
| Buzzer Sound Frequency Times | Failure Solution Method |
| Single beep Battery capacity failure Check if battery capacity is low | |
| Multiple beeps Internal tool failure Tool needs qualified service | |
BATTERY PACK USE AND CARE

CAUTION!!
- Only use battery charger as supplied together with the tool, the use of other chargers may cause fire.
- Only use, charge or store battery pack within the specified temperature range.
- Below +4C°, battery capacity may be affected and reduce the number of cycles.
- Do not short-circuit the battery pack and ensure to keep conductive items away from the battery pack when not in use.
- Do not disassemble the battery pack.
- Do not use the battery pack close to any heat source.
- Do not put the battery pack in fire or in water.
- Do not make any harm to the battery pack.
- Do not use a battery pack that is damaged, deformed or corroded.
- Do not perform soldering or welding on the battery pack.
- Do not use the battery pack on equipment other than the designated tool.
- Do not place the battery pack in microwave oven.
- Do not use a battery pack that is leaking.
- Keep the battery pack out of the reach of CHILDREN.
- If you come into contact with a leaking battery pack, wash with clear water immediately.
BATTERY PACK CHARGING
Connect the battery to the charger and connect the charger plug to the power socket. The LED indicator on the charger will turn RED during charging and turn GREEN when the battery is fully charged; see picture E2.

CAUTION!!
BATTERY PACK CHARGING
- During charging, it is normal for the charger and battery pack to be warm.
- Do not charge a damaged battery pack and do not disassemble the charger or battery pack.
- Only charge the battery pack within the specified temperature range.
- Do not place battery pack near a high temperature heat source; the battery pack may explode in
fi re or fater a long exposure to a high temperature heat source.
- Do not charge the battery pack in an outdoor or humid environment.
- To ensure good battery pack storage, keep it within the specified temperature range.
- If the equipment is not used for a long time, remove and charge the battery pack before storage.
- It is recommended to place the battery and charger in the tool's box during storage.
- Battery should be stored in a dry environment away from any infl ammables.
CHARGER USE AND CARE

CAUTION!!
Use the original charger to ensure the safety of the equipment.
Only use a charger in good condition and never try to use a defective charger.
Make sure that the supply voltage matches the rated voltage of the charger nameplate.
Disconnect the charger from the power supply when not in use.
Do not use the charger in an outdoor or humid environment. The entry of dirt or water will increase the risk of electric shock.
The charger shall only be used to charge the original battery, otherwise it may result in personal injury and cause a fire.
Avoid any damage to the charger; a damaged charger may increase the risk of electric shock.
Do not use chargers on fl ammable surfaces (e.g. paper, textiles)
If the power supply cord of the charger is damaged, it must be replaced by qualified personnel.
MAINTENANCE

WARNING!!
Disconnect battery before any maintenance GENERAL CLEANING AFTER EACH SPOOL IS FINISHED
The tool should be wiped with a wet cloth.
Use a paintbrush or similar to brush away foreign matters in the guide lane, twister wheel and feeding tray.
! Do not use any cleaning agent, as this may cause permanent damage to the tool.
OIL & LUBRICATION AFTER EACH WORK DAY
Use good multigrade oil, for example 3-IN-ONE or 15W-40. Lubricate each movable joint and the cutter, see picture A13.
FEEDING DEVICE REPLACEMENT
When the feeding wheel no longer feeds the wire, a replacement is recommended. Kit part number: 5001602
TWIST & HOOK DEVICE DEVICE REPLACEMENT
In case the twisting wheel stops twisting or you end up with bad twists, a replacement is recommended. Kit part number: 5001603
BRAKE DEVICE REPLACEMENT
When the O-ring between the rotating brake and the fixed brake hub is worn out, a replacement is recommended. Kit part number: 5001604
SPARE PART LIST
KIT A: CUTTING DEVICE
Art No 5001601
| POSITION DESCRIPTION QUANTITY | |
| 76. Fixed blade 1 | |
| 77. Blade guide block 1 | |
| 81. Mobile blade 1 |
KIT B: FEEDING DEVICE
Art No 5001602
| POSITION DESCRIPTION QUANTITY | ||
| 80. Rubber wheel 3 | ||
| 64. Circlip 3 | ||
KIT C: TWIST & HOOK DEVICE
Art No 5001603
| POSITION DESCRIPTION QUANTITY | |
| 61. Bundle wheel 1 | |
| 62. Hex screw 1 | |
| 68. Main hook | 1 |
| 69. Pin | 1 |
| 54. Guide block | 1 |
KIT D: BRAKE DEVICE
Art No 5001604
| POSITION DESCRIPTION QUANTITY | ||
| 5. | Head Screw | 1 |
| 6. | Flat Gasket | 1 |
| 8. | Ring | 1 |
| 11. Band | 1 | |
KIT E: SCISSORS
Art No 5001605
ADDITIONAL SERVICE INFORMATION
Look at www.rapid.com
WARRANTY
I. WARRANTY PERIOD
This RAPID product is guaranteed for three (3) years under the manufacturer's warranty (or commercial warranty), from the delivery date to the end user (wearing parts, accessories, batteries, and chargers excluded). The batteries and chargers are guaranteed for two (2) years. To extend the tool warranty to five (5) years, please register online at www.rapid.com or scan the QR code. Have your tool and purchase receipt ready.
II. WARRANTY CONDITIONS
Any products used differently from intended or operated in conditions different from the intended ones, especially regarding the points stated in this user's
manual, cannot be claimed under the manufacturer's warranty. The warranty also doesn't apply in the event of shock, fall, negligence, lack of supervision and/or maintenance. Any alteration, transformation or modification carried out on the products by the end user invalidates the warranty. The wearing parts, accessories and/or consumables are never covered by the warranty.
Considered as accessories, wearing parts, or consumables:
the transport case and packaging, the wire spools, and the spare parts kits (KIT A to KIT E) included in this user's manual.
III. CLAIM UNDER WARRANTY
The warranty period starts from the delivery date to the end user.
In the event of a claim under warranty, the product must be returned in its original case (batteries & charger included), along with a copy of the original dated receipt.
SPOOL DISPOSAL
Do not dispose of the empty spools with the usual domestic waste. Empty spools are to be recycled as plastic at a local collection point.
BATTERY DISPOSAL
Exhausted batteries are to be removed from the appliance and safely disposed of.
Batteries may not be disposed of with the usual domestic waste, they may contain toxic heavy metals and are subject to hazardous waste regulations.
For this reason, dispose of used batteries at a local

collection point.
2012/19/EU
EN Waste Electrical and Electronic Equipment (WEEE)
Electrical and electronic devices contain materials and substances that can have damaging effects on human health and the environment. This symbol indicates that this device must not be treated as unsorted municipal waste, but must be collected separately! Dispose of the device via a collection point for the recycling of waste electrical and electronic equipment within the EU and in other European countries that operate separate collection systems for waste electrical and electronic equipment. By disposing of the device in the proper manner, you help to avoid possible hazards for the environment and public health that could otherwise be caused by improper treatment of waste equipment. The recycling of materials contributes to the conservation of natural resources.
BHX50 AKKU-BINDEGERÄT
REPLACEMENT DU DISPOSITIF TWIST & HOOK
Consultez www.rapid.com
GARANTIE
I. DURÉE DE LA GARANTIE
VEILIGHEIDSWAARSCHUWINGEN BINDMACHINE

WAARSCHUWING!
SET C: BINDING & HAAK
ART. NR. 5001603
SET D: REM
ART. NR. 5001604
| POSITIE OMSCHRIJVING AANTAL | ||
| 5. | Hoofdschroef | 1 |
| 6. 0-ring 1 | ||
| 8. Ring 1 | ||
| 11. Band 1 | ||
SET E: SCHAREN
ART. NR. 5001605
AANVULLENDE SERVICE-INFORMATIE
Visite www.rapid.com
GARANTIA
I. PERÍODO DE GARANTIA
DOPLŇUJÍCÍ SERVISNÍ INFORMACE
Najdete na www.rapid.com
ZÁRUKA
I. ZÁRUČNÍ DOBA
UMETNITE NOV KOLUT ZA TRAKU POMOĆU SMART CUT

PAŽNJA!! SLJEDITE TIH 8 KORAKA DA BISTE UČINKOVITO PONOVNO NAPUNILI ALAT
- Prestanite s vezanjem kada vam na kolutu ostane 4-5 zavoja trake; vidi sliku G1
- Držite okidač 4-5 sek. dok se kuka za vođenje ne zaključa u aktivnom položaju, a zatim otpustite. Smart Cut je aktiviran; vidi sliku G2
Ne isključujte stroj i ne pritiskajte još okidač
Otvorite kopču za povlačenje i skinite vanjski poklopac - Uklonite iskorišteni kolut s preostalom trakom i čvor u kuki; vidi sliku G3
- Sada pritisnite okidač jednom da deaktivirate Smart Cut i uklonite čvor iz kuke; vidi sliku G4
- Umetnite novi kolut u držač koluta. Uklonite traku za pričvršćivanje početka trake za uvezivanje; vidi sliku G5
- Gurnite traku ravno u dovodnu mlaznicu dok traka ne dosegne krajnji graničnik, zatim pritisnite okidač da biste umetnuli traku; vidi sliku G6

SET A: DISPOZITIV DE TÄIERE
ARTICOL NR. 5001601
SET D: DISPOZITIV DE FRÂNARE ARTICOL NR. 5001604
UK Importer and authorised representative:
ACCO UK Limited
Oxford House Oxford Road
Aylesbury HP21 8SZ
United Kingdom
Rapid®
Isaberg Rapid AB
SE-335 71 Hestra, Sweden
www.rapid.com