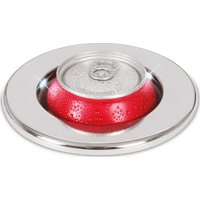
Cup Cooler - Fridge DOMETIC - Free user manual and instructions
Find the device manual for free Cup Cooler DOMETIC in PDF.


User questions about Cup Cooler DOMETIC
0 question about this device. Answer the ones you know or ask your own.
Ask a new question about this device
Download the instructions for your Fridge in PDF format for free! Find your manual Cup Cooler - DOMETIC and take your electronic device back in hand. On this page are published all the documents necessary for the use of your device. Cup Cooler by DOMETIC.
USER MANUAL Cup Cooler DOMETIC
natural_image
Exterior view of a beige industrial lampshade component with metallic rim and mounting base (no text or symbols visible)Cup Cooler
text_image
Technical diagram of a boat's internal structure with labeled parts, including a separate view and a detailed top-down view.3
text_image
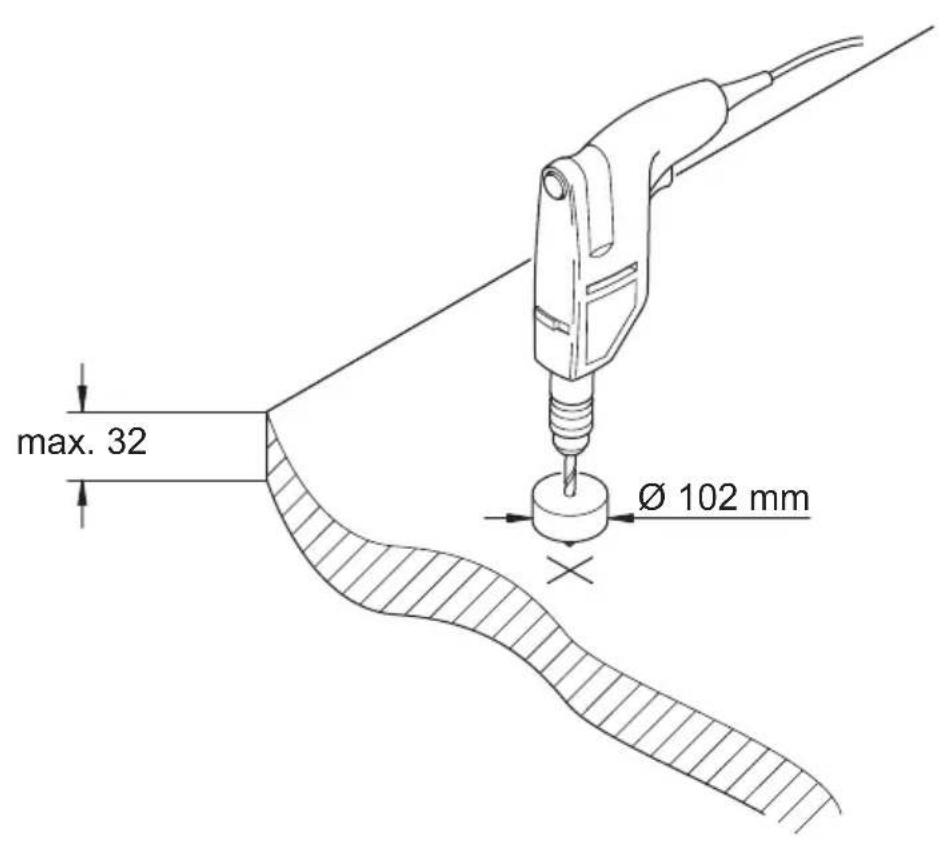
max. 32 Ø 102 mm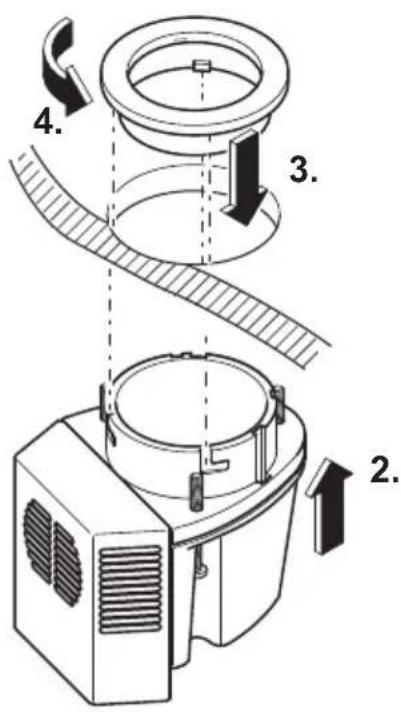
text_image
Technical diagram showing a mechanical assembly with labeled parts and directional arrows indicating motion or assembly steps.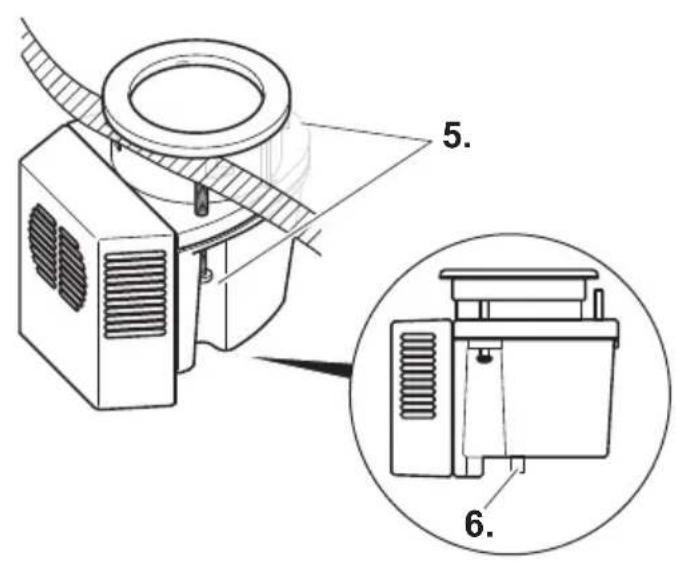
text_image
Technical diagram of a device with labeled parts and an inset view showing internal components4
text_image
Technical diagram of a heat exchanger or cooling unit with labeled components 1 and 25
text_image
174 137 120 102 38 32 159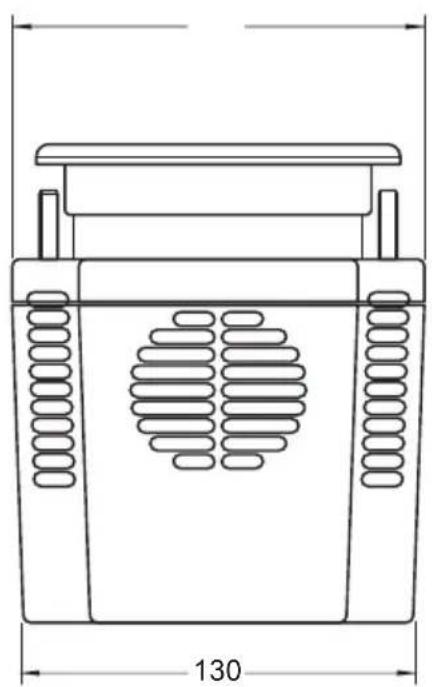
natural_image
Technical line drawing of a mechanical component with circular vent slots and a top handle, dimensioned 130 (no text or symbols)Please read this instruction manual carefully before installation and first use, and store it in a safe place. If you pass on the product to another person, hand over this instruction manual along with it.
Contents
1 Explanation of symbols 6
2 Safety instructions .... 7
3 Intended use 8
4 Spare parts 8
5 Installation 9
6 Operation....11
7 Cleaning and maintenance 11
8 Troubleshooting....12
9 Warranty 12
10 Disposal 12
11 Technical data .... 13
1 Explanation of symbols

DANGER!
Safety instruction: Failure to observe this instruction will cause fatal or serious injury.

WARNING!
Safety instruction: Failure to observe this instruction can cause fatal or serious injury.

CAUTION!
Safety instruction: Failure to observe this instruction can lead to injury.

NOTICE!
Failure to observe this instruction can cause material damage and impair the function of the product.

NOTE
Supplementary information for operating the product.
▶ Action: This symbol indicates that action is required on your part. The required action is described step-by-step.
√This symbol describes the result of an action.
Fig. 1 5, page 3: This refers to an element in an illustration. In this case, item 5 in figure 1 on page 3.
2 Safety instructions
The manufacturer accepts no liability for damage in the following cases:
● Damage to the product resulting from mechanical influences and excess voltage
- Alterations to the product without express permission from the manufacturer
- Use for purposes other than those described in the operating manual
2.1 General safety

DANGER!
- On boats: If the appliance is powered by the mains, ensure that the power supply has a residual current circuit breaker.

WARNING!
- Do not operate the device if it is visibly damaged.
- If this device's power cable is damaged, it must be replaced by the manufacturer, customer service or a similarly qualified person in order to prevent safety hazards.
- This device may only be repaired by qualified personnel. Improper repairs can lead to considerable hazards.
- This device can be used by children aged 8 years or over, as well as by persons with diminished physical, sensory or mental capacities or a lack of experience and/or knowledge, providing they are supervised or have been taught how to use the device safely and are aware of the resulting risks.
- Cleaning and user maintenance must not be carried out by children without supervision.
● Children must not play with the device.
● Children must be supervised to ensure that they do not play with the device.
● Always keep and use the device out of the reach of children under the age of 8 years.

NOTICE!
- Check that the voltage specification on the type plate corresponds to that of the energy supply.
2.2 Operating the device safely

DANGER!
- Do not touch exposed cables with your bare hands.

NOTICE!
● Danger of overheating!
Ensure at all times that there is sufficient ventilation so that the heat that arises during operation does not build up. Make sure that the device is sufficiently far away from walls and other objects so that the air can circulate.
● Ensure that the ventilation openings are not covered.
- Protect the device and the cable against heat and moisture.
3 Intended use
The Dometic Cup Cooler is a thermoelectric refrigerated cup holder. It can be mounted into surfaces of various thicknesses.
4 S p a r e p a r
Designation Item no.
Trim ring SP-373-RING-AS-A
5 Installation
5.1 Choosing the location
Please note the following:
- Choose an installation location that does not interfere with existing below-deck objects and has enough ventilation below the surface to help dissipate the heat generated by the thermoelectric process.
- Allow 150 mm of space on all sides of the unit (fig. 1, page 3).
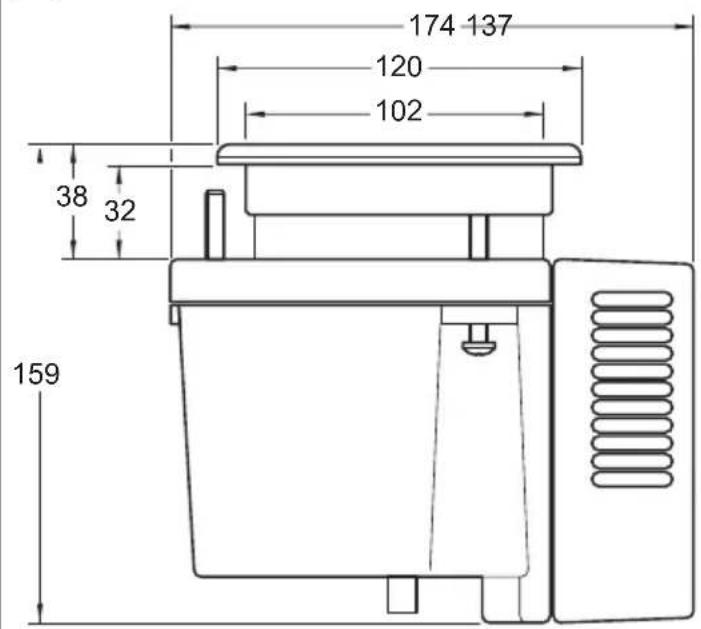
● Make sure the chosen mounting surface is not thicker than 32 mm. - If space underneath does not have proper ventilation, an optional vent or power vent might have to be installed to remove the built-up heat or unit will not cool properly.
- Do not locate in area where under-mounted portion of unit will receive frequent seawater exposure or deck wash down.
- For optimum performance, mount the cooler with the LED lights (rounded end) toward the bow or uphill to allow gravity to pull the beverage toward the coldest side of the cooler bore (fig. 2 2, page 3).
5.2 Mounting the Cup Cooler (fig. 3, page 4)

NOTICE! Risk of damage
Do not use power tools. Hand-tighten only. Overtightening will cause damage to the upper trim ring locking pins.

NOTE
For hard surfaces such as solid fiberglass and metal, tighten the unit down evenly by tightening each of the 3 screws 1 full revolution after surface contact. For soft surfaces such as marine plywood, tighten each of the 3 screws 2 full revolutions after surface contact.
▶ Drill a 102 mm hole in the installation surface (1).
▶ Seal the raw edges of the mounting surface if applicable.
▶ Detach the stainless-steel trim ring assembly from the Cup Cooler by rotating the ring clockwise then lift it off.
▶From beneath the installation surface, slide the cup cooler upward through the drilled hole (2).
▶Reattach the stainless-steel trim ring assembly by aligning the ring pins to the entry slots.
▶Lower the upper ring down on the lower body by aligning the pin into the slot between the two LED lights (3).
▶ Turn the ring counter-clockwise until it stops (4). It only fits one way.
▶Make sure the can pusher insert is properly aligned in bottom of Cup Cooler with the two pushers on the same side as the two LED lights (fig. 2 1, page 3).
▶ Tighten the three support screws until they make contact with the underside of the mounting surface (5).
▶Connect a 10 mm drainage hose to the drain tube fitting on the bottom of the unit (6).
▶Route the output sloping downward to an appropriate drainage location onboard.
5.3 Electrical connections (12 Volt DC only)

NOTE
- Control of Cup Cooler can be managed with a single switch or set up with zone switching.
● Low-voltage cut off is at 10.5 volts DC to avoid a dead battery.
▶ Locate (or install) an auxiliary 12 V DC power switch (not included in scope of delivery).
Typically this will be on a fused branch circuit attached to the supply battery (not the engine battery).
With the power off, attach the wires of the Cup Cooler to the wiring of that switch. The red wire is positive and the black wire is negative.
Each unit has a 5 amp fuse built into its wiring which should be positioned in an accessible location (fig. 1 1, page 3).
▶ Power on the switch and verify the blue lights inside the Cup Cooler are lit.
6 Operation

NOTE
● Make sure beverage container is in contact with optimum area of cooler.
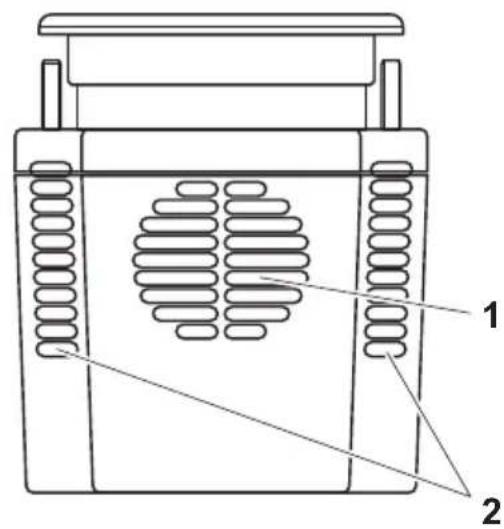
- If the cooling fan is clogged with debris, wipe or brush it clean (fig. 4 1, page 5). Do not spray with water.
- Check for proper ventilation around the unit (fig. 4 2, page 5). Poor ventilation will cause poor cooling capacity.
- In cold ambient temperatures the Cup Cooler may freeze cold beverages.
▶Power on the switch that controls the Cup Cooler.
▶Allow 2 to 3 minutes for the Cup Cooler to chill.
▶Between sips, store your can, bottle, or any appropriately sized beverage container in the Cup Cooler.
7 Cleaning and maintenance

NOTICE!
- Do not use sharp or hard objects or cleaning agents for cleaning as these may damage the product.
- Do not use an abrasive cleaner to clean the stainless-steel trim ring. It will scratch the surface.
- Do not use an abrasive cleaner to clean the cooler bore. It has an anti-stick coating and it will be damaged.
▶Occasionally clean the product with a damp cloth.
8 Troubleshooting
Problem Possible cause Suggested remedy
| LED lights are not on when the switch is on. | Fuse has blown. Check for blown fuse on unit, on house battery, or an open circuit breaker. | |
| There is no voltage. Verify polarity of DC voltage: Positive to positive and negative to negative. | ||
| Unit's high-heat cut off is at 65 °C and if reached, unit will shut down. This is usually caused by lack of air flow or high ambient temperature. | Ensure good ventilation. | |
9 W a r r a n t y
The statutory warranty period applies. If the product is defective, please contact your retailer or the manufacturer's branch in your country (see the back of the instruction manual for the addresses).
For repair and guarantee processing, please include the following documents when you send in the device:
● A copy of the receipt with purchasing date
● A reason for the claim or description of the fault
10 Disposal
▶Place the packaging material in the appropriate recycling waste bins wherever possible.
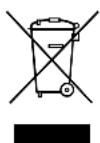
If you wish to finally dispose of the product, ask your local recycling centre or specialist dealer for details about how to do this in accordance with the applicable disposal regulations.
11 Technical data
| Cup Cooler | |
| Item no.: 9105330063 | |
| Rated input voltage: 12 V--- | |
| Rated current: 3.1 A | |
| Power consumption: | 35 W (12 V---) |
| Ambient temperature: +16 °C – +32 °C | |
| Climate class: N | |
| Interior diameter: 75 mm | |
| Cutout diameter: 102 mm | |
| Power cord length: ca. 40 cm | |
| Dimensions H x W x D: | 159 x 137 x 174 mm (see also fig. 5, page 5) |
| Weight: | 960 g |
| Inspection/certification: |  |
● Fare for overoppheting!
PASS PÅ! Fare for skade
Dometic Australia Pty. Ltd.
1 John Duncan Court
Varsity Lakes QLD 4227
+61 7 55076000
+61 7 55076001
Mail: sales@dometic-waeco.com.au
AUSTRIA
Dometic Austria GmbH
The Gateway · 25 Canton Road,
Tsim Sha Tsui · Kowloon
+852 24611386
+852 24665553
Mail: info@dometic-waeco.com.hk
HUNGARY
Dometic Plc. Sales Office
Kerékgyártó u. 5.
H-1147 Budapest
+36 1 468 4400
昌 +36 1 468 4401
Dometic Italy S.r.l.
Via Virgilio, 3
I-47100 Forli
+39 0543 754901
+39 0543 756631
Mail: info@dometic.it
NORWAY
Dometic Norway AS
Skolmar 24
N-3232 Sandefjord
+47 33428450
吕 +47 33428459
Mail: firmapost@waeco.no
POLAND
Dometic Poland Sp. z o.o.
Ul. Puławska 435A
02-801 Warszawa
+48 22 414 32 00
+48 22 414 32 01
Mail: info@dometic.pl
RUSSIA
Dometic RUS LLC
Komsomolskaya square 6-1
107140 Moscow
+7 495 780 79 39
+7 495 916 56 53
Mail: info@dometic.ru
SLOVAKIA
Dometic Slovakia Sales Office Bratislava
Nádražná 34/A
SK-900 28 Ivanka pri Dunaji
+421 2 45 529 680
Mail: bratislava@dometic.com
SPAIN
Dometic Spain S.L.
Avda. Sierra del Guadarrama, 16
E-28691 Villanueva de la Cañada
Madrid
+34 902 111 042
+34 900 100 245
Mail: info@dometic.es
SWEDEN
Dometic Scandinavia AB
Gustaf Melins gata 7
Dometic Switzerland AG
Riedackerstrasse 7a
CH-8153 Rümlang (Zürich)
+41 44 8187171
吕 +41 44 8187191
Mail: info@dometic-waeco.ch
TAIWAN
WAECO Impex Ltd.
Taipei Office
9F.-10, No. 1180, Zhongzheng Rd.,
Zhonghe Dist., New Taipei City 23586
+886 2 22237225
昌 +886 2 81926742
Mail: marketing@waeco.com.tw
UNITED KINGDOM
Dometic UK Ltd.
Dometic House · The Brewery
Blandford St. Mary
Dorset DT11 9LS
+44 844 626 0133
昌 +44 844 626 0143
Mail: sales@dometic.co.uk
UNITED ARAB EMIRATES
Dometic Middle East FZCO
P. O. Box 17860
S-D 6, Jebel Ali Freezone
Dubai
+971 4 883 3858
+971 4 883 3868
Mail: info@dometic.ae
UNITED STATES OF AMERICA
Dometic Marine Division
2000 N. Andrews Ave. Extension
Pompano Beach, FL 33069 USA
+1 954 973 2477
+1 954 979 4414
Mail: marinesales@dometicusa.com