ART2020-25 Li - Grass trimmer Grizzly - Free user manual and instructions
Find the device manual for free ART2020-25 Li Grizzly in PDF.

User questions about ART2020-25 Li Grizzly
0 question about this device. Answer the ones you know or ask your own.
Ask a new question about this device
Download the instructions for your Grass trimmer in PDF format for free! Find your manual ART2020-25 Li - Grizzly and take your electronic device back in hand. On this page are published all the documents necessary for the use of your device. ART2020-25 Li by Grizzly.
USER MANUAL ART2020-25 Li Grizzly
Cordless Lawn Trimmer
Tosaerba a batteria
natural_image
Two red metal levers with black handles and black blades, shown against a white background (no text or symbols visible)ART 2020-25 Li
ART 2020-25 Li Set

natural_image
Illustration of two workers using a tool, one holding a device and the other bending over a 30-degree angle (no text or symbols)natural_image
Illustration of two workers in protective gear using a tool, one holding a device and the other digging with a 30-degree angle marker (no text or symbols)natural_image
Illustration of two workers in protective gear using a tool, one holding a device and the other bending over a 30-degree angle (no text or symbols)Introduction......45
Intended purpose ....45
General description......46
Extent of the delivery....46
Overview 46
Functional description ....46
Technical data......47
Safety instructions....47
Symbols and icons......47
Additional safety instructions......48
Residual risks....50
Assembling instructions....51
Operation....51
Turning on and off....51
Trimmer settings 52
Replacing the spool ....53
Cutting grass....53
Lawn edge trimming....53
Cleaning and maintenance....53
Cleaning....53
General maintenance....53
Replacing the cutting insert....54
Replacing the spool....54
Storage 54
Disposal and protection of the
environment....54
Replacement parts/Accessories .....55
Guarantee....55
Repair Service....55
Trouble shooting 56
Translation of the original
EC declaration of conformity .....135
Exploded Drawing....142
Service-Center 143
Introduction
Congratulations on the purchase of your new device. With it, you have chosen a high quality product.
During production, this equipment has been checked for quality and subjected to a final inspection. The functionality of your equipment is therefore guaranteed.

The operating instructions constitute part of this product. They contain important information on safety, use and disposal. Before using the product, familiarise yourself with all of the operating and safety instructions. Use the product only as described and for the applications specified. Keep this manual safely and in the event that the product is passed on, hand over all documents to the third party.
Intended purpose
The appliance is solely intended for cutting grass and weeds in the garden and for edge trimming. Any other use that is not specifically approved in these Instructions can result in damage to the trimmer and give rise to serious danger for the user.
Do not use the appliance to trim hedges or bushes. The appliance must only be used by adults. Young people aged 16 and over may only use the trimmer under adult supervision.
The user or operator is responsible for accidents causing injury to other people or damage to property.
The manufacturer cannot be held liable for damage when the trimmer is not used in conformity with its intended purpose or
GB
due to incorrect operation.
This equipment is not suitable for commercial use. Commercial use will invalidate the guarantee.
General description
The illustration how to handle the appliance can be found on page 2 and 3.
Extent of the delivery
Carefully unpack the trimmer and check that it is complete:
Scope of Delivery for Prod. No. 72034200 Device WITH battery
- Battery-operated lawn trimmer
- 18 Cutting inserts
- Protective cover
- Distance roller
- Auxiliary handle
- 6 Phillips screws
- Battery charger
- Battery
- Charger and rechargeable battery operating instructions
- Instruction Manual
Scope of Delivery for Prod. No.
72034204 Device WITHOUT battery
- Battery-operated lawn trimmer
- 18 Cutting inserts
- Protective cover
- Distance roller
- Auxiliary handle
- 6 Phillips screws
- Instruction Manual
Overview

1 Top handle
On/Off switch
3 Switch lock
4 Receptor for spare spool
5 Auxiliary handle
5a Storage box
6 Handle rod
7 Lock of handle rod adjustment
8 Threaded bush for length adjustment
9 Telescopic shaft
10 Motor head
11 Bar for tilt angle adjustment
12 Protective cover
13 Cap
14 Cutting disk
15 Spacer bow (flower guard)
16 Distance roller
17 Battery
18 Battery charger

19 Phillips screw

20 Release (Cap)
21 Line cutter
22 Cutting insert
23 Pin, nylon blade

26 Handle holder
25 Quick-release lever
Functional description
The trimming assembly of the manually controlled, portable, battery-operated lawn trimmer consists of a system of plastic knife/cutting insert. A spool can be ordered optionally as a cutting device (See "Replacement parts/Accessories").
The appliance also features a pivoting motor head, adjustable aluminium telescopic shaft, and a spacer bow. A hood covering the cutting device protects the user.
Refer to the following descriptions for a functional description of the controls.
Technical data
Cordless Lawn
Trimmer .....ART 2020-25 Li
Motor voltage (U)....20 V==
Idling speed 9000 min ^-1 (rpm)
Protection Class ....III
Protection category.....IPX0
Cutting circle....250 mm
Weight (without battery charger) ...1.87 kg Sound pressure level
(L_pA) 83.1 dB (A), K_pA = 3 dB
Sound power level ( L_WA )
guaranteed....94 dB (A)
measured ..... 91.6 dB (A); K_WA = 2.41 dB
Vibration ( a_h )
upper handle ..... 0.87 m/s ^2 ; K= 1.5 m/s ^2
additional
handle 1.04 m/s ^2 ; K=1.5 m/s ^2
* The actual runtime under load of a fully charged battery depends on how you work and on the load put on the trimmer during operation.
Noise and vibration values have been determined according to the standards and regulations mentioned in the declaration of conformity. The vibration and noise measuring processes in accordance with EN 50636-2-91, were completed successfully.
Noise and vibration values have been determined according to the standards and regulations mentioned in the declaration of conformity.
The stated vibration emission value was measured in accordance with a standard testing procedure and may be used to compare one power tool to another.
The stated vibration emission value may also be used for a preliminary exposure assessment.

Warning: The vibration emission value may differ during actual use of the power tool from the stated value depending on the manner in which the power tool is used.
Try to keep the exposure to vibrations as low as possible. Examples of measures to reduce vibration exposure are the wearing of gloves when using the tool and limiting the working hours. For this purpose all parts of the operating cycle have to be considered (for example, times when the electric tool is switched off and times when it is switched on but running without any load).
Safety instructions
Ensure that the safety instructions are observed when operating the trimmer.
Symbols and icons
Symbols on the trimmer

WARNING!

Carefully read these Operating Instructions.

Wear goggles and ear defenders.

GB
111111111

The cutting device will keep rotating for a few seconds after the device has been switched off. Keep hands and feet at a safe distance.

Do not expose the trimmer to moisture. Do not work when it is raining and do not cut wet grass.
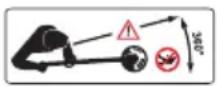
Keep by-standers well away. They could be injured by flung out objects.

Danger due to materials blown out of machine!

Remove persons in the vicinity from the danger area.

Remove the battery prior to servicing the appliance.

Noise level rating L_WA in dB
Electrical appliances must not be disposed of with the domestic waste.
Symbols in the manual

Warning symbols with in- formation on damage and injury prevention.

Warning symbols with information on the prevention of personal injury caused by electric shock.

Instruction symbols with information on preventing damage.

Carefully read through the user manual

Help symbols with information on improving tool handling.
Additional safety instructions
TRAINING
- Read the instructions carefully. Familiarise yourself with the controls and how to use the machine correctly.
- The appliance is not suitable for use by children. Children should be supervised to ensure that they do not play with the appliance. Cleaning and user maintenance shall not be made by children.
- This appliance is not intended for use by persons with reduced physical, sensory or mental capabilities, or lack of experience and knowledge.
-
Local regulations or bylaws may determine the minimum age for using the device.
-
The operator or user is responsible for accidents or damage to other persons or their property.
- Children and persons with limited physical, sensory or mental capabilities or inadequate experience and knowledge, or persons who are not familiar with the instructions, should never be allowed to use the machine! Local regulations may specify an age limit for the user.
- Never let children or persons who are not familiar with the instructions mentioned use the machine.
PREPARATION
- Never use the machine if people – especially children – or pets are nearby.
- Before each use, carry out a visual inspection on missing or wrongly mounted protective devices or parts of the cutting device.
- Before commissioning and after any impacts, check for signs of wear and damages, and have any necessary repairs performed.
OPERATION
- Wear safety goggles, stable shoes and long trousers over the entire period of use of the machine.
- The use of the machine under bad weather conditions, especially in case of lightning risk, must be avoided.
- Warning! Do not touch any moving dangerous parts before the battery has been removed and the moving dangerous parts have come to a complete stop.
- Caution, risk of injury from cuts on hands and feet.
- Stop using the machine when persons, above all children, and house pets are in the vicinity.
- Use the machine only in daylight or with good artificial lighting.
- Always keep your hands and feet away from the cutting equipment, above all when you switch the motor on.
- Never install metallic cutting elements.
- Never use the machine with damaged or missing protective equipment.
- Avoid an abnormal body posture. Ensure secure footing at all times to maintain balance when working on slopes.
- Go slowly. Do not walk with the device in your hand.
• Always wear sturdy shoes and long trousers during operation of the machine.
GB
- In the case of an accident or malfunction during operation, the device must be switched off immediately. Injuries must be properly treated or medical assistance sought. Read the „Trouble shooting“ section to correct any malfunctions or contact our Service Centre.
• Always disconnect the machine from the power supply (i.e. remove the locking device or the removable battery), - whenever leaving the machine unattended,
- before removing blockages,
- before checking, cleaning or modifying the machine,
- after contact with a foreign object,
- if the machine begins to vibrate in an unusual way.
- Be careful to avoid injuries to your feet and hands by the cutting unit.
• Make sure to keep the ventilation openings free of foreign objects.
MAINTENANCE AND STORAGE
- Remove the removable battery before carrying out maintenance or cleaning work.
-
Use only spare parts and accessories supplied and recommended by the manufacturer.
-
The machine must be checked regularly and maintained. Have the machine repaired in a licensed workshop.
- When the machine is not being used, store it out of the reach of children.

Comply with the device's instructions in the "Cleaning and Servicing" section.
Residual risks
Even if properly operating and handling this electric tool, some residual risks will remain. Due to its construction and build, this electric tool may present the following hazards:
a) Cuts
b) Ear damage if working without ear protection.
c) Damage to your health caused by swinging your hands and arms when operating the appliance for longer periods of time or if the unit is not held or maintained properly.

Warning! During operation, this electric tool generates an electromagnetic field which, under certain circumstances, may impair the functionality of active or passive medical implants.
To reduce the risk of serious or lethal injuries, we recommend that persons with medical implants consult their doctor and the manufacturer of their medical implant before operating the machine.
Assembling instructions

Remove the rechargeable battery from the device before assembly. Insert the rechargeable battery only once the device is completely assembled. There is a risk of injury!
B
Mounting the protective cover:
-
Place the protective cover (12) onto the motor head (10) and fasten it using the 4 Phillips screws (19).
-
Place the distance roller (16) onto the protective cover (12) and fasten it using the 2 Phillips screws (19).
C
Installing the cutting unit:
- Insert the cutting disk (14) into the cap (13). The side of the cutting disk (14), on which the rotation direction is indicated by arrows, must be visible after insertion.

Replacement plastic blades can be found in the storage box (5a) on the additional handle (5).
D
To put on the auxiliary handle:
-
Unscrew and remove the pre-assembled quick-release lever (25) of the additional handle (5).
-
Pull the ends of the auxiliary handle (5) to extend the handle and slide it over the handle holder (24). The holder for the spare spool (4) points upwards.
-
Screw the additional handle (5) to the quick-release lever (25).
-
Lock the quick-release levers (25) by pressing them in the direction of the bar (1).
They must fit the additional handle (5) so that a tensioning with medium force can be carried out. Otherwise, the quick-release levers (25) must be turned clockwise for tensioning them or anti-clockwise to loosen them.
Operation

Caution: risk of injury! Do not operate the appliance without the protective cover. To operate the appliance, wear suitable clothing, eye and ear protection.
Prior to every use, check that the appliance is operative. Do not block the On/Off switch or the switch lock. They must reliably turn off the motor when you release the switch. Do not operate the appliance if one of the switches is damaged.

Please observe local regulations concerning noise protection.

Turning on and off

Maintain a firm stand and hold the appliance well with both hands and at some distance away from your body. Before turning on the appli-
GB
ance, check that it will not touch any objects.
- To turn on, use your thumb to actuate the switch lock (3), then press the On/Off switch (2). Release the switch lock.
- To turn off, release the On/Off switch (2). There is no continuous operation mode.

After turning off the appliance, the trimming assembly will keep revolving for some time. Allow the trimming assembly to come to a standstill. Keep hands and feet away. Risk of injury!

Remove grass cuttings regularly from the cutting unit to make sure that cutting is not impaired.

Trimmer settings
To adjust the auxiliary handle:
The auxiliary handle can be set to various positions. Adjust the handle so that the cap is tilted slightly forward as you work (see picture below "cutting grass").
① Loosen the screw (25) in the handle and move the auxiliary handle (5) to your favourite position. Retighten the quick-release levers (25). The latching steps integrated into the holder prevent the handle changing position unintentionally.
To adjust the height:
The telescopic shaft allows you to adjust the appliance to your personal size.
② Loosen the threaded bush (8). Adjust the telescopic shaft (9) to the correct length and tighten the threaded bush.
To adjust the cutting angle:
Changing the cutting angle lets you trim grass at places that a difficult to reach, e.g. under benches or wall offsets.
③ Tread on the pedal (11) on the motor housing and tilt the telescopic shaft (9). There are 5 preset tilt angles (see "Work instructions").
Function as a lawn trimmer:
Cutting angle position 1 - 4 (rotary position 0°)
Function as a lawn edge trimmer:
Cutting angle position 5 (rotary position 180°)
To adjust the handle rod:
The handle rod (6) can be turned by 180^ (see “Work instructions”).
④ Press the latch (7) to release the lock and rotate the handle section 0° 180° (6) until it latches into the desired position.

Leave the handle (6) in the 0°-position when using the device as a lawn trimmer in the cutting angle positions 1 - 4. The protective cover must not be pointing away from the user. Risk of injury.
To adjust the spacer bow
(flower guard): The spacer bow keeps the trimming assembly away from plants and trunks not to be cut.
⑤ Fold down the distance bracket (15). If the distance bracket is not required, fold it up into the park position.
Replacing the spool

WARNING. Danger of injury!
not cut moist or wet grass.
- Before starting the unit, make sure that the spool is not touching any stones, scree, or other foreign objects.
- Switch on the trimmer before you approach the grass that is to be cut.
- Do not overload the trimmer during operation.
- Avoid contact with obstacles (stones, walls, fences, etc.). The cutting inserts would wear out rapidly.
- Avoid using the device in bad weather, especially if there is a danger of lightning!
Cutting grass
natural_image
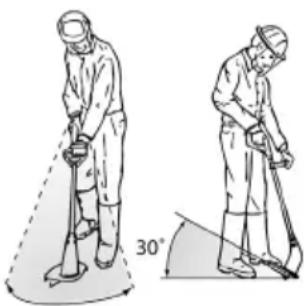
Illustration of two workers using a tool, one holding a device and the other digging with a 30° angle marker (no text or symbols)Cut the grass by swaying the trim-mer sideways to the right and left. Cut slowly while the trimmer is tilted forwards by approx. 30°.
Cut tall grass by a series of levels from top to bottom.

Lawn edge trimming
Setup for edge trimming:
To trim lawn edges, slowly move the appliance along the lawn edges.
- Handle rod: 180^ (see ④)
• Cutting angle position 5 (see ③)
- Spacer bow in parking position
Cleaning and maintenance

Warning! Risk of injury from moving dangerous parts!

Contact our Service Centre about repairs and servicing not described in this manual. Only use OEM parts. Risk of injury!

Turn off the appliance and, before doing any servicing, remove the battery.
The following cleaning and servicing should be done regularly. This will ensure a long and reliable service life.
Cleaning

Do not spray the appliance with water and do not immerse it in water. Electric shock hazard!
- Keep clean the ventilation slots, motor housing and handles of the appliance. Use a damp cloth or a brush. Do not use cleaning agents or solvents. You may otherwise irreparably damage the appliance.
• After every trimming session, remove grass and soil from the protective cover and the trimming assembly.
General maintenance
- Prior to every use, check the appliance for obvious defects such as loose, worn or damaged parts. Ensure that the screws in the cutting device are firmly in place.
- Check covers and safety devices for damages and correct installation. Replace as necessary.

Replacing the cutting insert
- Slide the cutting insert (13) inward and push it out of the pin (23) on the cutting disk (12).
- Place the new cutting insert (13) on the pin (23) and pull out the insert until it snaps in.
Replacing the spool
- Remove the battery (17) from the device.
- Open the cap (13) by simultaneously pressing the two releases (20) on the cap (13).
- Remove the cover of the cap (13) and take out the spool.
- Press the thread ends of the new spool out of the spool slots.
- Insert the new spool into the cap (13). The side of the spool, on which the rotation direction is indicated by arrows, must be visible after insertion.
- Insert both ends of the thread through the opposite line outlet loops.
- Put the cover (26) back on the cap (13). Make sure that the releases (20) on the cover fit precisely into the recesses on the cap (13). They will snap in noticeably.

Check the line cutter (21). Never use the device without a line cutter or with a defective line cutter. If the line cutter is damaged, be sure to contact one of our customer service centres.
Storage
- Store the trimmer in a dry place well out of reach of children.
- Do not stand the trimmer on its protective cover. Suspend it by its upper handle in such a manner that the protective cover does not come into contact with other objects. This is because the protective cover could become deformed, thereby changing its dimensions and its safety properties.
Disposal and protection of the environment
Remove the battery from the device and take the device, battery, accessories and packaging for environmentally friendly recycling.

Electrical appliances must not be disposed of with the domestic waste.
Do not throw batteries into domestic waste, fire (risk of explosion) or water. Damaged batteries can harm the environment and your health if poisonous fumes or liquids escape.
- Hand the device and the charger to a recycling point. The plastic and metal parts used on your device can be properly sorted according to materials and grades and efficiently recycled. Please contact our service centre for more information.
-
Dispose of batteries in a discharged state. We recommend covering the contacts with an adhesive strip to protect against short circuits. Do not open the battery.
-
Dispose of the batteries according to local standards. Hand in the batteries at a used battery collection point where they are recycled in an environmentally friendly manner. For more information, please contact your local waste management provider or our service centre.
- Defective units returned to us will be disposed of for free.
- Throw the cut grass on the compost. Do not throw it in the normal household waste.
Replacement parts/Accessories
Spare parts and accessories can be obtained at www.grizzlytools-service.eu
If you have any other questions, contact the "Service-Center" (see "Service-Center").
Auxiliary handle 91105863
Protective cover .....91105865
Spacer bow....91105861
Telescopic shaft....91099399
Line spool 13601151
Line spool + Spool cover...... 13601150
Cutting inserts....13604002
Cap 91105864
Quick-release lever....91105862
Guarantee
This appliance has a 24-month guarantee. This equipment is not suitable for commercial use. Commercial use will invalidate the guarantee.
Damages, which can be attributed to natural wear, overloading or inappropriate use, are excluded from the guarantee.
Certain component parts are subject to a normal wear and are excluded from the guarantee
The guarantee applies for all material and manufacturing defects. This guarantee does not extend to cover product parts that are subject to normal wear and may therefore be considered as wearing parts (e.g. cutting inserts and battery) or to cover damage to breakable parts (e.g. switches). Furthermore, the prerequisite for guarantee services is that the references indicated in the operating instructions regarding cleaning and maintenance have been adhered to.
Damage, which has been caused from material or manufacturing faults, will be made good free of charge, by replacement delivery or repair.
This requires that the appliance is re-turned to the merchant undismantled and with proof of purchase and guarantee.
Repair Service
For a charge, repairs not covered by the guarantee can be carried out by our service branch, which will be happy to issue a cost estimate for you.
We can handle only equipment that has been sent with adequate packaging and postage.
Justified guarantee claims should be reported to our Service Centre. Our Service Team will tell you more about our complaints handling procedure.
Attention: Please send your equipment to our service branch in clean condition and with an indication of the defect.
Equipment sent carriage forward or by bulky goods, express or other special freight will not be accepted.
We will dispose of your defective devices free of charge when you send them to us.
Trouble shooting

In the event of an accident or malfunction, remove the battery from the device immediately! Failure to comply may result in injuries from cuts.
| Problem Possible cause Corrective action | ||
| Appliance won't start | Battery (17) discharged | Recharge battery (17) (Observe the separate operating instructions for the rechargeable battery and charger) |
| Battery (17) not in | Insert battery (17) (Observe the separate operating instructions for the rechargeable battery and charger) | |
| On/Off switch (2) defective | Send in to Service Centre for repair | |
| Motor defective | ||
| Intermittent operation | Internal loose contact | Send in to Service Centre for repair |
| On/Off switch (2) defective | ||
| Much vibration Loud noise | Cutting insert (22) broken | Replace cutting insert (22)(see „Cleaning and maintenance“) |
| Trimming assembly dirty | Clean trimming assembly(see „Cleaning and maintenance“) | |
| Motor defective Send in to Service Centre for repair | ||
| Bad trim | Cutting insert (22) broken | Replace cutting insert (22)(see „Cleaning and maintenance“) |
| Trimming assembly dirty | Clean trimming assembly (see „Cleaning and maintenance“) | |
| Battery (17) not fully charged | Recharge battery (17) (Observe the separate operating instructions for the rechargeable battery and charger) | |
Contenuto
Introduzione....57
Uso conforme ....57
natural_image
Illustration of two workers using a tool, one holding a 30-degree angle marker (no text or symbols)natural_image
Illustration of two workers using a tool, one holding a device and the other bending forward with a 30-degree angle marker (no text or symbols)natural_image
Illustration of two workers using a tool, one holding a device and the other bending forward with a 30-degree angle marker (no text or symbols)natural_image
Illustration of two workers using a tool, one holding a 30-degree angle marker (no text or symbols)natural_image
Illustration of two workers in protective gear using a tool, with one holding a 30-degree angle marker (no text or symbols)natural_image
Illustration of two workers using a tool, one holding a device and the other bending forward with a 30-degree angle marker (no text or symbols)| GB Translation of the original EC declaration of conformity | |
| We hereby confirm that the Cordless Lawn Trimmer ART 2020-25 Li series Batch number B-48134 conforms with the following applicable relevant version of the EU guidelines: | |
| 2006/42/EC • 2014/30/EU • 2000/14/EC • 2005/88/EC • 2011/65/EU* • (EU) 2015/863 | |
| In order to guarantee consistency, the following harmonised standards as well as national standards and stipulations have been applied: | |
| EN 50636-2-91:2014 • EN 55014-1:2017 • EN 55014-2:2015 EN 60335-1:2012/A2:2019 • EN 62321-1:2013 | |
| We additionally confirm the following in accordance with the 2000/14/EC emissions guideline: Sound power level: Guaranteed: 94 dB(A) Measured: 91,6 dB(A) Compliance evaluation process carried out in accordance with Appendix VI, 2000/14/EC Registered Office: TÜV SÜD Industrie Service GmbH Westendstrasse 199, 80686 München, Deutschland, NB 0036 | |
| This declaration of conformity is issued under the sole responsibility of the manufacturer: | |
| CE Grizzly Tools GmbH & Co. KG Stockstädter Straße 20 63762 Großostheim Germany 15.01.2021 | Christian Frank Documentation Representative |
* The object of the declaration described above satisfies the provisions of Directive 2011/65/EU of the European Parliament and the Council of 8 June 2011 on limiting the use of certain harmful substances in electrical and electronic appliances.
Unit 3, Beldray Park
Beldray Road, Mount Pleasant
Bilston, West Midlands WV14 7NH
Tel.: 0845 683 2672
e-mail: care@novoserv.co.uk
Garden Italia SPA
Via Zaccarini, 8