ERT600R - Grass trimmer Grizzly - Free user manual and instructions
Find the device manual for free ERT600R Grizzly in PDF.

User questions about ERT600R Grizzly
0 question about this device. Answer the ones you know or ask your own.
Ask a new question about this device
Download the instructions for your Grass trimmer in PDF format for free! Find your manual ERT600R - Grizzly and take your electronic device back in hand. On this page are published all the documents necessary for the use of your device. ERT600R by Grizzly.
USER MANUAL ERT600R Grizzly
natural_image
Red and black manual tool with a lever handle, isolated on white background (no text or symbols)
Translation of the original instructions for use
natural_image
Black and white photo of a handheld device with articulated arms and a curved handle (no visible text or symbols)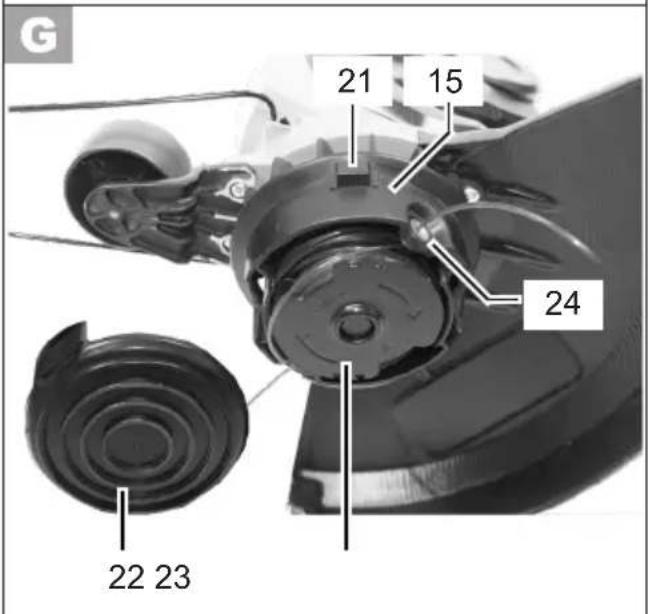
text_image
G 21 15 24 22 23
text_image
E ① 5 6 ② 7 8 180° 9 9 ③ 11 12 ④ 16 ⑤ 11 10
DE Originalbetriebsanleitung ....5
GB Translation of the original instructions for use .....18
NL Vertaling van de originele gebruiksaanwijzing ....30
IT Traduzione delle istruzioni per l'uso in originale .....42
FR Traduction de la notice d'utilisation originale ....55
PL Tłumaczenie oryginalnej instrukcji obsługi ......68
CZ Překlad originálního návodu k obsluze 81
LT Originalios eksploatavimo instrukcijos vertimas .....93
ES Traducción del manual de instrucciones original .....105
SK Preklad originálneho návodu na obsluhu ...... 118
Inhalt
natural_image
Two-step illustration of a worker using a tool to clean or dig the ground, showing the motion and shading (no text or symbols)General description....18
Extent of the delivery.... 18
Survey 18
Functional description ...... 19
Safety instructions 19
Symbols in the manual....19
Symbols on the trimmer 19
General safety instructions.... 20
Assembling instructions....23
Operation....23
Switching ON and OFF 23
Trimmer settings 24
Lengthening the cutting lines ..... 25
Working Instructions......25
Cutting grass 25
Vertical cutting / edge trimming......26
Cleaning and maintenance 26
Cleaning 26
Storage 27
Disposal and protection of the
environment......27
Replacement parts 27
Technical data......27
Guarantee....28
Repair service....28
Trouble shooting 29
Translation of the original EC
declaration of conformity....136
Exploded Drawing 141
Service-Center.... 142
Use
The trimmer is solely intended for cutting grass and weeds in the garden and for edge trimming. The equipment is intended for use in the field of DIY.
It is not designed for commercial use.
Any other use that is not specifically approved in these Instructions can result in damage to the equipment and give rise to serious danger for the user.
The equipment must only be used by adults. Young people aged 16 and over may only use the trimmer under adult supervision.
The manufacturer cannot be held liable for damage when the trimmer is not used in conformity with its intended purpose or due to incorrect operation.
General description

The illustrations can be found on pages 2 and 3
Extent of the delivery
Carefully unpack the trimmer and check that it is complete:
- Lawn trimmer
- Protective cover with 2 screws for fastening protective cover
• Additional handle - 2 thread bobbins
- Spacing bow (flower protection)
- Instruction Manual
Survey

1 Power cable
2 Upper handle
3a Switch lock
3b ON / OFF switch
4 Strain relief
5 Additional handle
6 Knurled nut and screw
7 Handle rod
8 Clamp for handle section (length) adjustment
9 Telescopic tube
10 Chassis adjustment
11 Chassis
12 Motor head
13 Bar for tilt angle adjustment
14 Protective cover
15 Cutter head with line spool or cutting thread
16 Spacing bow (flower protection)
17 Castor roll
18 Cord cutter (not visible)
19 Receptor for spare spool
Functional description
The portable, hand-guided lawn trimmer is powered by an electric motor. The trimmer features a dual line spool as the cutting device.
For grass trimming there are two nylon threads rotating parallel with the ground or, for vertical edge trimming, roughly perpendicular to the ground.
The following describes the functions of the operating parts.
Safety instructions

Before starting to use the appliance you should know and understand all its parts. Practice using the appliance and have an experienced user or expert explain its functionality, method of operation and best practices to you. Make sure you can immediately shut off the appli-
ance in case of emergency. Improper use of the appli- ance may cause serious injury.
Symbols in the manual

Warning symbols with in- formation on damage and injury prevention.

Instruction symbols (the instruction is explained at the place of the exclamation mark) with information on preventing damage.

Help symbols with information on improving tool handling.
Symbols on the trimmer

Caution!

Read the operating instructions carefully.

Wear eye and ear protection

Do not expose the equipment to the damp. Do not work in the rain and do not cut wet grass.

The cutting head will continue to rotate for a few seconds after the equipment has
been switched off. Keep hands and feet well away.

Risk of injury from parts being thrown up.
GB

Keep nearby people away from the trimmer.

Remove the plug from the mains. Immediately if the cable is damaged or cut.
Keep by-standers well away. They could be injured by flung out objects.

Noise level rating L_WA in dB
Electrical appliances must not be disposed of with the domestic waste.

Protection Class II

Cutting circle
General safety instructions

Observe! When using the machine, please observe the safety instructions.
Operating the trimmer

CAUTION: How to avoid accidents and injuries:
Preparations:
- Never allow children and people who are not familiar with these Operating Instructions to use the trimmer. Local regulations may stipulate a minimum age for operators.
- This appliance is not intended for use by persons (including children) with reduced physical, sensory or mental capabili-
ties, or lack of experience and knowledge, unless they have been given supervision or instruction concerning use of the appliance by a person responsible for their safety.
• Children should be supervised to ensure that they do not play with the appliance.
- Keep the equipment well away from by-standers, children and pets. Turn off the equipment if they are in the vicinity.
- Always wear appropriate work clothes and personal protective equipment! Always wear a face shield or goggles as well as ear defenders, boots or shoes with non-slip soles, strong long trousers and work gloves. Never operate the equipment while bare footed or wearing sandals. The protective devices and your personal protective equipment will protect yourself and other people and ensure that the equipment can be smoothly operated:
- Never use the equipment if it is damaged, incomplete or has been modified without the approval of the manufacturer. Never operate the equipment if the protective equipment is defective. Before starting up the equipment always check that the equipment is in a perfectly safe condition, especially the power cable, the switch and the protective cover. Never disconnect or remove any protective devices. This ensures that the equipment remains safe.
Use:
• Always maintain a secure footing while working. Be especially careful when working on a sloping terrain.
This enables you to control the equipment better in unexpected situations.
- Do not operate the equipment if you are tired or lack concentration and after having drunk alcohol or taken medication. Always take a work break in due time. A moment of carelessness when using the equipment can result in serious injury.
- Do not use the equipment while it is raining, in poor weather conditions and when the surrounding area is wet. Only work when the light conditions are good.
There is a risk of accidents.
- Always keep the cutting line well away from the body, particularly the hands and feet, when you switch on the motor and while the motor is running. Risk of injury from cuts.
- Never start the equipment when it is turned over or not in the correct working position.
- Switch off the motor and disconnect the plug from the mains socket:
- Whenever you are not using the equipment
- If the equipment is left unattended
- When the equipment is being cleaned, maintained or is to be inspected
- When relocating the equipment
- If the power or extension cable is damaged - When you remove or exchange the cutting device or manually adjust the length of the cutting line
- Check when starting up and working with the cutting head that it does not come into contact with stones, rubble, wire or other foreign bodies. Danger due to materials blown out of machine.
- Never try to stop the cutting device (cutting line) with your hands. Always wait until it has stopped rotating. Contact with the cutter can result in injury.
- Only use an original cutting line. The use of a metal wire instead of the nylon line is impermissible. This can result in serious injury.
- Do not use the equipment to cut grass that is not growing on the ground, e.g. grass on walls, rocks, etc. Using the equipment for purposes other than those intended can result in dangerous situations.
- Do not traverse gravel paths while the equipment is operating. Gravel can be thrown up and result in injury.
- Do not operate the equipment in the vicinity of inflammable liquids or gases as this could give rise to the danger of a fire or explosion.
- Store the equipment in a dry place that is not accessible to children.

CAUTION! The following states how damage to the equipment and possible injury to people can be avoided:
Taking care of the equipment:
- Ensure that the ventilation openings are not clogged.
- Only use spare parts and accessories that have been supplied or recommended by the manufacturer.
- Never try to repair the equipment yourself. All work that has not been listed in these Instructions must only be carried out by an authorised servicing agency.
- Treat the equipment with the greatest care. Always keep the equipment clean for better and safer work. Follow the maintenance instructions.
- Never overload the equipment. Always work within the stated capacity range. Do not use low-power machines for heavy-duty work. Do not operate the equipment for purposes for which it is not intended.
- Always inspect the equipment before it is to be used. Do not operate the equipment if safety devices, parts of the cutting device or bolts are missing, worn out or damaged.
Electrical safety:

CAUTION! The following states how to avoid accidents and injuries due to electric shock:
- Before each usage, check the mains power cable and the extension cable for damage and signs of aging. Do not use the device if the cable is damaged or worn. Damaged mains power cables increase the risk of electric shock.
• Always keep the extension cable well away from the cutting tools.
Should the power cable become damaged during work, then instantly disconnect the power cable from the mains. DO NOT TOUCH THE POWER CABLE BEFORE IT HAS BEEN DISCONNECTED FROM THE MAINS! Risk of electric shock.
- If the power cable for this equipment is damaged, it must be replaced with a special power cable, which is available from the manufacturer or a customer service agent of the same.
- Check that the mains voltage is the same as indicated on the rating plate.
- Wherever possible connect the equipment to a power socked with a residual-current circuit breaker that has a rated current of not more than 30 mA.
- Protect the equipment from moisture. The equipment must not be moist nor operated in a moist environment. Water entry into the equipment increases the risk of electric shock.
- Avoid body contact with earthed parts (e.g. metal fences, metal posts). There is an
increased risk of electric shock if your body is earthed.
- Only use extension cables with a maximum length of 75 m that have been approved for open-air use. The stranded cord diameter of the extension cable must be at least 2.5 mm ^2 . Always unreel a cable drum to its full length so that the entire cable can be inspected for damage.
- Never pass an operating equipment over the extension cable. Ensure that the power cable is always trailing behind the operator. The extension cable can be accidentally severed.
- Use the envisaged cable suspensions when attaching an extension cable.
- Never carry the equipment by its power cable. Never pull the cable to disconnect the plug from the mains socket. Protect the cable from heat, oil and sharp edges. The mains power cable could be damaged.
Assembling instructions

Always disconnect the plug before working on the trimmer and wait until the cutting lines have completely stopped. There is the danger of electric shock and the possibility of injury by the cutting lines.

Use OEM parts only and mind the thread cutter during assembly. Risk of injury!
B Assembling the protection cover:
- Place the protective cover (14) on the motor head (12).
- Fasten the protective cover using two of the screws provided.
Mounting the distance roller:
- Place the distance roller (17) on the motor head (12).
- Fasten the distance roller using two of the screws provided.
Mounting the additional handle:
- Pull the ends of the additional handle (5) apart and slide them over the handle unit (20).
- Screw on the additional handle.
Operation

Caution: Risk of injury! Never use the trimmer without its protective cover. Always check the operability of the trimmer before it is used. Check that the mains voltage is the same as indicated on the rating plate. Always wear goggles when working with the trimmer.

Please observe local regulations concerning noise protection.
D Switching ON and OFF
- Form a loop in the end of the extension cable, conduct it through the opening in the upper handle (2) and hang it on to the strain relief (4).
- Connect the trimmer to the mains socket.
GB
- Ensure a safe stance and hold the equipment firmly with both hands. Do not deposit the cutting head on the ground.
- To turn on, use your thumb to actuate the switch lock (3a), then press the On/Off switch (3b). Release the switch lock.
To turn off, release the On/Off switch (3b). There is no continuous operation mode.

After the trimmer has been switched off the cutting head will continue to rotate for a few seconds. Keep hands and feet well away.

The ON / OFF switch must not be locked in place. The trimmer must not be used if the switch is damaged. There is the immediate danger of injury if the motor does not switch off after the ON / OFF switch has been released.

Caution: Always remove grass residue from the line cutter so that the cutting effect is not impaired.

Trimmer settings
Adjusting the additional handle:
The additional handle can be set in different positions. Set the handle in such a manner that the cutting head is slightly tilting forwards when in the working position.
①
Release the knurled nut (6) and adjust the additional handle (5) in the required position. Retighten the knurled nut.
Adjusting the height:
The telescopic tube enables you to adjust the trimmer to your height.
② Release the clamp for the handle section (8). Adjust the telescopic tube (9) to the desired length and re-fasten the clamp (8).
To adjust the cutting angle:
Changing the cutting angle lets you trim grass at places that are difficult to reach, e.g. under benches or wall offsets.
② Release the clamp for the handle section (8). Rotate the handle section (7) by 90° or 180°. Re-fasten the clamp (8).
To adjust the handle rod:
The handle rod turns by 90° and 180° (see chapter: „Working Instructions“)
③ Operate the foot lever (13) on the motor head (12) and tilt the telescopic tube (9). There are 6 possible positions.
Adjusting the spacing bow (flower protection):
The spacing bow keeps plants and stalks that are not to be cut away from the cutting lines. If you do not need the spacer bow, you can place it behind the castor roll (parking position).
④ Tip the spacer bow (16) forward into its working position.
Positioning the chassis:
You can adjust the chassis (11) to the required cutting height. In addition, the chassis (11) can be folded away if the grass is too high or if edges need to be cut.
⑤ Press the chassis adjustment (10) and tilt the chassis (11) into the desired position. There are five possible positions.
Lengthening the cutting lines

A short or worn string will make bad cuts. If you notice reduced cutting performance, you should therefore check if there is still enough string on the spool. Pull the power plug first! Spool replacement is detailed in section „Replacing the Trimming Assembly“.
Fully automatic dual line system
The equipment features a fully automatic dual line system.
The lines will automatically elongate every time you turn on the appliance. To support proper line elongation, ensure that the coil has stopped moving completely before turning on the appliance again.
If the lines should be longer that defined by the cutting circle then they will be automatically cut to the correct length by the line cutter

Regularly check the nylon lines for damage and whether the lines still have the correct length defined by the line cutter
When no line ends are visible:
- Renew the line spool (see Cleaning and maintenance", Replacing the trimming assembly").
Adjusting the line length manually:
- Disconnect the plug from the mains socket! Press and hold the stop button (21) at the cutter head (15) and pull both threads outwards
Working Instructions

WARNING. Danger of injury!
Do not cut moist or wet grass.
- Before starting the trimmer check that the cutting head will not come into contact with stones, rubble or other foreign bodies.
- Switch on the trimmer before you approach the grass that is to be cut.
• Always trail the extension cable behind you. Do not pass the operating trimmer over the extension cable as the cable could be damaged.
- Do not overload the trimmer during operation.
- Avoid contacting solid obstacles (stones, walls, fences, etc.) since this would make the string wear out too quickly. Use the edge of the protective cover to keep the appliance away from such obstacles.
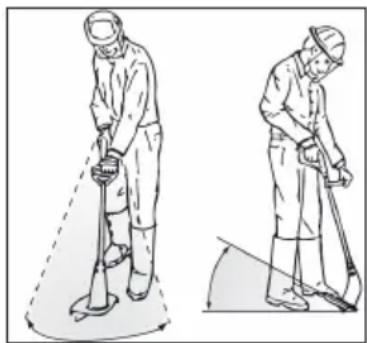
Cutting grass
natural_image
Two-step illustration of a worker using a tool to clean or walk, showing the motion and shading (no text or symbols)Cut the grass by swaying the trimmer side-ways to the right and left. Cut slowly, tipping the appliance slightly forwards.
Long grass should be cut at layers from top to bottom.
Vertical cutting / edge trimming
- Be particularly careful and attentive when holding the cutter head vertically. To avoid injuries, keep enough distance to the cutting thread.
- To prevent the thread from wearing out quickly, avoid contacting solid surfaces.
- To trim lawn edges, slowly move the appliance along the lawn edges.
• Vertical trimming is best done by moving the appliance on its castor roll. - You can also tip the chassis to the left or right and use it as a guide for edge trimming.

Vertical cut settings:
- Handle rod: 180^ (see E ②)
- Cutting angle: Vertical (see ③)
- Spacer bow in parking position
- No chassis
Cleaning and maintenance

Always disconnect the plug from the mains socket before working on the trimmer.

Any work that is not described in these Instructions must be carried out by a servicing agency authorized by us. Only use original parts and be very careful with the line cutter during installation work. Danger of injury!
Cleaning

Do not jet water onto the trim-mer and do not clean it under
flowing water. This would result in the danger of an electric shock and the trimmer could be damaged.
Always keep the trimmer clean. Do no use cleaning agents and solvents.
• After the work has been completed remove all grass and soil from the cutting device and the protective cover.
- Ensure that the ventilation slots are always clean and free of grass.
- Clean the trimmer with a soft brush or a cloth.

Never manipulate the cutting device by inserting worn out original or alien parts. Only use original spare parts. Never use metal lines. The use of alien parts can result in serious personal injury and cause irreparable damage to the trimmer and the guarantee will become instantly null and void.

Exchanging the line spool:
- Disconnect the plug from the mains socket.
- Remove the spare spool from the spare spool holder (19).
- Turn over the trimmer so that the cutting head (15) is facing upwards.
- Simultaneously press the two locks on the cutting head (15) and remove the hood (22) with the line spool (23).
-
Insert the new spool with the smooth side facing upwards in the cutting head and thread the two lines through the line eyelets (24). Ensure that the line ends do not slip out of the spool slots.
-
Return the hood. Ensure that the locks of the hood are accurately inserted in the corresponding recesses of the cutting head. They lock in audibly.
- Press the retaining head (21), release it again and pull the ends of the cord out a little. Repeat this process until the ends of the cord project a little beyond the cord cutter).

Check the string cutter. Do not use the appliance without a string or with a defective string. Contact our nearest Service Centre in case the string cutter is damaged.
Storage
- Carefully clean the trimmer and its accessories after each use (see “Cleaning and maintenance”), thereby avoiding mould formation.
- Store the trimmer in a dry place well out of reach of children.
- Do not expose the trimmer for extended periods to direct sunlight.
- Do not wrap plastic sacks around the trimmer as this could result in the formation of moisture and mould.
- Do not stand the trimmer on its protective cover. Suspend it by its upper handle in such a manner that the protective cover does not come into contact with other objects. This is because the protective cover could become deformed, thereby changing its dimensions and its safety properties.
Disposal and protection of the environment
Dispose of the trimmer, its accessories and the packaging in an environment-friendly manner.
Electrical appliances must not be disposed of with the domestic waste
Hand in a redundant trimmer to a recycling centre. The plastic and metals can then be sorted out and graded for recycling. Our Service Centre will be happy to answer any questions in this respect. Defective units returned to us will be disposed of for free.
Replacement parts
Spare parts and accessories can be obtained at www.grizzly-service.eu
If you have any other questions, contact the "Service-Center" (see "Service-Center").
Technical data
Electric lawn trimmer ....ERT 600 R
Rated input voltage..... 220-240 V\~, 50 Hz Power input.....600 W Idling speed.....10000 min ^-1
Weight without cable .....aprox. 2.16 kg Dual line.....2x4 m, fully automatic Cutting circle dual line ..... 280 mm Line thickness dual line ..... 1.6 mm Protection Class .....
Sound power level ( L_WA ) guaranteed.....96 dB(A) measured .....94.8 dB(A); K_WA = 1.62 dB Sound pressure level
(L_pA) .....73.05 dB(A); K_pA = 1.03 dB Vibration (a_h) .....5.035 m/s ^2 ; K=1.5 m/s^2
Noise and vibration ratings have been determined pursuant to the standards and regulations specified in the declaration of conformity.
Guarantee
- We grant a 24-month warranty for this appliance. Commercial use will invalidate the guarantee.
- Damage due to natural wear and tear, overload or incorrect use is excluded from the guarantee. Certain components are subject to normal wear and tear and are excluded from the guarantee. These include in particular: Line spool, cutting lines and line cutter provided that the claims are not traced back on material defects.
• Furthermore, the prerequisite for guarantee services is that the references indicated in the operating instructions regarding cleaning and maintenance have been adhered to. - Damage, which has been caused from material or manufacturing faults, will be made good free of charge, by replacement delivery or repair.
This requires that the appliance is re-turned to our service center undismantled and with proof of purchase and guarantee.
Repair service
- Repairs, which are not covered by the guarantee, can be carried out for charge by our service center. Our service center will be glad to provide you with a cost estimate.
We can only process devices which have been packaged sufficiently and which have been dispatched with correct stamping.
- Note: In case of complaint or service, please deliver your device cleaned, and with an indication of the defect, to our service address.
Devices sent in freight collect - by bulk freight, express or with other special freight - are not accepted.
- Defective units returned to us will be disposed of for free.
Trouble shooting
| Problem Possible | cause Remedy | |
| Trimmer vibrates | Spool (23) is dirty | Clean spool(see “Cleaning and maintenance”) |
| Spool (23) is defective | Exchange spool(see “Cleaning and maintenance”) | |
| Trimmer does not start | No mains power | Check cable, line, plug; repair by qualified electrician |
| ON / OFF switch (3) defective | Repair by After-Sales Service | |
| Worn carbon brushes | ||
| Motor defective | ||
| Poor cutting performance | Line spool (23) does not have sufficient line | Lengthen cutting line(see “Operation”)or exchange spool(see “Cleaning and maintenance”) |
| Line has not been conducted out of the spool (23) or only on one side | Remove spool and lace line through opening outwards and return spool. |
Inhoud
natural_image
Illustration of two workers using a tool to clean or walk, showing different angles (no text or symbols)natural_image
Two-step illustration of a worker using a tool to clean or dig the ground, showing hand positions and tool path (no text or symbols)natural_image
Illustration of two workers using a tool to clean or walk, showing different angles (no text or symbols)natural_image
Illustration of two workers using a tool to clean or walk, showing different angles (no text or symbols)natural_image
Illustration of two workers using a tool to clean or sweep a circular object, no text or symbols presentnatural_image
Illustration of two workers using a sand duster to work, showing different angles and positions (no text or symbols)natural_image
Two-step illustration of a worker using a tool to avoid sand or residue, showing the motion and shading (no text or symbols)KÁBEL ODPOJÍ OD SIETE.
natural_image
Two-step illustration of a worker using a tool to clean or dig the ground, showing the motion and angle (no text or symbols) | Translation of the original EC declaration of conformity | |
| We confirm, that the Electric lawn trimmer series ERT 600 R Batch number B-46132 conforms with the following applicable relevant version of the EU guidelines: | ||
| 2006/42/EC • 2014/30/EU • 2000/14/EC • 2005/88/EC • 2011/65/EU* | ||
| In order to guarantee consistency, the following harmonised standards as well as national standards and stipulations have been applied: | ||
| EN 60335-1:2012/A11:2014 • EN 62233:2008 EN 55014-1:2006/A2:2011 • EN 55014-2:2015 • EN 50636-2-91:2014 EN 61000-3-2:2014 • EN 61000-3-3:2013 | ||
| The following are also confirmed as complying with Noise Emissions Directive 2000/14: Guaranteed sound power level: 96 dB(A) Measured sound power level: 93,05 dB(A) The conformity evaluation procedure employed is compliant with appendix VI/2000/14/EC Registered Office: BUREAU VERITAS, Newtime - 52 Boulevard du Parc - Ile de la Jatte, F-92200 Neuilly sur Seine, NB: 0062 | ||
| This declaration of conformity is issued under the sole responsibility of the manufacturer: | ||
 | Grizzly Tools GmbH & Co. KG Stockstädter Straße 20 63762 Großostheim Germany 11.01.2020 |  Christian Frank Documentation Representative Christian Frank Documentation Representative |
* The object of the declaration described above satisfies the provisions of Directive 2011/65/EU of the European Parliament and the Council of 8 June 2011 on limiting the use of certain harmful substances in electrical and electronic appliances.
text_image
Exploded view diagram of a mechanical assembly with numbered parts and exploded viewsinformativ • informative • informatief • informatif pouczający • informační • informatyvus • informativo • informatívny
Service-Center
PI Krysiak Sp. z o.o.
ul. Rolna 6
62-081 Baranowo
Tel.: 061 650 75 30
Fax: 061 650 75 32
e-mail:
krysiak@krysiak.pl
Homepage: www.krysiak.pl
FR SAV03
ZA de la verrerie
03210 Souvigny
Unit 3, Beldray Park
Beldray Road, Mount Pleasant
Bilston, West Midlands WV14 7NH
Tel.: 0845 683 2672
e-mail: care@novoserv.co.uk
IT Garden Italia SPA
Via Zaccarini, 8