BRV 400 S - Scarifier Grizzly - Free user manual and instructions
Find the device manual for free BRV 400 S Grizzly in PDF.

User questions about BRV 400 S Grizzly
0 question about this device. Answer the ones you know or ask your own.
Ask a new question about this device
Download the instructions for your Scarifier in PDF format for free! Find your manual BRV 400 S - Grizzly and take your electronic device back in hand. On this page are published all the documents necessary for the use of your device. BRV 400 S by Grizzly.
USER MANUAL BRV 400 S Grizzly
natural_image
Black-and-white photo of a lawn mower with visible blades and control panel (no text or symbols)BRV 400 S
Translation of the original instructions for use
text_image
Labeled diagram of a lawn mower with numbered parts and a separate close-up of its blade structure.
text_image
B 3 4b
text_image
C 4a 1 7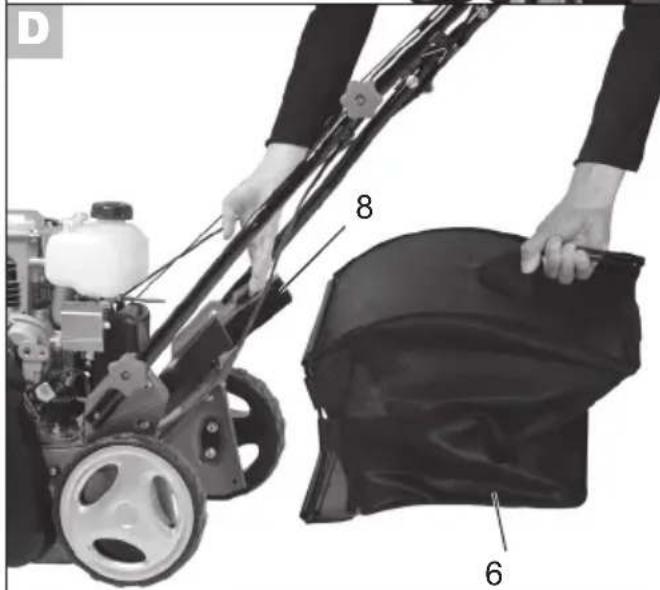
natural_image
Person using a lawn mower to handle a black cloth, with numbered parts labeled 6 and 8 (no text or symbols on the main subject)
text_image
E 1 2 17 16
text_image
F 1 18
natural_image
Close-up of a robotic arm with visible tire, wheels, and a brand logo (no text or symbols on main subject)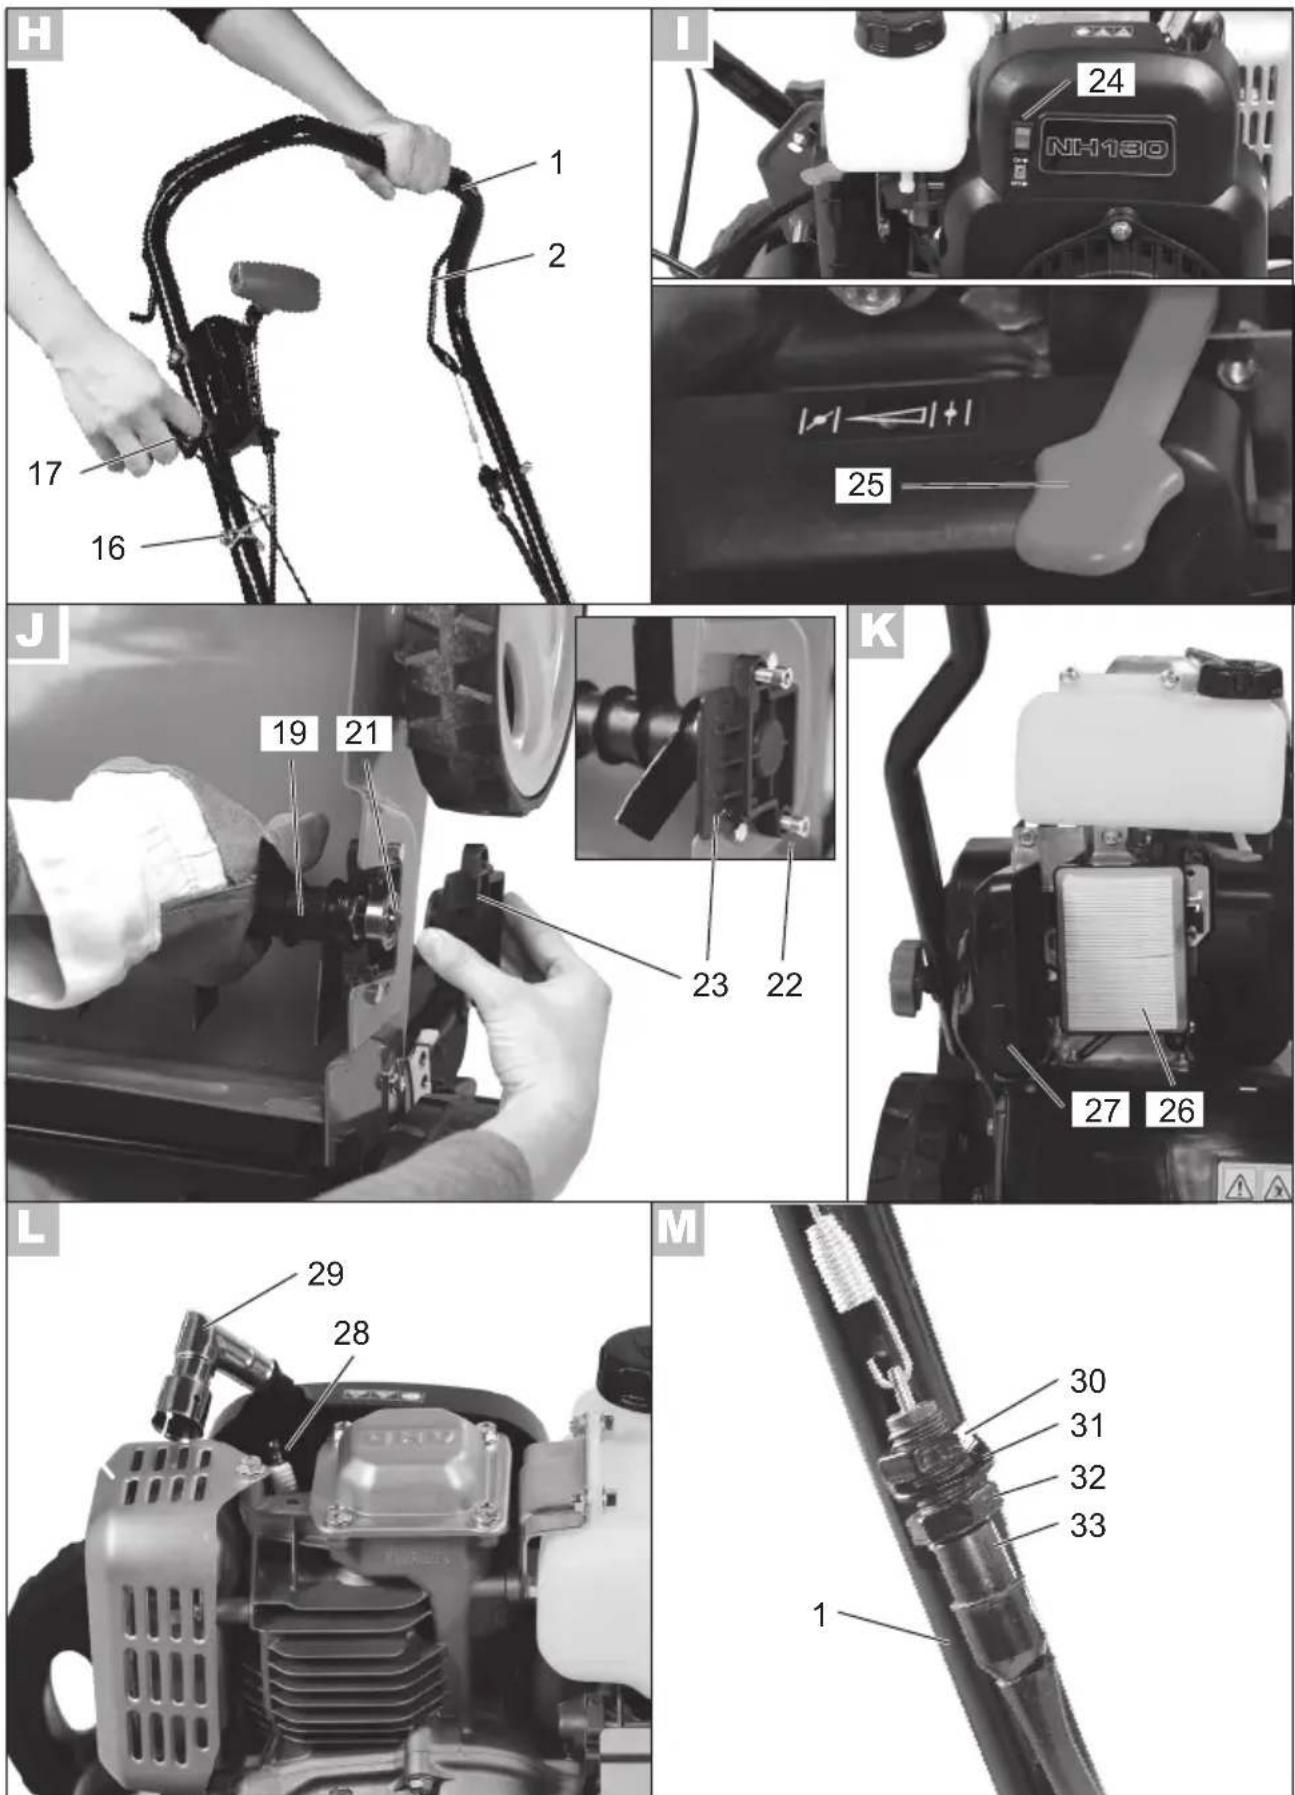

GB Translation of the original instructions for use 64
Grizzly Service-Center 166
text_image
Diagram showing four labeled arrows: gear, up/down, gear, and down, with a circular symbol at the top.Transport-Position
Grizzly Service-Center 166
Gebruiksdoeleinde
Grizzly-Service-Center....166
text_image
TICKING ↑ — — TICKINGtext_image
Diagram showing three labeled icons: gear, gear with upward arrow, and gear with downward arrow, likely representing a mechanical or optical system.No. de commande .....91103024
Before first using the machine, please read this instruction manual carefully, for your own safety and for the safety of others. Keep the manual in a safe place and pass it on to any subsequent owner to ensure that the information contained therein is available at all times.
Content
Use....64
Safety instructions 65
Symbols / Instructions on the implement 65
Symbols in the manual....66
General safety instructions .... 66
Functional parts....70
Functional description....70
Assembling instructions....70
Extent of the delivery 70
Installing the Handle Bar....71
Mounting and emptying the collection bag....71
Installing the Starter Cord 71
Filling with Engine Oil and Checking the Oil Level....71
Filling with Petrol....72
Operation....72
Setting the working positions ..... 72
Readjustment positions....72
Starting and Stopping the Engine....73
Working with the implement....73
Use
This implement is used:
- As a lawn aerator and to rake leaves, moss and weeds out of the lawn and to collect these leaves and plant residues.
- As a verticutor to cultivate the grass sward and thereby regenerate the lawn.
This appliance is not suitable for commercial use. Commercial use will void the warranty.
Exchanging the cylinder....74
Cleaning and Maintenance 74
Cleaning and General Maintenance Work....74
Replacing the Air Filter....75
Change / adjust spark plug 75
Changing the Engine Oil 75
Adjusting the Bowden Cable....75
Adjusting the Carburettor 76
General Storage
Instructions....76
Storage During Longer Breaks from Operation....76
Disposal / Environmental Protection 77
Guarantee....77
Repair Service.... 78
Spare parts....78
Technical data....79
Maintenance Intervals 80
Troubleshooting 81
Translation of the original EC declaration of conformity .... 159
Exploded Drawing 165
Grizzly Service-Center 166
Any other use that is not specifically approved in these Instructions can result in damage to the implement and could be a serious danger to the user.
The implement must only be operated by adults. Children and people who are not familiar with these Instructions must not be allowed to use this implement. Never operate this implement while it is raining and in a wet environment.
The owner or operator is responsible for accidents or harm to people and their property.
The manufacturer cannot be held liable for damage caused by incorrect operation of the implement or if it is not used in conformity with its intended purpose.
Safety instructions
This section covers the basic safety instructions when working with this implement.
Symbols / Instructions on the implement

WARNING!
these Instructions must be read!

Danger of injury due to flung-out material! Keep bystanders well away from the implement.
CAUTION – Sharp tools:
Ensure that the hands and feet are kept well away from the cutting tools. The cutting cylinder continues to rotate briefly after the motor has been switched off!
Caution – risk of injury!
Before maintenance work, switch off the engine and take out the spark plug connector.

Caution – toxic fumes!
Do not operate the equipment in enclosed areas.
Caution – petrol is flammable! Do not smoke and keep away from heat sources

Caution – hot surfaces!
Risk of burning.

Do not expose the equipment to the damp.
Caution – risk of injury! Wear eye and ear protection

Caution with steps! Turn off the power when the implement is to be carried across steps!

Noise level ratings L_WA in dB(A)..

Working width

text_image
TOMATO ↑ —— —— —— TOMATOTransport position
This position sets the maximum safety spacing between the tool and the floor.
Working position Set this position when working with a new implement.
GB

text_image
-15 -12 -9 -6 -3 5Read the Operating Instructions before setting up for work. This helps to eliminate roll wear.
Symbols on the handle bar:

Stop the equipment: lease the safety catch
Symbol on the choke lever

Lever in cold start position (START)
er in warm start position (RUN)
Symbol on the motor

On / off switch
Symbols on the filler cap:

Note on the petrol filler


Caution! Before starting, check the oil level.
Symbols on the oil filler cap:

Note on the oil filler
Symbols in the manual

Warning symbols with information on damage and injury prevention.

Instruction symbols (the instruction is explained at the place of the exclamation mark) with information on preventing damage..

Help symbols with information on improving tool handling.
General safety instructions

This implement can cause serious injuries if it is not properly used. Please read these Operating Instructions carefully and familiarize yourself with all the control elements before operating this implement. Keep these Operating Instructions in a readily accessible place so that this information is always at your disposal.
Operating the implement:

WARNING! The implement can cause serious injuries.
How to avoid accidents and injuries:
Preparations:
- Never allow children and people who are not familiar with these Operating Instructions to use the implement. Local regulations may stipulate a minimum age for operators.
- Never start up the implement while other people, but especially children and domestic pets, are in the vicinity.
- Check the area on which the implement is to be used. Remove all stones, sticks, wire and other foreign bodies that could be caught up and flung out.
Never use the implement to level out uneven patches.
- Always wear appropriate protective work clothes and firm shoes with non-slip soles, strong long trousers, ear defenders and goggles. Never operate the implement while bare footed or when wearing open sandals.
- Never operate the implement if it is damaged, incomplete or has been modified without the consent of the manufacturer. Never work with damaged or missing protective devices (e.g. starting lever, unlocking knob, impact protector).
- Never disengage protective devices (e.g. by tying the starting lever).
• Children must be supervised in order to ensure that they do not play with the equipment.
- Before starting the equipment, ensure that no objects are pushed into the blade opening, that the equipment is standing stably
and that the workspace is tidy and not blocked.
- Warning: Petrol is highly flammable. Fire or explosions can result in serious burns:
- Keep petrol only in containers intended for this purpose; - Only refuel outdoors and do not smoke whilst refuelling; - Fill with petrol before starting the engine. Do not open the filler cap or refill with petrol whilst the engine is running or the equipment is hot:
- If petrol is spilled, do not attempt to start the engine. Instead, remove the equipment from the surface on which the petrol has been spilled. Avoid any ignition attempt until the petrol fumes have evaporated;
- For reasons of safety, replace petrol and other filler caps in the event of damage.
- Replace defective silencers.
Use:
- Do not run the combustion engine in enclosed spaces, in which dangerous carbon monoxide can collect.
- CAUTION – A very sharp tool. Avoid cutting your fingers or toes. While working always keep your feet and fingers well away from the cutting cylinder and the ejector opening. There is the danger of serious injury!
• Work only in daylight or with good artificial lighting. An unlit working area can result in accidents.
GB
- If possible, avoid using the equipment on wet grass.
- Do not operate the implement if you are tired or are lacking in concentration and after having drunk alcohol or taken medicine. Always take a work break in due time. Approach the work with common sense.
- Familiarize yourself with the terrain and remain focused on the potential hazards that you could miss on account of the motor noise.
- Always maintain a secure footing while working, especially on a sloping terrain. Always work across slopes - never up and down! Be particularly careful when changing the travelling direction. Do not work on very steep slopes.
- Always guide the implement at a walking pace with both hands on the handle. Be especially careful when you turn the implement around or draw it towards you. Danger of stumbling!
- Do not change the engine regulator setting and do not over-rev it. This may damage the equipment.
- Before starting, the engine, disengage all cutting tools and drives.
- Start or operate the start switch with care and in accordance with the manufacturer's instructions. Ensure sufficient space between feet and the cutting tool. Risk of injury.
- Do not tilt the implement when starting, other than it has to be lifted. In this case tilt the implement only to the extent that
is absolutely necessary and always lift the implement on the side that is opposite to the operator.
- When the unit is put back on the ground after lifting, both hands must be in working position.
- Never operate the implement without the attached collection bag or impact protector. Danger of injury! Always keep well away from the ejector opening.
- Do not operate the implement in the vicinity of inflammable liquids or gases as this could give rise to the danger of a fire or explosion.
Work intervals:
• After the implement has been turned off, the cutting cylinder will continue to rotate for a few seconds. Keep hands and feet well away.
- Only remove plant parts when the implement is standing completely still. Ensure that the grass ejector opening is clean and free.
- Switch off the power when the implement is to be transported, lifted or tilted and when traversing other surfaces than grass.
- Never leave the implement unattended at the place of work.
- Switch off the engine, take out the spark plug connector and ensure that all moving parts are still:
- before touching the tines
- Before releasing blockages or removing obstructions in the ejection channel;
- Before checking, cleaning or working on the equipment;
- If a foreign body is struck.
Look for damage to the equipment and carry out the necessary repairs before restarting and working with the equipment; - If the equipment starts to vibrate unusually strongly, an immediate check is required.
- Switch off the engine
- When leaving the equipment;
- Before refuelling;
- Store the implement in a dry place well out of reach of children.

CAUTION! The following states how to avoid damage to the implement and any resulting harm to people:
Take care of your implement
- Switch off the power when the implement is to be carried across steps.
- Inspect the implement each time before it is to be used. Never operate the implement if safety devices (e.g. impact protector, parts of the cutting facility or bolts are missing, worn out or damaged. To avoid imbalance, all tools and bolts must be exchanged as complete sets.
- Only use spare parts and accessories that have been supplied or recommended by the manufacturer. The use of alien parts results in the immediate loss of all guarantee claims.
- Ensure that all nuts, bolts and
screws are firmly tightened and that the implement is in a safe working state.
- Never try to repair the implement yourself, other than you have been trained accordingly. All work that has not been listed in these Instructions must only be carried out by authorised servicing agencies.
- Treat the implement with the greatest care. Always keep the tool clean for better and safer work. Follow the maintenance instructions.
- Never overload the implement. Always work within the specified capacity range. Do not use low-power machines for heavy-duty work. Do not operate the implement for purposes for which it is not intended.
- Do not keep the equipment with petrol in the tank inside a building in which petrol fumes could potentially come into contact with open fire or sparks.
- Allow the engine to cool before placing the equipment in enclosed spaces. Risk of fire.
- To avoid the risk of fire, keep the engine, exhaust and area around the fuel tank free of grass, leaves or leaking grease (oil).
- Check the grass catcher regularly for wear or loss of function.
- If the fuel tank is to be drained, do this outdoors.
Functional parts

The most important functional parts are illustrated on the cover page.

1 Upper handle bar
2 Safety catch
3 Lower bar
4a 2 long screws and 2 wing nuts for attaching the bar
4b 2 short screws and 2 wing nuts for attaching the bar
5 Handle on the collection bag
6 Collection bag (optionally available)
7 2 cable clamps
8 Impact protector
9 Bolts for mounting the bar 10 Wheels
11 Implement case
12 Lever for adjusting the working position
13 Exhaust guard
14 Oil filler cap with dipstick
15 Filler cap
16 Starter cord guide
17 Starter handle with starter cord
18 Lever for setting the working position
19 Scarifier drum w/ blade (installed)
21 Shaft

24 On/Off switch
25 Choke lever

22 Mounting bolts for drum
23 Bearing cover

26 Air filter
27 Air filter cover

28 Spark plug
29 Spark plug connector

30 Upper nut
31 Bracket on the bar
32 Lower nut
33 Adjusting screw
Functional description
The verticutor and lawn aerator has two easily exchangeable work cylinders:
An aerator cylinder made of hard plastic with vertically rotating sprung tines, and a verticutor cylinder with vertically mounted high-grade steel knives.
The implement features a high-quality plastic case with collection bag and a handle bar with a folding function. Please refer to the subsequent descriptions for the actual functions of the individual control elements.
Assembling instructions

Switch off the engine, take out the spark plug connector and ensure that all moving parts are still:
Extent of the delivery
Carefully unpack the implement and check that all the subsequently listed parts are complete:
- Implement case with verticutor cylinder and impact protector
- Higher bar
- Lower bar
- 2 cable clamps
- Mounting accessories
- Spark plug wrench
- Operating instructions
- Operating instructions Zongshen
Installing the Handle Bar

Caution! When installing the handle bar, ensure that the Bowden cables are not squashed.

-
There is a drill hole located on the lower end of the handle bar (3) which is tightened using the corresponding bolts (9) in the holder on the device. This creates the lower pivot point used to adjust the tilt angle.
-
Fasten the lower handle bar (3) using the bar fastening screws and wing nuts (4b). You can determine the desired tilt by selecting one of the two possible screw positions (see B small pictures on the left).

-
Use the screws and wing nuts (4a) from the package to mount the upper bar (1) on the lower bar (3).
-
Fix the Bowden cables to the bar using the cable clamp (7).
Mounting and emptying the collection bag

WARNING: Never operate the implement without the impact protector. Danger of Injury!

Mounting the collection bag on the implement:
- Lift the impact protector (8).
- Attach the collecting bag (6) to the unit housing (11).
- Release the impact protector so that it holds the collection bag (6) in its position.
Removing and emptying the collection bag:
Lift the impact protector (8) and take out the collection bag (6).
Installing the Starter Cord

-
Move the safety catch (2) towards the handle bar (1) and hold it.
-
Slowly pull the starter cord on the starter handle (17) towards the bar and hook the starter cord into the starter cord guide (16).
-
Release the safety catch (2).
Filling with Engine Oil and Checking the Oil Level

Place the equipment on a level base.
- Unscrew the oil filler cap and dipstick (14) and pour oil into the tank. The oil tank holds 0.5 l oil. Use brand oil (e.g. SAE 30).
- To check the oil level, wipe the dipstick on a clean cloth and replace it in the tank until it stops.
- After pulling it out, read off the oil level on the dipstick. The oil level should be in the marked area between the minimum and maximum marks.
- Wipe off any spilt oil and close the oil filler cap (14).


Check the oil level every time before mowing and add oil when the lower marking point is reached.
Filling with Petrol

- Keep petrol in containers intended for this purpose;
- Only refuel outdoors and never with the engine running or when the machine is hot;
- Open the filler cap carefully to allow excess pressure to escape;
- Do not smoke whilst refuelling;
- Avoid skin contact and inhalation of the fumes;
- Remove spilt petrol;
- Keep petrol away from sparks, open flames and other ignition sources;

Do not use petrol/oil mixtures; e normal or super unleaded petrol;
- Only use clean, fresh petrol;
-
Do not store petrol for longer than one month, as its quality deteriorates
-
Unscrew the filler cap (15) and pour in the petrol to the lower edge of the filler.
Do not fill the tank entirely, to allow the petrol room to expand.
- Wipe away petrol residues around the filler cap and close the filler cap.
Operation

Please observe local regulations concerning noise protection.
Setting the working positions

The implement has 2 principal position settings:. These can be adjusted using the lever (18).

flowchart
graph TD
    A["Gear Icon"] --> B["Up Arrow"]
    B --> C["Gear Icon"]
    C --> D["Down Arrow"]
Transport position
This position sets the maximum safety spacing between the tool and the floor.
Working position
Set this position when working the implement.

When the implement is delivered it is in the Transport Position setting
Readjustment positions
The working position can be lowered with increased knife and sprung tine wear. Wear can be identified from an increasingly poor result.

Check that the appliance is turned off before adjusting the working position.
Pull up the adjusting knob (12). Turn the knob as appropriate and push it down to snap in. Use your other hand to hold the appliance.

The setting button is not intended for height adjustment but rather to compensate for wear. Selection of a readjustment position without the corresponding wear can overload the motor and damage the cylinder.
Starting and Stopping the Engine

Before switching on the implement ensure that it is not in contact with any objects. Keep your feet and hands well away from the cylinder and the ejector opening. Danger of injury!

Warning! Petrol is flammable. Start the engine at least 3 m away from the filling location.

Regularly check petrol and oil level (see „Initial Operation“) and refill in due time.

-
Set the On/Off switch (24) on the switching element to "On".
-
For a cold start set the choke lever(25) into position „START“.
For a warm start leave the choke lever (25) in position „RUN“.
-
Move the safety catch (2) towards the handle bar (1) and hold it.
-
Pull the starter cord (17).
- When the engine starts, allow the starter handle to slowly slide back into the starter cable guide (16).
Stopping the engine:
6 Release the safety loop (2). The motor switches off and the knife is braked.

WARNING! The cylinder continues to run for a brief period after the implement has been switched off. Do not tilt or carry the implement while the motor is still running and do not touch the cylinder while it is still rotating. Danger of injury!
Working with the implement
To maintain a well cared-for lawn it should be aerated every 4 to 6 weeks.
Verticuting is a more intensive intervention than aerating and should only be carried out once a year, the best time being in spring after the lawn has been mown for the first time.

When working on slopes always proceed across the slope. Be particularly careful when walking backwards and pulling the implement. Danger of stumbling!

The shorter the grass, the better the lawn can be treated. Furthermore, the implement is less stressed and the service life of the cylinder is prolonged.
- The implement can be operated with or without the collection bag.
Recommendation: Work with the collection bag for aerating and without the collection bag for verticuting. - To ensure that the collision guard flap closes properly, remove any earth that may have collected on the collision guard springs and/or the housing. When working without the bag, check that the collision guard flap is tightly closed.
- Mow the lawn to the required grass height.
- Do not use the scarifier in long grass. It may otherwise wind around the scarifier blade and result in damage to the equipment.
- Select the appropriate working or readjustment position (in the event of cylinder wear) so that the implement is not overloaded.
GB
- Guide the implement at a walking pace down lanes that are as straight as possible. To ensure uninterrupted aerating or verticuting the individual lanes should always overlap by a few centimetres. Dwelling too long at the same place while the implement is running can damage the grass sward.
- Adjust the transport position setting (see "Setting the Working Position") when transporting the implement.
- Lift the implement to transport it over steps and sensitive surfaces (e.g. tiles).
- Always clean the implement after each use (see “Cleaning, Maintenance, Storage”).
- After having treated lawns with dense moss growth, it is advisable to reseed the lawn so that it can regenerate itself quicker.
Exchanging the cylinder

Switch off the engine, take out the spark plug connector and ensure that all moving parts are still:

Wear gloves when handling the cylinder.

-
Turn the implement over.
-
Loosen the fixing screws (22) with a 5mm Allen key.
- Hold the roller (19) firmly with one hand and pull the bracket (23) to the right.
- Tilt the cylinder (19) upwards and pull the shaft (21) out of its seat. Insert the new cylinder by reversing the sequence.
Cleaning and Maintenance

Have any repair and maintenance work not described in these instructions carried out by a specialist workshop. Use only original Grizzly replacement parts. Risk of accidents!
Carry out maintenance and cleaning work strictly with the engine switched off and spark plug connectors removed. Risk of injury!
Allow the equipment to cool before any maintenance and cleaning work. Elements of the engine are hot. Risk of burning!

Wear gloves when handling the blade.
Cleaning and General Maintenance Work

Do not tilt the equipment sideways or forwards. Operating fluids could leak out and the engine could be damaged.
- When work has finished remove plant residues adhering to the wheels, inside the ventilation opening, the grass ejector opening and the cylinder. Doe not use hard or pointed objects for this purpose as they could damage the implement.
- To ensure that the collision guard flap closes properly, remove any earth that may have collected on the collision guard springs and/or the housing.
- Completely empty the collection bag.
• Always keep the implement clean. Do not use cleaning agents or solvents. Do not use water to clean the engine as it could contaminate the fuel system.
We cannot be held liable for damage caused by our implements if they were improperly repaired, if non-original parts have been used or if they were used not in keeping with their intended purpose.
Replacing the Air Filter

Do not operate the equipment without the air filter otherwise dust and dirt will get into the engine and result in damage to the machine

-
Release the air filter cover (27) and flip open the cover
-
Remove air filter (26).
- Replace a defective air filter with a new filter (see "Spare Parts").
- To install, place new air filter (26) into the air filter cover (27)
- Close the air filter cover.
Change / adjust spark plug

A worn spark plug or a spark gap that is too large will result in a reduction of engine performance.

- Disconnect the spark plug connector (29) from the spark plug (28) by simultaneously pulling and turning.
-
Unscrew spark plug (28) counter clockwise with spark plug socket.
-
Check the spark gap using a feeler gauge (available from specialist shops). The spark gap
must be at least 0.75 mm.
-
If necessary, adjust the gap by carefully bending the ground electrode on the spark plug.
-
Clean the spark plug with a wire brush.
- Insert the cleaned and adjusted spark plug or replace a damaged spark plug with a new one
( Torch F6RTC or Champion RN9Y or NGK BPR 6ES) (recommended torque 20 Nm, determined with a torque wrench).
Changing the Engine Oil

Changing the Engine Oil Change the engine oil with the petrol tank empty and the engine warm.

Change the engine oil for the first time after around 5 operating hours then every 50 operating hours or annually. Dispose of the used oil in an ecofriendly manner (see "Disposal/Environmental protection").
- Remove the spark plug connector (29) (see "Maintaining the Spark Plug").
- Open the oil tank cover (14) and pump out the motor oil with an oil pump.
- Refill with engine oil
Adjusting the Bowden Cable
If the Bowden cable becomes misplaced and has too much play, it can be adjusted.

- Loosen the lock nuts (30 and 32) in front of and behind the bracket (31).
-
- Turn the adjusting nut (33) anticlockwise:
The Bowden cable shortens.
- Turn the adjusting nut (33) clockwise:
The Bowden cable lengthens.
Adjusting the Carburettor
The carburettor has been preset in the factory for optimum performance. If readjustments are required, have the adjustments made by a specialist workshop.
General Storage Instructions

Do not store the equipment with a full collection box. In hot weather, the grass begins to ferment when heat is generated. Risk of fire.
- Clean and service the equipment before storage.
- Allow the engine to cool before storing the equipment in enclosed areas.
- Use suitable and authorised containers for storing fuel.
- Keep the equipment in a dry place that is protected from dust and out of reach of children.
- For space-saving storage, the upper handle bar can be folded down (see small image C) Release the wing nuts and fold down the handle bar so the equipment takes up less space. The Bowden cables must not be squashed when doing this.
- Do not wrap the equipment in nylon bags as damp and mould could form
Storage During Longer Breaks from Operation

Non-observance of the storage instructions may cause starting problems or permanent damage as a result of fuel residues in the carburettor.
- Empty petrol tank in a well-ventilated place.
- Empty carburettor: For this purpose, start motor and leave it running until the motor stops. Let motor cool down.
- Change the oil (see “changing the engine oil”).
- Preserve the engine:
- Unscrew the spark plug (see "cleaning and maintenance" - Change/adjust spark plug;
- Pour a tablespoon of engine oil through the spark plug hole into the engine compartment;
- Pull the starter cord slowly several times with the safety catch pulled in order to distribute the oil inside the engine;
- Screw the spark plug tight.
- Dispose of used oil and petrol residues in an ecofriendly manner (see "disposal / environmental protection").

There is no need to drain the petrol tank if a fuel stabiliser is added to the petrol.
Disposal / Environmental Protection
- Return the tool, accessories and packaging to a recycling centre when you have finished with them.
- Carefully drain the petrol and oil tanks and take your equipment to a recycling centre. The plastic and metal parts that are used can be separated by type and thus recycled.
- Take used oil and petrol residues to a disposal point and do not pour them into the sewer system or down the drain.
-
Please contact your Grizzly dealer.
-
Defective units returned to us will be disposed of for free.
- Do not throw cut grass in the dust-bin but rather compost it or spread it under bushes and trees as a mulch layer.
Guarantee
- The guarantee period for this equipment is 2 years from the date of purchase and it is applicable only for the initial buyer. This equipment is not suitable for commercial use. Commercial use will invalidate the guarantee.
• The guarantee does not include:
- Damage caused by natural wear, overloading or improper use.
- Equipment employed for commercial use.
- Damages arising as the result of non-compliance with the operating instructions or if the cleaning intervals have not been observed.
- Equipment on which technical interventions have been undertaken.
- Other damages excluded from the warranty are motor damages caused by using the wrong fuel or a wrongly mixed fuel as well as all damage to the machine caused by insufficient lubrication.
- The following parts are subject to normal wear and therefore not covered by the guarantee: cutter, spark plugs, air filter, fuel filter, starter cord.
- Please do not send equipment to our service points without prior agreement by telephone, as you could otherwise incur costs for non-acceptance.
- Attention: Please do not hand in defective appliances with fuel or oil still in the tanks. Always empty the tanks beforehand. Material damage (oil/fuel escaping when the appliance is put on the side or held upside down!) or fire damage during transport will be at the sender's expense.
- The repair or replacement of the equipment will neither result in extension of the guarantee period nor the commencement of a new guarantee period for the equipment or any replacement parts installed as a result of this work. This also applies if on-site service is used.
- Defective units returned to us will be disposed of for free.
Repair Service
- Repairs that are not subject to this guarantee can be carried out by our Service Center against a corresponding charge. Our Service Center will be happy to submit a cost estimate.
We can only deal with implements that have been adequately packed and carriage paid.
- Implements dispatched by unpaid carriage – as bulky goods, by express or other special freight forms – will not be accepted.
• We will dispose of your implements free of charge
Spare parts
Spare parts and accessories can be obtained at www.grizzly-service.eu
If you do not have internet access, please contact the Service Centre via telephone (see "Grizzly Service-Center"). Please have the order number mentioned below ready.
Scarifier drum 91103023
Collection bag....91103024
When ordering spare parts list the position number indicated in the exploded view.
Technical data
Petrol scarifier......BRV 400 S
Engine ...... Zongshen NH 130
Performance....2,2 kW (3 PS)
Engine size ....132 cm ^4
Blade rotation speed n_0 .....2800 min ^-1
Petrol tank volume....1,2 l
Octane rating....95-98
Engine oil tank volume....500 ml
Motoroil ......HD SAE 30 or 10W-30
Spark plug.....Torch F5RTC
Working width
Aerator drum ......max. 40 cm
Scarifier drum....max. 40 cm
Working depth ......max. 15 mm
Grass collection box volume......ca. 45 l
Weight (without collection bag).....29,7 kg
Sound pressure level
(L_pA) 85,8 dB(A); KpA = 3 dB
Sound power level ( L_WA )
measured .....96,4 dB(A); KWA = 2,78 dB
guaranteed....99 dB(A)
Vibration (an)
at the handle....5,61 m/s²; K=1,5 m/s²
The stated vibration emission value was measured in accordance with a standard testing procedure and may be used to compare one power tool to another.
The stated vibration emission value may also be used for a preliminary exposure assessment.

Warning: The vibration emission value may differ during actual use of the power tool from the stated value depending on the manner in which the power tool is used.
Safety precautions aimed at protecting the user should be based on estimated exposure under actual usage conditions (all parts of the operating cycle are to be considered, including, for example, times during which the power tool is turned off and times when the tool is turned on but is running idle).
Noise and vibration values were determined according to the standards and stipulations mentioned in the declaration of conformity.
Technical and optical changes can be carried out in the course of further development without notice. All dimensions, references and information of this instruction manual are therefore without guarantee.
Legal claims, which are made on the basis of the instruction manual, cannot thus be considered as valid.
Maintenance Intervals
Regularly carry out the maintenance work listed in the “maintenance intervals” table. Regular maintenance prolongs the life of the equipment. It also gives optimum cutting performance and avoids accidents.
Table maintenance intervals
| Maintenance Work(See “cleaning and maintenance”) | Before | After | After 1st5 Hrs. | After 8 Hrs. | After 50 Hrs. | Annual |
| Work | ||||||
| Check and tighten screws, nuts and bolts | √ | |||||
| Check the engine oil level / petrol level and refill with engine oil / petrol if required | √ | √ | ||||
| Clean operating elements / the area around the silencer | √ | √ | ||||
| Clean the finger protection | √ | |||||
| Change the engine oil | √ √ | √ | ||||
| Replace the air filtera | √ | |||||
| Clean/adjust the spark plug Replace the spark plug | √ | √ | ||||
| Check the silencer and spark catcherb | √ | √ | ||||
| Clean the air cooling systema, | √ | |||||
^a Clean more often if there is a high level of dust or heavy dirt
Troubleshooting
| Problem Possible | Cause Fault Correction | |
| Abnormal noises, clatter or vibrations | Foreign body on cylinder Remove foreign body | |
| Damaged sprung tines or cylinder knives | Exchange cylinder | |
| Cylinder incorrectly mounted | Install cylinder correctly (see chapter on exchanging the cylinder) | |
| Toothed-belt slip Repair by After-Sales Service | ||
| Engine does not start | Too little petrol in the tank Fill with petrol | |
| Incorrect starting sequence | Follow the instructions for starting the engine (see "operation") | |
| Spark plug connector (L 29) not put on correctly Sooted spark plug (L 28) | Attach the spark plug connector Clean, adjust or replace the spark plug (see "cleaning and maintenance") | |
| Incorrectly adjusted carburettor mix | Have the carburettor adjusted by a specialist workshop | |
| Engine starts but equipment does not run at full power | Dirty air filter (K 26) | Replace the air filter (see "cleaning and maintenance") |
| Incorrectly adjusted carburettor mix | Have the carburettor adjusted by a specialist workshop | |
| Engine splutters, stops | Incorrectly adjusted carburettor mix | Have the carburettor adjusted by a specialist workshop |
| Sooted spark plug (L 28) | Clean, adjust or replace the spark plugs (see "cleaning and maintenance") | |
| Engine overheats | Ventilation holes blocked Clean the ventilation slot | |
| Incorrect spark plug (L 28) | Change the spark plug | |
| Too little engine oil in the engine | Fill with engine oil (see "initial operation") | |
| Work result not satisfactory | Sprung tines of aerator cylinder worn out | Exchange cylinder |
| Knives of verticutor cylinder blunt or damaged | Exchange cylinder | |
| Toothed belt defective Repair by After-Sales Service | ||
| Transport Position or incorrect Working Position selected | Select Working Position or Readjust Position(see chapter "Readjustment positions) | |
| Grass is too long | Mow beforehand; see chapter "Operation" | |

Grizzly Service-Center 166
flowchart
graph TD
    A["Start Setup"] --> B["Intermediate Step"]
    B --> C["Final Output"]
text_image
Diagram showing three directional arrows with icons and labels: up, down, and a gear symbol above.Grizzly Service-Center 166
Paskirtis
flowchart
graph TD
    A["↑"] --> B["Gear Icon"]
    B --> C["Gear Icon"]
    C --> D["↓"]
Transportavimo padètis
Grizzly Service-Center 166
Účel použití
text_image
Technical schematic diagram with numbered components and dimension annotations for mechanical assembly or assembly.informativ • informatief • informatif • informativo informative • pouczający • informacijai • informační
Grizzly Service-Center

Unit B3, Beldray Park
Beldray Road, Mount Pleasant
Bilston, West Midlands WV14 7NH
Tel.: 0845 683 2672
e-mail: care@novoserv.co.uk

Garden Italia SPA
Via Zaccarini, 8