
BCA 4235 - Multitools SOLO - Free user manual and instructions
Find the device manual for free BCA 4235 SOLO in PDF.

User questions about BCA 4235 SOLO
0 question about this device. Answer the ones you know or ask your own.
Ask a new question about this device
Download the instructions for your Multitools in PDF format for free! Find your manual BCA 4235 - SOLO and take your electronic device back in hand. On this page are published all the documents necessary for the use of your device. BCA 4235 by SOLO.
USER MANUAL BCA 4235 SOLO
natural_image
Line drawing of a long-handled tool with a handle and base, no text or symbols present| DE |
| GB |
| NL |
| FR |
| ES |
| IT |
| SI |
| HR |
| PL |
| CZ |
| SK |
| HU |
| DK |
| SE |
| NO |
| FI |
| LT |
| LV |
| RU |
| UA |


Inhaltsverzeichnis
Deutsch 6
English....19
Nederlands 31
Français....44
Español 57
Italiano....70
Slovenščina 83
Hrvatski....95
Polski....107
Česky 120
Slovenská 132
Magyarul....145
Dansk 158
Svensk....170
Norsk 182
Suomi 194
Lietuvių 206
Latviešu 219
Русский 232
Україна....246
© 2018
AL-KO KOBER GROUP Kötz, Germany
This documentation or excerpts therefrom may not be reproduced or disclosed to third parties without the express permission of the AL-KO KOBER GROUP.

natural_image
Two workers in protective gear using a metal detector, no text or symbols visible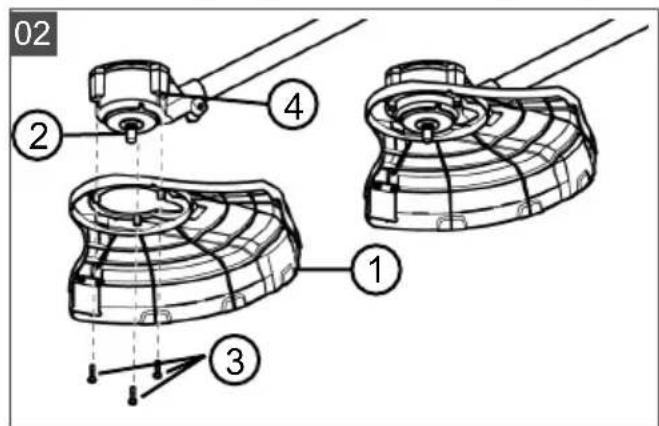

08
natural_image
Illustration showing a bird in flight over grass with a diagonal line crossing, and a checkmark symbol (no text or symbols present)The image is too blurry to recognize any text content.
natural_image
Illustration of a robotic arm climbing a brick wall with grass and butterflies nearby (no text or symbols)
Nr. Bauteil
Nr. Bauteil
www.al-ko.com/service-contacts
13 GARANTIE
1 About these operating instructions ..... 20
1.1 Legends and signal words ...... 20
2 Product description 20
2.1 Designated use (01).... 20
2.2 Possible foreseeable misuse ..... 20
2.3 Residual dangers 20
2.4 Symbols on the trimmer attachment .. 20
2.5 Scope of supply.... 21
2.6 Safety and protective devices ..... 21
2.7 Product overview.... 22
3 Safety instructions 22
3.1 Operator 22
3.2 Personal protective equipment...... 22
3.3 Safety in the workplace 22
3.4 Safety of persons and animals...... 22
3.5 Appliance safety.... 23
3.6 Electrical safety 23
3.7 Safety instructions for brushcutting attachment 23
3.7.1 Work instructions 23
3.7.2 Vibration load.... 24
3.7.3 Noise pollution 25
4 Installation and start-up 26
4.1 Putting the attachment on the basic appliance....26
4.2 Installing the guard plate (02).... 26
4.3 Fitting/removing the blade (03) ..... 26
4.4 Removing/fitting the spool head (04) . 26
5 Operation 26
5.1 Switching the appliance on and off .... 26
5.2 Prolonging the cutting line during operation (07).... 26
6 Working behaviour and working technique (08 - 09)...... 27
7 Maintenance and care 27
7.1 Replacing the blade 27
7.2 Changing the spool 27
8 Storage.... 27
9 Help in case of malfunction 27
10 Transport.... 28
11 Disposal.... 28
12 After-Sales / Service.... 29
13 Guarantee 30
14 EU declaration of conformity 30
1 ABOUT THESE OPERATING INSTRUCTIONS
The German version is the original operating instructions. All additional language versions are translations of the original operating instructions.
It is essential to read through these operating instructions carefully before start-up. This is essential for safe working and trouble-free handling.
■ Always safeguard these operating instructions so that they can be consulted if you need any information about the appliance.
■ Only pass on the appliance to other persons together with these operating instructions.
■ Comply with the safety and warning information in these operating instructions.
1.1 Legends and signal words

DANGER!
Denotes an imminently dangerous situation which will result in fatal or serious injury if not avoided.

WARNING!
Denotes a potentially dangerous situation which can result in fatal or serious injury if not avoided.

CAUTION!
Denotes a potentially dangerous situation which can result in minor or moderate injury if not avoided.
IMPORTANT!
Denotes a situation which can result in material damage if not avoided.

NOTE
Special instructions for ease of understanding and handling.
2 PRODUCT DESCRIPTION
2.1 Designated use (01)
The BCA 4235 trimmer attachment may only be used in interaction with the Multitool MT 42 basic appliance. The whole appliance can be used optionally as a lawn trimmer and as a power brush-cutter. The following operating options are available:
■ Use of the spool head - only for cutting soft grass and similar vegetation.
■ Use of the 3-toothed blade - for mowing thicker herbaceous plants, young under-growth and shrubs. The appliance must be guided on the ground.
The basic appliance as well as the attachments are solely intended for use in non-commercial applications. Any other use, as well as unauthorised conversions or add-ons, are regarded as contrary to the intended use and will result in invalidation of the warranty as well as loss of conformity (CE mark); the manufacturer will thus decline any responsibility for damage and/or injury suffered by the user or third parties.
2.2 Possible foreseeable misuse
- Do not cut any shrubs, hedges, trees or flowers.
- Do not lift the appliance off the ground during operation.
2.3 Residual dangers
Even during correct use of the appliance, there is always a certain residual risk that cannot be excluded. Depending on the use, the following potential risks can be derived from the type and construction of the appliance:
■ Throwing out of cuttings, soil and small stones
■ Throwing out of cut-off parts of the cutting line
■ Inhalation of cuttings particles if no breathing protection is worn.
■ Damage to the hearing if no hearing protection is worn.
■ Cutting injuries from reaching into the rotating cutting line
2.4 Symbols on the trimmer attachment
Symbol Meaning

Pay special attention when handling this product!
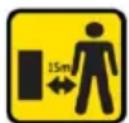
The distance between the appliance and persons not involved in the work must be at least 15 m in the entire area around the user.
Symbol Meaning

Keep other people out of the danger area.
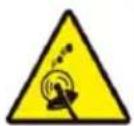
Danger due to objects being thrown out!
Do not bring the appliance in contact with any solid objects.

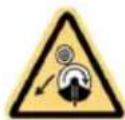
Maximum revolution

Read the operating instructions before starting operation.

Wear eye protection, ear defenders and a helmet!

Wear safety boots!

Wear protective gloves!

Protect the appliance from rain and moisture!

Do not use a saw tooth blade!
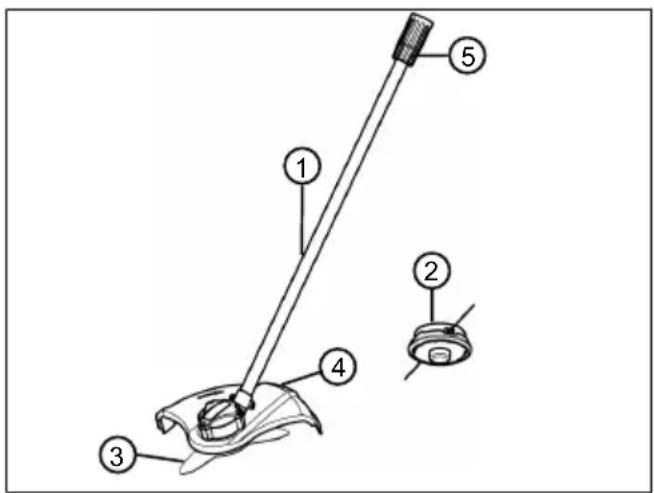
2.5 Scope of supply
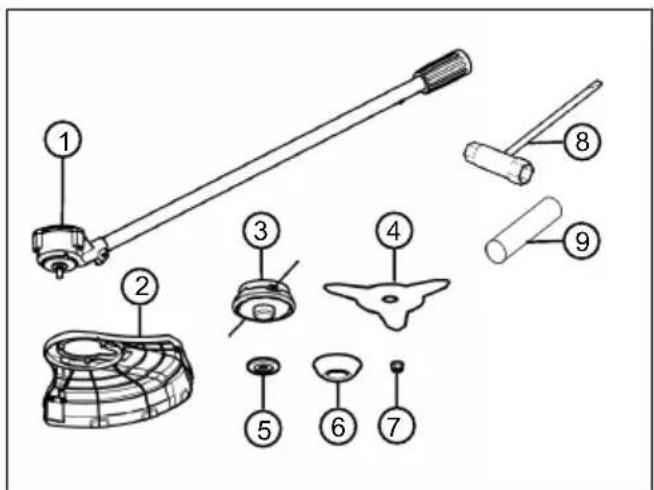
No. Component
| 1 Trimmer attachment with engine |
| 2 Guard plate |
| 3 Spool head with spool |
| 4 3-toothed blade |
| 5 Disc |
| 6 Cover |
| 7 Locknut |
| 8 Combination spanner |
| 9 Retaining pin |
2.6 Safety and protective devices
Guard plate
Protects the operator from contact with the rotating blade or the cutting line and objects flying out. In addition, a protective ring is fitted on the guard plate.
2.7 Product overview
No. Component
| 1 Trimmer attachment with 3-toothed blade |
| 2 Spool head |
| 3 3-toothed blade |
| 4 Guard plate |
| 5 Coupling for basic appliance |
3 SAFETY INSTRUCTIONS
3.1 Operator
■ Young people under 16 years of age and people who do not know the instructions for use are not allowed to use the appliance. Heed any country-specific safety regulations concerning the minimum age of the user.
■ Do not operate the appliance if you are under the influence of alcohol, drugs or medication.
3.2 Personal protective equipment
■ Wear clothing and protective equipment in accordance with the regulations in order to avoid injuries to the head and limbs, as well as to avoid hearing impairment.
■ The personal protective equipment comprises:
■ Protective helmet, safety goggles and breathing protection
■ Long trousers and solid shoes
■ During maintenance and care: Protective gloves
3.3 Safety in the workplace
■ Only work during daylight or under very bright artificial light.
■ Before working, remove any dangerous objects from the working area, e.g. branches, glass or metal pieces, stones.
■ Make sure you are standing safely.
3.4 Safety of persons and animals
■ Only use the appliance for the purposes for which it is intended. Any non-intended use can lead to injury and property damage.
■ Only switch on the appliance when there are no persons and/or animals in the working area.
- Keep hands, feet and other parts of the body away from moving appliance parts (e.g. saw chain, blade system).
■ Appliance parts, such as engine covers and cutting tools, can heat up considerably during operation. Do not touch them. After switching off, wait until the appliance has cooled.
3.5 Appliance safety
■ Only use the appliance under the following conditions:
■ The appliance is not soiled.
■ The appliance show no signs of damage.
■ All controls function properly.
- Keep all appliance handles dry and clean.
- Do not overload the appliance. It is intended for light work in the private sector. Overload can lead to damage to the appliance.
■ Never operate the appliance with worn or defective parts. Always replace defective parts with original spare parts from the manufacturer. If the appliance is operated with
worn or defective parts, guarantee claims against the manufacturer are excluded.
3.6 Electrical safety
■ To avoid short-circuits and destroying electrical components:
■ Protect the appliance against humidity and do not use it in the rain.
- Do not spray the appliance with water.
- Do not open the appliance.

NOTE
Heed the safety instructions for the rechargeable battery and for the charging unit in the separate operating instructions.
3.7 Safety instructions for brushcutting attachment
3.7.1 Work instructions
■ Always operate the machine with two hands.
■ Always keep hand and feet away from the cutting device, above all when switching on the motor.
■ Wait for the cutting device to come to a standstill after the motor has been switched off.
■ Only remove cuttings when the motor and cutting device are at a standstill.
■ Because of danger of cutting injuries, do not touch the line cutter with unprotected hands.
■ After pulling out a new line, always bring the appliance into its normal working position before switching it on.
- Do not use a metallic cutting line.
■ Always keep the guard plate, spool head and motor clear of mowing residues.
■ People who are not familiar with the appliance should practice handling it while the motor is turned off.
■ When working on a slope:
■ Never work on a smooth and slippery slope.
■ Always mow across the slope, never down or up.
■ Always stand below the cutting device.
■ After contact with a foreign object:
■ Switch off the motor.
- Check the machine for damage.
■ Attach the blade so that it does not loosen and fall during operation.
3.7.2 Vibration load

WARNING! Danger due to vibration
The actual magnitude of the vibration emissions during the use of the appliance may deviate from that stated by the manufacturer. Observe the following influencing factors before or during use:
■ Is the appliance being used as intended?
Is the material being cut or processed in the proper manner?
■ Is the appliance in a proper condition of use?
Is the cutting tool properly sharpened or is the correct cutting tool installed?
Are the handle grips and any optional vibration grips mounted, and are they firmly attached to the appliance?
■ Only operate the tool at the motor speed required for the respective work. Avoid using the maximum speed in order to reduce noise and vibrations.
The noise and vibrations of the tool may increase due to improper use and maintenance. This leads to health damage. In this case, immediately switch off the tool and have it repaired by an authorised service workshop.
■ The degree of stress due to vibration depends on the work to be performed or on the use of the tool. Estimate the stress and plan appropriate work breaks. This considerably reduces stress due to vibration over the entire working time.
■ Extensive use of the tool exposes the operator to vibrations, which can lead to circulatory issues ("white fingers"). To avoid this risk, wear gloves and keep your hands warm. If any symptoms of "white fingers" occur, immediately consult a physician. These symptoms include: Numbness, loss of feeling, tingling, itching, pain, reduced muscular strength, changes in the colour or condition of the skin. Normally these conditions affect the fingers, hands or pulse. The risk increases at low temperatures.
■ Take long breaks during your working day so you can re-
cover from the noise and the vibrations. Plan your work in such a way that the use of appliances that generate strong vibrations is spread over several days.
If you notice an unpleasant sensation or discolouration of the skin on your hands when using the tool, stop work immediately. Take sufficient work breaks. Without sufficient breaks, a hand/arm vibration syndrome can occur.
- Minimise your risk of being exposed to vibrations. Maintain the tool according to the instructions in the operating instructions.
If the tool is used frequently, contact your dealer to purchase anti-vibration accessories (e.g. handles).
- Avoid working with the tool at temperatures below 10 °C. Define how the vibration load can be limited in a work plan.
3.7.3 Noise pollution
A certain level of noise exposure from this appliance is inevitable. Carry out noisy work at approved and specified time periods. Observe rest periods as necessary and restrict the duration of the work to a minimum.
For your personal protection and protection of persons in the vicinity, appropriate hearing protection must be worn.
4 INSTALLATION AND START-UP

WARNING!
Danger of lacerations
Danger of cutting injuries when reaching into sharp-edged, moving appliance parts and into cutting tools.
■ Always switch off the appliance before installation work. Remove the rechargeable battery.
■ Always wear protective gloves during installation work.
4.1 Putting the attachment on the basic appliance
See "Multitool MT 42 – basic appliance" operating instructions.
4.2 Installing the guard plate (02)
Attach the guard plate (02)
- Insert the guard plate (02/1) on the cutter head (02/2).
- Guide the three screws (02/3) through the guard plate (02/b) and screw them into the drill holes (02/4).
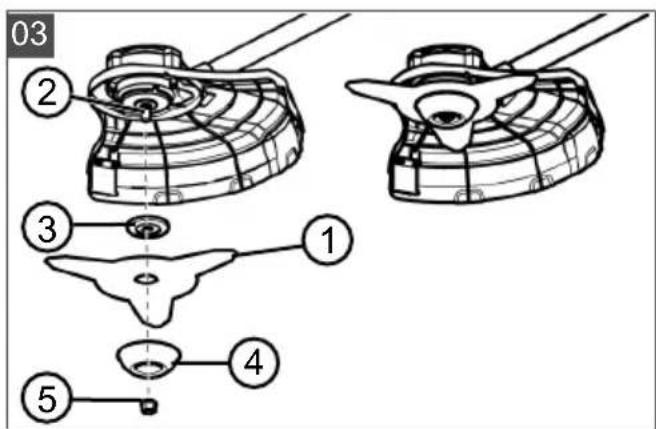
4.3 Fitting/removing the blade (03)

WARNING!
Risk of injury due to detaching appli- ance parts
Appliance parts detaching during operation can lead to serious injury.
- Attach the cutting tools so that they cannot come loose during operation.
Fitting the blade
- If fitted: Remove the spool head, see see chapter 4.4 "Removing/fitting the spool head (04)", page 26.
- Put the washer (03/3) and the blade (03/1) onto the drive shaft of the cutter head (03/2). The inscription on the blade must point outwards, i.e. away from the cutter head.
-
Put on the cover (03/4).
-
Put the locknut (03/5) onto the drive shaft and firmly tighten by hand in a clockwise direction.
- Firmly tighten the locknut (03/5) with the combination spanner.
Removing the blade
- Loosely turn the locknut (03/5) anti-clockwise with the combination spanner. Use the retaining pin to keep it in the correct position.
- Remove the locknut (03/5), cover (03/4), blade (03/1) and washer (03/3).
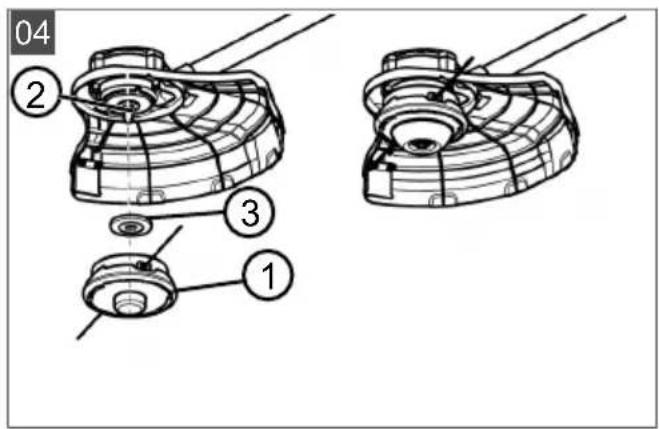
4.4 Removing/fitting the spool head (04)

WARNING!
Risk of injury due to detaching appli- ance parts
Appliance parts detaching during operation can lead to serious injury.
- Attach the cutting tools so that they cannot come loose during operation.
Mounting the line head
- If fitted: Remove the blade, see see chapter 4.3 "Fitting/removing the blade (03)", page 26.
- Place the washer (04/3) onto the drive shaft of the cutter head (04/2).
- Place on the cutter head and screw tight (04/1).
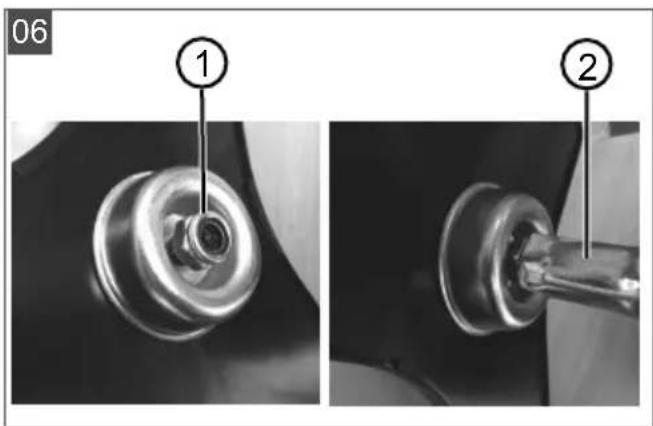
Dismantling the spool head
- Loosen the spool head (04/1) by turning anticlockwise. Use the retaining pin to keep it in the correct position.
- Remove the spool head (04/1) and washer (04/3).
5 OPERATION
5.1 Switching the appliance on and off
See "Multitool MT 42 – basic appliance" operating instructions.
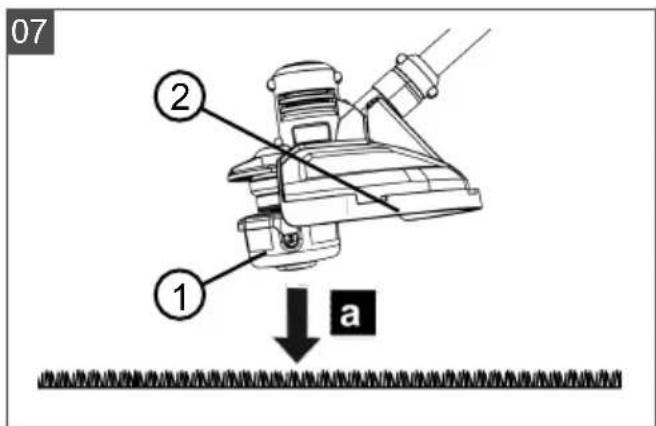
5.2 Prolonging the cutting line during operation (07)
The cutting line shortens during operation and frays out.
- Tap (07/a) the spool head (07/1) on the ground from time to time at high speed. This unwinds a piece of new cutting line from the spool and cuts off the used end of the cutting line (07/2).
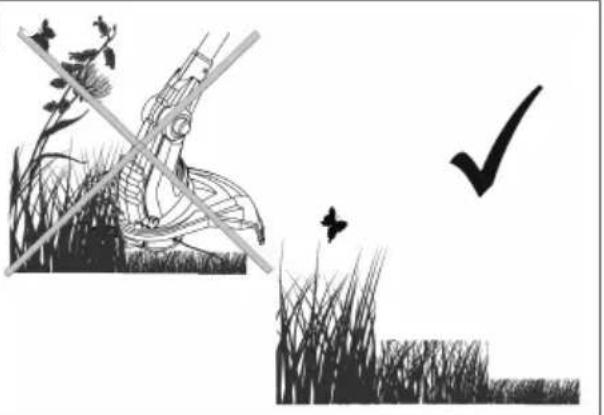
6 WORKING BEHAVIOUR AND WORKING TECHNIQUE (08 - 09)
■ Tilt the appliance slightly forwards (approx. 30°) to mow with the tip of the cutting line. Walk forwards slowly.
■ When mowing, swivel the appliance evenly to the right and left.
■ Long grass must be mown in several passes. Always proceed from top to bottom (08).
The appliance cuts best at very high speed. Therefore, do not overload the appliance by cutting long grass.
If the appliance is overloaded in long grass, the line will be blocked. Immediately lift the appliance so it releases. Otherwise, the motor could be permanently damaged.
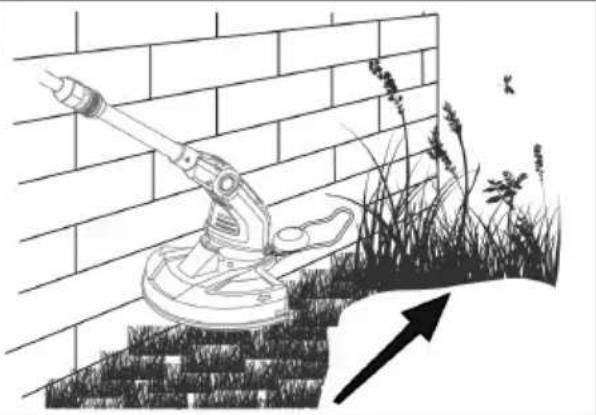
- Do not move the appliance directly against hard obstacles (e.g. walls), but mow sideways. This protects the cutting line (09).
- Keep the appliance away from delicate plants. Fold the protective bracket into the horizontal position.
Procedure if the blade jams
Thick vegetation, young trees or growth can block the blade and bring it to a stop.
- Avoid blocking by observing the direction in which the growth inclines and cut from the opposite side.
If the blade becomes entangled when cutting:
Immediately stop the motor.
- Hold the appliance at a height so the blade does not jump or break.
7 MAINTENANCE AND CARE

WARNING!
Danger of cutting injuries
Danger of cutting injuries when reaching into sharp-edged, moving appliance parts and into cutting tools.
■ Before maintenance, care and cleaning work, always switch off the appliance. Remove the rechargeable battery.
■ Always wear protective gloves during maintenance, care and cleaning work.
7.1 Replacing the blade
Replacing the blade: see chapter 4.3 "Fitting/removing the blade (03)", page 26.
7.2 Changing the spool
Precondition: The appliance must be switched off and the rechargeable battery must be removed from the basic appliance.
8 STORAGE
Thoroughly clean the appliance after each use and – if present – attach all covers. Store the appliance in a dry, lockable place out of the reach of children.
Carry out the following jobs before intervals in work lasting for longer than 30 days:
■ Clean the blade and spray with rust-proofing oil.
■ Thoroughly clean the appliance and store it in a dry place.
9 HELP IN CASE OF MALFUNCTION

CAUTION!
Risk of injury
Sharp-edged and moving appliance parts can lead to injury.
■ Always wear protective gloves during maintenance, care and cleaning work.
| Malfunction | Cause Remedy | |
| Grass is no longer cleanly cut. | Blade is blunt. | Have the blade sharpened. Contact an AL-KO service centre. |
| Replace the blade. | ||
| Recharge-able battery operating time is significantly shorter. | Grass is too long or too wet. | Cut the grass at a greater height.Let the grass dry. |
| Cutting height is too low. | Cut the grass at a greater height. | |
| Appliance vibrates unusually. | Appliance faults | Contact an AL-KO service centre. |
| Other faults See “Multitool MT 42 basic appliance” operating instructions. | ||

NOTE
If you encounter any malfunctions that are not listed in this table or that you cannot rectify yourself, please contact our customer service.
10 TRANSPORT
Before transporting, carry out the following measures:
- Switch off the appliance:
- Remove the rechargeable battery from the basic appliance.
- Separate the basic appliance and attachment.

NOTE
The nominal energy of the rechargeable battery is more than 100 Wh. Therefore, observe the following transport instructions.
The li-ion rechargeable battery contained in the appliance is subject to the hazardous goods law, but can be transported under simplified conditions:
The rechargeable battery can be transported on public roads by the private user without further conditions provided it is packaged for retail sale and the transport serves personal purposes.
■ Commercial users who carry out the transport in connection with their main activity (e.g. delivery from and to building sites, or demonstrations) can also take advantage of this simplification.
In both cases, it is essential to take the mandatory precautions mentioned above to prevent any leakage of the contents. In other cases, it is essential to comply with the regulations of the hazardous goods law. In the case of non-compliance, severe penalties can be imposed on the sender and possibly the transporter.
Additional notes on transport and shipment
■ Only transport or send the li-ion rechargeable battery in an undamaged condition.
For transporting the rechargeable battery, only use the original cardboard box or a suitable hazardous goods cardboard box (not required for rechargeable batteries with a nominal energy less than 100 Wh).
■ Tape off exposed rechargeable battery contacts to avoid a short circuit.
- Secure the rechargeable battery against shifting in the packaging to avoid damage to the rechargeable battery.
■ Ensure the correct marking and documentation of the shipment for transport or shipping (e.g. by parcel service or freight forwarding). - Check in advance that transport with the selected service provider is possible and indicate the shipment.
We recommend involving a hazardous goods specialist in preparation of the shipment. Also heed any further national regulations.
11 DISPOSAL
Information on the German Electrical and Electronic Equipment Act (ElectroG)

■ Electrical and electronic appliances do not belong in household waste, but should be collected and disposed of separately.
■ Used batteries or rechargeable batteries that are not installed permanently in the old appliance must be removed before disposal. Their disposal is regulated by the battery law.
- Owners or users of electrical and electronic appliances are obliged by law to return them after use.
■ The end user bears personal responsibility for deleting his personal data from the old appliance to be disposed of.
The symbol of the crossed-through rubbish bin means that electrical and electronic appliances may not be disposed of in the household rubbish.
Electrical and electronic appliances can be handed in at the following places at no charge:
■ Public service disposal or collection points (e.g. municipal building yards)
■ Points of sale of electrical appliances (stationary and online) provided traders are obliged to take them back or offer this voluntarily.
These statements only apply to appliances that are installed and sold in the countries of the European Union and are subject to European Directive 2012/19/EU. Different provisions may apply to the disposal of electrical and electronic appliances in countries outside the European Union.
Information on the German Battery Act (BattG)

■ Used batteries and rechargeable batteries do not belong in household waste, but should be collected and disposed of separately.
For safe removal of batteries or rechargeable batteries from the electrical appliance and for information on their type or chemical system, follow the further information within the operating or installation instructions.
Owners or users of batteries and rechargeable batteries are obliged by law to return them after use. Return is limited to the handover of customary household quantities.
Used batteries can contain harmful substances or heavy metals that can cause damage to the environment and human health. Reuse of the used batteries and use of the resources contained therein contributes to the protection of these two essential commodities.
The symbol of the crossed-through rubbish bin means that batteries and rechargeable batteries may not be disposed of in household rubbish.
In addition, if the symbol Hg, Cd or Pb appears under the rubbish bin, this stands for the following:
■ Hg: Battery contains more than 0.0005 % mercury
Cd: Battery contains more than 0.002 % cadmium
■ Pb: Battery contains more than 0.004 % lead
Rechargeable batteries and batteries can be handed in at the following places at no charge:
■ Public service disposal or collection points (e.g. municipal building yards)
■ Points of sale of batteries and rechargeable batteries
■ Disposal points of the common take-back system for the used batteries of appliances
■ Disposal point of the manufacturer (if not a member of the common take-back system)
These statements apply only to rechargeable batteries and batteries that are sold in the countries of the European Union and that are subject to European Directive 2006/66/EU. Different provisions can apply to the disposal of rechargeable batteries and batteries in countries outside the European Union.
12 AFTER-SALES / SERVICE
In the event of questions of warranty, repair or spare parts, please contact your nearest AL-KO Service Centre.
These can be found on the Internet at:
www.al-ko.com/service-contacts
13 GUARANTEE
We will resolve any material or manufacturing faults on the appliance during the legal warranty period for claims relating to faults, in accordance with our choice either to repair or replace. The legal warranty period is determined by the legislation of the country in which the appliance was purchased.
Our warranty promise applies only if:
■ These operating instructions are heeded
■ The appliance is handled correctly
■ Original spare parts have been used
The warranty becomes void in the case of:
■ Unauthorised repair attempts
■ Unauthorised technical modifications
Non-intended use
The guarantee excludes:
■ Paint damage that can be attributed to normal wear and tear
■ Wear parts that are marked with a frame xxxxxx (x) on the spare parts card
The guarantee period commences with purchase by the first end user. The date on the proof of purchase is decisive. In the event of a guarantee claim, please take this guarantee declaration and the original proof of purchase, and contact your dealer or the nearest authorised customer service centre. This statement does not affect the purchaser's statutory claims for defects against the vendor.
14 TRANSLATION OF THE ORIGINAL EU DECLARATION OF CONFORMITY
See "Multitool MT 42 – basic appliance" operating instructions.
VERTALING VAN DE ORIGINELE GEBRUIKERSHANDLEIDING Inhoudsopgave
12 Klantenservice/service centre 42
13 Garantie.... 43
2 PRODUCTOMSCHRIJVING
Nr. Component
Nr. Component
N° Pièce
www.al-ko.com/service-contacts
13 GARANTIE
N.° Componente
N.° Componente
www.al-ko.com/service-contacts
13 GARANTÍA
N. Componente
N. Componente
www.al-ko.com/service-contacts
13 GARANZIA
Št. Sestavni del
Št. Sestavni del
| 1 Nastavek za košnjo s 3-krakim rezalnim listom |
| 2 Glava z nitko |
| 3 3-kraki rezalni list |
| 4 Ščitnik |
| 5 Spojka za osnovno napravo |
3 VARNOSTNI NAPOTKI
3.1 Upravljavec
12 SERVISNA SLUŽBA/SERVIS
Br. Dio
1 Nastavak za kosu s motorom
2 Štitnik
3 Glava s nitnim namotajem
4 List noža s 3 zuba
5 Disk
6 Poklopac
7 Blokirna matica
8 Kombinirani ključ
9 Potporni klin
Br. Dio
1 Nastavak kose s listom noža s 3 zuba
2 Nitna glava
3 List noža s 3 zuba
4 Štitnik
Nr elementu
Nr elementu
www.al-ko.com/service-contacts
13 GWARANCJA
Č. Součást
Č. Součást
www.al-ko.com/service-contacts
13 ZÁRUKA
Sz. Alkatrész
Sz. Alkatrész
www.al-ko.com/service-contacts
13 GARANCIA
12 Kundeservice/service 168
13 Garanti....169
Nr. Komponent
Nr. Komponent
■ Sørg for at stå stabilt.
www.al-ko.com/service-contacts
13 GARANTI
Nr. Komponent
Nr. Komponent
Nr. Komponent
| 1 Påsettbar gresstrimmer med motor |
| 2 Skjold |
| 3 Trådhode med trådspole |
| 4 3-tenners knivblad |
| 5 Skive |
| 6 Deksel |
| 7 Festemutter |
| 8 Kominasjonsnøkkel |
| 9 Holdestift |
Nr. Komponent
1 Påsettbar gresstrimmer med 3-tenners knivblad
2 Trådhode
3 3-tenners knivblad
4 Skjold
5 Kobling til basisapparatet
3 SIKKERHETSHENVISNINGER
3.1 Operatør
7 VEDLIKEHOLD OG PLEIE

ADVARSEL! Fare for kuttskader
Nro Osa
Nro Osa
www.al-ko.com/service-contacts
13 GARANTIJA
Nr. Detaja
Nr. Detala
www.al-ko.com/service-contacts
13 GARANTIJA
Номер компонента
www.al-ko.com/service-contacts
13 ГАРАНТИЯ
www.al-ko.com/service-contacts
