MMC1500AL - Food Processor GORENJE - Free user manual and instructions
Find the device manual for free MMC1500AL GORENJE in PDF.

| Brand | Gorenje |
| Model | MMC1500AL |
| Product type | Kitchen machine with meat grinder and blender |
| Power | 1500 W |
| Power supply | 220-240 V ~ 50/60 Hz |
| Speeds | Variable speed selector |
| Bowl | Stainless steel, large capacity |
| Functions | Mixing, kneading, whisking, grinding, blending, sausage making, kebabs and pasta |
| Included accessories | Whisk, dough hook, mixing paddle, 2 grinding discs, worm screw, cutting blade, pusher, tray, cutting housing, separator, sausage funnel, forming accessory, cone, glass beaker with blade |
| Materials | Stainless steel bowl, plastic motor unit, stainless steel and plastic accessories |
| Noise level | 82 dB(A) |
| Safety | Release button, automatic stop, lock in position 0, never immerse the motor unit in water |
| Maintenance | Clean accessories with soapy water; wipe the motor unit with a damp cloth |
| Warranty | Gorenje international warranty |
| After-sales service | Contact Gorenje Customer Service or an authorized service center |
| Use | Household use only |
| Weight (estimated) | Approximately 8 kg |
| Dimensions W x D x H (estimated) | Approximately 40 x 30 x 35 cm |
Frequently Asked Questions - MMC1500AL GORENJE
User questions about MMC1500AL GORENJE
0 question about this device. Answer the ones you know or ask your own.
Ask a new question about this device
Download the instructions for your Food Processor in PDF format for free! Find your manual MMC1500AL - GORENJE and take your electronic device back in hand. On this page are published all the documents necessary for the use of your device. MMC1500AL by GORENJE.
USER MANUAL MMC1500AL GORENJE
natural_image
Exterior view of a modern kitchen mixer with a stainless steel bowl (no visible text or symbols)MMC1500AL
| Kuhinjski robot | Navodila za uporabo | SI |
| Kuhinjski robot | Upute za uporabu | BIH HR |
| Kuhinjski robot | Uputstvo za upotrebu | BIH SRB MNE |
| Кујнски робот | Упатства за употреба | MK |
| Kitchen robot mixer | Instruction manual | GB |
| Кухненски робот | Инструкции за употреба | BG |
| Robot de bucătărie | Manual de utilizare | RO |
| Konyhai robotgép | Használati utasítás | H |
| Robot kuchenny | Instrukcja obsługi | PL |
| Kuchynské roboty | Návod na obsluhu | SK |
| Kuchyňské roboty a procesory | Návod na použití | CZ |
| Küchenmaschine | Gebrauchsanweisung | D |
| Кухонний комбайн | Інцтрукція з експлуатації | UA |
| Кухонный комбайн | Инструкция по эксплуатации | RUS |
| Robot pâtissier | Notice d'utilisation | F |
SL Navodila za uporabo ....3
HR; BIH Upute za uporabu 9
SRB MNE BIH Uputstvo za upotrebu 15
natural_image
Four-panel illustration of a kitchen mixer with red arrows indicating motion, showing different states of press or cooling (no text or symbols present)natural_image
Four-panel illustration of a kitchen mixer with red arrows indicating motion, showing the mixing process (no text or symbols)natural_image
Four-step illustration of a manual kitchen grater with a handle, showing step-by-step assembly and cutting (no text or symbols)natural_image
Two-step illustration of a manual kitchen tool with a close-up view showing the process (no text or symbols)natural_image
Four-panel diagram showing a kitchen mixer with red arrows indicating motion, no text or symbols present.Nastavci su opremljeni sustavom za namještanje visine iznad dna zdjele radi postizanja optimalnih rezultata.
natural_image
Four-panel diagram showing a kitchen mixer with red arrows indicating motion, no text or symbols present.natural_image
Pure mechanical assembly diagram showing components and motion arrows without any text or symbols
natural_image
Exterior view of a modern kitchen mixer (no text or symbols visible)
natural_image
3D rendered image of a stainless steel kitchen brush (no text or symbols visible)
natural_image
Mechanical hand pump device with downward arrow indicating compression (no text or symbols)Sastavljanje i postavljanje nastavka:
natural_image
Four-step industrial sewing machine operation diagram showing tool path and cutting process (no text or symbols)natural_image
Four-panel illustration of a kitchen feeder with a handle, showing step-by-step assembly and cutting process (no text or symbols)natural_image
Two-step illustration of a manual kitchen tool with a close-up view showing the process (no text or symbols)natural_image
Four-panel illustration of a kitchen mixer with red arrows indicating motion, showing different states of press or cooling (no text or symbols present)Dodaci su opremljeni sistemom za podešavanje visine u odnosu na dno posude kako biste ostvarili najbolje rezultate prilikom korišćenja uređaja.
- Pritisnite dugme za otpuštanje (2) da biste podigli višenamensku glavu i umetnuli metlicu za mešanje, metlicu za mešanje testa ili metlicu za mućenje.
- Ostavite je u datom položaju.
- Pritisnite višenamensku glavu (10) i dugme (2) dok se ne čuje klik.
- Okretanjem vratila podesite visinu. Podesite dodatak u željeni položaj.
- Ponovo podignite višenamensku glavu (10). Zadržite u njenom položaju metlica za mešanje, metlicu za mešanje testa ili metlica za mućenje.
- Pre prvog korišćenja operite sve komponente dodatnog pribora vodom sa sapunicom, isperite ih, a zatim ih osušite.
- Postavite uređaj na čistu, ravnu i suvu površinu, a zatim ukopčajte uređaj.
B.
natural_image
Four-panel illustration of a kitchen mixer with red arrows indicating motion, showing step-by-step assembly (no text or symbols)- Pritisnite dugme (2) da biste otpustili višenamensku glavu (10) i da biste je podigli u vertikalni položaj.
- Postavite posudu (8) na uređaj tako što ćete je okretati dok ne nalegne u svoj položaj. Nakon toga možete da stavite sastojke u posudu.
- Postavite poklopac na višenamensku glavu tako da otvor za punjenje bude na prednjoj strani uređaja.
- Postavite željeni dodatni pribor (11, 12 ili 13) na priključak tako što ćete gurnuti vratilo osnove pribora i okrenuti ga prema vama za četvrtinu kruga dok ne nalegne u svoj položaj.
- Postavite višenamensku glavu uređaja u horizontalni položaj i pritisnite dugme (2) (trebalo bi da se čuje klik).
- Tokom pripreme hrane sastojke možete da dodajete kroz otvor na poklopcu.
- Okrenite prekidač (1) u položaj „0“ da biste zaustavili uređaj.
HOMOGENIZACIJA/ MEŠANJE/ BLENDIRANJE

U zavisnosti od karakteristika sastojaka blender može da se koristi za pripremanje smese zapremine do 1,4 l.
Sklapanje i postavljanje dodataka:
- Postavite sklop noževa na zaptivku i učvrstite ga u dno bokala tako što ćete ga okrenuti za četvrtinu kruga (bokal mora da stoji uspravno).
- Postavite višenamensku glavu (10) uređaja u horizontalni položaj i pritisnite dugme (2) (trebalo bi da se čuje klik).
- Uklonite poklopac (3).
- Uređaj mora da bude isključen pre nego što postavite sklopljeni blender.
- Postavite sklopljeni blender i učvrstite ga u njegov položaj tako što ćete ga okrenuti u smeru suprotnom od kretanja kazaljki na satu.
- Postavite sastojke u bokal blendera, a zatim ukopčajte uređaj. Sada možete da počnete sa obradom hrane.
Oprez:
Prazan blender nemojte da držite uključenim duže od 1 minuta.
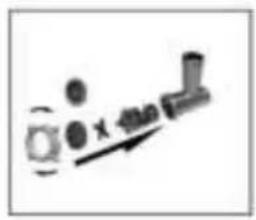
DODATAK ZA MLEVENJE MESA
D.
natural_image
Pure mechanical component diagram without any text, numbers, or symbols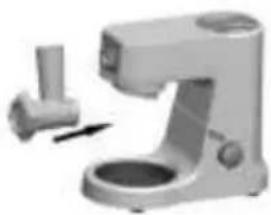
natural_image
Exterior view of a modern kitchen stand with handle and base (no text or symbols visible)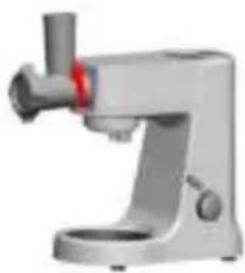
natural_image
Exterior view of a modern kitchen brush (no text or symbols visible)
natural_image
Illustration of a manual hand mixer with a downward arrow indicating compression (no text or symbols)Sklapanje i postavljanje dodataka:
- Izaberite željeno kućište dodatka za mlevenje (22). Postavite kućište dodatka tako da veći otvor bude okrenut nagore.
- Umetnite vratilo (tako da krilca za pokretanje budu okrenuta prema uređaju) u kućište dodatka za mlevenje. Postavite nož na vratilo tako da ivice za sečenje budu okrenute nagore.
- Postavite željenu rešetku preko noža tako da dva jezička nalegnu u dva zareza na telu.
- U potpunosti pričvrstite prsten za učvršćivanje na telo dodatka.
- Proverite sklop. Vratilo ne sme da ima prazan hod i ne sme samostalno da se okreće.
- Postavite višenamensku glavu u horizontalni položaj (trebalo bi da se čuje klik).
- Postavite sklopljeno kućište dodatka za mlevenje na priključak za seckalicu (6).
- Postavite levak na cev.
Oprez:
natural_image
Three-step industrial sewing machine operation diagrams showing tool path and cutting process (no text or symbols)natural_image
Four-step illustration of a manual kitchen tool, showing step-by-step assembly and cutting process (no text or symbols)natural_image
Two-step illustration of a kitchen hand mixer with tool manipulation, showing step-by-step assembly and rotation (no text or symbols)natural_image
Illustration of a kitchen mixer with red arrows indicating motion (no text or symbols)
natural_image
Modern kitchen mixer with a red lever, no visible text or symbols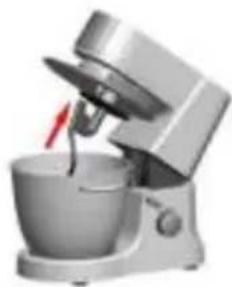
natural_image
Modern kitchen mixer with a bowl and handle, no visible text or symbols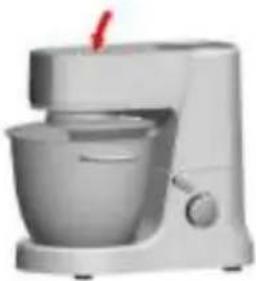
natural_image
White kitchen mixer with a side bowl and handle (no visible text or symbols)natural_image
Two 3D renderings of a kitchen mixer with red arrows indicating motion direction (no text or symbols)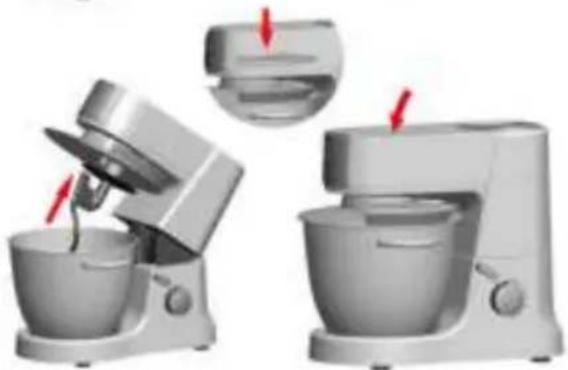
natural_image
Two views of a kitchen mixer with red arrows indicating motion, showing the top and side views (no text or symbols)natural_image
Four-step industrial sewing machine operation diagrams showing tool insertion and disassembly (no text or labels)natural_image
Two-step industrial sewing machine operation diagram showing tool path and assembly steps (no text or labels)- Speed control switch
- Release button for multifunction head
- Cover
- Removable cover for mincer power outlet
- Release button for Cutter housing
- Power outlet for mincer
- Bowl cover
- Stainless steel bowl
- Power outlet for blender
- Multifunction head
- Whisk
- Dough hook
- Mixer blade
- Fine grinding disc
- Worm shaft
- Cutter blade
- Coarse grinding disc
- Screw ring
- Pusher
- Tray
- Cutter housing
- Separator
- Sausage horn
- Former
- Cone
- Top cover
- Cover for jug
- Glass jug
- Blade
3D. Pasta maker
Danger
Do not immerse the motor unit in water nor rinse it under the tap.
Warning
- Carefully read the instructions before using your appliance.
- Switch off the appliance before fitting and removing the attachment.
- Keep your fingers away from moving parts and the opening on the attachment.
- Only use the appliance for its intended domestic use, the manufacture will not accept any liability if the appliance is
subject to improper use or failure to comply with these instructions.
- Never leave the appliance to run unsupervised, especially when young children or handicapped persons are present.
- Check that the voltage rating of the appliance does in fact match that of your electrical system.
- Any connection error will nullify the guarantee.
- The appliance must be plugged into an earthed electrical socket.
- If you have to use an electrical extension lead, it must be earthed and you should make sure that no-one can trip over it.
- Unplug the appliance as soon as you have finished using it and when you clean it.
- Don't use your attachment and/or appliance if it has been damaged. You should contact an approved service centre.
- Any work on the appliance other than normal care and cleaning by the customer must be carried out by an approved service centre.
- Do not immerse the appliance, the power cord or the plug in water or in any other liquid.
- Do not allow the power cord to hang within the reach of children, to come close to or into contact with the hot parts of your appliance, any other source of heat or any sharp edge.
- If the power cord or the plug are damaged, don't use your appliance. To avoid any risk, these must be replaced by an approved service centre.
- Switch off the appliance and disconnected from supply before changing accessories or approaching parts which move in use.
- Do not touch the whisk, mixer blade or kneading hook while the appliance is in operation.
- Only use one attachment at a time.
- Appliances can be used by persons with reduced physical, sensory or mental capabilities or lack of experience and knowledge if they have been given supervision or instruction concerning use of the appliance in a safe way and if they understand the hazards involved.
• Children shall not play with the appliance. - This appliance shall not be used by children. Keep the appliance and its cord out of reach of children.
- There is a potential injury from misuse. Please handle it with care.
- Care should be taken when handling the sharp cutting blades, emptying the bowl and during cleaning.
- Caution: Ensure that the blender is switched off before removing it from the stand.
-
Be careful if hot liquid is poured into the blender as it can be ejected out of the appliance due to a sudden steaming.
-
This appliance is intended to be used in household and similar applications such as:
- -staff kitchen areas in shops, offices and other working environments;
- farm houses;
- -by clients in hotels, motels and other residential type environments;
- bed and breakfast type environments.
• Noise level: 82 dB(A)
This appliance is marked according to the European directive 2012/19/EU on Waste Electrical and Electronic Equipment (WEEE). This guideline is the frame of a European-wide validity of return and recycling on Waste Electrical and Electronic Equipment.
Caution
Always place the appliance on a flat, stable surface.
This appliance is intended for household use only. Never use any accessories or parts from other manufacturers unless they are authorized by Gorenje. In case you use these accessories, the warranty will be canceled.
Before use
Clean all detachable parts before using the appliance for the first time (see chapter 'Cleaning').
Make sure the appliance is assembled properly (see chapter ‘General description’) before you plug it in the wall socket.
Put the plug in the wall socket.
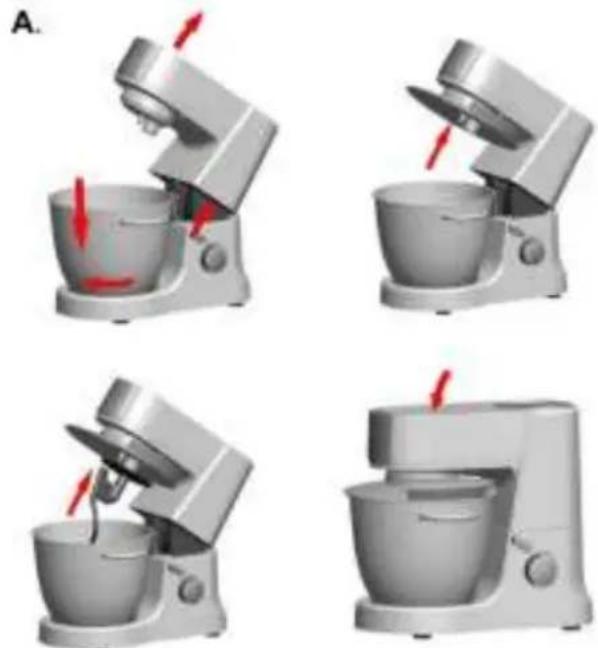
Using the appliance MIXER BLADE/ WISK/ DOUGH HOOK
A.
natural_image
3D rendering of a kitchen mixer with red arrows indicating motion (no text or symbols)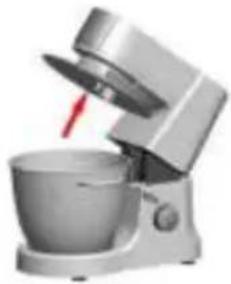
natural_image
Modern kitchen mixer with a red lever, no visible text or symbols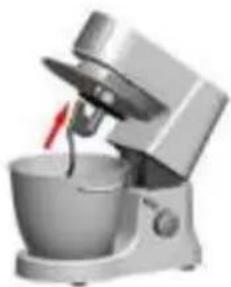
natural_image
Modern kitchen mixer with a bowl and handle, no visible text or symbols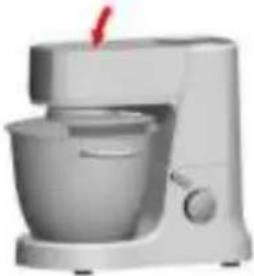
natural_image
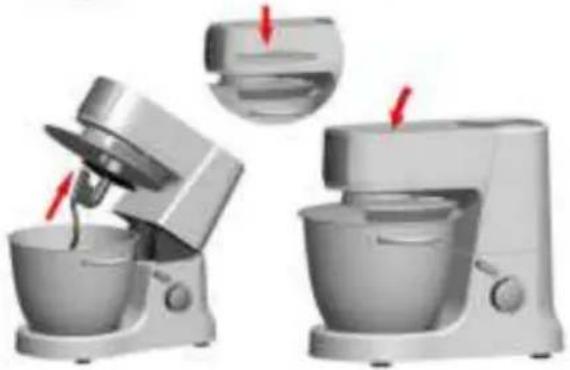
White kitchen mixer with a side bowl and handle (no visible text or symbols)Your attachments are equipped with a system for adjusting the height above the bottom of the bowl for optimum results.
- Press the release button (2) to lift the multifunction head and insert the mixer blade, dough hook or whisk.
- Hold it in position.
- Press the multifunction head (10) with the button (2) until a click is heard.
- Adjust the height by turning the shaft. Adjust the accessories to the ideal position.
- Lift the multifunction head (10) again. Hold the Mixer blade, Hook or whisk in position.
- Before using for the first time, clean all parts of the accessories with soapy water .rinse and dry.
- Place the appliance on a flat, clean and dry surface and then plug in your appliance.
B.
natural_image
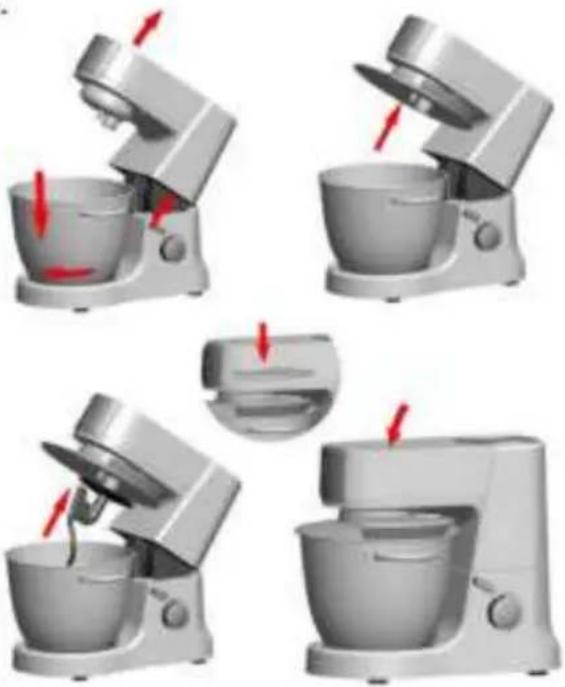
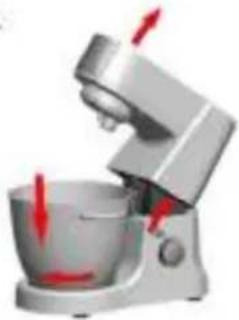
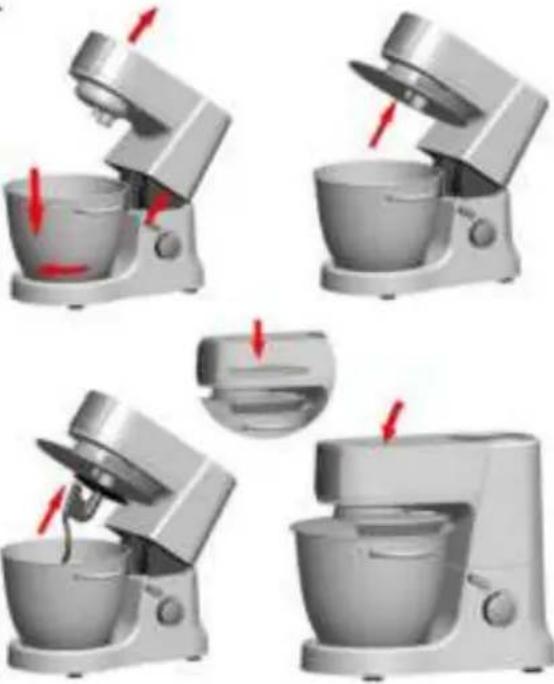
Four-panel illustration of a kitchen mixer with red arrows indicating action (no text or symbols)- Press button (2) to the release the multifunction head (10) and raise it to a vertical position.
- Fit the bowl (8) onto the appliance by turning until it locks in position and place the ingredients in it.
- Position the cover on the head with the filling opening at the front of the appliance.
- Fit the desired accessory (11, 12, 13) in the power outlet, pushing the shaft of the accessory home and turn it a quarter turn towards you to lock it in position.
- Put the multifunction head of the appliance to a horizontal position and press button (2) (a click should be heard).
- During preparation, you can add ingredients through the opening of the cover.
- To stop the appliance, turn the knob (1) back to 0.
HOMOGENIZING/ MIXING/ BLENDING
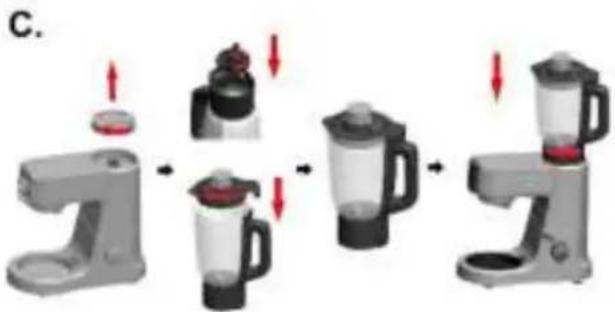
Depending on the nature of the ingredients, the blender can be used to prepare up to 1.4L of mixture.
Assembling and fitting the attachment:
- Assemble the blade assembly to the seal and lock it with a quarter turn clockwise into the bottom of the jug (the jug must be upright).
- Put the multifunction heard of the appliance (10) to a horizontal position and press button (2) (a click should be heard).
- Remove the cover (3).
- Ensure that the appliance is at a standstill before latching on the assembled blender.
- Fit the assembled blender and lock it in position by turning it anti-clockwise.
- Place the ingredients in the blender jug and plug in. You may start to process your food now.
Caution:
Do not run the empty blender for more than 1 minute.
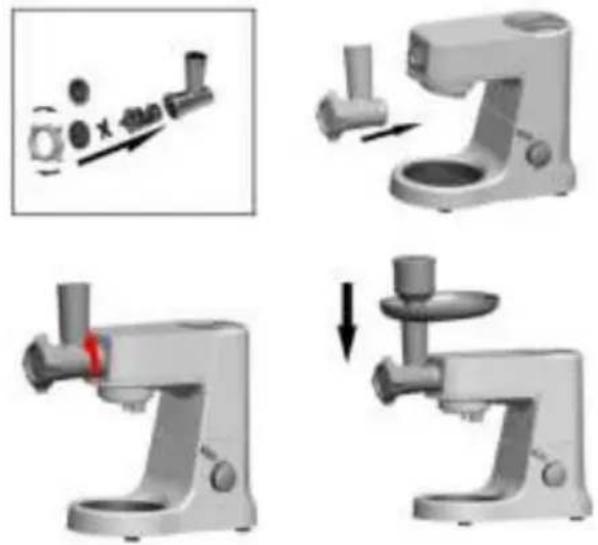
MEAT GRINDER
D.
natural_image
Four-step illustration of a manual kitchen tool, showing step-by-step assembly and disassembly (no text or symbols)Assembling and fitting the attachment:
- Choose the cutter housing (22) your need. Take the body of cutter housing by the feed tube with the largest opening upwards.
- Insert the worm shaft (drive pins first) in the cutter housing. Fit the cutter blade on the shaft with the cutting edges upwards.
- Place the selected hole-plate over the blades ensuring that the two lugs fit in the two cut-outs in the body.
- Lock the screw ring fully on the body.
- Check the assembly, the shaft should have no play nor be able to turn on itself.
- Play the multifunction head in the horizontal position (a click should be heard).
- Install the assembled cutter housing on the power outlet of the mincer (6).
- Place the removable tray on the feed tube.
Caution:
When you dissemble the body (Cutter housing), you must press the release button for cutter housing (5) first.
- Insert the pieces of meat in the feed tube piece by piece using the pusher. Never push the meat with the finger or any other utensil.
- After use, always turn the switch to the "0" position.
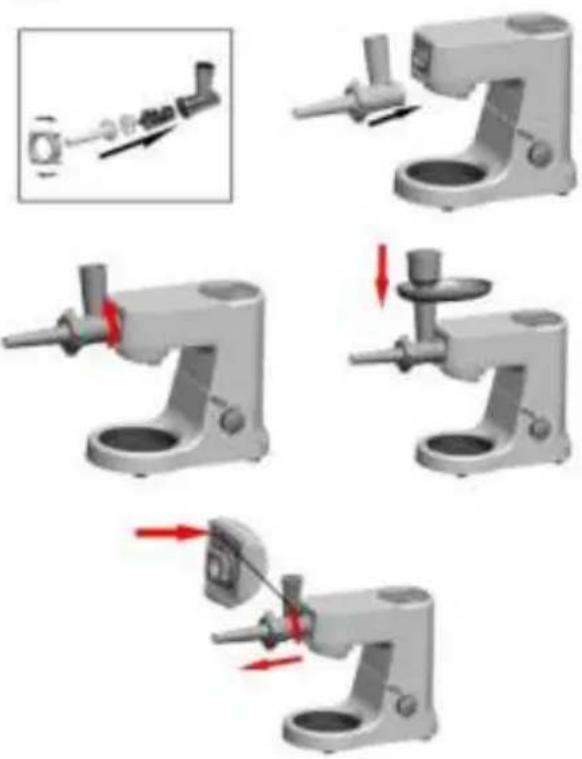
MAKING SAUSAGES
E.
natural_image
Four-step industrial sewing machine operation diagram showing tool path and cutting process (no text or labels)- Mince the meat.
- Insert the worm shaft into the cutter housing, the plastic end first.
- Place the separator in the cutter housing.
- Place the sausage horn on the cutter housing and screw the ring on the cutter housing.
(Make sure the notches of the separator fit onto the projections of the mincer head.)
- Attach the cutter housing to the motor unit.
- Place the tray on the upright part of the cutter housing.
- Now the appliance is ready for making sausages.
1) Put the ingredients in the tray.
2) Use the pusher to gently push the meat into the cutter housing.
Put the sausage skin in lukewarm water for 10 minutes. Then slide the wet skin onto the sausage horn. Push the (seasoned) minced meat into the cutter housing. If the skin gets stuck onto the sausage horn, wet it with some water.
Caution:
- When you dissemble the body (Cutter housing), you must press the release button for cutter housing (5) first.
- Insert the meat in the feed tube with the pusher. Never push the meat with the finger or any other utensil.
- After use, always turn the switch to the "0" position.
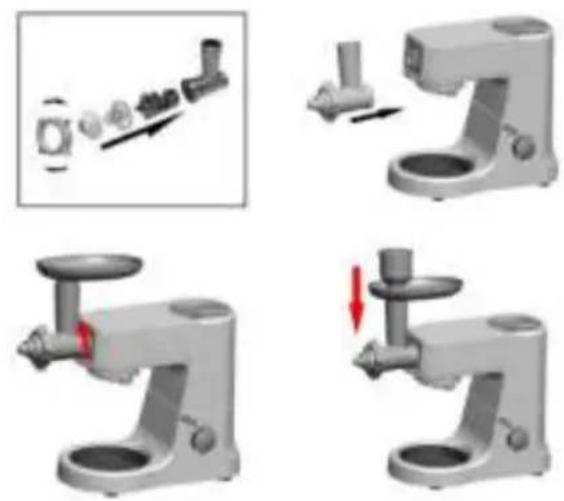
MAKING KEBAB
F.
natural_image
Four-step illustration of a manual kitchen grater with a red-handled handle, showing step-by-step assembly and adjustment (no text or symbols)Insert the worm shaft into the cutter housing, the plastic end first.
-
Place the cone in the cutter housing.
-
Place the former on the cutter housing and screw the ring on the cutter housing.
(Make sure the notches of the separator fit onto the projections of the mincer head.)
Attach the cutter housing to the motor unit. Place the tray on the upright part of the cutter housing.
Now the appliance is ready for making kebab.
1) Feed the prepared kebab mixture through the kebab maker.
2) Cut the continuous hollow cylinder into the desired lengths and user as required.
Kebab is a traditional Middle Eastern dish made primarily of lamb and bulgur wheat which are minced together to form a paste the mixture is extruded through the kebab maker and cut into short lengths. The tubes can then be stuffed with a minced meat mixture, the ends pinched together and then deep fried.
Caution:
-
When you dissemble the body (Cutter housing), you must press the release button for cutter housing (5) first.
-
Insert the food in the feed tube with the pusher. Never push the food with the finger or any other utensil.
- After use, always turn the switch to the "0" position.
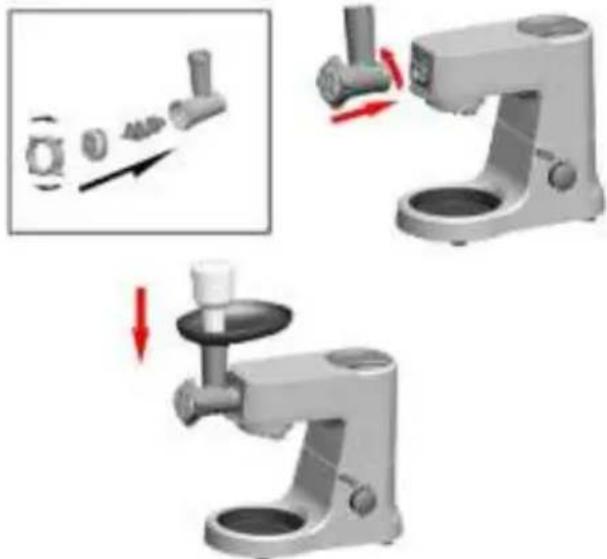
ПРАВЕНЕ НА ПАСТА
H.
natural_image
Two-step illustration of a manual kitchen tool with a close-up view showing the process (no text or symbols)- Unplug the appliance.
- Never immerse the motor unit in water or put it under running water. Wipe it with a soft dry or slightly damp cloth.
- For easier cleaning, quickly rinse the accessories after use. Completely dismantle the mixer attachment. Handle the blades with care, as some have sharp cutting edges.
- If your accessories are discoloured by food (carrots, oranges etc.), rub them gently with a kitchen towel dipped in cooking oil and then clean in the usual way.
Environment
This marking indicates that this product should not be disposed of with other household waste throughout the EU. To prevent possible harm to the environment or human health from uncontrolled waste disposal, recycle it responsibly to promote the sustainable reuse of material resources. To return your used device, please use the return and collection systems or contact the retailer where the product was purchased. They can take this product for environmentally safe recycling.
Guarantee & service
If you need information or if you have a problem, please contact the Gorenje Customer Care Centre in your country (you find its phone number in the worldwide guarantee leaflet). If there is no Customer Care Centre in your country, go to your local Gorenje dealer or contact the Service department of Gorenje domestic appliances.
For personal use only!
GORENJE WISHES YOU A LOT OF PLEASURE WHEN USING YOUR APPLIANCE
We reserve the right to any modifications!
natural_image
Illustration of a kitchen mixer with red arrows indicating fluid flow (no text or symbols)
natural_image
Modern kitchen mixer with a red lever, no visible text or symbols
natural_image
Illustration of a kitchen mixer with a bowl and handle (no text or symbols)
natural_image
Exterior view of a modern kitchen mixer (no text or symbols visible)natural_image
Two 3D renderings of a kitchen mixer with red arrows indicating motion, no text or symbols present
natural_image
Two grayscale kitchen models with red arrows indicating process steps, no visible text or symbolsnatural_image
Illustration of a manual manual tool in four sequential stages, showing mechanical assembly and tool path (no text or symbols)natural_image
Four-step illustration of a manual kitchen tool, showing step-by-step assembly and disassembly (no text or symbols)natural_image
Two-step illustration of a kitchen hand mixer with tool manipulation, showing step-by-step assembly and rotation (no text or symbols)natural_image
Four-panel illustration of a kitchen mixer with red arrows indicating motion, showing different states of mixing (no text or symbols present)natural_image
Four-panel illustration of a kitchen mixer with red arrows indicating motion, showing the mixing process (no text or symbols)natural_image
Pure mechanical assembly diagram showing components and motion arrows without any text or symbols
natural_image
Exterior view of a modern kitchen blender with handle and control panel (no text or symbols visible)
natural_image
Exterior view of a modern kitchen brush (no text or symbols visible)
natural_image
Mechanical tool with a downward arrow indicating compression or disassembly (no text or symbols visible)Atentie:
natural_image
Four-step industrial sewing machine operation diagram showing tool insertion and cutting (no text or labels)natural_image
Four-step illustration of a manual kitchen tool, showing step-by-step assembly and cutting process (no text or symbols)natural_image
Two-step illustration of a kitchen hand mixer with tool manipulation, showing step-by-step assembly and rotation (no text or symbols)natural_image
Four-panel illustration of a kitchen mixer with red arrows indicating motion, showing different states of press or cooling (no text or symbols present)natural_image
Four-panel illustration of a kitchen mixer with red arrows indicating motion, showing step-by-step assembly (no text or symbols)natural_image
Pure mechanical diagram showing a shaft and gear assembly without any text or symbols
natural_image
Exterior view of a modern kitchen stand mixer (no text or symbols visible)
natural_image
Exterior view of a modern kitchen brush (no text or symbols visible)
natural_image
Illustration of a manual hand mixer with a downward arrow indicating compression (no text or symbols)natural_image
Pure mechanical assembly diagram without any text, numbers, or symbols
natural_image
Exterior view of a modern kitchen brush (no text or symbols visible)
natural_image
3D rendered image of a mechanical tool or device with a red handle and circular base (no visible text or symbols)
natural_image
Illustration of a manual hand mixer with a red arrow indicating compression (no text or symbols)
natural_image
Mechanical device with red arrows indicating force or movement, no visible text or symbolsnatural_image
Four-panel illustration of a manual kitchen brush tool, showing step-by-step assembly and disassembly (no text or symbols)natural_image
Two-step illustration of a kitchen tool with a magnified inset showing the process (no text or symbols)natural_image
Illustration of a kitchen mixer with red arrows indicating airflow or motion (no text or symbols)
natural_image
Modern kitchen mixer with a red lever, no visible text or symbols
natural_image
Modern kitchen mixer with a bowl and handle, no visible text or symbols
natural_image
White kitchen mixer with a side arm and handle, no visible text or symbolsnatural_image
Two 3D renderings of a kitchen mixer with red arrows indicating motion, showing no text or symbols.
natural_image
Two grayscale kitchen machines with red arrows indicating tool positions, no visible text or symbolsnatural_image
Four-step illustration of a kitchen hand mixer with tool insertion and adjustment (no text or symbols)natural_image
Four-step industrial sewing machine operation diagram showing tool path and cutting (no text or labels)natural_image
Four-step illustration of a manual kitchen tool, showing step-by-step assembly and disassembly (no text or symbols)natural_image
Two-step illustration of a kitchen hand mixer with tool manipulation, showing step-by-step assembly and rotation (no text or symbols)natural_image
Four 3D renderings of a kitchen mixer with red arrows indicating motion, shown from different angles (no text or symbols)natural_image
Four-panel illustration of a kitchen mixer with red arrows indicating motion, showing step-by-step assembly (no text or symbols)natural_image
Four-step illustration of a manual kitchen tool, showing step-by-step assembly and disassembly (no text or symbols)natural_image
Three-step illustration of a manual tool in a machine, showing step-by-step assembly and disassembly (no text or symbols)- Pomel'te mäso.
- Zasuňte transportnú závitovku do tela mlynčeka. Plastický koniec ide prvý.
- Do tela mlynčeka vsuňte oddel'ovač.
- Nástavec na plnenie čriev nasad'te na telo mlynčeka a naskrutkujte kruhovú maticu.
natural_image
Four-step illustration of a manual kitchen grater with a red-handled handle, showing step-by-step assembly and cutting (no text or symbols)- Zasuňte transportnú závitovku do tela mlynčeka. Plastický koniec ide prvý.
- Do tela mlynčeka vsuňte kužel'.
- Tvarovač nasad'te na telo mlynčeka a naskrutkuite naň kruhovú maticu.
natural_image
Two-step industrial sewing machine diagram showing tool path and component assembly (no text or labels)natural_image
Four 3D renderings of a kitchen mixer with red arrows indicating motion, shown from different angles (no text or symbols)natural_image
Four-panel illustration of a kitchen mixer with red arrows indicating motion, showing the mixing process (no text or symbols)natural_image
Pure mechanical component diagram without any text, numbers, or symbols
natural_image
Exterior view of a modern kitchen stand mixer (no text or symbols visible)
natural_image
Exterior view of a modern kitchen grater with handle and side mount (no text or symbols visible)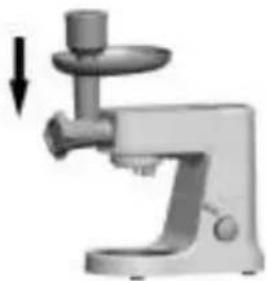
natural_image
Mechanical tool with a downward arrow indicating force or movement (no text or symbols visible)natural_image
Four-step industrial sewing machine operation diagram showing tool path and cutting process (no text or labels)natural_image
Four-step illustration of a manual kitchen grater with tool manipulation and red arrow indicating rotation (no text or symbols)natural_image
Two-step illustration of a manual kitchen tool with a close-up view showing the process (no text or symbols)MISCHERBLATT / SCHLAGBESEN / TEIGHAKEN
natural_image
Four-panel diagram of a kitchen mixer with red arrows indicating motion, showing different states of press or cooling (no text or symbols present)natural_image
Four-panel illustration of a kitchen mixer with red arrows indicating motion, showing step-by-step assembly (no text or symbols)natural_image
Four-step illustration of a manual hand tool on a stand, showing step-by-step assembly and disassembly (no text or symbols)natural_image
Four-step industrial sewing machine operation diagrams showing tool path and cutting process (no text or symbols)natural_image
Four-step illustration of a manual kitchen tool, showing step-by-step assembly and disassembly (no text or symbols)natural_image
Two-step industrial machine tool diagram showing assembly and disassembly process (no text or symbols)natural_image
Four-panel illustration of a kitchen mixer with red arrows indicating motion, showing different states of press or cooling (no text or symbols present)natural_image
Four-panel illustration of a kitchen mixer with red arrows indicating motion, showing step-by-step assembly (no text or symbols)natural_image
Four-step illustration of a manual kitchen tool, showing step-by-step assembly and disassembly (no text or symbols)natural_image
Four-step industrial sewing machine operation diagram showing tool path and cutting process (no text or labels)natural_image
Four-step illustration of a manual kitchen tool, showing step-by-step assembly and disassembly (no text or symbols)natural_image
Two-step illustration of a kitchen hand mixer with tool manipulation, showing step-by-step assembly and rotation (no text or symbols)natural_image
Four-panel illustration of a kitchen mixer with red arrows indicating motion direction (no text or symbols)natural_image
Four-panel illustration of a kitchen mixer with red arrows indicating motion, showing the mixing process (no text or symbols)natural_image
Four-step industrial sewing machine operation diagrams showing tool path and cutting process (no text or symbols)natural_image
Four-step illustration of a manual kitchen brush tool, showing step-by-step assembly and disassembly (no text or symbols)natural_image
Two-step illustration of a manual kitchen tool with a close-up view showing the process (no text or symbols)MANUEL D'INSTRUCTIONS
FR
natural_image
3D rendering of a kitchen mixer with red arrows indicating motion (no text or symbols)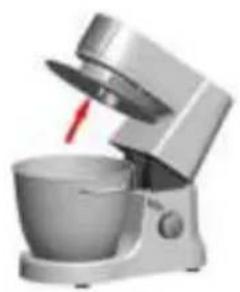
natural_image
Modern kitchen mixer with a red liquid being poured into the cup (no text or symbols visible)
natural_image
Modern kitchen mixer with a bowl and handle, no visible text or symbols
natural_image
Modern kitchen mixer with a bowl and handle (no visible text or symbols)natural_image
Two identical 3D renderings of a kitchen mixer with red arrows indicating motion, no text or symbols present.