eCraft APL-1422 - Vacuum Cleaner Starmix - Free user manual and instructions
Find the device manual for free eCraft APL-1422 Starmix in PDF.

User questions about eCraft APL-1422 Starmix
0 question about this device. Answer the ones you know or ask your own.
Ask a new question about this device
Download the instructions for your Vacuum Cleaner in PDF format for free! Find your manual eCraft APL-1422 - Starmix and take your electronic device back in hand. On this page are published all the documents necessary for the use of your device. eCraft APL-1422 by Starmix.
USER MANUAL eCraft APL-1422 Starmix
natural_image
Two symbolic icons: a triangular warning triangle with an exclamation mark and an open book with stacked books (no text or labels)Operating instructions
natural_image
Technical line drawings of three different vacuum cleaner units (no text or symbols visible)A
text_image
23 22 10 20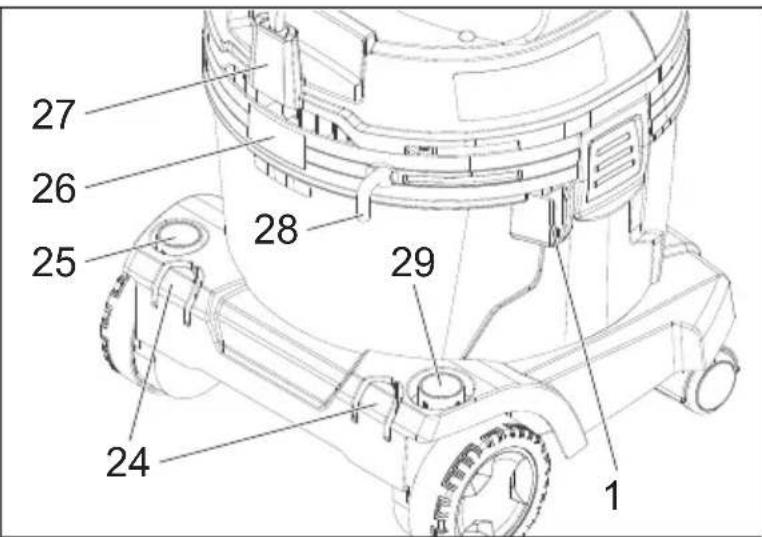
text_image
27 26 25 28 29 24 1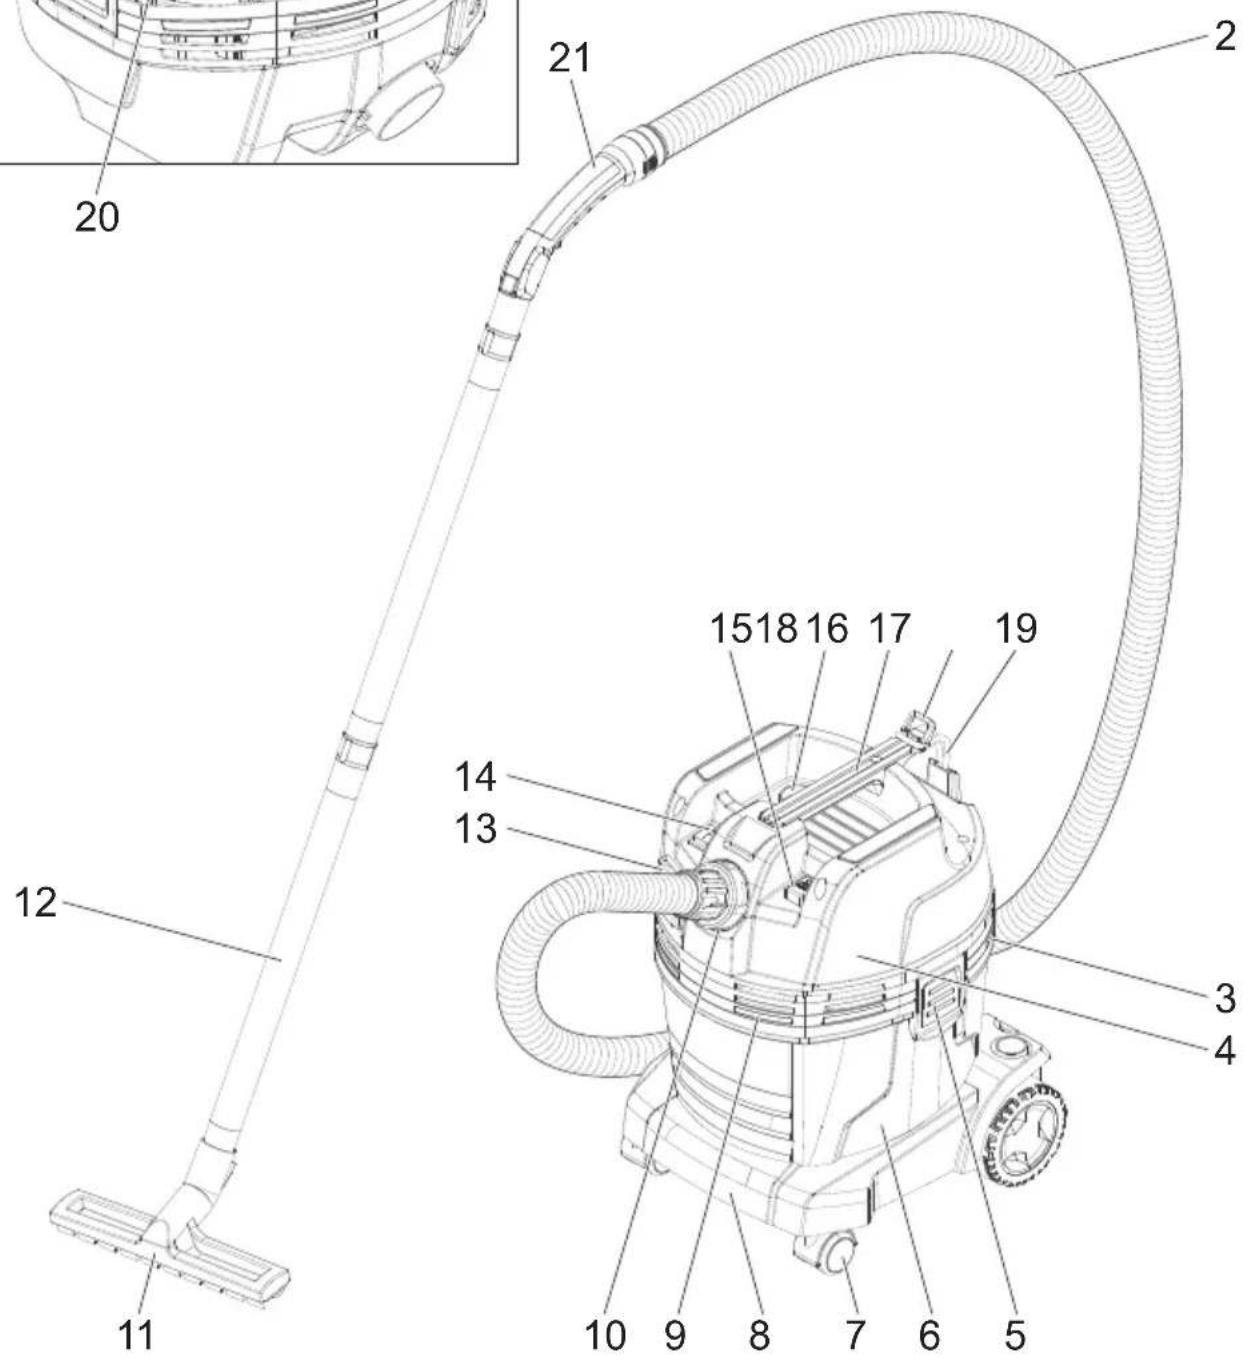
text_image
Technical diagram of a vacuum cleaner with numbered parts for identificationB
text_image
eCRAFTAPL1
text_image
1. 2.
text_image
2 "Click" 2x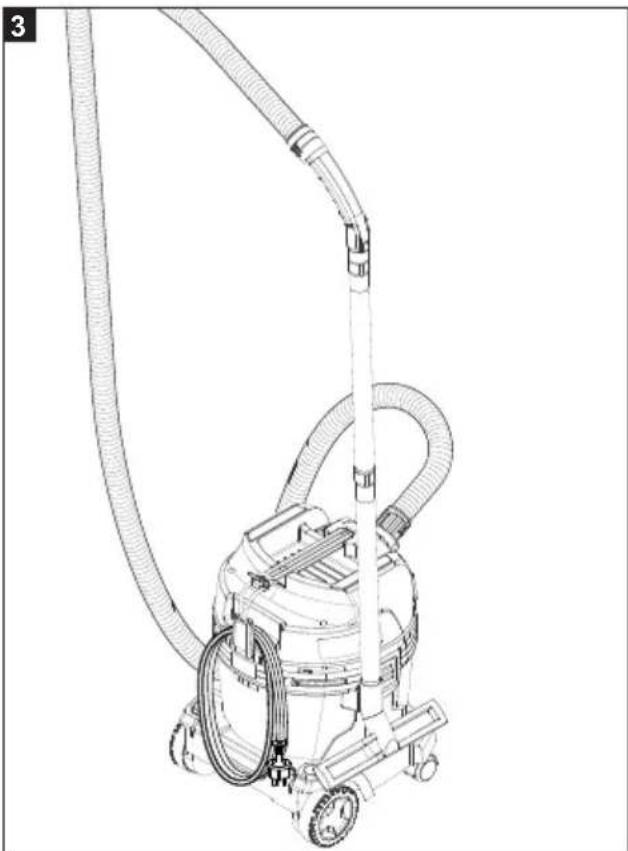
natural_image
Line drawing of a vacuum cleaner with coiled tubing and attached components (no text or symbols)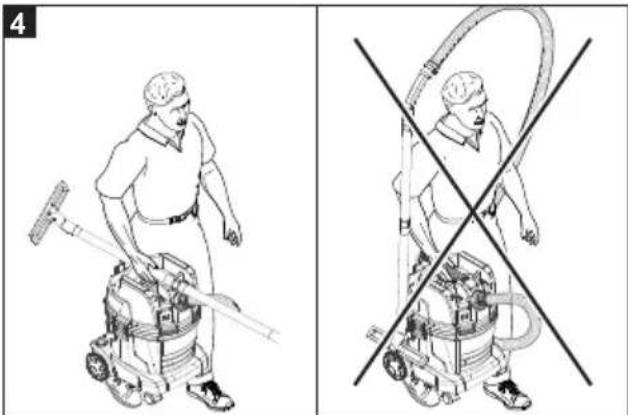
natural_image
Illustration of a person using a vacuum cleaner with a tool, shown in two different scenarios (no text or symbols present)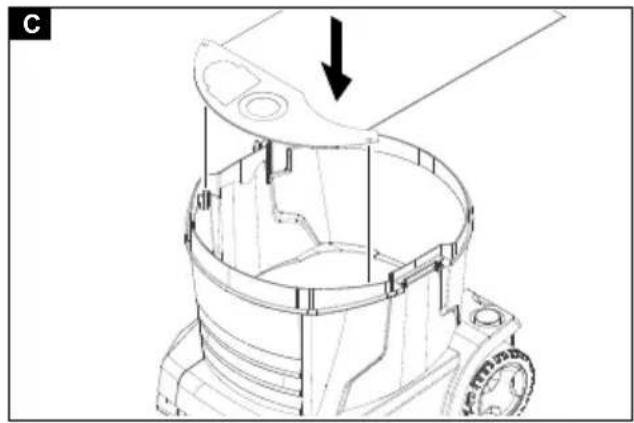
natural_image
Technical line drawing of a mechanical component with an arrow indicating assembly or transformation (no text or symbols present)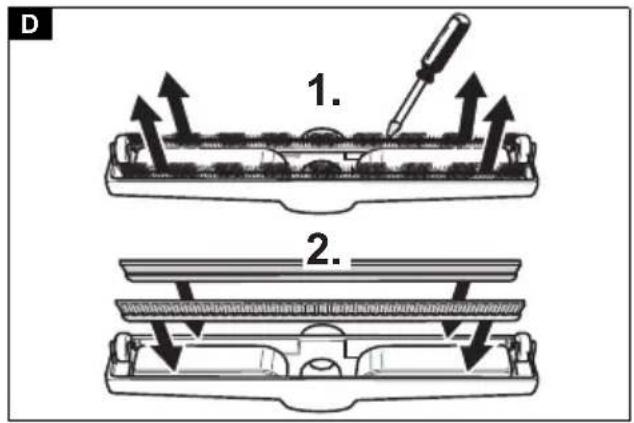
text_image
D 1. 2.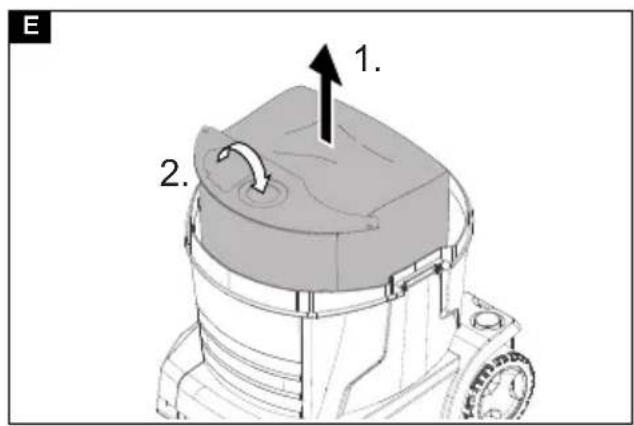
text_image
E 1. 2.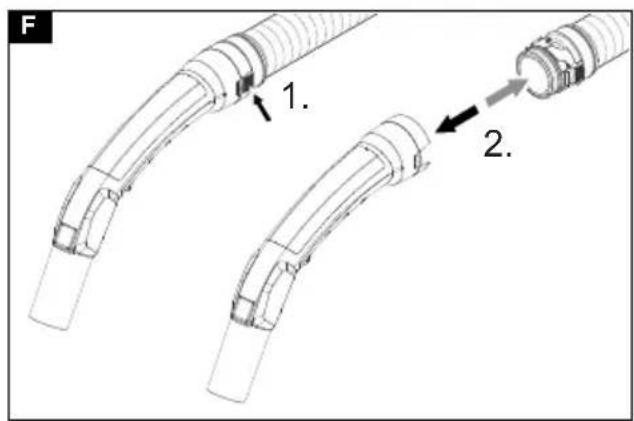
text_image
F 1. 2.
text_image
G 1. 2. 3.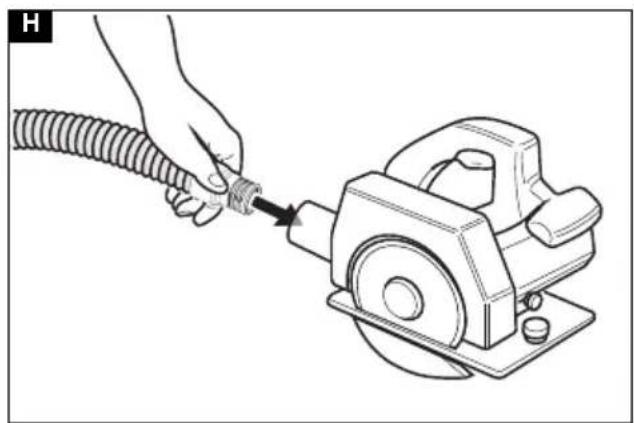
natural_image
Illustration of a hand connecting a coiled cable to a mechanical grinding machine (no text or symbols)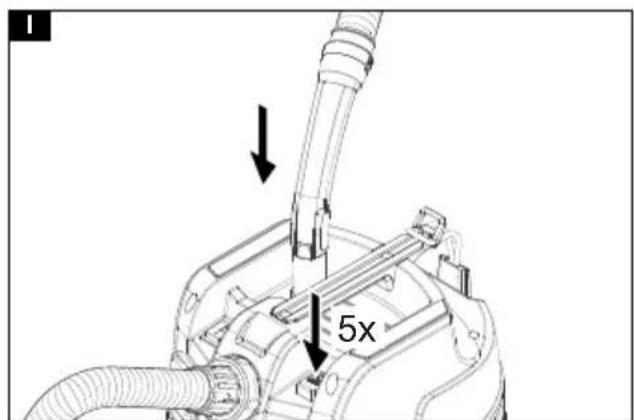
text_image
5x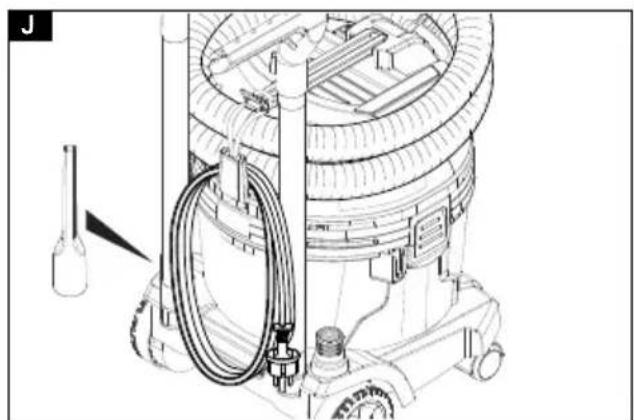
natural_image
Technical line drawing of a vacuum cleaner with hoses and a tool, no visible text or symbolsInhalt
Typ: eCRAFT PL-1422, eCRAFT APL-1422, eCRAFT APL-1430
Head of Quality Assurance
ELECTROSTAR GmbH
73061 Ebersbach/Fils, Germany
Ebersbach/Fils, 2020/03/01
Technische Daten
Environmental protection.... 10
Intended use.... 10
Description of the device 10
Symbols on the device 10
Preparation.... 11
Initial startup 11
Operation.... 11
Transport 12
Storage.... 12
Care and service 12
Troubleshooting guide.... 12
Warranty 13
Accessories and spare parts 13
EU Declaration of Conformity.... 13
Technical data 14
General notes


Read these original instructions and the enclosed safety instructions before using the device for the first time. Act in ac-
cordance with them.
Keep both books for future reference or for future owners.
- If the operating instructions and safety instructions are not observed, the device can be damaged and dangers could arise for users and other persons.
- Notify the dealer immediately in the case of shipping damage.
- Check the package contents when unpacking for missing accessories or for damage.
Environmental protection

The packing materials can be recycled. Please dispose of packaging in accordance with the environmental regulations.

Electrical and electronic appliances contain valuable, recyclable materials and often components such as batteries, rechargeable batteries or oil, which - if handled or disposed of incorrectly - can
pose a potential threat to human health and the environment. However, these components are required for the correct operation of the appliance. Appliances marked by this symbol are not allowed to be disposed of together with the household rubbish.
Intended use
- This vacuum cleaner is intended for the wet and dry cleaning of floor and wall surfaces.
- This device is suitable for vacuuming dry, non-flammable dusts that are harmful to health from machines and devices; dust class L as per EN 60335-2-69. Restrictions: No carcinogenic substances may be vacuumed.
- This device is suitable for commercial use, e.g. in hotels, schools, hospitals, factories, shops, offices, and rental companies.
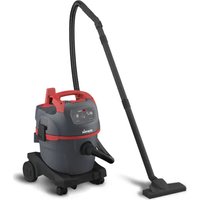
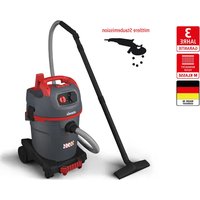
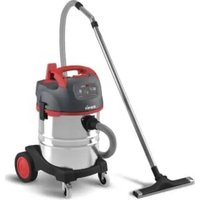
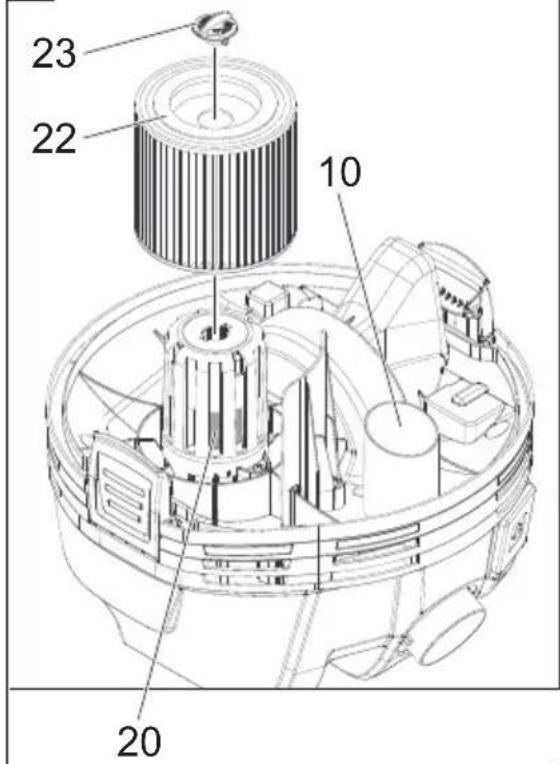
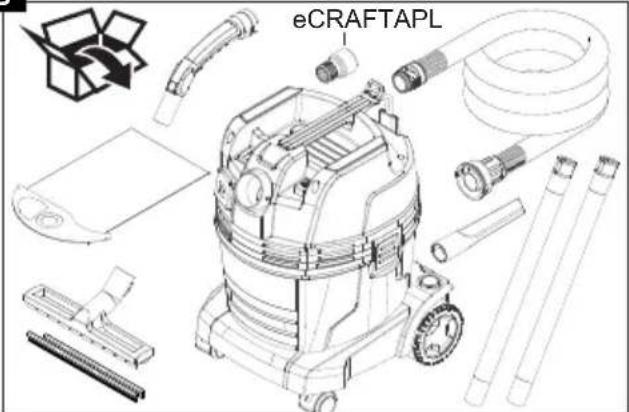
Description of the device
Illustration A
①Mount for floor nozzle
② Suction hose
③ Air exit, working air
④ Suction head
⑤ Suction head lock
6 Dirt receptacle
⑦ Steering roller
⑧ Recessed grip
⑨ Air inlet, motor cooling air
⑩Suction hose port
⑪ Floor nozzle
⑫Suction pipe
13 Socket (eCRAFT APL only)
⑭Main switch
15 Filter dedusting button
⑯Cleaning position for angle pieces
17 Carrying handle
18 Fastening eyelet
⑲Hose hook
20Float
21 Angle piece
22 Cartridge filter (PES)
23 Securing nut
24 Suction pipe holder
25 Holder for crevice nozzle
26Type plate
27 Cable hooks
28 Mains cable
29 Holder for rubber sleeve
Symbols on the device
Dust class
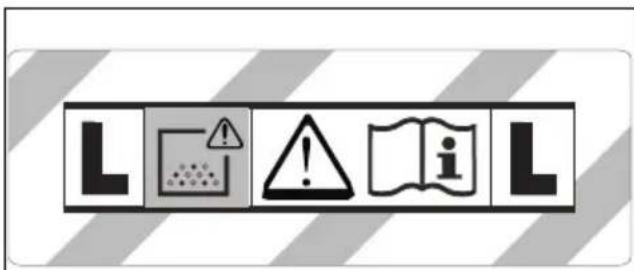
text_image
Warning sign with L, warning symbols for inspection, warning, and informationWARNING: This device contains dusts that are harmful to your health. Emptying and maintenance, including removal of the dust bag, may only be performed by appropriately trained personnel wearing suitable personal protective equipment. Do not switch on until the entire filter system is installed.
Cartridge filter
| Cartridge filter (PES) | ||
| Order number 454856 | ||
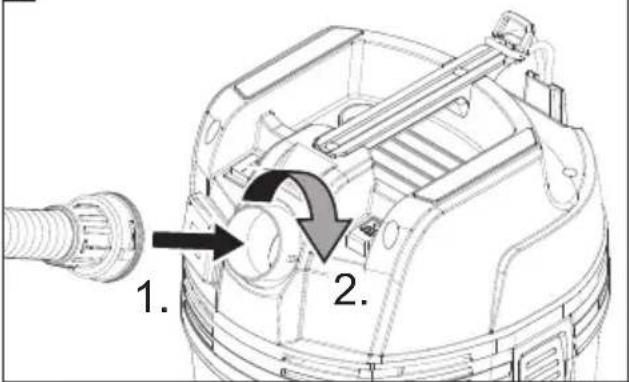
Preparation
- Unpack the device and install the accessories. Illustration B
Initial startup
⚠ WARNING
Danger from dust that is harmful to your health
Respiratory sicknesses through inhalation of dust. Do not vacuum without correctly installed filter elements, otherwise a danger to health from increased fine dust emission is present. Therefore, the cartridge filter must always be attached when vacuuming.
ATTENTION
Risk of damage to the suction motor. Never remove the cartridge filter when vacuuming.
Anti-static system
Only for devices with a built-in socket (APL):
Static charges are discharged through the earthed connection nozzles. This prevents sparking and electric shocks with electrically conducting accessories (optional).
Dry vacuuming
- eCRAFT 1422: The appliance is fitted with a fleece filter bag with lock latch, order no. 454870 (5 pieces).
- eCRAFT 1430: The appliance is fitted with a fleece filter bag with lock latch, order no. 455105 (5 pieces).
Note
All types of dust up to dust class L can be vacuumed with this device.
Note
The device is an industrial vacuum cleaner for vacuuming dry, non-inflammable dusts with workplace limit values (AGW) greater than or equal to 1 mg/m^3 .
- When vacuuming up fine dust, it is recommended to use an additional fleece filter bag.
Installing the fleece filter bag
- Unlock and remove the suction head.
- Fit the fleece filter bag.
Illustration C
- Fit and lock the suction head.
Wet vacuum cleaning
⚠️DANGER
Danger from dust that is harmful to your health
Respiratory sicknesses through inhalation of dust. No dusts harmful to health may be vacuumed when performing wet vacuum cleaning.
Installing the squeegees
-
Remove the brush strip. Illustration D
-
Install the squeegees.
Note
The structured side of the squeegees must face outwards.
Removing the fleece filter bag
- The fleece filter bag must always be removed when vacuuming wet substances.
- Unlock and remove the suction head.
- Pull the fleece filter bag on the flange up and out. Illustration E
- Fold in the lock latch and seal the fleece filter bag tight.
- Dispose of the used fleece filter bag in accordance with statutory regulations.
- Fit and lock the suction head.
General
- We recommend not using the "Semi-automatic filter dedusting" function button when vacuuming wet dirt with the crevice nozzle or upholstery nozzle (optional) when sucking mainly water out of a container.
- On completion of wet vacuum cleaning: Clean the cartridge filter with the filter dedusting and let it dry before changing to dry vacuuming. Clean the container with a moist cloth and dry it off.
Clip connection
The suction hose is equipped with a clip system. All accessory parts with a nominal width of 35 mm can be connected.
Illustration F
Operation
Main switch
| ||ON | Device ON Semi-automatic filter dedusting: ON Socket: ON |
| 0 | Device OFF |
| |ON | Device ON Semi-automatic filter dedusting: ON Socket: OFF |
Switching on the device
- Connect the mains plug.
- Set the main switch to the desired program.
Working with power tools
Only for devices with a built-in socket (APL):
⚠️DANGER
Danger of electric shock
Risk of injury and damage.
The socket is only intended for direct connection of power tools to the vacuum cleaner. Any other use of the socket is prohibited.
-
Plug the mains plug of the power tool into the power socket on the vacuum cleaner. The vacuum cleaner is in Standby mode.
-
Set the main switch to program "2".
Note
The vacuum cleaner is automatically switched on and off with the power tool.
Note
The vacuum cleaner has a startup delay of up to 0.5 seconds and an after-running time of up to 5 seconds.
Note
See the Technical data for the permissible power rating of the power tool.
-
Remove the angle piece from the suction hose. Illustration G
-
Unscrew the clip connection.
-
Screw on the rubber sleeve.
-
Connect the rubber sleeve to the power tool.
Illustration H
Semi-automatic filter dedusting
Note
Actuating the filter dedusting every 5-10 minutes extends the working time of the cartridge filter.
Note
The semi-automatic filter dedusting can only be switched on when the device is switched on.
-
Press the semi-automatic filter dedusting button 5x. The cartridge filter is then cleaned by a blast of air (pulsing noise).
-
Power dedusting (for particularly severe contamination of the cartridge filter): Close off the suction pipe or angle piece with your hand or put the angle piece in the cleaning position and at the same time press the semi-automatic filter dedusting button 5x. Illustration I
Draining the dirt receptacle
⚠ WARNING
Waste water hazard
Environmental pollution
Observe local waste water treatment regulations.
• The suction duct is equipped with a float.
- When the maximum permissible waste water level in the container is reached, the suction volume is interrupted.
-
Switch off the device at the main switch.
-
Empty the container.
Switching off the device
-
Press the semi-automatic filter dedusting button 5x.
-
Switch off the device at the main switch.
-
Pull out the mains plug.
Each time after use
-
Empty the container.
-
Vacuum off the inside and outside of the device and clean with a moist cloth.
Storing the device
- Store the suction pipes, suction hose, power cord, crevice nozzle and, if necessary, a rubber sleeve as shown in the illustration.
Illustration J
- Store the device in a dry room and secure it against unauthorised use.
Transport
⚠CAUTION
Failure to observe the weight
Risk of injury and damage
Be aware of the weight of the device during transportation.
-
Remove the suction hose with floor nozzle from the support. Carry the device by the carrying handle and suction pipe.
-
Store the accessories for longer transport as shown in illustration J.
-
When transporting the device in vehicles, secure it to prevent it from slipping or overturning in accordance with the respective valid guidelines.
Storage
△CAUTION
Failure to observe the weight
Risk of injury and damage
Be aware of the weight of the device during storage.
The device may only be operated indoors.
Care and service
⚠️DANGER
Danger of electric shock
Injuries due to touching live parts
Switch off the device.
Remove the mains plug.
Dust extraction machines are safety devices for the prevention or elimination of hazards according to the German BGV A1.
ATTENTION
Care agents containing silicone
These can attach plastic components.
Do not use care agents containing silicone for cleaning.
- You can perform basic maintenance and care work yourself.
- Clean the surface of the device and the interior of the container regularly with a moist cloth.
Changing the cartridge filter
-
Unlock and remove the suction head.
-
Turn the suction head by 180^ and set it down.
-
Unscrew the securing nut.
-
Remove the cartridge filter.
-
Dispose of the used cartridge filter in accordance with statutory regulations.
-
Remove any dirt deposits from the clean air side.
-
Clean the filter intake and the supporting surface of the filter intake with a damp cloth.
-
Install new cartridge filter.
-
Insert and tighten the securing nut.
-
Fit and lock the suction head.
Changing the fleece filter bag
-
Unlock and remove the suction head.
-
Pull the fleece filter bag on the flange up and out. Illustration E
-
Fold in the lock latch and seal the fleece filter bag tight.
-
Dispose of the used fleece filter bag in accordance with statutory regulations.
-
Fit the new fleece filter bag.
-
Fit and lock the suction head.
Troubleshooting guide
⚠️DANGER
Danger of electric shock
Injuries due to touching live parts
Switch off the device.
Remove the mains plug.
Note
The device must be switched off immediately if a malfunction occurs (e.g. filter breakage). The malfunction must be eliminated before switching the device on again.
Suction turbine does not start up
-
Check the socket and the power supply fuse.
-
Check the mains cable, mains plug, and (if necessary) the socket on the device.
-
Switch on the device.
Suction turbine runs, but the device does not suck
Float closes suction duct
- Empty the dirt receptacle.
Suction power decreases
- Remove any blockages from the suction nozzle, suction pipe, suction hose or cartridge filter.
- Change the filled fleece filter bag.
- Press the semi-automatic filter dedusting button 5x with the device switched on.
- Change the cartridge filter.
Escaping dust when vacuuming
-
Check that the cartridge filter is correctly fitted.
-
Change the cartridge filter.
Semi-automatic filter dedusting not working
- Suction hose not connected.
Semi-automatic filter dedusting does not switch off
- Contact Customer Service.
Semi-automatic filter dedusting cannot be switched on
- Contact Customer Service.
Customer Service department
If the malfunction cannot be corrected, the device must be checked by the Customer Service department.
Warranty
The warranty conditions issued by our relevant sales company apply in all countries. We shall remedy possible malfunctions on your appliance within the warranty period free of cost, provided that a material or manufacturing defect is the cause. In a warranty case, please contact your dealer (with the purchase receipt) or the next authorised customer service site. (See overleaf for the address)
Accessories and spare parts
Only use original accessories and original spare parts. They ensure that the appliance will run safely and fault-free.
Information on accessories and spare parts can be found at www.starmix.de.
EU Declaration of Conformity
We hereby declare that the machine described below complies with the relevant basic safety and health requirements in the EU Directives, both in its basic design and construction as well as in the version placed in circulation by us. This declaration is invalidated by any changes made to the machine that are not approved by us.
Product: NTS
Type: eCRAFT PL-1422, eCRAFT APL-1422, eCRAFT APL-1430
Currently applicable EU Directives
2006/42/EC
2011/65/EU
2014/30/EU
Harmonised standards used
EN 50581
EN 55014-1: 2017
EN 55014-2: 2015
EN 60335-1
EN 60335-2-69
EN 61000-3-2: 2014
EN 61000-3-3: 2013
EN 62233: 2008
National standards used
The signatory acts on behalf of and with the authority of the company management.

text_image
Candu SfrewCarsten Gresser
Head of Quality Assurance
ELECTROSTAR GmbH
Subject to technical modifications.
Contenu
text_image
Warning symbols and icons including L, warning sign, exclamation mark, open book, and iType : eCRAFT PL-1422, eCRAFT APL-1422, eCRAFT APL-1430
Head of Quality Assurance
ELECTROSTAR GmbH
73061 Ebersbach/Fils, Germany
Ebersbach/Fils, 01/03/2020
text_image
Warning sign with L, warning symbols including document, warning triangle, open book, and information iconInterruptor principal
Tipo: eCRAFT PL-1422, eCRAFT APL-1422, eCRAFT APL-1430
Directivas UE aplicables
2006/42/CE
2011/65/UE
2014/30/UE
Tipo: eCRAFT PL-1422, eCRAFT APL-1422, eCRAFT APL-1430
Head of Quality Assurance
ELECTROSTAR GmbH
text_image
Image displaying five black-and-white icons: letter 'L', warning symbol, exclamation mark, open book with 'i', and letter 'L'.Tipo: eCRAFT PL-1422, eCRAFT APL-1422, eCRAFT APL-1430
Head of Quality Assurance
ELECTROSTAR GmbH
Type: eCRAFT PL-1422, eCRAFT APL-1422, eCRAFT APL-1430
Head of Quality Assurance
ELECTROSTAR GmbH
Type: eCRAFT PL-1422, eCRAFT APL-1422, eCRAFT APL-1430
Head of Quality Assurance
ELECTROSTAR GmbH
Typ: eCRAFT PL-1422, eCRAFT APL-1422, eCRAFT APL-1430
Montere dukfilterpose
- Løsne sugehodet og ta det av.
- Sett på dukfilterposen.
Figur C
Støvutslipp under suging
-
Kontroller at patronfilteret sitter riktig.
-
Skift ut patronfilteret.
Type: eCRAFT PL-1422, eCRAFT APL-1422, eCRAFT APL-1430
Gjeldende EU-direktiver
2006/42/EF
2011/65/EU
2014/30/EU
Anvendte harmoniserte standarder
EN 50581
EN 55014-1: 2017
EN 55014-2: 2015
EN 60335-1
EN 60335-2-69
EN 61000-3-2: 2014
EN 61000-3-3: 2013
EN 62233: 2008
text_image
Warning symbols and icons including L, warning sign, exclamation mark, open book, and iTyyppi: eCRAFT PL-1422, eCRAFT APL-1422, eCRAFT APL-1430
Head of Quality Assurance
ELECTROSTAR GmbH
73061 Ebersbach/Fils, Germany
Ebersbach/Fils, 1.3.2020
Tekniset tiedot
text_image
Warning symbols and icons including L, warning sign, exclamation mark, open book, and letter 'i' in sequenceTúmpoç. eCRAFT PL-1422, eCRAFT APL-1422, eCRAFT APL-1430
Σχετικές Οδηγίες ΕΕ
2006/42/EK
2011/65/EE
2014/30/EE
Head of Quality Assurance
ELECTROSTAR GmbH
73061 Ebersbach/Fils, Germany
Ebersbach/Fils, 2020/03/01
text_image
Warning symbols and icons including L, warning sign, exclamation mark, open book, and iTip: eCRAFT PL-1422, eCRAFT APL-1422, eCRAFT APL-1430
Head of Quality Assurance
ELECTROSTAR GmbH
text_image
Warning symbols and icons including L, warning sign, exclamation mark, open book, and letter 'i' in sequenceTyp: eCRAFT PL-1422, eCRAFT APL-1422, eCRAFT APL-1430
Head of Quality Assurance
ELECTROSTAR GmbH
Típus: eCRAFT PL-1422, eCRAFT APL-1422, eCRAFT APL-1430
Typ: eCRAFT PL-1422, eCRAFT APL-1422, eCRAFT APL-1430
text_image
Warning sign with L, warning symbols including document, warning triangle, open book, and information iconTyp: eCRAFT PL-1422, eCRAFT APL-1422, eCRAFT APL-1430
73061 Ebersbach/Fils, Germany
text_image
Warning sign with L, warning symbols including document, warning triangle, open book, and information iconTip: eCRAFT PL-1422, eCRAFT APL-1422, eCRAFT APL-1430
Directive UE relevante
2006/42/UE
2011/65/UE
2014/30/UE
Norme armonizate aplicate
EN 50581
EN 55014-1: 2017
EN 55014-2: 2015
EN 60335-1
EN 60335-2-69
EN 61000-3-2: 2014
EN 61000-3-3: 2013
EN 62233: 2008
Tip: eCRAFT PL-1422, eCRAFT APL-1422, eCRAFT APL-1430
Zadevne EU-direktive
2006/42/ES
2011/65/EU
2014/30/EU
Tip: eCRAFT PL-1422, eCRAFT APL-1422, eCRAFT
APL-1430
Tip: eCRAFT PL-1422, eCRAFT APL-1422, eCRAFT APL-1430
Važeće direktive EU
2006/42/EZ
2011/65/EU
2014/30/EU
Primenjene harmonizovane norme
EN 50581
EN 55014-1: 2017
EN 55014-2: 2015
EN 60335-1
EN 60335-2-69
EN 61000-3-2: 2014
EN 61000-3-3: 2013
EN 62233: 2008
Primenjene nacionalne norme
Potpisnik postupa u ime i uz punomoć uprave preduzeća.

text_image
Candu SroosCarsten Gresser
Head of Quality Assurance
ELECTROSTAR GmbH
text_image
Warning symbols and icons including L, warning sign, exclamation mark, open book, and letter 'i'Тип: eCRAFT PL-1422, eCRAFT APL-1422, eCRAFT
APL-1430
Head of Quality Assurance
ELECTROSTAR GmbH
73061 Ebersbach/Fils, Germany
Ebersbach/Fils, 2020/03/01
Технически данни
Tüüp: eCRAFT PL-1422, eCRAFT APL-1422, eCRAFT APL-1430
73061 Ebersbach/Fils, Germany
Ebersbach/Fils, 2020/03/01
Tehnilised andmed
text_image
Warning sign with L, warning symbols for temporary contact, warning sign, and information iconTipas: eCRAFT PL-1422, eCRAFT APL-1422, eCRAFT APL-1430
Atitinkamos ES direktyvos
2006/42/EB
2011/65/ES
2014/30/ES
Taikomi darnieji standartai
EN 50581
EN 55014-1: 2017
EN 55014-2: 2015
EN 60335-1
EN 60335-2-69
EN 61000-3-2: 2014
EN 61000-3-3: 2013
EN 62233: 2008
text_image
Warning sign with L, warning symbols for inspection, warning, and informationTips: eCRAFT PL-1422, eCRAFT APL-1422, eCRAFT APL-1430
73061 Ebersbach/Fils, Germany
73061 Ebersbach/Fils, Germany
Ebersbach/Fils, 2020/03/01
类型:eCRAFT PL-1422, eCRAFT APL-1422, eCRAFT APL-1430
相关的欧盟指令
2006/42/EC
2011/65/EU
2014/30/EU