NSG uClean 1420 HK - Vacuum Cleaner Starmix - Free user manual and instructions
Find the device manual for free NSG uClean 1420 HK Starmix in PDF.

User questions about NSG uClean 1420 HK Starmix
0 question about this device. Answer the ones you know or ask your own.
Ask a new question about this device
Download the instructions for your Vacuum Cleaner in PDF format for free! Find your manual NSG uClean 1420 HK - Starmix and take your electronic device back in hand. On this page are published all the documents necessary for the use of your device. NSG uClean 1420 HK by Starmix.
USER MANUAL NSG uClean 1420 HK Starmix
Operating instructions
natural_image
Exterior view of a Starmix vacuum cleaner with red and black casing (no visible text or symbols)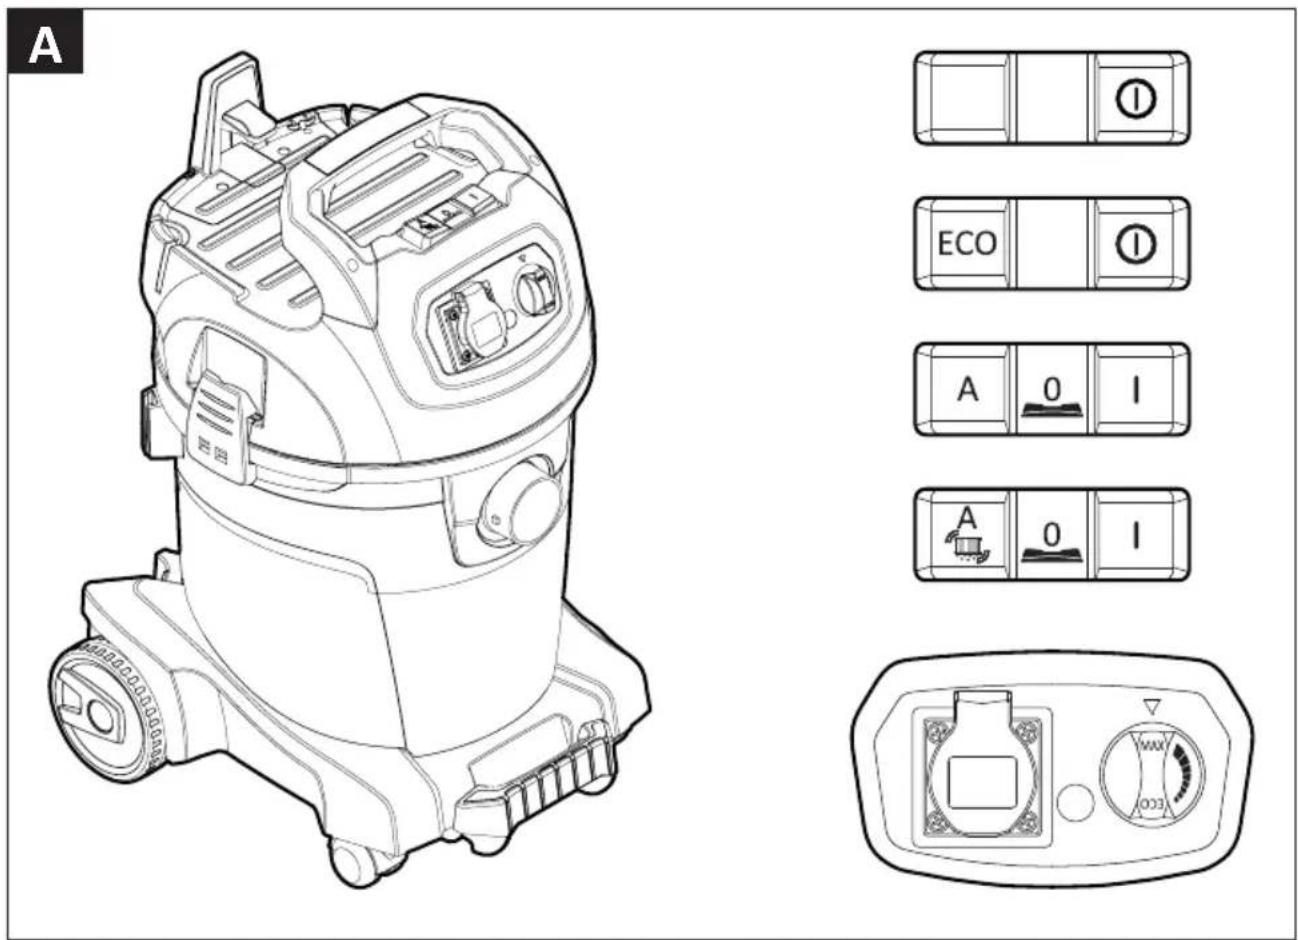
text_image
A ECO A 0 1 A 0 1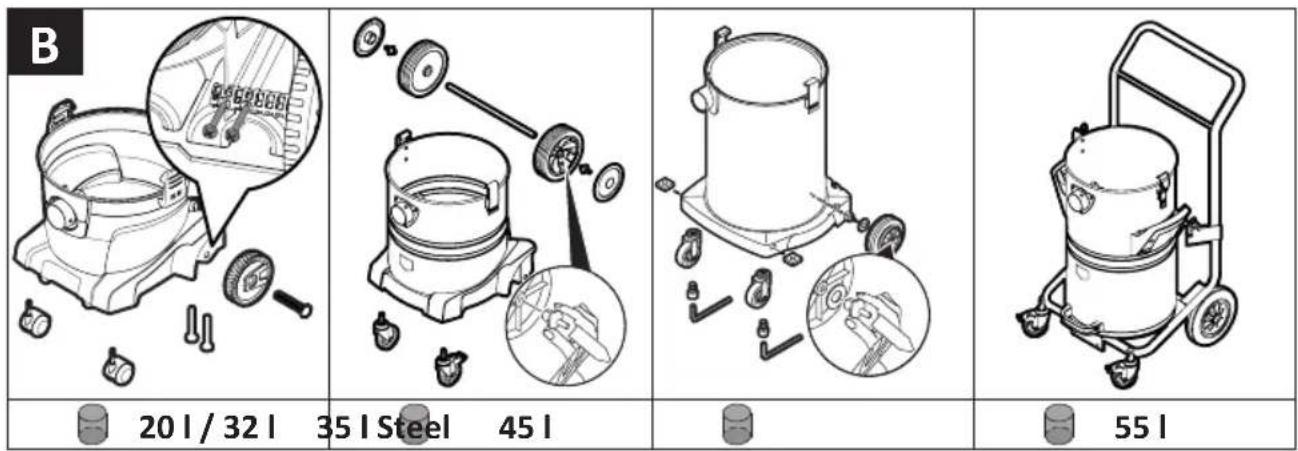
text_image
B 20 l / 32 l 35 l Steel 45 l 55 l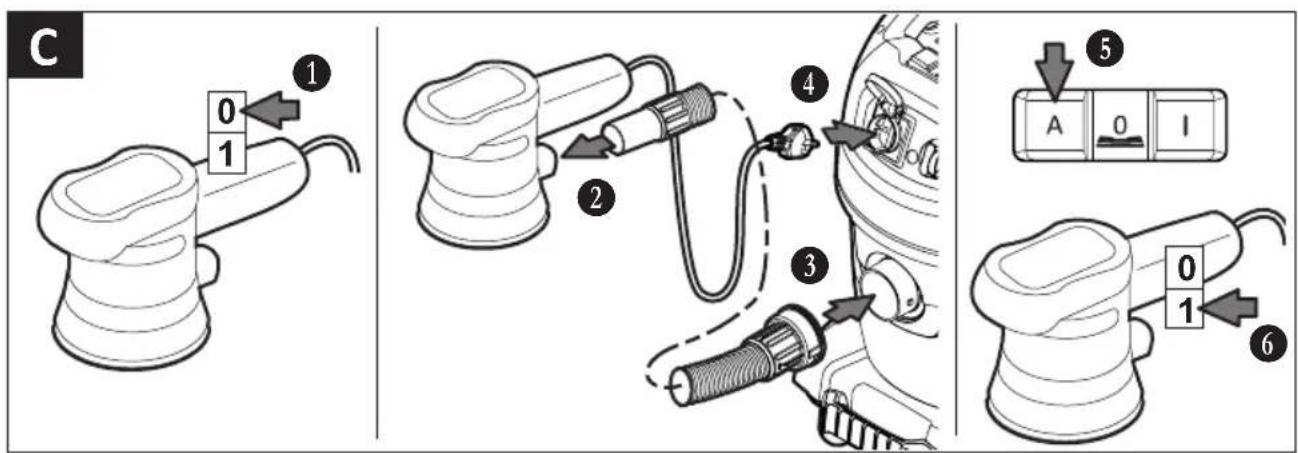
text_image
C 0 1 ① ② ③ ④ ⑤ A 0 I 0 1 ⑥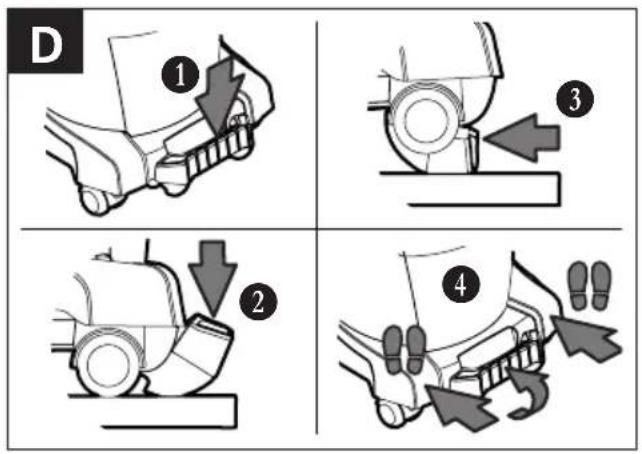
text_image
D ① ③ ② ④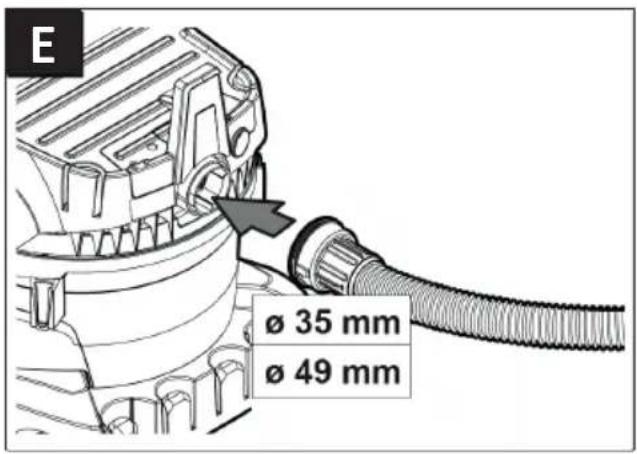
text_image
E Ø 35 mm Ø 49 mm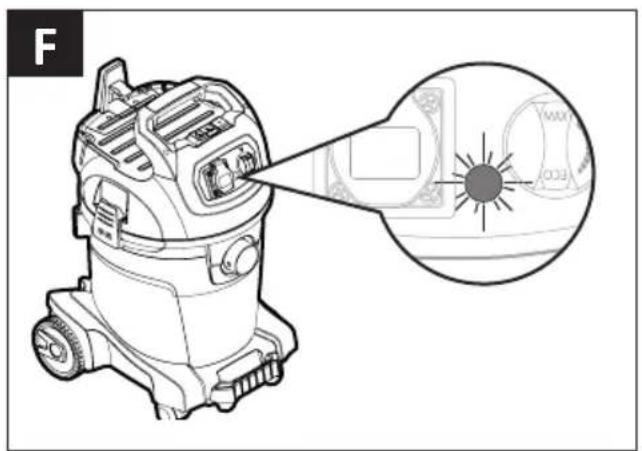
text_image
F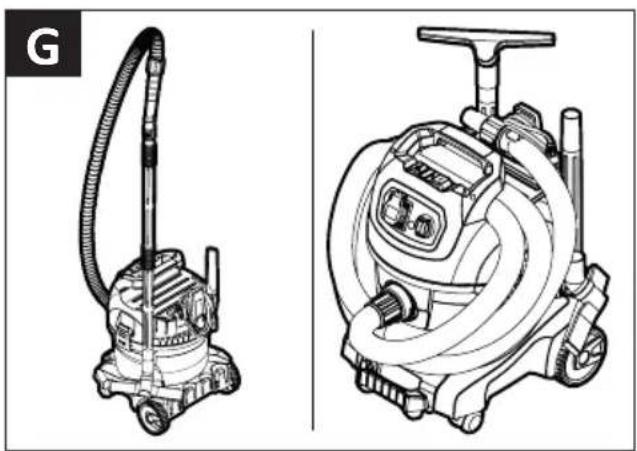
natural_image
Technical line drawings of two vacuum cleaner units, one with a hose and the other with hoses and tubing (no text or symbols)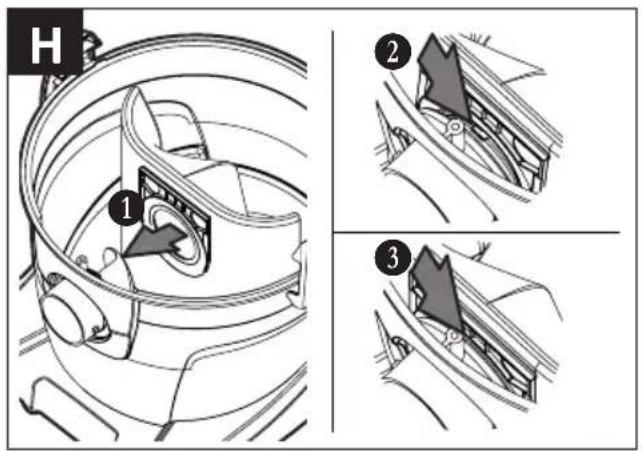
text_image
H ① ② ③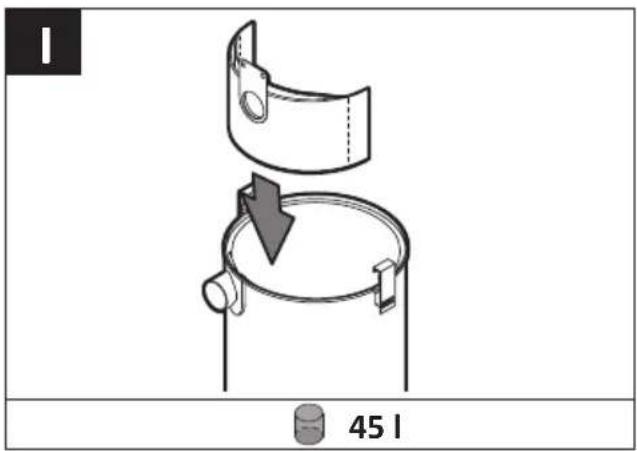
text_image
45 l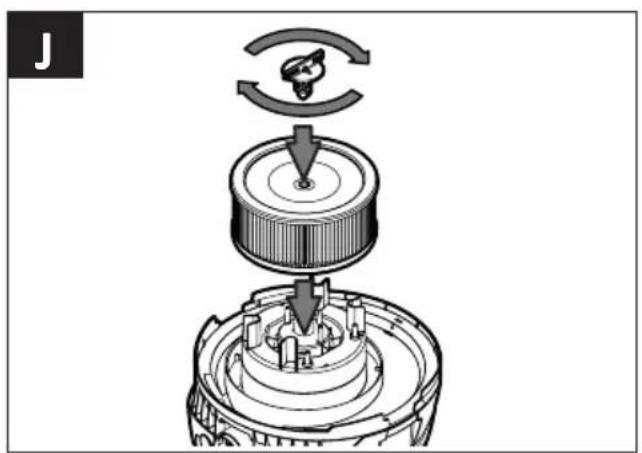
natural_image
Mechanical assembly diagram showing a rotating component with arrows indicating motion (no text or symbols)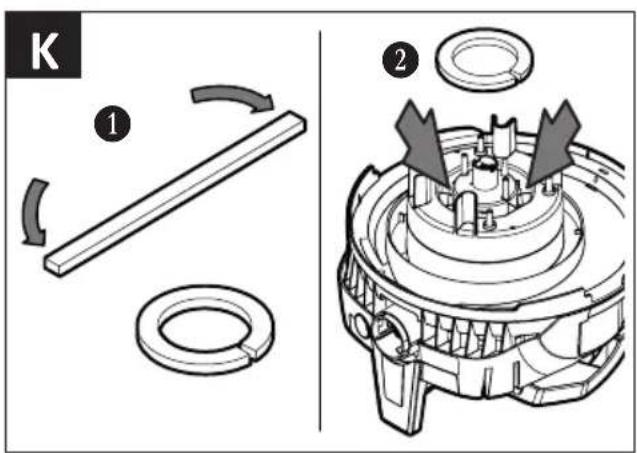
text_image
K ① ②1 Important safety information
Carefully read the operating instructions all the way through before operating the equipment and retain them for future reference.
The pictures in these instructions refer to all available versions of the model and may be different from the actual scope of delivery.
Explanation of symbols and signs used

This is the warning symbol. It warns against possible risk of injury. Follow all instructions which are marked with this sign to avoid injury or death. The warning symbol always appears in association with the signal words DANGER, WARNING and CAUTION.
Symbol Signal word Description
| DANGER Identifies a hazard with a high degree of risk which will cause death or serious injury if not avoided. | |
| WARNING Identifies a hazard with a medium degree of risk which could cause death or serious injury if not avoided. | |
| CAUTION Identifies a hazard with a low degree of risk which could cause minor or moderate injury if not avoided. | |
| NOTICE Identifies a hazard which could result in material damage if not avoided. | |
| Identifies a requirement which needs to be met before an action is taken. | |
| 1./2./3. Identifies steps to be taken one after the other by the user. | |
| Identifies the results of an action. | |
Qualification of the operating personnel
The vacuum cleaner must only be used by persons, who have been instructed in its correct usage and explicitly commissioned with the task of operating it.
The machine may not be used by persons (including children) who have reduced physical, sensory or metal capabilities or who are inexperienced or lack the knowledge of how to use the machine. Children must be supervised to ensure that they do not play with the device.
Intended use
The vacuum cleaner is suitable for vacuuming up dust and liquids.
Do not use the vacuum cleaner to vacuum up the following:
– Potentially explosive dusts
- Flammable or potentially explosive liquids or absorbent material soaked with these liquids
- Objects which are more than 60^ hot
Do not run the vacuum cleaner in a potentially explosive environment.
Vacuum cleaners for dust class L are suitable for vacuuming/sucking up dry, non flammable dusts that are hazardous to health with workplace exposure limits >1mg/m^3 .
en
Vacuum cleaners which are not identified as being suitable for dust class L are only suitable for vacuuming/sucking up non-hazardous to health dusts.
Only operate the vacuum cleaner under supervision. Do not climb onto or sit on the vacuum cleaner.
This machine is intended for commercial use, for example, in hotels, schools, hospitals, factories, shops, offices and in the rental business.
The manufacturer does not accept liability for damages caused by misappropriation, inappropriate usage or incorrect repairs.
Avoid danger from electric shocks
The voltage on the rating plate must match the mains voltage. Only connect the vacuum cleaner to a sufficiently protected electric socket.
Do not pull the mains connection cable over sharp edges, do not bend it or clamp it. Only replace a damaged mains connection cable with one meeting the specifications in the Technical Data chapter.
Do not use the vacuum cleaner including accessories in the following cases:
- Mains connection cable or extension cable is defective or showing cracks.
– There is visible damage to the vacuum cleaner, e.g. cracks in the housing.
– If you suspect an invisible defect, e.g. after a fall.
In the following cases, switch the vacuum cleaner off and unplug it from the mains:
- If any foam or liquid is discharged
– In the event of a longer work interruption and after every use
– Before carrying out any maintenance or retooling
When unplugging, only pull on the mains plug and not on the mains connection cable. Never touch the mains plug with wet hands.
Do not open the vacuum cleaner outdoors in the rain or during a thunderstorm. Always keep the inside of the lid dry.
Only use the brushes supplied with the vacuum cleaner or those specified in the operating instructions. Using other brushes can compromise safety. Never allow electrical brushes to come into contact with the mains connection cable.
Avoid any danger during operation
Only for vacuum cleaners in dust class L: Make sure that the air exchange rate is high enough if the exhaust air is being fed back into the room (pay attention to applicable national regulations).
Inform operating personnel about the following points before work starts:
– Handling the vacuum cleaner
– Dangers originating from the material to be sucked up
– Safe disposal of the material sucked up
Do not use the blowing function in closed rooms. Only work with a clean suction hose. Do not stir up any dusts which are hazardous to health. Do not inhale dusts.
When being used in food processing businesses: Immediately clean the vacuum cleaner after use and disinfect it to avoid microbial contamination.
Avoid any danger during maintenance and repair
Only have repairs carried out by experts. Only use original accessories and spare parts.
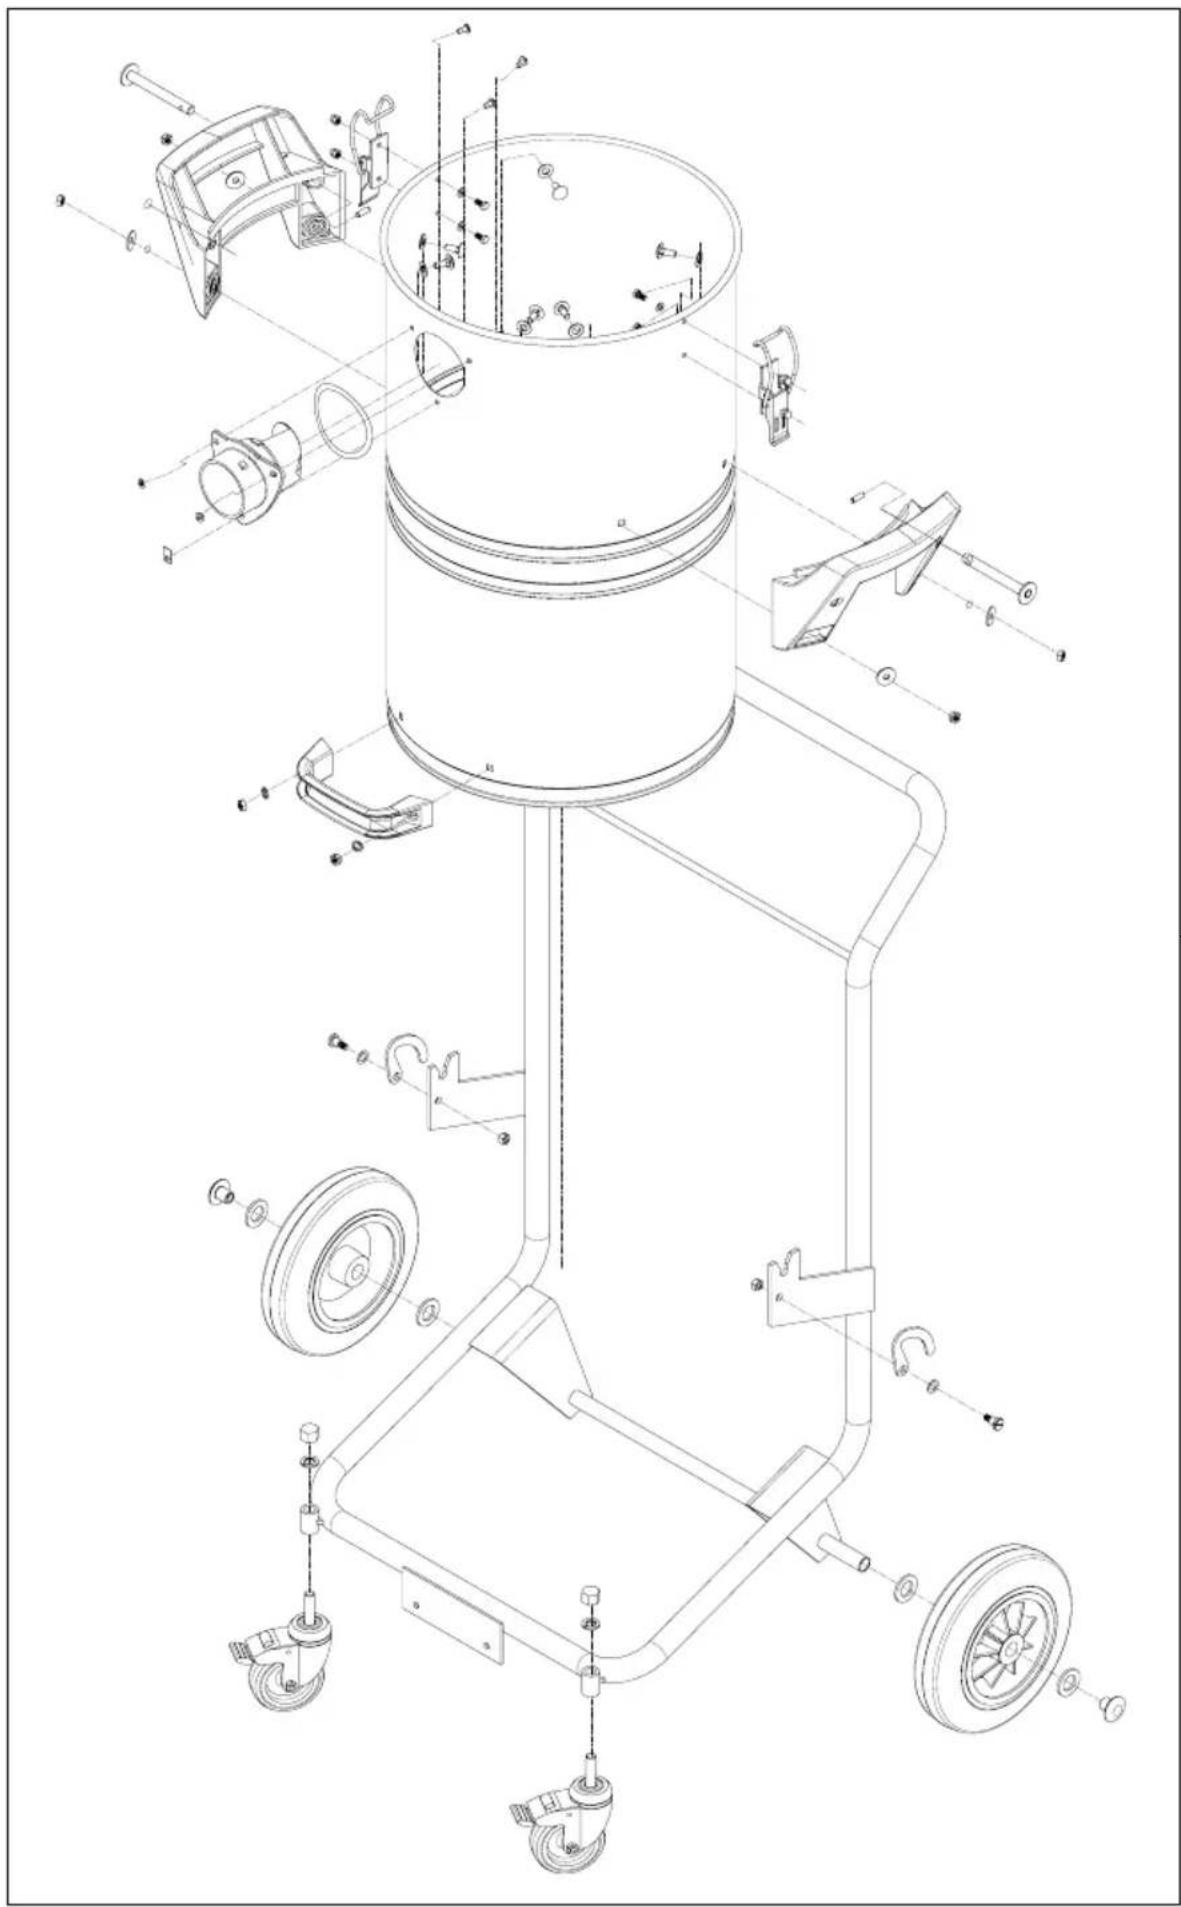
2 Before the first start-up
Assembly
See Fig. B.
- When unpacking, make sure everything is complete.
- Immediately report any transport damage to the retailer.
3 Operation
Before every use, please note
Make sure that the following conditions are met:
△ Vacuum cleaner, mains cable, suction hose and accessories are not damaged.
△ All filters have been inserted and are not damaged.
Operating modes
| Operating mode (depending on equipment) Description Switch position | ||
| Off Wall socket under voltage 0 | ||
| On Wall socket under voltage, manual operation | I | |
| Minimum suction power Vacuum cleaner operates at low power ECO | ||
| Maximum suction power Vacuum cleaner operates at maximum power | MAX | |
| Standby mode for automatic switch-on, infinitely adjustable speed control ECO-MAX | Vacuum cleaner is switched on and off by the electrical tool | A |
| Standby mode for automatic switch-on, infinitely adjustable speed control ECO-MAX, automatic filter cleaning | If the suction power drops, the filter is cleaned in breaks between work (= switched off electrical tool) |  |
Automatic filter cleaning (depending on the equipment variant)
The vacuum cleaner is fitted with an electromagnetic filter cleaning system with which any attached dust is automatically shaken from the filter cartridge.
Suck up dry materials
| Tools required | Notes |
| Main filter (filter cartridge) | Vacuum cleaner, filter and accessories need to be dry. If frequently changing between wet and dry vacuuming, use a separate main filter. |
| Filter bag for dust-free disposal of fine-grained material to be sucked up | When vacuuming soot, cement, plaster, flour or similar dusts: Insert a filter bag in the dirt container so that the dust does not stick and or cake. |
| Accessories depending on the area of application |
en
- Set required operating mode on the switch.
→ Vacuum cleaner is ready for vacuuming.
-
To adjust the suction power, select from the following options (depending on equipment):
-
Move switch to ECO position
- Set speed on the switch
- Set auxiliary air slide on the handle tube
Suck up liquids
Volume of liquid Tools required
Small volume of liquid Main filter (filter cartridge)
Water nozzle
Large volume of liquid Main filter (foam)
Water nozzle
- Remove filter bag from the dirt container before sucking up liquids.
- Slightly open auxiliary air slide on the handle.
- Move switch to position I.
Before switching off the vacuum cleaner:
- Remove suction nozzle from the liquid.
→ Residual water in the suction hose is sucked into the container and cannot leak out.
If there is a sudden loss of suction power and increased motor speed (changed motor noises), the float valve has interrupted the suction process: The container is full.
- Switch vacuum cleaner off.
- Empty dirt container and filter cartridge.
Connect an electrical tool
See Fig. C.
Use socket on vacuum cleaners with automatic switch on/off (switch position A) to connect electrical tools. The vacuum cleaner is switched on and off by the electrical tool. In switch position 0, the socket can be used as an extension cable, e.g. for a light.
Connection value: Vacuum cleaner + electrical tool = max. 16 A (value depends on the country version, pay attention to technical data).

WARNING!
The socket on the vacuum cleaner is always live.
Risk of injury due to electrical tool automatically starting up.
- Before plugging in: Switch off electrical tool.
Smart Stop
See Fig. D.
- Apply the brake with your foot.
→ The vacuum cleaner is prevented from rolling away.
Smart Stop offers further functions:
- Handle to empty the dirt container
– Ramp function to drive over obstacles
Blowing function
See Fig. E.
Only use the blowing function for cleaning, removing dust from and drying machines and appliances.
Flow volume display
See fig. F.
If the container is full or if there is a blockage in the suction hose, the flow volume display lights up.
After work
See Fig. G.
- Roll up mains connection cable and suction hose.
- Store the accessories in the accessories holder.
Transport and storage
- Before transport, close the locks on the upper part of the vacuum cleaner.
- Pay attention to the weight of the vacuum cleaner, particularly if the dirt container is full.
- Do not tilt the vacuum cleaner if there is liquid in the dirt container.
- Store the vacuum cleaner dry and indoors, protected from frost.
4 Troubleshooting and repair
| Fault Cause Remedy | ||
| Suction power drops Lid not properly closed Close lid | ||
| Filter dirty Clean | ||
| Filter bag full Change | ||
| Container full Empty | ||
| Motor protection filter blocked Clean | ||
| Nozzle, tube or hose blocked Clean | ||
| Vacuum cleaner does not start Mains plug not in socket Plug in | ||
| No mains voltage | Check fuse | |
| Mains connection cable defective | Have it replaced | |
| Water sensor/floater has switched off | Empty container | |
| Switch in position A | Move switch to I | |
| Vacuum cleaner does not start when the electrical tool is switched on | Electrical tool not plugged into socket on the vacuum cleaner | Plug mains plug into socket on the vacuum cleaner |
| Switch not in position A | Move switch to A | |
Do not try anything else, contact customer services.
5 Maintenance
See Fig. H-I-J-K.
When maintaining and cleaning the vacuum cleaner, handle it in such a way that there is no danger for maintenance personnel and other people.
Only for vacuum cleaners in dust class L
For maintenance by the user, the vacuum cleaner must be
– dismantled,
- cleaned and
- maintained,
as far as possible without creating any danger to the maintenance personnel or other.
Suitable precautionary measures include
– Cleaning before dismantling,
- Provide local filtered positive ventilation where the vacuum cleaner is to be dismantled,
– Clean the maintenance area and
– suitable personal protection equipment.
Have a technical inspection carried out at least once a year by specialist personnel, e.g. checking for damage to the filter, air tightness of the vacuum cleaner and that the control equipment is working properly.
Contaminated items
When carrying out maintenance or repair work, all contaminated items which have not been adequately cleaned must be disposed of. Such items must be disposed of in impermeable bags in accordance with the applicable regulations concerning the disposal of such waste.
Emptying the container
Only permitted for dust with workplace exposure limits >1mg/m^3 .
- Switch the vacuum cleaner off, pull the mains plug out.
- Open the latches.
- Remove the cover and suction hose from the container.
- Empty the container by pouring out.
Replacing filter cartridge
See Fig. J.
- Switch the vacuum cleaner off, pull the mains plug out.
- Open the latches.
- Remove the cover from the container.
- Loosen the locking screw.
- Removing the filter cartridge.
- Push new filter cartridge in a straight manner over the case, right up to the stop point.
- Tighten the locking screw.
Dispose of filter cartridges, filter bags or disposal bags
Dispose of the filter cartridge, filter bag or disposal bag in accordance with national regulations.
Cleaning
Do not clean the vacuum cleaner with a high pressure cleaner. Only use a wet cloth and mild cleaning agents to clean it. Acids, acetone and solvents can etch parts of the vacuum cleaner.
Clean the filter cartridge regularly, do not damage the fins while doing so. Only re-insert filter cartridges which you have cleaned using water when they are completely dry. Do not clean or dry filter cartridges using compressed air.
6 Disposal
Old equipment contains valuable materials which are designed for re-processing. The vacuum cleaners must not be thrown away in the normal household waste, but should be disposed of at a suitable proper collection system, e.g. via your communal disposal location.
7 Genuine accessories
| Description Order No. | NSG uClean 14.. / LD 14.. / ADL 14.. | Order No.NSG uClean ARDL 14.. |
| Filter cartridge FP 3600 411729 | ||
| Filter cartridge FPP 3600 415109 (540986) | ||
| Filter cartridge FPPR 3600 413464 (529776) | ||
| Filter cartridge FPPR 7200 413372 |
8 Technical Data
| NSG uClean14.. | NSG uCleanLD 14.. | NSG uCleanADL / ARDL 14.. | |||
| Voltage V 220-240 110 220-240 220-240 | |||||
| Frequency Hz 50/60 50/60 50/60 | 50/60 | ||||
| Power consumption (max.) | W | 1400 | 1400 | 1400 | 1400 |
| Protection class | II□ | II□ | I⊕ | ||
| Air flow rate: at the fan | m3/h | 248,4 | 174 | 248,4 | 248,4 |
| Air flow rate: at the hose | m3/h | 147 | 128 | 147 | 147 |
| Negative pressure: at the fan | kPa | 26 | 21 | 26 | 26 |
| Negative pressure: at the hose | kPa | 20 | 20 | 20 | 20 |
| Filter surface area | cm2 | 2950 | 2950 | 2950 | 2950 / 3400 |
| Noise level | dB(A) | 85 | 85 | 84 | 85 |
| Power cord: type | H05VV-F2x1,0 | H05VV-F3G1,5 | H05VV-F 2x1,0 | H05VV-F 3G1,5 | |
| Power cord: length | m | 8 | 8 | 12 | 8 |
en
| Tank volume l | Dimensions cm (l x w x h) | Weight kg | |
| NSG 1420 20 41,7 x 39 x 55 8,9 | |||
| NSG 1432 32 41,7 x 39 x 64 9,3 | |||
| NSG 1445 45 48,3 x 48,3 x 79 12,4 | |||
| NSG LD-1422 22 46,1 x 43 x 57 10,3 | |||
| NSG LD-1420 20 42,5 x 39 x 55 9,2 | |||
| NSG LD-1432 32 42,5 x 39 x 64 9,5 | |||
| NSG LD-1435 35 46,1 x 43 x 70,3 11,0 | |||
| NSG LD-1445 45 48,3 x 48, x 79 12,8 | |||
| NSG ADL-1420 20 42,5 x 39 x 55 8,9 | |||
| NSG ADL-1432 32 42,5 x 39 x 64 9,3 | |||
| NSG ADL-1445 45 48,3 x 48,3 x 79 12,6 | |||
| NSG ARDL-1420 20 42,5 x 39 x 55 9,8 | |||
| NSG ARDL-1432 32 42,5 x 39 x 64 10,2 | |||
| NSG ARDL-1435 35 46,1 x 43 x 70,3 11,8 | |||
| NSG ARDL-1445 45 48,3 x 48,3 x 79 13,3 | |||
| NSG ARDL-1455 KFG 55 53 x 51 x 99 20,0 |
IP24 C€
9 Declaration of conformity
Declaration of conformity
| We hereby declare that the machine described below complies with the relevant basic safety and health requirements of the EC Directives, both in its basic design and construction as well as in the version put into circulation by us. This declaration shall cease to be valid if the machine is modified without our prior approval. | |
| Product: Vacuum cleaner for wet and dry operation | |
| Type: NSG | |
| The design of the appliance corresponds to the following pertinent regulations: | EC Machinery Directive 2006/42/EUEMC Directive 2014/30/EURoHS 2011/65/EU |
| DIN EN 60335-1(VDE 0700-1):2012-10; EN 60335-1:2012DIN EN 60335-1 Ber.1 (VDE 0700-1 Ber.1):2014-04;EN 60335-1:2012/AC:2014; EN 60335-1:2012/A11:2014DIN EN 60335-1/A13 (VDE 0700-1/A13):2018-07EN 60335-1:2012/A13:2017DIN EN 60335-2-69 (VDE 0700-69):2015-07; EN 60335-2-69:2012DIN EN 62233 (VDE 0700-336)2008-11; EN 62233:2008DIN EN 62233 Ber.1 (VDE 0700-366 Ber.1):2009-04; EN 62233 Ber.1:2008 | |
| DIN EN 55014-1 (VDE 0875-14-1):2022-12; EN IEC 55014-1:2021DIN EN 55014-2 (VDE 0875-14-2):2022-10; EN IEC 55014-2:2021Anforderungen der Kategorie I & II / Requirements of category I & IIDIN EN IEC 61000-3-2 (VDE 0838-2):2019-12;EN IEC 61000-3-2:2019; EN IEC 61000-3-2:2019/A1:2021DIN EN 61000-3-3 (VDE 0838-3):2023-02;EN 61000-3-3:2013+A1+A2+A2/AC:2022 | |
| EN IEC 63000:2018 | |
| Authorized documentation representative: | ELECTROSTAR GmbH, Hans-Zinser-Straße 1-3, 73061 Ebersbach/Fils, Germany |
| 20.08.2023 | Carsten GresserHead of Quality Assurance |
Symbole Mention Description
Head of Quality Assurance
Unngå farer under driften
text_image
Technical diagram of a mechanical device with numbered components, including wheels, stators, and a cylindrical housing.