
ISC Batrix M 36-18V - Vacuum Cleaner Starmix - Free user manual and instructions
Find the device manual for free ISC Batrix M 36-18V Starmix in PDF.

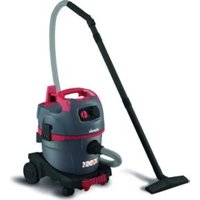
| Product type | Industrial vacuum cleaner for liquids or dry substances |
| Brand | Starmix |
| Model | ISC Batrix M 36-18V (ISC CLDC) |
| Dust class | M (OEL ≥ 0.1 mg/m³) |
| Nominal voltage | 36 V (CAS 18 V or 36 V batteries) |
| Nominal power / max. | 850 W / 900 W |
| Air flow (at fan) | 66 l/s (238 m³/h) |
| Air flow (at hose) | 38 l/s (137 m³/h) |
| Vacuum (at fan / at hose) | 240 hPa / 213 hPa |
| Sound level (LpA / Lwa) | 72 dB(A) / 86 dB(A) |
| Weight | 12.6 kg |
| Dimensions (L x W x H) | 46 x 40 x 57 cm |
| Tank volume | 25 L |
| Power supply | CAS lithium-ion batteries (2 × 18 V or 1 × 36 V) |
| Operating modes | ON (continuous), AUTO (standby with Cordless Control), 3 speeds |
| Filter cleaning | Automatic (AUTO), manual (MAN), or deactivated (OFF) |
| Fill level indicator | LED indicator (and acoustic signal for class M) |
| Suction types | Dry and wet |
| Safety | Automatic shut-off when tank full, battery overheat protection, minimum flow signal |
| Maintenance | Regular filter cleaning, emptying tank, cleaning battery contacts |
| Spare parts (examples) | Filter cartridges (FKP 4300, HEPA, NANO, Advanced), filter bags (FBV 25/35, FBPE 25/35), hose Ø35 mm 4 m, Li-HD 18V 10.0 Ah battery, ASC 145 charger |
| Repairability | Repairs by specialized personnel, original parts |
| Ambient conditions | Temperature 0-40°C, humidity 5-95%, indoor/outdoor |
| Disposal | Do not dispose with household waste; batteries at collection center |
Frequently Asked Questions - ISC Batrix M 36-18V Starmix
User questions about ISC Batrix M 36-18V Starmix
0 question about this device. Answer the ones you know or ask your own.
Ask a new question about this device
Download the instructions for your Vacuum Cleaner in PDF format for free! Find your manual ISC Batrix M 36-18V - Starmix and take your electronic device back in hand. On this page are published all the documents necessary for the use of your device. ISC Batrix M 36-18V by Starmix.
USER MANUAL ISC Batrix M 36-18V Starmix
natural_image
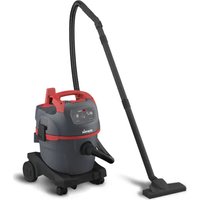
Exterior view of a black Batrex industrial vacuum cleaner with red hose and control panel (no visible text or symbols on device body)Bedienungsanleitung (original)
Operating instructions
natural_image
Technical line drawing of a mechanical device with no visible text or symbolsnatural_image
Technical line drawing of a mechanical assembly with no visible text or symbolsnatural_image
Technical line drawing of a mechanical assembly with internal components and a labeled component (no text or symbols present)natural_image
Technical line drawing of a vehicle interior showing internal compartments and structural elements (no text or labels)natural_image
Mechanical assembly diagram showing a component with a warning symbol and magnified detail view (no text or labels)natural_image
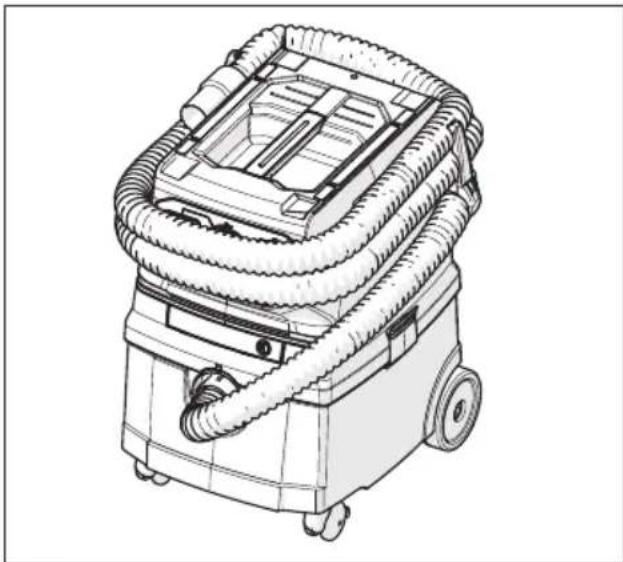
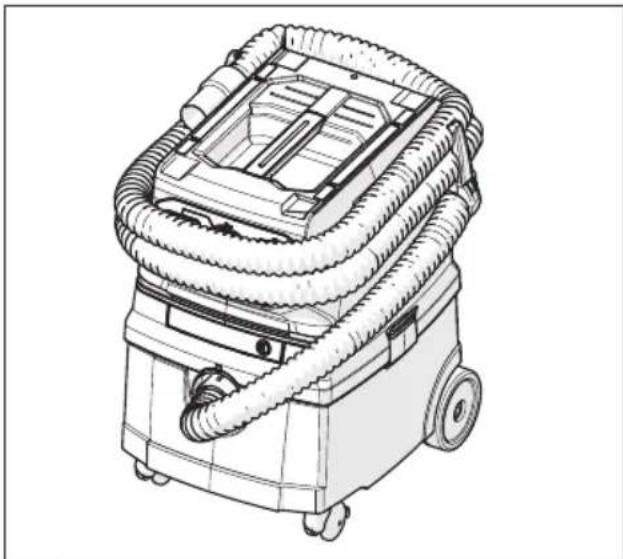
Line drawing of a vacuum cleaner with coiled tubing and control panel (no text or symbols)natural_image
Line drawing of a vacuum cleaner with coiled tubing and wheels (no text or symbols)natural_image
Technical illustration of a mechanical device with internal components and directional arrows indicating assembly or operation (no text or symbols present)Head of Quality Assurance
English
Read the operating instructions carefully before using the vacuum cleaner. The operating instructions provide important information on safety, commissioning, operation, maintenance and care. Keep the operating instructions in a safe place and pass them on to the next owner if you sell it.
The manufacturer reserves the right to make design and specification changes.
1 Symbols and signs used
| Symbol / Signal word | Description |
| This is the warning symbol. It alerts to the potential risk of injuries. Observe all instructions with this symbol to avoid injuries or even death. The warning symbol is always accompanied by the signal words DANGER, WARNING and CAUTION. | |
| DANGER! | Indicates a high risk hazard which will result in death or serious injuries unless averted. |
| WARNING! | Indicates a moderate risk hazard which may result in death or serious injuries unless averted. |
| CAUTION! | Indicates a low risk hazard which may result in mild or moderate injuries unless averted. |
| NOTE Indicates | advice or instructions which facilitate work and ensure safe operation. |
| Indicates a requirement which must be met before carrying out an action. | |
| Indicates actions which must be carried out by the user in succession. | |
| Indicates the result of an action. |
2 Safety
2.1 Important safety instructions
WARNING!
Explosion and fire hazard
Vacuuming flammable substances or overheated components may cause the machine to catch fire. Risk of burns or injury from flying parts.
- Do not operate the vacuum cleaner in potentially explosive environments.
- Keep the vacuum cleaner away from flammable gases and substances.
▶ Do not operate the vacuum cleaner in an aerosol environment.
The following materials must not be vacuumed: - flammable or explosive solvents
• substances impregnated with solvent - explosive dusts
• liquids such as petrol, oil, alcohol, thinner
• materials and shavings hotter than 60 °C
▶ Switch off the vacuum cleaner immediately if the motor is blocked.
▶ Remove battery/batteries when the device is unattended
WARNING!
Danger from burning battery
Overheating of the battery and short circuits can lead to the battery catching fire and exploding.
▶ Protect the battery pack from heat, e.g. also from constant exposure to sunlight and fire.
When a battery is not in use, keep it away from other metal objects such as paper clips, coins, keys, nails, screws or other small metal objects. These could establish a conductive connection between the contacts.
- Do not transport battery packs in carrying bags with mixed contents.
▶ NEVER POUR WATER ON A BURNING LI-ION BATTERY! Always use a fire extinguisher (fire class D).
▶ Do not inhale fumes from a burning battery. Seek medical attention if neccesary.
Do not charge the battery at ambient temperatures below 5 °C or above 45 °C The longest life and best performance of the battery pack is achieved when it is charged at an air temperature of about 20 °C.
▶ If the battery block becomes too hot while charging, disconnect the mains plug and switch off the device immediately.
▶ Do not short-circuit the battery contacts.
▶ Clean the batteries and battery compartment regularly.
▶ Replace defective batteries.
▶ Do not open the batteries.
WARNING!
Health hazard due to hazardous dusts
Inhalation of hazardous dusts can lead to serious lung diseases.
▶ Do not vacuum dust containing asbestos.
▶ Wear suitable respiratory protection when vacuuming dust of dust class M.
▶ Switch off the vacuum cleaner and remove the batteries before every service.
▶ Wear suitable personal protective equipment.
▶ Clean the vacuum cleaner before dismantling.
▶ Disassembly must be carried out before carrying out locally filtered forced ventilation.
▶ Clean the maintenance area after the work.
- Do not operate class M vacuum cleaners if the horn and LED are defective.
WARNING!
Risk of electric shock!
The voltage in the type plate must match the battery voltage.
▶ Switch off the vacuum cleaner after each use and before any maintenance.
▶ Never open the vacuum cleaner outdoors in rain or storms.
- Store the vacuum cleaner indoors in a dry place and protected from frost.
▶ Only use original batteries.
▶ Remove battery/batteries when not in use.
- Remove the battery/batteries before servicing or opening the vacuum cleaner.
▶ Switch off the vacuum cleaner before changing the battery.
▶ Do not touch the battery with wet hands.
If foam or liquid is leaking out, switch off the vacuum cleaner immediately. Empty the container and pleated filter cassette.
▶ Always keep the inside of the cover dry.
▶ Always keep the battery compartment closed when the batteries are inserted.
▶ Do not touch the contacts in the battery compartment with hands or other objects.
▶ Do not place any objects in the battery compartment.
▶ Before use, check that the battery/batteries is/are securely in place.
▶ Clean the battery contacts regularly.
▶ Only use the original electrically conductive hose intended for the cordless vacuum cleaner.
▶ Ensure charge balance.
WARNING!
Risk of injury due to defective batteries
▶ If the battery is leaking, do not touch the leaking material.
WARNING!
Danger due to improper maintenance, repair and cleaning
Equipment that is not properly maintained and repaired poses a danger to the user.
▶ Repairs should only be carried out by qualified personnel, e.g. customer service.
▶ Only use original spare parts.
▶ Always use the accessories included with the vacuum cleaner or specified in the operating instructions.
When using in food processing facilities: Clean and disinfect the vacuum cleaner immediately after use to prevent contamination.
▶ Do not use flammable cleaning agents.
▶ Do not clean with steam jet equipment or high-pressure cleaners.
▶ Do not clean the filter cassettes with compressed air.
▶ Do not clean vacuum cleaner parts with acid, acetone or solvents. You may damage the material.
▶ Check the function of the horn and LED regularly.
WARNING!
Danger due to human error
The vacuum cleaner must not be used by persons (including children) with reduced physical, sensory or mental capacity or those lacking experience and knowledge.
▶ Children must be supervised to ensure that they do not play with the device.
▶ Do not point the nozzle, hose or tube at people or animals.
WARNING!
Risk of explosion during underground work
Vacuuming flammable gases when drilling a methane bubble can cause the device to ignite. Explosion hazard.
The vacuum cleaner must not be operated in potentially explosive environments.
WARNING!
Risk of injury due to improper handling
▶ Do not leave the vacuum cleaner unattended.
▶ Never stand or sit on the vacuum cleaner.
▶ Only place the vacuum cleaner on horizontal surfaces.
Risk of falling when working on stairs. Ensure secure footing.
▶ Do not pull, kink or pinch the suction hose over sharp edges.
▶ Always lay the suction hose so that nobody can trip over it.
▶ Place no more than one tool box on the vacuum cleaner.
▶ Remove the toolbox before opening the lid.
▶ Do not lift the vacuum cleaner by the toolbox.
▶ Do not use the vacuum cleaner or its accessories in the following cases:
• The batteries are defective
• Vacuum cleaner is visibly damaged, e.g. cracks in the housing, damage from sharp edges.
- If hidden defects are suspected, e.g. after falling
WARNING!
Danger due to lightning strike
▶ Do not use the vacuum cleaner outdoors during thunderstorms.
CAUTION!
Noise hazard
Risk of injury due to fatigue, stress or difficult communication.
▶ Wear hearing protection while working.
CAUTION!
Danger of damage to posture
▶ Ensure good posture when vacuuming and changing batteries.
CAUTION!
Possible risk of injury from working with a defective device
▶ Switch the vacuum cleaner off immediately if you detect a defect.
▶ If the vacuum cleaner cannot be switched off, remove the batteries from the machine.
▶ Do not operate a defective device.
CAUTION!
Danger due to ejected objects
Injury due to collision or impact
▶ Refer to chapter 5 (Operation) to find out which filters or filter cassettes you need for which purpose.
▶ Insert the filters or filter cassettes only as described in Chapter 5 (Operation).
CAUTION!
Suffocation hazard
▶ Do not let children play with packaging material, e.g. plastic bags.
▶ Do not let children play with small parts.
2.2 Dust classes
Dust removing machines are tested according to DIN EN 60335-2-69 and divided into dust classes.
Vacuum cleaners of dust class L are suitable for vacuuming dry, non-flammable, hazardous dusts with a maximum allowable concentration (MAC) of > 1 mg/m ^3 .
Vacuum cleaners of class M are suitable for vacuuming dry, non-flammable dusts, non-flammable liquids, wood dust and hazardous dusts with a MAC of ≥ 0.1 mg/m ^3 .
Vacuum cleaners of class H are suitable for vacuuming dry, non-flammable dusts, carcinogenic and pathogenic particles as well as non-flammable liquids, wood dusts and hazardous dusts with all concentration levels.
2.3 Intended use
The ISC CLDC vacuum cleaner is suitable for vacuuming dust, dirt and water.
This machine is intended for commercial use, for example for use in hotels, schools, hospitals, factories, shops, offices and rental properties.
DO NOT VACUUM the following materials:
- flammable or explosive solvents, including liquids such as petrol, oil, alcohol, thinners
- substances impregnated with solvent
- explosive dusts
- materials (shavings) hotter than 60 °C
- dust which contains asbestos
- Proper use also includes:
- Read and understand safety instructions
- Observe operating and maintenance instructions
- Observe inspection and maintenance conditions
2.4 Reasonably foreseeable use (misuse)
Any application other than those described above is not permitted. This includes in particular:
- Vacuuming the materials excluded in chapter 3.6
- Using it as a ladder or step
- Carrying the vacuum cleaner by the tool box
- Non-compliance with the operating instructions
- Manipulation or removal of protective devices
- Use, modification, maintenance and servicing of the device by insufficiently trained and instructed personnel
- Use by unsuitable persons (under 18 years of age, persons under the influence of drugs)
- Insufficient or improper maintenance and servicing
- Making unauthorised changes
- Use of unsuitable spare and wear parts
The consequences of these reasonably foreseeable applications may include:
- Fire or explosion of the vacuum cleaner, including fire in the battery, with consequent risk to the operator due to burns or flying parts, inhalation of potentially toxic substances
- When vacuuming asbestos, danger to the operator or other persons in the vicinity through inhalation of harmful substances.
- Danger of falling when climbing on the cordless vacuum cleaner
2.5 Ambient conditions
Temperature range 0 °C to 40 °C
Humidity range 5% to 95%
Explosion protected area not allowed
Use inside and outside closed spaces, even in rain and wet weather
3 Display and control elements
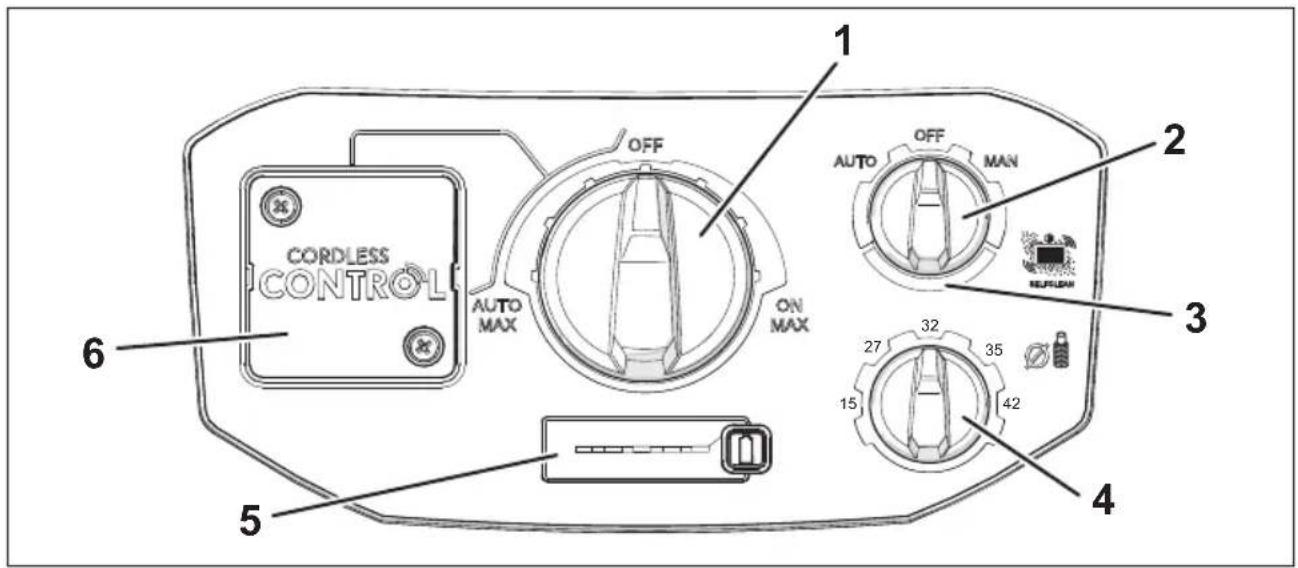
Select the following functions and settings:
| Line Name | Switch position Description | ||
| 1 | Control dialOperation mode / speed | OFF - Vacuum cleaner is | switched off |
| ON | - Vacuum cleaner starts up immediately- Speed selection in 3 steps | ||
| AUTO | - Standby operation *- Speed selection in 3 steps | ||
| 2 | Rotating switchCleaning mode | OFF - No filter cleaning | |
| AUTO | - Filter cleaning takes place automatically in the next work break when the set minimum volume flow is reached. | ||
| MAN | - Filter is cleaned immediately- Switch returns to OFF | ||
| 3 Fill indicator | - Lights up whenContainer fullSuction hose cloggedFor class M vacuum cleaners, an additional acoustic signal sounds in AUTO mode | ||
| 4 | Rotating switch hose diameter * | 15 - 27 - 32 - 35 - 42 | - On class M vacuum cleaners for volume flow monitoring, to trigger the warning signal if the air speed falls below the minimum of 20 m/s |
| 5 | PanelBattery capacity | - LED display Battery capacity- Button Battery capacityActivating the vacuum cleaner from sleep mode *If the vacuum cleaner is switched off: Activate the battery capacity LED indicator for a few seconds | |
| 6 | Dongle bracketCordless control * | - More detailed information in the manufacturer's documentation. | |
4 Initial Use
- Verify the contents are complete and check for transport damage when unpacking the device.
▶ Ensure the following requirements are met:
- The vacuum cleaner, power cord, suction hose and accessories are undamaged.
- All fi Iters are installed and undamaged.
NOTE
Acclimatise the vacuum cleaner before operation to prevent condensation
5 Operation
5.1 Preparing the vacuum cleaner for operation
5.1.1 Inserting the battery/batteries
⚠ WARNING!
Risk of electric shock!
The contacts of the unused battery compartments are under electrical voltage.
▶ Always keep the battery compartment closed.
- Do not place or transport any objects in the battery compartment.
▶ Observe the safety instructions in chapter 2.
NOTE
Keep batteries dry.
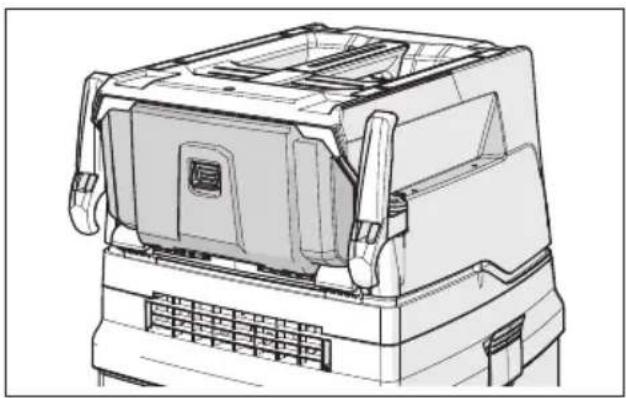
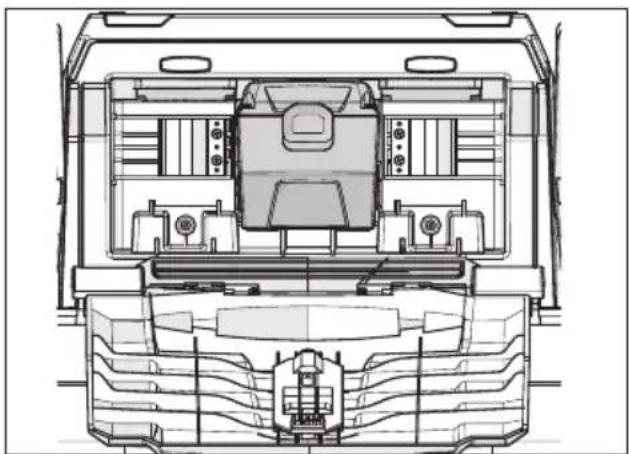
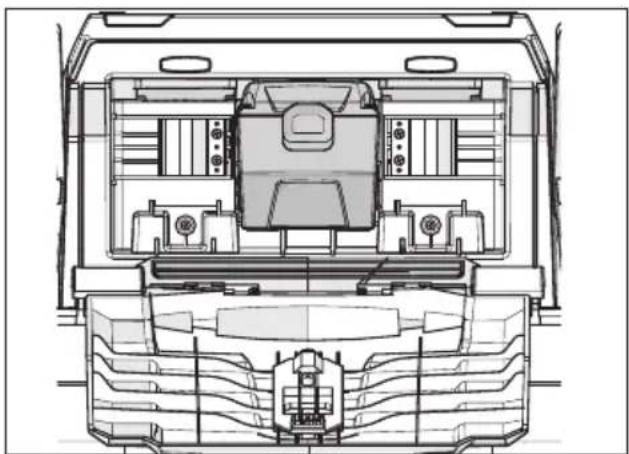
Insert the battery/batteries in the battery compartment (see Fig. 9). A compartment lid with a locking mechanism protects the batteries from splash water.
natural_image
Technical line drawing of a mechanical device with no visible text or symbolsFig. 9: Batterycompartment
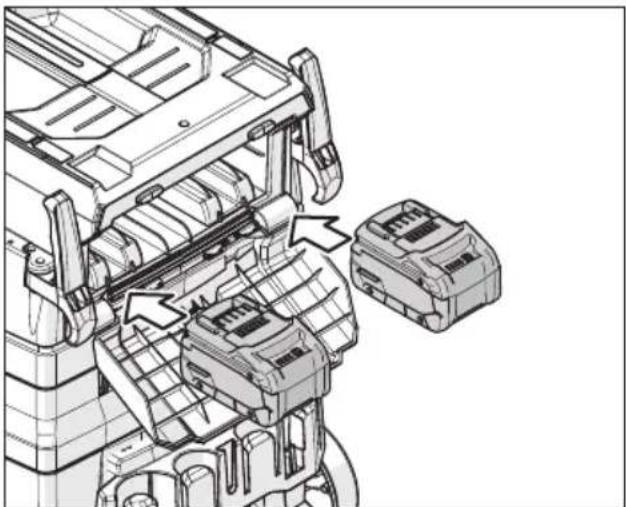
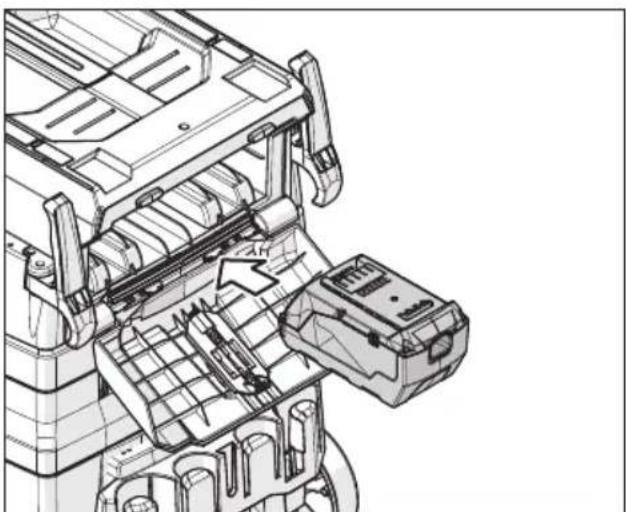
The vacuum cleaner can be operated with the following battery types of the CAS group:
- 2 x 18 V batteries
- 1 x 36 V battery
For more information on battery types, refer to chapter 10.
- Push the battery/batteries into the corresponding slots until the lock engages.
NOTE
▶ Pay attention to guide slots when inserting the batteries.
▶ Proceed with caution.
natural_image
Technical line drawing of a mechanical assembly with no visible text or symbolsFig. 10: Battery compartment with two 18 V batteries
natural_image
Technical line drawing of a mechanical assembly with internal components and a labeled component (no text or symbols present)Fig. 11: Battery compartment with a 36 V battery

natural_image
Technical line drawing of a vehicle interior showing internal compartments and structural elements (no text or labels)Fig. 12: Battery compartment with a 36 V battery inserted
5.1.2 Attaching the hose
WARNING!
Risk of electric shock
Risk of fi re
If a non-electrically conductive hose is used, this can lead to an electric shock and damage to the electronics in the vacuum cleaner. This could cause a fire.
▶ Only use the original electrically conductive hose intended for the cordless vacuum cleaner.
▶ Put the suitable hose onto the connection sleeve.
▶ Ensure a secure connection.
5.1.3 Attach the cordless control \*
To operate in the >AUTO< mode, the cordless control must be installed.
You can find more detailed information in the manufacturer's documentation.
5.1.4 Inserting the disposal bag
NOTE
Vacuuming without a disposal bag is only permitted for dusts with a concentrations of > 1 mg/m ^3 .
NOTE
Only class M vacuum cleaners with a special container and rotating slider in the suction opening are suitable for the use of PE emptying and disposal bags.
If necessary, remove the existing fi Iter bag or empty the container (see Kap. 5.5 „Removing the vacuumed material“ on page 31).
▶ Select a suitable fi Iter bag for your application.
To insert the bags, proceed as described in one of the following sections:
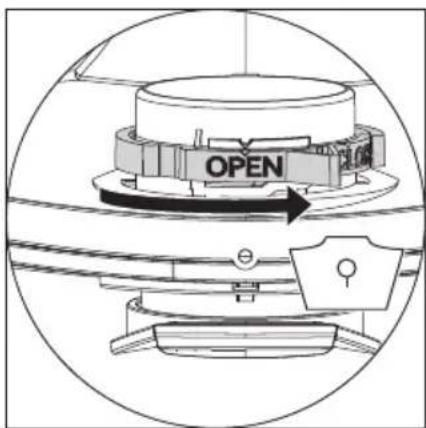
Inserting a non-woven fi Iter bag\*
NOTE
Use the non-woven filter bag only for dry vacuuming.
▶ Push the fl ange completely over the suction port.
▶ Turn the red rotating slider inside to CLOSE until it stops at the ▲ mark.
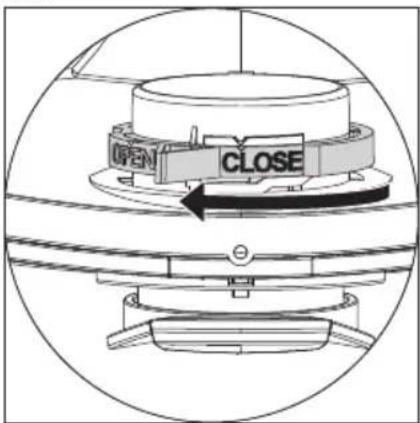
Inserting PE emptying and disposal bags\*
NOTE
Only class M and H vacuum cleaners with a special container and rotating slider in the suction opening are suitable for the use of PE emptying and disposal bags.
▶ Turn the red rotating slider inside to OPEN until it stops at the ▲ mark.
▶ Push the fl ange completely over the suction port.
Place the upper bag opening over the edge of the container.
5.2 Configuring settings
5.2.1 Set filter cleaning mode\*
The vacuum cleaner is equipped with an electromagnetic filter cleaning system that shakes off any dust clinging to the pleated filter cassettes.
Filter cleaning takes place automatically in the next work break when the set minimum volume flow is reached (switch position >AUTO<).
- Set the desired mode on the filter cleaning rotating switch (see chKap. 3 „Display and control elements“ on page 27).
Information on manual cleaning can be found in chapter 5.4.3.
5.2.2 Set hose diameter \*
CAUTION!
Preselector switch for minimum volume flow signal (horn and light for dust class "M" vacuum cleaners)
If the incorrect hose diameter is set, the warning function will not work as intended when the suction power decreases.
▶ Set the hose diameter correctly.
- For class M vacuum cleaners, set the hose diameter with the switch:
| Preselector switch forinner hose diameter | Flow rate |
| ∅ 42 mm | 100 m^3/h |
| ∅ 35 mm | 73 m^3/h |
| ∅ 32 mm | 58 m^3/h |
| ∅ 27 mm | 41 m^3/h |
| ∅ 15 mm | 13 m^3/h |
5.3 Switching on the vacuum cleaner
The vacuum cleaner is switched on using the control dial for operating mode / speed.
Two operating modes are available in which the suction power can be regulated in 3 stages:
▶ Set the control dial to the desired speed level in the >ON<range.
The vacuum cleaner starts up immediately.
or:
- Set the control dial to the desired speed level in the >AUTO< range.
The vacuum cleaner is in standby mode for power tools (only in conjunction with cordless control*)
5.4 Vacuuming
WARNING!
Risk of fire! Explosion hazard! Risk of electric shock!
▶ Observe the safety instructions in chapter 2.
5.4.1 Dry vacuuming
▶ Only vacuum with a dry filter, vacuum cleaner and accessories to prevent dust from sticking and becoming encrusted.
For vacuuming soot, cement, plaster or similar dust: Insert the PE emptying bag into the dust container.
▶ Always use filter bags in conjunction with pleated filter cassettes.
NOTE
Class M vacuum cleaners should preferably be used as dry vacuum cleaners.
5.4.2 Wet vacuuming
⚠ WARNING!
Risk of electric shock!
▶ If foam or liquid is leaking out, switch off the vacuum cleaner immediately. Empty the container and pleated filter cassette.
NOTE
Clean the water level sensors (1) and check for signs of damage regularly.
▶ Vacuum without a non-woven filter bag.
The pleated filter cassettes are suitable for wet vacuuming.
The built-in sensor switches the motor off when the container is full. The handling of the vacuum cleaner can be impaired by a full container.
▶ Empty the container (see chKap. 5.5 „Removing the vacuumed material“ on page 31).
NOTE
If the vacuum cleaner is not switched off, the restart protection remains effective. The vacuum cleaner is only ready for operation again after it has been switched off and back on again.
Before emptying, first remove the suction hose from the liquid.
▶ Due to the high suction power and streamlined container shape, some water may run back out of the hose after switching off.
▶ Use dry filters for subsequent dry vacuuming.
NOTE
If frequent changes between dry and wet vacuuming are required, we recommend the use of a second filter set, preferably polyester pleated filter cassettes.
5.4.3 Cleaning the pleated fi Iter (cleaning mode >OFF<)
△ The fill level indicator lights up
▶ Turn the cleaning mode rotating switch to the right to the >MAN<position.
The filter cleaning is performed immediately.
The rotating switch springs back to >OFF<.
5.5 Removing the vacuumed material
△ The fi ll indicator lights up although the fi lter has been cleaned recently.
If the fi ll indicator lights up although the fi lter has been cleaned, the container or disposal bag is full and must be emptied or disposed of.
▶ Proceed as described in one of the following chapters:
5.5.1 Emptying the container
▶ Switch off the vacuum cleaner.
▶ Open the closures.
Remove the lid and suction hose from the container.
▶ Tip out the container.
5.5.2 Disposing of the non-woven fi lter bag
▶ Switch off the vacuum cleaner.
▶ Wear a suitable breathing mask.
Remove the suction hose.
Seal the suction port with a cap*.
▶ Open the closures on the sides.
Remove the top.
Carefully pull the fl ange off the suction port and close the fl ange.
- Dispose of the vacuumed material in accordance with the legal regulations.
5.5.3 Disposing of PE emptying and disposal bags\*
▶ Move the switch to the >MAN< position.
Pleated filter cassettes are cleaned automatically.
→ Any residual dust in the filters falls into the bag.
▶ Switch off the vacuum cleaner.
▶ Wear a suitable breathing mask.
▶ Remove the suction hose.
Seal the suction port with a cap*.
▶ Open the closures on the sides.
Remove the top.
Carefully close the PE emptying and disposal bag with the enclosed sealing tape.
▶ Carefully pull the fl ange off the suction port and close it.
- Carefully remove the PE emptying and disposal bag from the container.
- Dispose of the vacuumed material in accordance with the legal regulations.
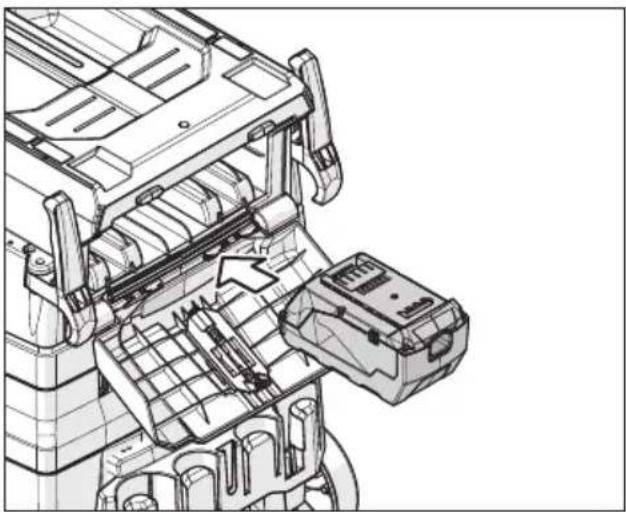
5.6 Changing the pleated fi Iter
▶ Clean the pleated fi Iter cassettes before changing the fi Iter.
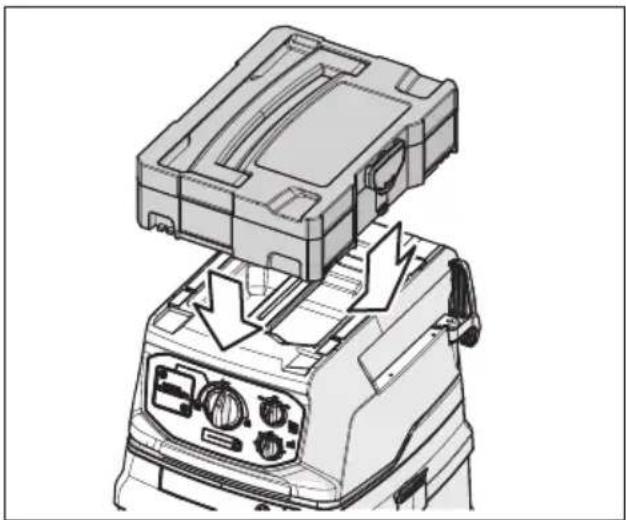
▶ If necessary, remove the tool box from the vacuum cleaner.
Using a coin or similar object, turn the lock counter-clockwise by 90° and push it back (see general overview on page 3).
▶ Lift up the cover and fix it in place with the locking clip.
Immediately close the removed pleated filter cassettes in a dustproof plastic bag and dispose of them in accordance with the regulations.
▶ Insert the new pleated filter cassettes.
▶ Lift the locking bar. Lower the cover and lock it by pressing lightly.

natural_image
Mechanical assembly diagram showing a component with a warning symbol and magnified detail view (no text or labels)Fig. 13: Locking bar
CAUTION!
Danger due to falling cover
If the cover drops down under its own weight, there is a risk fi ngers getting crushed or caught.
▶ Proceed with caution.
5.7 Sleep mode\*
Sleep mode is automatically activated if the vacuum cleaner has not been used for 5 hours in >AUTO< mode. This avoids power consumption thanks to the cordless control.
Sleep mode can be disabled in two ways:
▶ Press the battery capacity button.
▶ Set the operating mode / speed control dial to >OFF<.
5.8 Switching off the vacuum cleaner
- Set the operating mode/speed control dial to the >OFF< position.
→ The vacuum cleaner is switched off.
Remove the battery/batteries when the device is switched off. - Fix the suction hose to the rear wall of the container by inserting it into the accessories depot*.
Remove the power tool.
6 Transit
▶ Remove the suction hose.
▶ Seal the suction port with a cap.
▶ Place the top part on the container.
▶ Close the closures on the sides.
▶ Remove the battery/batteries
- Place accessories in suitable plastic bags and seal the plastic bags.
▶ Plug the hose ends together so that no dirt particles escape.
- Wrap the hose around the vacuum cleaner and clamp it to the handle.
natural_image
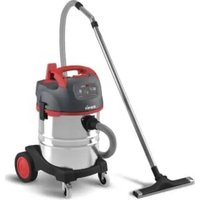
Line drawing of a vacuum cleaner with coiled tubing and control panel (no text or symbols)Fig. 14: Winding up the suction hose, step 1
natural_image
Line drawing of a vacuum cleaner with coiled tubing and control panel (no text or symbols)Fig. 15: Winding up the suction hose, step 2
natural_image
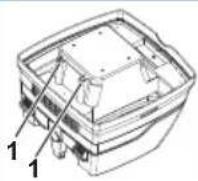
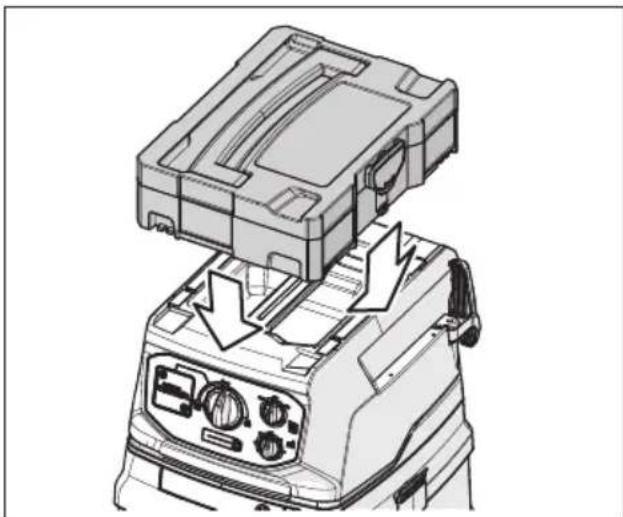
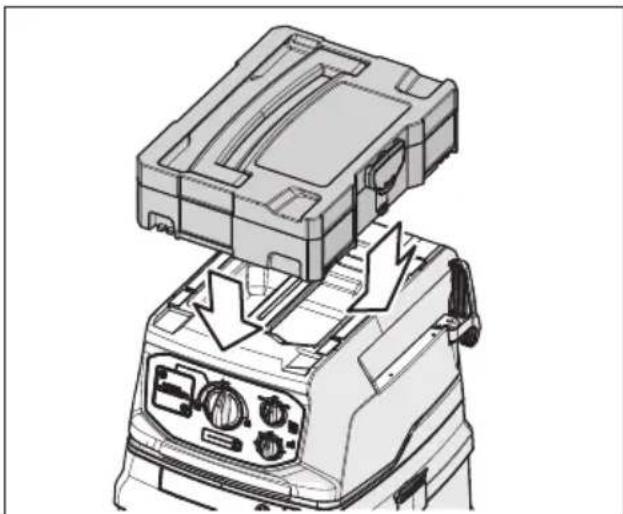
Technical illustration of a mechanical device with a lid and control panel, showing internal components and directional arrows (no text or symbols)Fig. 16: Tool box
⚠️ CAUTION!
Risk of tipping during transport
▶ Transport no more than one tool box on the vacuum cleaner.
NOTE
If the vacuum cleaner is subjected to impact, the batteries may be damaged.
▶ If possible, remove batteries before transport.
▶ After transport with batteries inserted: check the batteries for damage (e.g. broken plastic parts).
7 Maintenance
WARNING!
Danger due to dust
▶ Switch off the vacuum cleaner and remove the batteries before every service.
▶ Wear suitable personal protective equipment.
▶ Clean the vacuum cleaner before dismantling.
▶ Disassembly must be carried out before carrying out locally filtered forced ventilation.
▶ Clean the maintenance area after the work.
7.1 Precautions for class M vacuum cleaners
The exterior of the vacuum cleaner should be cleaned by vacuuming and wiped clean or treated with sealants before removing it from the hazardous area. All vacuum cleaner parts must be considered contaminated when they are removed from the hazardous area and appropriate precautions must be taken to prevent dust dispersion.
Contaminated objects
When carrying out service or repairs, any contaminated objects which cannot be cleaned satisfactorily must be disposed of. These objects must be disposed of in impermeable bags in compliance with applicable waste disposal regulations.
7.2 Changing the motor protection filter
If the motor protection filter is dirty, this indicates defective filter cassettes.
▶ Replace the pleated filter cassettes.
- Replace the motor protection filter or wash the motor protection filter under running water, dry it and reinsert it.
7.3 Testing the effectiveness of the vacuum cleaner
At least once a year, the manufacturer or a trained person should carry out an inspection of the dust technology to check for damage to the filter, the seal of the vacuum cleaner and the function of the inspection device, among other things.
There must be a sufficient air exchange rate L in the room when the exhaust air returns to the room. Observe national regulations.
If the suction power of the vacuum cleaner decreases and even cleaning the pleated filter cassettes no longer increases the suction power (provided that the container is empty and the non-woven filter bag has been replaced), the pleated filter cassettes must be replaced (see chKap. 5.6 „Changing the pleated filter“ on page 31).
8 Cleaning
WARNING!
Danger due to improper cleaning
Equipment that is not properly maintained poses a danger to the user.
- When using in food processing facilities: Clean and disinfect the vacuum cleaner immediately after use to prevent contamination.
▶ Do not use flammable cleaning agents. - Do not clean with steam jet equipment or high-pressure cleaners.
▶ Do not clean the filter cassettes with compressed air.
NOTE
Acid, acetone and solvents can damage vacuum cleaner parts.
▶ Clean containers and accessories with water.
▶ Wipe the top with a damp cloth.
▶ Allow the containers and accessories to dry.
▶ Clean the battery contacts regularly.
9 Troubleshooting and repairs
WARNING!
Improperly repaired vacuum cleaners pose a danger to the user!
▶ Repairs should only be carried out by qualified personnel, e.g. customer service.
▶ Only use original spare parts.
NOTE
Malfunctions are not always due to defects of the vacuum cleaner.
| Fault Possible cause Solution | ||
| Decrease in suction power Filter dirty Clean | ||
| Filter bag full Replace | ||
| Container full Empty | ||
| Motor protection filter clogged Clean | ||
| Nozzle, tubes or hose clogged Clean | ||
| Vacuum not starting Cover not properly closed | Closed Close | |
| Water sensor switched off Empty container | ||
| Vacuum cleaner in standby mode >AUTO< | Set the operating mode / speed control dial to >ON< (see chKap. 3 „Display and control elements“ on page 27) | |
| Battery defective Replace | ||
| Battery not inserted correctly | Insert correctly | |
| Battery empty | Replace / charge | |
| Contacts defective or corroded | Contact a specialist workshop | |
| The vacuum cleaner does not start when the tool is switched on in >AUTO< mode. | Pairing of the cordless control failed | See the manufacturer's instructions for cordless control. |
| Cordless control defective | ||
| PE emptying and disposal bag is sucked onto the filters | Position of rotating slider incorrect | Set the rotating slider to ▲ OPEN (see Kap. „Inserting PE emptying and disposal bags*“ on page 29) |
| Class M vacuum cleaner: dust in the container with non-woven filter installed | Position of rotating slider incorrect | Set the rotating slider to ▲ CLOSE (seeKap. „Inserting a non-woven filter bag*“ on page 29) |
| Static discharges via operator | Electrostatic discharge not guaranteed | Use electrically conductive suction hose or replace defective EL hose |
| Fill indicator lights | Filter full | Filter cleaning |
| Container full Empty container | ||
| Hose clogged | Remove vacuumed material from hose | |
| All capacity and signal display LEDs flash | Battery error | Remove and reinsert the battery packs |
| Only one 18V battery pack inserted | Insert the second 18V battery | |
| One capacity or signal display LED flashes | Battery/batteries empty | Charge the battery/batteries |
| Fast beeping (1/10 s on, 1 s off) | Battery pack will be empty in approx. 20 s | Charge the battery/batteries |
| Continuous beep | Advance warning shortly before switching off | Charge the battery/batteries |
| 3 s continuous beep | Water level in container full | Empty container |
Do not proceed to make any further interventions – contact the central customer service workshop.
10 Original parts
NOTE
Only use original accessories.
NOTE
Only charge batteries with the appropriate charger.
| Article description Special features/material Order No. | ||
| Pleated filter cassette FKP 4300 | Polyester material, IFA class M approved (Ti15) | 416069 |
| Pleated filter cassette FKP 4300 HEPA | Polyester, fibre glass and cellulose material, IFA class H approved (Ti26) | 419190 |
| Pleated filter cassette FKPN 3000 NANO | Polyester material with nanofibre overlay, IFA class M approved (Ti201) | 425740 |
| Pleated filter cassette FKP 4800 M Advanced | 1-layer, Polyester material (Ti15), class M approved Filter surface area 4800 cm2, | 459257 |
| Filter bag 25 l: | ||
| Non-woven filter bag FBV 25/35 (5-pack) | for 25 l and 35 l plastic containers, IFA class M approved (VIT610/TMO908) | 411231 |
| PE emptying and disposal bags FBPE 25/35 (5-pack M,H) | for L/M/H vacuum cleaners with 25 and 35 l containers, polyethylene | 425764 |
| PE emptying and disposal bags FBVPE 25/35 (5-pack M,H) | Safety fi Iter bag for M/H vacuum cleaners with 25 and 35 l containers, polyethylene exterior with inner non-woven fi Iter bag | 445267 |
| Suction hose: | ||
| Suction hose diameter 35 mm, length: 4 m Electrically conductive 455563 | ||
| Rechargeable battery and charger: | ||
| Battery pack Li-HD 18V 10.0 Ah Battery pack Li-HD 18V | 10.0 Ah, Li-ion technology 457031 | |
| Quick charger ASC 145 | For charging all CAS-Li-Ion and LiHD sliding seat battery packs (12 V-36 V) | 448855 |
Further accessories can be found in the special accessories list, these are available on request from the starmix service team or online at: www.starmix.de, e-mail: info@starmix.de.
11 Disposal
Waste equipment contains valuable materials which can be reprocessed. Do not dispose of the vacuum cleaner through regular household waste. Properly dispose through a suitable collection point, e.g. at your municipal disposal site.
NOTE
Batteries do not belong in household waste.
Batteries contain valuable materials such as zinc, iron, aluminium, lithium and silver. Some of the possible ingredients, such as mercury, cadmium and lead, are heavy metals which can be harmful to the environment and health if they are not disposed of properly. If the disposable and rechargeable batteries are disposed of with the household waste, harmful substances could be released into the environment. In addition, valuable raw materials will be lost. Furthermore, batteries can contain substances that can cause irritation or allergies or are highly reactive.
Dispose of used disposable and rechargeable batteries properly in the collection boxes at retailers or at municipal collection points.
12 Specifications
| Type: ISC CLDC Unit Value | ||
| Voltage V 36 | ||
| Rated power W 850 | ||
| Max. Output power W 900 | ||
| Air flow* l/s (m3/h) 66 (238) | ||
| Vacuum* hPa/MG 240 | ||
| Air flow** l/s (m3/h) 38 (137) | ||
| Vacuum** hPa/SE 213 | ||
| Sound level L_pA / L_WA | dB(A) | 72 / 86 ±2 |
| Weight | kg | 12.6 |
| Dimensions L x W x H | cm | 46 x 40 x 57 |
| Container volumes | l | 25 |
| Vibration measurement | m/s2 | 0.08 ±0.01 |
* at the cooling fan
**at the hose
13 Tests and approvals
Electrotechnical tests are to be carried out in accordance with the regulations for the prevention of accidents (DGUV V3) and DIN VDE 0701 Part 1 and Part 3. These tests are required at regular intervals and after repair or modification in accordance with DIN VDE 0702. The vacuum cleaners have been successfully tested according to IEC/EN 60335-2-69.
14 EC Declaration of conformity
We declare that the machine described below complies with the relevant basic safety and health requirements of the EU Directives, both in its basic design and construction as well as in the version put into circulation by us. This declaration shall cease to be valid if the machine is modified without our prior approval.
Product: Commercial wet/dry vacuum cleaner
Type:
ISC CLDC
The design of the devices complies with the following relevant regulations:
EC Machinery Directive 2006/42/EC
EC EMC Directive 2004/108/EC
ROHS 2011/65/EU
EC Machinery Directive 2006/42/EC including amendments:
Requirements of category III
RoHS 2011/65/EU
EN 63000:2018
Merianstr. 28, 63069 Offenbach, Germany, has tested and certified the product.
Authorised representative for the compilation of the technical documentation:
ELECTROSTAR GmbH, Hans-Zinser-Str. 1-3, 73061 Ebersbach/Fils, Germany

13.10.2023
Carsten Gresser
Head of Quality Assurance
Français
natural_image
Technical line drawing of a mechanical device with no visible text or symbolsnatural_image
Technical line drawing of a mechanical assembly with no visible text or symbolsnatural_image
Technical line drawing of a mechanical assembly with no visible text or symbolsnatural_image
Technical line drawing of a vehicle interior showing internal compartments and structural elements (no text or labels)natural_image
Technical diagram of a mechanical assembly with an inset showing a bracket and warning symbol (no text or labels present)Fig. 21: Étrier de fixation
ATTENTION!
natural_image
Line drawing of a vacuum cleaner with coiled tubing and control panel (no text or symbols)natural_image
Line drawing of a vacuum cleaner with coiled tubing and mounting base (no text or symbols)natural_image
Technical line drawing of a mechanical device with internal components and directional arrows indicating assembly or operation (no text or symbols present)Head of Quality Assurance
Español
natural_image
Technical line drawing of a mechanical device with no visible text or symbolsnatural_image
Technical line drawing of a mechanical assembly with no visible text or symbolsnatural_image
Technical line drawing of a mechanical assembly with internal components and a highlighted section (no text or symbols)natural_image
Technical line drawing of a vehicle interior showing internal compartments and structural elements (no text or labels)natural_image
Technical diagram of a mechanical assembly with an inset showing a bracket mechanism and warning symbol (no text or labels present)natural_image
Line drawing of a vacuum cleaner with coiled tubing and control panel (no text or symbols)natural_image
Line drawing of a vacuum cleaner with coiled tubing and wheels (no text or symbols)natural_image
Technical line drawing of a mechanical device with internal components and directional arrows indicating assembly or operation (no text or symbols present)Head of Quality Assurance
Italiano
natural_image
Technical line drawing of a mechanical device with no visible text or symbolsFig. 33: Vanoportabatterie
natural_image
Technical line drawing of a mechanical assembly with no visible text or symbolsFig. 34: Vano portabatterie con due batterie da 18 V
natural_image
Technical line drawing of a mechanical assembly with no visible text or symbolsnatural_image
Technical line drawing of a vehicle rear view showing internal compartments and structural components (no text or labels)natural_image
Technical diagram of a mechanical assembly with an inset showing a bracket mechanism and warning symbol (no text or labels present)Fig. 37: Staffa di arresto
CAUTELA!
natural_image
Line drawing of a vacuum cleaner with coiled tubing and control panel (no text or symbols)natural_image
Line drawing of a vacuum cleaner with coiled tubing and wheels (no text or symbols)natural_image
Technical line drawing of a mechanical device with internal components and directional arrows indicating assembly or operation (no text or symbols present)Head of Quality Assurance
Nederlands
natural_image
Technical line drawing of a mechanical device with no visible text or symbolsFig. 41: Accuvak
- 2 accu's 18 V
- 1 accu 36 V
Meer informatie over de accu-types vindt u in hfdst. 10.
natural_image
Technical line drawing of a mechanical assembly with no visible text or symbolsnatural_image
Technical line drawing of a mechanical assembly with internal components and a labeled component (no text or symbols present)natural_image
Technical line drawing of a vehicle interior showing internal compartments and structural elements (no text or labels)PE-opvang- en afvalzak inzetten\*
OPMERKING
→ De stofzuiger begint direct.
of:
natural_image
Technical diagram of a mechanical assembly with an inset showing a bracket mechanism and warning symbol (no text or labels present)Fig. 45: Arreteerbeugel
△ PAS OP!
natural_image
Line drawing of a vacuum cleaner with coiled tubing and control panel (no text or symbols)Fig. 46: Zuigslang oprollen, stap 1
natural_image
Line drawing of a vacuum cleaner with coiled tubing and wheels (no text or symbols)Fig. 47: Zuigslang oprollen, stap 2
natural_image
Technical line drawing of a mechanical device with internal components and directional arrows indicating assembly or operation (no text or symbols present)Fig. 48: Gereedschapskist
⚠ PAS OP!
natural_image
Technical line drawing of a mechanical device with no visible text or symbolsFig. 49: Batterirum
natural_image
Technical line drawing of a mechanical assembly with no visible text or symbolsnatural_image
Technical line drawing of a mechanical assembly with internal components and a highlighted section (no text or symbols)natural_image
Technical line drawing of a vehicle interior showing structural components and dashboard (no text or labels)natural_image
Technical diagram of a mechanical assembly with an inset showing a bracket mechanism and warning symbol (no text or labels present)Fig. 53: Låsebøjle
⚠ FORSIGTIG!
natural_image
Line drawing of a vacuum cleaner with coiled tubing and control panel (no text or symbols)Fig. 54: Sugeslangen rulles op, trin 1
natural_image
Line drawing of a vacuum cleaner with coiled tubing and wheels (no text or symbols)Fig. 55: Sugeslangen rulles op, trin 2
natural_image
Technical illustration of a mechanical device with internal components and directional arrows indicating assembly or operation (no text or symbols present)Head of Quality Assurance
Svenska
natural_image
Technical line drawing of a mechanical device with no visible text or symbolsIllustration 57: Batterifack
natural_image
Technical line drawing of a mechanical assembly with no visible text or symbolsnatural_image
Technical line drawing of a mechanical assembly with internal components and a labeled component (no text or symbols present)Illustration 59: Batterifack med 36V batteri
natural_image
Technical line drawing of a vehicle interior showing structural components (no text or labels)Illustration 60: Batterifack med 36V batteri, isatt
natural_image
Technical diagram of a mechanical assembly with an inset showing a bracket mechanism and warning symbol (no text or labels present)Illustration 61: Låsbygel
⚠ SE UPP!
natural_image
Line drawing of a vacuum cleaner with coiled tubing and wheels (no text or symbols)natural_image
Line drawing of a vacuum cleaner with coiled tubing and control panel (no text or symbols)Illustration 63: Veckla upp sugslangen, steg 2
natural_image
Technical illustration of a mechanical device with a lid and control panel, showing internal components and directional arrows (no text or symbols)Head of Quality Assurance
Polski
natural_image
Technical line drawing of a mechanical device with no visible text or symbolsRys. 65: Komora akumulatora
natural_image
Technical line drawing of a mechanical assembly with no visible text or symbolsRys. 66: Komora akumulatora z dwoma akumulatorami 18 V
natural_image
Technical line drawing of a mechanical assembly with internal components and a highlighted component (no text or symbols)Rys. 67: Komora akumulatora z akumulatorem 36 V
natural_image
Technical line drawing of a vehicle interior showing internal compartments and structural elements (no text or labels)Rys. 68: Komora akumulatora z umieszczonym akumulatorem 36 V
natural_image
Technical diagram of a mechanical assembly with an inset showing a bracket mechanism and warning symbol (no text or labels present)natural_image
Line drawing of a vacuum cleaner with coiled tubing and control panel (no text or symbols)natural_image
Line drawing of a vacuum cleaner with coiled tubing and wheels (no text or symbols)natural_image
Technical line drawing of a mechanical device with internal components and directional arrows indicating assembly or operation (no text or symbols present)Head of Quality Assurance
Русский
natural_image
Technical line drawing of a mechanical device with no visible text or symbolsnatural_image
Technical line drawing of a mechanical assembly with internal components and directional arrows (no text or symbols)natural_image
Technical line drawing of a mechanical assembly with no visible text or symbolsnatural_image
Technical line drawing of a vehicle interior showing structural components (no text or labels)natural_image
Technical diagram of a mechanical assembly with an inset showing a bracket mechanism and warning symbol (no text or labels present)natural_image
Line drawing of a vacuum cleaner with coiled tubing and control panel (no text or symbols)natural_image
Line drawing of a vacuum cleaner with coiled tubing and control panel (no text or symbols)natural_image
Technical illustration of a mechanical device with a top component and internal control panel (no text or symbols)
Staubklassen / dust class
Class L vacuum devices are suitable for aspiration/clearing of dry, non-combustible dusts and hazardous dusts with occupational expo- sure limit values (AGW) > 1 mg/m ^3 .
Class M vacuum devices are suitable for aspiration/clearing of dry, non-combustible dusts, non-combustible liquids, wood dusts and hazardous dusts with workplace limit values of ≥ 0.1 mg/m ^3 .
- English
- Safety
- Important safety instructions
- WARNING!
- Explosion and fire hazard
- Danger from burning battery
- Health hazard due to hazardous dusts
- Risk of electric shock!
- Risk of injury due to defective batteries
- Danger due to improper maintenance, repair and cleaning
- Danger due to human error
- Risk of explosion during underground work
- Risk of injury due to improper handling
- Danger due to lightning strike
- CAUTION!
- Noise hazard
- Danger of damage to posture
- Possible risk of injury from working with a defective device
- Danger due to ejected objects
- Suffocation hazard
- Dust classes
- Intended use
- DO NOT VACUUM the following materials:
- Reasonably foreseeable use (misuse)
- Ambient conditions
- Display and control elements
- Initial Use
- NOTE
- Operation
- Preparing the vacuum cleaner for operation
- Inserting the battery/batteries
- ⚠ WARNING!
- Attaching the hose
- Risk of electric shock
- Risk of fi re
- Attach the cordless control \*
- Inserting the disposal bag
- Inserting a non-woven fi Iter bag\*
- Inserting PE emptying and disposal bags\*
- Configuring settings
- Set filter cleaning mode\*
- Set hose diameter \*
- Preselector switch for minimum volume flow signal (horn and light for dust class "M" vacuum cleaners)
- Switching on the vacuum cleaner
- Vacuuming
- Risk of fire! Explosion hazard! Risk of electric shock!
- Dry vacuuming
- Wet vacuuming
- Cleaning the pleated fi Iter (cleaning mode >OFF<)
- Removing the vacuumed material
- Emptying the container
- Disposing of the non-woven fi lter bag
- Disposing of PE emptying and disposal bags\*
- Changing the pleated fi Iter
- Danger due to falling cover
- Sleep mode\*
- Switching off the vacuum cleaner
- Transit
- ⚠️ CAUTION!
- Risk of tipping during transport
- Maintenance
- Danger due to dust
- Precautions for class M vacuum cleaners
- Contaminated objects
- Changing the motor protection filter
- Testing the effectiveness of the vacuum cleaner
- Cleaning
- Danger due to improper cleaning
- Troubleshooting and repairs
- Original parts
- Disposal
- Tests and approvals
- EC Declaration of conformity
- Français
- ATTENTION!
- Español
- Italiano
- CAUTELA!
- Nederlands
- PE-opvang- en afvalzak inzetten\*
- OPMERKING
- △ PAS OP!
- ⚠ PAS OP!
- ⚠ FORSIGTIG!
- Svenska
- ⚠ SE UPP!
- Polski
- Русский
- Staubklassen / dust class
Brand : Starmix
Model : ISC Batrix M 36-18V
Category : Vacuum Cleaner