
Duplicator 4K - Professional audiovisual equipment Blackmagic Design - Free user manual and instructions
Find the device manual for free Duplicator 4K Blackmagic Design in PDF.

| Product Type | Professional SD Card Video Duplicator |
| Brand | Blackmagic Design |
| Model | Duplicator 4K |
| Category | Professional Audiovisual Equipment |
| Mounting Format | 1U Rack |
| Power Supply | AC 110-240 V, 50/60 Hz |
| Video Input | 1 x 12G-SDI (BNC) |
| Video Output | 1 x 12G-SDI Loop (BNC) |
| Supported Video Formats | SD, HD, Ultra HD up to 2160p60 |
| Codecs | H.264 and H.265 |
| Number of Card Slots | 25 SD Card Slots |
| Card Type | SD Class 10 or higher, exFAT formatted |
| Recording Modes | Duplicate, Single Disk, Single Disk Overwrite |
| Bitrates | Low, Medium, High (depending on format and codec) |
| Remote Control | RS-422, Ethernet (HyperDeck protocol), daisy chain |
| Display | Built-in LCD Screen with Menus |
| Connectivity | Ethernet, USB (for updates), RS-422 input/output |
| Additional Functions | Panel lock, SDI trigger, append recordings, batch format |
| Operating Temperature | Up to 40°C (tropical climate) |
| Maximum Altitude | 2,000 m |
| Dimensions | Approx. 482 x 44 x 300 mm (W x H x D) |
| Weight | Approx. 3.5 kg |
| Maintenance and Cleaning | Disconnect before cleaning; use a dry, non-abrasive cloth |
| Safety | Do not expose to liquids; ensure ventilation; use power cables with protective conductor |
| Spare Parts and Repairability | Not user-serviceable; contact an authorized Blackmagic Design service center; optional fiber optic SFP module |
| Warranty | 12 months limited (parts and labor) |
Frequently Asked Questions - Duplicator 4K Blackmagic Design
User questions about Duplicator 4K Blackmagic Design
0 question about this device. Answer the ones you know or ask your own.
Ask a new question about this device
Download the instructions for your Professional audiovisual equipment in PDF format for free! Find your manual Duplicator 4K - Blackmagic Design and take your electronic device back in hand. On this page are published all the documents necessary for the use of your device. Duplicator 4K by Blackmagic Design.
USER MANUAL Duplicator 4K Blackmagic Design
Installation and Operation Manual
Blackmagic Duplicator 4K
February 2019
English, 日本語, Français, Deutsch, Español, 中文, 한국어, Русский, Italiano, Português and Türkçe.
Languages
To go directly to your preferred language, simply click on the hyperlinks listed in the contents below.
English 3
日本語 39
Français 76
Deutsch 113
Español 150
中文 188
한국어...225
Русский 262
Italiano 299
Português 336
Türkçe 373

natural_image
Circular portrait photo of a smiling man in a dark shirt against a gray background (no text or symbols)Welcome
Thank you for purchasing your Blackmagic Duplicator 4K.
We are extremely excited with Blackmagic Duplicator 4K and think it is the perfect solution to make it possible for you to distribute high quality Ultra HD content direct to your customers. This is possible because the duplicator will record onto 25 separate SD cards in all SD, HD and Ultra HD formats up to 2160p60 in widely used H.264 or latest H.265 compression so you get amazing quality and high frame rates but with low enough data rates that you can use cheap cards and get a long record duration.
Blackmagic Duplicator 4K is easy to set up and use. The front panel has a built in LCD and control panel so you can change settings and control the unit using buttons, but you can also control your duplicator remotely via Ethernet or by connecting an RS-422 controller. You can even custom build your own controller and control the unit using the Blackmagic HyperDeck Ethernet Protocol.
The built in real time H.265 video encoder records high quality video on inexpensive SD cards in video formats up to Ultra HD 2160p60, so you can record amazing Ultra HD video without having to use the fastest cards available. With the latest Blackmagic Duplicator 4K version 1.2 software, we've added H.264 compression so you can also record H.264 files for greater compatibility!
Blackmagic Duplicator 4K is 1 rack unit high which means you can daisy chain a bank of units in a portable rack system and take them with you on location so you can always record on hundreds of SD cards at once.
This instruction manual contains all the information you need to start using your Blackmagic Duplicator 4K.
Please check the support page on our website at www.blackmagicdesign.com for the latest version of this manual and for updates to your Blackmagic Duplicator 4K's software. Keeping your software up to date will ensure you get all the latest features! When downloading software, please register with your information so we can keep you updated when new software is released. We are continually working on new features and improvements, so we would love to hear from you!
Grant Petty
Grant Petty
CEO Blackmagic Design
Contents
Blackmagic Duplicator 4K
Getting Started 5
Plugging in Power 5
Plugging in Video and Audio 5
Daisy Chaining 6
Inserting and Formatting SD Cards 7
Recording
Setting the Recording Mode 8
Setting the Codec 9
Setting the Bit Rate 10
Recording Clips 11
LED Status Indicators 11
Append Record 12
Locking your Blackmagic Duplicator 4K 13
Daisy Chaining Multiple Duplicators 13
LCD Menu Settings 15
Record 15
Settings 20
About 21
Blackmagic Duplicator Utility 21
Updating your Blackmagic Duplicator 4K 21
File Name Prefix 21
Installing the optional Optical Fiber SDI Module 22
RS-422 Control 23
What is RS-422 Control? 23
Using an External RS-422 Controller 23
RS-422 Developer Information 25
Remote Control via Ethernet 25
An Example of Controlling via an Arduino 26
Blackmagic HyperDeck Ethernet Protocol 28
Protocol Commands 28
Protocol Details 29
Configuring the watchdog 34
Configuring the record mode 34
Configuring the file format 34
Help 35
Regulatory Notices 36
Safety Information 37
Warranty 38
Getting Started
Getting started with your Blackmagic Duplicator 4K is easy!
All you need to do is plug in power, connect your SDI video source and insert up to 25 SD cards. If you want to record on even more SD cards, you can daisy chain multiple Blackmagic Duplicator 4Ks and that's easy to do because there are built in video and control connections to connect to each downstream unit. This section of the manual will show you exactly how to set up your Blackmagic Duplicator 4K so you can immediately begin recording on multiple SD cards simultaneously.
Plugging in Power
To power your Blackmagic Duplicator 4K, simply plug a standard IEC power cord into the 110-240V AC power input on the rear panel.

When Blackmagic Duplicator 4K is powered you will see the home screen appear on the built in LCD.
Home Screen
The home screen displays the source video image and information such as the source video format, the number of SD cards inserted, a status indicator to show you when you are recording and when recording is stopped, plus audio meters so you can monitor the audio levels in your source video.
Plugging in Video and Audio
Plug your source video into 12G-SDI input on the rear panel. Your Blackmagic Duplicator 4K will automatically detect the input format and display it on the LCD home screen.
The SDI input and output BNC connectors support video signals up to 12G-SDI so you can plug in SD, HD or Ultra HD video up to 2160p60 on a single BNC cable. This means the loop output will always match your source video format so you can output the same signal to other SDI video equipment, or for when daisy chaining multiple Blackmagic Duplicator 4Ks together. It also supports progressive segmented frame modes, and automatically detects level A and level B 3G-SDI formats for 1080p50, 1080p59.94 and 1080p60.

Plug your source video into the SDI in connector. Audio is embedded in the SDI video signal.
Your Blackmagic Duplicator 4K supports 2 channels of embedded SDI audio, so you don't need to plug in audio as it is already connected via the SDI video input.
TIP You can monitor your source video's audio levels on the LCD home screen.
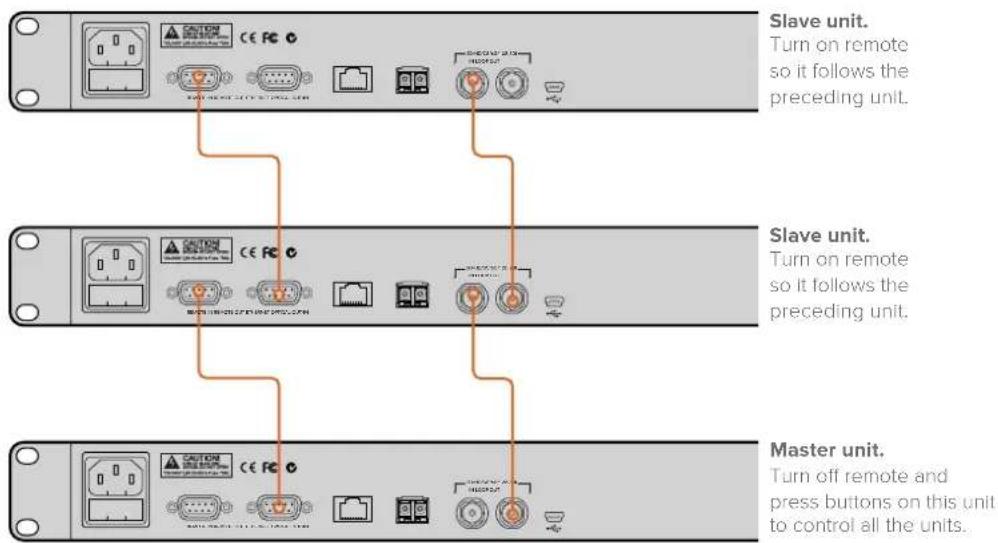
Daisy Chaining
You can daisy chain multiple Blackmagic Duplicator 4Ks so you can record on even more SD cards. For example, if you wanted to duplicate 100 cards, then you just daisy chain 4 units together.
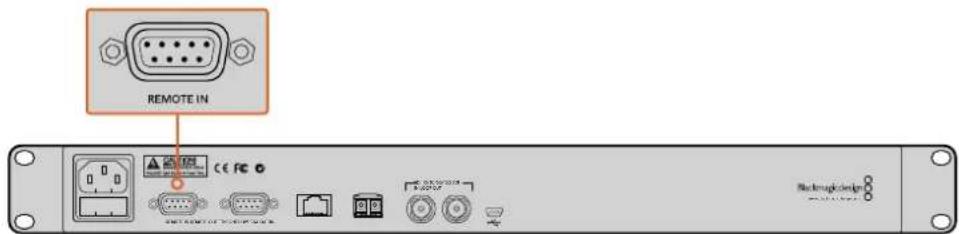
1 Connect the RS-422 'remote' output from the first Blackmagic Duplicator 4K to the 'remote' input on the second unit. Repeat this process for each unit in the chain.
2 Similarly, connect the loop SDI output from the first unit to the SDI input of the second unit and repeat for each unit down the chain
3 On each unit's control panel there is a button marked REM. This is the 'remote' button and it needs to be turned on to enable remote control between units. Press the remote buttons on each Blackmagic Duplicator 4K from the second unit all the way down the chain.
NOTE Make sure the first unit has the remote button turned off as this will be the Blackmagic Duplicator 4K that controls all the others in the chain. This first unit, with the remote turned off, is the master unit and any button pressed on its front panel will be output from the remote output and this is what controls the downstream units with their remote buttons turned on. Any television product with RS-422 deck control can be the master unit as the remote protocol is simply the industry standard deck control format.
Now all Blackmagic Duplicator 4Ks in the chain are ready to follow the commands of the first unit.
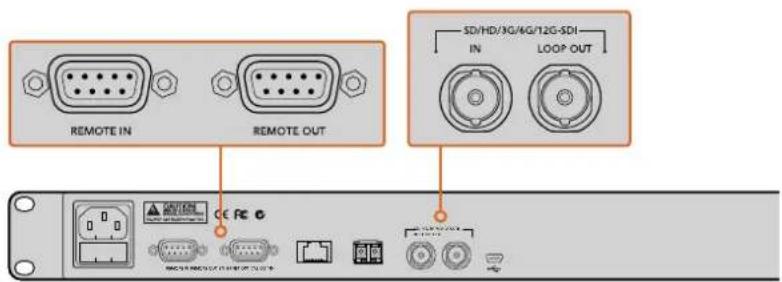
The 'remote' and 'loop' connectors are used for daisy chaining multiple Blackmagic Duplicator 4Ks. The loop connector on the last unit in the chain can also be used to loop the source video to other SDI equipment such as a Blackmagic SmartView monitor or HyperDeck disk recorder.
For more detailed information about daisy chaining multiple units, refer to the section titled, 'Daisy Chaining Multiple Duplicators'.
Inserting and Formatting SD Cards
Blackmagic Duplicator 4K uses common class 10 SD cards so you don't have to buy the fastest cards available. SD cards can be purchased from any store that sells camera equipment, and even some supermarkets sell class 10 SD cards.
TIP On the label of all SD cards you will see a number from 1 to 10 printed in a small circle. This number represents the speed rating of the card and 10 is the fastest rating. Any card that has the number 10 printed in the circle is a class 10 SD card and the type of card you will need to record up to Ultra HD video at the highest bit rate setting.
To insert an SD card:
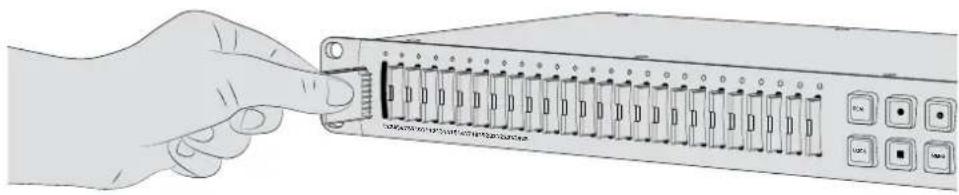
1 Hold the card with the gold connectors facing the control panel LCD and align it with one of your Blackmagic Duplicator 4K's SD card slots.
2 Gently push the card into the slot until it is firmly seated. Your Blackmagic Duplicator 4K verifies the card quickly, and when the card is ready to record status LED above the slot turns green.
natural_image
Illustration of a hand inserting a USB into a network switch device (no text or symbols visible)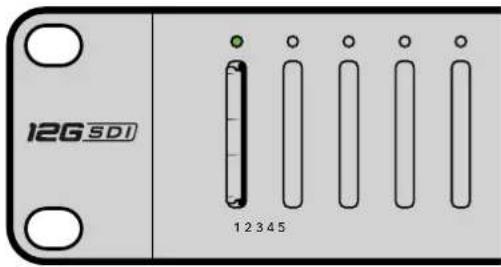
Align the SD card with the gold connectors facing the LCD and gently push the card into the slot until it is firmly seated. The LED status indicator turns green when your card is ready to record.
To remove a card, simply hold the card by its edge and remove it from the slot.
TIP When inserting a card, make sure the card is not write protected. Write protection is disabled by moving the little plastic switch on the left side of the card to the position closest to the connectors. After recording, you can then write protect the card by sliding the switch back down to the bottom position.
Formatting SD Cards
Before you can start recording, you will need to format your SD cards to exFAT format. This format is compatible on both macOS and Windows computers. It's easy to format your media using your Blackmagic Duplicator 4K's 'format' feature and can be used to format up to 25 SD cards simultaneously on a single unit.
To format your SD cards on Blackmagic Duplicator 4K:
1 Press the 'Menu' button on the control panel.
2 Using the illuminated soft menu buttons on each side of the LCD, press 'record'.
3 Press the left arrow soft button to select the 'format cards' setting, then press 'format' at the bottom right side of the LCD menu.
4 A warning message will appear asking you to confirm the format. Press the 'format' soft button to confirm the format, or press 'cancel' to stop.
5 A progress bar will show you the progress of the format. When the format is complete, press 'OK'.
6 Press the 'menu' button on the control panel to return to the home screen.
That's all there is to getting started. With your video and audio connected and your SD cards formatted, you can now start recording!
TIP Different types and sizes of SD cards may format at different speeds so some cards will complete formatting faster than others.
Recording
You can start recording immediately by pressing the record button on the control panel. But we recommend setting the recording mode, codec, and bit rate first as these set the type of recording used, plus the length and quality of your recording.
Setting the Recording Mode
Blackmagic Duplicator 4K has the following recording modes:
- Duplicate: write to all SD cards simultaneously.
- Single Disk: write to one SD card at a time in order and stop recording when the last card is full.
- Single Disk Overwrite: write to one SD card at a time in order, and overwrite in a continuous loop.
Duplicate Mode
In duplicate mode, Blackmagic Duplicator 4K records the same video onto all SD cards at the same time.
Single Disk Mode
Blackmagic Duplicator 4K is an ideal logging recorder with a multitude of applications from television broadcasts to security cameras. It writes to one SD slot at a time, and when that SD card is full then it continues on the next available slot. When Blackmagic Duplicator 4K is in single disk mode, it stops recording when all SD cards are full. With 25 recording slots available, you can easily record for as long as a week. For continuous and uninterrupted recording, you can swap out full cards for empty cards at any time.
If you have multiple duplicators daisy chained together, you can record even longer. As soon as all cards are full in the master unit, recording will continue on the first slave unit through the chain to all connected units. Recording stops when the last card on the last unit is full.
Single Disk Overwrite Mode
Single disk overwrite mode allows a single Blackmagic Duplicator 4K with two or more SD cards to loop back to the first card when the last card is full so it records continually. It writes to one SD slot at a time. When one SD card is full then it formats and writes to the card in the next available slot.
This mode is similar to single disk mode, except the unit formats and writes to the next card in a loop, rather than stopping after the last card is full. In single disk overwrite mode, your Blackmagic Duplicator 4K will keep recording indefinitely until you press stop.
TIP If you are recording in single disk mode or single disk overwrite mode, you can insert new SD cards with space at any time. Duplicator 4K will continue recording as long as there are cards in any of the 25 slots with free space to record onto.
To set a recording mode:
1 Power Blackmagic Duplicator 4K.
2 Press the 'menu' button on the front control panel to open the LCD menu. The soft buttons next to the screen are lit to refer to options on the menu. Press the 'record' soft button.
The record menu has dots at the bottom of the screen to indicate how many options are available. If you want to move up to the previous level of the menu hierarchy at any time, press the 'back' button. Use the < and > buttons to cycle through the options.
3 Navigate to the 'mode' option, and click 'change'.
4 Press the 'select' button to use the mode currently shown. The LCD menu indicates the option you have selected.
5 Press the 'back' button to return to the record menu. The option you selected is now displayed.
For more information on daisy chaining multiple duplicators together, refer to the sections titled, 'daisy chaining' and 'daisy chaining multiple duplicators'.
TIP If an important event is recording in single disk or single disk overwrite mode, and you want to remove the SD card without waiting for the current card to fill up, simply press and hold the 'record' button for three seconds to switch to recording on the next SD card. When recording in duplicate mode, you can press the 'append record' button. For more information, see the 'Append record' section.
Setting the Codec
Your Blackmagic Duplicator 4K can record files using H.264 or H.265 compression codecs. H.264 compression is the default codec.
To change the codec:
1 Press the 'menu' button
2 Press the 'record' soft button to open the record settings.
3 Navigate to the 'codec' setting using the arrow soft buttons and press 'change.'
4 Use the arrow soft buttons to select your preferred codec, then press 'set' to confirm the change, or press the 'menu' button on the control panel to confirm the change and return to the LCD home screen.
NOTE Your Blackmagic Duplicator 4K must be updated to software version 1.1 or above to change codecs. For more information on updating software see the 'Blackmagic Duplicator Utility' section in this manual.
Choosing the right codec
For the best compatibility, we recommend using the H.264 codec. That is why we have made H.264 the default codec for Blackmagic Duplicator 4K.
H.265 is a great codec for high quality Ultra HD video at smaller file sizes, but is still very new and so there may be less compatibility with computers and playback equipment.
Both codecs have their advantages. Using H.265 will let you use cheaper SD storage, as the bit rates and sizes of files will be lower for a given image quality. H.264 is a good choice if compatibility is vital to your project.
Setting the Bit Rate
The three bit rate settings on your Blackmagic Duplicator 4K are low, medium, and high. These let you choose how much data is written by the built in video encoder for each second of video. The default bit rate setting is 'medium' for a high quality recording and a manageable file size. However you can easily change that setting in the LCD menu.
To change the bit rate setting:
1 Press the 'menu' button.
2 Press the 'record' soft button to open the record settings.
3 Navigate to the 'bit rate' setting using the arrow soft buttons and press 'change'.
4 Use the arrow soft buttons to select your preferred bit rate, then press 'set' to confirm the change, or press the 'menu' button on the control panel to confirm the change and return to the LCD home screen.
NOTE Higher bit rates result in higher quality recordings, but will fill a card faster or require a bigger and more expensive card. However, reducing the data rate will increase the time you can record on a card, but could reduce image quality to lower than you desire.
It's worth recording some experiments using different bit rate settings to get just the right amount of picture quality you need in the smallest file size.
Recording Clips
To start recording, simply press the record button on the control panel. When recording, the LED status indicators for each slot will illuminate red. When recording is stopped, the LED indicator will illuminate green, letting you know the recording was successful and the card is ready to record another clip. You can easily check your recordings on a computer via its SD card slot or reader, or on an HDMI television if it supports SD cards and the exFAT file system.
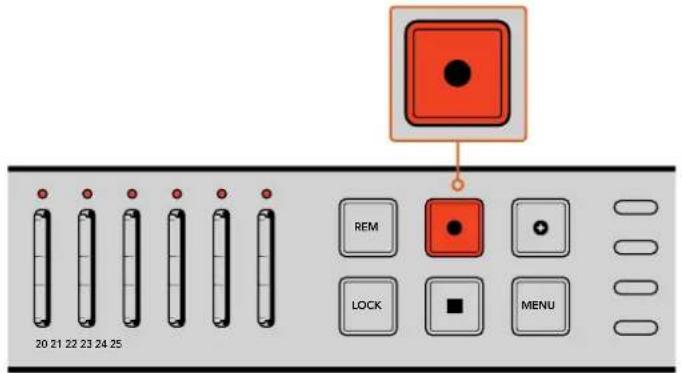
Press the 'record' button to start recording. The status LEDs above each slot will glow red to let you know the SD cards are recording.
LED Status Indicators
The status LEDs above each SD card slot will illuminate different colors to let you know the status of the slot. For example, when inserting an SD card, the slot's LED will illuminate green when the card has been recognized and is ready to record.
Below is a description of each LED color, LED action, and the status represented:

Constant green
Ready to record. The LED will glow green to indicate the SD card is ready to record.

Constant red
Recording. The LED will glow a constant red while a clip is being recorded.

Flashing red
Recording and card is almost full. The indicator will flash when there is less than 3 minutes of recording space remaining on the card.

Flashing red quickly
Dropping frames. The SD card write speed is not fast enough to match the recording speed.

Constant yellow
Card full, write-protected, or write failure. If you see the LED glow constant yellow during recording, it means your SD card may be bad, write-protected, not yet formatted, or have less than 10 seconds of space left. Try sliding the lock switch into the 'unlock' position, lowering the data rate, using a faster SD card, formatting it, or swapping it over to a different card.
Although the duplicator will attempt to keep the file system on each card organized and prepared in case a card is removed during recording, it's important you don't remove an SD card while your Blackmagic Duplicator 4K is recording. This is because some operating systems that could be used to view the card are not as robust as others and they might see the recording as being damaged. So it's always safer to stop recording before removing a card. If you do find that you want to be able to pass cards to people before a performance has completed, it might be a good idea to use multiple duplicators and then you can stop one unit early to distribute cards from that unit, while the other units keep recording.
TIP While SD cards with a class 10 speed rating can record using all data rates supported by your Blackmagic Duplicator 4K, you can also record lower data rates using cards with a slower rating if you need to. For example, you may wish to record security vision for long durations and don't need the highest video quality. We recommend always performing a test recording to make sure your SD card can record video at your chosen bit rate. For more information about SD card speed ratings, refer to 'inserting and formatting SD cards' in the Getting Started section.
Append Record
When recording in duplicate mode, you may wish to record a new clip, and add it to the previously recorded clip so they appear as one single clip. For example, you may be recording a performance with multiple separate events. If you want to record each event separately, but have them combined into one clip, this is how the 'append record' feature can help you.
1 Record the first clip as you normally would using the 'record' button. Press stop.
2 When the next event starts, press the 'append record' button. The button will be illuminated together with the standard 'record' button to let you know you are recording a clip that will be appended to the previously recorded clip.
3 Press stop. The new clip will then be appended to the first clip and they will be saved as one single clip.
TIP Using the 'append record' feature, there is no limit to the number of subsequent clips you can append to the first clip. The only consideration is the size of the card and length of the recordings.
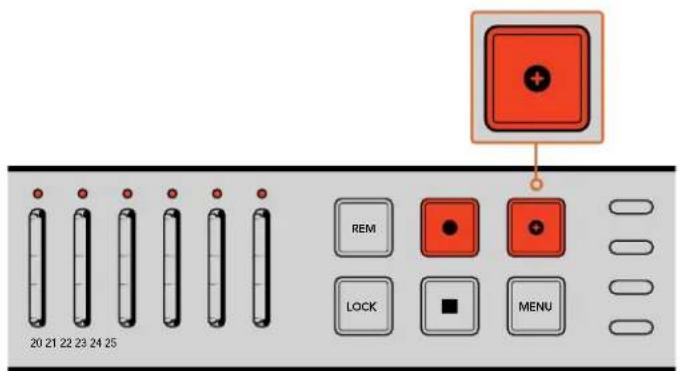
Press the 'append record' button to append a new clip to the previously recorded clip.
TIP When recording in single disk or single disk overwrite mode, you can press and hold the 'record' button for three seconds to shift the recording to the next card, freeing up the current card. This is helpful if you want to access an important event immediately after it happens without stopping recording. For more information on single disk and single disk overwrite modes, refer to the 'setting the recording mode' section. When recording in duplicate mode, you can press the 'append record' button. For more information, see the 'Append record' section.
Locking your Blackmagic Duplicator 4K
When recording an important event, you might want to lock the control panel so a recording cannot be accidentally stopped. It's also helpful to lock any daisy chained slave units so any controls on a unit cannot accidentally interrupt a recording.
Locking is enabled or disabled using the 'lock' button on each unit independently. Accidentally unlocking a unit is highly unlikely as you will need to physically hold the 'lock' button down for 2 seconds on each unit to unlock the controls.
To lock a Blackmagic Duplicator 4K:
1 Press the 'lock' button on your Blackmagic Duplicator 4K's control panel,
2 To unlock the unit, press and hold the 'lock' button. At the completion of 2 seconds, the unit will be unlocked.
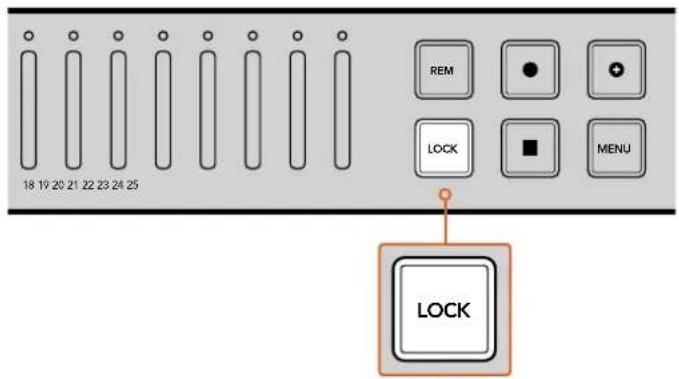
Locking your Blackmagic Duplicator 4K's control panel makes sure there is no risk of accidentally stopping a recording.
Daisy Chaining Multiple Duplicators
If you need to record to more than 25 SD cards, you can daisy chain multiple Blackmagic Duplicator 4Ks together. When daisy chained they will share the same video signal via the 'loop' SDI connector from each unit, plus communicate with each other via their 'remote' connectors using the RS-422 protocol.
To daisy chain multiple Blackmagic Duplicator 4Ks:
1 Connect the first unit's RS-422 'remote out' port to the second unit's 'remote in' port using a common serial cable with DB-9 connectors. Serial cables with DB-9 connectors are commonly available at your local computer or video equipment store.
2 Connect the 'loop' SDI output from the first unit to the second unit's SDI input.
It's really that easy! To daisy chain more Blackmagic Duplicator 4Ks, simply keep plugging each 'remote' and 'loop' output to the next unit's remote and SDI input all the way down the chain.
To daisy chain multiple Blackmagic Duplicator 4K's together, simply connect the loop output from one unit to the SDI input of the next unit. Similarly, connect the remote output from one unit to the remote input on the next.
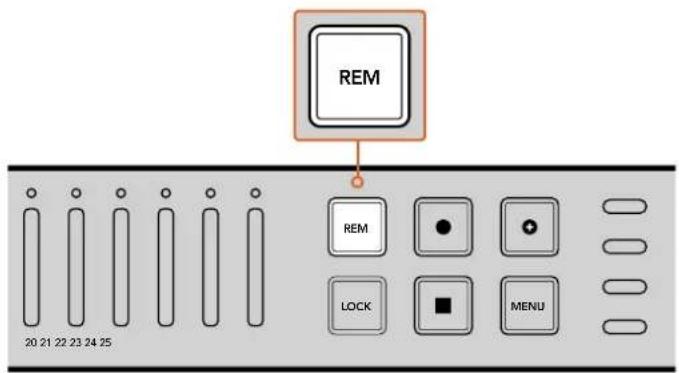
Press the remote button on each slave unit in the chain so they can be controlled remotely by the first unit.
NOTE Make sure you press the 'remote' button on each slave unit's control panel to enable remote control. The 'remote' button will illuminate when enabled. Press again to disable.
It's worth performing a test recording to make sure all the units are controlled by the master unit before the final recording. If the slave units are not conforming to the master unit, check the master unit has its remote button turned off and the slave units have their remote button turned on.
LCD Menu Settings
All the settings for your Blackmagic Duplicator 4K can be changed using the control panel LCD menu and soft buttons. The soft buttons are located on each side of the LCD and will illuminate corresponding to the settings displayed in the LCD menu.
To change a setting:
1 Press the 'menu' button on the control panel to open the LCD menu settings.
2 Use the menu soft buttons to navigate the menu.
3 Once you have selected your setting, press the 'change' menu soft button.
4 Adjust the setting, then press 'set' to confirm the change.
You can always cancel the change by pressing the 'back' menu soft button which will take you one step back in the menu sequence, or by simply pressing the 'menu' button on the control panel, which will return the LCD to the home screen.
Record
The ‘record’ settings lets you change the video source, set the bit rate, enable or disable trigger recording, and format your SD cards.
Video Source
This setting is used to select between the SDI input and the optical fiber input if you have the optical fiber SDI module installed.
Mode
Use this setting to select a recording mode:
Duplicate
Record the same video onto all SD cards at the same time.
Single Disk
Write to one SD card at a time, and when the SD card is full then continue on the next available SD card. When all cards are full, Duplicator 4K stops recording. If you have multiple units daisy chained together, recording continues to the next Duplicator 4K until all SD cards are full.
Single Disk Overwrite
Record a continual loop. Write to one SD card at a time, and when the SD card is full then continue on the next available SD card. When all cards are full, Duplicator 4K loops back to the first SD card and keeps recording.
Codec
Use this setting to set your Blackmagic Duplicator 4K to record using the H.264 and H.265 compression codecs.
Below is a description of the two different codecs.
H.264
Very commonly used compression offering a good compromise between image quality and file size. Most playback devices made in the last ten years will be able to view files compressed with this codec up to at least HD resolution.
H.265
Highly efficient compression capable of halving the size of video files for a given image quality compared to H.264. This codec is excellent for packaging high quality or Ultra HD video, but may need more up to date playback software and hardware to watch.
NOTE For more information on the difference between H.264 and H.265 see the 'recording' section of this manual.
Bit Rate
The bit rate setting determines how much video can be recorded to your SD cards and the quality of the video recording. There are three options you can choose.
High
Select 'high' when you want the highest quality video with the least compression.
Medium
Use the medium setting if you want to fit more video on your SD cards but also want to have very good image quality.
Low
Select 'low' if you want to fit the most video on your SD cards and you don't need the highest video quality. This setting will use the most compression so you may see visible compression artifacts in your recording.
NOTE The built in H.265 encoder uses the latest compression technology which means you get high quality video recordings using the least amount of data. Even at the lowest quality setting, with the most video compression, the quality of your recording will still be very good.
Bit Rates for Video Formats
| Ultra HD | |||
| Video Format | Bit Rate Setting | Bit Rate (Mb/s) H.264 | Bit Rate (Mb/s) H.265 |
| 2160p60 | High 75 50 | ||
| Medium 66 38 | |||
| Low 50 20 | |||
| 2160p59.94 | High 75 50 | ||
| Medium 66 38 | |||
| Low 50 20 | |||
Ultra HD
| Video Format | Bit Rate Setting | Bit Rate (Mb/s) H.264 | Bit Rate (Mb/s) H.265 |
| 2160p50 | High 72 48 | ||
| Medium 61 32 | |||
| Low 42 16 | |||
| 2160p30 | High 50 30 | ||
| Medium 37 20 | |||
| Low 24 10 | |||
| 2160p29.97 | High 50 30 | ||
| Medium 37 20 | |||
| Low 24 10 | |||
| 2160p25 | High 40 25 | ||
| Medium 32 18 | |||
| Low 20 10 | |||
| 2160p24 | High 40 25 | ||
| Medium 32 18 | |||
| Low 20 10 | |||
| 2160p23.98 | High 40 25 | ||
| Medium 32 18 | |||
| Low 20 10 |
HD
| Video Format | Bit Rate Setting | Bit Rate (Mb/s) H.264 | Bit Rate (Mb/s) H.265 |
| 1080p60 | High 40 20 | ||
| Medium 32 15 | |||
| Low 20 10 | |||
| 1080i60 | High 40 20 | ||
| Medium 32 15 | |||
| Low 20 10 | |||
| 1080p59.94 | High 40 20 | ||
| Medium 32 15 | |||
| Low 20 10 | |||
| 1080i59.94 | High 40 20 | ||
| Medium 32 15 | |||
| Low 20 10 | |||
| 1080p50 | High 36 20 | ||
| Medium 28 15 | |||
| Low 18 10 |
HD
| Video Format | Bit Rate Setting | Bit Rate (Mb/s) H.264 | Bit Rate (Mb/s) H.265 |
| 1080i50 | High 36 20 | ||
| Medium 28 15 | |||
| Low 18 10 | |||
| 1080p30 | High 28 15 | ||
| Medium 20 11 | |||
| Low 11 7 | |||
| 1080p29.97 | High 28 15 | ||
| Medium 20 11 | |||
| Low 11 7 | |||
| 1080p25 | High 24 15 | ||
| Medium 16 10 | |||
| Low 9 6 | |||
| 1080p24 | High 24 15 | ||
| Medium 15 10 | |||
| Low 8 6 | |||
| 1080p23.98 | High 24 15 | ||
| Medium 15 10 | |||
| Low 8 6 | |||
| 720p60 | High 25 12 | ||
| Medium 17 10 | |||
| Low 9 8 | |||
| 720p59.94 | High 25 12 | ||
| Medium 17 10 | |||
| Low 9 8 | |||
| 720p50 | High 20 12 | ||
| Medium 14 9 | |||
| Low 7 6 |
SD
| Video Format | Bit Rate Setting | Bit Rate (Mb/s) H.264 | Bit Rate (Mb/s) H.265 |
| High 18 11 | |||
| 625i50 PAL | Medium 12 8 | ||
| Low 6 6 | |||
| High 20 12 | |||
| 525i59.94 NTSC | Medium 14 9 | ||
| Low 7 6 |
Trigger
The trigger setting enables the record trigger feature which lets you start recording on your Blackmagic Duplicator 4K triggered by the record button on other SDI equipment, for example Blackmagic URSA Mini.
None
Select 'none' to disable the trigger recording feature.
SDI Start/Stop
When SDI Start/Stop is selected, your Blackmagic Duplicator 4K can start recording when you press the record button on other SDI equipment.
For example, Blackmagic URSA Mini always sends a record trigger signal via the SDI outputs, so whenever you press record on your camera, your Blackmagic Duplicator 4K will start recording and then stop recording when you press the record button again. You don't need to adjust any settings to enable the trigger record feature on URSA Mini, however, if you are using other SDI equipment that supports trigger recording and you want to trigger the recording using that equipment, you will need to enable SDI start/stop trigger recording using your equipment's settings menu.
Timecode Run
If your SDI equipment doesn't support SDI start/stop trigger recording, you can set your Blackmagic Duplicator 4K to start recording as soon as it detects running timecode. For example, if you have an SDI camera connected to your Blackmagic Duplicator 4K and the camera is set to 'record run' timecode, it will trigger your Blackmagic Duplicator 4K to start recording as well. When you stop recording on your camera, the timecode will stop running and the recording will stop on your Blackmagic Duplicator 4K.
This is a terrific feature, but you will need to make sure your equipment's timecode setting is set to 'record run'. If the timecode setting is set to 'time of day', it will continually output running timecode and keep triggering record on your Blackmagic Duplicator 4K, which you probably don't want.
Format Cards
You can format up to 25 cards simultaneously using the format feature in your Blackmagic Duplicator 4K.
To format your cards:
1 Press the 'menu' button on the control panel to open the LCD menu.
2 Press the 'record' menu soft button to open the record settings.
3 Press the left or right arrow soft buttons to navigate to the 'format cards' setting and press 'format'.
4 A message will appear asking you to confirm the format. You will also see a warning that this action cannot be undone. If you have any data on your SD cards that you want to keep, make sure you back it up before proceeding with the action.
5 Press 'format' to confirm the action. You can also press 'cancel' and go back to the 'record' settings.
6 While your cards are formatting the status LED indicators will blink yellow and a progress bar will appear on the LCD. When the cards are formatted, the status indicators will remain green and the LCD menu will advise you that formatting is complete and your cards are now ready for recording.
7 Press OK. Then press the 'menu' button on the control panel to return to the home screen.
Settings
The 'settings' menu is used to change the network settings for your Blackmagic Duplicator 4K, such as DHCP on or off, IP address, subnet mask and gateway settings. Connecting your Blackmagic Duplicator 4K to a network lets you control the unit remotely using third party administration software such as Telnet.
DHCP 'ON'
To set your Blackmagic Duplicator 4K to automatically configure the best settings when connected to a network, select 'on'. This means your Blackmagic Duplicator 4K will check all the connected devices on the network and set its IP address and other network settings to avoid any potential settings conflicts. This is very reliable and an easy way to get your network settings working quickly.
DHCP 'OFF'
If you want to have full manual control over your network settings you can enter them manually by setting DHCP to 'off', then navigating through and changing the IP address, subnet mask and gateway settings.
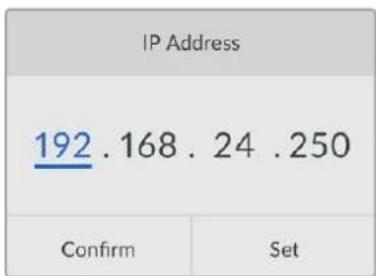
IP Address, Subnet Mask and Gateway
When DHCP is set to 'off' you can manually change these settings.
To edit the number fields:
1 Select the number field you want to change using the left or right soft menu buttons and press 'change'.
2 Press the left and right soft menu buttons to increase or decrease the number value. You can hold the soft button down to move through them faster.
3 Press 'set' to confirm the change.
Now you can use the soft menu buttons to move through the rest of the sequence and make the changes you need.
The 'settings' LCD menu lets you change the network settings so you can control your Blackmagic Duplicator 4K using third party administration software such as Telnet.
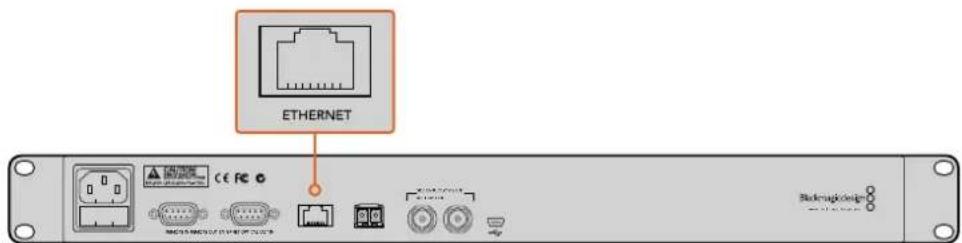
Plug your Blackmagic Duplicator 4K into your network via the Ethernet port on the rear panel.
About
This menu setting provides an instant overview showing you the current bit rate setting, file name of your latest recording, the network status and version of your Blackmagic Duplicator 4K's internal software.
Blackmagic Duplicator Utility
Updating your Blackmagic Duplicator 4K
Blackmagic Duplicator Utility software is used to update your Blackmagic Duplicator 4K's internal software, and to change the 'file name prefix' setting so you can label your recordings. We recommend downloading the software and updating your Blackmagic Duplicator 4K so you can benefit from new features and improvements.
The latest latest version can be downloaded from the Blackmagic Design support center at www.blackmagicdesign.com/support
To update the internal software using macOS:
1 Download and unzip Blackmagic Duplicator Utility.
2 Open the resulting disk image and launch the Blackmagic Duplicator Utility Installer. Follow the onscreen instructions.
3 After installing the latest Blackmagic Duplicator Utility, connect a USB cable from Blackmagic Duplicator 4K to your computer.
4 Launch Duplicator Utility and open the settings by clicking on the circular 'settings' icon. If the software detects an earlier version installed on your Blackmagic Duplicator 4K, it will display an 'update now' icon. Simply click on the icon to update the internal software. If your Blackmagic Duplicator 4K has the latest internal software installed, there is nothing more you need to do.
To update the internal software using Windows:
1 Download and unzip Blackmagic Duplicator Utility.
2 You should see a Blackmagic Duplicator Utility folder containing this manual and the Blackmagic Duplicator Utility installer. Double-click the installer and follow the onscreen prompts to complete the installation.
3 After installing the latest Blackmagic Duplicator Utility, connect a USB cable from your Blackmagic Duplicator 4K to your computer.
4 Launch Duplicator Utility and open the settings by clicking on the circular 'settings' icon. If the software detects an earlier version installed on your Blackmagic Duplicator 4K, it will display an 'update now' icon. Simply click on the icon to update the internal software. If your Blackmagic Duplicator 4K has the latest internal software installed, there is nothing more you need to do.
File Name Prefix
You can change the file name prefix so that your recordings can be labeled and easily identified. Simply click in the 'File Name Prefix' edit box and type in a new name. Now when your Blackmagic Duplicator 4K records the next clip, its file name will have a customized name followed by four digits to identify the clip number. These digits will increment with each recorded clip.
You can also make sure the recordings on all daisy chained units use the same file name by turning on the slave units remote buttons, then changing the file name prefix setting on the master unit. This lets you record clips and have all cards on all units share the same file name.
Installing the optional Optical Fiber SDI Module
If you want to plug in SDI video via optical fiber, you will need to install the optional optical fiber SDI module. Any SMPTE compatible SFP optical fiber module can be installed and can be purchased separately from any Blackmagic Design reseller. The module simply plugs into the built in optical fiber cage on your Blackmagic Duplicator 4K's rear panel. With the optical fiber SDI module installed you can connect SDI video with embedded audio over extremely long cable lengths. You can also use the optical output as an additional loop video connector.
If you are running lower speed optical fiber systems such as 3G-SDI or 6G-SDI optical fiber then you can install a slower module in this slot to save costs if you don't need the higher speeds.
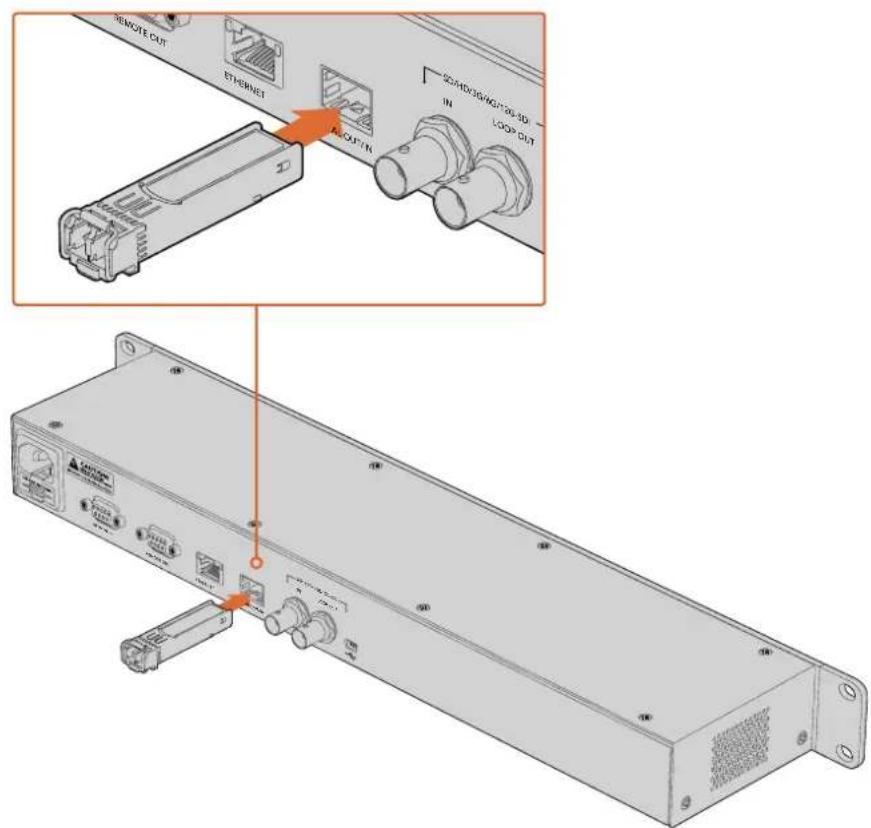
You can connect SDI video via optical fiber by installing the optional optical fiber SDI module.
Blackmagic Duplicator 4K will use whichever video connector was plugged in first, but if you have both SDI and optical fiber connected, you can select between them using the 'video source' setting in the LCD menu. For more information, refer to the 'settings' section.
RS-422 Control
What is RS-422 Control?
The RS-422 standard is a serial deck control broadcast standard and has been used by broadcasters since the early 1980s and is found on many decks, linear editors, non linear editors and broadcast automation products. Your Blackmagic Duplicator 4K supports this standard so can be integrated into broadcast automation, remote control systems, scheduled recording systems and any kind of custom control you might like to design yourself.
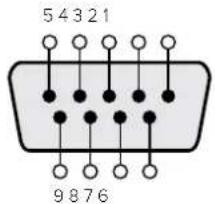
| Transmit(−) | Transmit(+) | Receive(−) | Receive(+) | GroundPins |
| 27831 | 4,6,9 |
RS-422 remote pin connections for the remote Input connector.
Using an External RS-422 Controller
Your Blackmagic Duplicator 4K features an industry standard Sony(tm) compatible 'remote' RS-422 deck control port, which has the correct pin connections for a direct connection to any remote controller with RS-422.
You can use pre-manufactured 9 pin cables as long as each end of the cable is wired 'pin for pin' where the same pin numbers on each end of the cable are connected together. If your equipment is wired differently and you would like to make custom cables, please refer to the accompanying remote input wiring diagram so you can make sure the transmit, or Tx, pins are wired to the receive, or Rx, pins.
By connecting an external RS-422 controller to your Blackmagic Duplicator 4K, you can control the unit remotely instead of pushing buttons locally.
1 Connect an RS-422 cable from your external controller to your Blackmagic Duplicator 4K's remote input.
2 Press the remote button marked 'REM' on your Blackmagic Duplicator 4K's control panel to enable remote deck control.
You can now start and stop recording, or start and stop an append record with your Blackmagic Duplicator 4K remotely. A full list of supported RS-422 commands are provided in the following section named 'supported RS-422 commands'.
Connect an external RS-422 controller to Blackmagic Duplicator 4K's remote input to control the unit remotely.
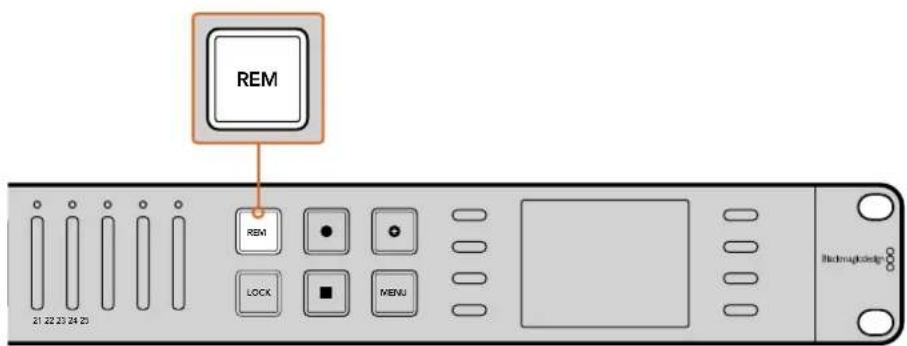
Press the remote button on your Blackmagic Duplicator 4K's control panel to enable RS-422 deck control.
Supported RS-422 Commands
| Command Reply No Remote Notes | |||||
| 0 - System Control | |||||
| 0x00 0x11 | DeviceTypeRequest | NTSC: 0xF0E0PAL: 0xF1E024P: 0xF2E0 | Enabled – | ||
1 - Slave Response
| 0x20 | 0x00 | Stop | Acknowledge | Disabled | - |
| 0x20 | 0x02 | Record | Acknowledge | Disabled | - |
| 0x21 | 0x02 | Append | Acknowledge | Disabled | Non-standard command - an extra payload of 0x00 indicates append |
4 - Preset/Select Control
| 0x40 | 0x40 | AutoMode Off | Acknowledge | Disabled | ignored, Status bit remembered |
| 0x40 | 0x41 | AutoMode On | Acknowledge | Disabled | ignored, Status bit remembered |
| 0x61 | 0x20 | StatusSense | StatusData | Enabled | - |
7 - Sense Reply
| 0x70 | 0x20 | StatusData | - | - | Please see “Status Bits” sheet: Limited to 9 bytes of status, silently truncated |
RS-422 Developer Information
| Bit 7 Bit 6 | Bit 5 Bit 4 | Bit 3 Bit 2 | Bit 1 Bit 0 | |||||
| Byte 0 | 0 0 Cassette out 0 0 0 Local | |||||||
| Byte 1 | Standby 0 Stop 0 0 0 Record 0 | |||||||
| Byte 2 | 0 0 0 0 0 0 0 | |||||||
| Byte 3 | Auto Mode 0 0 0 0 0 0 | |||||||
| Byte 4 | Select EE Full EE | 0 0 0 0 0 | ||||||
| Byte 5 | 0 0 0 0 0 0 0 | |||||||
| Byte 6 | 0 0 0 0 0 0 0 | |||||||
| Byte 7 | 0 0 0 0 0 0 0 | |||||||
| Byte 8 | 0 0 0 0 0 0 0 | |||||||
| Byte 9 | 0 0 0 0 0 0 0 | |||||||
| Variables | |
| Cassette Out | Set if no cards are ready to record |
| Local | Set if in local mode (no remote control) |
| Standby | Set if one or more cards are ready to record |
| Auto Mode | For compatibility only |
| Full EE | For compatibility only - always on |
| Select EE | For compatibility only - always on |
| Blackmagic Duplicator 4K RS-422 Settings | |
| Protocol | Based on Sony 9-pin protocol |
| Baud Rate | 38.4 K |
| Start Bits | 1 |
| Data Bits | 8 |
| Stop Bits | 1 |
| Parity Bits | 1 |
| Parity Type | Odd |
Remote Control via Ethernet
Your Blackmagic Duplicator 4K can be controlled externally via Ethernet using text based commands from the Blackmagic HyperDeck Ethernet Protocol. This gives you the ability to control your Blackmagic Duplicator 4K remotely from a computer using administration software such Telnet, or you can custom build your own hardware control panel and program it to integrate with your Blackmagic Duplicator 4K using the HyperDeck Ethernet Protocol.
You can develop your own custom solutions to control your duplicator from computers or dedicated hardware control devices or large systems used in broadcast studios or trucks. For example, Arduino microcontrollers are small circuit boards that can be customized with expansion boards called 'shields'. There are many types of shields and they can house different connectors. To control your Blackmagic Duplicator 4K an Ethernet shield is required. You can even buy additional shields with programmable buttons! Arduino microcontrollers are easy to set up, very affordable and are completely open source. After programming the Arduino software, you can simply connect the Arduino to your Blackmagic Duplicator 4K's Ethernet port and start controlling your duplicator immediately.
An Example of Controlling via an Arduino
Arduino microcontrollers are programmed using common C programming language. Simply program your controller to trigger commands to your Blackmagic Duplicator 4K using the HyperDeck Ethernet Protocol. All supported commands are shown in the following section named "Blackmagic HyperDeck Ethernet Protocol".
You can add other expansion shields to your Arduino so you can perform various recording functions. For example, if you add an internal clock, you can program your controller to instruct Blackmagic Duplicator 4K to record at specific times of the day, which may be helpful if you are scheduling security recordings.
We are excited by this technology and would love to hear about any external Ethernet controllers you have built!
![BlackmagicDuplicatorControl | Arduino 1.6.5 { Telnet client Blackmagic Duplicator 4K Control { Circuit: * Ethernet shield attached to pins 10, 11, 12, 13 */ #Include #Include // Enter a MML address and IP address for your controller below. // The IP address will be dependent on your local network: byte moc[] = {0x90, 0xA2, 0xDA, 0x0F, 0x17, 0xEf}; byte ip[] = {192, 168, 28, 204}; //IP address of Ethernet Shield byte server[] = {192, 168, 28, 85}; //IP address of Duplicator EthernetClient client; //Give the ethernet client a name void setup() { Ethernet.begin(mar, ip); //Start the Ethernet connection: client.connect(server, 9993); //Connect to Duplicator on port 9993 } void loop() { while (client.available()) //Read the Duplicator Preamble { char c = client.read(); } client.print("record: name: CAMRAT\xDa"); //Start Duplicator recording a clip named Camera 1 delay(60000); //Wait a minute client.print("stop\xDa"); //Stop recoding while (1); //Do nothing until program starts again } }](/content/2026/04/665058/images/e2d92b967a6672dfb2837ac8b813d50e90ac31c149be5f2f60444a0b01eb634d.jpg)
When programming an external Ethernet controller, such as this example of using an Arduino with an Ethernet shield, then you simply use the Ethernet protocol reference here to select which commands you need to use to get the control you desire.
The code shown in the window above is also presented on the next page so you can copy and paste it into your Arduino IDE. The code programs the Arduino to instruct Blackmagic Duplicator 4K to record for 1 minute, then stop recording and wait until the program runs again.
/*
Telnet client Blackmagic Duplicator 4K Control Circuit: *
Ethernet shield attached to pins 10, 11, 12, 13
*/

#include <SPI.h>

#include <Ethernet.h>

// Enter a MAC address and IP address for your controller below.
// The IP address will be dependent on your local network:
byte mac[] = {0x90, 0xA2, 0xDA, 0x0F, 0x17, 0xEF};
byte ip[] = {192, 168, 28, 204}; // IP address of Ethernet Shield
byte server[] = {192, 168, 28, 141}; // IP address of Duplicator
EthernetClient client; // Give the ethernet client a name

void setup()
{
    Ethernet.begin(mac, ip); //Start the Ethernet connection:

    client.connect(server, 9993); //Connect to Duplicator on port 9993
}

void loop()
{
    while (client.available()) //Read the Duplicator Preamble
    {
    char c = client.read();
    }

    client.print("record: name: Cameral\x0a");
    //Start Duplicator recording a clip named Camera 1
    delay(60000); //Wait a minute
    client.print("stop\x0a"); //Stop recoding
    while (1); //Do nothing until program starts again
}
Blackmagic HyperDeck Ethernet Protocol
The Blackmagic HyperDeck Ethernet Protocol is a text based protocol that was originally written for controlling Blackmagic HyperDeck disk recorders via the Ethernet port, but you can also use the same protocol to control your Blackmagic Duplicator 4K.
Because the duplicator only records, it does not have the full command set of the HyperDeck protocol, however this section shows the commands available that are relevant when using the HyperDeck Ethernet protocol on the duplicator.
Protocol Commands
| Command Command Description | |
| help or ? Provides help text with all commands and parameters. | |
| remote Queries the state of HyperDeck's remote control mode. | |
| remote: enable: true Enables remote control. | |
| remote: enable: false Disables remote control. | |
| remote: override: true Turns remote override on. | |
| remote: override: false Turns remote override off. | |
| quit Disconnects HyperDeck server. | |
| ping Determines HyperDeck server is responding. | |
| record Starts recording. | |
| record: append: true Starts appended recording. | |
| stop Stops playback or recording. | |
| commands Lists all supported commands in an XML format. | |
| notify Queries the current state of all notifications. | |
| notify: transport: true | Enables transport notifications. |
| notify: transport: false | Disables transport notifications. |
| notify: slot: true | Enables slot notifications. |
| notify: slot: false | Disables slot notifications. |
| notify: remote: true | Enables remote notifications. |
| notify: remote: false | Disables remote notifications. |
| notify: configuration: true | Enables configuration notifications. |
| notify: configuration: false | Disables configuration notifications. |
| notify: dropped frames: true | Enables dropped frames notifications. |
| notify: dropped frames: false | Disables dropped frames notifications. |
| device info Provides device information. | |
| slot info: slot id: {slot ID} | Provides information about a specified slot. |
| transport info | Provides information for the state of the transport. |
| configuration | Queries the current configuration. |
| configuration: record mode: Duplicate | Configures the record mode to duplicate. |
| configuration: record mode: SingleDisk Configures the record mode to single disk. | |
| configuration: record mode: DiskOverwrite Configures the record mode to disk overwrite. | |
| configuration: video input: {"SDI", "optical"} Configures video input. | |
| configuration: file format: {format} Configures the record codec and bit rate. | |
| format: prepare: {format} prepare a disk formatting operation to filesystem {format} | |
| format: confirm: {token} perform a pre-prepared formatting operation using token | |
| watchdog: period: {seconds} Configures the watchdog. | |
Using XML
While you can use the Terminal to talk to HyperDeck, if you are writing software you can use XML to confirm the existence of a specific command based on the firmware of the HyperDeck you are communicating with. This helps your software user interface adjust to the capabilities of the specific HyperDeck model and software version.
Protocol Details
Connection
The HyperDeck Ethernet server listens on TCP port 9993.
Basic syntax
The HyperDeck protocol is a line oriented text protocol. Lines from the server will be separated by an ascii CR LF sequence. Messages from the client may be separated by LF or CR LF.
New lines are represented in this document as a "←" symbol.
Command syntax
Command parameters are usually optional. A command with no parameters is terminated with a new line: {Command name}
If parameters are specified, the command name is followed by a colon, then pairs of parameter names and values. Each parameter name is terminated with a colon character:
{Command name}: {Parameter}: {Value} {Parameter}: {Value}.
Response syntax
Simple responses from the server consist of a three digit response code and descriptive text terminated by a new line:
{Response code} {Response text}
If a response carries parameters, the response text is terminated with a colon, and parameter name and value pairs follow on subsequent lines until a blank line is returned:
{Response code} {Response text}:
{Parameter}: {Value}
{Parameter}: {Value}
...
Successful response codes
A simple acknowledgement of a command is indicated with a response code of 200:
200 ok
Other successful responses carry parameters and are indicated with response codes in the range of 201 to 299.
Failure response codes
Failure responses to commands are indicated with response codes in the range of 100 to 199:
100 syntax error
101 unsupported parameter
102 invalid value
103 unsupported
104 disk full
105 no disk
106 disk error
109 out of range
110 no input
111 remote control disabled
120 connection rejected
150 invalid state
Asynchronous response codes
The server may return asynchronous messages at any time. These responses are indicated with response codes in the range of 500 to 599:
5xx {Response Text}: ←
{Parameter}: {Value} ←
{Parameter}: {Value} ←
←
Connection response
On connection, an asynchronous message will be delivered:
500 connection info: ←
protocol version: {Version} ←
model: {Model Name} ←
Connection rejection
Only one client may connect to the server at a time. If other clients attempt to connect concurrently, they will receive an error and be disconnected:
120 connection rejected
Timecode syntax
Timecodes are expressed as non-drop-frame timecode in the format:
HH:M M:SS:FF
Handling of deck "remote" state
The “remote” command may be used to enable or disable the remote control of the deck. Any attempt to change the deck state over ethernet while remote access is disabled will generate an error:
111 remote control disabled
To enable or disable remote control:
remote: enable: {"true", "false"}
The current remote control state may be overridden allowing remote access over ethernet irrespective of the current remote control state:
remote: override: {"true", "false"}
The override state is only valid for the currently connected ethernet client and only while the connection remains open.
The “remote” command may be used to query the remote control state of the deck by specifying no parameters:
remote
The deck will return the current remote control state:
210 remote info: ←
enabled: {"true", "false"}
    ←
override: {"true", "false"}
    ←
Asynchronous remote control information change notification is disabled by default and may be configured with the "notify" command. When enabled, changes in remote state will generate a "510 remote info:" asynchronous message with the same parameters as the "210 remote info:" message.
Closing connection
The "quit" command instructs the server to cleanly shut down the connection:
quit
Checking connection status
The "ping" command has no function other than to determine if the server is responding:
ping←
Getting help
The "help" or "?" commands return human readable help text describing all available commands and parameters:
help
or:
?
The server will respond with a list of all supported commands:
201 help:
{Help Te xt}    ←
{Help Te xt}    ←
←
Stopping deck operation
The "stop" command instructs the deck to stop the current capture:
stop←
Enumerating supported commands and parameters
The "commands" command returns the supported commands:
commands
The command list is returned in a computer readable XML format:
212 commands :
<commands>
<command name="..."><parameter name="..."/>...</command>
<command name="..."><parameter name="..."/>...</command>
...
</commands>
More XML tokens and parameters may be added in later releases.
Controlling asynchronous notifications
The "notify" command may be used to enable or disable asynchronous notifications from the server. To enable or disable transport notifications:
notify: transport: {"true", "false"}
To enable or disable slot notifications:
notify: slot: {"true", "false"}
To enable or disable remote notifications:
notify: remote: {"true", "false"}
To enable or disable configuration notifications:
notify: configuration: {"true", "false"}
To enable or disable dropped frames notifications:
notify: dropped frames: {"true", "false"}
Multiple parameters may be specified. If no parameters are specified, the server returns the current state of all notifications:
209 notify:
transport: {"true", "false"}
slot: {"true", "false"}
remote: {"true", "false"}
configuration: {"true", "false"}
Retrieving device information
The "device info" command returns information about the connected deck device:
device info
The server will respond with:
204 device info: ←
protocol version: {Version} ←
model: {Model Name} ←
unique id: {unique alphanumeric identifier} ←
Example of response from server:
204 device info:
protocol version: 1.8
model: Blackmagic Duplicator 4K
uniq ue id: 101112131415
Retrieving slot information
The "slot info" command returns information about a slot.
The specified slot will be queried:
slot info: slot id: {Slot ID}
The server will respond with slot specific information:
202 slot info: ←
slot id: {Slot ID} ←
status: {"empty", "mounting", "error", "mounted"} ←
volume name: {Volume name} ←
recording time: {recording time available in seconds} ←
video format: {disk's default video format} ←
Asynchronous slot information change notification is disabled by default and may be configured with the "notify" command. When enabled, changes in slot state will generate a "502 slot info:" asynchronous message with the same parameters as the "202 slot info:" message.
Retrieving transport information
The "transport info" command returns the state of the transport:
transport info
The server responds with transport specific information:
208 transport info: ←
status: {"stopped","record"}
display timecode: {timecode}
timecode: {timecode}
The "timecode" value is the timecode within the current timeline for playback or the clip for record. The "display timecode" is the timecode displayed on the front of the deck. The two timecodes will differ in some deck modes.
Asynchronous transport information change notification is disabled by default and may be configured with the "notify" command. When enabled, changes in transport state will generate a "508 transport info:" asynchronous message with the same parameters as the "208 transport info:" message.
Video Formats
The following video formats are currently supported on Blackmagic Duplicator 4K:
SD
| 525i59.94 NTSC |
| 625i50 PAL |
HD
| 720p50 | 1080p30 |
| 720p59.94 | 1080i50 |
| 720p60 | 1080p50 |
| 1080p23.98 | 1080i59.94 |
| 1080p24 | 1080p59.94 |
| 1080p25 | 1080i60 |
| 1080p29.97 | 1080p60 |
Ultra HD
| 2160p23.98 | 2160p30 |
| 2160p24 | 2160p50 |
| 2160p25 | 2160p59.94 |
| 2160p29.97 | 2160p60 |
Duplicator 4K supports progressive segmented frame modes, and automatically detects level A and level B 3G-SDI formats for 1080p50, 1080p59.94 and 1080p60.
File Formats
Duplicator 4K supports the following file formats:
H.264Low
H.264Medium
H.264High
H.265Low
H.265Medium
H.265High
Querying and updating configuration information
The "configuration" command may be used to query the current configuration of the deck: configuration
The server returns the configuration of the deck:
211 configuration: ←
video input: { "SDI", "optical" } ←
One or more configuration parameters may be specified to change the configuration of the deck.
To change the current video input:
configuration: video input: {"SDI", "optical"}
Configuring the watchdog
The “watchdog” command instructs the deck to monitor the connected client and terminate the connection if the client is inactive for at least a specified period of time.
To configure the watchdog:
watchdog: period: {period in seconds}
To avoid disconnection, the client must send a command to the server at least every (period) seconds. Note that if the period is set to 0 or less than 0, connection monitoring will be disabled.
Configuring the record mode
Use the 'record mode' command to select the deck recording mode:
configuration: record mode: {"Duplicate", "SingleDisk", "DiskOverwrite"}
Configuring the file format
The 'file format' command instructs the deck to switch to a specific file format for codec and bit rate: configuration: file format: {"H.264High", "H.264Medium", "H.264Low", "H.265High", "H.265Mediu m", "H.265Low"}
Help
Getting Help
The fastest way to obtain help is to go to the Blackmagic Design online support pages and check the latest support material available for your Blackmagic Duplicator 4K.
Blackmagic Design Online Support Pages
The latest manual, software and support notes can be found at the Blackmagic Design support center at www.blackmagicdesign.com/support.
Blackmagic Design Forum
The Blackmagic Design forum on our website is a helpful resource you can visit for more information and creative ideas. This can also be a faster way of getting help as there may already be answers you can find from other experienced users and Blackmagic Design staff which will keep you moving forward. You can visit the forum at https://forum.blackmagicdesign.com
Contacting Blackmagic Design Support
If you can't find the help you need in our support material or on the forum, please use the "Send us an email" button on the support page to email a support request. Alternatively, click on the "Find your local support team" button on the support page and call your nearest Blackmagic Design support office.
Checking the Software Version Currently Installed
To check which version of Blackmagic Duplicator Utility software is installed on your computer, open the About Blackmagic Duplicator Utility window.
- On macOS, open Blackmagic Duplicator Utility from the Applications folder. Select About Blackmagic Duplicator Utility from the application menu to reveal the version number.
- On Windows 8.1, open Blackmagic Duplicator Utility from the Blackmagic Duplicator Utility tile on your Start page. Click on the Help menu and select About Blackmagic Duplicator Utility to reveal the version number.
- On Windows 10, open Blackmagic Duplicator Utility from your Start menu. Click on the Help menu and select About Blackmagic Duplicator Utility to reveal the version number.
How to Get the Latest Software Updates
After checking the version of Blackmagic Duplicator Utility software installed on your computer, please visit the Blackmagic Design support center at www.blackmagicdesign.com/support to check for the latest updates. While it is usually a good idea to run the latest updates, it is wise to avoid updating any software if you are in the middle of an important project.
Regulatory Notices
Disposal of Waste of Electrical and Electronic Equipment Within the European Union.

The symbol on the product indicates that this equipment must not be disposed of with other waste materials. In order to dispose of your waste equipment, it must be handed over to a designated collection point for recycling. The separate collection and recycling of your waste equipment at the time of disposal will help conserve natural resources and ensure that it is recycled in a manner that protects human health and the environment. For more information about where you can drop off your waste equipment for recycling, please contact your local city recycling office or the dealer from whom you purchased the product.

This equipment has been tested and found to comply with the limits for a Class A digital device, pursuant to Part 15 of the FCC rules. These limits are designed to provide reasonable protection against harmful interference when the equipment is operated in a commercial environment. This equipment generates, uses, and can radiate radio frequency energy and, if not installed and used in accordance with the instructions, may cause harmful interference to radio communications. Operation of this product in a residential area is likely to cause harmful interference, in which case the user will be required to correct the interference at personal expense.
Operation is subject to the following two conditions:
1 This device may not cause harmful interference.
2 This device must accept any interference received, including interference that may cause undesired operation.
ISED Canada Statement
This device complies with Canadian standards for Class A digital apparatus.
Any modifications or use of this product outside its intended use could void compliance to these standards.
This equipment has been tested for compliance with the intended use in a commercial environment. If the equipment is used in a domestic environment, it may cause radio interference.
Safety Information
For protection against electric shock, the equipment must be connected to a mains socket outlet with a protective earth connection. In case of doubt contact a qualified electrician.
To reduce the risk of electric shock, do not expose this equipment to dripping or splashing.
Product is suitable for use in tropical locations with an ambient temperature of up to 40^ C.
Ensure that adequate ventilation is provided around the product and that it is not restricted.
When rack mounting, ensure that the ventilation is not restricted by adjacent equipment.
No operator serviceable parts inside product. Refer servicing to your local Blackmagic Design service center.
Some products have the facility to connect small form-factor transceiver (SFP) optical fibre modules. Only use Laser class 1 optical SFP modules.
Recommended Blackmagic Design SFP modules:
3G-SDI: PL-4F20-311C
- 6G-SDI: PL-8F10-311C
• 12G-SDI: PL-TG10-311C

Use only at altitudes not more than 2000m above sea level.
State of California statement
This product can expose you to chemicals including hexavalent chromium, which is known to the state of California to cause cancer and birth defects or other reproductive harm.
For more information go to www.P65Warnings.ca.gov.
Warning for Authorized Service Personnel
Caution — Double Pole/ Neutral Fusing
The power supply contained in this equipment has a fuse in both line and neutral conductors and is suitable for connection to the IT power distribution system in Norway.
Warranty
12 Month Limited Warranty
Blackmagic Design warrants that the Blackmagic Duplicator 4K product will be free from defects in materials and workmanship for a period of 12 months from the date of purchase. If a product proves to be defective during this warranty period, Blackmagic Design, at its option, either will repair the defective product without charge for parts and labor, or will provide a replacement in exchange for the defective product.
In order to obtain service under this warranty, you the Customer, must notify Blackmagic Design of the defect before the expiration of the warranty period and make suitable arrangements for the performance of service. The Customer shall be responsible for packaging and shipping the defective product to a designated service center nominated by Blackmagic Design, with shipping charges pre paid. Customer shall be responsible for paying all shipping changes, insurance, duties, taxes, and any other charges for products returned to us for any reason.
This warranty shall not apply to any defect, failure or damage caused by improper use or improper or inadequate maintenance and care. Blackmagic Design shall not be obligated to furnish service under this warranty: a) to repair damage resulting from attempts by personnel other than Blackmagic Design representatives to install, repair or service the product, b) to repair damage resulting from improper use or connection to incompatible equipment, c) to repair any damage or malfunction caused by the use of non Blackmagic Design parts or supplies, or d) to service a product that has been modified or integrated with other products when the effect of such a modification or integration increases the time or difficulty of servicing the product. THIS WARRANTY IS GIVEN BY BLACKMAGIC DESIGN IN LIEU OF ANY OTHER WARRANTIES, EXPRESS OR IMPLIED. BLACKMAGIC DESIGN AND ITS VENDORS DISCLAIM ANY IMPLIED WARRANTIES OF MERCHANTABILITY OR FITNESS FOR A PARTICULAR PURPOSE. BLACKMAGIC DESIGN'S RESPONSIBILITY TO REPAIR OR REPLACE DEFECTIVE PRODUCTS IS THE WHOLE AND EXCLUSIVE REMEDY PROVIDED TO THE CUSTOMER FOR ANY INDIRECT, SPECIAL, INCIDENTAL OR CONSEQUENTIAL DAMAGES IRRESPECTIVE OF WHETHER BLACKMAGIC DESIGN OR THE VENDOR HAS ADVANCE NOTICE OF THE POSSIBILITY OF SUCH DAMAGES. BLACKMAGIC DESIGN IS NOT LIABLE FOR ANY ILLEGAL USE OF EQUIPMENT BY CUSTOMER. BLACKMAGIC IS NOT LIABLE FOR ANY DAMAGES RESULTING FROM USE OF THIS PRODUCT. USER OPERATES THIS PRODUCT AT OWN RISK.
© Copyright 2019 Blackmagic Design. All rights reserved. 'Blackmagic Design', 'DeckLink', 'HDLink', 'Workgroup Videohub', 'Videohub', 'DeckLink', 'Intensity' and 'Leading the creative video revolution' are registered trademarks in the US and other countries. All other company and product names may be trade marks of their respective companies with which they are associated. Thunderbolt and the Thunderbolt logo are trademarks of Intel Corporation in the U.S. and/or other countries.

natural_image
Circular portrait photo of a smiling man in a black shirt against a gray background (no text or symbols)ようこそ
Blackmagic Design CEO
グラント・ペティ
目次
Blackmagic Duplicator 4K
はじめに 42
電源の接続 42
ビデオ/オーディオの接続 42
デイジ ーチェーン 43
SDカードの挿入/フォーマット 44
収録 45
収録モードの設定 45
コーデックの設定 46
ビットレートの設定 47
クリップの収録 48
LED ステータスインジケーター 48
アペンド収録 49
natural_image
Illustration of a hand inserting a network switch into a rack-mounted server unit (no text or symbols visible)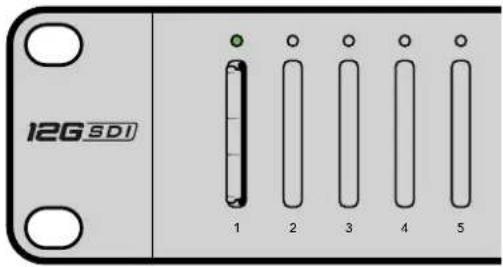
Supported RS-422 Commands
| Command Reply No Remote Notes | |||||
| 0 - System Control | |||||
| 0x00 | 0x11 | DeviceTypeRequest | NTSC: 0xF0E0PAL: 0xF1E024P: 0xF2E0 | Enabled | - |
1 - Slave Response
| 0x20 | 0x00 | Stop | Acknowledge | Disabled | - |
| 0x20 | 0x02 | Record | Acknowledge | Disabled | - |
| 0x21 | 0x02 | Append | Acknowledge | Disabled | Non-standard command - an extra payload of 0x00 indicates append |
4 - Preset/Select Control
| 0x40 | 0x40 | AutoMode Off | Acknowledge | Disabled | ignored, Status bit remembered |
| 0x40 | 0x41 | AutoMode On | Acknowledge | Disabled | ignored, Status bit remembered |
| 0x61 | 0x20 | StatusSense | StatusData | Enabled | - |
7 - Sense Reply
| 0x70 | 0x20 | StatusData | - | - | Please see "Status Bits" sheet: Limited to 9 bytes of status, silently truncated |
RS-422 Developer Information
| Bit 7 | Bit 6 | Bit 5 | Bit 4 | Bit 3 | Bit 2 | Bit 1 | Bit 0 | |
| Byte 0 | 0 0 Cassette | out 0 | 0 0 0 Local | |||||
| Byte 1 | Standby 0 Stop 0 0 0 Record 0 | |||||||
| Byte 2 | 0 0 | 0 | 0 0 0 0 | 0 | ||||
| Byte 3 | Auto Mode | 0 | 0 | 0 | 0 | 0 | 0 | 0 |
| Byte 4 | Select EE | Full EE | 0 | 0 | 0 | 0 | 0 | 0 |
| Byte 5 | 0 0 | 0 | 0 0 0 0 | 0 | ||||
| Byte 6 | 0 0 | 0 | 0 0 0 0 | 0 | ||||
| Byte 7 | 0 0 | 0 | 0 0 0 0 | 0 | ||||
| Byte 8 | 0 0 | 0 | 0 0 0 0 | 0 | ||||
| Byte 9 | 0 0 | 0 | 0 0 0 0 | 0 | ||||
| Variables | |
| Cassette Out | Set if no cards are ready to record |
| Local | Set if in local mode (no remote control) |
| Standby | Set if one or more cards are ready to record |
| Auto Mode | For compatibility only |
| Full EE | For compatibility only - always on |
| Select EE | For compatibility only - always on |
| Blackmagic Duplicator 4K RS-422 Settings | |
| Protocol | Based on Sony 9-pin protocol |
| Baud Rate | 38.4 K |
| Start Bits | 1 |
| Data Bits | 8 |
| Stop Bits | 1 |
| Parity Bits | 1 |
| Parity Type | Odd |
イーサネット経由でリモートコントロール
| Command Command Description | |
| help or ? | Provides help text with all commands and parameters. |
| remote Queries | the state of HyperDeck's remote control mode. |
| remote: enable: true Enables | remote control |
| remote: enable: false Disables | remote control. |
| remote: override: true Turns | remote override on. |
| remote: override: false Turns | remote override off. |
| quit | Disconnects HyperDeck server. |
| ping | Determines HyperDeck server is responding. |
| record | Starts recording. |
| record: append: true | Starts appended recording. |
| stop | Stops playback or recording. |
| commands Lists | all supported commands in an XML format. |
| notify | Queries the current state of all notifications. |
| notify: transport true | Enables transport notifications. |
| notify: transport false | Disables transport notifications. |
| notify: slot true | Enables slot notifications. |
| notify: slot false | Disables slot notifications. |
| notify: remote true | Enables remote notifications. |
| notify: remote false | Disables remote notifications. |
| notify: configuration true | Enables configuration notifications. |
| notify: configuration false | Disables configuration notifications. |
| notify: dropped frames: true | Enables dropped frames notifications. |
| notify: dropped frames: false | Disables dropped frames notifications. |
| device info | Provides device information. |
| slot info: slot Id: {slotID} | Provides information about a specified slot. |
| transport info | Provides information for the state of the transport. |
| configuration | Queries the current configuration. |
| configuration: record mode; Duplicate | Configures the record mode to duplicate. |
| configuration: record mode: SingleDisk Configures | the record mode to single disk. |
| configuration: record mode: DiskOverwrite Configures | the record mode to disk overwrite. |
| configuration: video input: {"SDI", "optical"} | Configures video input. |
| configuration: file format: {format} | Configures the record codec and bit rate. |
| format: prepare: {format} | prepare a disk formatting operation to filesystem {format} |
| format: confirm: {token} | perform a pre-prepared formatting operation using token |
| watchdog: period: {seconds} | Configures the watchdog. |
Using XML
While you can use the Terminal to talk to HyperDeck, if you are writing software you can use XML to confirm the existence of a specific command based on the firmware of the HyperDeck you are communicating with. This helps your software user interface adjust to the capabilities of the specific HyperDeck model and software version.
Protocol Details
Connection
The HyperDeck Ethernet server listens on TCP port 9993.
Basic syntax
The HyperDeck protocol is a line oriented text protocol. Lines from the server will be separated by an ascii CR LF sequence. Messages from the client may be separated by LF or CR LF.
New lines are represented in this document as a "←" symbol.
Command syntax
Command parameters are usually optional. A command with no parameters is terminated with a new line: {Command name}
If parameters are specified, the command name is followed by a colon, then pairs of parameter names and values. Each parameter name is terminated with a colon character:
{Command name}: {Parameter}: {Value} {Parameter}: {Value} ...
Response syntax
Simple responses from the server consist of a three digit response code and descriptive text terminated by a new line:
{Response code} {Response text}
If a response carries parameters, the response text is terminated with a colon, and parameter name and value pairs follow on subsequent lines until a blank line is returned;
{Response code} {Response text}:
{Parameter}: {Value}
{Parameter}: {Value}
...
Successful response codes
A simple acknowledgement of a command is indicated with a response code of 200:
200 ok
Other successful responses carry parameters and are indicated with response codes in the range of 201 to 299.
Failure response codes
Failure responses to commands are indicated with response codes in the range of 100 to 199:
100 syntax error
101 unsupported parameter
102 invalid value
103 unsupported
104 disk full
105 no disk
106 disk error
109 out of range
110 no input
111 remote control disabled
120 connection rejected
150 invalid state
Asynchronous response codes
The server may return asynchronous messages at any time. These responses are indicated with response codes in the range of 500 to 599:
5xx {Response Text}: ←
{Parameter}: {Value} ←
{Parameter}: {Value} ←
←
Connection response
On connection, an asynchronous message will be delivered;
500 connection info: ←
protocol version: {Version} ←
model: {Model Name} ←
Connection rejection
Only one client may connect to the server at a time. If other clients attempt to connect concurrently, they will receive an error and be disconnected:
120 connection rejected
Timecode syntax
Timecodes are expressed as non-drop-frame timecode in the format HH:MM:SS:FF
Handling of deck "remote" state
The "remote" command may be used to enable or disable the remote control of the deck. Any attempt to change the deck state over ethernet while remote access is disabled will generate an error:
111 remote control disabled
To enable or disable remote control:
remote: enable: {"true", "false"}
The current remote control state may be overridden allowing remote access over ethernet irrespective of the current remote control state:
remote: override: {"true", "false"}
The override state is only valid for the currently connected ethernet client and only while the connection remains open.
The “remote” command may be used to query the remote control state of the deck by specifying no parameters:
remote
The deck will return the current remote control state:
210 remote info: enabled: {"true", "false"} override: {"true", "false"}
Asynchronous remote control information change notification is disabled by default and may be configured with the "notify" command. When enabled, changes in remote state will generate a "510 remote info:" asynchronous message with the same parameters as the "210 remote info" message.
Closing connection
The "quit" command instructs the server to cleanly shut down the connection: quit
Checking connection status
The "ping" command has no function other than to determine if the server is responding: ping
Getting help
The "help" or "?" commands return human readable help text describing all available commands and parameters:
help
or:
?
The server will respond with a list of all supported commands:
201 help:
{Help Text}
{Help Text}
←
Stopping deck operation
The "stop" command instructs the deck to stop the current capture: stop ←
Enumerating supported commands and parameters
The "commands" command returns the supported commands: commands
The command list is returned in a computer readable XML format:
212 commands
<commands>←
<command name="..."><parameter name="..."/>...</command>
<command name="..."><parameter name="..."/>...</command>
...
</commands>←
More XML tokens and parameters may be added in later releases.
Controlling asynchronous notifications
The "notify" command may be used to enable or disable asynchronous notifications from the server. To enable or disable transport notifications:
notify: transport: {"true", "false"}
To enable or disable slot notifications:
notify: slot: {"true", "false"}
To enable or disable remote notifications:
notify: remote: {"true", "false"}
To enable or disable configuration notifications:
notify: configuration: {"true", "false"}
To enable or disable dropped frames notifications;
notify: dropped frames: {"true", "false"}
Multiple parameters may be specified. If no parameters are specified, the server returns the current state of all notifications:
209 notify:
    transport: {"true", "false"}
    slot: {"true", "false"}
    remote: {"true", "false"}
    configuration: {"true", "false"}
Retrieving device information
The "device info" command returns information about the connected deck device:
device info
The server will respond with;
204 device info:
protocol version: {Version}
model: {Model Name}
unique id: {unique alphanumeric identifier}
Example of response from server:
204 device info:←
protocol version: 1.8 ←
model: Blackmagic Duplicator 4K ←
unique id: 101112131415 ←
Retrieving slot Information
The "slot info" command returns information about a slot.
The specified slot will be queried:
slot info: slot id: {Slot ID}
The server will respond with slot specific information:
202 slot info: ←
slot id: {Slot ID} ←
status: {"empty", "mounting", "error", "mounted"}
←
volume name: {Volume name} ←
recording time: {recording time available in seconds} ←
video format: {disk's default video format} ←
Asynchronous slot information change notification is disabled by default and may be configured with the "notify" command. When enabled, changes in slot state will generate a "502 slot info" asynchronous message with the same parameters as the "202 slot info:" message.
Retrieving transport information
The "transport info" command returns the state of the transport; transport info
The server responds with transport specific information;
208 transport info: ←
status: { "stopped", "record" } ←
display timecode: {timecode} ←
timecode: {timecode} ←
The "timecode" value is the timecode within the current timeline for playback or the clip for record. The "display timecode" is the timecode displayed on the front of the deck. The two timecodes will differ in some deck modes.
Asynchronous transport information change notification is disabled by default and may be configured with the "notify" command. When enabled, changes in transport state will generate a "508 transport info:" asynchronous message with the same parameters as the "208 transport info" message.
Video Formats
The following video formats are currently supported on Blackmagic Duplicator 4K
SD
525i59.94 NTSC 625i50 PAL
HD
720p50 1080p30
720p59.94 1080i50
720p60 1080p50
1080p23.98 1080i59.94
1080p24 1080p59.94
1080p25 1080i60
1080p29.97 1080p60
Ultra HD
2160p23.98 2160p30
2160p24 2160p50
2160p25 2160p59.94
2160p29.97 2160p60
Duplicator 4K supports progressive segmented frame modes, and automatically detects level A and level B 3G-SDI formats for 1080p50, 1080p59.94 and 1080p60.
File Formats
Duplicator 4K supports the following file formats:
H.264Low
H.264Medium
H.264High
H.265Low
H.265Medium
H.265High
Querying and updating configuration information
The "configuration" command may be used to query the current configuration of the deck; configuration
The server returns the configuration of the deck:
211 configuration:
video input: {"SDI", "optical"}
One or more configuration parameters may be specified to change the configuration of the deck.
To change the current video input;
configuration: video input: {"SDI", "optical"}
Configuring the watchdog
The "watchdog" command instructs the deck to monitor the connected client and terminate the connection if the client is inactive for at least a specified period of time.
To configure the watchdog:
watchdog: period: {period in seconds}
To avoid disconnection, the client must send a command to the server at least every {period} seconds. Note that if the period is set to 0 or less than 0, connection monitoring will be disabled.
Configuring the record mode
Use the 'record mode' command to select the deck recording mode:
configuration: record mode: {"Duplicate", "SingleDisk", "DiskOverwrite"}
Configuring the file format
The 'file format' command instructs the deck to switch to a specific file format for codec and bit rate:
configuration: file format: {"H.264High", "H.264Medium", "H.264Low", "H.265High", "H.265Medium", "H.265Low"}
ヘルプ
ヘルプライン
natural_image
Circular portrait photo of a smiling man in a black shirt against a gray background (no text or symbols)Bienvenue
CEO Blackmagic Design
Contents
Blackmagic Duplicator 4K
Mise en route 79
natural_image
Illustration of a hand inserting a device into a rack-mounted network (no text or symbols visible)
| 0x20 | 0x00 | Stop | Acknowledge | Disabled | |
| 0x20 | 0x02 | Record | Acknowledge | Disabled | |
| 0x21 | 0x02 | Append | Acknowledge | Disabled | Non-standard command - an extra payload of 0x00 indicates append |
4 - Preset/Select Control
| 0x40 | 0x40 | AutoMode Off | Acknowledge | Disabled | ignored, Status bit remembered |
| 0x40 | 0x41 | AutoMode On | Acknowledge | Disabled | ignored, Status bit remembered |
| 0x61 | 0x20 | StatusSense | StatusData | Enabled |
7 - Sense Reply
| 0x70 | 0x20 | StatusData | - | - | Please see "Status Bits" sheet: Limited to 9 bytes of status, silently truncated |
RS-422 Developer Information
| Bit 7 Bit 6 Bit 5 Bit 4 Bit 3 Bit 2 Bit 1 Bit 0 | ||||||||
| Byte 0 0 0 | Cassette out | 0 0 0 0 Local | ||||||
| Byte 1 | Standby | 0 | Stop | 0 | 0 | 0 | Record | 0 |
| Byte 2 0 0 0 0 0 0 0 0 | ||||||||
| Byte 3 | Auto Mode | 0 0 0 0 0 0 0 | ||||||
| Byte 4 | Select EE | Full EE 0 0 0 0 0 0 | ||||||
| Byte 5 0 0 0 0 0 0 0 0 | ||||||||
| Byte 6 0 0 0 0 0 0 0 0 | ||||||||
| Byte 7 0 0 0 0 0 0 0 0 0 | ||||||||
| Byte 8 0 0 0 0 0 0 0 0 0 | ||||||||
| Byte 9 0 0 0 0 0 0 0 0 0 | ||||||||
| Variables | |
| Cassette Out Set if no cards are ready to record | |
| Local Set if in local mode (no remote control) | |
| Standby | Set if one or more cards are ready to record |
| Auto Mode | For compatibility only |
| Full EE | For compatibility only - always on |
| Select EE | For compatibility only - always on |
| Blackmagic Duplicator 4K RS-422 Settings | |
| Protocol | Based on Sony 9-pin protocol |
| Baud Rate | 38.4 K |
| Start Bits | 1 |
| Data Bits | 8 |
| Stop Bits | 1 |
| Parity Bits | 1 |
| Parity Type | Odd |
/*
Telnet client Blackmagic Duplicator 4K Control Circuit: *
Ethernet shield attached to pins 10, 11, 12, 13
*/

#include <SPI.h>

#include <Ethernet.h>

// Enter a MAC address and IP address for your controller below.
// The IP address will be dependent on your local network:
byte mac[] = {0x90, 0xA2, 0xDA, 0x0F, 0x17, 0xEF};
byte ip[] = {192, 168, 28, 204}; // IP address of Ethernet Shield

byte server[] = {192, 168, 28, 141}; // IP address of Duplicator
EthernetClient client; // Give the ethernet client a name

void setup()
{
    Ethernet.begin(mac, ip); //Start the Ethernet connection:

    client.connect(server, 9993); //Connect to Duplicator on port 9993
}

void loop()
{
    while (client.available()) //Read the Duplicator Preamble
    {
    char c = client.read();
    }

    client.print("record: name: Cameral\x0a");
    //Start Duplicator recording a clip named Camera 1
    delay(60000); //Wait a minute
    client.print("stop\x0a"); //Stop recoding
    while (1); //Do nothing until program starts again
}
Protocole Ethernet Blackmagic HyperDeck
| Command Command Description | |
| help or ? Provides help text with all commands and parameters. | |
| remote Queries the state of HyperDeck's remote control mode. | |
| remote: enable: true Enables remote control. | |
| remote: enable: false Disables remote control. | |
| remote: override: true Turns remote override on. | |
| remote: override: false Turns remote override off. | |
| quit Disconnects HyperDeck server. | |
| ping Determines HyperDeck server is responding. | |
| record Starts recording. | |
| record: append: true Starts appended recording. | |
| stop Stops playback or recording. | |
| commands | Lists all supported commands in an XML format. |
| notify | Queries the current state of all notifications. |
| notify: transport: true | Enables transport notifications. |
| notify: transport: false | Disables transport notifications. |
| notify: slot: true | Enables slot notifications. |
| notify: slot: false | Disables slot notifications. |
| notify: remote: true | Enables remote notifications. |
| notify: remote: false | Disables remote notifications. |
| notify: configuration: true | Enables configuration notifications. |
| notify: configuration: false | Disables configuration notifications. |
| notify: dropped frames: true | Enables dropped frames notifications. |
| notify: dropped frames: false | Disables dropped frames notifications. |
| device info | Provides device information. |
| slot info: slot id: {slot ID} | Provides information about a specified slot. |
| transport info | Provides information for the state of the transport. |
| configuration | Queries the current configuration. |
| configuration: record mode: Duplicate | Configures the record mode to duplicate. |
Command Command Description
| configuration: record mode: SingleDisk Configures the record mode to single disk. |
| configuration: record mode: DiskOverwrite Configures the record mode to disk overwrite. |
| configuration: video input: {"SDI", "optical"} Configures video input. |
| configuration: file format: {format} Configures the record codec and bit rate. |
| format: prepare: {format} prepare a disk formatting operation to filesystem {format} |
| format: confirm: {token} perform a pre-prepared formatting operation using token |
| watchdog: period: {seconds} Configures the watchdog. |
Using XML
While you can use the Terminal to talk to HyperDeck, if you are writing software you can use XML to confirm the existence of a specific command based on the firmware of the HyperDeck you are communicating with. This helps your software user interface adjust to the capabilities of the specific HyperDeck model and software version.
Protocol Details
Connection
The HyperDeck Ethernet server listens on TCP port 9993.
Basic syntax
The HyperDeck protocol is a line oriented text protocol. Lines from the server will be separated by an ascii CR LF sequence. Messages from the client may be separated by LF or CR LF.
New lines are represented in this document as a "←" symbol.
Command syntax
Command parameters are usually optional. A command with no parameters is terminated with a new line: {Command name}
If parameters are specified, the command name is followed by a colon, then pairs of parameter names and values. Each parameter name is terminated with a colon character:
{Command name}: {Parameter}: {Value} {Parameter}: {Value} .
Response syntax
Simple responses from the server consist of a three digit response code and descriptive text terminated by a new line:
{Response code} {Response text}
If a response carries parameters, the response text is terminated with a colon, and parameter name and value pairs follow on subsequent lines until a blank line is returned:
{Response code} {Response text}:
{Parameter}: {Value}
{Parameter}: {Value}
...
Successful response codes
A simple acknowledgement of a command is indicated with a response code of 200:
200 ok
Other successful responses carry parameters and are indicated with response codes in the range of 201 to 299.
Failure response codes
Failure responses to commands are indicated with response codes in the range of 100 to 199:
100 syntax error
101 unsupported parameter
102 invalid value
103 unsupported
104 disk full
105 no disk
106 disk error
109 out of range
110 no input
111 remote control disabled
120 connection rejected
150 invalid state
Asynchronous response codes
The server may return asynchronous messages at any time. These responses are indicated with response codes in the range of 500 to 599:
5xx {Response Text}: ←
{Parameter}: {Value} ←
{Parameter}: {Value} ←
←
Connection response
On connection, an asynchronous message will be delivered:
500 connection info: ←
protocol version: {Version} ←
model: {Model Name} ←
Connection rejection
Only one client may connect to the server at a time. If other clients attempt to connect concurrently, they will receive an error and be disconnected:
120 connection rejected
Timecode syntax
Timecodes are expressed as non-drop-frame timecode in the format:
HH:M M:SS:FF
Handling of deck "remote" state
The “remote” command may be used to enable or disable the remote control of the deck. Any attempt to change the deck state over ethernet while remote access is disabled will generate an error:
111 remote control disabled
To enable or disable remote control:
remote: enable: {"true", "false"}
The current remote control state may be overridden allowing remote access over ethernet irrespective of the current remote control state:
remote: override: {"true", "false"}
The override state is only valid for the currently connected ethernet client and only while the connection remains open.
The “remote” command may be used to query the remote control state of the deck by specifying no parameters:
remote
The deck will return the current remote control state:
210 remote info: ←
enabled: {"true", "false"}
    ←
override: {"true", "false"}
    ←
Asynchronous remote control information change notification is disabled by default and may be configured with the "notify" command. When enabled, changes in remote state will generate a "510 remote info:" asynchronous message with the same parameters as the "210 remote info:" message.
Closing connection
The "quit" command instructs the server to cleanly shut down the connection:
quit
Checking connection status
The "ping" command has no function other than to determine if the server is responding:
ping←
Getting help
The "help" or "?" commands return human readable help text describing all available commands and parameters:
help
or:
?
The server will respond with a list of all supported commands:
201 help:
{Help Te xt}    ←
{Help Te xt}    ←
←
Stopping deck operation
The "stop" command instructs the deck to stop the current capture:
stop←
Enumerating supported commands and parameters
The "commands" command returns the supported commands:
commands
The command list is returned in a computer readable XML format:
212 commands :
<commands>
<command name="..."><parameter name="..."/>...</command>
<command name="..."><parameter name="..."/>...</command>
...
</commands>
More XML tokens and parameters may be added in later releases.
Controlling asynchronous notifications
The "notify" command may be used to enable or disable asynchronous notifications from the server. To enable or disable transport notifications:
notify: transport: {"true", "false"}
To enable or disable slot notifications:
notify: slot: {"true", "false"}
To enable or disable remote notifications:
notify: remote: {"true", "false"}
To enable or disable configuration notifications:
notify: configuration: {"true", "false"}
To enable or disable dropped frames notifications:
notify: dropped frames: {"true", "false"}
Multiple parameters may be specified. If no parameters are specified, the server returns the current state of all notifications:
209 notify:
transport: {"true", "false"}
slot: {"true", "false"}
remote: {"true", "false"}
configuration: {"true", "false"}
Retrieving device information
The "device info" command returns information about the connected deck device:
device info
The server will respond with:
204 device info: ←
protocol version: {Version} ←
model: {Model Name} ←
unique id: {unique alphanumeric identifier} ←
Example of response from server:
204 device info:
protocol version: 1.8
model: Blackmagic Duplicator 4K
uniq ue id: 101112131415
Retrieving slot information
The "slot info" command returns information about a slot.
The specified slot will be queried:
slot info: slot id: {Slot ID}
The server will respond with slot specific information:
202 slot info: ←
slot id: {Slot ID} ←
status: {"empty", "mounting", "error", "mounted"} ←
volume name: {Volume name} ←
recording time: {recording time available in seconds} ←
video format: {disk's default video format} ←
Asynchronous slot information change notification is disabled by default and may be configured with the "notify" command. When enabled, changes in slot state will generate a "502 slot info:" asynchronous message with the same parameters as the "202 slot info:" message.
Retrieving transport information
The "transport info" command returns the state of the transport:
transport info
The server responds with transport specific information:
208 transport info: ←
status: {"stopped","record"}
display timecode: {timecode}
timecode: {timecode}
The "timecode" value is the timecode within the current timeline for playback or the clip for record. The "display timecode" is the timecode displayed on the front of the deck. The two timecodes will differ in some deck modes.
Asynchronous transport information change notification is disabled by default and may be configured with the "notify" command. When enabled, changes in transport state will generate a "508 transport info:" asynchronous message with the same parameters as the "208 transport info:" message.
Video Formats
The following video formats are currently supported on Blackmagic Duplicator 4K:
SD
| 525i59.94 NTSC |
| 625i50 PAL |
HD
| 720p50 | 1080p30 |
| 720p59.94 | 1080i50 |
| 720p60 | 1080p50 |
| 1080p23.98 | 1080i59.94 |
| 1080p24 | 1080p59.94 |
| 1080p25 | 1080i60 |
| 1080p29.97 | 1080p60 |
Ultra HD
| 2160p23.98 | 2160p30 |
| 2160p24 | 2160p50 |
| 2160p25 | 2160p59.94 |
| 2160p29.97 | 2160p60 |
Duplicator 4K supports progressive segmented frame modes, and automatically detects level A and level B 3G-SDI formats for 1080p50, 1080p59.94 and 1080p60.
File Formats
Duplicator 4K supports the following file formats:
H.264Low
H.264Medium
H.264High
H.265Low
H.265Medium
H.265High
Querying and updating configuration information
The "configuration" command may be used to query the current configuration of the deck: configuration
The server returns the configuration of the deck:
211 configuration: ←
video input: { "SDI", "optical" } ←
One or more configuration parameters may be specified to change the configuration of the deck.
To change the current video input:
configuration: video input: {"SDI", "optical"}
Configuring the watchdog
The “watchdog” command instructs the deck to monitor the connected client and terminate the connection if the client is inactive for at least a specified period of time.
To configure the watchdog:
watchdog: period: {period in seconds}
To avoid disconnection, the client must send a command to the server at least every (period) seconds. Note that if the period is set to 0 or less than 0, connection monitoring will be disabled.
Configuring the record mode
Use the 'record mode' command to select the deck recording mode:
configuration: record mode: {"Duplicate", "SingleDisk", "DiskOverwrite"}
Configuring the file format
The 'file format' command instructs the deck to switch to a specific file format for codec and bit rate: configuration: file format: {"H.264High", "H.264Medium", "H.264Low", "H.265High", "H.265Mediu m", "H.265Low"}
Assistance
Obtenir de l'aide
natural_image
Circular portrait photo of a smiling man in a dark shirt against a gray background (no text or symbols)Willkommen
CEO, Blackmagic Design
Inhaltsverzeichnis
Blackmagic Duplicator 4K
Erste Schritte 116
natural_image
Illustration of a hand inserting a network switch into a server rack (no text or symbols visible)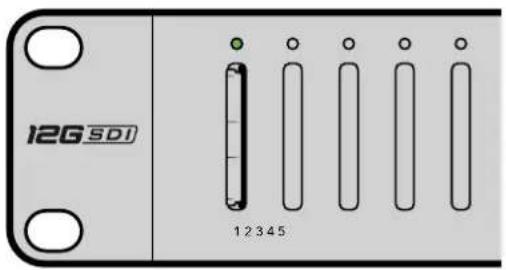
Supported RS-422 Commands
| Command Reply No Remote Notes | |||||
| 0 - System Control | |||||
| 0x00 0x11 | DeviceTypeRequest | NTSC: 0xF0E0PAL: 0xF1E024P: 0xF2E0 | Enabled – | ||
1 - Slave Response
| 0x20 | 0x00 | Stop | Acknowledge | Disabled | - |
| 0x20 | 0x02 | Record | Acknowledge | Disabled | - |
| 0x21 | 0x02 | Append | Acknowledge | Disabled | Non-standard command - an extra payload of 0x00 indicates append |
4 - Preset/Select Control
| 0x40 | 0x40 | AutoMode Off | Acknowledge | Disabled | ignored, Status bit remembered |
| 0x40 | 0x41 | AutoMode On | Acknowledge | Disabled | ignored, Status bit remembered |
| 0x61 | 0x20 | StatusSense | StatusData | Enabled | - |
7 - Sense Reply
| 0x70 | 0x20 | StatusData | - | - | Please see “Status Bits” sheet: Limited to 9 bytes of status, silently truncated |
RS-422 Developer Information
| Bit 7 Bit 6 | Bit 5 Bit 4 | Bit 3 Bit 2 | Bit 1 Bit 0 | |||||
| Byte 0 | 0 0 Cassette out 0 0 0 Local | |||||||
| Byte 1 | Standby 0 Stop 0 0 0 Record 0 | |||||||
| Byte 2 | 0 0 0 0 0 0 0 | |||||||
| Byte 3 | Auto Mode 0 0 0 0 0 0 | |||||||
| Byte 4 | Select EE Full EE | 0 0 0 0 0 | ||||||
| Byte 5 | 0 0 0 0 0 0 0 | |||||||
| Byte 6 | 0 0 0 0 0 0 0 | |||||||
| Byte 7 | 0 0 0 0 0 0 0 | |||||||
| Byte 8 | 0 0 0 0 0 0 0 | |||||||
| Byte 9 | 0 0 0 0 0 0 0 | |||||||
| Variables | |
| Cassette Out | Set if no cards are ready to record |
| Local | Set if in local mode (no remote control) |
| Standby | Set if one or more cards are ready to record |
| Auto Mode | For compatibility only |
| Full EE | For compatibility only - always on |
| Select EE | For compatibility only - always on |
| Blackmagic Duplicator 4K RS-422 Settings | |
| Protocol | Based on Sony 9-pin protocol |
| Baud Rate | 38.4 K |
| Start Bits | 1 |
| Data Bits | 8 |
| Stop Bits | 1 |
| Parity Bits | 1 |
| Parity Type | Odd |
| Command Command Description | |
| help or ? Provides help text with all commands and parameters. | |
| remote Queries the state of HyperDeck's remote control mode. | |
| remote: enable: true Enables remote control. | |
| remote: enable: false Disables remote control. | |
| remote: override: true Turns remote override on. | |
| remote: override: false Turns remote override off. | |
| quit Disconnects HyperDeck server. | |
| ping Determines HyperDeck server is responding. | |
| record Starts recording. | |
| record: append: true Starts appended recording. | |
| stop Stops playback or recording. | |
| commands Lists all supported commands in an XML format. | |
| notify | Queries the current state of all notifications. |
| notify: transport: true | Enables transport notifications. |
| notify: transport: false | Disables transport notifications. |
| notify: slot: true | Enables slot notifications. |
| notify: slot: false | Disables slot notifications. |
| notify: remote: true | Enables remote notifications. |
| notify: remote: false | Disables remote notifications. |
| notify: configuration: true | Enables configuration notifications. |
| notify: configuration: false | Disables configuration notifications. |
| notify: dropped frames: true | Enables dropped frames notifications. |
| notify: dropped frames: false | Disables dropped frames notifications. |
| device info Provides device information. | |
| slot info: slot id: {slot ID} | Provides information about a specified slot. |
| transport info | Provides information for the state of the transport. |
| configuration | Queries the current configuration. |
| configuration: record mode: Duplicate | Configures the record mode to duplicate. |
| configuration: record mode: SingleDisk | Configures the record mode to single disk. |
Command Command Description
configuration: record mode: DiskOverwrite Configures the record mode to disk overwrite.
configuration: video input: ("SDI", "optical") Configures video input.
configuration: file format: {format} Configures the record codec and bit rate.
format: prepare: {format} prepare a disk formatting operation to filesystem {format}
format: confirm: {token} perform a pre-prepared formatting operation using token
watchdog: period: [seconds] Configures the watchdog.
Using XML
The HyperDeck protocol is a line oriented text protocol. Lines from the server will be separated by an ascii CR LF sequence. Messages from the client may be separated by LF or CR LF.
New lines are represented in this document as a "←" symbol.
Command syntax
Command parameters are usually optional. A command with no parameters is terminated with a new line:
{Command name}
If parameters are specified, the command name is followed by a colon, then pairs of parameter names and values. Each parameter name is terminated with a colon character:
{Command name}: {Parameter}: {Value} {Parameter}: {Value}
Response syntax
Simple responses from the server consist of a three digit response code and descriptive text terminated by a new line:
{Response code} {Response text}
If a response carries parameters, the response text is terminated with a colon, and parameter name and value pairs follow on subsequent lines until a blank line is returned:
{Response code} {Response text}:
{ Parameter }: { Value }
{ Parameter }: { Value }
...
←
Successful response codes
A simple acknowledgement of a command is indicated with a response code of 200:
200 ok
Other successful responses carry parameters and are indicated with response codes in the range of 201 to 299.
Failure response codes
Failure responses to commands are indicated with response codes in the range of 100 to 199:
100 syntax error
101 unsupported parameter
102 invalid value
103 unsupported
104 disk full
105 no disk
106 disk error
109 out of range
110 no input
111 remote control disabled
120 connection rejected
150 invalid state
Asynchronous response codes
The server may return asynchronous messages at any time. These responses are indicated with response codes in the range of 500 to 599:
5xx {Response Text}: ←
{Pa ra m e te r}: { Va lu e}←
{Pa ra m e te r}: { Va lu e}←
Connection response
On connection, an asynchronous message will be delivered:
500 connection info: ←
protocol version: {Version} ←
model: {Model Name} ←
Connection rejection
Only one client may connect to the server at a time. If other clients attempt to connect concurrently, they will receive an error and be disconnected:
120 connection rejected
Timecode syntax
Timecodes are expressed as non-drop-frame timecode in the format: HH:MM:SS:FF
Handling of deck "remote" state
The “remote” command may be used to enable or disable the remote control of the deck. Any attempt to change the deck state over ethernet while remote access is disabled will generate an error:
111 remote control disabled
To enable or disable remote control:
remote: enable: {"true", "false"}
The current remote control state may be overridden allowing remote access over ethernet irrespective of the current remote control state:
remote: override: {"true", "false"}
The override state is only valid for the currently connected ethernet client and only while the connection remains open.
The “remote” command may be used to query the remote control state of the deck by specifying no parameters:
remote
The deck will return the current remote control state:
210 remote info: ←
enabled: {"true", "false"}
override: {"true", "false"}
Asynchronous remote control information change notification is disabled by default and may be configured with the "notify" command. When enabled, changes in remote state will generate a "510 remote info:" asynchronous message with the same parameters as the "210 remote info:" message.
Closing connection
The "quit" command instructs the server to cleanly shut down the connection:
quit
Checking connection status
The "ping" command has no function other than to determine if the server is responding:
ping←
Getting help
The "help" or "?" commands return human readable help text describing all available commands and parameters:
help
or:
?←
The server will respond with a list of all supported commands:
201 help:
{Help Tex t} ←
{Help Tex t} ←
←
Stopping deck operation
The "stop" command instructs the deck to stop the current capture:
stop←
Enumerating supported commands and parameters
The "commands" command returns the supported commands:
commands
The command list is returned in a computer readable XML format:
212 commands :
<commands>
<command name="..."><parameter name="..." />...</command>
<command name="..."><parameter name="..." />...</command>
...
</commands>
More XML tokens and parameters may be added in later releases.
Controlling asynchronous notifications
The "notify" command may be used to enable or disable asynchronous notifications from the server. To enable or disable transport notifications:
notify: transport: {"true", "false"}
To enable or disable slot notifications:
notify: slot: {"true", "false"}
To enable or disable remote notifications:
notify: remote: {"true", "false"}
To enable or disable configuration notifications:
notify: configuration: {"true", "false"}
To enable or disable dropped frames notifications:
notify: dropped frames: {"true", "false"}
Multiple parameters may be specified. If no parameters are specified, the server returns the current state of all notifications:
209 notify:
    transport: {"true", "false"}
    slot: {"true", "false"}
    remote: {"true", "false"}
    configuration: {"true", "false"}
Retrieving device information
The "device info" command returns information about the connected deck device:
device info
The server will respond with:
204 device info: ←
protocol version: {Version} ←
model: {Model Name} ←
unique id: {unique alphanumeric identifier} ←
Example of response from server:
204 device info:
protocol version: 1.8
model: Blackmagic Duplicator 4K
unique id: 101112131415
Retrieving slot information
The "slot info" command returns information about a slot.
The specified slot will be queried:
slot info: slot id: {Slot ID}
The server will respond with slot specific information:
202 slot info: ←
slot id: {Slot ID} ←
status: {"empty", "mounting", "error", "mounted"} ←
volume name: {Volume name} ←
recording time: {recording time available in seconds} ←
video format: {disk's default video format} ←
Asynchronous slot information change notification is disabled by default and may be configured with the "notify" command. When enabled, changes in slot state will generate a "502 slot info:" asynchronous message with the same parameters as the "202 slot info:" message.
Retrieving transport information
The "transport info" command returns the state of the transport: transport info
The server responds with transport specific information:
208 transport info: ←
status: {"stopped","record"}
←
display timecode: {timecode}
←
timecode: {timecode}
The “timecode” value is the timecode within the current timeline for playback or the clip for record. The “display timecode” is the timecode displayed on the front of the deck. The two timecodes will differ in some deck modes.
Asynchronous transport information change notification is disabled by default and may be configured with the "notify" command. When enabled, changes in transport state will generate a "508 transport info:" asynchronous message with the same parameters as the "208 transport info:" message.
Video Formats
The following video formats are currently supported on Blackmagic Duplicator 4K:
SD
525i59.94 NTSC 625i50 PAL
HD
720p50 1080p30
720p59.94 1080i50
720p60 1080p50
1080p23.98 1080i59.94
1080p24 1080p59.94
1080p25 1080i60
1080p29.97 1080p60
Ultra HD
2160p23.98 2160p30
2160p24 2160p50
2160p25 2160p59.94
2160p29.97 2160p60
Duplicator 4K supports progressive segmented frame modes, and automatically detects level A and level B 3G-SDI formats for 1080p50, 1080p59.94 and 1080p60.
File Formats
Duplicator 4K supports the following file formats:
H.264Low
H.264Medium
H.264High
H.265Low
H.265Medium
H.265High
Querying and updating configuration information
The "configuration" command may be used to query the current configuration of the deck: configuration
The server returns the configuration of the deck:
211 configuration: ←
video input: {"SDI", "optical"} ←
←
One or more configuration parameters may be specified to change the configuration of the deck.
To change the current video input:
configuration: video input: {"SDI", "optical"}
Configuring the watchdog
The "watchdog" command instructs the deck to monitor the connected client and terminate the connection if the client is inactive for at least a specified period of time.
To configure the watchdog:
watchdog: period: {period in seconds}
To avoid disconnection, the client must send a command to the server at least every [period] seconds. Note that if the period is set to 0 or less than 0, connection monitoring will be disabled.
Configuring the record mode
Use the 'record mode' command to select the deck recording mode:
configuration: record mode: {"Duplicate", "SingleDisk", "DiskOverwrite"}
Configuring the file format
The 'file format' command instructs the deck to switch to a specific file format for codec and bit rate: configuration: file format: {"H.264High", "H.264Medium", "H.264Low", "H.265High", "H.265Medium", "H.265Low"}
Hilfe
Hilfestellung
ISED Canada Statement
California Proposition 65
natural_image
Circular portrait photo of a smiling man in a dark shirt against a gray background (no text or symbols)Bienvenido
natural_image
Illustration of a hand inserting a network switch into a rack-mounted server (no text or symbols visible)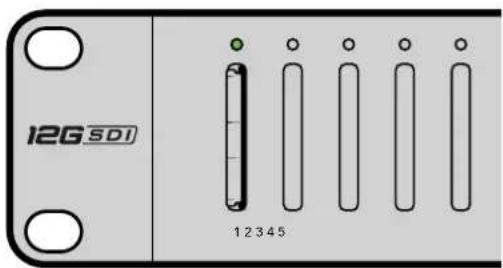
Unidad secundaria
Presione el botón
Supported RS-422 Commands
| Command Reply No Remote Notes | |||||
| 0 - System Control | |||||
| 0x00 0x11 DeviceTypeRequest | NTSC: 0xF0E0PAL: 0xF1E024P: 0xF2E0 | Enabled - | |||
1 - Slave Response
| 0x20 | 0x00 | Stop | Acknowledge | Disabled | - |
| 0x20 | 0x02 | Record | Acknowledge | Disabled | - |
| 0x21 | 0x02 | Append | Acknowledge | Disabled | Non-standard command - an extra payload of 0x00 indicates append |
4 - Preset/Select Control
| 0x40 | 0x40 | AutoMode Off | Acknowledge | Disabled | ignored, Status bit remembered |
| 0x40 | 0x41 | AutoMode On | Acknowledge | Disabled | ignored, Status bit remembered |
| 0x61 | 0x20 | StatusSense | StatusData | Enabled | - |
7 - Sense Reply
| 0x70 | 0x20 | StatusData | - | - | Please see "Status Bits" sheet: Limited to 9 bytes of status, silently truncated |
RS-422 Developer Information
| Bit 7 Bit 6 Bit 5 Bit 4 Bit 3 Bit 2 Bit 1 Bit 0 | ||||||||
| Byte 0 0 | Cassette out 0 0 0 0 Local | |||||||
| Byte 1 | Standby | 0 | Stop | 0 | 0 | 0 | Record | 0 |
| Byte 2 | 0 | 0 | 0 | 0 | 0 | 0 | 0 | 0 |
| Byte 3 | Auto Mode | 0 | 0 | 0 0 0 0 | 0 | |||
| Byte 4 | Select EE | Full EE | 0 | 0 | 0 | 0 | 0 | 0 |
| Byte 5 | 0 | 0 | 0 | 0 | 0 | 0 | 0 | 0 |
| Byte 6 | 0 | 0 | 0 | 0 | 0 | 0 | 0 | 0 |
| Byte 7 | 0 | 0 | 0 | 0 | 0 | 0 | 0 | 0 |
| Byte 8 | 0 | 0 | 0 | 0 | 0 | 0 | 0 | 0 |
| Byte 9 | 0 | 0 | 0 | 0 | 0 | 0 | 0 | 0 |
| Variables | |
| Cassette Out | Set if no cards are ready to record |
| Local | Set if in local mode (no remote control) |
| Standby | Set if one or more cards are ready to record |
| Auto Mode | For compatibility only |
| Full EE | For compatibility only - always on |
| Select EE | For compatibility only - always on |
| Blackmagic Duplicator 4K RS-422 Settings | |
| Protocol | Based on Sony 9-pin protocol |
| Baud Rate | 38.4 K |
| Start Bits | 1 |
| Data Bits | 8 |
| Stop Bits | 1 |
| Parity Bits | 1 |
| Parity Type | Odd |
Control a distancia mediante redes Ethernet
/*
Telnet client Blackmagic Duplicator 4K Control Circuit: *
Ethernet shield attached to pins 10, 11, 12, 13
*/

#include <SPI.h>

#include <Ethernet.h>

// Enter a MAC address and IP address for your controller below.
// The IP address will be dependent on your local network:
byte mac[] = {0x90, 0xA2, 0xDA, 0x0F, 0x17, 0xEF};
byte ip[] = {192, 168, 28, 204}; // IP address of Ethernet Shield
byte server[] = {192, 168, 28, 141}; // IP address of Duplicator
EthernetClient client; // Give the ethernet client a name

void setup()
{
    Ethernet.begin(mac, ip); //Start the Ethernet connection:

    client.connect(server, 9993); //Connect to Duplicator on port 9993
}

void loop()
{
    while (client.available()) //Read the Duplicator Preamble
    {
    char c = client.read();
    }

    client.print("record: name: Cameral\x0a");
    //Start Duplicator recording a clip named Camera 1
    delay(60000); //Wait a minute
    client.print("stop\x0a"); //Stop recoding
    while (1); //Do nothing until program starts again
| Command Command Description | |
| help or ? Provides help text with all commands and parameters. | |
| remote Queries the state of HyperDeck's remote control mode. | |
| remote: enable: true Enables remote control. | |
| remote: enable: false Disables remote control. | |
| remote: override: true Turns remote override on. | |
| remote: override: false Turns remote override off. | |
| quit Disconnects HyperDeck server. | |
| ping Determines HyperDeck server is responding. | |
| record Starts recording. | |
| record: append: true Starts appended recording. | |
| stop Stops playback or recording. | |
| commands Lists all supported commands in an XML format. | |
| notify | Queries the current state of all notifications. |
| notify: transport: true | Enables transport notifications. |
| notify: transport: false | Disables transport notifications. |
| notify: slot: true | Enables slot notifications. |
| notify: slot: false | Disables slot notifications. |
| notify: remote: true | Enables remote notifications. |
| notify: remote: false | Disables remote notifications. |
| notify: configuration: true | Enables configuration notifications. |
| notify: configuration: false | Disables configuration notifications. |
| notify: dropped frames: true | Enables dropped frames notifications. |
| notify: dropped frames: false | Disables dropped frames notifications. |
| device info Provides device information. | |
| slot info: slot id: {slot ID} | Provides information about a specified slot. |
| transport info | Provides information for the state of the transport. |
| configuration | Queries the current configuration. |
| configuration: record mode: Duplicate | Configures the record mode to duplicate. |
Command Command Description
| configuration: record mode: SingleDisk Configures the record mode to single disk. |
| configuration: record mode: DiskOverwrite Configures the record mode to disk overwrite. |
| configuration: video input: {"SDI", "optical"} Configures video input. |
| configuration: file format: {format} Configures the record codec and bit rate. |
| format: prepare: {format} prepare a disk formatting operation to filesystem {format} |
| format: confirm: {token} perform a pre-prepared formatting operation using token |
| watchdog: period: {seconds} Configures the watchdog. |
Lenguaje XMLL
The HyperDeck protocol is a line oriented text protocol. Lines from the server will be separated by an ascii CR LF sequence. Messages from the client may be separated by LF or CR LF. New lines are represented in this document as a "←" symbol.
Command syntax
Command parameters are usually optional. A command with no parameters is terminated with a new line: {Command name}
If parameters are specified, the command name is followed by a colon, then pairs of parameter names and values. Each parameter name is terminated with a colon character: {Command name}: {Parameter}: {Value} {Parameter}: {Value}.
Response syntax
Simple responses from the server consist of a three digit response code and descriptive text terminated by a new line:
{Response code} {Response text}
If a response carries parameters, the response text is terminated with a colon, and parameter name and value pairs follow on subsequent lines until a blank line is returned:
{Response code} {Response text}:
{Parameter}: {Value}
{Parameter}: {Value}
...
Successful response codes
A simple acknowledgement of a command is indicated with a response code of 200:
200 ok
Other successful responses carry parameters and are indicated with response codes in the range of 201 to 299.
Failure response codes
Failure responses to commands are indicated with response codes in the range of 100 to 199:
100 syntax error
101 unsupported parameter
102 invalid value
103 unsupported
104 disk full
105 no disk
106 disk error
109 out of range
110 no input
111 remote control disabled
120 connection rejected
150 invalid state
Asynchronous response codes
The server may return asynchronous messages at any time. These responses are indicated with response codes in the range of 500 to 599:
5xx {Response Text}: ←
{Parameter}: {Value} ←
{Parameter}: {Value} ←
←
Connection response
On connection, an asynchronous message will be delivered:
500 connection info: ←
protocol version: {Version} ←
model: {Model Name} ←
Connection rejection
Only one client may connect to the server at a time. If other clients attempt to connect concurrently, they will receive an error and be disconnected:
120 connection rejected
Timecode syntax
Timecodes are expressed as non-drop-frame timecode in the format:
HH:M M:SS:FF
Handling of deck "remote" state
The “remote” command may be used to enable or disable the remote control of the deck. Any attempt to change the deck state over ethernet while remote access is disabled will generate an error:
111 remote control disabled
To enable or disable remote control:
remote: enable: {"true", "false"}
The current remote control state may be overridden allowing remote access over ethernet irrespective of the current remote control state:
remote: override: {"true", "false"}
The override state is only valid for the currently connected ethernet client and only while the connection remains open.
The “remote” command may be used to query the remote control state of the deck by specifying no parameters:
remote
The deck will return the current remote control state:
210 remote info: ←
enabled: {"true", "false"}
    ←
override: {"true", "false"}
    ←
Asynchronous remote control information change notification is disabled by default and may be configured with the "notify" command. When enabled, changes in remote state will generate a "510 remote info:" asynchronous message with the same parameters as the "210 remote info:" message.
Closing connection
The "quit" command instructs the server to cleanly shut down the connection:
quit
Checking connection status
The "ping" command has no function other than to determine if the server is responding:
ping←
Getting help
The "help" or "?" commands return human readable help text describing all available commands and parameters:
help
or:
?
The server will respond with a list of all supported commands:
201 help:
{Help Te xt}    ←
{Help Te xt}    ←
←
Stopping deck operation
The "stop" command instructs the deck to stop the current capture:
stop←
Enumerating supported commands and parameters
The "commands" command returns the supported commands:
commands
The command list is returned in a computer readable XML format:
212 commands :
<commands>
<command name="..."><parameter name="..."/>...</command>
<command name="..."><parameter name="..."/>...</command>
...
</commands>
More XML tokens and parameters may be added in later releases.
Controlling asynchronous notifications
The "notify" command may be used to enable or disable asynchronous notifications from the server. To enable or disable transport notifications:
notify: transport: {"true", "false"}
To enable or disable slot notifications:
notify: slot: {"true", "false"}
To enable or disable remote notifications:
notify: remote: {"true", "false"}
To enable or disable configuration notifications:
notify: configuration: {"true", "false"}
To enable or disable dropped frames notifications:
notify: dropped frames: {"true", "false"}
Multiple parameters may be specified. If no parameters are specified, the server returns the current state of all notifications:
209 notify:
    transport: {"true", "false"}
    slot: {"true", "false"}
    remote: {"true", "false"}
    configuration: {"true", "false"}
Retrieving device information
The "device info" command returns information about the connected deck device:
device info
The server will respond with:
204 device info:
protocol version: {Version}
model: {Model Name}
unique id: {unique alphanumeric identifier}
Example of response from server:
204 device info:↓
protocol version: 1.8 ←
model: Blackmagic Duplicator 4K ←
uniq ue id: 101112131415 ←
←
Retrieving slot information
The "slot info" command returns information about a slot.
The specified slot will be queried:
slot info: slot id: {Slot ID}
The server will respond with slot specific information:
202 slot info: ←
slot id: {Slot ID} ←
status: {"empty", "mounting", "error", "mounted"} ←
volume name: {Volume name} ←
recording time: {recording time available in seconds} ←
video format: {disk's default video format} ←
Asynchronous slot information change notification is disabled by default and may be configured with the "notify" command. When enabled, changes in slot state will generate a "502 slot info:" asynchronous message with the same parameters as the "202 slot info:" message.
Retrieving transport information
The "transport info" command returns the state of the transport:
transport info
The server responds with transport specific information:
208 transport info: ←
status: {"stopped","record"}
display timecode: {timecode}
timecode: {timecode}
The "timecode" value is the timecode within the current timeline for playback or the clip for record. The "display timecode" is the timecode displayed on the front of the deck. The two timecodes will differ in some deck modes.
Asynchronous transport information change notification is disabled by default and may be configured with the "notify" command. When enabled, changes in transport state will generate a "508 transport info:" asynchronous message with the same parameters as the "208 transport info:" message.
Video Formats
The following video formats are currently supported on Blackmagic Duplicator 4K:
SD
| 525i59.94 NTSC |
| 625i50 PAL |
HD
| 720p50 | 1080p30 |
| 720p59.94 | 1080i50 |
| 720p60 | 1080p50 |
| 1080p23.98 | 1080i59.94 |
| 1080p24 | 1080p59.94 |
| 1080p25 | 1080i60 |
| 1080p29.97 | 1080p60 |
Ultra HD
| 2160p23.98 | 2160p30 |
| 2160p24 | 2160p50 |
| 2160p25 | 2160p59.94 |
| 2160p29.97 | 2160p60 |
Duplicator 4K supports progressive segmented frame modes, and automatically detects level A and level B 3G-SDI formats for 1080p50, 1080p59.94 and 1080p60.
File Formats
Duplicator 4K supports the following file formats:
H.264Low
H.264Medium
H.264High
H.265Low
H.265Medium
H.265High
Querying and updating configuration information
The "configuration" command may be used to query the current configuration of the deck: configuration
The server returns the configuration of the deck:
211 configuration: ←
video input: { "SDI", "optical" } ←
One or more configuration parameters may be specified to change the configuration of the deck.
To change the current video input:
configuration: video input: {"SDI", "optical"}
Configuring the watchdog
The “watchdog” command instructs the deck to monitor the connected client and terminate the connection if the client is inactive for at least a specified period of time.
To configure the watchdog:
watchdog: period: {period in seconds}
To avoid disconnection, the client must send a command to the server at least every (period) seconds. Note that if the period is set to 0 or less than 0, connection monitoring will be disabled.
Configuring the record mode
Use the 'record mode' command to select the deck recording mode:
configuration: record mode: {"Duplicate", "SingleDisk", "DiskOverwrite"}
Configuring the file format
The 'file format' command instructs the deck to switch to a specific file format for codec and bit rate: configuration: file format: {"H.264High", "H.264Medium", "H.264Low", "H.265High", "H.265Mediu m", "H.265Low"}
Ayuda
Cómo obtener ayuda
SDI 3G: PL-4F20-311C
SDI 6G: PL-8F10-311C
• SDI 12G: PL-TG10-311C

natural_image
Circular portrait photo of a smiling man with short hair, wearing a dark collared shirt (no text or symbols visible)欢迎辞
感谢您购买Blackmagic Duplicator 4K!
natural_image
Illustration of a hand inserting a network switch into an Ethernet rack (no text or symbols visible)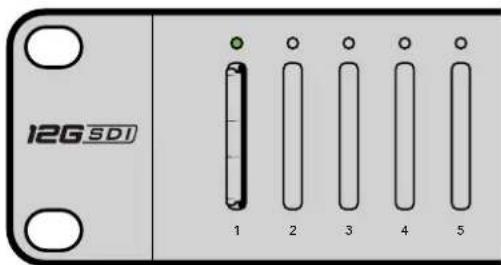
Supported RS-422 Commands
| Command Reply No | Remote Notes | ||||
| 0 - System Control | |||||
| 0x00 0x11 DeviceTypeRequest | NTSC: 0xF0E0PAL: 0xF1E024P: 0xF2E0 | Enabled | |||
1 - Slave Response
| 0x20 | 0x00 | Stop | Acknowledge | Disabled | |
| 0x20 | 0x02 | Record | Acknowledge | Disabled | |
| 0x21 | 0x02 | Append | Acknowledge | Disabled | Non-standard command – an extra payload of 0x00 indicates append |
4 - Preset/Select Control
| 0x40 | 0x40 | AutoMode Off | Acknowledge | Disabled | ignored, Status bit remembered |
| 0x40 | 0x41 | AutoMode On | Acknowledge | Disabled | ignored, Status bit remembered |
| 0x61 | 0x20 | StatusSense | StatusData | Enabled |
7 - Sense Reply
| 0x70 | 0x20 | StatusData | - | - | Please see “Status Bits” sheet: Limited to 9 bytes of status, silently truncated |
RS-422 Developer Information
| Bit 7 Bit | 6 Bit | 5 Bit | 4 Bit | 3 Bit | 2 Bit | 1 Bit | 0 | |
| Byte 0 | 0 | 0 | Cassette out | 0 0 0 | 0 Local | |||
| Byte 1 | Standby 0 | Stop 0 0 0 | Record 0 | |||||
| Byte 2 | 0 0 0 0 | 0 0 0 0 | ||||||
| Byte 3 | Auto Mode | 0 0 0 | 0 0 0 0 | |||||
| Byte 4 | Select EE | Full EE | 0 0 0 0 | 0 0 | ||||
| Byte 5 | 0 0 0 0 | 0 0 0 0 | ||||||
| Byte 6 | 0 0 0 0 | 0 0 0 0 | ||||||
| Byte 7 | 0 0 0 0 | 0 0 0 0 | ||||||
| Byte 8 | 0 0 0 0 | 0 0 0 0 | ||||||
| Byte 9 | 0 0 0 0 | 0 0 0 0 |
Variables
| Cassette Out | Set if no cards are ready to record |
| Local | Set if in local mode (no remote control) |
| Standby | Set if one or more cards are ready to record |
| Auto Mode | For compatibility only |
| Full EE | For compatibility only – always on |
| Select EE | For compatibility only – always on |
Blackmagic Duplicator 4K RS-422 Settings
| Protocol | Based on Sony 9-pin protocol |
| Baud Rate | 38.4 K |
| Start Bits | 1 |
| Data Bits | 8 |
| Stop Bits | 1 |
| Parity Blts | 1 |
| Parity Type | Odd |
通过以太网远程控制
/*
Telnet client Blackmagic Duplicator 4K Control Circuit: *
Ethernet shield attached to pins 10, 11, 12, 13
*/

#include <SPI.h>

#include <Ethernet.h>

// Enter a MAC address and IP address for your controller below.
// The IP address will be dependent on your local network:
byte mac[] = {0x90, 0xA2, 0xDA, 0x0F, 0x17, 0xEF};
byte ip[] = {192, 168, 28, 204}; // IP address of Ethernet Shield
byte server[] = {192, 168, 28, 141}; // IP address of Duplicator
EthernetClient client; // Give the ethernet client a name

void setup()
{
    Ethernet.begin(mac, ip); //Start the Ethernet connection:

    client.connect(server, 9993); //Connect to Duplicator on port 9993
}

void d loop()
{
    while (client.available()) //Read the Duplicator Preamble
    {
    char c = client.read();
    }

    client.print("record: name: Cameral\x0a");
    //Start Duplicator recording a clip named Camera 1
    delay(60000); //Wait a minute
    client.print("stop\x0a"); //Stop recoding
    while (1); //Do nothing until program starts again
}
Blackmagic HyperDeck以太网协议
| Command Command Description | |
| help or ? Provides help text with all commands and parameters. | |
| remote Queries the state of HyperDeck's remote control mode. | |
| remote: enable: true Enables remote control. | |
| remote: enable: false Disables remote control. | |
| remote: override: true | Turns remote override on. |
| remote: override: false | Turns remote override off. |
| quit | Disconnects HyperDeck server. |
| ping | Determines HyperDeck server is responding. |
| record | Starts recording. |
| record: append: true | Starts appended recording. |
| stop | Stops playback or recording. |
| commands | Lists all supported commands in an XML format. |
| notify | Queries the current state of all notifications. |
| notify: transport: true | Enables transport notifications. |
| notify: transport: false | Disables transport notifications. |
| notify: slot: true | Enables slot notifications. |
| notify: slot: false | Disables slot notifications. |
| notify: remote: true | Enables remote notifications. |
| notify: remote: false | Disables remote notifications. |
| notify: configuration: true | Enables configuration notifications. |
| notify: configuration: false | Disables configuration notifications. |
| notify: dropped frames: true | Enables dropped frames notifications. |
| notify: dropped frames: false | Disables dropped frames notifications. |
| device info | Provides device information. |
| slot info: slot id: {slot ID} | Provides information about a specified slot. |
| transport info | Provides information for the state of the transport. |
| configuration | Queries the current configuration. |
| configuration: record mode: Duplicate | Configures the record mode to duplicate. |
Command Command Description
configuration: record mode: SingleDisk Configures the record mode to single disk.
configuration: record mode: DiskOverwrite Configures the record mode to disk overwrite.
configuration: video input: {"SDI", "optical"} Configures video input.
configuration: file format: {format} Configures the record codec and bit rate.
format: prepare: {format} prepare a disk formatting operation to filesystem {format}
format: confirm: {token} perform a pre-prepared formatting operation using token
watchdog: period: {seconds} Configures the watchdog.
Using XML
While you can use the Terminal to talk to HyperDeck, if you are writing software you can use XML to confirm the existence of a specific command based on the firmware of the HyperDeck you are communicating with. This helps your software user interface adjust to the capabilities of the specific HyperDeck model and software version.
Protocol Details
Connection
The HyperDeck Ethernet server listens on TCP port 9993.
Basic syntax
The HyperDeck protocol is a line oriented text protocol. Lines from the server will be separated by an ascii CR LF sequence. Messages from the client may be separated by LF or CR LF.
New lines are represented in this document as a "←" symbol.
Command syntax
Command parameters are usually optional. A command with no parameters is terminated with a new line: {Command name}
If parameters are specified, the command name is followed by a colon, then pairs of parameter names and values. Each parameter name is terminated with a colon character:
{Command name}: {Parameter}: {Value} {Parameter}: {Value}.
Response syntax
Simple responses from the server consist of a three digit response code and descriptive text terminated by a new line:
{Response code} {Response text}
If a response carries parameters, the response text is terminated with a colon, and parameter name and value pairs follow on subsequent lines until a blank line is returned:
{Response code} {Response text}:
{Parameter}: {Value}
{Parameter}: {Value}
...
Successful response codes
A simple acknowledgement of a command is indicated with a response code of 200:
200 ok
Other successful responses carry parameters and are indicated with response codes in the range of 201 to 299.
Failure response codes
Failure responses to commands are indicated with response codes in the range of 100 to 199:
100 syntax error
101 unsupported parameter
102 invalid value
103 unsupported
104 disk full
105 no disk
106 disk error
109 out of range
110 no input
111 remote control disabled
120 connection rejected
150 invalid state
Asynchronous response codes
The server may return asynchronous messages at any time. These responses are indicated with response codes in the range of 500 to 599:
5xx {Response Text}: ←
{Parameter}: {Value} ←
{Parameter}: {Value} ←
←
Connection response
On connection, an asynchronous message will be delivered:
500 connection info: ←
protocol version: {Version} ←
model: {Model Name} ←
Connection rejection
Only one client may connect to the server at a time. If other clients attempt to connect concurrently, they will receive an error and be disconnected:
120 connection rejected
Timecode syntax
Timecodes are expressed as non-drop-frame timecode in the format:
HH:M M:SS:FF
Handling of deck "remote" state
The “remote” command may be used to enable or disable the remote control of the deck. Any attempt to change the deck state over ethernet while remote access is disabled will generate an error:
111 remote control disabled
To enable or disable remote control:
remote: enable: {"true", "false"}
The current remote control state may be overridden allowing remote access over ethernet irrespective of the current remote control state:
remote: override: {"true", "false"}
The override state is only valid for the currently connected ethernet client and only while the connection remains open.
The “remote” command may be used to query the remote control state of the deck by specifying no parameters:
remote
The deck will return the current remote control state:
210 remote info: ←
enabled: {"true", "false"}
    ←
override: {"true", "false"}
    ←
Asynchronous remote control information change notification is disabled by default and may be configured with the "notify" command. When enabled, changes in remote state will generate a "510 remote info:" asynchronous message with the same parameters as the "210 remote info:" message.
Closing connection
The "quit" command instructs the server to cleanly shut down the connection:
quit←
Checking connection status
The "ping" command has no function other than to determine if the server is responding:
ping←
Getting help
The "help" or "?" commands return human readable help text describing all available commands and parameters:
help
or:
?
The server will respond with a list of all supported commands:
201 help:
{Help Te xt}    ←
{Help Te xt}    ←
←
Stopping deck operation
The "stop" command instructs the deck to stop the current capture:
stop←
Enumerating supported commands and parameters
The "commands" command returns the supported commands:
commands
The command list is returned in a computer readable XML format:
212 commands :
<commands>
<command name="..."><parameter name="..."/>...</command>
<command name="..."><parameter name="..."/>...</command>
...
</commands>
More XML tokens and parameters may be added in later releases.
Controlling asynchronous notifications
The "notify" command may be used to enable or disable asynchronous notifications from the server. To enable or disable transport notifications:
notify: transport: {"true", "false"}
To enable or disable slot notifications:
notify: slot: {"true", "false"}
To enable or disable remote notifications:
notify: remote: {"true", "false"}
To enable or disable configuration notifications:
notify: configuration: {"true", "false"}
To enable or disable dropped frames notifications:
notify: dropped frames: {"true", "false"}
Multiple parameters may be specified. If no parameters are specified, the server returns the current state of all notifications:
209 notify:
transport: {"true", "false"}
slot: {"true", "false"}
remote: {"true", "false"}
configuration: {"true", "false"}
Retrieving device information
The "device info" command returns information about the connected deck device:
device info
The server will respond with:
204 device info: ←
protocol version: {Version} ←
model: {Model Name} ←
unique id: {unique alphanumeric identifier} ←
Example of response from server:
204 device info:
protocol version: 1.8
model: Blackmagic Duplicator 4K
uniq ue id: 101112131415
Retrieving slot information
The "slot info" command returns information about a slot.
The specified slot will be queried:
slot info: slot id: {Slot ID}
The server will respond with slot specific information:
202 slot info: ←
slot id: {Slot ID} ←
status: {"empty", "mounting", "error", "mounted"} ←
volume name: {Volume name} ←
recording time: {recording time available in seconds} ←
video format: {disk's default video format} ←
Asynchronous slot information change notification is disabled by default and may be configured with the "notify" command. When enabled, changes in slot state will generate a "502 slot info:" asynchronous message with the same parameters as the "202 slot info:" message.
Retrieving transport information
The "transport info" command returns the state of the transport:
transport info
The server responds with transport specific information:
208 transport info: ←
status: {"stopped","record"}
display timecode: {timecode}
timecode: {timecode}
The "timecode" value is the timecode within the current timeline for playback or the clip for record. The "display timecode" is the timecode displayed on the front of the deck. The two timecodes will differ in some deck modes.
Asynchronous transport information change notification is disabled by default and may be configured with the "notify" command. When enabled, changes in transport state will generate a "508 transport info:" asynchronous message with the same parameters as the "208 transport info:" message.
Video Formats
The following video formats are currently supported on Blackmagic Duplicator 4K:
SD
| 525i59.94 NTSC |
| 625i50 PAL |
HD
| 720p50 | 1080p30 |
| 720p59.94 | 1080i50 |
| 720p60 | 1080p50 |
| 1080p23.98 | 1080i59.94 |
| 1080p24 | 1080p59.94 |
| 1080p25 | 1080i60 |
| 1080p29.97 | 1080p60 |
Ultra HD
| 2160p23.98 | 2160p30 |
| 2160p24 | 2160p50 |
| 2160p25 | 2160p59.94 |
| 2160p29.97 | 2160p60 |
Duplicator 4K supports progressive segmented frame modes, and automatically detects level A and level B 3G-SDI formats for 1080p50, 1080p59.94 and 1080p60.
File Formats
Duplicator 4K supports the following file formats:
H.264Low
H.264Medium
H.264High
H.265Low
H.265Medium
H.265High
Querying and updating configuration information
The "configuration" command may be used to query the current configuration of the deck: configuration
The server returns the configuration of the deck:
211 configuration: ←
video input: { "SDI", "optical" } ←
One or more configuration parameters may be specified to change the configuration of the deck.
To change the current video input:
configuration: video input: {"SDI", "optical"}
Configuring the watchdog
The “watchdog” command instructs the deck to monitor the connected client and terminate the connection if the client is inactive for at least a specified period of time.
To configure the watchdog:
watchdog: period: {period in seconds}
To avoid disconnection, the client must send a command to the server at least every (period) seconds. Note that if the period is set to 0 or less than 0, connection monitoring will be disabled.
Configuring the record mode
Use the 'record mode' command to select the deck recording mode:
configuration: record mode: {"Duplicate", "SingleDisk", "DiskOverwrite"}
Configuring the file format
The 'file format' command instructs the deck to switch to a specific file format for codec and bit rate: configuration: file format: {"H.264High", "H.264Medium", "H.264Low", "H.265High", "H.265Mediu m", "H.265Low"}
帮助
获得帮助
natural_image
Circular portrait photo of a smiling man in a dark shirt against a gray background (no text or symbols)환영합니다.
natural_image
Illustration of a hand inserting a USB into a network device (no text or symbols visible)
Supported RS-422 Commands
| Command Reply No Remote Notes | |||||
| 0 - System Control | |||||
| 0x00 0x11 | DeviceTypeRequest | NTSC: 0xF0E0PAL: 0xF1E024P: 0xF2E0 | Enabled | - | |
1 - Slave Response
| 0x20 0x00 | Stop Acknowledge | Disabled | - | ||
| 0x20 0x02 | Record | Acknowledge | Disabled | - | |
| 0x21 | 0x02 Append | Acknowledge | Disabled | Non-standard command - an extra payload of 0x00 indicates append |
4 - Preset/Select Control
| 0x40 | 0x40 | AutoMode Off | Acknowledge | Disabled | ignored, Status bit remembered |
| 0x40 | 0x41 | AutoMode On | Acknowledge | Disabled | ignored, Status bit remembered |
| 0x61 | 0x20 | StatusSense | StatusData | Enabled | - |
7 - Sense Reply
| 0x70 | 0x20 StatusData | - | - | Please see "Status Bits" sheet: Limited to 9 bytes of status, silently truncated |
RS-422 Developer Information
| Bit 7 | Bit 6 | Bit 5 | Bit 4 | Bit 3 | Bit 2 | Bit 1 | Bit 0 | |
| Byte 0 | 0 0 Cassette out 0 0 0 0 Local | |||||||
| Byte 1 | Standby 0 Stop 0 0 0 Record 0 | |||||||
| Byte 2 | 0 0 0 0 0 0 0 | |||||||
| Byte 3 | Auto Mode 0 0 0 0 0 0 | |||||||
| Byte 4 | Select EE Full EE 0 0 0 0 0 0 | |||||||
| Byte 5 | 0 0 0 0 0 0 0 | |||||||
| Byte 6 | 0 0 0 0 0 0 0 | |||||||
| Byte 7 | 0 0 0 0 0 0 0 | |||||||
| Byte 8 | 0 0 0 0 0 0 0 | |||||||
| Byte 9 | 0 0 0 0 0 0 0 | |||||||
| Variables | |
| Cassette Out | Set if no cards are ready to record |
| Local | Set if in local mode (no remote control) |
| Standby | Set if one or more cards are ready to record |
| Auto Mode | For compatibility only |
| Full EE | For compatibility only - always on |
| Select EE | For compatibility only - always on |
| Blackmagic Duplicator 4K RS-422 Settings | |
| Protocol | Based on Sony 9-pin protocol |
| Baud Rate | 38.4 K |
| Start Bits | 1 |
| Data Bits | 8 |
| Stop Bits | 1 |
| Parity Bits | 1 |
| Parity Type | Odd |
이더넷을 통한 원격 제어
| Command Command Description | |
| help or ? | Provides help text with all commands and parameters. |
| remote | Queries the state of HyperDeck's remote control mode. |
| remote: enable: true | Enables remote control. |
| remote: enable: false | Disables remote control. |
| remote: override: true | Turns remote override on. |
| remote: override: false | Turns remote override off. |
| quit | Disconnects HyperDeck server. |
| ping | Determines HyperDeck server is responding. |
| record Starts recording. | |
| record: append: true | Starts appended recording. |
| stop | Stops playback or recording. |
| commands | Lists all supported commands in an XML format. |
| notify | Queries the current state of all notifications. |
| notify: transport: true | Enables transport notifications. |
| notify: transport: false | Disables transport notifications. |
| notify: slot: true | Enables slot notifications. |
| notify: slot: false | Disables slot notifications. |
| notify: remote: true | Enables remote notifications. |
| notify: remote: false | Disables remote notifications. |
| notify: configuration: true | Enables configuration notifications. |
| notify: configuration: false | Disables configuration notifications. |
| notify: dropped frames: true | Enables dropped frames notifications. |
| notify: dropped frames: false | Disables dropped frames notifications. |
| device info | Provides device information. |
| slot info: slot id: {slot ID} | Provides information about a specified slot. |
| transport info | Provides information for the state of the transport. |
| configuration | Queries the current configuration. |
| configuration: record mode: Duplicate | Configures the record mode to duplicate. |
| configuration: record mode: SingleDisk | Configures the record mode to single disk. |
| configuration: record mode: DiskOverwrite | Configures the record mode to disk overwrite. |
| configuration: video input: {"SDI", "optical"} | Configures video input. |
| configuration: file format: {format} | Configures the record codec and bit rate. |
| format: prepare: {format} | prepare a disk formatting operation to filesystem {format} |
| format: confirm: {token} | perform a pre-prepared formatting operation using token |
| watchdog: period: {seconds} | Configures the watchdog. |
Using XML
While you can use the Terminal to talk to HyperDeck, if you are writing software you can use XML to confirm the existence of a specific command based on the firmware of the HyperDeck you are communicating with. This helps your software user interface adjust to the capabilities of the specific HyperDeck model and software version.
Protocol Details
Connection
The HyperDeck Ethernet server listens on TCP port 9993.
Basic syntax
The HyperDeck protocol is a line oriented text protocol. Lines from the server will be separated by an ascii CR LF sequence. Messages from the client may be separated by LF or CR LF.
New lines are represented in this document as a "←" symbol.
Command syntax
Command parameters are usually optional. A command with no parameters is terminated with a new line:
{Command name}
If parameters are specified, the command name is followed by a colon, then pairs of parameter names and values. Each parameter name is terminated with a colon character:
{Command name}: {Parameter}: {Value} {Parameter}: {Value} ...
Response syntax
Simple responses from the server consist of a three digit response code and descriptive text terminated by a new line:
{Response code} {Response text}
If a response carries parameters, the response text is terminated with a colon, and parameter name and value pairs follow on subsequent lines until a blank line is returned:
{Response code} {Response text}:
{Parameter}: {Value}
{Parameter}: {Value}
...
Successful response codes
A simple acknowledgement of a command is indicated with a response code of 200:
200 ok
Other successful responses carry parameters and are indicated with response codes in the range of 201 to 299.
Failure response codes
Failure responses to commands are indicated with response codes in the range of 100 to 199:
100 syntax error
101 unsupported parameter
102 invalid value
103 unsupported
104 disk full
105 no disk
106 disk error
109 out of range
110 no input
111 remote control disabled
120 connection rejected
150 invalid state
Asynchronous response codes
The server may return asynchronous messages at any time. These responses are indicated with response codes in the range of 500 to 599:
5xx {Response Text}: ←
{Parameter}: {Value} ←
{Parameter}: {Value} ←
←
Connection response
On connection, an asynchronous message will be delivered:
500 connection info: ←
protocol version: {Version} ←
model: {Model Name} ←
Connection rejection
Only one client may connect to the server at a time. If other clients attempt to connect concurrently, they will receive an error and be disconnected:
120 connection rejected
Timecode syntax
Timecodes are expressed as non-drop-frame timecode in the format: HH:MM:SS:FF
Handling of deck "remote" state
The “remote” command may be used to enable or disable the remote control of the deck. Any attempt to change the deck state over ethernet while remote access is disabled will generate an error:
111 remote control disabled
To enable or disable remote control:
remote: enable: {"true", "false"}
The current remote control state may be overridden allowing remote access over ethernet irrespective of the current remote control state:
remote: override: {"true", "false"}
The override state is only valid for the currently connected ethernet client and only while the connection remains open.
The “remote” command may be used to query the remote control state of the deck by specifying no parameters:
remote
The deck will return the current remote control state:
210 remote info: ←
enabled: {"true", "false"}
override: {"true", "false"}
Asynchronous remote control information change notification is disabled by default and may be configured with the "notify" command. When enabled, changes in remote state will generate a "510 remote info:" asynchronous message with the same parameters as the "210 remote info:" message.
Closing connection
The "quit" command instructs the server to cleanly shut down the connection:
quit←
Checking connection status
The "ping" command has no function other than to determine if the server is responding:
ping←
Getting help
The "help" or "?" commands return human readable help text describing all available commands and parameters:
help
or:
?
The server will respond with a list of all supported commands:
201 help:
{Help Text}
{Help Text}
Stopping deck operation
The "stop" command instructs the deck to stop the current capture:
stop←
Enumerating supported commands and parameters
The "commands" command returns the supported commands:
commands
The command list is returned in a computer readable XML format:
212 commands :
<commands>
<command name="..."><parameter name="..."/>...</command>
<command name="..."><parameter name="..."/>...</command>
...
</commands>
More XML tokens and parameters may be added in later releases.
Controlling asynchronous notifications
The "notify" command may be used to enable or disable asynchronous notifications from the server. To enable or disable transport notifications:
notify: transport: {"true", "false"}
To enable or disable slot notifications:
notify: slot: {"true", "false"}
To enable or disable remote notifications:
notify: remote: {"true", "false"}
To enable or disable configuration notifications:
notify: configuration: {"true", "false"}
To enable or disable dropped frames notifications:
notify: dropped frames: {"true", "false"}
Multiple parameters may be specified. If no parameters are specified, the server returns the current state of all notifications:
209 notify:
    transport: { "true", "false" }
    slot: { "true", "false" }
    remote: { "true", "false" }
    configuration: { "true", "false" }
Retrieving device information
The "device info" command returns information about the connected deck device:
device info
The server will respond with:
204 device info: ←
protocol version: {Version} ←
model: {Model Name} ←
unique id: {unique alphanumeric identifier} ←
Example of response from server:
204 device info:←
protocol version: 1.8 ←
model: Blackmagic Duplicator 4K ←
unique id: 101112131415 ←
←
Retrieving slot information
The "slot info" command returns information about a slot.
The specified slot will be queried:
slot info: slot id: {Slot ID}
The server will respond with slot specific information:
202 slot info: ←
slot id: {Slot ID} ←
status: {"empty", "mounting", "error", "mounted"}
←
volume name: {Volume name} ←
recording time: {recording time available in seconds} ←
video format: {disk's default video format} ←
Asynchronous slot information change notification is disabled by default and may be configured with the "notify" command. When enabled, changes in slot state will generate a "502 slot info:" asynchronous message with the same parameters as the "202 slot info:" message.
Retrieving transport information
The "transport info" command returns the state of the transport: transport info
The server responds with transport specific information:
208 transport info: ←
status: {"stopped","record"}
display timecode: {timecode}
timecode: {timecode}
The “timecode” value is the timecode within the current timeline for playback or the clip for record. The “display timecode” is the timecode displayed on the front of the deck. The two timecodes will differ in some deck modes.
Asynchronous transport information change notification is disabled by default and may be configured with the "notify" command. When enabled, changes in transport state will generate a "508 transport info:" asynchronous message with the same parameters as the "208 transport info:" message.
Video Formats
The following video formats are currently supported on Blackmagic Duplicator 4K:
SD
525i59.94 NTSC 625i50 PAL
HD
720p50 1080p30
720p59.94 1080i50
720p60 1080p50
1080p23.98 1080i59.94
1080p24 1080p59.94
1080p25 1080i60
1080p29.97 1080p60
Ultra HD
2160p23.98 2160p30
2160p24 2160p50
2160p25 2160p59.94
2160p29.97 2160p60
Duplicator 4K supports progressive segmented frame modes, and automatically detects level A and level B 3G-SDI formats for 1080p50, 1080p59.94 and 1080p60.
File Formats
Duplicator 4K supports the following file formats:
H.264Low
H.264Medium
H.264High
H.265Low
H.265Medium
H.265High
Querying and updating configuration information
The "configuration" command may be used to query the current configuration of the deck: configuration
The server returns the configuration of the deck:
211 configuration: ←
video input: {"SDI", "optical"} ←
One or more configuration parameters may be specified to change the configuration of the deck.
To change the current video input:
configuration: video input: {"SDI", "optical"}
Configuring the watchdog
The “watchdog” command instructs the deck to monitor the connected client and terminate the connection if the client is inactive for at least a specified period of time.
To configure the watchdog:
watchdog: period: {period in seconds}
To avoid disconnection, the client must send a command to the server at least every {period} seconds. Note that if the period is set to 0 or less than 0, connection monitoring will be disabled.
Configuring the record mode
Use the 'record mode' command to select the deck recording mode:
configuration: record mode: {"Duplicate", "SingleDisk", "DiskOverwrite"}
Configuring the file format
The 'file format' command instructs the deck to switch to a specific file format for codec and bit rate: configuration: file format: {"H.264High", "H.264Medium", "H.264Low", "H.265High", "H.265Medium", "H.265Low"}
지원
지원 받기
natural_image
Circular portrait photo of a smiling man in a dark shirt against a gray background (no text or symbols)Добро пожаловать!
CEO Blackmagic Design
Содержание
Blackmagic Duplicator 4K
natural_image
Illustration of a hand inserting a network switch into a rack-mounted device (no text or symbols visible)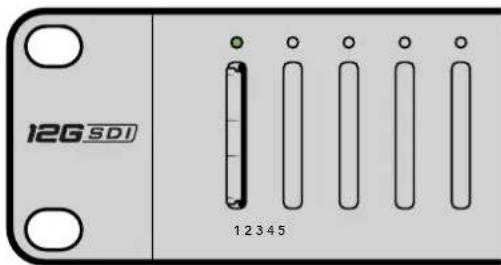
Ведомое устройство
IP Address, Subnet Mask n Gateway
Supported RS-422 Commands
| Command Reply No Remote Notes | |||||
| 0 - System Control | |||||
| 0x00 0x11 | DeviceTypeRequest | NTSC: 0xF0E0PAL: 0xF1E024P: 0xF2E0 | Enabled – | ||
1 - Slave Response
| 0x20 | 0x00 | Stop | Acknowledge | Disabled | - |
| 0x20 | 0x02 | Record | Acknowledge | Disabled | - |
| 0x21 | 0x02 | Append | Acknowledge | Disabled | Non-standard command - an extra payload of 0x00 indicates append |
4 - Preset/Select Control
| 0x40 | 0x40 | AutoMode Off | Acknowledge | Disabled | ignored, Status bit remembered |
| 0x40 | 0x41 | AutoMode On | Acknowledge | Disabled | ignored, Status bit remembered |
| 0x61 | 0x20 | StatusSense | StatusData | Enabled | - |
7 - Sense Reply
| 0x70 | 0x20 | StatusData | - | - | Please see “Status Bits” sheet: Limited to 9 bytes of status, silently truncated |
RS-422 Developer Information
| Bit 7 Bit 6 | Bit 5 Bit 4 | Bit 3 Bit 2 | Bit 1 Bit 0 | |||||
| Byte 0 | 0 0 Cassette out 0 0 0 Local | |||||||
| Byte 1 | Standby 0 Stop 0 0 0 Record 0 | |||||||
| Byte 2 | 0 0 0 0 0 0 0 | |||||||
| Byte 3 | Auto Mode 0 0 0 0 0 0 | |||||||
| Byte 4 | Select EE Full EE | 0 0 0 0 0 | ||||||
| Byte 5 | 0 0 0 0 0 0 0 | |||||||
| Byte 6 | 0 0 0 0 0 0 0 | |||||||
| Byte 7 | 0 0 0 0 0 0 0 | |||||||
| Byte 8 | 0 0 0 0 0 0 0 | |||||||
| Byte 9 | 0 0 0 0 0 0 0 | |||||||
| Variables | |
| Cassette Out | Set if no cards are ready to record |
| Local | Set if in local mode (no remote control) |
| Standby | Set if one or more cards are ready to record |
| Auto Mode | For compatibility only |
| Full EE | For compatibility only - always on |
| Select EE | For compatibility only - always on |
| Blackmagic Duplicator 4K RS-422 Settings | |
| Protocol | Based on Sony 9-pin protocol |
| Baud Rate | 38.4 K |
| Start Bits | 1 |
| Data Bits | 8 |
| Stop Bits | 1 |
| Parity Bits | 1 |
| Parity Type | Odd |
/*
Telnet client Blackmagic Duplicator 4K Control Circuit: *
Ethernet shield attached to pins 10, 11, 12, 13
*/

#include <SPI.h>

#include <Ethernet.h>

// Enter a MAC address and IP address for your controller below.
// The IP address will be dependent on your local network:
byte mac[] = {0x90, 0xA2, 0xDA, 0x0F, 0x17, 0xEF};
byte ip[] = {192, 168, 28, 204}; // IP address of Ethernet Shield

byte server[] = {192, 168, 28, 141}; // IP address of Duplicator
EthernetClient client; // Give the ethernet client a name

void setup()
{
    Ethernet.begin(mac, ip); //Start the Ethernet connection:

    client.connect(server, 9993); //Connect to Duplicator on port 9993
}

void d loop()
{
    while (client.available()) //Read the Duplicator Preamble
    {
    char c = client.read();
    }

    client.print("record: name: Cameral\x0a");
    //Start Duplicator recording a clip named Camera 1
    delay(60000); //Wait a minute
    client.print("stop\x0a"); //Stop recoding
    while (1); //Do nothing until program starts again
}
Blackmagic HyperDeck Ethernet Protocol
| Command Command Description | |
| help or ? Provides help text with all commands and parameters. | |
| remote Queries the state of HyperDeck's remote control mode. | |
| remote: enable: true Enables remote control. | |
| remote: enable: false Disables remote control. | |
| remote: override: true Turns remote override on. | |
| remote: override: false Turns remote override off. | |
| quit Disconnects HyperDeck server. | |
| ping Determines HyperDeck server is responding. | |
| record Starts recording. | |
| record: append: true Starts appended recording. | |
| stop Stops playback or recording. | |
| commands Lists all supported commands in an XML format. | |
| notify | Queries the current state of all notifications. |
| notify: transport: true | Enables transport notifications. |
| notify: transport: false | Disables transport notifications. |
| notify: slot: true | Enables slot notifications. |
| notify: slot: false | Disables slot notifications. |
| notify: remote: true | Enables remote notifications. |
| notify: remote: false | Disables remote notifications. |
| notify: configuration: true | Enables configuration notifications. |
| notify: configuration: false | Disables configuration notifications. |
| notify: dropped frames: true | Enables dropped frames notifications. |
| notify: dropped frames: false | Disables dropped frames notifications. |
| device info Provides device information. | |
| slot info: slot id: {slot ID} | Provides information about a specified slot. |
| transport info | Provides information for the state of the transport. |
| configuration | Queries the current configuration. |
| configuration: record mode: Duplicate | Configures the record mode to duplicate. |
Command Command Description
| configuration: record mode: SingleDisk Configures the record mode to single disk. |
| configuration: record mode: DiskOverwrite Configures the record mode to disk overwrite. |
| configuration: video input: {"SDI", "optical"} Configures video input. |
| configuration: file format: {format} Configures the record codec and bit rate. |
| format: prepare: {format} prepare a disk formatting operation to filesystem {format} |
| format: confirm: {token} perform a pre-prepared formatting operation using token |
| watchdog: period: {seconds} Configures the watchdog. |
Using XML
While you can use the Terminal to talk to HyperDeck, if you are writing software you can use XML to confirm the existence of a specific command based on the firmware of the HyperDeck you are communicating with. This helps your software user interface adjust to the capabilities of the specific HyperDeck model and software version.
Protocol Details
Connection
The HyperDeck Ethernet server listens on TCP port 9993.
Basic syntax
The HyperDeck protocol is a line oriented text protocol. Lines from the server will be separated by an ascii CR LF sequence. Messages from the client may be separated by LF or CR LF.
New lines are represented in this document as a "←" symbol.
Command syntax
Command parameters are usually optional. A command with no parameters is terminated with a new line: {Command name}
If parameters are specified, the command name is followed by a colon, then pairs of parameter names and values. Each parameter name is terminated with a colon character:
{Command name}: {Parameter}: {Value} {Parameter}: {Value} .
Response syntax
Simple responses from the server consist of a three digit response code and descriptive text terminated by a new line:
{Response code} {Response text}
If a response carries parameters, the response text is terminated with a colon, and parameter name and value pairs follow on subsequent lines until a blank line is returned:
{Response code} {Response text}:
{Parameter}: {Value}
{Parameter}: {Value}
...
Successful response codes
A simple acknowledgement of a command is indicated with a response code of 200:
200 ok
Other successful responses carry parameters and are indicated with response codes in the range of 201 to 299.
Failure response codes
Failure responses to commands are indicated with response codes in the range of 100 to 199:
100 syntax error
101 unsupported parameter
102 invalid value
103 unsupported
104 disk full
105 no disk
106 disk error
109 out of range
110 no input
111 remote control disabled
120 connection rejected
150 invalid state
Asynchronous response codes
The server may return asynchronous messages at any time. These responses are indicated with response codes in the range of 500 to 599:
5xx {Response Text}: ←
{Parameter}: {Value} ←
{Parameter}: {Value} ←
←
Connection response
On connection, an asynchronous message will be delivered:
500 connection info: ←
protocol version: {Version} ←
model: {Model Name} ←
Connection rejection
Only one client may connect to the server at a time. If other clients attempt to connect concurrently, they will receive an error and be disconnected:
120 connection rejected
Timecode syntax
Timecodes are expressed as non-drop-frame timecode in the format:
HH:M M:SS:FF
Handling of deck "remote" state
The “remote” command may be used to enable or disable the remote control of the deck. Any attempt to change the deck state over ethernet while remote access is disabled will generate an error:
111 remote control disabled
To enable or disable remote control:
remote: enable: {"true", "false"}
The current remote control state may be overridden allowing remote access over ethernet irrespective of the current remote control state:
remote: override: {"true", "false"}
The override state is only valid for the currently connected ethernet client and only while the connection remains open.
The “remote” command may be used to query the remote control state of the deck by specifying no parameters:
remote
The deck will return the current remote control state:
210 remote info: ←
enabled: {"true", "false"}
    ←
override: {"true", "false"}
    ←
Asynchronous remote control information change notification is disabled by default and may be configured with the "notify" command. When enabled, changes in remote state will generate a "510 remote info:" asynchronous message with the same parameters as the "210 remote info:" message.
Closing connection
The "quit" command instructs the server to cleanly shut down the connection:
quit
Checking connection status
The "ping" command has no function other than to determine if the server is responding:
ping←
Getting help
The "help" or "?" commands return human readable help text describing all available commands and parameters:
help
or:
?
The server will respond with a list of all supported commands:
201 help:
{Help Te xt} ←
{Help Te xt} ←
←
Stopping deck operation
The "stop" command instructs the deck to stop the current capture:
stop←
Enumerating supported commands and parameters
The "commands" command returns the supported commands:
commands
The command list is returned in a computer readable XML format:
212 commands :
<commands>
<command name="..."><parameter name="..."/>...</command>
<command name="..."><parameter name="..."/>...</command>
...
</commands>
More XML tokens and parameters may be added in later releases.
Controlling asynchronous notifications
The "notify" command may be used to enable or disable asynchronous notifications from the server. To enable or disable transport notifications:
notify: transport: {"true", "false"}
To enable or disable slot notifications:
notify: slot: {"true", "false"}
To enable or disable remote notifications:
notify: remote: {"true", "false"}
To enable or disable configuration notifications:
notify: configuration: {"true", "false"}
To enable or disable dropped frames notifications:
notify: dropped frames: {"true", "false"}
Multiple parameters may be specified. If no parameters are specified, the server returns the current state of all notifications:
209 notify:
transport: {"true", "false"}
slot: {"true", "false"}
remote: {"true", "false"}
configuration: {"true", "false"}
Retrieving device information
The "device info" command returns information about the connected deck device:
device info
The server will respond with:
204 device info: ←
protocol version: {Version} ←
model: {Model Name} ←
unique id: {unique alphanumeric identifier} ←
Example of response from server:
204 device info:
protocol version: 1.8
model: Blackmagic Duplicator 4K
uniq ue id: 101112131415
Retrieving slot information
The "slot info" command returns information about a slot.
The specified slot will be queried:
slot info: slot id: {Slot ID}
The server will respond with slot specific information:
202 slot info: ←
slot id: {Slot ID} ←
status: {"empty", "mounting", "error", "mounted"} ←
volume name: {Volume name} ←
recording time: {recording time available in seconds} ←
video format: {disk's default video format} ←
Asynchronous slot information change notification is disabled by default and may be configured with the "notify" command. When enabled, changes in slot state will generate a "502 slot info:" asynchronous message with the same parameters as the "202 slot info:" message.
Retrieving transport information
The "transport info" command returns the state of the transport:
transport info
The server responds with transport specific information:
208 transport info: ←
status: {"stopped","record"}
display timecode: {timecode}
timecode: {timecode}
The "timecode" value is the timecode within the current timeline for playback or the clip for record. The "display timecode" is the timecode displayed on the front of the deck. The two timecodes will differ in some deck modes.
Asynchronous transport information change notification is disabled by default and may be configured with the "notify" command. When enabled, changes in transport state will generate a "508 transport info:" asynchronous message with the same parameters as the "208 transport info:" message.
Video Formats
The following video formats are currently supported on Blackmagic Duplicator 4K:
SD
| 525i59.94 NTSC |
| 625i50 PAL |
HD
| 720p50 | 1080p30 |
| 720p59.94 | 1080i50 |
| 720p60 | 1080p50 |
| 1080p23.98 | 1080i59.94 |
| 1080p24 | 1080p59.94 |
| 1080p25 | 1080i60 |
| 1080p29.97 | 1080p60 |
Ultra HD
| 2160p23.98 | 2160p30 |
| 2160p24 | 2160p50 |
| 2160p25 | 2160p59.94 |
| 2160p29.97 | 2160p60 |
Duplicator 4K supports progressive segmented frame modes, and automatically detects level A and level B 3G-SDI formats for 1080p50, 1080p59.94 and 1080p60.
File Formats
Duplicator 4K supports the following file formats:
H.264Low
H.264Medium
H.264High
H.265Low
H.265Medium
H.265High
Querying and updating configuration information
The "configuration" command may be used to query the current configuration of the deck: configuration
The server returns the configuration of the deck:
211 configuration: ←
video input: { "SDI", "optical" } ←
One or more configuration parameters may be specified to change the configuration of the deck.
To change the current video input:
configuration: video input: {"SDI", "optical"}
Configuring the watchdog
The “watchdog” command instructs the deck to monitor the connected client and terminate the connection if the client is inactive for at least a specified period of time.
To configure the watchdog:
watchdog: period: {period in seconds}
To avoid disconnection, the client must send a command to the server at least every (period) seconds. Note that if the period is set to 0 or less than 0, connection monitoring will be disabled.
Configuring the record mode
Use the 'record mode' command to select the deck recording mode:
configuration: record mode: {"Duplicate", "SingleDisk", "DiskOverwrite"}
Configuring the file format
The 'file format' command instructs the deck to switch to a specific file format for codec and bit rate: configuration: file format: {"H.264High", "H.264Medium", "H.264Low", "H.265High", "H.265Mediu m", "H.265Low"}
Помощь
Как получить помощь
•3G-SDI: PL-4F20-311C
-6G-SDI: PL-8F10-311C
•12G-SDI: PL-TG10-311C

natural_image
Circular portrait photo of a smiling man in a black shirt against a gray background (no text or symbols)natural_image
Illustration of a hand inserting a network switch into an electronic device (no text or symbols visible)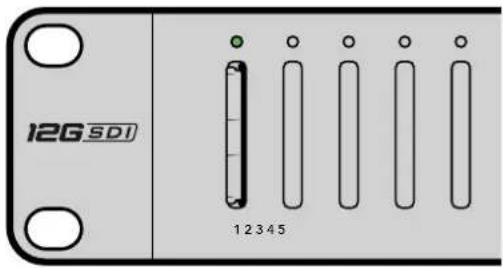
IP Address, Subnet Mask e Gateway
Supported RS-422 Commands
| Command Reply No Remote Notes | |||||
| 0 - System Control | |||||
| 0x00 0x11 | DeviceTypeRequest | NTSC: 0xF0E0PAL: 0xF1E024P: 0xF2E0 | Enabled – | ||
1 - Slave Response
| 0x20 | 0x00 | Stop | Acknowledge | Disabled | - |
| 0x20 | 0x02 | Record | Acknowledge | Disabled | - |
| 0x21 | 0x02 | Append | Acknowledge | Disabled | Non-standard command - an extra payload of 0x00 indicates append |
4 - Preset/Select Control
| 0x40 | 0x40 | AutoMode Off | Acknowledge | Disabled | ignored, Status bit remembered |
| 0x40 | 0x41 | AutoMode On | Acknowledge | Disabled | ignored, Status bit remembered |
| 0x61 | 0x20 | StatusSense | StatusData | Enabled | - |
7 - Sense Reply
| 0x70 | 0x20 | StatusData | - | - | Please see “Status Bits” sheet: Limited to 9 bytes of status, silently truncated |
RS-422 Developer Information
| Bit 7 Bit 6 | Bit 5 Bit 4 | Bit 3 Bit 2 | Bit 1 Bit 0 | |||||
| Byte 0 | 0 0 Cassette out 0 0 0 Local | |||||||
| Byte 1 | Standby 0 Stop 0 0 0 Record 0 | |||||||
| Byte 2 | 0 0 0 0 0 0 0 | |||||||
| Byte 3 | Auto Mode 0 0 0 0 0 0 | |||||||
| Byte 4 | Select EE | Full EE | 0 0 0 0 0 0 | |||||
| Byte 5 | 0 0 0 0 0 0 0 | |||||||
| Byte 6 | 0 0 0 0 0 0 0 | |||||||
| Byte 7 | 0 0 0 0 0 0 0 | |||||||
| Byte 8 | 0 0 0 0 0 0 0 | |||||||
| Byte 9 | 0 0 0 0 0 0 0 | |||||||
| Variables | |
| Cassette Out | Set if no cards are ready to record |
| Local | Set if in local mode (no remote control) |
| Standby | Set if one or more cards are ready to record |
| Auto Mode | For compatibility only |
| Full EE | For compatibility only - always on |
| Select EE | For compatibility only - always on |
| Blackmagic Duplicator 4K RS-422 Settings | |
| Protocol | Based on Sony 9-pin protocol |
| Baud Rate | 38.4 K |
| Start Bits | 1 |
| Data Bits | 8 |
| Stop Bits | 1 |
| Parity Bits | 1 |
| Parity Type | Odd |
Controllo remoto tramite ethernet
/*
Telnet client Blackmagic Duplicator 4K Control Circuit: *
Ethernet shield attached to pins 10, 11, 12, 13
*/

#include <SPI.h>

#include <Ethernet.h>

// Enter a MAC address and IP address for your controller below.
// The IP address will be dependent on your local network:
byte mac[] = {0x90, 0xA2, 0xDA, 0x0F, 0x17, 0xEF};
byte ip[] = {192, 168, 28, 204}; // IP address of Ethernet Shield
byte server[] = {192, 168, 28, 141}; // IP address of Duplicator
EthernetClient client; // Give the ethernet client a name

void setup()
{
    Ethernet.begin(mac, ip); //Start the Ethernet connection:

    client.connect(server, 9993); //Connect to Duplicator on port 9993
}

void loop()
{
    while (client.available()) //Read the Duplicator Preamble
    {
    char c = client.read();
    }

    client.print("record: name: Cameral\x0a");
    //Start Duplicator recording a clip named Camera 1
    delay(60000); //Wait a minute
    client.print("stop\x0a"); //Stop recoding
    while (1); //Do nothing until program starts again
}
Blackmagic HyperDeck Ethernet Protocol
| Command Command Description | |
| help or ? Provides help text with all commands and parameters. | |
| remote Queries the state of HyperDeck's remote control mode. | |
| remote: enable: true Enables remote control. | |
| remote: enable: false Disables remote control. | |
| remote: override: true Turns remote override on. | |
| remote: override: false Turns remote override off. | |
| quit Disconnects HyperDeck server. | |
| ping Determines HyperDeck server is responding. | |
| record Starts recording. | |
| record: append: true Starts appended recording. | |
| stop Stops playback or recording. | |
| commands | Lists all supported commands in an XML format. |
| notify | Queries the current state of all notifications. |
| notify: transport: true | Enables transport notifications. |
| notify: transport: false | Disables transport notifications. |
| notify: slot: true | Enables slot notifications. |
| notify: slot: false | Disables slot notifications. |
| notify: remote: true | Enables remote notifications. |
| notify: remote: false | Disables remote notifications. |
| notify: configuration: true | Enables configuration notifications. |
| notify: configuration: false | Disables configuration notifications. |
| notify: dropped frames: true | Enables dropped frames notifications. |
| notify: dropped frames: false | Disables dropped frames notifications. |
| device info | Provides device information. |
| slot info: slot id: {slot ID} | Provides information about a specified slot. |
| transport info | Provides information for the state of the transport. |
| configuration | Queries the current configuration. |
| configuration: record mode: Duplicate | Configures the record mode to duplicate. |
Command Command Description
configuration: record mode: SingleDisk Configures the record mode to single disk.
configuration: record mode: DiskOverwrite Configures the record mode to disk overwrite.
configuration: video input: {"SDI", "optical"} Configures video input.
configuration: file format: {format} Configures the record codec and bit rate.
format: prepare: {format} prepare a disk formatting operation to filesystem {format}
format: confirm: {token} perform a pre-prepared formatting operation using token
watchdog: period: {seconds} Configures the watchdog.
Utilizzare XML
The HyperDeck protocol is a line oriented text protocol. Lines from the server will be separated by an ascii CR LF sequence. Messages from the client may be separated by LF or CR LF.
New lines are represented in this document as a "←" symbol.
Command syntax
Command parameters are usually optional. A command with no parameters is terminated with a new line: {Command name}
If parameters are specified, the command name is followed by a colon, then pairs of parameter names and values. Each parameter name is terminated with a colon character:
{Command name}: {Parameter}: {Value} {Parameter}: {Value}.
Response syntax
Simple responses from the server consist of a three digit response code and descriptive text terminated by a new line:
{Response code} {Response text}
If a response carries parameters, the response text is terminated with a colon, and parameter name and value pairs follow on subsequent lines until a blank line is returned:
{Response code} {Response text}:
{Parameter}: {Value}
{Parameter}: {Value}
...
Successful response codes
A simple acknowledgement of a command is indicated with a response code of 200:
200 ok
Other successful responses carry parameters and are indicated with response codes in the range of 201 to 299.
Failure response codes
Failure responses to commands are indicated with response codes in the range of 100 to 199:
100 syntax error
101 unsupported parameter
102 invalid value
103 unsupported
104 disk full
105 no disk
106 disk error
109 out of range
110 no input
111 remote control disabled
120 connection rejected
150 invalid state
Asynchronous response codes
The server may return asynchronous messages at any time. These responses are indicated with response codes in the range of 500 to 599:
5xx {Response Text}: ←
{Parameter}: {Value} ←
{Parameter}: {Value} ←
←
Connection response
On connection, an asynchronous message will be delivered:
500 connection info: ←
protocol version: {Version} ←
model: {Model Name} ←
Connection rejection
Only one client may connect to the server at a time. If other clients attempt to connect concurrently, they will receive an error and be disconnected:
120 connection rejected
Timecode syntax
Timecodes are expressed as non-drop-frame timecode in the format:
HH:M M:SS:FF
Handling of deck "remote" state
The “remote” command may be used to enable or disable the remote control of the deck. Any attempt to change the deck state over ethernet while remote access is disabled will generate an error:
111 remote control disabled
To enable or disable remote control:
remote: enable: {"true", "false"}
The current remote control state may be overridden allowing remote access over ethernet irrespective of the current remote control state:
remote: override: {"true", "false"}
The override state is only valid for the currently connected ethernet client and only while the connection remains open.
The “remote” command may be used to query the remote control state of the deck by specifying no parameters:
remote
The deck will return the current remote control state:
210 remote info: ←
enabled: {"true", "false"}
    ←
override: {"true", "false"}
    ←
Asynchronous remote control information change notification is disabled by default and may be configured with the "notify" command. When enabled, changes in remote state will generate a "510 remote info:" asynchronous message with the same parameters as the "210 remote info:" message.
Closing connection
The "quit" command instructs the server to cleanly shut down the connection:
quit
Checking connection status
The "ping" command has no function other than to determine if the server is responding:
ping←
Getting help
The "help" or "?" commands return human readable help text describing all available commands and parameters:
help
or:
?
The server will respond with a list of all supported commands:
201 help:
{Help Te xt}    ←
{Help Te xt}    ←
←
Stopping deck operation
The "stop" command instructs the deck to stop the current capture:
stop←
Enumerating supported commands and parameters
The "commands" command returns the supported commands:
commands
The command list is returned in a computer readable XML format:
212 commands :
<commands>
<command name="..."><parameter name="..."/>...</command>
<command name="..."><parameter name="..."/>...</command>
...
</commands>
More XML tokens and parameters may be added in later releases.
Controlling asynchronous notifications
The "notify" command may be used to enable or disable asynchronous notifications from the server. To enable or disable transport notifications:
notify: transport: {"true", "false"}
To enable or disable slot notifications:
notify: slot: {"true", "false"}
To enable or disable remote notifications:
notify: remote: {"true", "false"}
To enable or disable configuration notifications:
notify: configuration: {"true", "false"}
To enable or disable dropped frames notifications:
notify: dropped frames: {"true", "false"}
Multiple parameters may be specified. If no parameters are specified, the server returns the current state of all notifications:
209 notify:
transport: {"true", "false"}
slot: {"true", "false"}
remote: {"true", "false"}
configuration: {"true", "false"}
Retrieving device information
The "device info" command returns information about the connected deck device:
device info
The server will respond with:
204 device info: ←
protocol version: {Version} ←
model: {Model Name} ←
unique id: {unique alphanumeric identifier} ←
Example of response from server:
204 device info:
protocol version: 1.8
model: Blackmagic Duplicator 4K
uniq ue id: 101112131415
Retrieving slot information
The "slot info" command returns information about a slot.
The specified slot will be queried:
slot info: slot id: {Slot ID}
The server will respond with slot specific information:
202 slot info: ←
slot id: {Slot ID} ←
status: {"empty", "mounting", "error", "mounted"} ←
volume name: {Volume name} ←
recording time: {recording time available in seconds} ←
video format: {disk's default video format} ←
Asynchronous slot information change notification is disabled by default and may be configured with the "notify" command. When enabled, changes in slot state will generate a "502 slot info:" asynchronous message with the same parameters as the "202 slot info:" message.
Retrieving transport information
The "transport info" command returns the state of the transport:
transport info
The server responds with transport specific information:
208 transport info: ←
status: {"stopped","record"}
display timecode: {timecode}
timecode: {timecode}
The "timecode" value is the timecode within the current timeline for playback or the clip for record. The "display timecode" is the timecode displayed on the front of the deck. The two timecodes will differ in some deck modes.
Asynchronous transport information change notification is disabled by default and may be configured with the "notify" command. When enabled, changes in transport state will generate a "508 transport info:" asynchronous message with the same parameters as the "208 transport info:" message.
Video Formats
The following video formats are currently supported on Blackmagic Duplicator 4K:
SD
| 525i59.94 NTSC |
| 625i50 PAL |
HD
| 720p50 | 1080p30 |
| 720p59.94 | 1080i50 |
| 720p60 | 1080p50 |
| 1080p23.98 | 1080i59.94 |
| 1080p24 | 1080p59.94 |
| 1080p25 | 1080i60 |
| 1080p29.97 | 1080p60 |
Ultra HD
| 2160p23.98 | 2160p30 |
| 2160p24 | 2160p50 |
| 2160p25 | 2160p59.94 |
| 2160p29.97 | 2160p60 |
Duplicator 4K supports progressive segmented frame modes, and automatically detects level A and level B 3G-SDI formats for 1080p50, 1080p59.94 and 1080p60.
File Formats
Duplicator 4K supports the following file formats:
H.264Low
H.264Medium
H.264High
H.265Low
H.265Medium
H.265High
Querying and updating configuration information
The "configuration" command may be used to query the current configuration of the deck: configuration
The server returns the configuration of the deck:
211 configuration: ←
video input: { "SDI", "optical" } ←
One or more configuration parameters may be specified to change the configuration of the deck.
To change the current video input:
configuration: video input: {"SDI", "optical"}
Configuring the watchdog
The “watchdog” command instructs the deck to monitor the connected client and terminate the connection if the client is inactive for at least a specified period of time.
To configure the watchdog:
watchdog: period: {period in seconds}
To avoid disconnection, the client must send a command to the server at least every (period) seconds. Note that if the period is set to 0 or less than 0, connection monitoring will be disabled.
Configuring the record mode
Use the 'record mode' command to select the deck recording mode:
configuration: record mode: {"Duplicate", "SingleDisk", "DiskOverwrite"}
Configuring the file format
The 'file format' command instructs the deck to switch to a specific file format for codec and bit rate: configuration: file format: {"H.264High", "H.264Medium", "H.264Low", "H.265High", "H.265Mediu m", "H.265Low"}
Assistenza
Supporto tecnico
natural_image
Circular portrait photo of a smiling man in a dark shirt against a gray background (no text or symbols)Prezado Cliente,
Obrigado por adquirir o Blackmagic Duplicator 4K.
natural_image
Illustration of a hand inserting a network switch into a rack-mounted device (no text or symbols visible)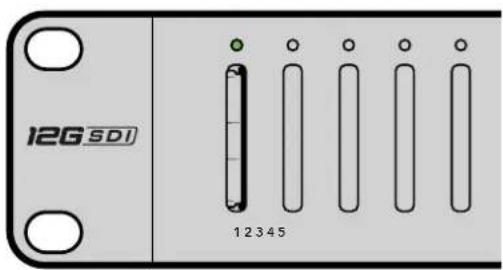
IP Address, Subnet Mask e Gateway
/*
Telnet client Blackmagic Duplicator 4K Control Circuit: *
Ethernet shield attached to pins 10, 11, 12, 13
*/

#include <SPI.h>

#include <Ethernet.h>

// Enter a MAC address and IP address for your controller below.
// The IP address will be dependent on your local network:
byte mac[] = {0x90, 0xA2, 0xDA, 0x0F, 0x17, 0xEF};
byte ip[] = {192, 168, 28, 204}; // IP address of Ethernet Shield
byte server[] = {192, 168, 28, 141}; // IP address of Duplicator
EthernetClient client; // Give the ethernet client a name

void setup()
{
    Ethernet.begin(mac, ip); //Start the Ethernet connection:

    client.connect(server, 9993); //Connect to Duplicator on port 9993
}

void loop()
{
    while (client.available()) //Read the Duplicator Preamble
    {
    char c = client.read();
    }

    client.print("record: name: Cameral\x0a");
    //Start Duplicator recording a clip named Camera 1
    delay(60000); //Wait a minute
    client.print("stop\x0a"); //Stop recoding
    while (1); //Do nothing until program starts again
}
Blackmagic HyperDeck Ethernet Protocol
| Comando Descrição do Comando | |
| help or ? Provides help text on all commands and parameters | |
| remote Queries the state of HyperDeck's remote control mode. | |
| remote: enable: true Enables remote control. | |
| remote: enable: false Disables remote control. | |
| remote: override: true Turns remote override on. | |
| remote: override: false Turns remote override off. | |
| quit Disconnects HyperDeck server. | |
| ping Determines HyperDeck server is responding. | |
| record Starts recording. | |
| record: append: true Starts appended recording. | |
| stop Stops playback or recording. | |
| commands Lists all supported commands in an XML format. | |
| notify | Queries the current state of all notifications. |
| notify: transport: true | Enables transport notifications. |
| notify: transport: false | Disables transport notifications. |
| notify: slot: true | Enables slot notifications. |
| notify: slot: false | Disables slot notifications. |
| notify: remote: true | Enables remote notifications. |
| notify: remote: false | Disables remote notifications. |
| notify: configuration: true | Enables configuration notifications. |
| notify: configuration: false | Disables configuration notifications. |
| notify: dropped frames: true | Enables dropped frames notifications. |
| notify: dropped frames: false | Disables dropped frames notifications. |
| device info Provides device information. | |
| slot info: slot id: {slot ID} | Provides information about a specified slot. |
| transport info | Provides information for the state of the transport. |
| configuration | Queries the current configuration. |
| configuration: record mode: Duplicate | Configures the record mode to duplicate. |
| configuration: record mode: SingleDisk | Configures the record mode to single disk. |
configuration: record mode: DiskOverwrite Configures the record mode to disk overwrite.
configuration: video input: ("SDI", "optical") Configures video input.
configuration: file format: {format} Configures the record codec and bit rate.
format: prepare: {format} prepare a disk formatting operation to filesystem {format}
format: confirm: {token} perform a pre-prepared formatting operation using token
watchdog: period: (seconds) Configures the watchdog.
Como usar XML
The HyperDeck protocol is a line oriented text protocol. Lines from the server will be separated by an ascii CR LF sequence. Messages from the client may be separated by LF or CR LF.
New lines are represented in this document as a "←" symbol.
Command syntax
Command parameters are usually optional. A command with no parameters is terminated with a new line:
{Command name}
If parameters are specified, the command name is followed by a colon, then pairs of parameter names and values. Each parameter name is terminated with a colon character:
{Command name}: Parameter {Value} {Parameter}: {Value} ...
Response syntax
Simple responses from the server consist of a three digit response code and descriptive text terminated by a new line:
{Response code} {Response text}
If a response carries parameters, the response text is terminated with a colon, and parameter name and value pairs follow on subsequent lines until a blank line is returned:
{Response code} {Response text}:
{P a r a m et er}: { Va lue}
{P a r a m et er}: { Va lue}
...
Successful response codes
A simple acknowledgement of a command is indicated with a response code of 200:
200 ok
Other successful responses carry parameters and are indicated with response codes in the range of 201 to 299.
Failure response codes
Failure responses to commands are indicated with response codes in the range of 100 to 199:
100 syntax error
101 unsupported parameter
102 invalid value
103 unsupported
104 disk full
105 no disk
106 disk error
109 out of range
110 no input
111 remote control disabled
120 connection rejected
150 invalid state
Asynchronous response codes
The server may return asynchronous messages at any time. These responses are indicated with response codes in the range of 500 to 599:
5xx {Response Text}: ←
{Pa ra m e te r}: { Va lu e}←
{Pa ra m e te r}: { Va lu e}←
←
Connection Response
On connection, an asynchronous message will be delivered:
500 connection info:←
protocol version: {Version}
model: {Model Name}←
Connection rejection
Only one client may connect to the server at a time. If other clients attempt to connect concurrently, they will receive an error and be disconnected:
120 connection rejected
Timecode syntax
Timecodes are expressed as non-drop-frame timecode in the format:
HH:MM:SS:FF
Handling of deck "remote" state
The "remote" command may be used to enable or disable the remote control of the deck. Any attempt to change the deck state over ethernet while remote access is disabled will generate an error:
111 remote control disabled
To enable or disable remote control:
remote: enable: {"true", "false"}
The current remote control state may be overridden allowing remote access over ethernet irrespective of the current remote control state:
remote: override: {"true", "false"}
The override state is only valid for the currently connected ethernet client and only while the connection remains open.
The "remote" command may be used to query the remote control state of the deck by specifying no parameters:
remote
The deck will return the current remote control state:
210 remote info: ←
enabled: {"true", "false"}
override: {"true", "false"}
Asynchronous remote control information change notification is disabled by default and may be configured with the "notify" command. When enabled, changes in remote state will generate a "510 remote info:" asynchronous message with the same parameters as the "210 remote info:" message.
Closing connection
The "quit" command instructs the server to cleanly shut down the connection:
quit
Checking connection status
The "ping" command has no function other than to determine if the server is responding:
ping←
Getting help
The "help" or "?" commands return human readable help text describing all available commands and parameters:
help
ou
?←
The server will respond with a list of all supported commands:
201 help:
{Help Tex t} ←
{Help Tex t} ←
←
Stopping deck operation
The "stop" command instructs the deck to stop the current capture:
stop←
Enumerating supported commands and parameters
The "commands" command returns the supported commands:
commands
The command list is returned in a computer readable XML format:
212 commands :
<commands>
<command name="..."><parameter name="..."/>...</command>
<command name="..."><parameter name="..."/>...</command>
...
</commands>
More XML tokens and parameters may be added in later releases.
Controlling asynchronous notifications
The "notify" command may be used to enable or disable asynchronous notifications from the server. To enable or disable transport notifications:
notify: transport: {"true", "false"}
To enable or disable slot notifications:
notify: slot: {"true", "false"}
To enable or disable remote notifications:
notify: remote: {"true", "false"}
To enable or disable configuration notifications:
notify: configuration: {"true", "false"}
To enable or disable dropped frames notifications:
notify: dropped frames: {"true", "false"}
Multiple parameters may be specified. If no parameters are specified, the server returns the current state of all notifications:
209 notify:
    transport: {"true", "false"}
    slot: {"true", "false"}
    remote: {"true", "false"}
    configuration: {"true", "false"}
Retrieving device information
The "device info" command returns information about the connected deck device:
device info
The server will respond with:
204 device info: ←
protocol version: {Version} ←
model: {Model Name} ←
unique id: {unique alphanumeric identifier} ←
Example of response from server:
204 device info:←
protocol version: 1.8 ←
model: Blackmagic Duplicator 4K ←
unique id: 101112131415 ←
←
Retrieving slot information
The "slot info" command returns information about a slot.
The specified slot will be queried:
slot info: slot id: {Slot ID}
The server will respond with slot specific information:
202 slot info: ←
slot id: {Slot ID} ←
status: {"empty", "mounting", "error", "mounted"} ←
volume name: {Volume name} ←
recording time: {recording time available in seconds} ←
video format: {disk's default video format} ←
Asynchronous slot information change notification is disabled by default and may be configured with the "notify" command. When enabled, changes in slot state will generate a "502 slot info:" asynchronous message with the same parameters as the "202 slot info:" message.
Retrieving transport information
The "transport info" command returns the state of the transport: transport info
The server responds with transport specific information:
208 transport info: ←
status: {"stopped","record"}
display timecode: {timecode}
timecode: {timecode}
The “timecode” value is the timecode within the current timeline for playback or the clip for record. The “display timecode” is the timecode displayed on the front of the deck. The two timecodes will differ in some deck modes.
Asynchronous transport information change notification is disabled by default and may be configured with the "notify" command. When enabled, changes in transport state will generate a "508 transport info:" asynchronous message with the same parameters as the "208 transport info:" message.
Video Formats
The following video formats are currently supported on Blackmagic Duplicator 4K:
| SD | |
| 525i59.94 NTSC | |
| 625i50 PAL | |
| HD | |
| 720p50 | 1080p30 |
| 720p59.94 | 1080i50 |
| 720p60 | 1080p50 |
| 1080p23.98 | 1080i59.94 |
| 1080p24 | 1080p59.94 |
| 1080p25 | 1080i60 |
| 1080p29.97 | 1080p60 |
| Ultra HD | |
| 2160p23.98 | 2160p30 |
| 2160p24 | 2160p50 |
| 2160p25 | 2160p59.94 |
| 2160p29.97 | 2160p60 |
Duplicator 4K supports progressive segmented frame modes, and automatically detects level A and level B 3G-SDI formats for 1080p50, 1080p59.94 and 1080p60.
File Formats
Duplicator 4K supports the following file formats:
H.264Low
H.264Medium
H.264High
H.265Low
H.265Medium
H.265High
Querying and updating configuration information
The "configuration" command may be used to query the current configuration of the deck: configuration
The server returns the configuration of the deck:
211 configuration: ←
video input: {"SDI", "optical"} ←
←
One or more configuration parameters may be specified to change the configuration of the deck.
To change the current video input:
configuration: video input: {"SDI", "optical"}
Configuring the watchdog
The “watchdog” command instructs the deck to monitor the connected client and terminate the connection if the client is inactive for at least a specified period of time.
To configure the watchdog:
watchdog: period: {period in seconds}
To avoid disconnection, the client must send a command to the server at least every (period) seconds. Note that if the period is set to 0 or less than 0, connection monitoring will be disabled.
Configuring the record mode
Use the 'record mode' command to select the deck recording mode:
configuration: record mode: {"Duplicate", "SingleDisk", "DiskOverwrite"}
Configuring the file format
The 'file format' command instructs the deck to switch to a specific file format for codec and bit rate:
configuration: file format: {"H.264High", "H.264Medium", "H.264Low",
"H.265High", "H.265Medium", "H.265Low"}
Ajuda
Obter Ajuda
natural_image
Circular portrait photo of a smiling man in a dark shirt against a gray background (no text or symbols)Hoş Geldiniz
Blackmagic Design CEO
İçindekiler
Blackmagic Duplicator 4K
Başlarken
Configuring the watchdog 405
Configuring the record mode 405
Configuring the file format 405
Yardım 406
natural_image
Illustration of a hand inserting a USB into a network switch device (no text or symbols visible)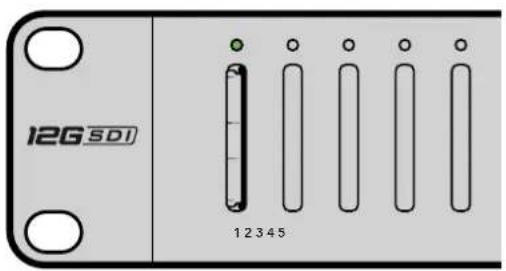
/*
Telnet client Blackmagic Duplicator 4K Control Circuit: *
Ethernet shield attached to pins 10, 11, 12, 13
*/

#include <SPI.h>

#include <Ethernet.h>

// Enter a MAC address and IP address for your controller below.
// The IP address will be dependent on your local network:
byte mac[] = {0x90, 0xA2, 0xDA, 0x0F, 0x17, 0xEF};
byte ip[] = {192, 168, 28, 204}; // IP address of Ethernet Shield
byte server[] = {192, 168, 28, 141}; // IP address of Duplicator
EthernetClient client; // Give the ethernet client a name

void setup()
{
    Ethernet.begin(mac, ip); //Start the Ethernet connection:

    client.connect(server, 9993); //Connect to Duplicator on port 9993
}

void loop()
{
    while (client.available()) //Read the Duplicator Preamble
    {
    char c = client.read();
    }

    client.print("record: name: Cameral\x0a");
    //Start Duplicator recording a clip named Camera 1
    delay(60000); //Wait a minute
    client.print("stop\x0a"); //Stop recoding
    while (1); //Do nothing until program
    starts again
}
Blackmagic HyperDeck Ethernet Protokolü
The HyperDeck protocol is a line oriented text protocol. Lines from the server will be separated by an ascii CR LF sequence. Messages from the client may be separated by LF or CR LF.
New lines are represented in this document as a "←" symbol.
Command syntax
Command parameters are usually optional. A command with no parameters is terminated with a new line: {Command name}
If parameters are specified, the command name is followed by a colon, then pairs of parameter names and values. Each parameter name is terminated with a colon character:
{Command name}: {Parameter}: {Value} {Parameter}: {Value}.
Response syntax
Simple responses from the server consist of a three digit response code and descriptive text terminated by a new line:
{Response code} {Response text}
If a response carries parameters, the response text is terminated with a colon, and parameter name and value pairs follow on subsequent lines until a blank line is returned:
{Response code} {Response text}:←
{Parameter}: {Value}
{Parameter}: {Value}
...
←
Successful response codes
A simple acknowledgement of a command is indicated with a response code of 200:
200 ok
Other successful responses carry parameters and are indicated with response codes in the range of 201 to 299.
Failure response codes
Failure responses to commands are indicated with response codes in the range of 100 to 199:
100 syntax error
101 unsupported parameter
102 invalid value
103 unsupported
104 disk full
105 no disk
106 disk error
109 out of range
110 no input
111 remote control disabled
120 connection rejected
150 invalid state
Asynchronous response codes
The server may return asynchronous messages at any time. These responses are indicated with response codes in the range of 500 to 599:
5xx {Response Text}:
{Parameter}: {Value}:
{Parameter}: {Value}:
Connection response
On connection, an asynchronous message will be delivered:
500 connection info:
protocol version: {Version}
model: {Model Name}
Connection rejection
Only one client may connect to the server at a time. If other clients attempt to connect concurrently, they will receive an error and be disconnected:
120 connection rejected
Timecode syntax
Timecodes are expressed as non-drop-frame timecode in the format:
HH:M M:SS:FF
Handling of deck "remote" state
The “remote” command may be used to enable or disable the remote control of the deck. Any attempt to change the deck state over ethernet while remote access is disabled will generate an error:
111 remote control disabled
To enable or disable remote control:
remote: enable: {"true", "false"}
The current remote control state may be overridden allowing remote access over ethernet irrespective of the current remote control state:
remote: override: {"true", "false"}
The override state is only valid for the currently connected ethernet client and only while the connection remains open.
The “remote” command may be used to query the remote control state of the deck by specifying no parameters:
remote
The deck will return the current remote control state:
210 remote info:←
enabled: {"true", "false"}←
override: {"true", "false"}←
Asynchronous remote control information change notification is disabled by default and may be configured with the "notify" command. When enabled, changes in remote state will generate a "510 remote info:" asynchronous message with the same parameters as the "210 remote info:" message.
Closing connection
The "quit" command instructs the server to cleanly shut down the connection:
quit
Checking connection status
The "ping" command has no function other than to determine if the server is responding:
ping←
Getting help
The "help" or "?" commands return human readable help text describing all available commands and parameters:
help
or:
?←
The server will respond with a list of all supported commands:
201 help: ←
{Help Te xt}←
{Help Te xt}←
←
Stopping deck operation
The "stop" command instructs the deck to stop the current capture:
stop←
Enumerating supported commands and parameters
The "commands" command returns the supported commands:
commands
The command list is returned in a computer readable XML format:
212 commands:
<commands>
    <command name="..."><parameter name="..." />...</command>
    <command name="..."><parameter name="..." />...</command>
    ...
</commands>
↓
More XML tokens and parameters may be added in later releases.
Controlling asynchronous notifications
The "notify" command may be used to enable or disable asynchronous notifications from the server. To enable or disable transport notifications:
notify: transport: {"true", "false"}
To enable or disable slot notifications:
notify: slot: {"true", "false"}
To enable or disable remote notifications:
notify: remote: {"true", "false"}
To enable or disable configuration notifications:
notify: configuration: {"true", "false"}
To enable or disable dropped frames notifications:
notify: dropped frames: {"true", "false"}
Multiple parameters may be specified. If no parameters are specified, the server returns the current state of all notifications:
209 notify:
transport: {"true", "false"}
slot: {"true", "false"}
remote: {"true", "false"}
configuration: {"true", "false"}
Retrieving device information
The "device info" command returns information about the connected deck device:
device info
The server will respond with:
204 device info:
protocol version: {Version}
model: {Model Name}
unique id: {unique alphanumeric identifier}
Example of response from server:
204 device info:
protocol version: 1.8
model: Blackmagic Duplicator 4K
uniq ue id: 101112131415
Retrieving slot information
The "slot info" command returns information about a slot.
The specified slot will be queried:
slot info: slot id: {Slot ID}
The server will respond with slot specific information:
202 slot info:
slot id: {Slot ID}
status: {"empty", "mounting", "error", "mounted"}
volume name: {Volume name} ←
recording time: {recording time available in seconds}
video format: {disk's default video format} ←
Asynchronous slot information change notification is disabled by default and may be configured with the "notify" command. When enabled, changes in slot state will generate a "502 slot info:" asynchronous message with the same parameters as the "202 slot info:" message.
Retrieving transport information
The "transport info" command returns the state of the transport: transport info ←
The server responds with transport specific information:
208 transport info:←
status: {"stopped","record"}←
display timecode: {timecode}←
timecode: {timecode}←
The “timecode” value is the timecode within the current timeline for playback or the clip for record. The “display timecode” is the timecode displayed on the front of the deck. The two timecodes will differ in some deck modes.
Asynchronous transport information change notification is disabled by default and may be configured with the "notify" command. When enabled, changes in transport state will generate a "508 transport info:" asynchronous message with the same parameters as the "208 transport info:" message.
Video Formats
The following video formats are currently supported on Blackmagic Duplicator 4K:
SD
525i59.94 NTSC 625i50 PAL
HD
| 720p50 | 1080p30 |
| 720p59.94 | 1080i50 |
| 720p60 | 1080p50 |
| 1080p23.98 | 1080i59.94 |
| 1080p24 | 1080p59.94 |
| 1080p25 | 1080i60 |
| 1080p29.97 | 1080p60 |
Ultra HD
| 2160p23.98 | 2160p30 |
| 2160p24 | 2160p50 |
| 2160p25 | 2160p59.94 |
| 2160p29.97 | 2160p60 |
Duplicator 4K supports progressive segmented frame modes, and automatically detects level A and level B 3G-SDI formats for 1080p50, 1080p59.94 and 1080p60.
File Formats
Duplicator 4K supports the following file formats:
H.264Low
H.264Medium
H.264High
H.265Low
H.265Medium
H.265High
Querying and updating configuration information
The "configuration" command may be used to query the current configuration of the deck: configuration
The server returns the configuration of the deck:
211 configuration:
video input: {"SDI", "optical"}
One or more configuration parameters may be specified to change the configuration of the deck.
To change the current video input:
configuration: video input: {"SDI", "optical"}
Configuring the watchdog
The “watchdog” command instructs the deck to monitor the connected client and terminate the connection if the client is inactive for at least a specified period of time.
To configure the watchdog:
watchdog: period: {period in seconds}
To avoid disconnection, the client must send a command to the server at least every (period) seconds. Note that if the period is set to 0 or less than 0, connection monitoring will be disabled.
Configuring the record mode
Use the 'record mode' command to select the deck recording mode:
configuration: record mode: {"Duplicate", "SingleDisk", "DiskOverwrite"}
Configuring the file format
The 'file format' command instructs the deck to switch to a specific file format for codec and bit rate: configuration: file format: {"H.264High", "H.264Medium", "H.264Low", "H.265High", "H.265Mediu m", "H.265Low"} ←