HyperDeck Extreme 8K - Video recorder Blackmagic Design - Free user manual and instructions
Find the device manual for free HyperDeck Extreme 8K Blackmagic Design in PDF.


| Type de produit | Enregistreur vidéo professionnel 8K HDR |
| Marque | Blackmagic Design |
| Modèle | HyperDeck Extreme 8K HDR |
| Résolution maximale d'enregistrement | 8K (4320p) jusqu'à 60 ips |
| Codecs supportés | Apple ProRes (HQ, 422, LT) et H.265 (High, Medium, Low) |
| Écran tactile | 7 pouces HDR, 2000 nits, affichage Rec.2020/Rec.709/DCI-P3 |
| Entrées vidéo | 4x 12G-SDI (quad link 8K), 1x HDMI, 1x composite, 1x composant (YUV), 1x RCA stéréo |
| Sorties vidéo | 4x 12G-SDI, 1x HDMI, 1x 3G-SDI monitor out |
| Entrées audio | 4x XLR symétrique, 2x RCA asymétrique |
| Sorties audio | 4x XLR symétrique |
| Stockage interne | 2 slots CFast 2.0, 1 port USB-C pour disque externe (10 Gb/s) |
| Cache optionnel | M.2 NVMe PCIe SSD (non inclus) pour enregistrement vers médias lents |
| Connectivité réseau | Ethernet 10 Gb/s, FTP, protocole HyperDeck |
| Alimentation | AC 100-240V (IEC) ou DC 12V (XLR 4 broches) |
| Dimensions (approx.) | 483 x 178 x 300 mm (19 pouces, 4U) |
| Poids (approx.) | 7,5 kg |
| Température de fonctionnement | 0°C à 40°C |
| Nettoyage | Chiffon doux et sec; éviter solvants |
| Sécurité | Ne pas exposer à l'humidité; ventilation adéquate; usage en intérieur |
| Garantie | 12 mois |
Frequently Asked Questions - HyperDeck Extreme 8K Blackmagic Design
User questions about HyperDeck Extreme 8K Blackmagic Design
0 question about this device. Answer the ones you know or ask your own.
Ask a new question about this device
Download the instructions for your Video recorder in PDF format for free! Find your manual HyperDeck Extreme 8K - Blackmagic Design and take your electronic device back in hand. On this page are published all the documents necessary for the use of your device. HyperDeck Extreme 8K by Blackmagic Design.
USER MANUAL HyperDeck Extreme 8K Blackmagic Design
Installation and Operation Manual
HyperDeck Extreme 8K HDR and HyperDeck Extreme Control
March 2020
English, 日本語, Français, Deutsch, Español, 中文, 한국어, Русский, Italiano, Português and Türkçe.

natural_image
Circular portrait photo of a smiling man in a dark shirt against a gray textured background (no text or symbols)Welcome
When we released the original Blackmagic HyperDeck disk recorders, our dream was to allow anyone to record and play back the highest quality video using portable SSD storage. Now we are excited to introduce HyperDeck Extreme 8K HDR!
HyperDeck Extreme 8K HDR is a professional video recording deck that records up to 8K video using Apple ProRes and H.265 codecs. The unit features a bright and colorful HDR touchscreen that gives you control via tap and swipe gestures plus displays scopes for professional SDR and HDR workflows.
You can record up to 8K H.265 on CFast cards or 8K ProRes files via external disks. If you install the optional cache feature, media speed doesn't matter so you can record 8K video to any Cfast card or even connect an external HDD dock via USB-C and record to an external hard drive!
A variety of video and audio sources can be connected including decks, monitors, routers and cameras, or legacy broadcast decks via composite analog inputs, which is especially useful for archival workflows converting from tape to file.
We also wanted to create a deck controller that works just like a traditional broadcast deck with a search dial and familiar controls. With HyperDeck Extreme Control, you can control your HyperDeck Extreme 8K HDR as well as broadcast decks such as Betacam SP, Digital Betacam decks and even 1 inch machines. HyperDeck Extreme Control can control up to 8 broadcast decks via industry standard RS-422 connections and we believe you will find the experience intuitive and efficient!
This instruction manual contains all the information you need to get started with HyperDeck Extreme 8K HDR and HyperDeck Extreme Control. Please check the support page at www.blackmagicdesign.com for the latest version of this manual and updates to the HyperDeck software. Keeping your software up to date will always ensure you get all the latest features. When downloading software, please register with your information so we can keep you updated when new software is released. We are constantly working on new features and improvements, so we would love to hear from you!
Grant Petty
Grant Petty
CEO Blackmagic Design
Contents
HyperDeck Extreme 8K HDR and HyperDeck Extreme Control
Getting Started with HyperDeck
Extreme 8K HDR 5
Plugging in Power 5
Plugging in Video and Audio 6
Plugging in CFast Cards 7
Recording
Selecting your Source and Codec 8
Starting Record 9
Playback 10
HyperDeck Extreme 8K HDR Front Panel 11
HyperDeck Extreme 8K HDR Rear Panel 13
Touchscreen Display 16
Touchscreen Features 16
Upper Toolbar 17
Lower Toolbar 24
Settings 28
Dashboard Menu 28
Record 28
Monitor 31
Audio 33
Setup 34
LUTs 40
Storage Media 42
CFast Cards 42
EXT Disk 43
Preparing Media For Recording 44
Preparing Media on a Computer 46
Storage Indicators 47
Using the Optional Internal Cache 50
Choosing your M.2 NVMe PCIe
Flash Disk 50
Installing The Cache 51
Formatting The Cache 53
Cache Icons and Status 53
Getting Started with HyperDeck
Extreme Control 53
Plugging in Power 54
Connecting HyperDeck Extreme 8K HDR 54
Enabling Remote Control on
your HyperDeck 8 55
Playback using HyperDeck
Extreme Control 55
HyperDeck Extreme Control Workflow 56
Connecting your RS-422 Devices 56
Connecting your Video Signal 57
Reference Signal 57
Selecting your Devices 57
Controlling your playback and record decks 58
Testing Control 59
Finding your Timecode Point using the Search Dial 59
Using the Transport Controls 62
Using the Multi Deck Feature 64
HyperDeck Extreme Control Front Panel 64
HyperDeck Extreme Control Rear Panel 65
Accessories 66
Rack Mounting HyperDeck 66
RS-422 Control 68
Transferring Files over a Network 74
Developer Information 75
Blackmagic HyperDeck
Ethernet Protocol 75
Protocol Commands 76
Protocol Details 79
Help 88
Regulatory Notices 89
Safety Information 90
Warranty 91
Getting Started with HyperDeck Extreme 8K HDR
This section of the manual shows how to get started using your HyperDeck Extreme 8K HDR.
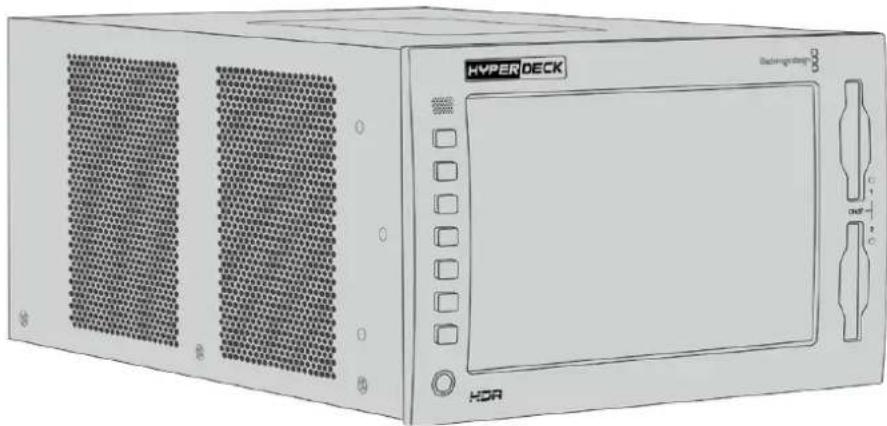
Getting started is as simple as connecting power, plugging in your video and audio, inserting a formatted CFast card and pressing the record button! You can then stop recording and play back your files using the built in touchscreen or transport control buttons on the front panel.
natural_image
Illustration of a Hyper Deck computer with ventilation grilles and control panel (no text or symbols on body)However, you can also connect Blackmagic HyperDeck Extreme Control and operate your HyperDeck remotely. This is a powerful external controller with many features including a search dial for precise jog and shuttle control. An entire section dedicated to HyperDeck Extreme Control is provided later in this manual.
Plugging in Power
To power your HyperDeck Extreme 8K HDR, connect a standard IEC cable to the AC power input on the rear of the unit. You can also use the 12V DC input if you want to connect external power or redundancy via an external power supply, for example an uninterruptible power supply or external 12V battery.
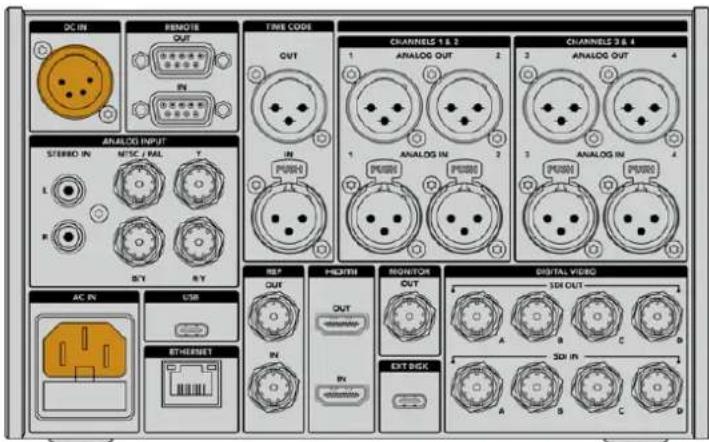
Connect power to the AC or DC power inputs on the rear of the unit
NOTE When plugging in external power, make sure the power voltage output matches the input voltage range marked on the rear panel.
Once powered, the touchscreen display will prompt you to select your language. To select your language, tap on the language option followed by 'update'. The main window will now appear.
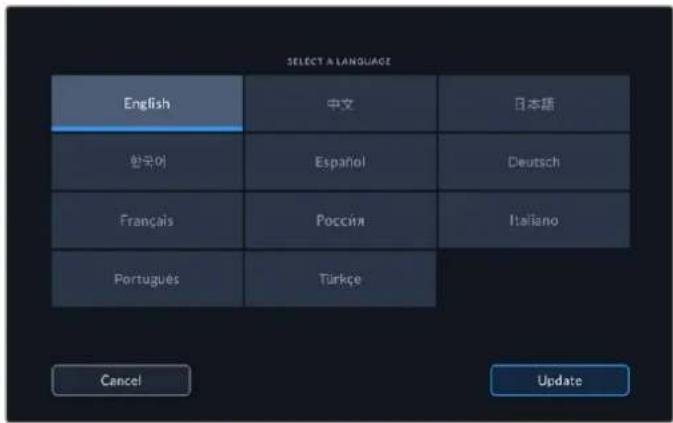
Select your language and tap update to confirm
TIP You can change your language at any time via the setup menu. For more information, see the 'setup tab' later in this manual.
Plugging in Video and Audio
There are a range of connectors on the rear of the unit so you can plug in a variety of sources, from analog composite and component video, to SDI and HDMI.
If you want to connect an HDMI or SDI monitor, plug them into the HDMI or SDI outputs.
Audio is embedded in SDI and HDMI so you don't have to worry about connecting audio. However, if you want to plug in analog audio sources you can connect them via the balanced XLR or unbalanced RCA inputs. For detailed information on all the input and output connectors, refer to the 'HyperDeck Extreme 8K HDR rear panel' section of this manual.
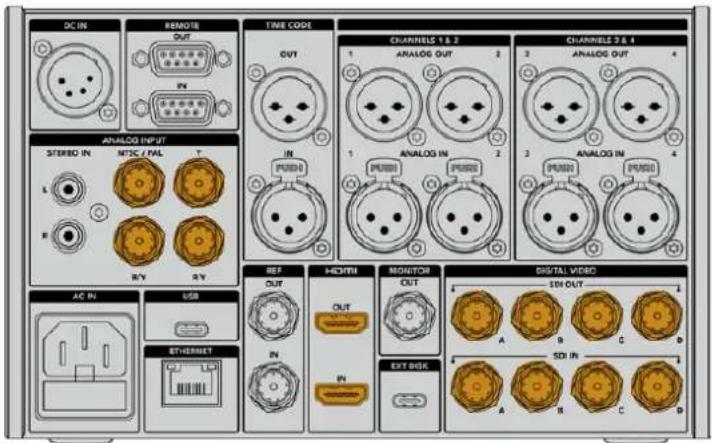
Plug your video source into the SDI, HDMI or analog video inputs
TIP HyperDeck Extreme 8K HDR automatically detects the video format and frame rate and you can see this information displayed on the touchscreen overlay.
Plugging in CFast Cards
HyperDeck Extreme 8K HDR ships ready to record immediately. All you need is a formatted CFast card!
You can format your CFast cards via the touchscreen LCD or via a computer. For more information, see the 'preparing storage media' section later in this manual.
Using CFast Cards
The front panel features two CFast 2.0 slots for recording. CFast cards are capable of supporting very high data rates, so are perfect for recording HD and Ultra HD Apple ProRes and 8K H.265 files.
To insert a CFast card, slide it into the CFast card slot with the smaller socket facing upwards. Apply gentle pressure until you feel it click into place. If the card is inserted incorrectly, you will feel a solid resistance and the card will not seat.
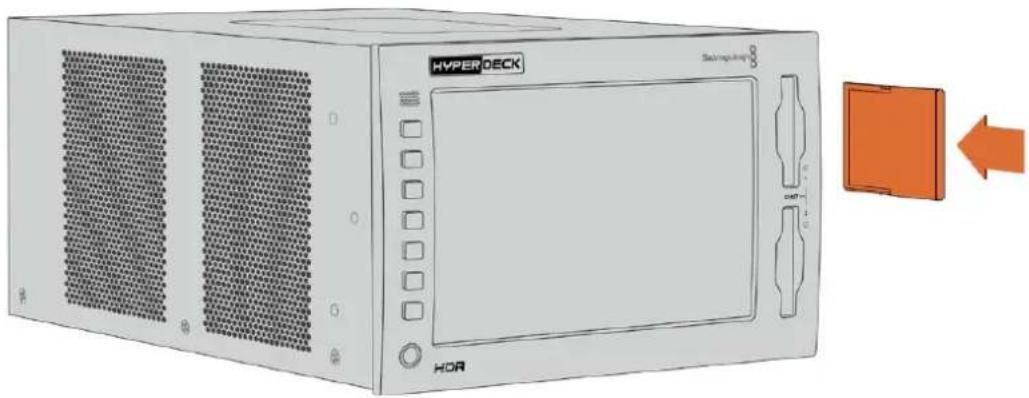
Insert the CFast card with the card's small slot facing upwards
To remove a CFast card, gently push the CFast card into the slot until you feel it click, then release. The card will eject enough for you to hold the end of the card and remove it from the slot.
That's all there is to getting started! With the unit powered, your video source plugged in and CFast cards formatted and inserted, you can now start recording!
Keep reading this manual to learn about all the record and playback controls on your HyperDeck and how to change settings using the touchscreen display. You can also find information about the connectors on the rear panel, including how to connect analog archival video via the composite and component inputs.
Recording
HyperDeck Extreme 8K HDR records video using H.265 and Apple ProRes codecs. The default codec is Apple ProRes so you can press record straight away and record high quality 10-bit video. If you want to record 8K video, you will need to change the codec to H.265. This section of the manual will show you how to do that.
Selecting your Source and Codec
Change the source and codec settings using the intuitive touchscreen display.
To select a source:
1 Tap the 'source' icon to the right of the timecode display at the top of the touchscreen to open the 'record' menu.
2 From the input options, tap the icon corresponding to the source input your video signal is connected to, for example HDMI or component.
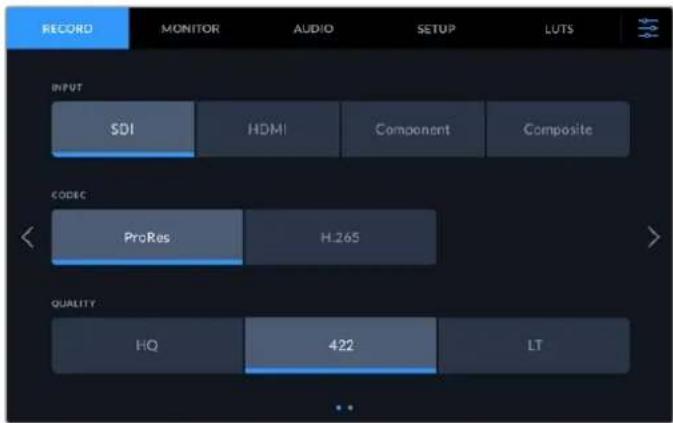
To select a codec:
1 From the codec options, tap on ProRes or H.265.
2 Different quality settings are available depending on the codec selected and you can choose one by tapping the desired 'quality' icon. For ProRes, 'HQ' is the highest quality available. If you have selected H.265, 'high' will record the highest quality.
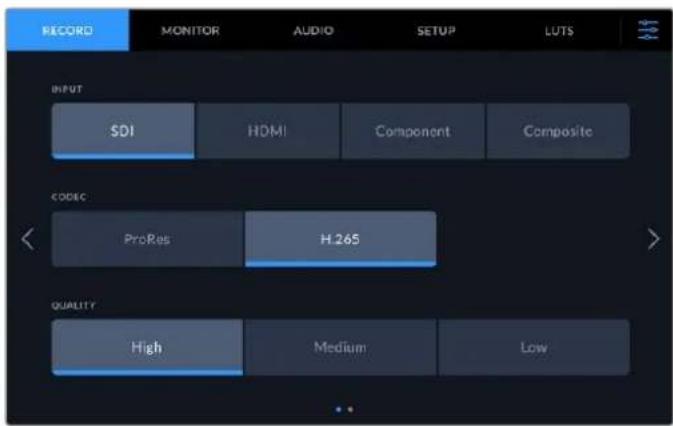
To return to the main display, tap the menu icon in the top right corner. Your input and codec selection will appear on the top toolbar of the main display along with the video source on the LCD.
TIP For more information on codecs and available quality settings, see the 'codec and quality' section in the record menu later in this manual.
Starting Record
Now that you have set your source and codec, you can start recording.
Press the 'record' button on the front panel, or tap the red record icon on the touchscreen. You can see your HyperDeck is recording because the record button will illuminate red along with the timecode display and media icon. To stop recording, simply press either the touchscreen or front panel 'stop' button.
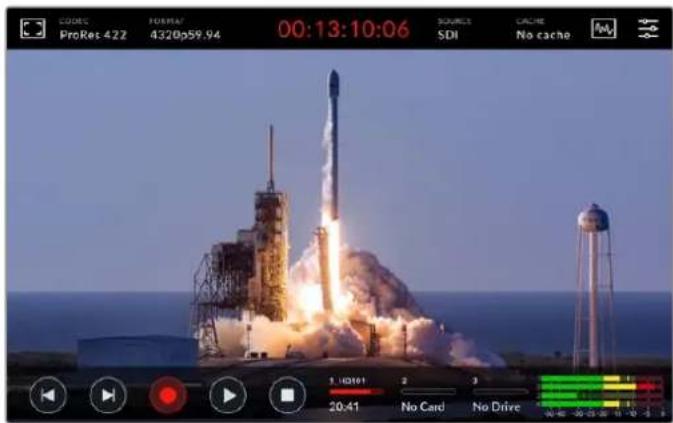
Media Warning Indicator
If you are recording Ultra HD or high quality 8K video using slower media, you may experience problems with your media. For example, 8K recording uses a higher data rate compared to Ultra HD, so your CFast cards need to be the fastest available. If there are problems with your media during recording, you will see a red exclamation icon above the audio meters on the touchscreen overlay.
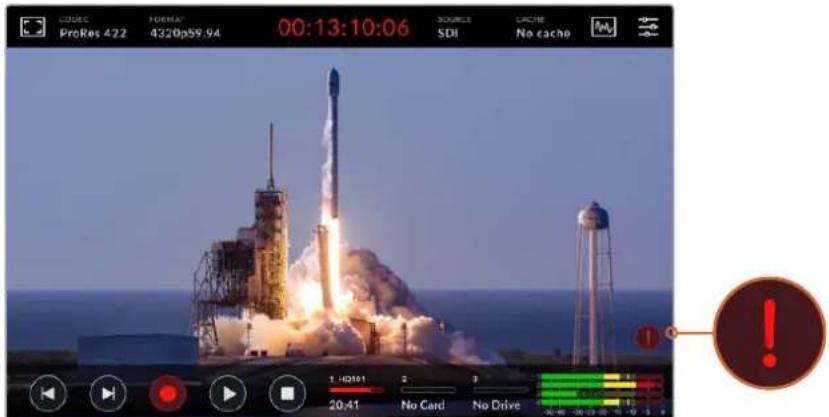
An exclamation mark will appear in the lower right hand corner of the display if problems with your media have been detected
We strongly recommend making sure your media is on the approved media list, which can be found in the 'storage media' section later in this manual.
Cache Recording
You can avoid the risk of problems with your media completely by using the optional cache recording feature in HyperDeck Extreme 8K HDR. This lets you record the highest resolutions and frame rates on even the slowest media. For example, with a cache you can record 8K ProRes HQ files onto a CFast card.
The optional cache recording feature records all files to an internal M.2 PCIe NVMe flash disk before they are transferred to your storage media. Depending on the speed of your storage media, this transfer can appear almost instantaneous! A benefit of M.2 PCIe NVMe flash disks is that they are incredibly fast, completely removing the risk of problems even with slow recording media!
Another benefit of the cache feature is that recordings will continue even after your connected storage media is full! When the card has no recording space left, the recording will continue to the cache. Once a formatted CFast card or external disk inserted, the recording will automatically start transferring to the newly inserted card.
For more information about cache recording, including how to install the M.2 PCIe NVMe SSD, see the 'about cache' section later in this manual.
Playback
Once you have finished recording, simply press the 'play' button, or tap the play icon on the touchscreen to start playback immediately.
You might have noticed that if you press the play button or tap the play icon more than once, the play icon on the touchscreen changes. That is because pressing play more than once enables the 'loop' feature. Looping can be helpful if you want the playback to continue looping the same clip indefinitely, or to loop all clips on the timeline.
You can tell which loop feature is enabled by observing the play icon on the touchscreen. If it is not the loop feature you want, simply keep pressing or tapping play to cycle it to the feature you do want.

Loops the same clip.

After the final clip has played, playback will return to the first clip and continue playing all clips.
To disable the loop feature, simply tap or press play until the loop icons are no longer visible.
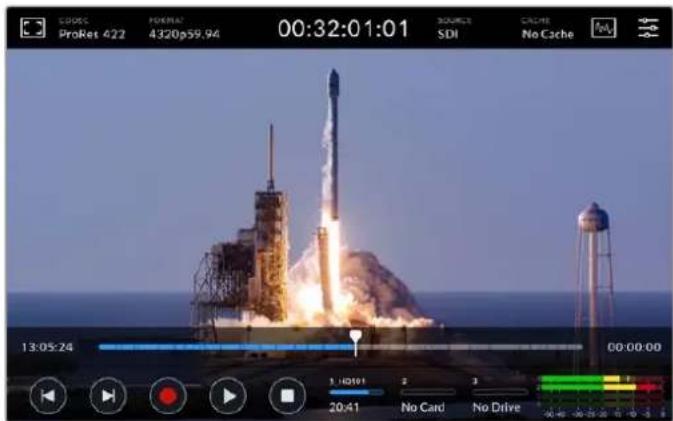
Toggle the stop button to switch between playback and record mode
You aren't locked in to using the soft touch buttons or touchscreen buttons to control the HyperDeck Extreme 8K HDR. Using the HyperDeck Extreme Control your HyperDeck Extreme 8K HDR and 7 other remote devices at once!
For more information on HyperDeck Extreme Control, see the dedicated section later in this manual.
HyperDeck Extreme 8K HDR Front Panel
The front panel includes soft touch buttons for easy, immediate access and an ultra bright 2000 nit HDR display to see your video in brilliant true to life colors.
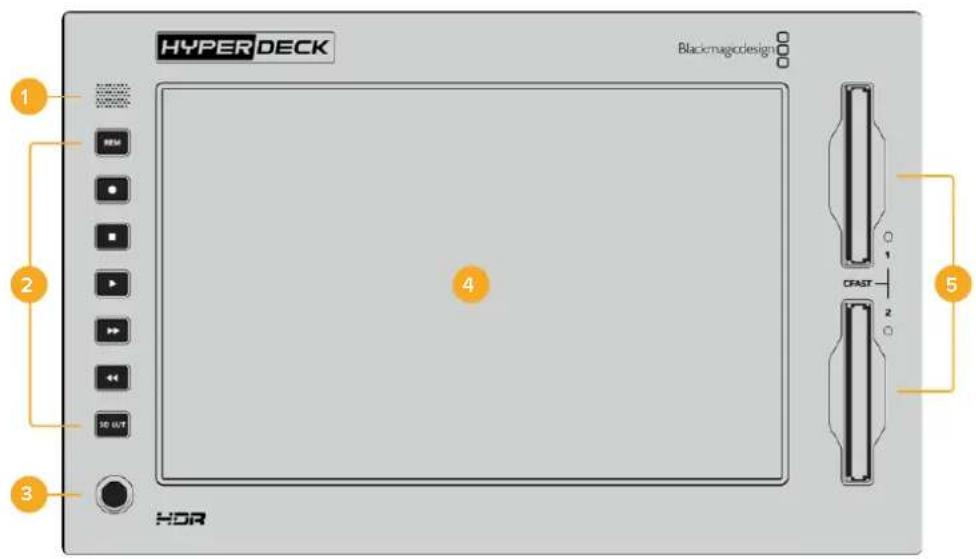
1 Front Panel Speaker
The built in mono speaker on the front panel lets you check your audio levels directly from the front panel. Simply tap on the volume meters on the bottom right of the touchscreen display and adjust the speaker level using the slider.
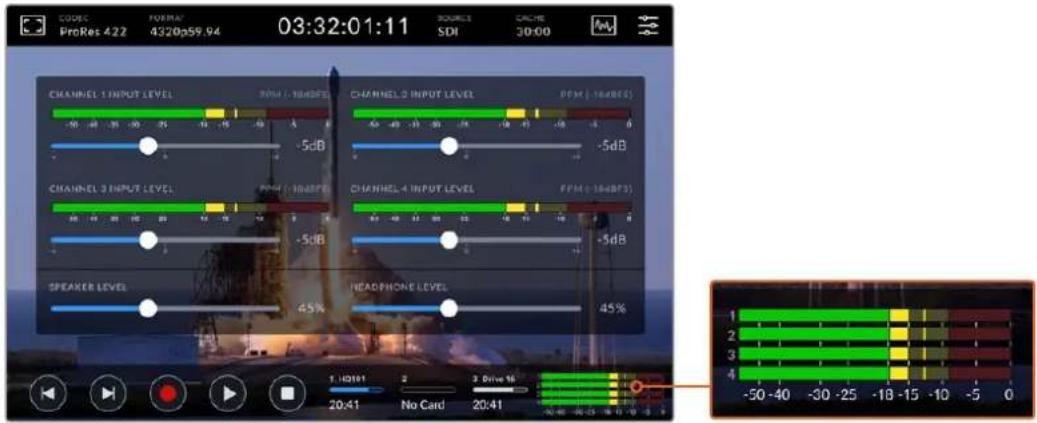
Tap on the audio meters to display and adjust the speaker level
2 Soft Touch Buttons
HyperDeck Extreme 8K HDR features 7 soft touch buttons on the front panel so you can quickly access traditional transport controls or apply LUTs. Each button is backlit when the unit is powered so you can easily see the buttons when the unit is installed in low light conditions, such as a dubbing facility.
 | If you are using a RS-422 device to control playback and recording remotely, press the 'rem' button. This will allow the your HyperDeck to be controlled externally from a device such as the HyperDeck Extreme Control or the HyperDeck Ethernet Protocol. The button will illuminate to indicate the remote feature is active. |
 | The five transport control buttons including the most commonly used functions for recording and playback; record, stop, play, fast forward and rewind. Use these buttons for immediate control over the record and playback functions.When active the selected button will illuminate. |
 | |
 | |
 | |
 | |
 | 3D LUT lets you toggle the active display LUT on the HDR LCD display.The button will illuminate when active.For more information on LUTs, including how to set your LUT and display it on the LCD and or monitor out, see the 'LUTS' tab in the dashboard menu later in this manual. |
NOTE It is worth noting that if the unit does not have a valid signal connected, pressing the 'record' button has no effect on the unit. This is the same for the play and fast forward and rewind buttons when no storage media is connected.
3 Headphone Port
Connect a set of headphones to the 1/4" headphone jack on the front panel to listen to the audio. To change the headphone volume level, tap on the volume meters on the touchscreen display and adjust the 'headphone level' slider.
4 Touchscreen
The 7" LCD display features a large ultra bright HDR video display with intuitive touchscreen controls. The wide color gamut displays both Rec. 2020 and Rec. 709 color spaces and 100% of the DCI-P3 format. You can also display full screen video scopes. You can access all available on screen controls and menu options via the touchscreen display!
For more information on the menu settings and using the touchscreen, see the 'touchscreen settings' section further in this manual.
5 CFast 2.0 Card Slots
2 CFast slots on the front of the panel for your CFast cards. LED lights to the right of the slow indicate the media status.
| Playback | |
| Recording or while cache is transferring | |
| Card is ready or no card is installed |
HyperDeck Extreme 8K HDR Rear Panel
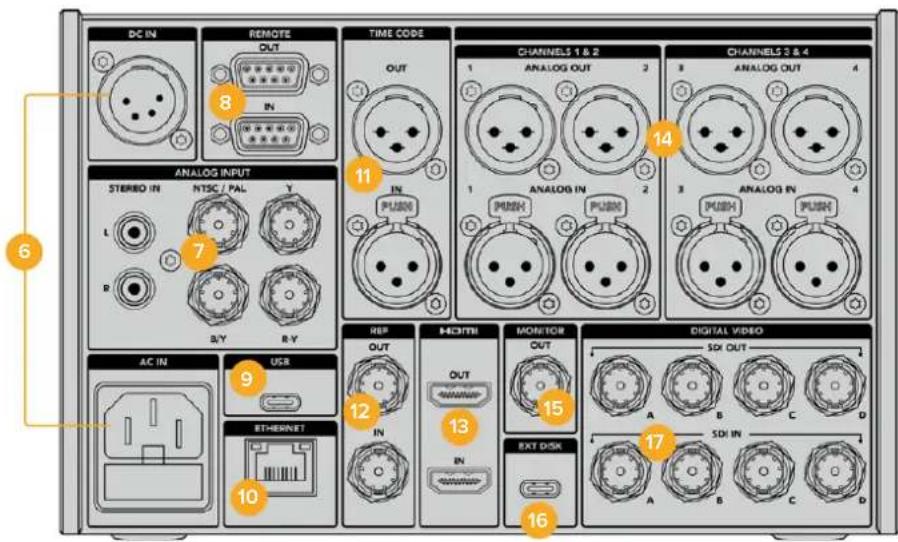
6 Power
There are two power options on the rear, an AC power input for IEC mains power input as well as a 12V 4 pin XLR DC input for connecting redundancy or battery power. Ensure any DC power source connected to the units is compatible with the input voltage and current rating marked at the DC IN connector
7 Analog Input
Connect analog sources for archiving via the analog stereo left and right RCA connectors, the single BNC composite input or via the component in.
8 Remote
There are two RS-422 DB9 connectors for remote in and out.
9 USB
Use the USB-C connector with the white surround for software updates via a computer using the HyperDeck Setup Utility.
10 Ethernet
A 10Gb/s ethernet connection lets you connect directly to your network for fast ftp transfers or to remotely control the unit via the HyperDeck Ethernet Protocol.
Connect it to the same network as an ATEM Switcher and you can use your HyperDeck for playback using the HyperDecks palette in ATEM Software Control or via an ATEM broadcast panel. For more details on transferring files via an FTP client, see the 'transferring files over a network' section later in this manual.
11 Time Code
Receive external timecode via the XLR timecode inputs or loop out timecode via the XLR timecode out connection. For more information on how to select your timecode options, see the 'setup' menu later in this manual.
12 Ref
Your HyperDeck Extreme 8K HDR features a stabilized video reference output corresponding to standard definition black burst and high definition tri-sync standards.
You can also receive reference signals from external sources such as a sync generator. This means you can have multiple devices in your facility receiving a reference signal from a single source, such as the Blackmagic Sync Generator, to genlock all your equipment together! Select between the input and external reference source via the touchscreen setup menu.
For more information on selecting your reference source, see 'setup' settings later in the manual.
13 HDMI
The HDMI connections are perfect for when you're using the unit as a field recorder and connecting to an HDMI enabled display for playback. For signals from standard definition to 2160p60, the HDMI input will auto detect SDR and HDR video standards when the signal is flagged with the correct metadata. This means you can display stunning HDR images on HDR enabled HDMI screens using the HDMI out.
14 Analog Audio
You can connect up to 4 channels of balanced analog audio in or out via 3 pin XLR connectors. Select your audio input using the 'audio' tab in the dashboard menu. See the 'audio' section later in this manual for more information.
15 Monitor Out
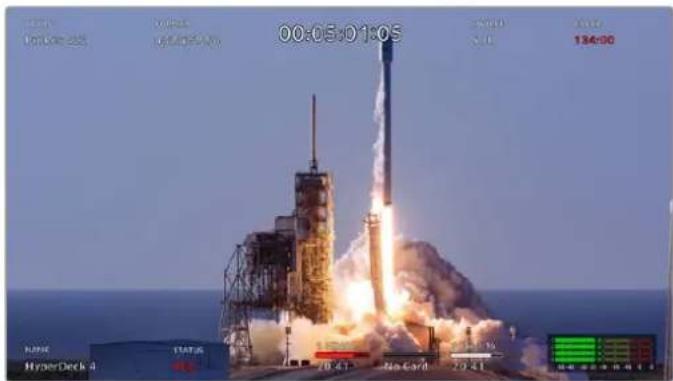
An 3G-SDI monitor out connection provides a downscaled output with overlays so that you can monitor on an external display. The overlays include focus and exposure tools such as grid and false color that you can toggle on and off as well as drive icons, audio meters and a time counter display. For more information on the Monitor SDI settings, including how to output a clean signal, see the 'monitor' page in the dashboard menu later in this manual.
16 Ext Disk
Connect a flash disk to the USB-C connector on the rear so you can record to external disks at up to 10Gb/s. You can also connect to multi port USB-C hubs or the MultiDock 10G allowing you to connect one or multiple SSDs for far greater storage capacity! Recording to high speed SSD's and hard drives reduces the risk of problems with your media compared to CFast 2.0 cards. For more information on external disks, see the 'storage media' section later in this manual.
17 12G-SDI Digital Video
Featuring four 12G-SDI inputs and outputs on the rear for video signals from standard definition to Ultra HD via a single cable, 8K30p via dual link 12G-SDI and up to 8K60p via quad link 12G-SDI.
Using the quad link 12G-SDI connections you can use HyperDeck Extreme in 8K workflows. Connect it to ATEM Constellation 8K as a playback or recording device that can be accessed via the HyperDecks palette in ATEM Software Control
Connect your 4 12G-SDI cables from the input or output on the HyperDeck Extreme to one of the 8K inputs or outputs on the rear of the ATEM Constellation 8K. It is important to connect your quad link SDI cables in the correct order. For example, connect the SDI input or output labelled 'c' on HyperDeck Extreme to the third input or output on the ATEM Constellation 8K.
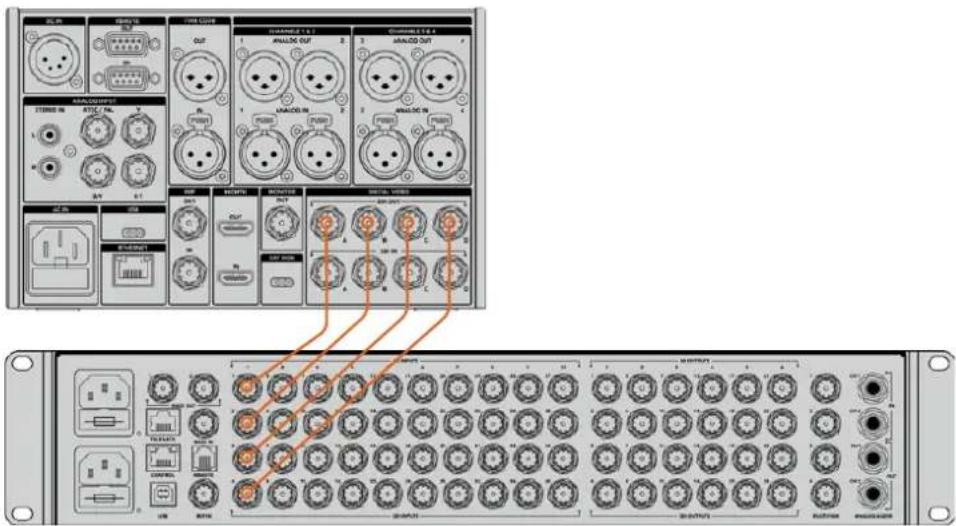
Plugging the 8K quad Link SDI output of a HyperDeck Extreme 8K HDR into the SDI input of the ATEM Constellation 8K.
Two Sample Interleave
There are two different methods for 8K workflows; two sample interleave and square division. HyperDeck Extreme 8K HDR and ATEM Constellation 8K both use two sample interleave, known as 2SI. With 2SI, each 12G-SDI connection delivers an 8K signal at 1/4 of the resolution. When combined, you have a full resolution 8K signal!
A benefit of the 2SI method is that if one of the 4 connections become loose, you will only lower the resolution rather than lose one corner of the image, as would be the case in a square quadrant setup.
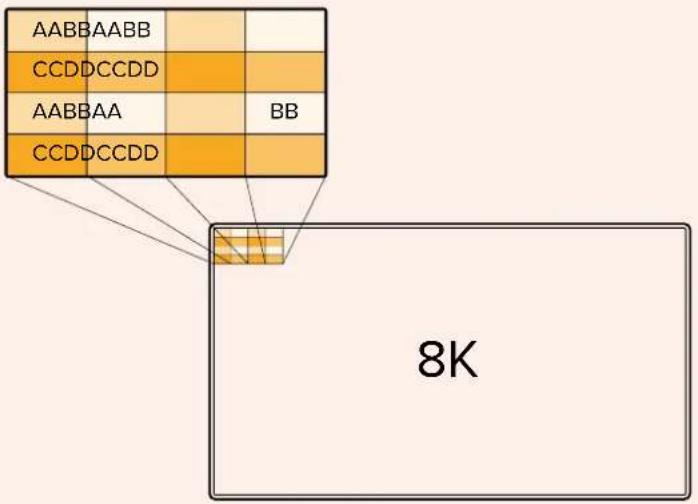
If your 8K workflow involves devices using the square division method, your can use Teranex Mini SDI to HDMI 8K HDR to convert automatically from 2SI to square division.
Touchscreen Display
Touchscreen Features
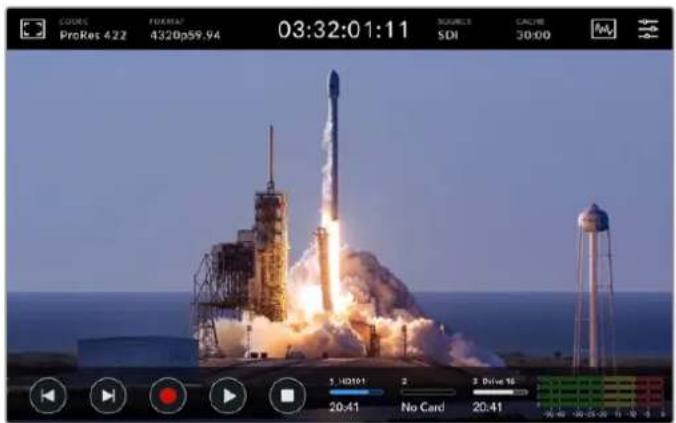
The Interactive touchscreen display lets you view and select options directly from the screen
The intuitive 7 inch display lets you view and select many of the HyperDeck Extreme functions directly from the touchscreen display.
The display includes an upper and lower toolbar. These toolbars display settings and status information, for example the current source, or the clip currently being recorded or played. Settings can also be adjusted by tapping on their relevant icons, for example to change the source, tap on the 'source' icon and then tap on one of the source options.
Indicators show the current status for items such as the source video format and frame rate, timecode, media record time remaining, audio levels and transport controls.
The lower toolbar can be hidden or revealed by swiping the touchscreen up or down.
Upper Toolbar

Navigate directly to the related menu options by tapping 'source' or 'codec'.
Monitor options
Tap on the monitor icon on the left to access the monitor overlay settings. These settings let you select and modify the appearance of overlay options including zebra, focus peaking, guides, grid, false color, contrast, brightness and saturation. This is especially useful when using the HyperDeck Extreme 8K HDR as a field recorder.
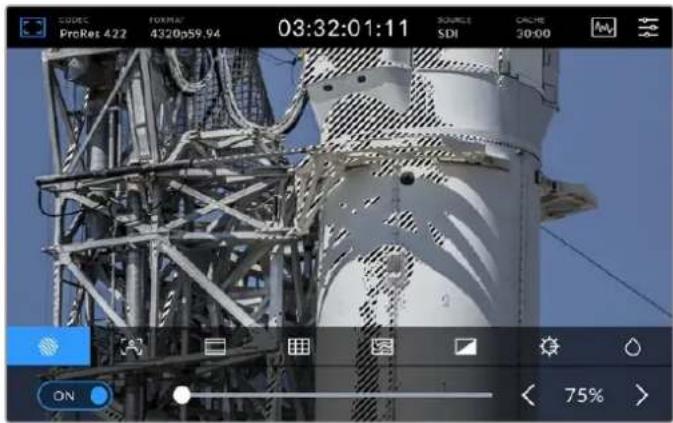
Zebra
Zebra mode will help you to achieve the optimum exposure by displaying diagonal lines over the areas of content that exceed the set zebra level. To enable zebra mode, toggle the switch to on. Use the slider or the arrows to the left and right of the percentage icon to select your zebra level. A level of 100% will mean any area of the image displaying diagonal lines is overexposed.
natural_image
Close-up of a white industrial tower structure with visible structural beams and no readable text or symbols.Use the slider or arrow to select your zebra percentage
TIP You can also set the zebra to highlight areas of your image that represent specific video levels on a waveform, for example setting the zebra for 50% means you can visually identify which regions of your image will appear at approximately 50% on a waveform scope.
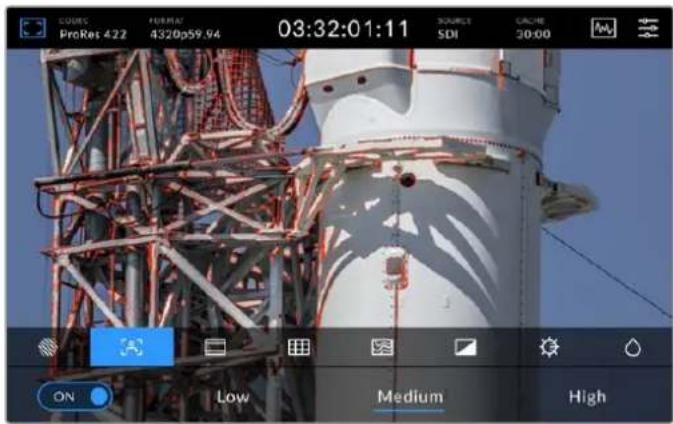
Focus Assist
Focus assist gives you powerful tools to help focus your image fast. Focus assist displays edge lines on the sharpest areas of the image. To turn on focus assist, toggle the switch to on. Sensitivity settings let you change how strong the lines are from 'low', 'medium' or 'high'. In images with lots of detail and high contrast, the lines can be distracting, so in these conditions you can select 'low' or 'medium'.
Alternatively, for low contrast shots with less detail, select 'high' so the lines are stronger and easier to see. If you find lines are too visually intrusive, you can select 'peak' levels instead. For more information on how to set peak levels, see the 'monitor' settings later in this manual.
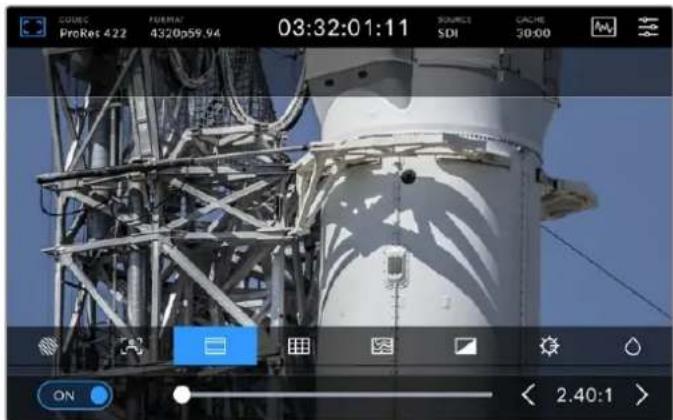
Frame Guides
Guides provide a range of aspect ratios from various film, television and online standards. Tap the toggle switch to on and then select your guide by tapping the left and right arrows or by dragging the slider control.
Grid
The grid option lets you select overlays to assist with shot framing.
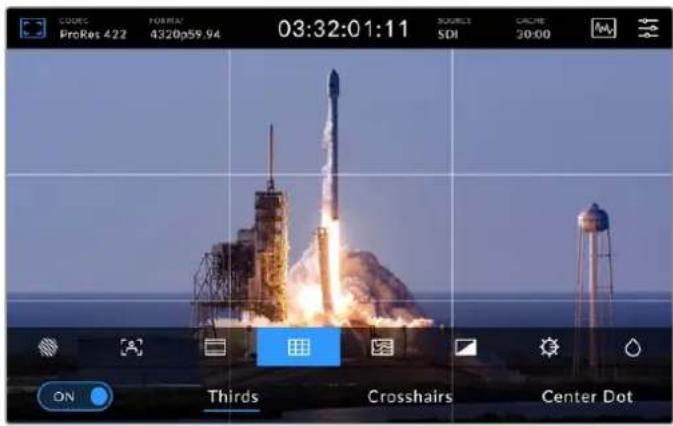
| Thirds Thirds will | overlay two horizontal and two vertical lines over your image,breaking it up into 9 smaller sections to help you compose your shot.The human eye typically looks for action near the points where the lines intersect, so it's helpful to frame key points of interest in these zones.An actor's eyeline is commonly framed along the top third of the screen,so you can use the top third to guide your framing. |
| Crosshairs The 'crosshairs' setting places a crosshair in the center of the frame.Like thirds, the crosshairs is a very useful compositional tool, making it easy to frame the subject of a shot in the very center of a frame. This is sometimes used when filming scenes that will be assembled using very fast cuts.Keeping viewers' eyes focused on the center of a frame can make rapid editing easier to follow. | |
| Center Dot | The 'center dot' setting places a dot in the center of the frame. This works in exactly the same way as the 'crosshair' setting, albeit with a smaller overlay that you may find less intrusive.You can enable a combination of 'thirds' and 'crosshairs' or 'thirds' and 'center dot' by tapping both options in the 'grids' menu. 'Crosshairs' and 'center dot' cannot be selected together. |
False Color
The ‘false color’ setting toggles the appearance of false color exposure assistance on the LCD touchscreen and the SDI monitor out. When false color is on, different colors are superimposed over your image to represent different exposure levels. For example, optimal exposure for skin tones can be achieved by using green for dark shades and pink for light shades. Monitoring the colors during recording can help you maintain consistent exposure for skin tones. Similarly, when elements in your image change from yellow to red, that means they are now over exposed.
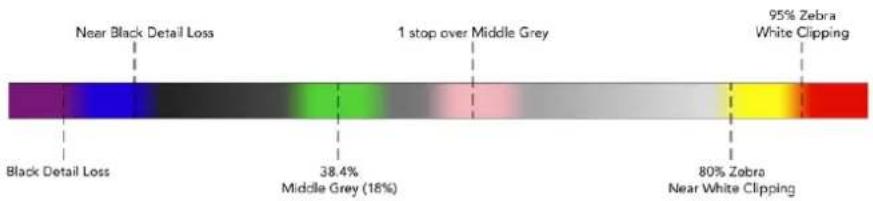
bar
| Category | Value (%) | |---|---| | Black Detail Loss | 38.4 | | Middle Grey (18%) | 1 stop over Middle Grey | | 95% Zebra White Clipping | 80 | | Near White Clipping | 95 |TIP Zebra, focus peaking, guides, grid and false color can be toggled on or off via the 'monitor settings' in the dashboard menu. You can also toggle the overlays for the 3G-SDI Monitor output. See 'monitor settings' later in this manual for more information.
The three remaining monitor settings alter the LCD display settings.
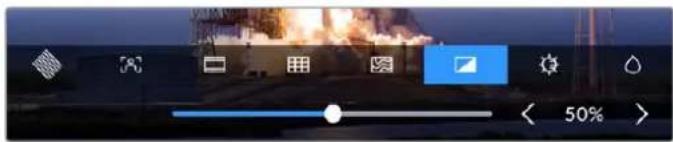
 | Contrast Adjust the contrast of the HDR display to increase or decrease the range between the brightest and darkest parts. A high contrast image can reveal detail and depth in the image, low contrast can make the image appear soft and flat. |
 | Brightness Adjust the brightness of the display by dragging the slider to the left to make the image darker, or the right to make it lighter. Changing the display brightness can make it easier to see images when the HyperDeck Extreme 8K HDR is in extremely bright or low light locations. |
 | Saturation Use the saturation slider to increase or decrease the amount of color in your displayed image. |
NOTE All settings will be kept when the unit is powered off. It's also worth mentioning that the use of monitor options will affect the image displayed on the LCD display, but not your recorded video.
Codec
The codec icon displays your currently selected 'record' codec or the 'playback' codec of the file currently playing. You can select a new codec for recording by tapping the codec icon and selecting from the menu options displayed on screen. For more codec information, see the 'record' settings section later in this manual.
Format
When in playback mode, the 'format' icon will display the current clips resolution and frame rate. If you are in 'record' mode, it will display the resolution and frame rate of the current source selected. If 'no signal' appears, it means a valid signal is not detected.
Timecode
A large timecode view at the top displays either SMPTE timecode or a timeline time counter. Simply toggle between the two by tapping anywhere on the timecode icon.
 | SMPTE timecode mode is indicated by a 'tc' icon to the right. |
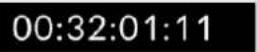 | The time counter displays the timeline timecode. |
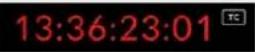 | The timecode display will appear red while the unit is recording in both timecode and timecounter modes. |
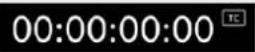 | If you don't have a valid timecode source, the timecode for each recording will begin at 00:00:00:00. |
The timecode view display SMPTE timecode or time counter.
Source
The source icon displays the current source input you have selected on the HyperDeck Extreme 8K HDR. Tap on the source icon to open the record menu where you can select from SDI, HDMI, Component and Composite.
Cache
If you are using the optional cache feature, you can see at a quick glance the storage remaining and status of the cache by looking at the cache icon. When a M.2 PCIe NVMe disk in installed and formatted, the cache icon will display will display the remaining space on the drive. When a valid video signal is detected, the remaining space will be displayed in hours:minutes:seconds based on the current format and your selected codec. When no valid signal is detected, the remaining space available will be listed in TB or GBs.
If there is no SSD installed, the icon will display 'no cache'. For more details on using the optional cache feature, see the 'Using the Optional Internal Cache' section later in this manual.
Video Scopes
Tap on the video scopes icon to display the video scope options.
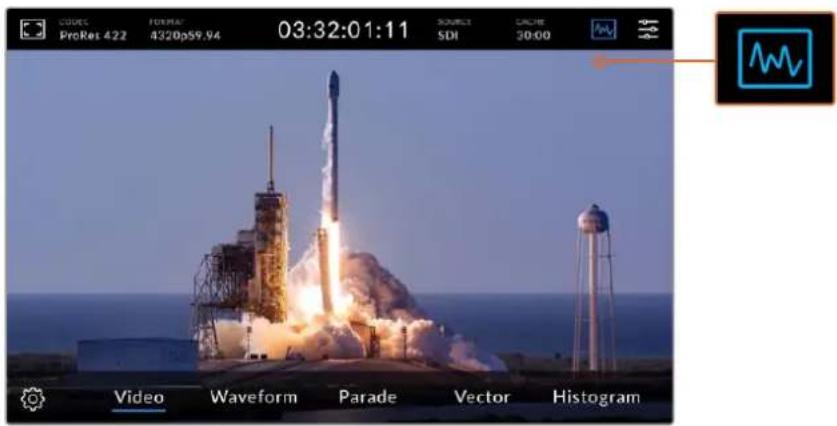
Tap on the scopes icon to reveal the different video scopes you can view
There are 4 different video scopes to choose from:
| Waveform | The waveform monitor is a graphical representation of the image, showing luma values in the same position relative to those within the frame. For example, if part of your sky is overexposed you will see it in the same horizontal position on the waveform display as it appears in the frame. |
| Parade | The real time RGB parade waveform view is the ideal scope for accurate color correction. The parade view separates the value of each channel so that you can identity which colors represent each brightness. |
| Vector | A vectorscope is the only way to measure colors in video accurately. If you're color correcting video, vectorscope shows when color has been removed or nulled out for accurate white balance. When you need to apply a tint, the vectorscope lets you see exactly how much tint you're adding and what color it is. |
| Histogram | Histogram view lets you see where the pixels are in your video, and how they are distributed from black to white. You can see if your video is clipping and adjust the camera iris and ISO settings to keep all black and white detail in the image. This means you have the full contrast range of video for easy color correction during post production. |
To disable the scopes and return to your full screen video view, select 'video.'
When selecting any of the video scopes, you can click on the settings icon to display brightness and opacity sliders allowing you to alter the view of the scopes and adjust how they appear over the footage. Altering the opacity can assist in reading the scope information depending on your source video.
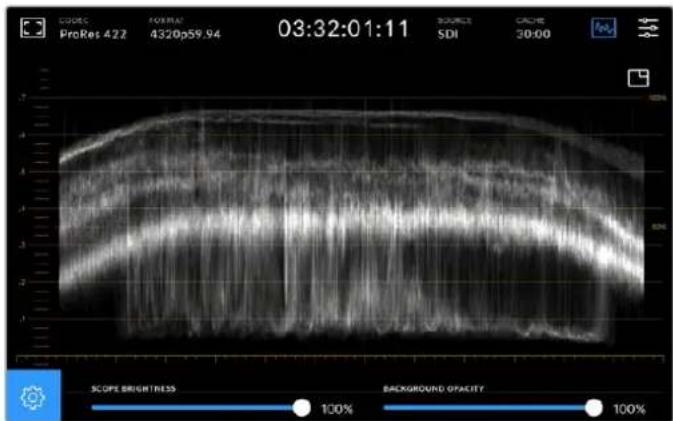
Adjust the opacity of the background by using the slider adjustment
Scope Brightness
You can control the brightness of the white scope graphic from 0% to full brightness at 100%. This can help you find areas of fine detail that may not be so clear with a low scope brightness.
Background Opacity
Each video scope has a black background. You can modify the display of this background from invisible at 0% to completely black at 100%. The higher the opacity, the darker the background, which will make your video appear and the graticules clear.
NOTE It is worth noting that each of the video scope options feature an orange graphic element displaying your levels. Modifying your scope brightness or background opacity has no impact on the display of these orange graphics.
Picture in Picture
When a video scope is active, a small 'mini preview' icon will appear at the top right of the scope.
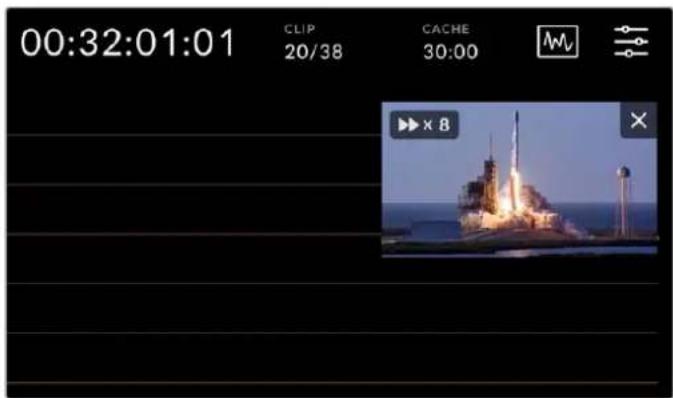
Tap on the 'mini preview' icon to display your video in a small preview window
You can use the picture in picture option to minimize the video to a small preview window that can be moved around the display to your preferred location.
TIP If your video scopes aren't appearing when you switch them on, make sure 'scopes' is enabled in the monitor page of the dashboard menu. For more information, see the 'monitor settings' section later in this manual.
Menu
The last icon on the top row is the menu icon where you can access the dashboard menu.
This dashboard menu is where you can access to all the recording options including source and codec, audio channels, monitor options audio preferences and more.
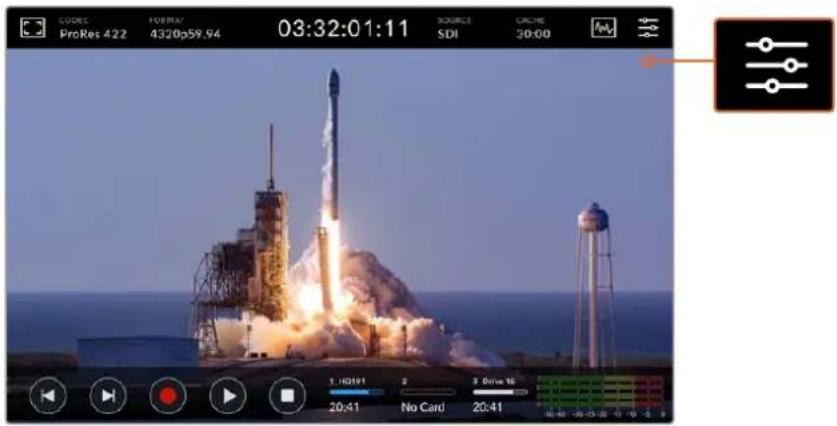
Tap on the menu icon to open the dashboard menu.
For more information on menu options available, see the 'dashboard' section later in this manual.
Lower Toolbar
Transport Controls
The first five icons on the bottom left of the display are your touchscreen transport controls. The function of these buttons can depend on whether you are in 'record' mode or ' playback' mode.
The 'record', 'play' and 'stop' buttons work just like they do on the front panel.

To start recording, tap the 'record' button once and both the touchscreen and front panel record buttons will illuminate red. To stop recording, tap the 'stop' button.

To view your recently recorded clip, tap the 'play' button. You will now be in 'playback' mode. The touchscreen 'play' button will illuminate blue and the soft touch play button on the left of the front panel will illuminate green.

Pressing 'stop' will stop the HyperDeck Extreme recording. If you press 'stop' while in playback mode, playback will stop and a clip timeline will appear above the transport controls. Similar to a timeline in editing, it's a visual representation of all the clips on your timeline with a playhead indicating your current playback position.
The time counter to the left of the timeline bar displays the current location of the playhead and the time counter to the right displays the total duration of all clips.
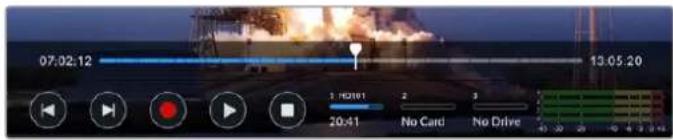
You can navigate along the timeline by tapping the 'skip' back and 'skip' next icons.

Tap the skip back button once to move the playhead to the first frame of the current clip. If the playhead is already on the start of a clip, it will jump to the first frame of a previous clip. You can also use the skip buttons to enter shuttle mode for greater playback speeds.

Press and hold either of the skip buttons down until the icon changes to a blue with two arrows. Now you can use can change the playback speed from x1/2 up to x50 speed by either holding down the button or tapping it to change the speed in set increments. To reduce the speed, simply press the shuttle button in the other direction.
To exit shuttle mode, simply press either the 'stop' or 'play' buttons and the buttons will revert to the skip forward and skip backward icons. When in shuttle mode, you can increase shuttle speed by tapping the shuttle forwards or backwards buttons more than once. To decrease the speed, tap on the alternative shuttle button.
For example, when shuttling forwards at an increased speed, tap the shuttle backwards button to decrease the speed. This lets you avoid using the stop button, which will take you out of shuttle mode.
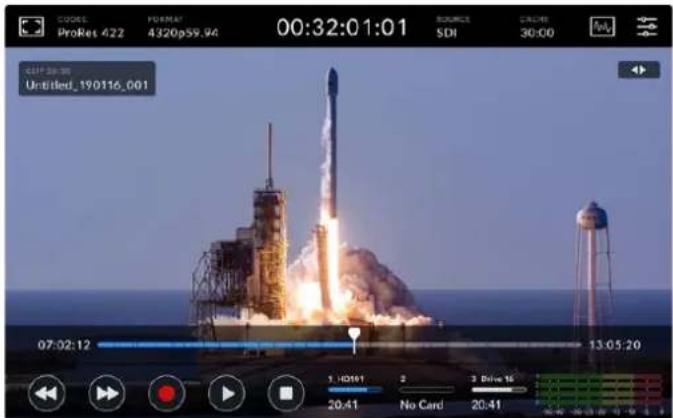
When using the fast forward shuttle mode, press the rewind icon to stop playback but remain in shuttle mode.
To leave playback mode, press 'stop' once to stop playback and 'stop' again to return to record mode.
NOTE It is worth noting that when in record mode, pressing the skip buttons performs no action.
Clip Name and Transport Status
During playback only the top and bottom toolbars will be in view. When playback is paused or you are playing at greater than real time speed, the transport status will appear on the top right hand side of the display. The clip name will be visible on the top left of the display so you can see at a quick glance exactly what is playing and its transport status.
The clip name and transport status can be hidden from the display by setting the clean feed to 'on' in the monitor menu or by swiping the display up or down. This will also move the lower menu bar out of view. For more information on clean feed, see the 'monitor' settings section later in this manual.
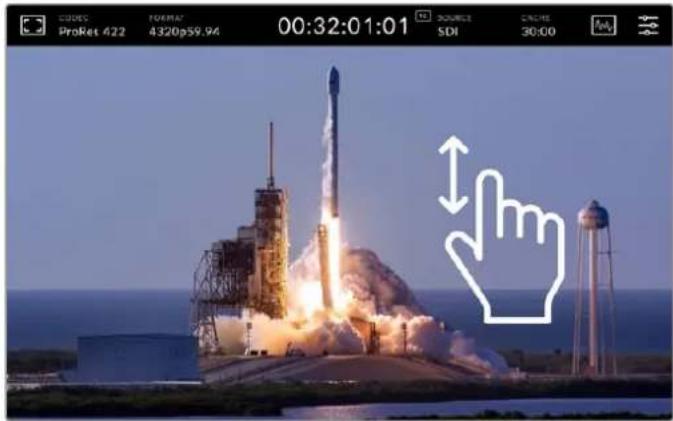
Swipe the display up or down to remove the lower toolbar and timeline
Touch and Swipe Controls
You can also use touch and swipe gestures to jog through your clip for precision control over playback down to the frame!
Tap on the timeline and the playhead will immediately move to the location of your finger.
To scrub through the footage, drag the playhead to the left and right along the timeline. The playhead will move to the location of your finger.
For precision jog movements, simply swipe your finger on the video above the timeline and below the top toolbar. The speed adjusts to your momentum, meaning the faster you swipe, the faster the playhead will move!
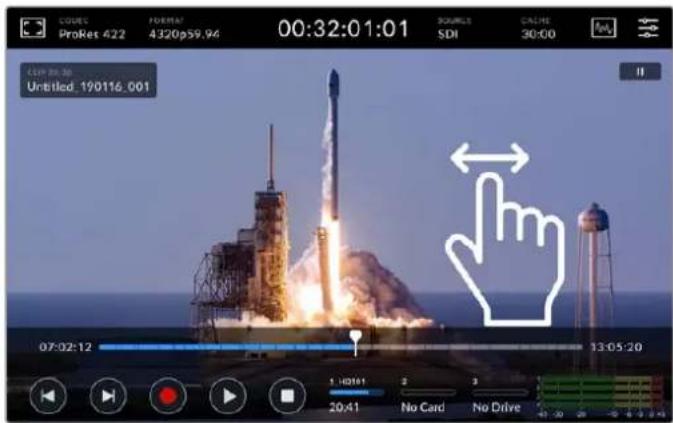
Swipe left or right for precision control
Storage Indicators
The storage indicators display the status of the media slots including record duration available. The first two icons represent 2 CFast card slots on the front panel. The third drive icon displays the active USB flash disk connected via the 'ext disk' connector on the rear of the HyperDeck Extreme 8K HDR.
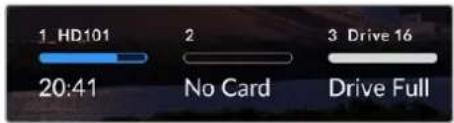
On screen icons let you see the status of your storage at a quick glance
Your active drive is used for playback and recording. Once a drive is filled, recording will spill over to the next drive, ensuring you don't miss a frame.
For more information on storage indicators, see the 'storage media' section later in this manual.
Audio Meters
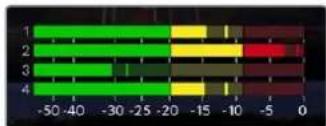
On screen audio meters display the first four audio channels of any source. To display larger meters, tap on the audio meter icon. The meters will now appear over the video. Labels to the right of each channel identify the type of meter, for example PPM or VU.
heatmap
| | 1 | 2 | 3 | 4 | |---|---|---|---|---| | Green Bar | -50 | -30 | -25 | -20 | | Yellow Bar | -15 | -10 | -10 | -15 | | Red Bar | -5 | 0 | 0 | 0 |The audio meters will display your current audio as a VU or PPM audio monitor. Tap on the audio meters to adjust levels
When in record mode you can adjust the levels of XLR audio using the sliders beneath each channel.
When in playback mode, you can use the slider beneath each channel to adjust the XLR audio output levels. Idle or disable audio channels will be grayed out.
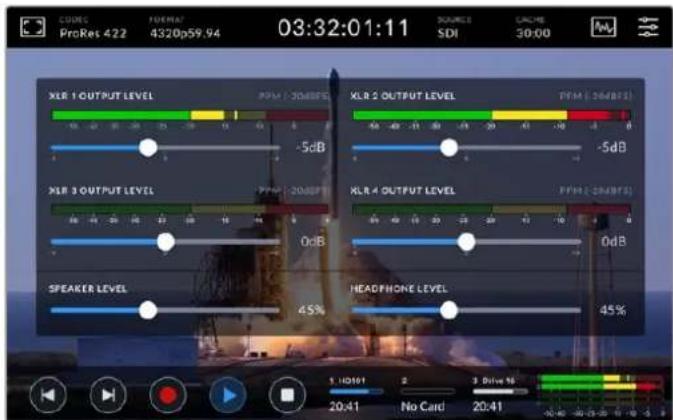
The audio meters will display your current audio via a VU or PPM audio monitor. Disabled audio tracks will be grayed out
You can select your meter type via the setup tab in the dashboard menu. See the setup section in the dashboard menu later in this manual.
Settings
Dashboard Menu
Pressing the 'menu' icon on your HyperDeck Extreme 8K HDR will open the dashboard menu. This is a tabbed menu containing the settings not available from your HyperDeck's front upper and lower toolbars.
Settings are divided by function into 'record', 'monitor', 'audio', 'setup' and 'LUTs'. Dots at the bottom of the menu let you know when a tab contains multiple pages. You can navigate between by swiping the touchscreen display to the left or right or by tapping on the arrows.
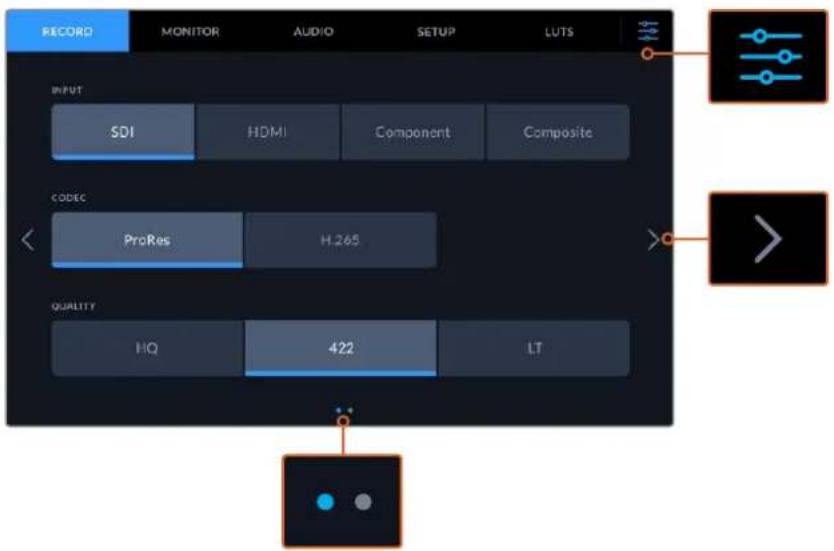
Return to the full screen view at any time by tapping on the 'dashboard menu' icon at any time
Record
Record Page 1
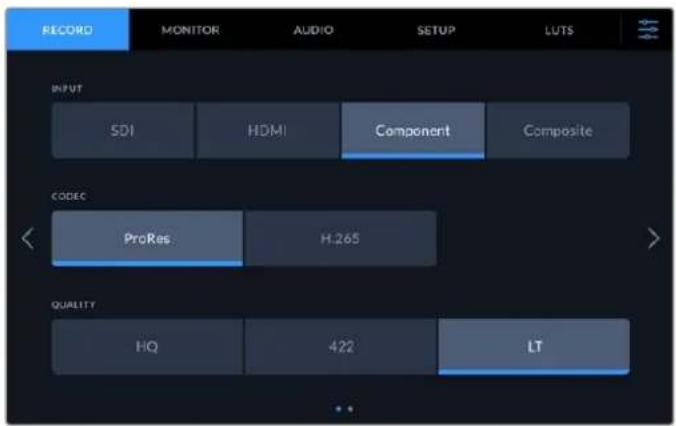
Use the 'record' tab to select your input and choose your codec and quality settings
Input
Once your sources are connected, you can select your input via the 'record' settings tab. The four options represent each type of connection and it's as easy as tapping the button to select the input. For SDI connections from standard definition to quad link 8K, tap on 'sdi'. For analog devices attached via the component YUV connections, such as a Beta SP deck, tap on 'component'.
Codec and Quality
With HyperDeck Extreme 8K HDR, you can record compressed video using Apple ProRes or H.265 codecs. For each codec, there are different quality settings you can choose to record to.
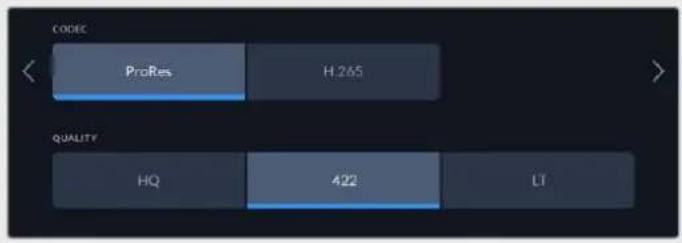
ProRes When ProRes is selected, there are three options available: HQ, 422 and LT.
Choose HQ for times when you need to record the highest quality available and therefore larger file sizes. When you want your recordings to take up less space, you can choose ProRes LT which has a higher compression and therefore smaller overall file size.
H.265
If you select H.265 as your recording codec, there are three different compression settings available: high, medium and low. High quality is the perfect choice for when you want the highest quality with the least amount of compression. Low provides a much smaller file size as the file is more compressed.
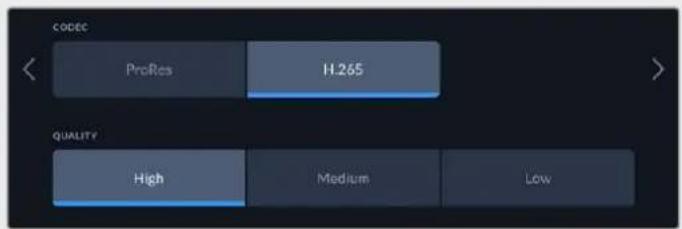
When selecting your codec, it's important to take into account what storage media your are recording to. For CFast cards, you can record up to 8K using H.265 or up to 4K using ProRes HQ. When recording to external disks such as a USB-C flash disks, you can record 8K in any codec. With the optional cache installed, all codec and quality options are available for 8K recording.
NOTE HyperDeck Extreme will play back H.265 files recorded on a HyperDeck Extreme, but not H.265 files recorded on other video equipment.
Record Page 2
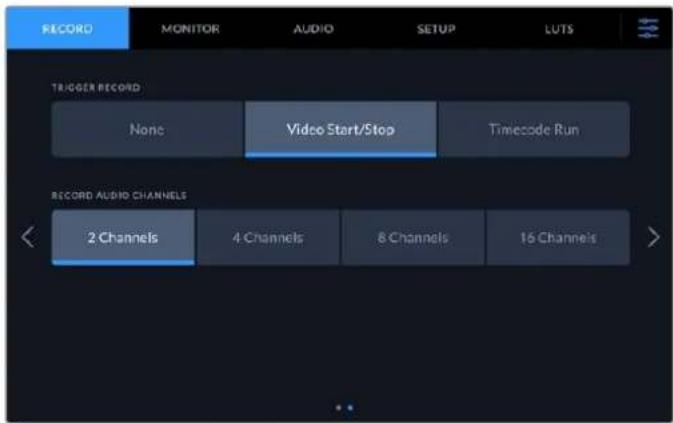
Additional settings on the second record page
Trigger Record
There are two trigger record modes available, video start/stop and timecode run. Some cameras, such as the URSA Mini, send a signal over SDI to start and stop recording on external recorders. Tapping on 'video start/stop' will trigger the HyperDeck Extreme to start or stop recording when the record button is pressed on the camera.
You can use the time 'timecode run' option to trigger the unit to start recording when it receives a valid timecode signal via the inputs. When the signal stops, recording will also stop. You can disable trigger recording by tapping the 'none' option.

Select 'none' to disable trigger recording
Record Audio Channels
HyperDeck Extreme 8K HDR can record up to 16 channels of audio at a time. Select how many channels you wish to record by tapping 2, 4, 8 or 16 channels. If you are recording 4 channels or less via the XLR inputs, you can adjust the input volume level by using the adjustments meters on the audio tab or the onscreen audio meter settings. For more information, see the 'audio settings' section later in this manual.
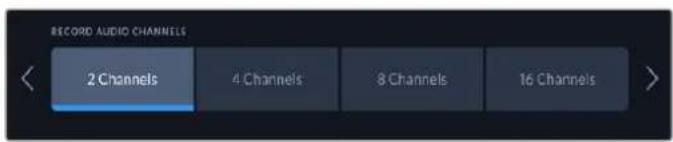
Tap on 2, 4, 8 or 16 channels to select the number of audio channels you want to record
Monitor
The 'monitor' tab lets you toggle the monitor options as well as Display 3D LUT and Scopes. These can be toggled on or off for the LCD display and SDI monitor out.
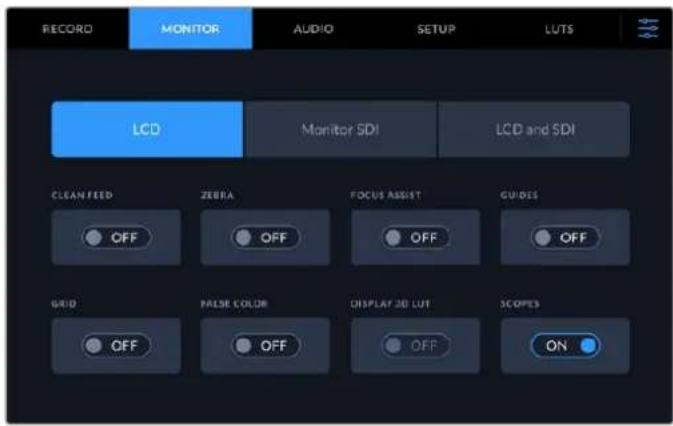
Tap on LCD or SDI to toggle the options on or off
Monitor Settings – LCD tab and Monitor SDI tab
Display options can be toggled on or off for the LCD screen and SDI output feed individually using the LCD or Monitor SDI tab.
These include:
Clean Feed
Turn clean feed 'on' to disable all status text and overlays for the LCD display and monitor SDI output. This option is a quick way to turn off all the outputs at once.
Zebra
Tap the 'zebra' setting on to enable zebra guides. When your zebra guides are on, diagonal lines with appear to let you know what areas may be clipped. See the 'touchscreen menu' in this manual for information on how to set the zebra guide levels.
Focus Assist
Toggle on 'focus assist' on the LCD or monitor SDI output to view the focus assist overlay lines. Focus assist type and color settings can be in the 'LCD and SDI' menu.
Guides
To see frame guide overlays for different film, television and online aspect ratios, toggle on frame guides. Choose your desired guide from the front panel display by tapping on the 'monitor overlays' icon.
Grid
To see one of three grid options to assist with framing, toggle 'grid' on. Grid options include thirds, center dot and crosshair. Toggle grid on or off. To set the desired grid, tap on the menu icon in the top right corner to return to the LCD display and tap on the 'monitor overlays' option.
False Color
The 'false color' setting toggles the appearance of false color exposure assistance on the LCD touchscreen. For more information, see the 'false color' section in the 'touchscreen menu' in this manual.
Display 3D LUT
Toggles display LUTs on and off to your LCD or monitor SDI. The toggle appears disabled when no LUT is active. For information on how to set a LUT, see the LUTs section later in this manual.
Monitor Settings – LCD and SDI
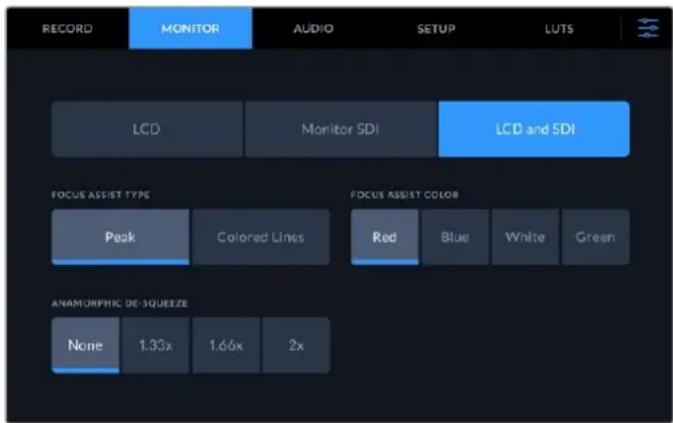
The LCD and SDI setting features controls for focus assist as well as options for anamorphic displays
You can adjust the appearance of focus assistance settings using the 'LCD and SDI' tab. These options affect the look of for both the LCD display ad the SDI monitor output.
Focus Assist Type
There are two focus assist modes, 'peak' and 'colored lines'.
| Peak When you select focus peaking the areas within your frame with the highest contrast will be highlighted. | |
| Colored Lines | If colored lines is selected, lines will be super imposed over any part of the image in focus. This can be a more visually intrusive than using ‘peak’. |
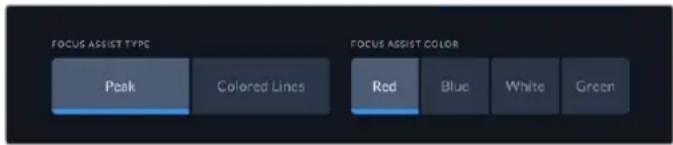
Focus Assist Color
When you are using colored lines for focus assistance on your LCD display or SDI monitor out, you can select your preferred color for the lines from red, blue, white or green. Changing the color can help to make your area of focus stand out more.
Anamorphic De-squeeze
The anamorphic de-squeeze option allows you to correctly display horizontally squeezed images from any anamorphic sources, such as digi-beta tapes containing anamorphic 16:9 content or anamorphic lenses. Tap 'none' for non anamorphic sources.

Audio
Audio Page 1
The audio input displays audio meters for embedded, XLR and RCA audio inputs. You can select to display PPM or VU Meters. To change your meter type, see the 'setup' settings later in this manual.
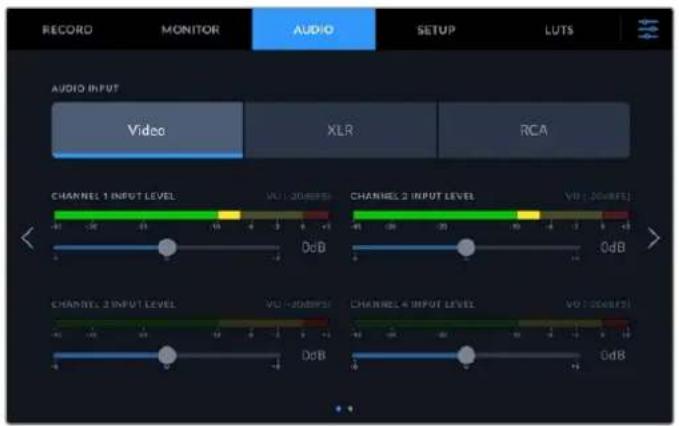
| Video Click on the video tab for audio embedded in SDI and HDMI signals. If you have selected 2 channels of audio on the record tab, only the top two channels will be active. |
| XLR When recording audio from an XLR input, you can change the input level using the slider beneath each channel. |
| RCA If you are using audio connected via RCA, only channels 1 and 2 are active. |
Audio Page 2
Swipe the audio tab left or right to reveal the XLR output audio meters screen to navigate to the XLR output controls. You can adjust the levels for all four XLR outputs. Adjust the level by dragging the slider beneath each channel to the left to reduce the output volume, or to the right to increase the volume. The type of audio meter displayed depends on the meter selected in the setup tab. XLR audio outputs can be used to connect audio to other devices such as the ATEM Constellation 8K switcher.
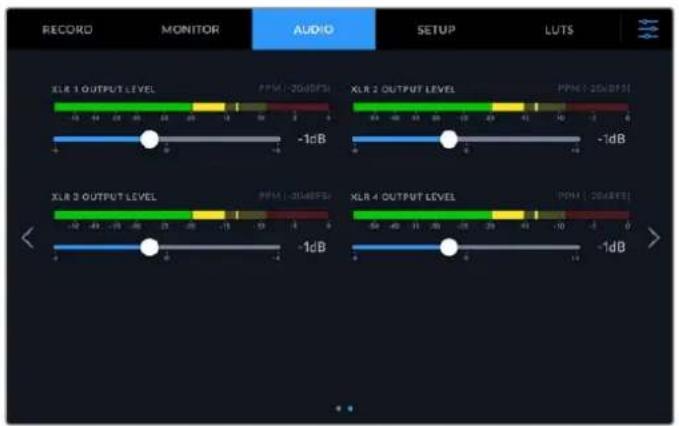
Adjust the XLR Output channels using the slider beneath
Setup
The setup tab provides access to network, timecode and reference settings as well as your audio meters.
Setup Page 1
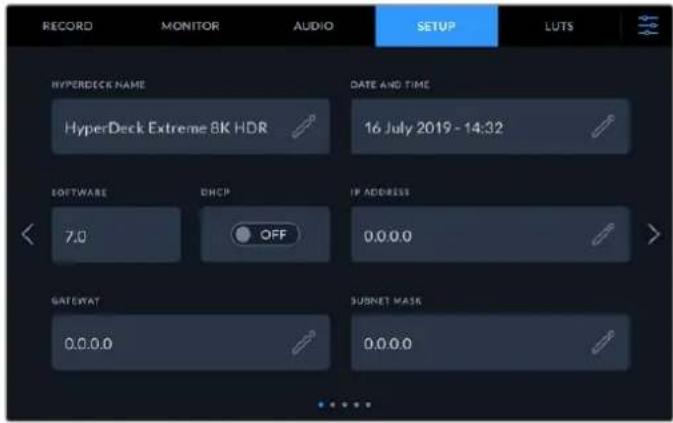
Add your HyperDeck Name and network settings on the Setup tab
HyperDeck Name
Change the name of the unit by clicking on the pencil icon to the right of the name. It can be especially useful to name your device when you have more than one HyperDeck Extreme 8K HDR on your network for easy identification. The name is also displayed on the SDI Monitor out too.
Date and Time
Set your date and time by clicking on the pencil icon. The date edit screen will appear.
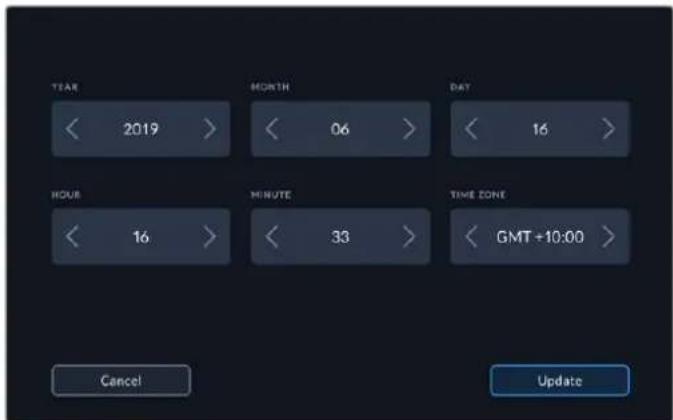
Use the arrows to change your date and time
Tap the arrows either side of each setting to select your year, month and day. Repeat the process to set your hour, minute and time zone. Press update to save the settings.
Software
Displays the current software version.
DHCP
To connect to your network via a dynamic IP address, toggle the switch to on. To manually set a static IP address, toggle it to off.
IP address
When DHCP is switched 'off', you can enter your network details manually. Click on the pencil edit icon. Enter the IP address into the numeric keypad view. Once you have entered your address, press the 'update' button.
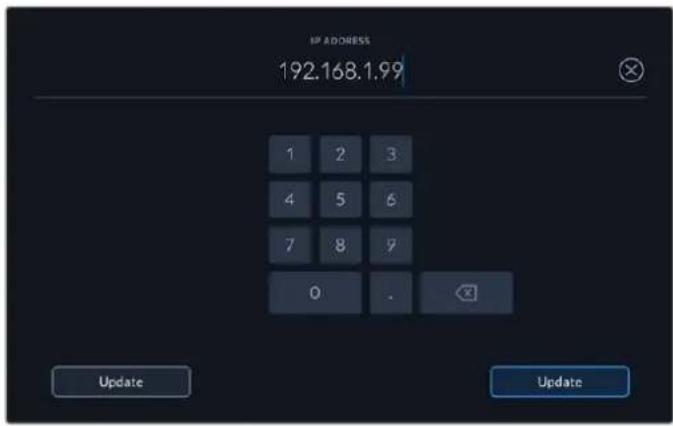
When you edit any numeric option, a numeric keyboard will appear. Type In the address and press update to confirm.
Gateway
Set your network gateway address by clicking on the pencil icon to open the numeric keypad. Press update to return to Setup page 1.
Subnet Mask
Your subnet mask can be manually entered by clicking pencil edit icon. Once you have entered your address, click the update icon to return to the menu.
Setup Page 2
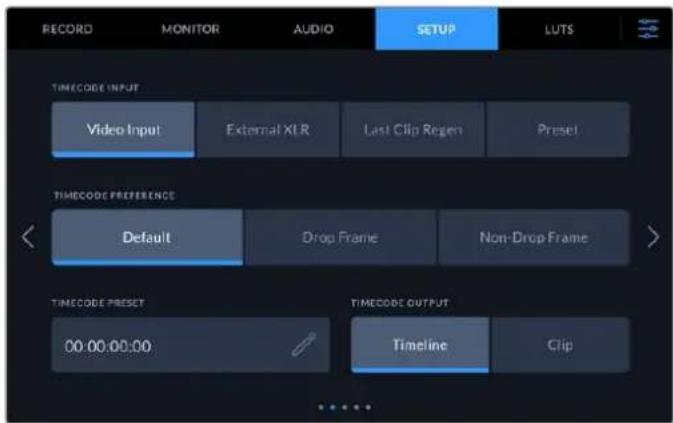
Set your timecode settings on the second setup page
Timecode Input
There are four timecode input options available when recording.
| Video Input Selecting video input will take the embedded timecode from SDI and HDMI sources with embedded SMPTE RP 188 metadata. This will maintain sync between your SDI or HDMI source and the file recorded on the HyperDeck Extreme 8K HDR. | |
| External XLR Click this option when using timecode via external XLR from analog based sources. | |
| Last Clip Regen | By selecting 'last clip regen' for your timecode input, each file will start one frame after the last frame of the previous clip. For example, if your first clip ends on 10:28:30:10, the next clip timecode will start at 10:28:30:11. |
| Preset Preset will use the set timecode under 'timecode preset'. | |
Timecode Preference
For NTSC sources at frame rates of 29.97 or 59.94, you can select 'drop frame' or 'non-drop frame' recording. If the source is unknown, tap on default. This will maintain the standard of the input, or default to drop frame if there is no valid timecode.
Timecode Preset
You can set your time code manually by tapping on the pencil icon and entering the start time code via the touchscreen keypad.
Timecode Output

Tap on clip or timeline to select your timecode output
Select your timecode options for your SDI outputs.
| Timeline Tap the timeline option to output your timeline timecode. |
| Clip The clip option will output the timecode of your clip. |
Setup Page 3
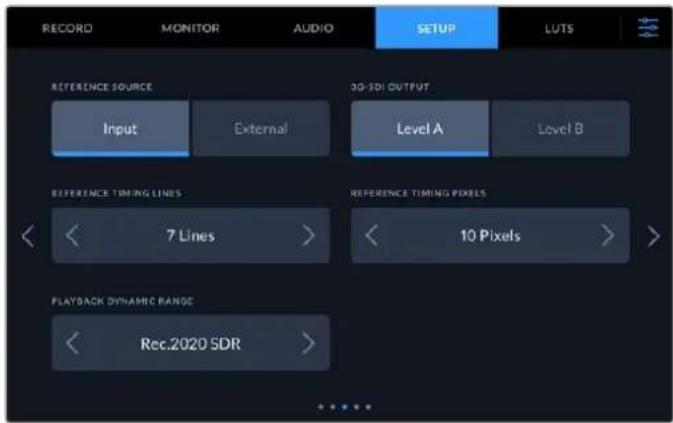
Reference Source
Select your reference source from the two options.
| Input Select ‘input’ if your source has embedded reference that you want to sync to. An example of this would be where your tape based deck may have a genlock source directly connected. |
| External If you have an external reference device, for example the Blackmagic Sync Generator, connected via the ‘ref in’ connection on the rear, select ‘external’. |
3G-SDI Output
Some broadcast equipment can only receive level A or level B 3G-SDI video. To maintain compatibility, tap either 'level A' or 'level B'.
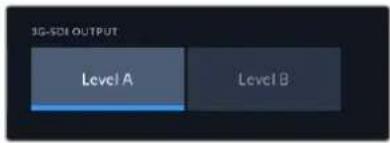
Tap 'level a' or 'level b'
Reference Timing
If you are archiving from analog based tape decks, you may find you need to adjust the reference timing for accurate color representation. This is especially the case if you don't have a valid reference signal. The reference adjustment lets you adjust the timing of the video outputs of your hardware relative to the video reference input. This is commonly used in large broadcast facilities where the video output needs to be accurately timed. The reference adjustment is in samples so you can get an extremely accurate timing adjustment down to the sample level.
Adjust the number of lines and pixels by tapping the arrow to the left to decrease or the arrow to the right to increase.

Tap on the arrows to increase or decrease your timing lines and pixels.
Playback Dynamic Range
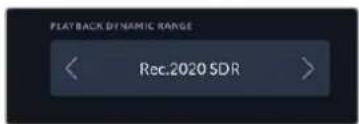
To change your playback dynamic range to match your source, tap on the arrows to the left and right.
Available dynamic ranges include:
Auto
Rec. 709
Rec. 2020 SDR
HLG
ST2084 300
ST2084 500
ST2084 800
ST2084 1000
ST2084 2000
ST2084 4000
ST2084
Setup Page 4
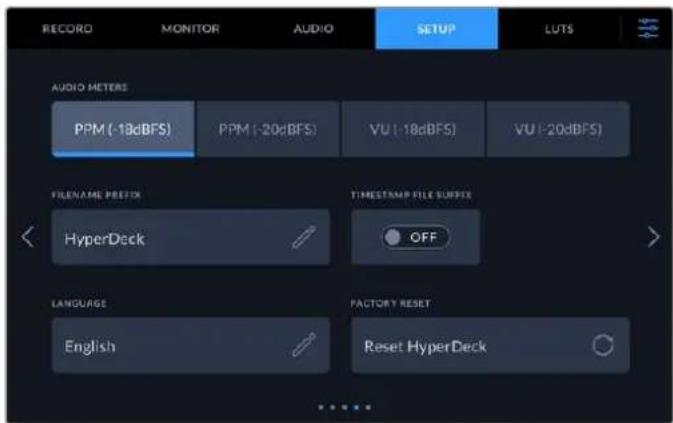
The 4th page of 'setup' includes audio meter settings and filename options
Audio Meters
You can choose from two different audio meter display types.
| VU The VU meter, or ‘volume units’ meter, averages out short peaks and troughs in your audio signal. If you are using VU metering, adjust the input levels on the HyperDeck Extreme 8K HDR so that the meter peaks at the 0db indicator on the audio meter. This maximizes the signal to noise ratio and ensures your audio is at the highest quality. If your audio peaks beyond the 0dB indicator there is a high risk of sound distortion. |
| PPM PPM meters, or ‘peak program meters’ displays a ‘peak hold’ feature that momentarily holds the signal peaks and a slow fall back so you can easily see where your audio is peaking. |
Both VU and PPM meters are available at reference levels of -18dB or -20dB so you can monitor your audio to suit different international broadcasting standards.
To adjust XLR input levels on the 'touchscreen display', tap on the audio meter in the bottom right corner. For more information, see the 'audio monitor' section under 'lower toolbar' in this manual.
Filename Prefix
When first set up, your HyperDeck Extreme 8K HDR will record clips to your CFast or USB Flash disk using the following filename convention.
Untitled_0001
Untitled_0001 Filename
Untitled_0001 Clip Number
You can edit the filename of your recorded files by tapping the 'edit' pencil icon.
A touchscreen keyboard will appear. Type in the filename.
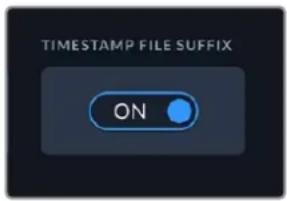
Timestamp File Suffix
The timestamp added to the filename is turned off by default. If you would like the date and time recorded in your filename, toggle the 'timestamp file suffix' option to on.
Untitled_1904061438_0001
Untitled_1904061438_0001 Filename
Untitled_1904061438_0001 Year
Untitled_1904061438_0001 Month
Untitled_1904061438_0001 Day
Untitled_1904061438_0001 Hour
Untitled_1904061438_0001 Minute
Untitled_1904061438_0001 Clip Number
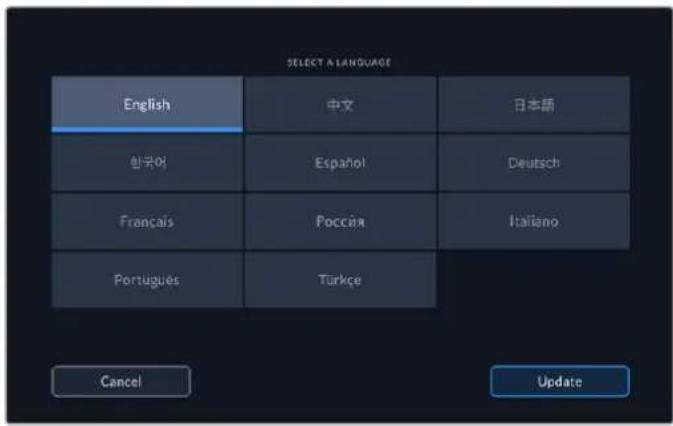
Language
HyperDeck Extreme 8K HDR supports 11 popular languages including English, Chinese, Japanese, Korean, Spanish, German, French, Russian, Italian, Portuguese and Turkish. The language page will also appear on initial start up.
To select your language:
1 Tap on the ‘language’ and select your language from the list.
2 Select 'update' to return to the setup menu.
Factory Reset
Tap on 'reset HyperDeck' to restore your HyperDeck to factory settings.
Setup Page 5
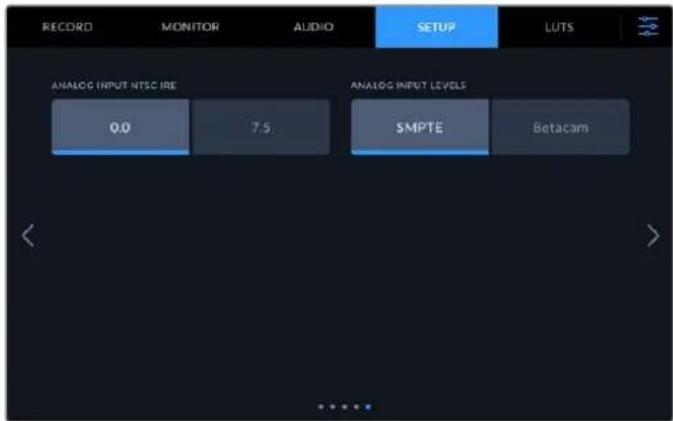
Analog Input NTSC IRE
For analog NTSC inputs, select between 0.0 IRE and 7.0 IRE depending on the region you are working in.
Analog Input Levels
When you have selected component video, you can switch between SMPTE and Betacam levels. SMPTE levels are more common, and even Betacam SP can use SMPTE, so only switch to Betacam if you are sure that Betacam levels are being used.
LUTs
Display LUTs can be especially helpful when using the HyperDeck Extreme as a field recorder. They work by telling the unit what color and luminance output to display. This can be useful for when you are using the 'film' dynamic range on your camera which has an intentionally undersaturated, 'flat' appearance. By applying a display LUT, you can get an idea of what your video will look like after it has been graded.
Display LUTs can be applied for the LCD display as well as the SDI monitor out. To view a LUT you first need to select your active LUT. In the LUT menu, tap on the LUT you want to use, it will highlight blue. Tap the tick icon at the bottom. A vertical blue line will appear to the left of the LUT name to confirm the LUT is active.
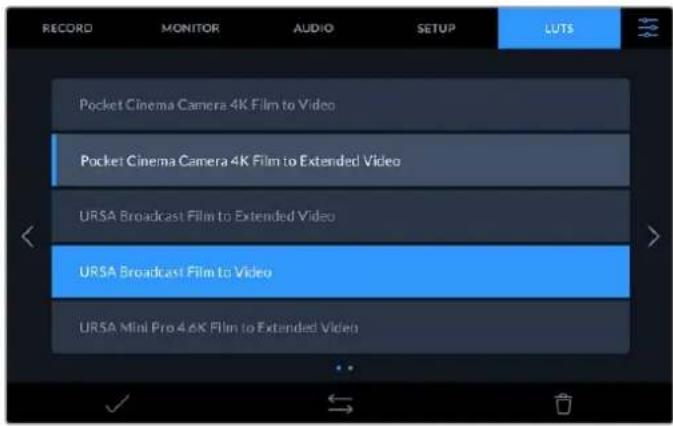
You can now press the '3DLUT' button on the front of the panel to display the selected LUT. The button will illuminate when selected. Press the button again to toggle it off.
TIP You can also toggle the display LUT on the LCD and Monitor SDI via the 'Monitor' tab in the touchscreen menu. For more information, see the 'monitor' settings in the dashboard manual
You are not limited to using the preloaded display LUTs either, you can import or export your own!
To import a LUT:
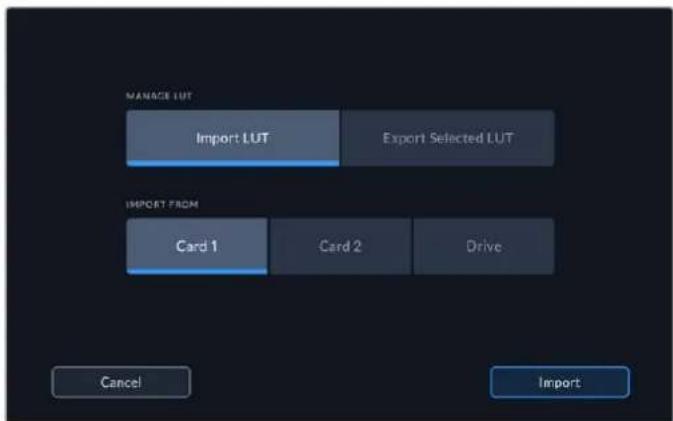
1 On the LUTS tab, tap on the double head arrow icon at the bottom center of the display.
2 Under manage LUT, tap on 'import LUT'.
3 Select the storage media where the LUT is located and tap 'import'.
flowchart
graph TD
    A["Manage LUT"] --> B["Import LUT"]
    A --> C["Export Selected LUT"]
    D["IMPORT FROM"] --> E["Card 1"]
    D --> F["Card 2"]
    D --> G["Drive"]
    H["Cancel"] --> I["Import"]
Select the location of your stored LUT and tap Import.
4 Tap on the LUT you want to import followed by 'import'. A progress screen will let you know the LUT is importing. Once done, the LUT will appear in the list.
The LUT will now appear in the list and once you make it active your can apply it to the LCD and external monitor.
NOTE If you try to import a LUT that already exists, a screen will prompt you to either keep both or replace the existing LUT.
Storage Media
The HyperDeck Extreme 8K HDR can record to CFast cards via the two front panel slots or external storage connected via the rear USB-C port. With Blackmagic MultiDock 10G, you can have 4 SSD's connected at once!
Depending on your workflow and desired recording resolution, you may already have CFast cards or external disks fast enough to use. For example, standard definition workflows, such as archiving from Digital Betacam to file, will not require the fastest media. For workflows recording the highest resolutions, such as 8K video, media with higher write speeds is required.
TIP The following approved media is based on recording 8K video to HyperDeck Extreme without the optional cache installed.
CFast Cards
When working with high data rates it is important to carefully check the CFast card you would like to use. This is because CFast 2.0 cards have different read and write speeds. The tables below identify the CFast cards recommended for use.
Choosing a CFast 2.0 Card
The following CFast 2.0 cards are recommended for recording 8K Apple ProRes LT up to 60 fps.
| Brand Card Name Storage | ||
| Angelbird AV PRO CF 1TB | ||
| Wise CFA-5120 3500X CFast 2.0 512GB | ||
| Wise CFA-10240 3500X CFast 2.0 1TB |
The following CFast 2.0 cards are recommended for recording Ultra HD ProRes LT up to 60fps.
| Brand Card Name Storage | ||
| Angelbird AV PRO CF XT 512GB | ||
| Cinedisk Pro CineDisk Pro 510MB/s 256GB | ||
| Delkin Devices CFAST 2.0 250GB | ||
| KomputerBay | KomputerBay 3600X | 64GB |
| ProGrade Digital | ProGrade Digital 550MB/s | 128GB |
| ProGrade Digital | ProGrade Digital 550MB/s | 256GB |
| ProGrade Digital | ProGrade Digital 550MB/s | 512GB |
NOTE Slower CFast cards are compatible when the optional cache is installed. This is because the cache can accept overflow data when the card cannot keep up. However, it might take a few minutes for the cache to finish copying to the card when recording stops, depending on the speed of the media card.
EXT Disk
With HyperDeck Extreme 8K HDR you can record directly to USB-C flash disks. These fast, high capacity drives allow you to record video for long periods. You can then connect the flash disk to your computer and edit directly from them!
For even higher storage capacities, you can connect a USB-C dock or external hard drive.
To connect your Blackmagic MultiDock 10G or USB-C flash disk, connect a cable from your USB-C connected device to the 'ext disk' port on the rear of the HyperDeck Extreme 8K HDR.
Choosing an External Disk
The following external USB-C drives are recommended for recording 8K Apple ProRes LT up to 60 fps.
| Brand Card Name Storage | ||
| SanDisk SanDisk Extreme Portable SSD 1TB | ||
| Wise Wise Portable SSD PTS-512 512GB | ||
| Wise Wise Portable SSD PTS-1024 1TB |
The following external USB-C drives are recommended for recording Ultra HD ProRes HQ up to 60fps.
| Brand Card Name Storage | ||
| Samsung Portable SSD T5 250GB | ||
| Wise Wise Portable SSD PTS-256 256GB |
The following external USB-C Drives recommended for recording Ultra HD ProRes 422 up to 60fps.
| Brand Card Name Storage | ||
| G-Technology G-Drive Mobile SSD 1TB | ||
| Samsung Portable SSD T5 1TB | ||
| Samsung Portable SSD T5 2TB |
TIP With the optional cache feature, you can even use slower CFast cards and external disks as the cache will continue recording even if there are problems with your media, no matter what resolution you are recording!
Preparing Media For Recording
Preparing Media on HyperDeck Extreme 8K HDR
CFast Cards can be formatted directly on the unit or via a Mac or Windows computer. Storage media connected via the rear 'ext disk' USB-C port can be formatted on a Mac or Windows computer.
HFS+, is also known as Mac OS X Extended, and is the recommended format as it supports 'journaling'. Data on journaled media is more likely to be recovered in the rare event that your storage media becomes corrupted. HFS+ is natively supported by Mac. exFAT is supported natively by Mac and Windows without needing any additional software, but does not support journaling.
Preparing CFast Cards on HyperDeck Extreme 8K HDR
1 Tap the drive area icon on the front panel to enter the storage manager.
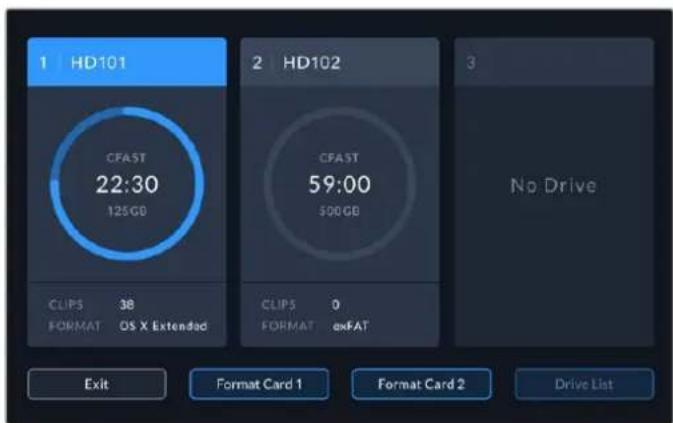
2 Tap 'format card 1' or 'format card 2' to select the card to format. These numbers correspond to the labels on the CFast slots on the HyperDeck Extreme front panel. The 'format card' option will be grayed out if no media is inserted in the corresponding slot.
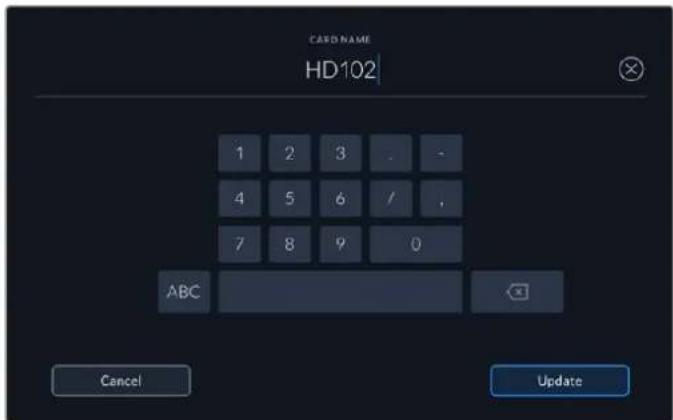
3 If you want to rename the card, tap on the pencil icon to open the keyboard, type the new name using the touchscreen keyboard and press 'update'.
4 Choose 'OS X Extended' or 'exFat' and tap the format button.
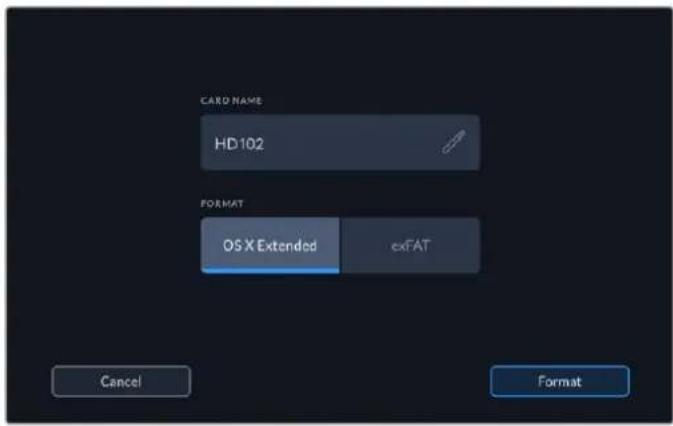
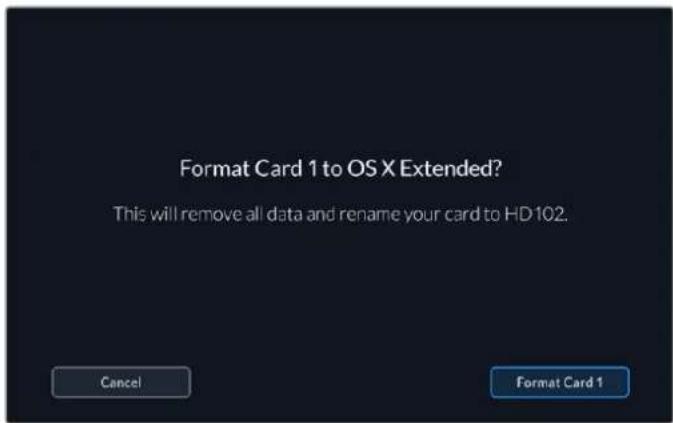
5 A confirmation window will appear detailing which card is to be formatted, the selected format option and the card name. Tap on the 'format card' button.
6 Formatting will begin. While the card is being formatted the status led on the CFast slot will illuminate green.
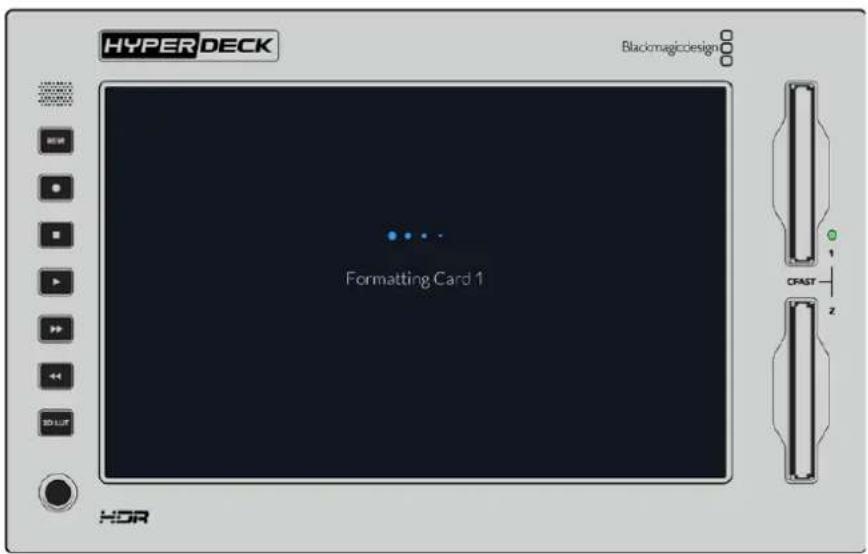
7 Once formatting is complete, tap 'ok'.
Preparing Media on a Computer
Formatting Media on a Mac Computer
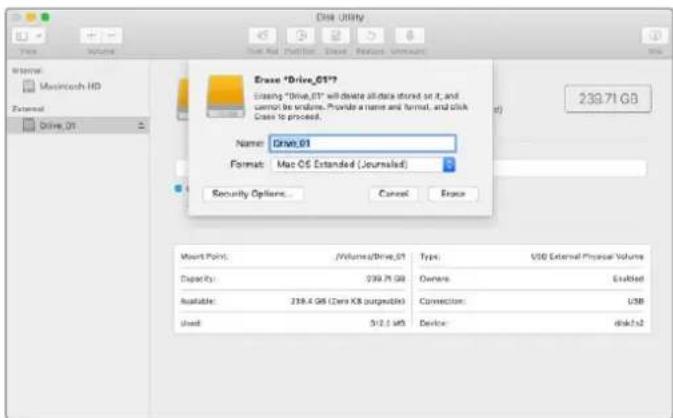
The Disk Utility application included with Mac can format a drive in the HFS+ or exFAT formats. Make sure you back up anything important from your disk as you will lose everything on it when it is formatted.
1 Connect an SSD to your computer with an external dock or cable adapter and dismiss any message offering to use your SSD for Time Machine backups. For CFast cards, connect it to your computer via an external card reader.
2 Go to applications/utilities and launch Disk Utility.
3 Click on the disk icon of your SSD or CFast card and then click the erase tab.
4 Set the format to Mac OS Extended (Journaled) or exFAT.
5 Type a name for the new volume and then click erase. Your media will quickly be formatted and made ready for use with HyperDeck.
Formatting Media on a Windows computer
The format dialog box can format a drive in the exFAT format on a Windows PC. Make sure you back up anything important from your SSD or SD card as you will lose everything on it when it is formatted.
1 Connect an SSD to your computer with an external dock or cable adapter. For CFast cards, connect it to your computer via an external CFast card reader.
2 Open the start menu or start screen and choose computer. Right-click on your SSD or CFast card.
3 From the contextual menu, choose format.
4 Set the file system to exFAT and the allocation unit size to 128 kilobytes.
5 Type a volume label, select quick format and click Start.
6 Your media will quickly be formatted and made ready for use with HyperDeck.
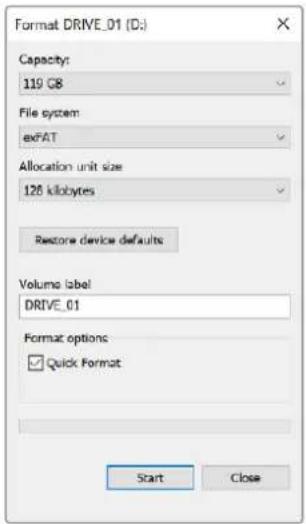
Use the Format dialog box feature in Windows to format your SSD or CFast card in the exFAT format
Storage Indicators
The status of the storage media slots can be seen on the bottom toolbar of the main display.
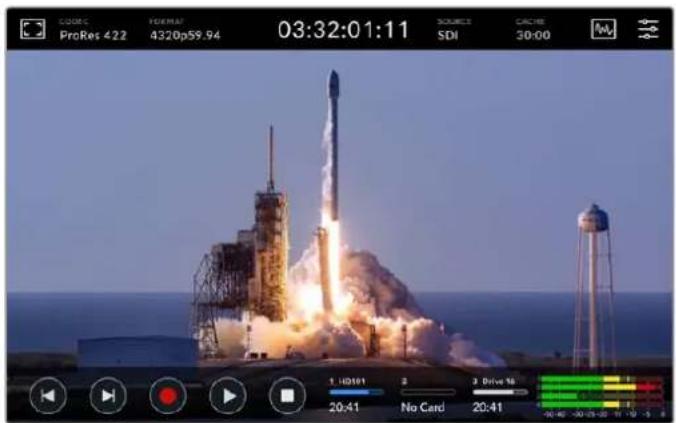
These icons display the number, name, progress bar and status of the CFast slots and active external disk drive.
Number
Drives '1' and '2' show the two CFast card slots on the front panel. Drive '3' shows the status of the external drive connected via the 'ext disk' USB-C port on the rear.
TIP If you are using a drive hub you can connect multiple drives via the 'ext disk' connector on the rear. In this case the third drive icon will only display the active drive.
Name
The text to the right of the number is the name of the CFast card or ext disk. This will be the name you selected when formatting the storage and is especially helpful if you are using the Blackmagic MultiDock in order to make sure you are playing or recording to the correct drive!
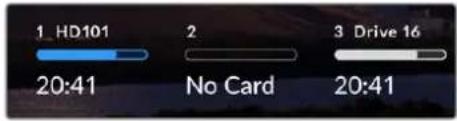
Progress Bar
The bar icon will be either blue, white or red depending on its current status. The intensity of the color will also display the used space on the card.
| The blue drive icon indicates the active drive. If you press play, playback will start from this drive, if you want to record video, it will be to this drive. | |
| A white drive icon indicates there is a CFast card or ext disk connected, but not active. A solid white icon indicates the drive is full. | |
| The bar will be red during recording. |
Status
Text underneath the progress bar will display either the storage space remaining or the status of the slot.
Capacity remaining
When your CFast card or drive has space remaining, the duration available will be displayed in hours:minutes:seconds based on the current source format and your chosen codec and quality settings. If there is less than an hour left, it will display minutes:seconds remaining only.
If a valid source is not detected, the available storage remaining on the media will display in gigabytes or terabytes.
Slot status
'No card' and 'no drive' will display if there is no media connected to that drive slot.
Once a CFast card or external disk is full, the icon will display 'card full' or 'drive full' so you know it's time to swap out the storage media. If you have another CFast card inserted, the recording will automatically spill over and start recording onto it. If you have an external disk connected, the recording will spill over when the second CFast card is full.
A locked drive will be shown with 'locked' under the progress bar.
If you see 'blocked' display underneath the progress bar, this means you are unable to play or record to that media. To resume playback or recording on that CFast card or drive, eject it and reconnect. The CFast card or ext disk will now be available.
Active storage media
When using HyperDeck Extreme 8K HDR, you can connect up to 2 CFast cards and 5 ext drives at once. This means you can access terabytes of recording space all from the one HyperDeck Extreme disk recorder!
If you only have a single drive or CFast card connected, it is your active media for all playback and recording.
If you are using more than one card or drive, you can select which one you want to use for recording and playback.
To select your active media:
1 Tap on the drive icon area in the bottom screen.
2 In the storage media window, three large icons will appear. Tap on the drive you want to make active. In playback mode the active drive will appear blue. In record mode the active drive will be red.
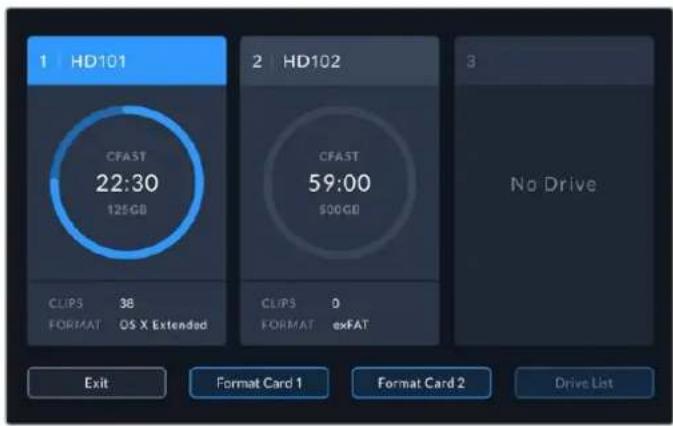
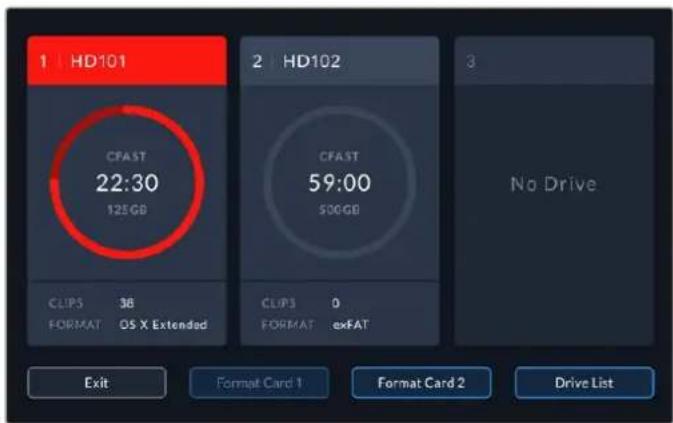
If you are using a dock to connect multiple external disks, such as the Blackmagic MultiDock 10G, you can access the full list of attached drives by tapping on the 'drive list' button.
To select an active drive from the drive list:
1 Tap on the 'drive list' button.
2 Select the drive from the list. The selected drive is indicated by the vertical blue line to the left of the name. Press exit to return to the previous screen.
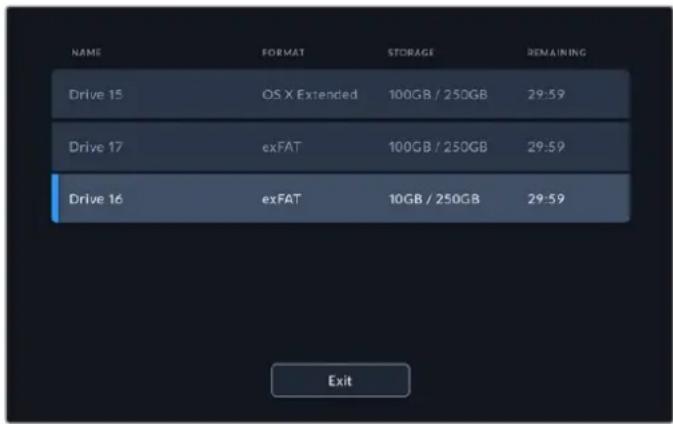
The blue line on the left hand side indicates which drive is selected.
NOTE Spill recording is available when multiple cards and drives are connected. Your HyperDeck Extreme 8K will automatically spill recording from one CFast card to another when it is full. Once the second CFast card is full, recording will spill over to the active external disk.
Using the Optional Internal Cache
The cache feature on HyperDeck Extreme 8K HDR enables you to record up to 8K Ultra HD on to a M.2 NVMe PCIe flash disk in case of problems with your media.. This means you can use slower external drives and CFast cards which in turn can be less expensive.
The cache works as short term storage, recording your video and audio to the internal M.2 PCIe flash disk before transferring the files to your selected media in 5 second segments. These 5 second segments then make up a single continuous file on your storage media.
Once you've installed an PCIe flash disk, all future recordings will be saved to the cache prior to your storage media. Even if you turn your HyperDeck Extreme off, any files recorded prior that weren't transferred to a CFast card or external disk will still be there!
Choosing your M.2 NVMe PCIe Flash Disk
When choosing an M.2 NVMe PCIe flash disk for the cache, it is a good idea to keep in mind future workflows and not just current ones. By selecting a flash disk that is capable of recording the highest frame rates and resolutions, you can be sure you won't miss a frame, even with the slowest CFast cards or external disks.
The following M.2 PCIe flash disk are recommended for 8K Apple Pro Res HQ up to 60 fps.
| Brand Card Name Storage | ||
| Samsung Samsung 960 EVO NVMe 1TB | ||
| Samsung Samsung 970 PRO V-NAND 1TB | ||
| Samsung Samsung 970 EVO Plus V-NAND 1TB | ||
| SanDisk SanDisk Extreme PRO 3D SSD 1TB |
Installing The Cache
Installing a M.2 PCIe flash disk is easy and only needs to be done once. You can access the cache location via a removable panel underneath the unit. There are four different length M.2 PCIe flash disks you can use; 2242, 2260, 2280 & 22110. The numbers relate to the width and length of your NVMe, so a 2242 is 22 millimeters wide by 42 millimeters long.
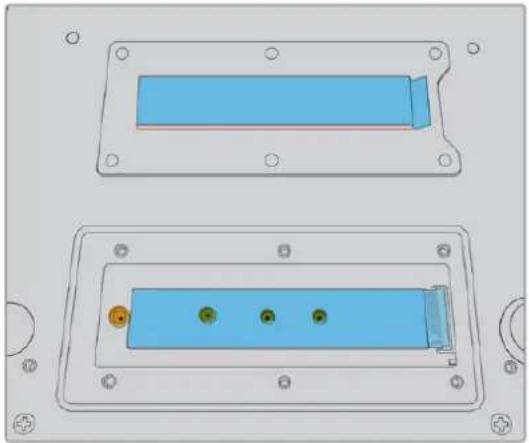
natural_image
Technical diagram of two electronic device modules with blue casing and three green dots, no text or symbols presentIf needed, the standoff and screw can be relocated to the suitable slot on the board.
To install the cache:
1 Disconnect your HyperDeck Extreme 8K HDR from the power source. You can leave other cables connected, but you may find it easier to remove them.
2 Turn the unit upside down and unfasten the 6 screws from the cover plate to remove it.
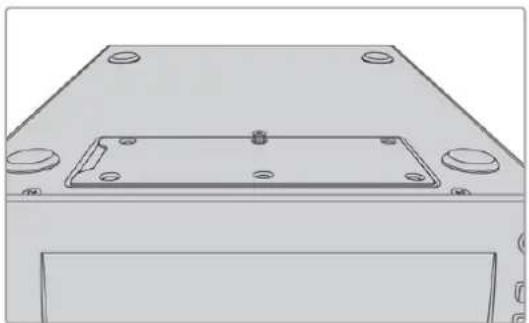
natural_image
Technical line drawing of a mechanical component with mounting holes and a rectangular base (no text or symbols)NOTE HyperDeck Extreme 8K HDR ships with thermally conductive heat pads pre installed to fill the air gaps between your PCIe flash disk and the unit. These work by transferring the heat away from the PCIe flash disk to the chassis. One pad is installed onto the mother board, the other on the inside of the cover plate. Remember to remove the blue protective film when installing a SSD.
3 Unfasten the standoff mount screw. If you are using a different length NVMe card, unscrew the standoff mount as well and lightly fasten it into the suitable slot.
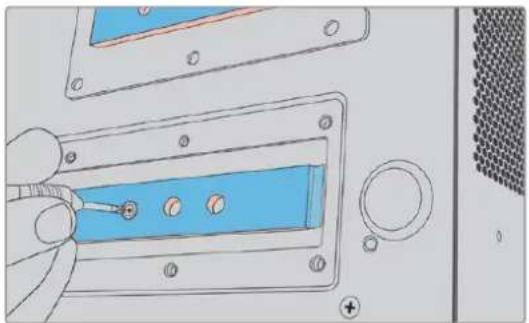
natural_image
Illustration of a hand inserting a blue component into a panel, with no visible text or symbols4 Peel back the protective blue film on the motherboard heat pad.
5 Remove your NVMe SSD from the packaging and slide the card into place in the PCIe slot. The slot will pivot up to 30 degrees to help installation.
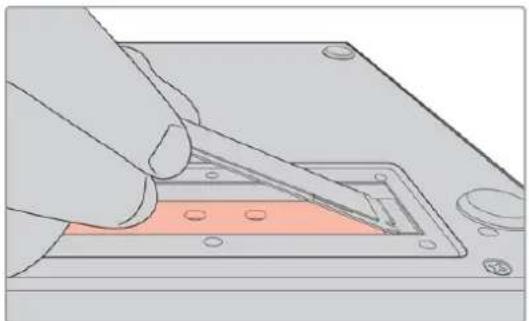
natural_image
Illustration of a hand using a tool to apply material to a component with a highlighted orange area (no text or symbols)6 Push the card down lightly onto the standoff mount and fasten the standoff screw. You only need to tighten enough to keep the NVMe SSD snug.
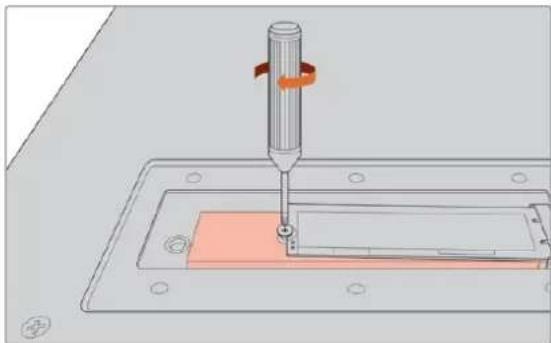
natural_image
Technical illustration of a mechanical assembly with a cylindrical component inserted into a rectangular base (no text or symbols)7 Remove the protective blue film from the heat pad on the inside of the cover plate.
8 Replace the cover plate, the screws will only line up when installed correctly. You will feel a little pressure on the cover plate from the density of the NVMe SSD combined with the heat pads. This is normal as it is how they will conduct heat away from the board.
9 Turn the unit right side up and reconnect your power and other cables.
Formatting The Cache
Once your NVMe SSD is installed you will need to format it.
1 When a recognized NVMe SSD is installed, the 'cache' icon will display 'format' instead of 'no cache'. Tap on the icon to open the format window.
2 A window will appear prompting you to format the cache. Tap on 'format'. This will erase any data on the NVMe SSD.
3 Formatting will begin. Once complete the cache will be ready to use. Tap 'ok'.
Once your cache is formatted, you will not need to format it again unless you remove the NVMe and install a different one, such as one with a higher capacity.
Cache Icons and Status
The storage capacity of the cache is dependent on the NVMe media size and the codec and resolution you are recording. When you have a valid signal connected to the rear of the HyperDeck Extreme 8K HDR, the cache icon on the front panel will display the duration available to record based on your current resolution and selected codec. If there is no valid signal connected, the cache icon will display the space available in GB.
There are four different status modes for the cache:
| Standby The cache icon information will be white when the cache is in standby mode | |
| Recording | The cache icon will be red during recording and the duration indicator will reduce as the space is filled. If you have fast storage media connected with usable space, the duration indicator may not appear to move much as the storage media can copy files as fast as your cache can record them. If you are using slower media or you have run out of space, the available cache duration will decrease. |
| Stored | If you run out of available on space on your connected storage media, the cache icon will flash green and white until sufficient storage is connected and the information stored on the cache is transferred over. |
| Transferring | The cache icon will illuminate green while the cache media is being transferred to CFast or USB-C external storage. Due to the nature of how the cache records, this process can be very quick depending on your storage media.If your media runs out of available storage space, the recording will continue to the cache until the media is swapped. |
Getting Started with HyperDeck Extreme Control
HyperDeck Extreme Control is a remote control panel that lets you control up to 8 HyperDeck disk recorders or broadcast decks from a single control panel.
All playback and record units are controlled via the RS-422 connections on HyperDeck Extreme Control's rear panel.
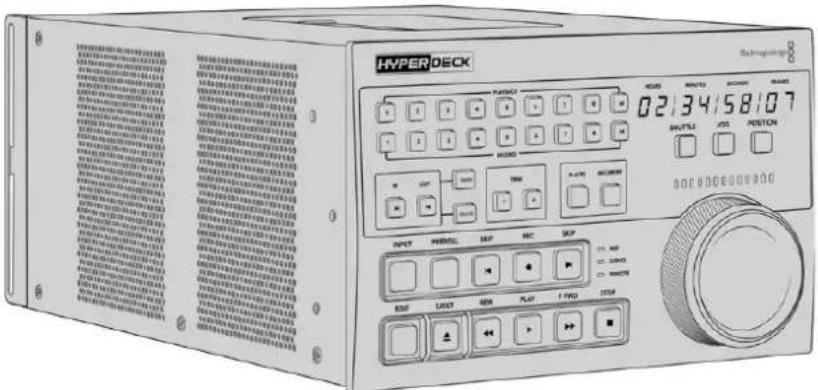
If you have previously used broadcast decks with a search dial and edit controls, then HyperDeck Extreme Control will feel very familiar to you. The controls follow a similar layout, so you can operate the unit comfortably with confidence. The search dial even has a mechanical clutch built in giving you a tactile response when using the shuttle or position modes.
This section of the manual will show you how to get started with your HyperDeck Extreme Control, including plugging in power, connecting a HyperDeck Extreme 8K HDR, and making sure the 'remote' button is enabled so you can control the unit remotely.
Plugging in Power
To power your HyperDeck Extreme Control, connect an IEC cable to the AC power input on the rear of the unit. You can also use the 12V DC input if you want to connect external power or redundancy via an external power supply, for example an uninterruptible power supply or external 12V battery.
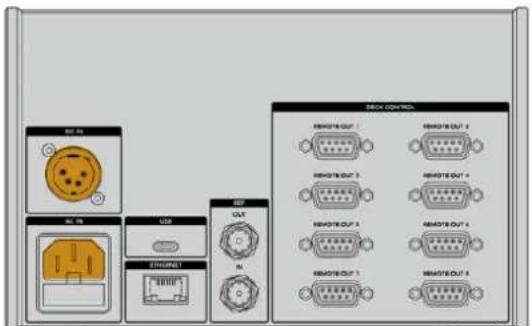
Connecting HyperDeck Extreme 8K HDR
HyperDeck Extreme Control features eight RS-422 connectors on the rear panel to allow remote control of up to 8 HyperDeck units, or broadcast decks.
Connect the HyperDeck Extreme 8K HDR's 'remote in' connector to your HyperDeck controller's RS-422 port labelled '1' using an RS-422 serial cable.
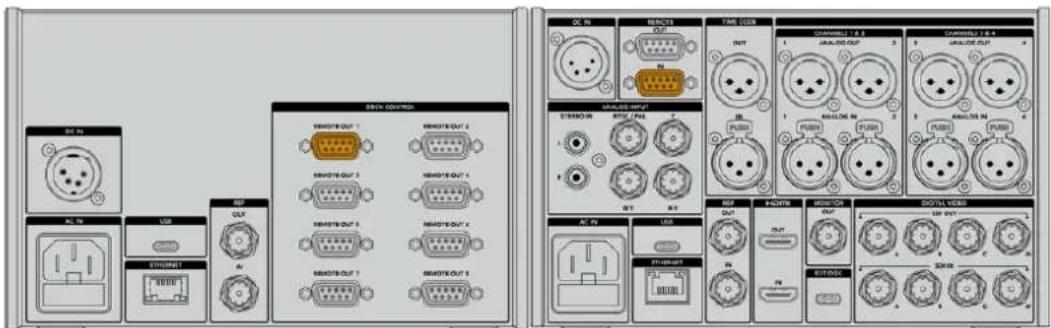
By tightening the screws on both sides of the RS-422 connector, you can prevent any interruption to the connection.
Enabling Remote Control on your HyperDeck
Now that your HyperDeck Extreme 8K HDR is connected, press the remote button labelled 'rem' on the unit's front panel. This lets your HyperDeck disk recorder know that you are assigning remote control to HyperDeck Extreme Control.
Playback using HyperDeck Extreme Control
The two rows of numbered soft buttons on the HyperDeck Extreme Control correspond to the numbered RS-422 ports on the rear panel. Earlier in this section we connected HyperDeck Extreme 8K HDR to RS-422 port 1. This means you can control that HyperDeck as either the record or playback unit by selecting unit 1 on the playback and record buttons.
To enable the HyperDeck as a playback unit, simply press the '1' button in the playback row. The '1' playback button will now be green.
If it's not already illuminated, tap on the 'player' button. The timecode display and status indicators on your HyperDeck controller will match the playback unit. Your HyperDeck recorder is ready to be operated using HyperDeck Extreme Control's powerful deck controls.
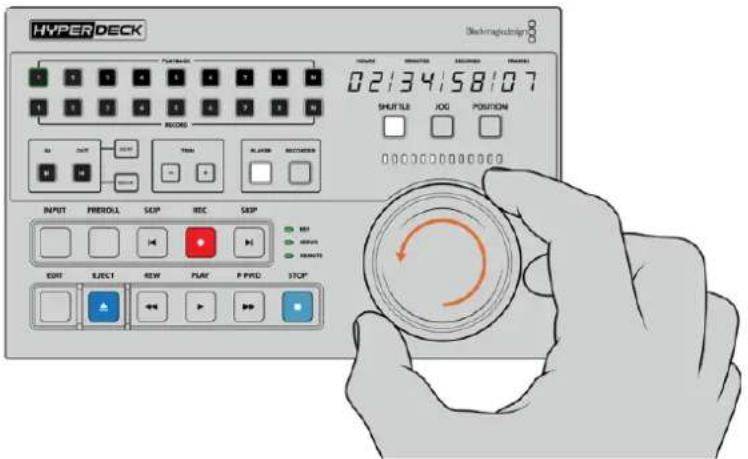
You can use the soft touch transport controls or the search dial and mode buttons to control your HyperDeck Extreme 8K HDR.
Tap on the 'shuttle' button above the search dial. You can now turn the dial right and left to shuttle through your video. Press the 'stop' button to exit shuttle mode. Now press 'play' for real time playback, or the skip buttons to navigate from recorded clip to recorded clip.
The next section of the manual provides a basic workflow example showing how to control a broadcast deck for archiving material to a HyperDeck Extreme 8K HDR.
HyperDeck Extreme Control Workflow
The following example features a traditional broadcast tape deck recording to a HyperDeck Extreme 8K HDR recorder, but you don't need to use a HyperDeck with the HyperDeck Extreme Control. You could connect two or more traditional broadcast decks and dub from tape to tape or connect up to 8 decks to control simultaneous playback at the press of a button.
Connecting your RS-422 Devices
RS-422 connections on the rear of the HyperDeck Extreme Control allow up to 8 RS-422 enabled decks and devices to be attached from the rear of your HyperDeck recorder or broadcast deck to the RS-422 connections on the rear panel of the HyperDeck Extreme Control. Up to 8 separate devices can be connected.
1 Connect a 9 pin serial cable from the RS-422 connection on your tape based deck to the first RS-422 connection on the controller.
2 Now connect a serial cable from the RS-422 connection on your HyperDeck recorder to the second RS-422 connection on the HyperDeck Extreme Control.
3 You can repeat these steps to connect up to 8 devices.
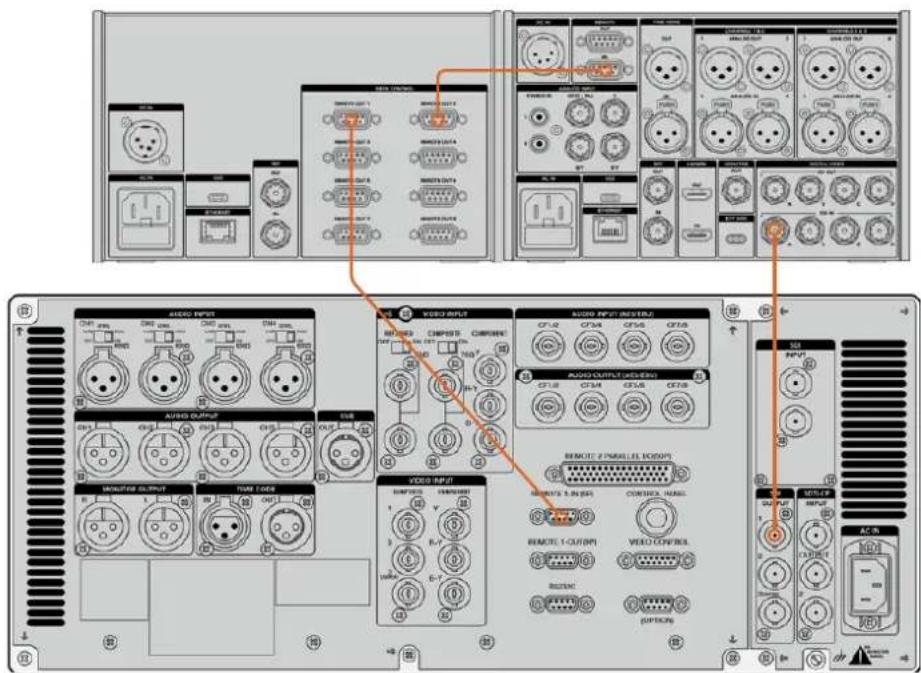
By tightening the screws to either side of your 9 pin serial cable, you can prevent any interruption to the connection.
TIP HyperDeck Extreme 8K HDR and HyperDeck Extreme Control can both be rack mounted using the HyperDeck rack mount kit. See the section 'accessories' later in this manual.
Connecting your Video Signal
With the HyperDeck Extreme 8K HDR, you can use the large touchscreen display to view playback of your tape device.
To connect your video signals:
1 Connect a BNC cable to the 'SDI out' connection on the rear of your tape based deck to the 'SDI in A' connection on the HyperDeck Extreme 8K HDR.
2 Insert your cassette tape into the tape based deck.
3 Put your deck into 'remote' mode.
TIP The HyperDeck Extreme 8K HDR can accept both digital and analog based sources, meaning you can also archive media from analog based tape decks. Just connect the composite out of the tape deck to the composite in on the rear of the HyperDeck Extreme 8K HDR.
Reference Signal
The HyperDeck Extreme Control features reference in and reference out connections on the rear panel to allow synchronous recordings.
If you are using an external reference source, connect your reference signal from the 'ref out' of your reference device or deck to the 'ref in' on the controller.
Selecting your Devices
Now that your RS-422 devices and video signals are attached, it's time to select them on the HyperDeck Extreme Control front panel. Choose you record and playback deck by selecting the numbered soft touch button in the playback or record row.
1 On the front panel of the controller, press the button numbered '1' on the top row. This selects the tape deck you previously connected into the first RS-422 connection as your playback deck. The button surround will illuminate green.
Press number '2' button on the second row to select the HyperDeck Extreme 8K HDR as your 'record' deck. The button surround will illuminate red to indicate this deck is the recorder.
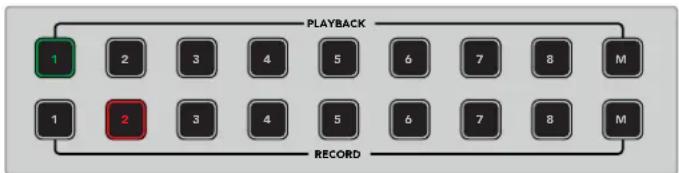
The green number 1 button indicated the playback deck, the red button 2 indicates the recording deck.
Using the M button you can control multiple decks at once. Simply hold down the M button and press the numbers for the decks. It's worth noting that once you've selected multiple decks, the timecode and status indicators will display the lowest numbered deck selected. For example, if you have selected numbers 2,3 and 4 as playback decks, the status and timecode will display deck number 2. See 'using the multi deck feature' later in this manual for more information.
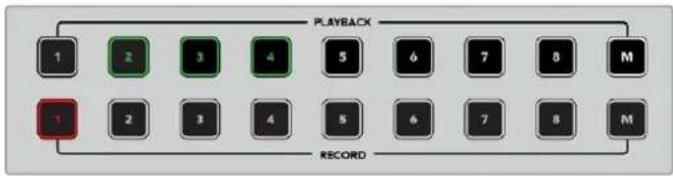
To select multiple playback decks, hold down the M button so it illuminates and then press the deck numbers you wish to select.
Controlling your playback and record decks
Once your playback and record decks are connected and selected, you will be able to switch control between the two by using the soft touch 'player' and 'recorder' buttons on the front panel above the status indicators. When remote is enabled, you can then use the search dial and transport controls to navigate to the location on your deck.
1 Press the soft touch 'player' button and the player button will illuminate. The timecode display and deck status indicator LEDs on the controller will update to show the ref, servo and remote status of the playback deck. If you press 'recorder', the displays will update to show the status of the HyperDeck recorder.
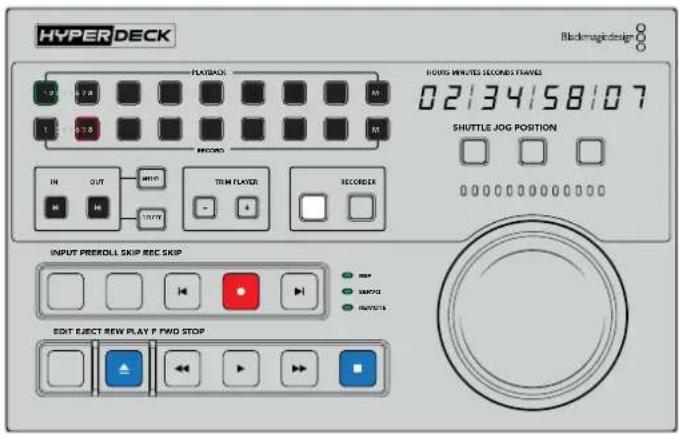
When the 'player' button is selected, the timecode display will update to match the deck selected as player. The deck status lights will also update to reflect the settings of the connected device.
2 The deck status indicators to the left of the search dial display the conditions of the active player or recorder.
| Ref | A valid reference signal is important to maintain synchronous timecode between the connected decks. If the ‘ref’ status signal is unlit, your deck doesn’t have a reference signal that matches your format. Connect a cable from the ref out of the controller rear panel to the ref in on your deck. |
| Servo | An illuminated servo light indicates that the tape deck is in playback or record mode. If your deck is idle, you may need to press a button on it to establish the servo status. |
| Remote | The remote LED lets you know whether the remote switch on the connected deck is on or off. If the ‘remote’ indicator is not illuminated, this means your connected deck is not in remote. While you can see the status of the deck and the timecode, you will be unable to control the deck with the transport buttons or search dial. The location of the remote button or switch on traditional broadcast decks can vary. If you are unable to locate the remote button or switch, refer to your deck’s manual. |
TIP HyperDeck Studio models and HyperDeck Extreme 8K HDR have a REM button on the front panel to turn on remote mode. If you are using a HyperDeck Studio Mini, remote mode can be enabled via the control panel display menu on the front panel.
Testing Control
Once your playback and record decks have the remote button enabled, you can then use the search dial and transport controls to test control and navigate to the location on your deck.
1 To control the playback deck, press the 'player' button. The timecode display on the controller will now update to reflect the timecode on your deck.
2 Turn the search dial to the right or left, or press the forward or rewind buttons. The timecode will update to reflect the forward or reverse motion.
3 To control the record deck, press 'recorder'. The timecode and status indicators will now match those of your HyperDeck recorder. Turn the search dial to confirm control or press one of the transport buttons.
Now that you have established control over your HyperDeck recorder and Digi Beta deck, you can use the search dial or transport buttons to locate your 'in' and 'out' points.
Finding your Timecode Point using the Search Dial
The HyperDeck Extreme Control search dial has three modes; shuttle, jog and position. The selected button will illuminate when you choose your mode. The search direction indicators will illuminate to show you which direction your are moving and at what speed. Once you are spooled to your desired location, you can set your in and out points.
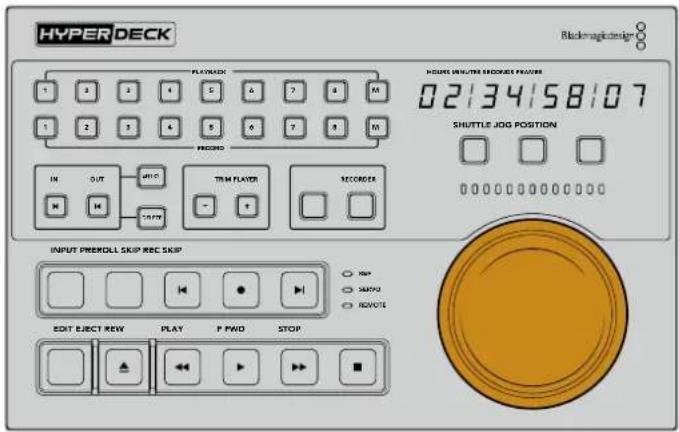
Shuttle
When you are in shuttle mode you can turn the dial to the left or right up to a maximum of 120 degrees to rewind or fast forward your tape or file based media. The further you turn the dial, the faster the media will spool until the clutch engages to let you know you are at full speed. To stop spooling, return the dial to the center position. You will feel a tap on the knob when you reach the center.
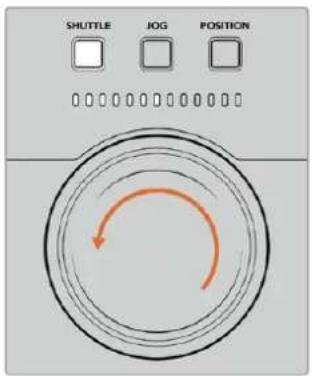
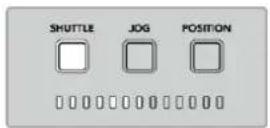
Full reverse Stop position
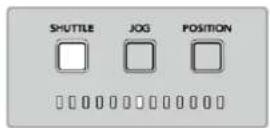
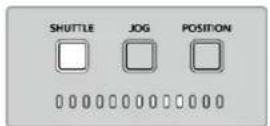
Forward Full speed forward
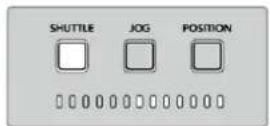
Light indicators above the search dial will indicate the direction and speed you are traveling in shuttle mode.
Jog
Jog mode offers precise control over tape and drive based decks with a slower speed compared to 'shuttle' mode. Press the jog button to select jog mode and the button will illuminate. The search dial will now respond to how fast you rotate the dial. The dial will spin freely without any clutch engaging.
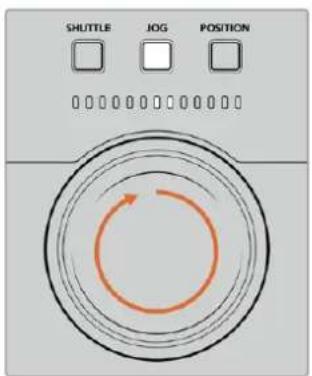
Jog backward Jog forward
Light indicators will display the direction of your search dial position.
TIP You may find you use two or three search dial modes to find your timecode point. Use 'shuttle' mode as a quick way to navigate to the area of interest, then change to jog mode for more precision.
Position
Position mode lets your navigate to your area of interest based on the duration of the tape or timeline you are viewing. On a traditional tape based broadcast deck, 'position' indicates whether you are near the start or end of a recorded tape. For a HyperDeck, 'position' indicates your location relevant to the timeline position.
The light indicators when in 'position' mode will indicate the position relative to the start middle and end.
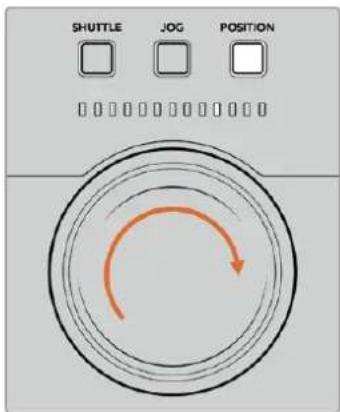
Position mode lights indicate your position relative to the timeline
Near start of timeline Center of timeline
Towards end of timeline End of timeline
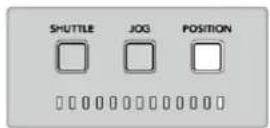
NOTE When using 'position' with a tape based deck, the position indicator will improve with time as the deck is queried by the controller.
To locate your timecode point, make sure your 'player' has a reference signal and is in 'remote' mode. Then on the controller:
1 Press the 'player' button if it is not already illuminated
2 Press the 'shuttle' button. Once pressed, the button will illuminate.
3 Rewind your tape by turning the search dial knob to the left until you feel the clutch engage. You are now rewinding at full speed and the tape will be spooling back to the start.
4 Once you are nearing the timecode point, turn the dial back to the center. Once the knob is near the center stop position you will feel a tap on the dial to let you know.
5 Press the 'jog' mode button. The jog button will now be illuminated. The dial will now spin freely and you can turn it to find your desired timecode. The faster you turn the dial, the faster the media will jog.
Now that you have found your timecode in point, you can use the four soft touch timecode buttons to define your in and out timecode points. These timecode entry buttons operate the same way as they do on traditional broadcast decks.
To set your timecode points:
1 Press 'entry' and 'in' to select your in point and release the buttons. The 'in' button will be illuminated to confirm an 'in' point is selected.
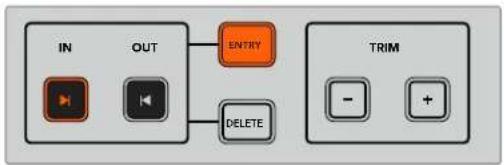
flowchart
graph TD
    A["IN"] --> B["NOT"]
    C["OUT"] --> D["NOT"]
    E["ENTRY"] --> F["DELETE"]
    G["TRIM"] --> H["-"]
    G --> I["+"]
Press the entry and in buttons to set your in point
2 Now you can use the transport controls or search dial to locate your 'out' point. Once you have found your out point, set it by pressing the 'entry' and 'out' buttons together. Both the 'in' and 'out' buttons will now be illuminated.
The trim function lets you adjust your in and out points frame by frame. If you want to move either of your timecode points by individual frames, you can do this by using the 'trim' buttons.
To trim your timecode frame by frame:
Press the 'in' button and then either trim '-' or trim'+' to move the in point backwards or forwards one frame at a time.
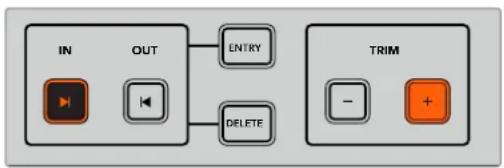
flowchart
graph TD
    A["IN"] --> B["NOT"]
    C["OUT"] --> D["NOT"]
    B --> E["DELETE"]
    D --> E
    E --> F["ENTRY"]
    G["TRIM"] --> H["-"]
    G --> I["+"]
Move your in point forward by a frame by pressing the 'In' button and the trim '+' button
Once your ‘in’ point is set, you can repeat the above steps to locate the ‘out’ point using the search dial.
Using the Transport Controls
You can also use the transport controls on the HyperDeck Extreme Control to navigate to your in and out points. The two rows of transport controls feature buttons commonly found on traditional broadcast decks and will be familiar to you. These buttons include 'preroll', 'record', 'edit', 'eject', 'rewind', 'play', 'fast fwd' and 'stop'.
'Skip' reverse and 'skip' forwards buttons operate like previous and next buttons on file based decks such as the HyperDeck Studio Mini, so you can quickly navigate from clip to clip.
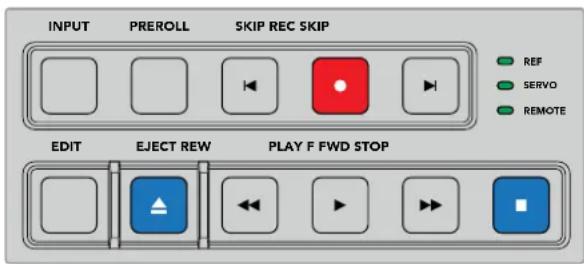
Using REW, PLAY, F FWD and STOP buttons on the front panel let you quickly control your video on file and tape based decks.
To locate your timecode point, make sure your 'player' has reference and is in remote, then on the controller:
1 Press the 'recorder' button to control the deck you have previously selected as your record deck.
2 Press the REW to F FWD buttons to rewind or fast forward.
3 Once you have reached your timecode, press STOP to stop playback and define select your in point by pressing the 'entry' and 'in' buttons together.
The HyperDeck Extreme Control also features other transport controls for file based decks.
Skip forward and skip back
If you are using a file based deck for record or playback, such as the HyperDeck Extreme 8K HDR, you can use the 'skip' forward and reverse buttons. Press 'skip' reverse once to skip back to the first frame of the current clip. Press 'skip' forward and you will skip forward to the first frame of the next clip.
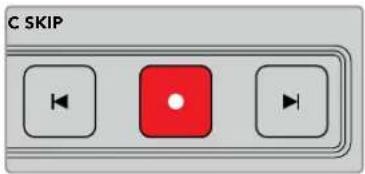
The 'skip' buttons are either side of the 'rec' button. Pressing 'skip' reverse when already located on the first frame of a clip will navigate you to the first frame of the previous clip.
Record
To start recording, press the 'rec' and 'play' buttons at the same time. During recordings you can switch which storage media your HyperDeck Extreme 8K HDR is recording to by holding down the record button for three seconds.
Input
Press the INPUT button to switch between playback or source mode on the recording deck. When input is selected, the HyperDeck Extreme 8K HDR will display the connected source.
Preroll
When you press 'preroll', tape decks will rewind to the preroll point before the set in point. The preroll duration can be set on broadcast decks and is often set to up to 5 seconds. For example, if the preroll on a broadcast deck is set to 5 seconds and the preroll button is pressed on the deck or HyperDeck Extreme Control, the deck will search and park the tape 5 seconds prior to that point. This is important for tape based decks where the deck needs time to lock the signal before it is useable.
Edit
Once you have set your in and/or out points on your playback and record units, pressing 'edit' will perform an auto edit, cueing your tapes to the preroll point and then starting the record. The 'edit' button will flash when recording has started.
Eject
The 'eject' button has two different functions depending on whether you are connected to a traditional tape based broadcast deck or a file based deck such as the HyperDeck Extreme 8K HDR.
| On a traditional broadcast deck | Pressing the eject button will unthread a tape on the selected player or recorder and eject the tape or cassette. The timecode panel will update to reflect the deck as it will no longer reference the tape timecode. |
| On a HyperDeck recorder | When a HyperDeck is in ‘stop’ mode, pressing the ‘eject’ button will switch your active recording slot to the other one available. For example, HyperDeck recording with slot 1 active will switch to slot 2. When you HyperDeck is in record or play mode, pressing ‘eject’ will stop the record or playback and switch slots in the one step. |
TIP If you are using a HyperDeck recorder with HyperDeck Extreme Control, the illuminated 'eject' button will let you know there is no media inserted in the drive slots of the HyperDeck recorder.
Using the Multi Deck Feature
Using the HyperDeck Extreme Control's multi deck feature, you can select more that one deck for simultaneous playback or recording. Select each deck individually to set your in or out points. These don't have to be the same, any timecode point will work. Alternatively, you can just scrub to the point you want playback to start. Once all the timecode points have been set individually on each deck, you can select them together. Press the 'M' key to the right of the soft touch numbers for either the playback or record row and while holding it down, select the other connected decks you which to operate concurrently. Each selected button will illuminate. If the button flashes, it means there is either no deck connected or recognized attached to that port.
NOTE When using the multi feature the timecode display will show the lowest number deck selected. For example, if you have selected decks 2, 3 and 4 as playback decks, the timecode display will show deck connected to deck number 2.
HyperDeck Extreme Control Front Panel
In this section of the manual you will find detailed descriptions of all the features on your HyperDeck Extreme Control.
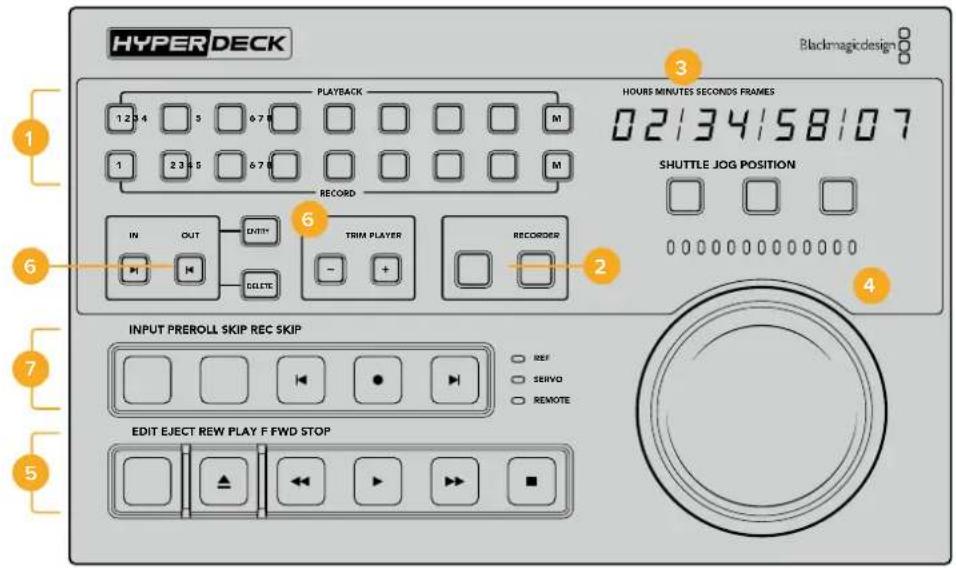
1 Playback and record buttons
16 numbered buttons let you select which deck is the player and which deck is the recorder. Use the M button to select multiple playback and record decks.
2 Player and Recorder buttons
Player and recorder buttons let you select your player or recorder device. Once you press the player button, the status indicators and timecode will update to reflect the deck or device selected as player.
3 Timecode Display
The timecode display will update to the connected deck when the numbered playback or record button or 'player' or 'recorder' button is selected. When a drive or tape is ejected, the timecode display will revert to the deck default, generally 00:00:00:00.
4 Search dial, indicator LEDs and mode buttons
There are three modes when using the large search dial; shuttle, jog and position. The row of LED lights will indicate the search direction depending on which mode is selected. Turn the dial left or right to fast forward or rewind.
5 Transport Controls
Traditional transport controls provide familiar playback controls including play, stop, record and edit. The skip buttons are for file based decks such as a HyperDeck recorder.
6 Timecode Entry and Trim buttons
You can select your in and out points and refine them frame by frame by using the timecode entry and trim buttons.
7 Deck status indicators
LED indicators will display the status of the deck letting you know when it is ready for playback and recording.
HyperDeck Extreme Control Rear Panel
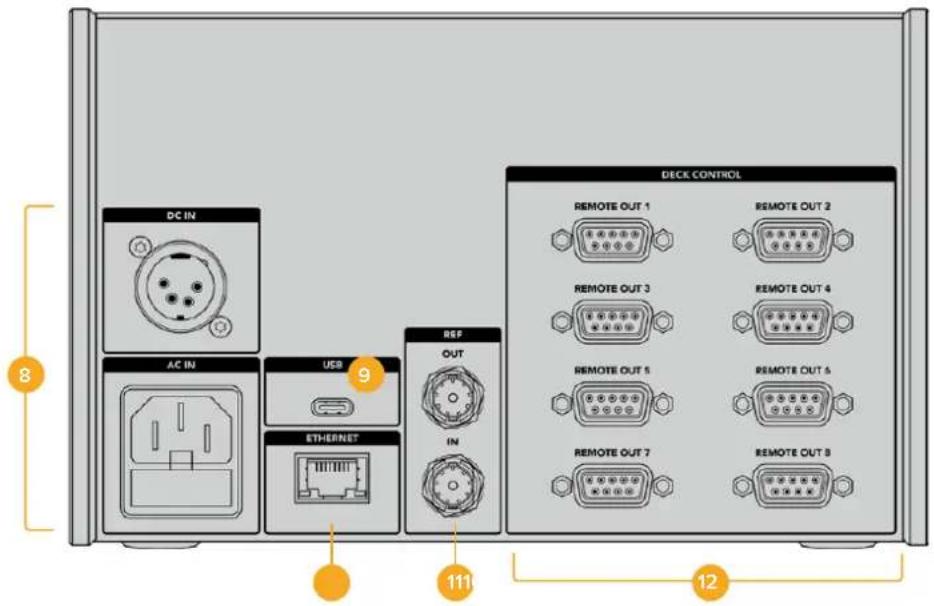
8 Power Inputs
The HyperDeck Extreme Control has inputs for both AC and DC power.
9 USB
A USB port lets you connect your controller to a computer so you can update via the HyperDeck Setup Utility.
10 Ethernet
The ethernet connection is not enabled at this time.
11 Reference
Reference out and reference in connections for synchronous recordings between connected devices.
12 Deck Control
Eight numbered RS-422 connections to connect up to 8 RS-422 enabled devices.
Accessories
Rack Mounting HyperDeck
The HyperDeck Extreme 8K HDR and HyperDeck Extreme Control can be rack mounted into a broadcast rack or road case using the HyperDeck rack mount kit.
Sitting at three rack units high and half the width of a standard rack, HyperDeck Extreme can be mounted side by side or individually using the blanking panel provided with the kit.
The HyperDeck Extreme Rack Kit contains the following items:
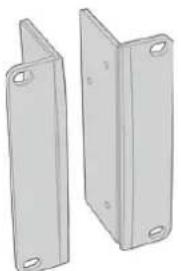
natural_image
Two identical metal bracket panels with mounting holes, shown from different angles (no text or symbols)2 x Rack ears
Attach rack 'ears' to the outside edge of HyperDeck Extreme for mounting in a rack.
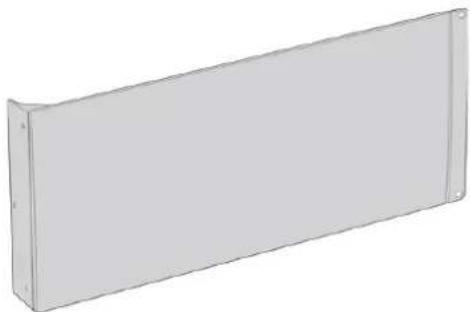
natural_image
3D rendering of a rectangular metal panel or enclosure with rounded corners and a flat top edge (no text or symbols)1 x Half rack width blanking panel
The blanking panel has a mounting ear on one side so you can cover the empty rack space if you are installing a single unit. The illustration shows the ear on the right side. Simply rotate the panel 180° to mount it to the other side.
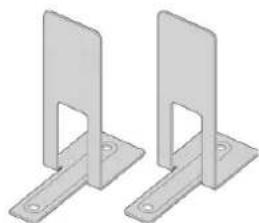
natural_image
Two identical metal bracket components with mounting holes, shown side by side (no text or symbols)2 x Support brackets
The T-shaped support brackets attach underneath the HyperDeck Extreme units where the two units meet at the front and the rear to provide support.
Screws
8 x M4 10mm
4 x M4 8mm
15 x M3 5mm
Rack ear
Blanking panel
Support
screws
screws
bracket screws
2 x Cable tab insert
Preparing the HyperDeck Extreme 8K HDR or
HyperDeck Extreme Control for individual rack installation:
1 Position the blanking panel on one of the sides of your HyperDeck unit, depending on whether you would like the unit to sit on the right or left of the shelf. The front face of the blanking panel should be parallel with the front panel of the unit.
2 Attach the blanking panel to the side of your HyperDeck unit using three of the supplied blanking panel screws.
3 Use three of the rack ear screws to attach a rack ear to the other side of the HyperDeck unit.
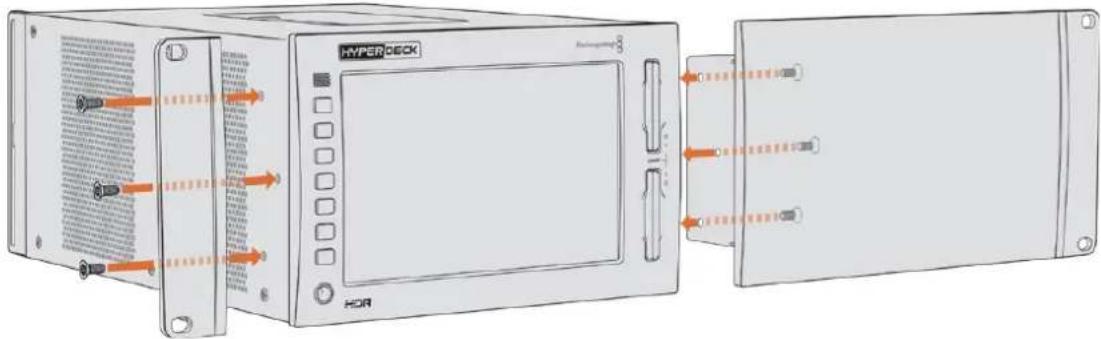
With the rack ear and blanking panel now attached, you can install the HyperDeck unit into a rack. Use the mounting holes on both sides and standard rack screws.
Preparing to rack mount a HyperDeck Extreme 8K HDR with a HyperDeck Extreme Control.
When rack mounting HyperDeck Extreme 8K HDR and HyperDeck Extreme Control side by side, it's best to have the controller on the right. This way your headphone port will be on the far left and your search dial on the far right, making it a seamless transition from traditional broadcast deck to your HyperDeck Extreme.
1 The two units will be joined on one side using support brackets, so the first step is to remove the two rubber feet from the joining side of each unit.
2 The units will be secured via the cable brackets on the rear along with t shaped support brackets installed on the base.
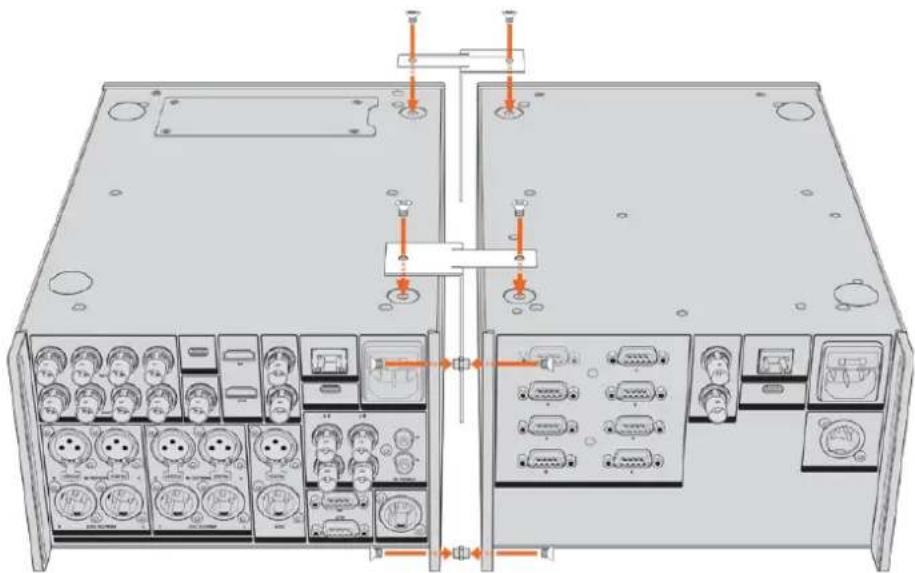
On the rear cable brackets, insert a cable tab insert into the top and bottom holes on one unit, securing each in place using the supplied support bracket screws. Attach the two t-shaped supports between the two units at the front and rear and screw in place using support brackets screws.
3 The cable tab insert installed previously should line up with the holes of the cable bracket on the other unit. Secure with the supplied support bracket screws. You can now turn the unit right side up.
4 Attach the rack ears to the outer edges near the front of both units using the supplied rack ear screws. Your HyperDeck Extreme 8K HDR and HyperDeck Extreme Control are now ready to be mounted into your rack as a single unit.
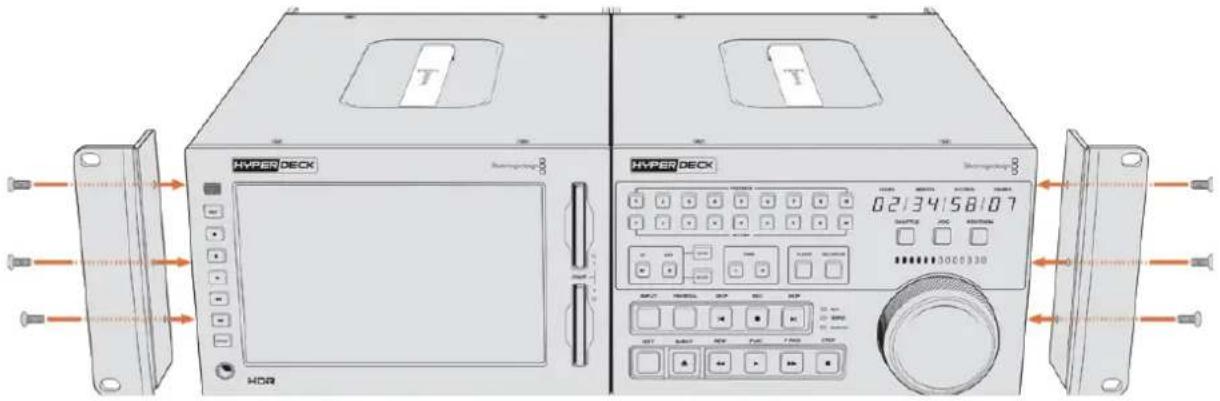
RS-422 Control
What is RS-422 Control?
The RS-422 standard is a serial deck control broadcast standard and has been used by broadcasters since the early 1980s and is found on many decks, linear editors, non linear editors and broadcast automation products. All current HyperDeck models support this standard so can be integrated into broadcast automation, remote control systems, editing systems and any kind of custom control you might like to design yourself.
HyperDeck Extreme 8K HDR also supports file based commands from the Advanced Media Protocol via RS-422. This lets you control your HyperDeck with an external device using AMP commands such as adding clips to a playlist, determining the filename of the next clip, looping a single clip or timeline, or clearing a playlist.
Using an External RS-422 Controller
All current HyperDeck models feature an industry standard Sony™ compatible RS-422 deck control port, which has the correct pin connections for a direct connection to any remote controller that supports RS-422.
You can use pre-manufactured 9 pin cables as long as each end of the cable is wired 'pin for pin' where the same pin numbers on each end of the cable are connected together. If you would like to make custom cables, please refer to the accompanying wiring diagram.
Using RS-422 control means you can build your own custom controller, or incorporate your HyperDeck Extreme 8K HDR into an already existing RS-422 control solution.
For example, you can remotely start and stop recording and playback of your HyperDeck as well as performing other common jog and shuttle functions. The full list of supported RS-422 commands is in the following section named 'supported RS-422 commands'.
54321
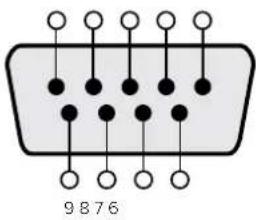
natural_image
Pure electrical connector pinout diagram without any text or symbols| Receive (-) | Receive (+) | Transmit (-) | Transmit (+) | Ground Pins |
| 2 7 8 3 1,4,6,9 |
RS-422 remote pin connections
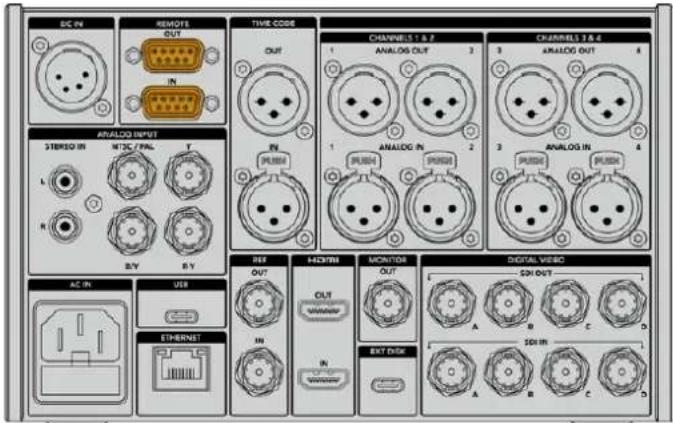
Remote port on HyperDeck Extreme 8K HDR
Supported RS-422 Commands
| Command Reply No Remote Notes | |||||
| 0 - System Control | |||||
| 0x00 0x11 DeviceTypeRequest | NTSC: 0xF0E0PAL: 0xF1E024P: 0xF2E0 | Enabled | |||
| 1 - Slave Response | |||||
| 0x20 | 0x00 | Stop | Acknowledge | Disabled | |
| 0x20 | 0x01 | Play | Acknowledge | Disabled | |
| 0x20 | 0x02 | Record | Acknowledge | Disabled | |
| 0x20 | 0x04 | StandbyOff | Acknowledge | Disabled | |
| 0x20 | 0x05 | StandbyOn | Acknowledge | Disabled | |
| 0x20 | 0x0F | Eject | Acknowledge | Disabled | |
| 0x20 | 0x10 | FastFwd | Acknowledge | Disabled | |
| 0x21 | 0x11 | JogFwd1 | Acknowledge | Disabled | |
| 0x22 | 0x11 | JogFwd2 | Acknowledge | Disabled | Treated as N=1;Same as JogFwd1 |
Command Reply No Remote Notes
| 0x21 | 0x12 | VarFwd1 | Acknowledge | Disabled | Uses ShuttleFwd1 |
| 0x22 | 0x12 | VarFwd2 | Acknowledge | Disabled | Treated as N=1;Same as VarFwd1 |
| 0x21 0x13 Shuttle | Fwd1 Acknowledge Disabled | ||||
| 0x22 0x13 Shuttle | Fwd2 Acknowledge Disabled | Treated as N=1;Same as ShuttleFwd1 | |||
| 0x20 0x20 Rewind Acknowledge Disabled | |||||
| 0x21 0x21 JogRev1 Acknowledge Disabled | |||||
| 0x22 | 0x21 | JogRev2 | Acknowledge | Disabled | Treated as N=1;Same as JogRev1 |
| 0x21 | 0x22 | VarRev1 | Acknowledge | Disabled | Uses ShuttleRev1 |
| 0x22 0x22 VarRev2 Acknowledge Disabled | Treated as N=1;Same as VarRev1 | ||||
| 0x21 | 0x23 | ShuttleRev1 | Acknowledge | Disabled | |
| 0x22 | 0x23 | ShuttleRev2 | Acknowledge | Disabled | Treated as N=1;Same as ShuttleRev1 |
| 0x20 | 0x30 | Preroll | Acknowledge | Disabled | |
| 0x24 | 0x31 CueData Acknowledge Disabled | ||||
| 0x20 | 0x34 | SyncPlay | Acknowledge | Disabled | |
| 0x21 | 0x38 | ProgSpeedPlayPlus | Acknowledge | Disabled | |
| 0x21 | 0x39 | ProgSpeedPlayMinus | Acknowledge | Disabled | |
| 0x20 | 0x40 | Preview | Acknowledge | Disabled | Status bits are set |
| 0x20 | 0x41 | Review | Acknowledge | Disabled | Status bits are set |
| 0x20 | 0x43 | OutpointPreview | Acknowledge | Disabled | |
| 0x22 | 0x5C | DMCSetFwd | Acknowledge | Disabled | |
| 0x22 | 0x5D | DMCSetRev | Acknowledge | Disabled | |
| 0x20 | 0x60 | FullEEOff | Acknowledge | Disabled | |
| 0x20 | 0x61 | FullEEOn | Acknowledge | Disabled | |
| 0x20 | 0x63 | SelectEEOn | Acknowledge | Disabled | |
4 - Preset/Select Control
| 0x40 | 0x10 | InEntry | Acknowledge | Disabled | |
| 0x22 | 0x23 | ShuttleRev2 | Acknowledge | Disabled | Treated as N=1;Same as ShuttleRev1 |
| 0x20 | 0x30 | Preroll | Acknowledge | Disabled | |
| 0x24 | 0x31 CueData Acknowledge Disabled | ||||
| 0x20 | 0x34 | SyncPlay | Acknowledge | Disabled | |
| 0x21 | 0x38 | ProgSpeedPlayPlus | Acknowledge | Disabled | |
| 0x21 | 0x39 | ProgSpeedPlayMinus | Acknowledge | Disabled | |
| 0x40 | 0x11 | OutEntry | Acknowledge | Disabled | |
| 0x44 | 0x14 | InDataPreset | Acknowledge | Disabled | |
Command Reply No Remote Notes
| 0x44 | 0x15 | OutDataPreset | Acknowledge | Disabled | |
| 0x40 | 0x18 | InShift+ | Acknowledge | Disabled | |
| 0x40 | 0x19 | InShift- | Acknowledge | Disabled | |
| 0x40 | 0x1A | OutShift+ | Acknowledge | Disabled | |
| 0x40 | 0x1B | OutShift- | Acknowledge | Disabled | |
| 0x40 | 0x20 | InReset | Acknowledge | Disabled | |
| 0x40 | 0x21 | OutReset | Acknowledge | Disabled | |
| 0x40 | 0x22 | AlnReset | Acknowledge | Disabled | |
| 0x40 | 0x23 | AOutReset | Acknowledge | Disabled | |
| 0x44 | 0x31 | PrerollPreset | Acknowledge | Disabled | |
| 0x40 | 0x40 | AutoModeOff | Acknowledge | Disabled | ignored, Status bit remembered |
| 0x40 | 0x41 | AutoModeOn | Acknowledge | Disabled | ignored, Status bit remembered |
| 0x41 | 0x37 | InputCheck | Acknowledge | Disabled |
6 - Sense Request
| 0x61 | 0x0A | TimeCodeGenSense | — | — | |
| 0x61 | 0x0C | CurrentTimeSense | — | — | |
| 0x60 | 0x10 | InDataSense | InData | Enabled | |
| 0x60 | 0x11 | OutDataSense | OutData | Enabled | |
| 0x60 | 0x12 | AlnDataSense | AlnData | Enabled | |
| 0x60 | 0x13 | AOutDataSense | AOutData | Enabled | |
| 0x61 | 0x20 | StatusSense | StatusData | Enabled | |
| 0x60 | 0x2B | RemainTimeSense | RemainTimeData | Enabled | |
| 0x60 | 0x2E | SpeedSense | SpeedData | Enabled | |
| 0x60 | 0x31 | PrerollTimeSense | PreRollTimeData | Enabled | |
| 0x60 | 0x36 | TimerModeSense | TimerModeData | Enabled | |
| 0x60 | 0x3E | RecordInhibitSense | RecordInhibitStatus | Enabled |
7 - Sense Reply
| 0x78 | 0x00 | Timer1Data | — | — | Current Time and 00:00:00:00 |
| 0x78 | 0x04 | LTCUserBitsTimeData | — | — | Current Time and 00:00:00:00 |
| 0x78 | 0x06 | VITCUserBitsTimeData | — | — | Current Time and 00:00:00:00 |
| 0x74 | 0x06 | VITCTimeData | — | — | Current Time |
| 0x74 | 0x07 | UserBitsVITCTimeData | — | — | 00:00:00:00 |
| 0x74 | 0x08 | GenTCData | — | — | Current Time |
| 0x78 | 0x08 | GenTCUBData | — | — | Current Time and 00:00:00:00 |
Command Reply No Remote Notes
| 0x74 | 0x09 | GenUBData | — | — | 00:00:00:00 |
| 0x74 0x10 InData — — | |||||
| 0x74 0x11 OutData — — | |||||
| 0x74 0x12 AlnData — — | |||||
| 0x74 0x13 AOutData — — | |||||
| 0x74 | 0x14 | CorrectedLTCTimeData | — | — | Current Time |
| 0x70 | 0x20 | StatusData | — | — | Please see “Status Bits” sheet: Limited to 9 bytes of status, silently truncated |
| 0x76 | 0x2B | RemainTimeData | — | — | |
| 0x71 | 0x2E | SpeedData | — | — | |
| 0x74 | 0x31 | PrerollTimeData | — | — | |
| 0x71 | 0x36 | TimerModeData | — | — | Returns 0 (TimeCode) |
| 0x72 | 0x3E | RecordInhibitStatus | — | — | |
A - Advanced Media Protocol
| 0xA1 | 0x01 | AutoSkip | Acknowledge | Disabled | 8-bit signed number of clips to skip from current clip |
| 0xAX | 0x15 | ListNextID | IDListing | Enabled | when x = 0 single clip request when x = 1, # clips can be specified in the send data |
| 0x20 | 0x29 | ClearPlaylist | Acknowledge | Disabled | |
| 0x41 | 0x42 | SetPlaybackLoop | Acknowledge | Disabled | Bit 0 loop mode enable, 0=false 1=trueBit 1 is single clip/timeline 0=single clip 1=timeline |
| 0x41 | 0x44 | SetStopMode | Acknowledge | Disabled | 0 = Off1 = Freeze on last frame2 = Freeze on next clip3 = Show black |
| 0x4f | 0x16 | AppendPreset | Acknowledge | Disabled |
Blackmagic Extensions
| 0x08 | 0x02 | BmdSeekToTimelinePosition | Acknowledge | Disabled | 16-bit little endian fractional position [0..65535] |
| 0x03 | 0x08 | BMDSeekRelativeClip | Acknowledge | Disabled | One-byte signed integer, which is the number of clips to skip (negative for backwards). |
RS-422 Developer Information
| bit 7 bit 6 bit 5 bit 4 bit 3 bit 2 bit 1 bit 0 | ||||||||
| Byte 0 | 0 0 Cassette out 0 0 0 0 Local | |||||||
| Byte 1 | Standby | 0 | Stop | 0 | Rewind | Forward | Record | Play |
| Byte 2 | Servo Lock | 0 | Shuttle | Jog | Var | Direction | Still | 1 |
| Byte 3 | Auto Mode | 0 | 0 | 0 | Aout Set | Ain Set | Out Set | In Set |
| Byte 4 | Select EE | Full EE 0 | 0 0 0 0 0 | |||||
| Byte 5 | 0 0 0 | 0 0 0 0 0 | ||||||
| Byte 6 | 0 | Lamp Still | Lamp Fwd | Lamp Rev | 0 | 0 | 0 | 0 |
| Byte 7 | 0 0 0 | 0 0 0 0 0 | ||||||
| Byte 8 | 0 0 Near EOT | EOT | 0 0 0 0 | |||||
| Byte 9 | 0 0 0 | 0 0 0 0 0 | ||||||
| Variables | |
| Cassette Out | Set if no SSD is present |
| Local | Set if Remote is disabled (local control) |
| Standby | Set if a disk is available |
| Direction | Clear if playback is forwarding, set if playback is reversing |
| Still | Set if playback is paused, or if in input preview mode |
| Auto Mode | Set if in Auto Mode |
| Select EE, Full EE | Set if in input preview mode |
| Lamp Still/Fwd/Rev | Set according to playback speed and direction |
| Near EOT | Set if total space left on available SSDs is less than 3 minutes |
| EOT | Set if total space left on available SSDs is less than 30 seconds |
| Others | |
| Cue Complete (byte 2, bit 0) | Always 1: Cue requests are always instantaneous |
| HyperDeck Serial RS-422 Protocol | ||
| Protocol | Based on Sony 9-pin protocol | |
| Interface | Baud rate | 38.4 Kbps |
| 1 start bit | ||
| 8 data bits | ||
| 1 stop bit | ||
| 1 parity bit | ||
| Odd parity | ||
Transferring Files over a Network
HyperDeck Extreme 8K HDR supports file transfer via file transfer protocol, or ftp. This powerful feature lets you copy files directly from your computer to your HyperDeck via a network with the fast speeds a local network can provide. For example, you could be copying new files to a HyperDeck unit being used for playing back video on monitor walls and digital signage.
Connecting to HyperDeck Extreme 8K HDR
With your computer and HyperDeck Extreme 8K HDR on the same network, all you need is an ftp client and your HyperDeck Extreme 8K HDR's IP address.
1 Download and install an FTP client on the computer you want to connect your HyperDeck Extreme to. We recommend Cyberduck, FileZilla or Transmit but most FTP applications will work. Cyberduck and FileZilla are free downloads.
2 Connect your HyperDeck Extreme 8K HDR to your network using an Ethernet cable and note its IP address.
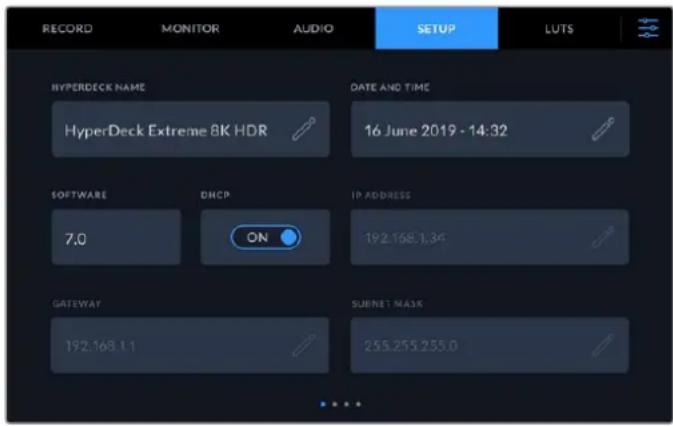
If you haven't previously connected the HyperDeck Extreme 8K HDR to the network, see 'setup' menu settings to find out how to connect it to the network.
3 Enter your HyperDeck Extreme 8K HDR's IP address into your FTP client's connection dialog. The naming and position of this box can vary between applications, but it is usually labeled 'server' or 'host.' If your FTP program includes an 'anonymous login' checkbox, make sure this is checked.
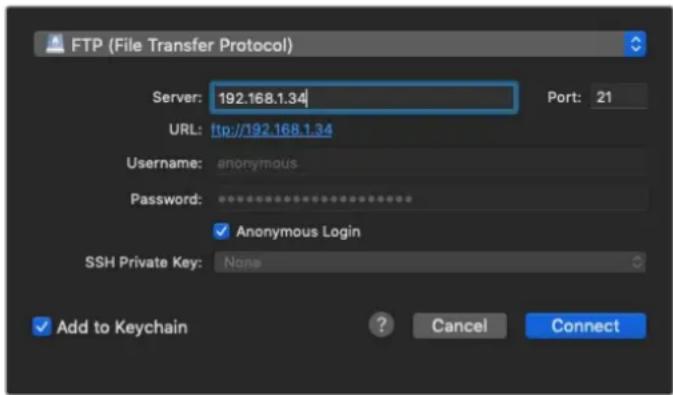
When connecting to HyperDeck Extreme 8K HDR, you don't need to enter a username or password. Simply enter your disk recorder's IP address in your FTP application's 'server' or 'host' field and check an 'anonymous login' checkbox if one is available.
Transferring Files
Once connected to HyperDeck Extreme 8K HDR you can transfer files as you normally would with your ftp program. Most ftp applications have a drag and drop interface, but check your particular application for the appropriate method.
You can also transfer any file to and from a HyperDeck Extreme 8K HDR, but it's worth noting that any files you intend to play back from the HyperDeck will need to conform to your HyperDeck's supported codecs and resolutions. You can find a list of supported codecs in the 'Blackmagic HyperDeck Setup' section of this manual.
TIP You can transfer files over a network while your HyperDeck Extreme 8K HDR is recording. HyperDeck Extreme 8K HDR will automatically adjust transfer speeds to make sure recording is not affected.
Developer Information
Blackmagic HyperDeck Ethernet Protocol
Version 1.10
The Blackmagic HyperDeck Ethernet Protocol is a text based protocol accessed by connecting to TCP port 9993 on HyperDeck Extreme 8K HDR. If you are a software developer you can use the protocol to construct devices that integrate with our products. Here at Blackmagic Design our approach is to open up our protocols and we eagerly look forward to seeing what you come up with!
You can connect to your HyperDeck recorder using the HyperDeck Ethernet Protocol using a command line program on your computer, such as Terminal on a Mac and putty on a Windows computer.
The HyperDeck Ethernet Protocol lets you schedule playlists and recordings. The following is an example of how to For example, to play 7 clips from clip number 5 onwards via the HyperDeck Ethernet Protocol. If your recorder is installed out of reach, you can also turn on the 'remote' feature via ethernet.
On a Mac
1 Open the Terminal application which is located with the applications > utilities folder.
2 Type in "nc" and a space followed by the IP address of your HyperDeck Extreme 8K HDR another space and "9993" which is the HyperDeck Ethernet Protocol port number. For example type: nc 192.168.1.154 9993. The Protocol preamble will appear.
3 Type "playrange set: clip id: 5 count: 7" and press 'return'.
If you look on the timeline on the front panel of the HyperDeck Extreme 8K HDR, you will see in and out points marked around clips 5 through the end of clip 11.
4 Type "play". Clips 5 through 11 will now play back.
5 To clear the playrange, type "playrange clear"
6 To exit from the protocol, type 'quit'.
Protocol Commands
| Command Command Description | |
| help Provides help text on all commands and parameters | |
| commands return commands in XML format | |
| device info return device information | |
| disk list query clip list on active disk | |
| disk list: slot id: {n} query clip list on disk in slot {n} | |
| quit disconnect ethernet control | |
| ping check device is responding | |
| preview: enable: {true/false} switch to preview or output | |
| play play from current timecode | |
| play: speed: (-5000 to 5000) play at specific speed | |
| play: loop: {true/false} play in loops or stop-at-end | |
| play: single clip: {true/false} play current clip or all clips | |
| playrange query play range setting | |
| playrange set: clip id: {n} set play range to play clip {n} only | |
| playrange set: clip id: {n} count: {m} | set play range to {m} clips starting from clip {n} |
| playrange set: in: {inT} out: {outT} | set play range to play between:- timecode {inT} and timecode {outT} |
| playrange set: timeline in:{in} timeline out: {out} | set play range in units of frames between:- timeline position {in} and position {out} |
| playrange clear | clear/reset play range setting |
| play on startup | query unit play on startup state |
| play on startup: enable: {true/false} | enable or disable play on startup |
| play on startup: single clip: {true/false} | play single clip or all clips on startup |
| play option | query play option |
| play option: stop mode:{lastframe/nextclip/black} | set output frame when playback stops |
| record | record from current input |
| record: name: {name} | record named clip |
| record spill | spill current recording to next slot |
| record spill: slot id: {n} | spill current recording to specified slot use current slot id to spill to same slot |
| stop stop playback or recording | |
| clips count | query number of clips on timeline |
| clips get | query all timeline clips |
| clips get: clip id: {n} | query a timeline clip info |
| clips get: clip id: {n} count: {m} | query m clips starting from n |
| clips get: version: {1/2} | query clip info using specified output version:version 1: id: name startT durationversion 2: id: startT duration inT outT name |
| clips add: name: {name} append a clip to timeline | |
| clips add: clip id: {n} name: {name} insert clip before existing clip {n} | |
| clips add: in: {inT} out: {outT} name:{name} | append the (inT) to {outT} portion of clip |
| clips remove: clip id: {n} remove clip {n} from the timeline | |
| clips clear empty timeline clip list | |
| transport info query current activity | |
| slot info query active slot | |
| slot info: slot id: {n} query slot {n} | |
| slot select: slot id: {n} switch to specified slot | |
| slot select: video format: {format} load clips of specified format | |
| cache info query cache status | |
| dynamic range query dynamic range | |
| dynamic range: playback override:{auto/Rec709/Rec2020_SDR/HLG/ST2084_300/ST2084_500/ST2084_800/ST2084_1000/ST2084_2000/ST2084_4000/ST2048} | set playback dynamic range override |
| notify | query notification status |
| notify: remote: {true/false} | set remote notifications |
| notify: transport: {true/false} | set transport notifications |
| notify: slot: {true/false} | set slot notifications |
| notify: configuration: {true/false} | set configuration notifications |
| notify: dropped frames: {true/false} | set dropped frames notifications |
| notify: display timecode: {true/false} | set display timecode notifications |
| notify: timeline position: {true/false} | set playback timeline position notifications |
| notify: playrange: {true/false} | set playrange notifications |
| notify: cache: {true/false} | set cache notifications |
| notify: dynamic range: {true/false} | set dynamic range notifications for input or playback video |
| goto: clip id: {n} | goto clip id {n} |
| goto: clip id: +{n} | go forward {n} clips |
| goto: clip id: {-n} | go backward {n} clips |
| goto: clip: {start/end} | goto start or end of clip |
| goto: clip: {n} | go forward {n} frames within current clip |
| goto: clip: +{n} | go forward {n} frames within current clip |
| goto: clip: {-n} | go backward {n} clips |
| goto: timeline: {start/end} goto start or end of timeline | |
| goto: timeline: {n} goto frame position {n} within timeline | |
| goto: timeline: +{n} go forward {n} frames within timeline | |
| goto: timeline: {-n} go backward {n} frames within timeline | |
| goto: timecode: {timecode} goto specified timecode | |
| goto: timecode: +{timecode} go forward {timecode} duration | |
| goto: timecode: {-timecode} go backward {timecode} duration | |
| goto: slot id: {n} goto slot id {n} equivalent to "slot select: slot id: {n}" | |
| jog: timecode: {timecode} jog to timecode | |
| jog: timecode: +{timecode} jog forward {timecode} duration | |
| jog: timecode: {-timecode} jog backward {timecode} duration | |
| shuttle: speed: {-5000 to 5000} shuttle with speed | |
| remote | query unit remote control state |
| remote: enable: {true/false} | enable or disable remote control |
| remote: override: {true/false} | session override remote control |
| configuration | query configuration settings |
| configuration: video input: optical | switch to optical input |
| configuration: video input: {SDI/HDMI/component/composite} | change the video input |
| configuration: audio input: {embedded/XLR/RCA} | change the audio input |
| configuration: file format: {format} | switch to specific file format |
| configuration: timecode input: {external/embedded/preset/clip} | change the timecode input |
| configuration: timecode preset: {timecode} | set the timecode preset |
| configuration: audio input channels: {n} | set the number of audio channels recorded to {n} |
| configuration: record trigger: {none/recordbit/timecoderun} | change the record trigger |
| configuration: record prefix: {name} | set the record prefix name (supports UTF-8 name) |
| configuration: append timestamp: {true/false} | append timestamp to recorded filename |
| uptime | return time since last boot |
| format: slot id: {n} prepare: {exFAT/HFS+} name: {name} | prepare formatting operation filesystem type with volume name {name}"slot id" can be omitted for the current mounted slot"name" defaults to current volume name if mounted (supports UTF-8) |
| format: confirm: {token} | perform a pre-prepared formatting operation using token |
Command Command Description
identify: enable: (true/false) identify the device
watchdog: period: {period in seconds} client connection timeout
Command Combinations
You can combine the parameters into a single command, for example:
play: speed: 200 loop: true single clip: true
Or for configuration:
configuration: video input: SDI audio input: XLR
Or to switch to the second disk, but only play NTSC clips:
slot select: slot id: 2 video format: NTSC
Using XML
While you can use the Terminal to talk to HyperDeck, if you are writing software you can use XML to confirm the existence of a specific command based on the firmware of the HyperDeck you are communicating with. This helps your software user interface adjust to the capabilities of the specific HyperDeck model and software version.
Protocol Details
Connection
The HyperDeck Ethernet server listens on TCP port 9993.
Basic syntax
The HyperDeck protocol is a line oriented text protocol. Lines from the server will be separated by an ascii CR LF sequence. Messages from the client may be separated by LF or CR LF.
New lines are represented in this document as a "←" symbol.
Command syntax
Command parameters are usually optional. A command with no parameters is terminated with a new line:
{Command name}
If parameters are specified, the command name is followed by a colon, then pairs of parameter names and values. Each parameter name is terminated with a colon character:
{Command name}: {Parameter}: {Value} {Parameter}: {Value} ...
Response syntax
Simple responses from the server consist of a three digit response code and descriptive text terminated by a new line:
{Response code} {Response text}
If a response carries parameters, the response text is terminated with a colon, and parameter name and value pairs follow on subsequent lines until a blank line is returned:
{Response code} {Response text}:
{Parameter}: {Value}
{Parameter}: {Value}
...
←
Successful response codes
A simple acknowledgement of a command is indicated with a response code of 200:
200 ok←
Other successful responses carry parameters and are indicated with response codes in the range of 201 to 299.
Failure response codes
Failure responses to commands are indicated with response codes in the range of 100 to 199:
100 syntax error
101 unsupported parameter
102 invalid value
103 unsupported
104 disk full
105 no disk
106 disk error
107 timeline empty
108 internal error
109 out of range
110 no input
111 remote control disabled
120 connection rejected
150 invalid state
151 invalid codec
160 invalid format
161 invalid token
162 format not prepared
Asynchronous response codes
The server may return asynchronous messages at any time. These responses are indicated with response codes in the range of 500 to 599:
5xx {Response Text}:
{Parameter}: {Value}
{Parameter}: {Value}
Connection response
On connection, an asynchronous message will be delivered:
500 connection info:
protocol version: {Version}
model: {Model Name}
Connection rejection
Only one client may connect to the server at a time. If other clients attempt to connect concurrently, they will receive an error and be disconnected:
120 connection rejected
Timecode syntax
Timecodes are expressed as non-drop-frame timecode in the format:
H H:M M:SS:FF
Handling of deck "remote" state
The “remote” command may be used to enable or disable the remote control of the deck. Any attempt to change the deck state over ethernet while remote access is disabled will generate an error:
111 remote control disabled
To enable or disable remote control:
remote: enable: {"true", "false"}
The current remote control state may be overridden allowing remote access over ethernet irrespective of the current remote control state:
remote: override: { "true", "false"}
The override state is only valid for the currently connected ethernet client and only while the connection remains open.
The "remote" command may be used to query the remote control state of the deck by specifying no parameters:
remote
The deck will return the current remote control state:
210 remote info:←
enabled: {"true", "false"}←
override: {"true", "false"}←
Asynchronous remote control information change notification is disabled by default and may be configured with the "notify" command. When enabled, changes in remote state will generate a "510 remote info:" asynchronous message with the same parameters as the "210 remote info:" message.
Closing connection
The "quit" command instructs the server to cleanly shut down the connection:
q uit
Checking connection status
The "ping" command has no function other than to determine if the server is responding:
ping←
Getting help
The "help" or "?" commands return human readable help text describing all available commands and parameters:
help
Or:
?←
The server will respond with a list of all supported commands:
201 help:
{Help Text}
{Help Text}
←
Switching to preview mode
The "preview" command instructs the deck to switch between preview mode and output mode:
preview: enable: {"true", "false"}
Playback will be stopped when the deck is switched to preview mode. Capturing will be stopped when the deck is switched to output mode.
Controlling device playback
The "play" command instructs the deck to start playing:
play←
The play command accepts a number of parameters which may be used together in most combinations.
By default, the deck will play all remaining clips on the timeline then stop.
The "single clip" parameter may be used to override this behaviour:
play: single clip: { "true", "false"}
By default, the deck will play at normal (100%) speed. An alternate speed may be specified in percentage between -5000 and 5000:
play: speed: {\$\% normal speed}
By default, the deck will stop playing when it reaches to the end of the timeline. The "loop" parameter may be used to override this behaviour:
play: loop: {"true", "false"}
The "playrange" command returns the current playrange setting if any:
playrange←
To override this behaviour and select a particular clip:
playrange set: clip id: {Clip ID}
To only play a certain number of clips starting at a particular clip:
playrange set: clip id: {n} count: {m}
To only play a certain timecode range:
playrange set: in: {in timecode} out: {out timecode}
To play a certain timeline range:
playrange set: timeline in: {in} timeline out: {out}
To clear a set playrange and return to the default value:
playrange clear
The “play on startup command” instructs the deck on what action to take on startup. By default, the deck will not play. Use the “enable” command to start playback after each power up.
play on startup: enable { "true", "false"}
By default, the unit will play back all clips on startup. Use the "single clip" command to override:
play on startup: single clip: {"true", "false"}
The "play option" command queries the output frame for when playback stops:
play option←
By default, the deck will display the last frame when playback stops. To override this behaviour, the "stop mode" parameter can be used:
play option: stop mode: {"lastframe", "nextframe", "black"}
Stopping deck operation
The "stop" command instructs the deck to stop the current playback or capture:
stop←
Changing timeline position
The "goto" command instructs the deck to switch to playback mode and change its position within the timeline.
To go to the start of a specific clip:
goto: clip id: {Clip ID}
To move forward/back {count} clips from the current clip on the current timeline:
goto: clip id: +/- {count}
Note that if the resultant clip id goes beyond the first or last clip on timeline, it will be clamp at the first or last clip.
To go to the start or end of the current clip:
goto: clip: { "start", "end"}
To go to the start of the first clip or the end of the last clip:
goto: timeline: { "start", "end"}
To go to a specified timecode:
goto: timecode: {timecode}
To move forward or back a specified duration in timecode:
goto: timecode: { "+", "-"}{duration in timecode}
To specify between slot 1 and slot 2:
goto: slot id: {Slot ID}
Note that only one parameter/value pair is allowed for each goto command.
Enumerating supported commands and parameters
The "commands" command returns the supported commands:
commands
The command list is returned in a computer readable XML format:
212 commands:
<commands>
    <command name="..."><parameter name="..."/>...</command>
    <command name="..."><parameter name="..."/>...</command>
...
</c    om    m    a    nd    s>
More XML tokens and parameters may be added in later releases.
Controlling asynchronous notifications
The "notify" command may be used to enable or disable asynchronous notifications from the server.
To enable or disable transport notifications:
notify: transport: {"true", "false"}
To enable or disable slot notifications:
notify: slot: {"true", "false"}
To enable or disable remote notifications:
notify: remote: {"true", "false"}
To enable or disable configuration notifications:
notify: configuration: {"true", "false"}
Multiple parameters may be specified. If no parameters are specified, the server returns the current state of all notifications:
209 notify:
transport: {"true", "false"}
slot: {"true", "false"}
remote: {"true", "false"}
configuration: {"true", "false"}
Retrieving device information
The "device info" command returns information about the connected deck device:
device info←
The server will respond with:
204 device info:←
protocol version: {Version}←
model: {Model Name}←
unique id: {unique alphanumeric identifier}←
Retrieving slot information
The "slot info" command returns information about a slot. Without parameters, the command returns information for the currently selected slot:
slot info←
If a slot id is specified, that slot will be queried:
slot info: slot id: {Slot ID}
The server will respond with slot specific information:
202 slot info:←
slot id: {Slot ID}←
status: {"empty", "mounting", "error", "mounted"}←
volume name: {Volume name}←
recording time: {recording time available in seconds}←
video format: {disk's default video format}←
Asynchronous slot information change notification is disabled by default and may be configured with the "notify" command. When enabled, changes in slot state will generate a "502 slot info:" asynchronous message with the same parameters as the "202 slot info:" message.
Retrieving clip information
The “disk list” command returns the information for each playable clip on a given disk. Without parameters, the command returns information for the current active disk:
disk list
If a slot id is specified, the disk in that slot will be queried:
disk list: slot id: {Slot ID}
The server responds with the list of all playable clips on the disk in the format of: Index, name, formats, and duration in timecode:
206 disk list:←
slot id: {Slot ID}←
{clip index}: {name} {file format} {video format} {Duration timecode}←
{clip index}: {name} {file format} {video format} {Duration timecode}←
Note that the clip index starts from 1.
Retrieving clip count
The "clips count" command returns the number of clips on the current timeline:
clips count ←
The server responds with the number of clips:
214 clips count: ←
clip count: {Count}←
Retrieving timeline information
The “clips get” command returns information for each available clip, for a given range in timecode, on the current timeline. Without parameters, the command returns information for all clips on timeline:
clips get←
The server responds with a list of clip IDs, names and timecodes:
205 clips info:←
clip count: {Count}←
{Clip ID}: {Name} {Start timecode} {Duration timecode}←
{Clip ID}: {Name} {Start timecode} {Duration timecode}←
Note that the clip list format has changed incompatibly in protocol version 1.1,
i.e., Start timecode information field is inserted to each clip information line.
Retrieving transport information
The "transport info" command returns the state of the transport:
transport info ←
The server responds with transport specific information:
208 transport info:
status: {"preview", "stopped", "play", "forward", "rewind", "jog", "shuttle", "record"}←
speed: {Play speed between -1600 and 1600 %}←
slot id: {Slot ID or "none"}←
display timecode: {timecode}←
timecode: {timecode}←
clip id: {Clip ID or "none"}←
video format: {Video format}←
loop: {"true", "false"}←
The “timecode” value is the timecode within the current timeline for playback or the clip for record. The “display timecode” is the timecode displayed on the front of the deck. The two timecodes will differ in some deck modes.
Asynchronous transport information change notification is disabled by default and may be configured with the "notify" command. When enabled, changes in transport state will generate a "508 transport info:" asynchronous message with the same parameters as the "208 transport info:" message.
Video Formats
The following video formats are currently supported on HyperDeckExtreme 8K HDR:
NTSC, PAL, NTSCp, PALp
720p50, 720p5994, 720p60
1080p23976, 1080p24, 1080p25, 1080p2997, 1080p30
1080i50, 1080i5994, 1080i60
2160p23.98, 2160p24, 2160p25, 2160p29.97, 2160p30, 2160p50, 2160p59.94, 2160p60
4Kp23976, 4Kp24, 4Kp25, 4Kp2997, 4Kp30
4Kp50, 4Kp5994, 4Kp60
4320p23.98, 4320p24, 4320p25, 4320p29.97, 4320p30, 4320p50, 4320p59.94, 4320p60
8Kp23976, 8Kp24, 8Kp25
Video format support may vary between models and software releases.
File Formats
HyperDeck Extreme 8K HDR supports the following file formats:
H.265Low
H.265Medium
H.265High
QuickTimeProResHQ
QuickTimeProRes
QuickTimeProResLT
Supported file formats may vary between models and software releases.
Querying and updating configuration information
The “configuration” command may be used to query the current configuration of the deck:
configuration
The server returns the configuration of the deck:
211 configuration:
audio input: { "embedded", "XLR", "RCA"}
video input: { "SDI", "HDMI", "component"}
file format: {File format}
←
One or more configuration parameters may be specified to change the configuration of the deck.
To change the current video input:
configuration: video input: { "SDI", "HDMI", "component"}
Valid video inputs may vary between models. To configure the current audio input:
configuration: audio input: {"embedded", "XLR", "RCA"}
Valid audio inputs may vary between models.
To configure the current file format:
configuration: file format: {File format}
Note that changes to the file format may require the deck to reset, which will cause the client connection to be closed. In such case, response code 213 will be returned (instead of 200) before the client connection is closed:
"213 deck rebooting"
Asynchronous configuration information change notification is disabled by default and may be configured with the "notify" command. When enabled, changes in configuration will generate a "511 configuration:" asynchronous message with the same parameters as the "211 configuration:" message.
Selecting active slot and video format
The “slot select” command instructs the deck to switch to a specified slot, or/and to select a specified output video format. To switch to a specified slot:
slot select: slot id: {slot ID}
To select the output video format:
slot select: video format: {video format}
Either or all slot select parameters may be specified. Note that selecting video format will result in a rescan of the disk to reconstruct the timeline with all clips of the specified video format.
Clearing the current timeline
The "clips clear" command instructs the deck to empty the current timeline:
clips clear
The server responds with
200 ok←
Adding a clip to the current timeline
The "clips add:" command instructs the deck to add a clip to the current timeline:
clips add: name: {"clip name"}
The server responds with
200 ok←
or in case of error
1xx {error description}
Configuring the watchdog
The “watchdog” command instructs the deck to monitor the connected client and terminate the connection if the client is inactive for at least a specified period of time.
To configure the watchdog:
watchdog: period: {period in seconds}
To avoid disconnection, the client must send a command to the server at least every [period] seconds. Note that if the period is set to 0 or less than 0, connection monitoring will be disabled.
Help
Getting Help
The fastest way to obtain help is to go to the Blackmagic Design online support pages and check the latest support material available for your Blackmagic HyperDeck Disk Recorder.
Blackmagic Design Online Support Pages
The latest manual, software and support notes can be found at the Blackmagic Design support center at www.blackmagicdesign.com/support.
Blackmagic Design Forum
The Blackmagic Design forum on our website is a helpful resource you can visit for more information and creative ideas. This can also be a faster way of getting help as there may already be answers you can find from other experienced users and Blackmagic Design staff which will keep you moving forward. You can visit the forum at https://forum.blackmagicdesign.com
Contacting Blackmagic Design Support
If you can't find the help you need in our support material or on the forum, please use the "Send us an email" button on the support page to email a support request. Alternatively, click on the "Find your local support team" button on the support page and call your nearest Blackmagic Design support office.
Checking the Software Version Currently Installed
To check which version of Blackmagic HyperDeck software is installed on your computer, open the About Blackmagic HyperDeck Setup window.
- On Mac OS, open Blackmagic HyperDeck Setup from the Applications folder. Select About Blackmagic HyperDeck Setup from the application menu to reveal the version number.
- On Windows 7, open Blackmagic HyperDeck Setup from your Start menu. Click on the Help menu and select About Blackmagic HyperDeck Setup to reveal the version number.
- On Windows 8, open Blackmagic HyperDeck Setup from the Blackmagic HyperDeck Setup tile on your Start page. Click on the Help menu and select About Blackmagic HyperDeck Setup to reveal the version number.
How to Get the Latest Software Updates
After checking the version of Blackmagic HyperDeck Setup software installed on your computer, please visit the Blackmagic Design support center at
www.blackmagicdesign.com/support to check for the latest updates. While it is usually a good idea to run the latest updates, it is wise to avoid updating any software if you are in the middle of an important project.
Regulatory Notices
Disposal of Waste of Electrical and Electronic Equipment Within the European Union.

The symbol on the product indicates that this equipment must not be disposed of with other waste materials. In order to dispose of your waste equipment, it must be handed over to a designated collection point for recycling. The separate collection and recycling of your waste equipment at the time of disposal will help conserve natural resources and ensure that it is recycled in a manner that protects human health and the environment. For more information about where you can drop off your waste equipment for recycling, please contact your local city recycling office or the dealer from whom you purchased the product.

This equipment has been tested and found to comply with the limits for a Class A digital device, pursuant to Part 15 of the FCC rules. These limits are designed to provide reasonable protection against harmful interference when the equipment is operated in a commercial environment. This equipment generates, uses, and can radiate radio frequency energy and, if not installed and used in accordance with the instructions, may cause harmful interference to radio communications. Operation of this product in a residential area is likely to cause harmful interference, in which case the user will be required to correct the interference at personal expense.
Operation is subject to the following two conditions:
1 This device may not cause harmful interference.
2 This device must accept any interference received, including interference that may cause undesired operation.
ISED Canada Statement
This device complies with Canadian standards for Class A digital apparatus.
Any modifications or use of this product outside its intended use could void compliance to these standards.
Connection to HDMI interfaces must be made with high quality shielded HDMI cables.
This equipment has been tested for compliance with the intended use in a commercial environment. If the equipment is used in a domestic environment, it may cause radio interference.
Safety Information
For protection against electric shock, the equipment must be connected to a mains socket outlet with a protective earth connection. In case of doubt contact a qualified electrician.
To reduce the risk of electric shock, do not expose this equipment to dripping or splashing.
Ensure any DC power source connected to the units is compatible with the input voltage and current rating marked at the DC IN connector.
Product is suitable for use in tropical locations with an ambient temperature of up to 40^ C.
Ensure that adequate ventilation is provided around the product and that it is not restricted.
When rack mounting, ensure that the ventilation is not restricted by adjacent equipment.
No operator serviceable parts inside product. Refer servicing to your local Blackmagic Design service center.

Use only at altitudes not more than 2000m above sea level.
State of California statement
This product can expose you to chemicals such as trace amounts of polybrominated biphenyls within plastic parts, which is known to the state of California to cause cancer and birth defects or other reproductive harm.
For more information go to www.P65Warnings.ca.gov.
Warranty
12 Month Limited Warranty
Blackmagic Design warrants that this product will be free from defects in materials and workmanship for a period of 12 months from the date of purchase. If a product proves to be defective during this warranty period, Blackmagic Design, at its option, either will repair the defective product without charge for parts and labor, or will provide a replacement in exchange for the defective product.
In order to obtain service under this warranty, you the Customer, must notify Blackmagic Design of the defect before the expiration of the warranty period and make suitable arrangements for the performance of service. The Customer shall be responsible for packaging and shipping the defective product to a designated service center nominated by Blackmagic Design, with shipping charges pre paid. Customer shall be responsible for paying all shipping charges, insurance, duties, taxes, and any other charges for products returned to us for any reason.
This warranty shall not apply to any defect, failure or damage caused by improper use or improper or inadequate maintenance and care. Blackmagic Design shall not be obligated to furnish service under this warranty: a) to repair damage resulting from attempts by personnel other than Blackmagic Design representatives to install, repair or service the product, b) to repair damage resulting from improper use or connection to incompatible equipment, c) to repair any damage or malfunction caused by the use of non Blackmagic Design parts or supplies, or d) to service a product that has been modified or integrated with other products when the effect of such a modification or integration increases the time or difficulty of servicing the product. THIS WARRANTY IS GIVEN BY BLACKMAGIC DESIGN IN LIEU OF ANY OTHER WARRANTIES, EXPRESS OR IMPLIED. BLACKMAGIC DESIGN AND ITS VENDORS DISCLAIM ANY IMPLIED WARRANTIES OF MERCHANTABILITY OR FITNESS FOR A PARTICULAR PURPOSE. BLACKMAGIC DESIGN'S RESPONSIBILITY TO REPAIR OR REPLACE DEFECTIVE PRODUCTS IS THE WHOLE AND EXCLUSIVE REMEDY PROVIDED TO THE CUSTOMER FOR ANY INDIRECT, SPECIAL, INCIDENTAL OR CONSEQUENTIAL DAMAGES IRRESPECTIVE OF WHETHER BLACKMAGIC DESIGN OR THE VENDOR HAS ADVANCE NOTICE OF THE POSSIBILITY OF SUCH DAMAGES. BLACKMAGIC DESIGN IS NOT LIABLE FOR ANY ILLEGAL USE OF EQUIPMENT BY CUSTOMER. BLACKMAGIC IS NOT LIABLE FOR ANY DAMAGES RESULTING FROM USE OF THIS PRODUCT. USER OPERATES THIS PRODUCT AT OWN RISK.
© Copyright 2020 Blackmagic Design. All rights reserved. 'Blackmagic Design', 'DeckLink', 'HDLink', 'Workgroup Videohub', 'Multibridge Pro', 'Multibridge Extreme', 'Intensity' and 'Leading the creative video revolution' are registered trademarks in the US and other countries. All other company and product names may be trade marks of their respective companies with which they are associated.
- HyperDeck Extreme 8K HDR and HyperDeck Extreme Control
- Welcome
- Contents
- Getting Started with HyperDeck
- Recording
- Touchscreen Display 16
- Settings 28
- Storage Media 42
- Using the Optional Internal Cache 50
- Enabling Remote Control on
- HyperDeck Extreme Control Workflow 56
- HyperDeck Extreme Control Front Panel 64
- HyperDeck Extreme Control Rear Panel 65
- Transferring Files over a Network 74
- Developer Information 75
- Getting Started with HyperDeck Extreme 8K HDR
- Plugging in Power
- Plugging in Video and Audio
- Plugging in CFast Cards
- Using CFast Cards
- Selecting your Source and Codec
- To select a source:
- To select a codec:
- Starting Record
- Media Warning Indicator
- Cache Recording
- Playback
- HyperDeck Extreme 8K HDR Front Panel
- Front Panel Speaker
- Soft Touch Buttons
- Headphone Port
- Touchscreen
- CFast 2.0 Card Slots
- HyperDeck Extreme 8K HDR Rear Panel
- Power
- Analog Input
- Remote
- USB
- Ethernet
- Time Code
- Ref
- HDMI
- Analog Audio
- Monitor Out
- Ext Disk
- 12G-SDI Digital Video
- Two Sample Interleave
- Touchscreen Display
- Touchscreen Features
- Upper Toolbar
- Monitor options
- Zebra
- Focus Assist
- Frame Guides
- Grid
- False Color
- Codec
- Format
- Timecode
- Source
- Cache
- Video Scopes
- Scope Brightness
- Background Opacity
- Picture in Picture
- Menu
- Lower Toolbar
- Transport Controls
- Clip Name and Transport Status
- Touch and Swipe Controls
- Storage Indicators
- Audio Meters
- Settings
- Dashboard Menu
- Record
- Input
- Codec and Quality
- ProRes When ProRes is selected, there are three options available: HQ, 422 and LT.
- H.265
- Trigger Record
- Record Audio Channels
- Monitor
- Monitor Settings – LCD tab and Monitor SDI tab
- Clean Feed
- Guides
- Display 3D LUT
- Focus Assist Type
- Focus Assist Color
- Anamorphic De-squeeze
- Audio
- Audio Page 1
- Audio Page 2
- Setup
- Setup Page 1
- HyperDeck Name
- Date and Time
- Software
- DHCP
- IP address
- Gateway
- Subnet Mask
- Timecode Input
- Timecode Preference
- Timecode Preset
- Timecode Output
- Setup Page 3
- Reference Source
- 3G-SDI Output
- Reference Timing
- Playback Dynamic Range
- Filename Prefix
- Timestamp File Suffix
- Language
- Factory Reset
- Setup Page 5
- Analog Input NTSC IRE
- Analog Input Levels
- LUTs
- To import a LUT:
- Storage Media
- CFast Cards
- Choosing a CFast 2.0 Card
- EXT Disk
- Choosing an External Disk
- Preparing Media For Recording
- Preparing Media on HyperDeck Extreme 8K HDR
- Preparing CFast Cards on HyperDeck Extreme 8K HDR
- Preparing Media on a Computer
- Formatting Media on a Mac Computer
- Formatting Media on a Windows computer
- Number
- Name
- Progress Bar
- Status
- Capacity remaining
- Slot status
- Active storage media
- To select your active media:
- To select an active drive from the drive list:
- Using the Optional Internal Cache
- Choosing your M.2 NVMe PCIe Flash Disk
- Installing The Cache
- To install the cache:
- Formatting The Cache
- Cache Icons and Status
- Getting Started with HyperDeck Extreme Control
- Connecting HyperDeck Extreme 8K HDR
- Enabling Remote Control on your HyperDeck
- Playback using HyperDeck Extreme Control
- HyperDeck Extreme Control Workflow
- Connecting your RS-422 Devices
- Connecting your Video Signal
- To connect your video signals:
- Reference Signal
- Selecting your Devices
- Controlling your playback and record decks
- Testing Control
- Finding your Timecode Point using the Search Dial
- Shuttle
- Jog
- Position
- To set your timecode points:
- To trim your timecode frame by frame:
- Using the Transport Controls
- Skip forward and skip back
- Preroll
- Edit
- Eject
- Using the Multi Deck Feature
- HyperDeck Extreme Control Front Panel
- Playback and record buttons
- Player and Recorder buttons
- Timecode Display
- Search dial, indicator LEDs and mode buttons
- Transport Controls
- Timecode Entry and Trim buttons
- Deck status indicators
- HyperDeck Extreme Control Rear Panel
- Power Inputs
- Reference
- Deck Control
- Accessories
- Rack Mounting HyperDeck
- The HyperDeck Extreme Rack Kit contains the following items:
- x Rack ears
- x Half rack width blanking panel
- x Support brackets
- Screws
- x Cable tab insert
- Preparing the HyperDeck Extreme 8K HDR or
- HyperDeck Extreme Control for individual rack installation:
- Preparing to rack mount a HyperDeck Extreme 8K HDR with a HyperDeck Extreme Control.
- RS-422 Control
- What is RS-422 Control?
- Using an External RS-422 Controller
- Transferring Files over a Network
- Connecting to HyperDeck Extreme 8K HDR
- Transferring Files
- Developer Information
- Blackmagic HyperDeck Ethernet Protocol
- Version 1.10
- On a Mac
- Command Command Description
- Command Combinations
- Using XML
- Protocol Details
- Connection
- Basic syntax
- Command syntax
- Response syntax
- Successful response codes
- Failure response codes
- Asynchronous response codes
- Connection response
- Connection rejection
- Timecode syntax
- Handling of deck "remote" state
- remote control disabled
- Closing connection
- Checking connection status
- Getting help
- Switching to preview mode
- Controlling device playback
- Stopping deck operation
- Changing timeline position
- Retrieving device information
- Retrieving slot information
- Retrieving clip information
- Retrieving clip count
- Retrieving timeline information
- Retrieving transport information
- Video Formats
- File Formats
- Querying and updating configuration information
- Selecting active slot and video format
- Clearing the current timeline
- Adding a clip to the current timeline
- Configuring the watchdog
- Help
- Blackmagic Design Online Support Pages
- Blackmagic Design Forum
- Contacting Blackmagic Design Support
- Checking the Software Version Currently Installed
- How to Get the Latest Software Updates
- Regulatory Notices
- Disposal of Waste of Electrical and Electronic Equipment Within the European Union.
- ISED Canada Statement
- Safety Information
- State of California statement
- Warranty
- Month Limited Warranty
Brand : Blackmagic Design
Model : HyperDeck Extreme 8K
Category : Video recorder