
Porta-Dry 400 - Dehumidifier Aerial - Free user manual and instructions
Find the device manual for free Porta-Dry 400 Aerial in PDF.

| Product type | Dehumidifier |
| Brand | Aerial |
| Model | Porta-Dry 400 |
| Manufacturer | Dantherm A/S (Marienlystvej 65, DK-7800 Skive) |
| Intended use | Air dehumidification in enclosed indoor spaces (basements, garages, warehouses) |
| Minimum room area | Greater than 4 m² |
| Refrigerant | Odorless and flammable (type not specified) |
| Defrost system | Automatic |
| Operating mode | Continuous (switch I/0) |
| Electrical connection | Mains plug with earthing |
| Drain hose | Diameter 19 mm, minimum slope 5% |
| Delivery contents | Dehumidifier, instruction manual, drain hose ∅19 mm |
| Transport handle | Can be mounted horizontally or vertically |
| Wheels | Yes (2 wheels) |
| Operating hours counter | Integrated |
| On/off switch | Yes (positions 0 and I) |
| Maintenance and cleaning | Clean the air intake surface with a vacuum cleaner; use mild cleaning agents |
| Safety | Do not use in explosive or aggressive atmospheres; observe the minimum room area of 4 m² |
| Spare parts and repairability | Contact an authorized dealer or after-sales service |
| Storage conditions | Between 0°C and +40°C |
| Disposal | Observe local regulations; do not dispose with household waste |
| EC Declaration | Compliant with directives 2006/42/EC and 2014/30/EU |
Frequently Asked Questions - Porta-Dry 400 Aerial
User questions about Porta-Dry 400 Aerial
0 question about this device. Answer the ones you know or ask your own.
Ask a new question about this device
Download the instructions for your Dehumidifier in PDF format for free! Find your manual Porta-Dry 400 - Aerial and take your electronic device back in hand. On this page are published all the documents necessary for the use of your device. Porta-Dry 400 by Aerial.
USER MANUAL Porta-Dry 400 Aerial
natural_image
Exterior view of a portable industrial machine with wheels and handle (no visible text or symbols)Porta-Dry 400
EN Instructions for use 10
FI Käyttöohje 18
Fig. 2: Rückansicht
$$ 0 = \text { Aus } $$
natural_image
Close-up of a server rack with labeled components (1 and 2), showing front panel and side panel views (no text or symbols beyond labels)natural_image
Two black industrial electrical enclosures with ventilation grilles and a handle, shown from different angles (no text or symbols visible)1 Product overview.... 11
2 About these operating instructions.... 12
3 Product description.... 12
4 Safety....12
5 Unpacking 13
6 Fitting the transport handle 13
7 Transport and connection 14
8 Operation.... 15
9 Maintenance and care 15
10 Troubleshooting 15
11 Decommissioning, storage and disposal 16
12 EC Declaration of Conformity.... 17
1 Product overview
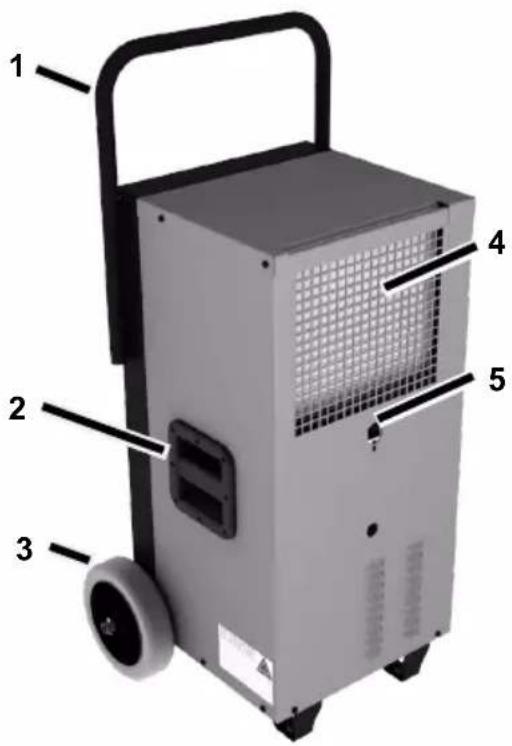
Fig. 1: Front view
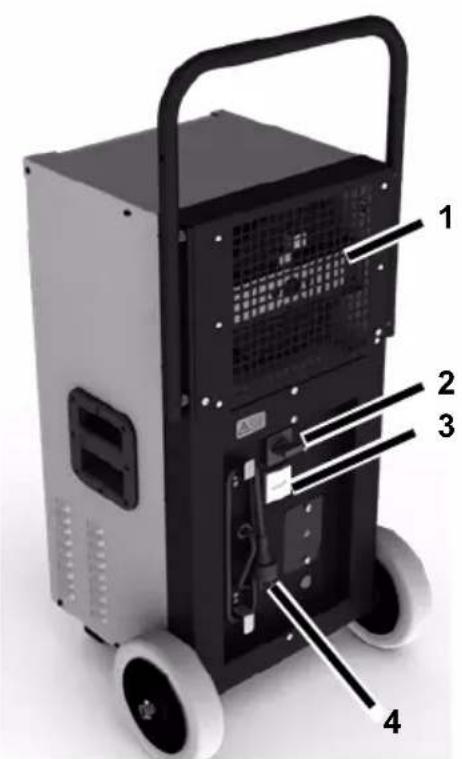
Fig. 2: Back view
1 Transport handle
2 Carry handle
3 Wheels
4 Air intake area
5 Water outlet
1 Air outlet
2 On/off switch:
$$ 0 = \text { off } $$
$$ I = \text { continuous operation } $$
3 Hour counter
4 Mains plug
2 About these operating instructions
These operating instructions must not be reproduced, duplicated or distributed without the written consent of the manufacturer.
Important: Read carefully before use. Keep for later reference.
3 Product description
The dehumidifier regulates the air humidity in the room and is suitable for use on building sites, in warehouses and in residential buildings. The condensate water which is produced is drained away via a discharge hose. The dehumidifier has an automatic defrost function.
Package contents
- Dehumidifier
- Operating instructions
- Drain hose ∅ 19 mm
Identification plate
![054219 Model Item No. Voltage Supply V AC 230 Frequency Hz 50 Phase ~1N Machine F.L.A. A 6.85 Max Supply Fuse A 13 Gas/Charge kg R454C/0.5 Enclosure IP 22 Ps max bar 27.6 GWP / (CO2 Eq.) 146/(0,07t) Production Year/Month 2021 - 06 Serial No. 2112241714007 CE [REDACTED] [FROCCOLATED] Hermetically sealed Contains illuminated greenhouse gases covered by the Kyoto Protocol Danthem A/S Marienlystvej 65, Skive DK 7800 Denmark Made in Denmark](/content/2026/04/664184/images/b0ab5f58a86cfbb8a7524230253f3d1e1d77181b89f3fe9da1723dd5c5d0d8e7.jpg)
The identification plate is on the housing.
4 Safety
Intended use and conditions of use
The dehumidifier is used to remove humidity from air where there is atmospheric pressure in closed indoor rooms, such as basements, garages or warehouses.
The dehumidifier must only be used and stored in rooms larger than 4 m^2 .
The dehumidifier must only be used in compliance with the technical data (see last page).
Persons with physical, sensory or mental restrictions and children are not permitted to use the dehumidifier.
Every user must have read and understood the operating instructions.
Foreseeable misuse
The dehumidifier must not be used:
- In rooms with potentially explosive atmospheres.
- In rooms with an aggressive atmosphere (e.g. caused by chemicals).
- In rooms with water with a pH value below 7.0 or above 7.4.
- In rooms with salt or liquids with a salt content > 1 %, e.g. brine baths.
- In wet areas of indoor swimming pools.
- In rooms with ozone-treated air, high solvent concentrations or high dust pollution.
General safety information
WARNING! Risk of explosion, burns and poisoning from refrigerants!
The appliance contains an odourless, flammable refrigerant which, if handled incorrectly, could result in explosions and fire as well as injuries and burns.
The refrigerant circuit is pressurised.
Do not use any objects to accelerate the thawing process.
Do not store the dehumidifier in rooms with permanent sources of ignition, such as open flames, operational gas appliances or electric heaters.
Do not drill open or ignite dehumidifiers.
- Only operate the appliance in an adequately ventilated room larger than 4 m ^2 .
- Any work to the refrigerant circuit must be performed by the manufacturer or the manufacturer's au-
thorised technical personnel. Before working on the refrigerant circuit, it must be depressurised using the designated mechanisms.
Observe the national regulations for gas installations.
Do not dump refrigerants or dispose of them as household waste.
- Avoid coming into contact with the refrigerant.
WARNING! Electrocution!
Working on live components or water on live components can cause life-threatening electrocution.
- Avoid contact between water and live components.
Always switch off and unplug the dehumidifier and drain away any water before moving it to another location.
→ Only allow the manufacturer or authorised personnel to carry out work on electric components.
5 Unpacking
Procedure
- Check that the package contents are complete. Contact your stockist in the event of damage or missing contents.
- Remove the packaging and dispose of it in accordance with local regulations.
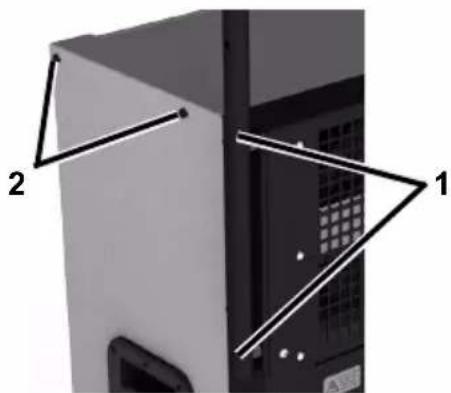
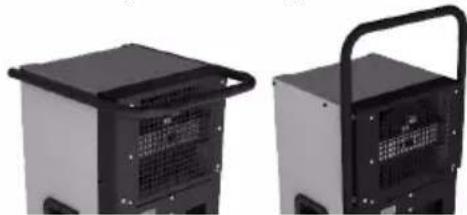
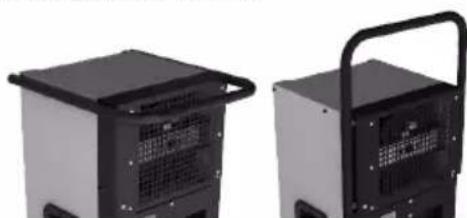
6 Fitting the transport handle
The transport handle can be fitted horizontally or vertically as required.
Procedure
- Undo and remove the four screws on the transport handle (1).
natural_image
Diagram of a server rack with labeled components (1 and 2), showing front and side views without any readable text or symbols.-
Undo and remove the four screws on the housing (2).
-
Align the transport handle either horizontally or vertically.
natural_image
Two industrial electronic devices with black and gray casing, one with a handle extending into the frame (no visible text or symbols)-
Secure the transport handle to the housing at the required position using four screws.
-
Screw the other four screws into the free holes in the housing.
7 Transport and connection
Transport
WARNING! Crushing as a result of instability!
Transport the dehumidifier in an upright position and secure it so that it cannot tip over or slip.
- Position the dehumidifier on a stable, even surface.
WARNING! Reaching into the grille of the air intake area can result in crushing or cutting!
- U se the handles to transport the dehumidifier.
Do not reach into the air intake area.
CAUTION! Crushing or ergonomic damage when transporting the dehumidifier!
U se the handles to transport the dehumidifier.
The dehumidifier must be transported by two people.
Procedure
- Make sure that the condensate water is drained away.
- Make sure that the appliance is switched off and the mains cable has been disconnected.
- Transport the dehumidifier to where it is going to be used.
NOTE: The air must circulate freely. Do not cover the air openings. There must be a clearance of at least 1 m in front of the air outlet and air intake area.
Connecting the discharge hose
It is essential to connect the drain hose provided.
ATTENTION! Inadequate appliance output!
Do not place the end of the hose in the water (backwater possible).
Do not bend the discharge hose.
Do not place any objects on the hose.
Procedure
- Attach the drain hose to the Water outlet on the front of the appliance.
- Make sure that the end of the hose is lower than the start of the hose at the Water outlet. Minimum slope of 5 % (5 cm/metre).
- Run the discharge hose away from the dehumidifier to a drain or into a suitable container (recommended container volume = 90 litres).
Electrical connection
Procedure
- Make sure that the supply voltage is the same as the connection voltage in the technical data.
- Provide an adequate fuse for the socket and the power supply.
- Install an earth leakage circuit breaker in damp rooms and building sites.
- Make sure that the mains plug is suitable for the socket of the building.
- Make sure that the socket used is earthed.
- Plug the mains plug into the socket.
8 Operation
Dehumidifying the room
NOTE: Allow the dehumidifier to rest in its final position for approx. 15 minutes before starting up, after transport and after prolonged storage.
Procedure
- WARNING! Electrocution and risk of injury!
If the drain hose is not correctly connected, water in or in front of the housing can cause electric shock or present a slip hazard. Make sure that the condensate water can drain away via the drain hose and that the drain hose is securely positioned on the water outlet. - Set the on/off switch to "I".
The dehumidifier will start operating. The dehumidifier will run in continuous mode.
Switching off
Procedure
- Set the on/off switch to "0".
9 Maintenance and care
WARNING! Damage to health from dust!
- Only clean the dehumidifier with compressed air in open spaces.
- Wear a protective mask and goggles.
ATTENTION! Damage to property!
- Cleaning agents can damage surfaces. Only use mild detergents.
- Only use approved original spare parts.
Cleaning and inspection
Procedure
- Switch off the dehumidifier.
- Unplug the mains plug.
- Check the water outlet and hose, if connected.
- Check the air intake area. Vacuum with a vacuum cleaner if necessary.
- Plug in the mains cable.
- Switch on the dehumidifier if necessary.
Spare parts and customer service
If you have any questions about the de-humidifier or require spare parts, contact your authorised dealer or Service.
10 Troubleshooting
Please check the following points in the event of a fault. If necessary contact Service.
WARNING! Poisoning from refrigerant, burns, crushing or electrocution during maintenance work!
- Only allow the manufacturer or authorised personnel to carry out repairs and maintenance work.
In the event of malfunctions, switch off the dehumidifier and secure it
so that it cannot be switched back on again.
Allow any hot components to cool sufficiently before working on them.
Faults
| Problem | Possible cause | Remedial action |
| The dehumidifier is not performing well/removing moisture. | Air intake area is dirty/blocked. The dehumidifier is not getting enough air. If the air intake area is dirty, the appliance can suffer long term damage. | Remove any dirt/objects from the air intake area. |
| The dehumidifier is out of operation/fan and compressor are not working. | Dehumidifier is switched off. | Switch on the dehumidifier. |
| There is no power supply to the dehumidifier. | Check the power supply. |
11 Decommissioning, storage and disposal
Decommissioning
Procedure
- Switch off the dehumidifier.
- Unplug the mains plug.
- Cover the dehumidifier with a cloth to protect it from dust.
Storage
CAUTION! Injury!
→ D o not stack dehumidifiers.
Secure the dehumidifiers so that they do not fall over.
Procedure
- Store the dehumidifier between 0^ and +40^ .
Disposal
ATTENTION! Risk from materials and substances!
Sort materials according to type and recycle in accordance with local regulations.
When disposing of auxiliary and operating materials, observe the local regulations and information on the safety data sheets.
Do not dispose of the de-humidifier as household waste but rather in accordance with the legal regulations.
12 EC Declaration of Conformity
EC Declaration of Conformity in accordance with Machinery Directive 2006/42/EC Appendix II 1.A
Manufacturer: Dantherm A/S, Marienlystvej 65, Skive DK 7800
Product: Dehumidifier
Product no.: Porta-Dry 400
Functional description: The dehumidifier is used to remove humidity from air where there is atmospheric pressure in closed rooms.
We hereby confirm that the product complies with the relevant provisions of the following directives:
• 2006/42/EC Machinery directive
• 2014/30/EU Directive on electromagnetic compatibility (EMC)
The following harmonised standards have been applied:
• EN 60335-2-40:2003
• EN 60204-1:2018
• EN 378-2:2016
• EN ISO 12100:2010
• EN ISO 13857:2019
• EN ISO 14120:2015
Person authorised to compile the technical documentation: Jakob Bonde Jessen - Marienlystvej 65, Skive DK 7800
Skive DK, 21.07.2022
Kuva 1: Etupuoli
Kuva 2: Taustapuoli
1 Ilmanpoistoaukko
2 Virtakytkin:
natural_image
Diagram of a server rack with labeled components (no text or symbols present)natural_image
Two industrial electronic devices with ventilation grilles and a handle, shown from different angles (no text or symbols visible)Fig. 1: Vista frontale
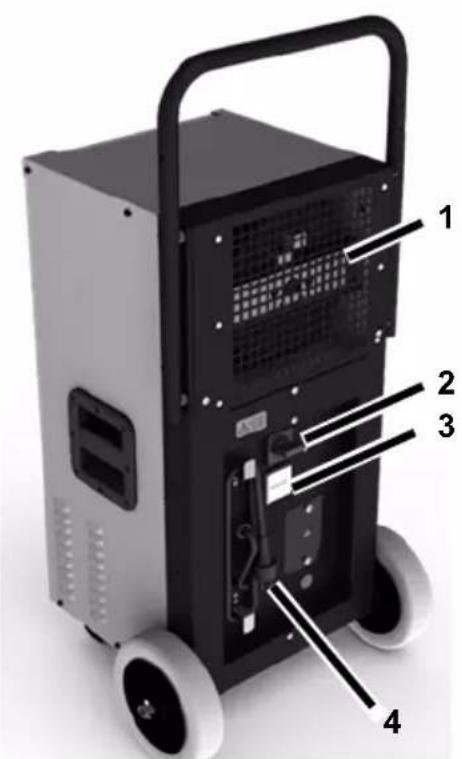
Fig. 2: Vista posteriore
natural_image
Close-up of a server rack with labeled components (1 and 2), showing front panel and side door (no text or symbols beyond labels)natural_image
Two industrial electronic devices with ventilation grilles and black casing (no visible text or symbols)natural_image
Diagram of a server rack with labeled components (1 and 2), showing front and side views without any readable text or symbols.natural_image
Two industrial electronic devices with ventilation grilles and a handle, shown from different angles (no text or symbols visible)7 Transport et raccordement
Transport
Fig. 1: Set forfra
Fig. 2: Set bagfra
natural_image
Diagram of a server rack with labeled components (no text or symbols present)-
Løsn og fjern de fire skruer på huset (pos. 2).
-
Transportgrebet kan vendes vandret eller lodret.
natural_image
Two black industrial electronic devices with ventilation grilles and a handle, shown from different angles (no text or symbols visible)Fig. 1: Sett forfra
Fig. 2: Sett bakfra
natural_image
Diagram of a server rack with labeled components (no text or symbols present)natural_image
Two industrial electronic devices with black bases and ventilation grilles, one with a handle (no visible text or symbols)natural_image
Diagram of a server rack with labeled components (1 and 2), showing front panel and side panel views without any readable text or symbols.natural_image
Two industrial electronic devices with ventilation grilles and a handle, shown from different angles (no text or symbols visible)Fig. 1: Vista dianteira

Fig. 2: Vista traseira
1 Pega de transporte
2 Pega de transporte
3 Rodas
4 Superfície de entrada de ar
5 Tubuladura de drenagem
natural_image
Two black industrial electronic devices with ventilation grilles and a handle, shown from different angles (no text or symbols visible)Fig. 1: Framifrån
Fig. 2: Bakifrån
natural_image
Exterior view of a server rack with labeled components (no text or symbols beyond numbers 1 and 2)natural_image
Two industrial electronic devices with ventilation grilles and black handles, shown from different angles (no visible text or symbols)Fig. 1: Vista delantera
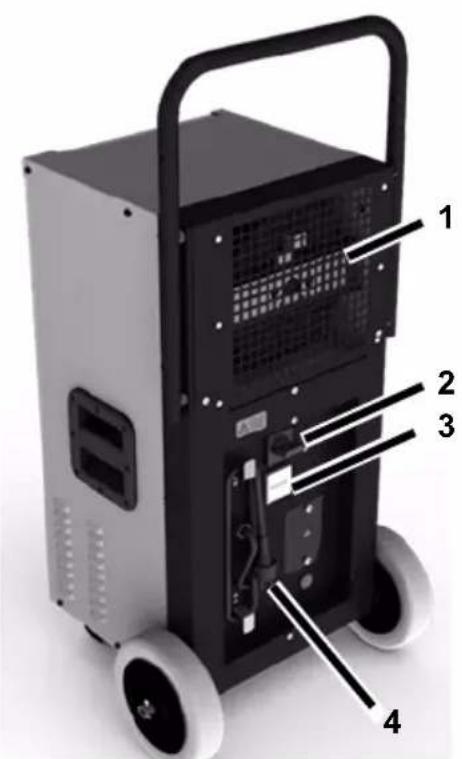
Fig. 2: Vista trasera
natural_image
Two industrial electronic devices with ventilation grilles and black frame handles, shown from different angles (no text or symbols visible)natural_image
Two industrial electronic devices with black casing and ventilation grilles, shown from different angles (no text or symbols visible)WAARSCHUWING! Gezondheids- schade door stof!

- Porta-Dry 400
- Product overview
- About these operating instructions
- Product description
- Package contents
- Safety
- Foreseeable misuse
- General safety information
- WARNING! Risk of explosion, burns and poisoning from refrigerants!
- WARNING! Electrocution!
- Unpacking
- Procedure
- Fitting the transport handle
- Transport and connection
- Transport
- WARNING! Crushing as a result of instability!
- WARNING! Reaching into the grille of the air intake area can result in crushing or cutting!
- CAUTION! Crushing or ergonomic damage when transporting the dehumidifier!
- Connecting the discharge hose
- ATTENTION! Inadequate appliance output!
- Electrical connection
- Operation
- Dehumidifying the room
- Switching off
- Maintenance and care
- WARNING! Damage to health from dust!
- ATTENTION! Damage to property!
- Cleaning and inspection
- Spare parts and customer service
- Troubleshooting
- WARNING! Poisoning from refrigerant, burns, crushing or electrocution during maintenance work!
- Decommissioning, storage and disposal
- Decommissioning
- Storage
- CAUTION! Injury!
- Disposal
- ATTENTION! Risk from materials and substances!
- EC Declaration of Conformity
- Transport et raccordement
- WAARSCHUWING! Gezondheids- schade door stof!
Brand : Aerial
Model : Porta-Dry 400
Category : Dehumidifier