
AD 750 - Dehumidifier Aerial - Free user manual and instructions
Find the device manual for free AD 750 Aerial in PDF.


| Product type | Dehumidifier |
| Brand | Aerial |
| Model | AD 750 (variants AD 750-P and AD 780-P with pump) |
| Recommended use | Enclosed rooms over 4 m² (basements, garages, warehouses) |
| Water collection method | Removable bucket (AD 750) or built-in pump with drain hose (AD 750-P/AD 780-P) |
| Control | Adjustable mechanical hygrostat (0 to continuous) and on/off switch |
| Display | Ambient temperature, ambient humidity, operating hours |
| Indicator lights | Setpoint reached, dehumidifying, outside temperature out of range, malfunction, pump failure (flashing) |
| Automatic defrost | Yes |
| Power supply | 230 V, 50 Hz (check rating plate) |
| Operating temperature range | 1 °C to 34 °C (frost protection: restarts >5 °C or <30 °C) |
| Air filter | Cleanable or replaceable (use original filters) |
| Drain connection | Rear connection for drain hose (12 x 2 mm); supplied on models with pump |
| Package contents | Dehumidifier, instruction manual, bucket (AD 750) or drain hose with clamp (AD 750-P/780-P) |
| Safety | Frost protection, auto shut-off if tank full or malfunction, min. area 4 m² |
| Routine maintenance | Clean the air filter regularly, check the drain hose |
| Spare parts | Original filters; contact AERIAL customer service |
| CE compliance | Yes (directives 2006/42/EC, 2014/30/EU) |
| Optional accessories | Drain hose for AD 750 |
| Transport and storage | Vertical, temperature 0 °C to +40 °C, do not stack more than two units |
Frequently Asked Questions - AD 750 Aerial
User questions about AD 750 Aerial
0 question about this device. Answer the ones you know or ask your own.
Ask a new question about this device
Download the instructions for your Dehumidifier in PDF format for free! Find your manual AD 750 - Aerial and take your electronic device back in hand. On this page are published all the documents necessary for the use of your device. AD 750 by Aerial.
USER MANUAL AD 750 Aerial
natural_image
Two AERAL industrial robotic devices with yellow and gray casing, shown from front and side views (no text or symbols visible)AD 750
AD 750-P
AD 780-P
EN Instructions for use 13
FI Käyttöohje 23
natural_image
Close-up of a white and yellow wheeled vehicle chassis with wheels and a black arrow pointing to a component (no text or symbols visible)Ausschalten
Vorgehensweise
1 Models 13
2 Product overview.... 14
3 Overview of control panel.... 15
4 About these operating instructions.... 16
5 Product description.... 16
6 Safety.... 16
7 Unpacking 17
8 Transport and connection 17
9 Operation.... 19
10 Maintenance and care 19
11 Troubleshooting 20
12 Decommissioning, storage and disposal 21
13 EC Declaration of Conformity.... 22
1 Models
These operating instructions relate to various models. The functions and operation are virtually identical. You can find out which model you have from the identification plate. Further information can be found in the Technical Data (see last page).
| Model | Main characteristics |
| AD 750 | Basin |
| AD 750-P | Built-in pump |
| AD 780-P | Built-in pump |
2 Product overview
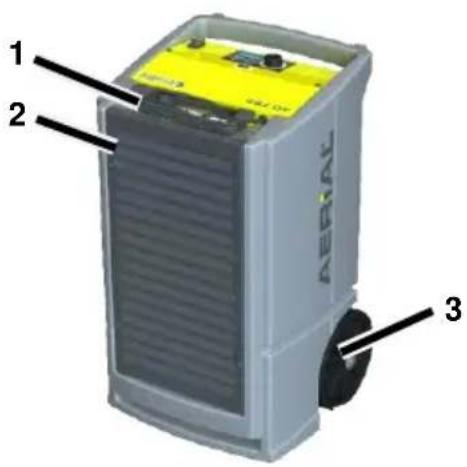
Fig. 1: Front view
| 1 | Mains plug |
| 2 | Air outlet |
| 3 | Wheels |
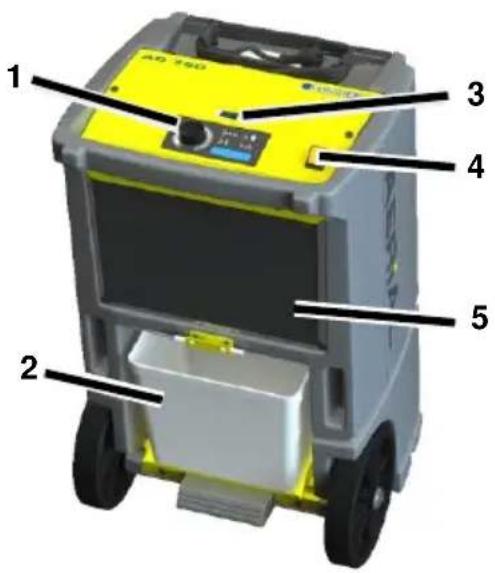
Fig. 2: Back view
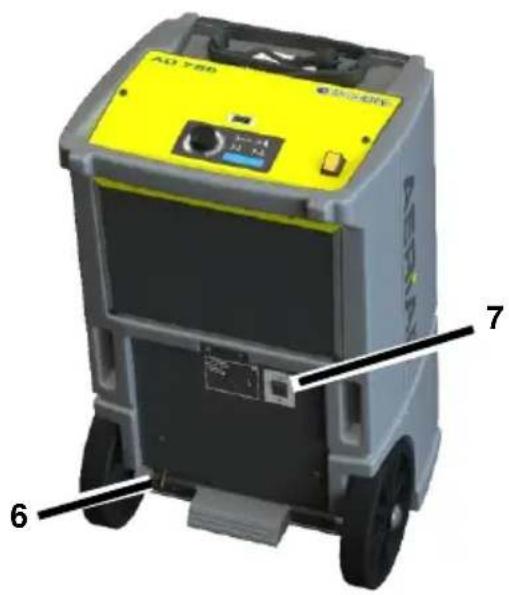
| 1 | Control panel | 5 | Air intake area with filter |
| 2 | Basin(AD 750 only) | 6 | Discharge nozzle |
| 3 | Load counter (MID) | 7 | Toggle switch “Pump” (only AD 750-P/AD780-P) |
| 4 | On/off button |
3 Overview of control panel
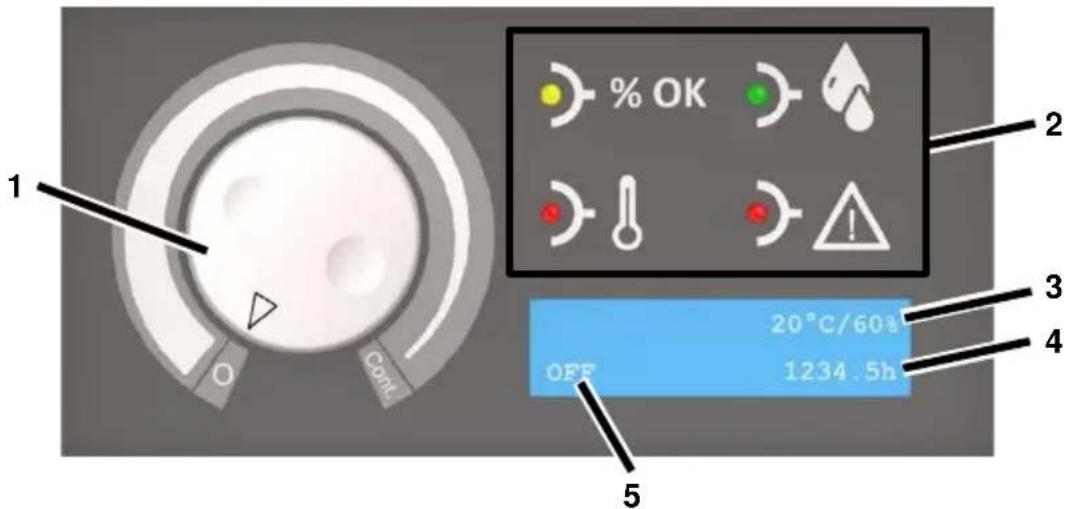
Fig. 3: Overview of control panel
| 1 | Humidity switch:0 = offCont. = continuous operation | 4 | Operating hours |
| 2 | Signal lights | 5 | Operating state/Target room humidity |
| 3 | Actual room temperature/Actual room humidity |
| Signal light | State | Meaning |
 | Illuminated | Target room humidity reached |
 | Illuminated | Dehumidifying room.Min 10 minutes + fan delay of 30Min. (Details page 19) |
| Flashing | Target humidity exceeded during fan delay | |
 | Illuminated | Outside temperature <1°C or >34 °C |
 | Illuminated | Fault |
| Flashing | Pump fault. The pump will start up again automatically once the fault has been repaired. |
4 About these operating instructions
These operating instructions must not be reproduced, duplicated or distributed without the written consent of the manufacturer.
Important: Read carefully before use. Keep for later reference.
5 Product description
The dehumidifier controls the air humidity in the room. The condensate water produced is collected in a basin (AD 750) or pumped away by an internal pump (AD 750-P/
AD 780-P). The dehumidifier has an automatic defrost function.
Package contents
- Dehumidifier
- Operating instructions
• AD 750 only: Basin (in appliance) - Only AD 750-P/780-P:
Discharge hose 12 x 2 mm with hose clamp
Optional accessories
• AD 750: Discharge hose
Identification plate
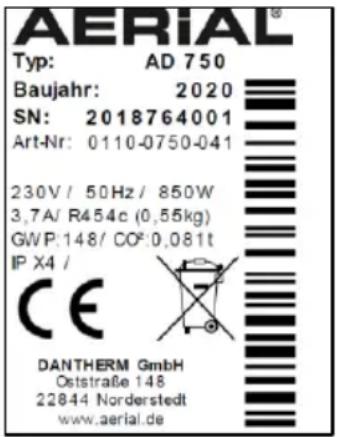
The identification plate is on the housing.
6 Safety
Intended use and conditions of use
The dehumidifier is used to remove humidity from the air where there is atmospheric pressure in closed indoor rooms, such as basements, garages or warehouses.
The dehumidifier must only be used and stored in rooms larger than 4 m^2 .
The dehumidifier must only be used in compliance with the Technical Data (see last page).
Persons with physical, sensory or mental restrictions and children are not permitted to use the dehumidifier.
Every user must have read and understood the operating instructions.
Foreseeable misuse
The dehumidifier must not be used:
- In rooms with potentially explosive atmospheres.
- In rooms with an aggressive atmosphere (e.g. caused by chemicals).
- In rooms with water with a pH value below 7.0 or above 7.4.
- In rooms with salt or liquids with a salt content > 1 %, e.g. brine baths.
- In rooms with ozone-treated air, high solvent concentrations or high dust pollution.
General safety information
WARNING! Risk of explosion, burns and poisoning from refrigerants!
The appliance contains an odourless, flammable refrigerant which, if handled incorrectly, could result in explosions and fire as well as injuries and burns. The refrigerant circuit is pressurised.
Do not use any objects to accelerate the thawing process.
Do not store the dehumidifier in rooms with permanent sources of ignition, such as open flames, operational gas appliances or electric heaters.
Do not drill open or ignite dehumidifiers.
Only operate the appliance in an adequately ventilated room larger than 4 m².
- Any work to the refrigerant circuit must be performed by the manufacturer or the manufacturer's authorised technical personnel. Before working on the refrigerant circuit, it must be depressurised using the designated mechanisms.
- Observe the national regulations for gas installations.
Do not dump refrigerants or dispose of them as household waste.
Avoid coming into contact with the refrigerant.
WARNING! Electrocution!
Working on live components or water on live components can cause life-threatening electrocution.
Avoid contact between water and live components.
Always switch off and unplug the dehumidifier and drain away any
water before moving it to another location.
- Only allow the manufacturer or authorised personnel to carry out work on electric components.
7 Unpacking
Procedure
- Check that the package contents are complete. Contact your stockist in the event of damage or missing contents.
- Remove the packaging and dispose of it in accordance with local regulations.
8 Transport and connection
Transport
WARNING! Crushing as a result of instability!
→ Transport the dehumidifier in an upright position and secure it so that it cannot tip over or slip.
- Position the dehumidifier on a stable, even surface.
WARNING! Crushing or cutting from reaching into the grille of the air filter!
- Use the handles to transport the dehumidifier.
Do not reach into the air filter.
CAUTION! Crushing or ergonomic damage when transporting the dehumidifier!
- Use the handles to transport the dehumidifier.
The dehumidifier must be transported by two people.
Procedure
- Make sure that the basin is empty / the condensate water has been pumped out.
- Make sure that the discharge hose (optional) and the mains cable have been disconnected from the appliance.
- Transport the dehumidifier to where it is going to be used.
NOTE: The air must circulate freely. Do not cover the air openings. There must be a clearance of at least 1 m in front of the air outlet and the air filter.
AD 750: Preparing the basin
Does not apply if an optional discharge hose is connected.
Procedure
➢ Slide the basin into the dehumidifier.
AD 750-P/AD 780-P: Connecting the discharge hose
With the AD 750-P/ AD 780-P it is essential to connect the discharge hose provided.
ATTENTION! Inadequate appliance output!
Do not bend the discharge hose.
Do not place any objects on the hose.
Procedure
- Attach the discharge hose on the back of the device to the discharge nozzle and secure with the hose clamp.
- Run the discharge hose away from the dehumidifier to a drain or into a suitable container (maximum height difference: 3 m).
AD 750: Connecting an optional discharge hose
If necessary, the condensate water in the AD 750 can be drained off via a discharge hose instead of into the basin. To do this, proceed as follows:
ATTENTION! Inadequate appliance output!
Do not place the end of the hose in the water (backwater possible).
Do not bend the discharge hose.
Do not place any objects on the hose.
Procedure
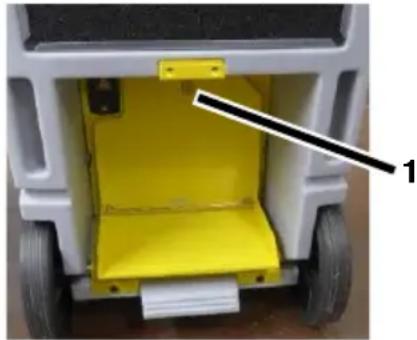
- Remove the basin.
- Attach a suitable hose (12 x 2 mm) to the discharge nozzle (Pos. 1) using a pipe clip.
natural_image
Close-up of a white and yellow wheeled vehicle chassis with wheels and a black arrow pointing to a component (no text or symbols visible)-
Make sure that the end of the hose is lower than the start of the hose at the discharge nozzle. Minimum slope of 5% (5 cm/metre).
-
Run the end of the hose into a drain or a suitable container.
Electrical connection
Procedure
- Make sure that the supply voltage is the same as the connection voltage in the technical data.
- Provide an adequate fuse for the socket and the power supply.
-
Install an earth leakage circuit breaker in damp rooms and building sites.
-
Make sure that the mains plug is suitable for the socket of the building.
- Make sure that the socket used is earthed.
- Plug the mains plug into the socket.
9 Operation
Dehumidifying the room
NOTE: Allow the dehumidifier to rest in its final position for approx. 15 minutes before starting up, after transport and after prolonged storage.
Procedure
- Make sure that the condensate water can drain off through a discharge hose or into the basin.
- Set on/off button to "I".
- Turn the humidity switch from "0" to "Cont". Set the desired humidity at the humidity switch. The dehumidifier will only start if the actual room humidity is higher than the target room humidity.
Light D illuminates. The dehumidifier will start operating. The dehumidifier runs for at least 10 minutes. Once the target room humidity has been reached, the fan continues to run for 30 minutes. If the actual room humidity increases by 5% during the cool-down period, the
light flashes and the compressor restarts when the time is up. If the humidity switch is at "Cont", the dehumidifier will run continuously.
AD 750: Emptying the basin
The light flashes, the basin is full.
Procedure
- Empty the basin.
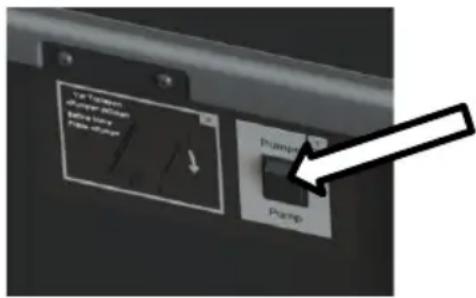
AD 750-P/AD 780-P: Pumping out water
The condensate water can be pumped away if necessary as follows:
Procedure
- Make sure that the discharge hose runs into a drain or suitable container.
- Switch on the pump. To do this, press and hold the toggle switch "Pump" until the condensate water has been pumped away.
Switching off
Procedure
- Empty the basin or pump water out of if necessary.
- Set humidity switch to "0".
- Set on/off button to "0".
10 Maintenance and care
WARNING! Damage to health from dust!
- Only clean the dehumidifier with compressed air in open spaces.
- Wear a protective mask and goggles.
ATTENTION! Damage to property!
- Cleaning agents can damage surfaces. Only use mild detergents.
- Only use approved original spare parts.
Cleaning and inspection
Procedure
- Switch off the dehumidifier.
- Unplug the mains plug.
- Remove and clean the air filter (e.g. with vacuum cleaner) or replace it.
- Check the discharge nozzle and discharge hose, if connected.
- Insert a new or clean filter. Only use an original filter.
- Plug in the mains cable.
- Switch on the dehumidifier if necessary.
Spare parts and customer service
If you have any questions about the de-humidifier or require spare parts, contact your authorised dealer or AERIAL Service.
11 Troubleshooting
Please check the following points in the event of a fault. If necessary contact AERIAL Service.
WARNING! Poisoning from refrigerant, burns, crushing or electrocution during maintenance work!
Only allow the manufacturer or authorised personnel to carry out repairs and maintenance work.
In the event of malfunctions, switch off the dehumidifier and secure it so that it cannot be switched back on again.
Allow any hot components to cool sufficiently before working on them.
Error messages
| Display message | Possible cause | Remedial action |
| Error E1<Room temp> | Outside temperature < 1°C or >34°C | Appliance will automatically re-start as soon as the temperature is >5°C or< 30°C. |
| Error E2<cooling system> | Cooling system fault | Switch off the dehumidifier and reset to the required target room humidity. |
Faults
| Problem | Possible cause | Remedial action |
| The dehumidifier is not performing well/removing moisture. | Air filter is dirty. The dehumidifier is not getting enough air. Dirty filters can damage the appliance in the long term. | Clean the filter or replace if necessary. |
| The dehumidifier is out of operation / fan and compressor are not working. | Dehumidifier is switched off. | Switch on the dehumidifier. |
| There is no power supply to the dehumidifier. | Check the power supply. | |
| Pump fault | Pump is blocked, e.g. water cannot drain out of the discharge hose/basin. | Check the discharge hose/basin, if connected. |
| Pump faulty. | Contact AERIAL Service. |
12 Decommissioning, storage and disposal
Decommissioning
Procedure
- Switch off the dehumidifier.
- Empty the basin (AD 750) or pump the water out.
- Unplug the mains plug.
- Cover the dehumidifier with a cloth to protect it from dust.
Storage
CAUTION! Injury!
Do not stack more than two dehumidifiers on top of each other.
- Secure the dehumidifiers so that they do not fall over.
Procedure
- Store the dehumidifier between 0 °C and +40 °C.
Disposal
ATTENTION! Risk from materials and substances
Sort materials according to type and recycle in accordance with local regulations.
When disposing of auxiliary and operating materials, observe the local regulations and information on the safety data sheets.
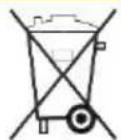
Do not dispose of the de-humidifier as household waste but rather in accordance with the legal regulations.
13 EC Declaration of Conformity
EC Declaration of Conformity in accordance with Machinery Directive 2006/42/EC Appendix II 1.A
Product no.: AD750 / AD750-P / AD780-P
Functional description: The dehumidifier is used to remove humidity from air where there is atmospheric pressure in closed rooms.
We hereby confirm that the product complies with the relevant provisions of the following directives:
• 2006/42/EC Machinery directive
• 2014/30/EU Directive on electromagnetic compatibility (EMC)
The following harmonised standards have been applied:
• EN 60335-2-40:2003
• EN 60204-1:2006
• EN 378-2:2016
• EN ISO 12100:2010
• EN ISO 13857:2008
• EN ISO 14120:2015
Person authorised to compile the technical documentation:
natural_image
Close-up of a white and yellow wheeled vehicle chassis with wheels and a black arrow pointing to a component (no text or symbols visible)Sammuttaminen
Toimintaohjeet
natural_image
Close-up of a yellow and white wheeled vehicle chassis with wheels and a black arrow pointing to a component (no text or symbols visible)8 Transport et raccordement
Transport
natural_image
Top-down view of a white wheeled vehicle with yellow seat and wheels, no visible text or symbolsnatural_image
Close-up of a yellow and white wheeled vehicle chassis with wheels and a black arrow pointing to a component (no text or symbols visible)Frakobling
Fremgangsmåde
- Tøm beholderen/pump vandet bort efter behov.
- Stil hygrostaten på "0".
- Stil til/fra-kontakten på "0".
natural_image
Close-up of a white and yellow wheeled vehicle chassis with wheels, no visible text or symbolsSlå av
Fremgangsmåte
natural_image
Close-up of a yellow and white wheeled vehicle chassis with wheels and a black arrow pointing to a component (no text or symbols visible)Wyłączanie
Sposób postępowania
natural_image
Close-up of a yellow and white wheeled vehicle chassis with wheels and a black arrow pointing to a component (no text or symbols visible)Desligar
Procedimento
natural_image
Close-up of a white wheeled vehicle with yellow safety panel and black arrow pointing to component 1 (no text or symbols visible)Stänga av
Gör så här
natural_image
Close-up of a white and yellow wheeled vehicle chassis with wheels and a black panel, labeled with number 1 (no text or symbols on the vehicle itself)natural_image
Top-down view of a yellow and gray wheeled vehicle chassis with a black arrow pointing to a component (no text or symbols visible)Uitschakelen
Werkwijze
WAARSCHUWING! Gezondheids- schade door stof!
- Ausschalten
- Vorgehensweise
- Models
- Product overview
- Overview of control panel
- About these operating instructions
- Product description
- Package contents
- Optional accessories
- Identification plate
- Safety
- Intended use and conditions of use
- Foreseeable misuse
- General safety information
- WARNING! Risk of explosion, burns and poisoning from refrigerants!
- WARNING! Electrocution!
- Unpacking
- Procedure
- Transport and connection
- Transport
- WARNING! Crushing as a result of instability!
- WARNING! Crushing or cutting from reaching into the grille of the air filter!
- CAUTION! Crushing or ergonomic damage when transporting the dehumidifier!
- AD 750: Preparing the basin
- ATTENTION! Inadequate appliance output!
- AD 750: Connecting an optional discharge hose
- Electrical connection
- Operation
- Dehumidifying the room
- AD 750: Emptying the basin
- AD 750-P/AD 780-P: Pumping out water
- Switching off
- Maintenance and care
- WARNING! Damage to health from dust!
- ATTENTION! Damage to property!
- Cleaning and inspection
- Spare parts and customer service
- Troubleshooting
- WARNING! Poisoning from refrigerant, burns, crushing or electrocution during maintenance work!
- Decommissioning, storage and disposal
- Decommissioning
- Storage
- CAUTION! Injury!
- Disposal
- ATTENTION! Risk from materials and substances
- EC Declaration of Conformity
- Sammuttaminen
- Toimintaohjeet
- Transport et raccordement
- Frakobling
- Fremgangsmåde
- Slå av
- Fremgangsmåte
- Wyłączanie
- Sposób postępowania
- Desligar
- Procedimento
- Stänga av
- Gör så här
- Uitschakelen
- Werkwijze
- WAARSCHUWING! Gezondheids- schade door stof!
Brand : Aerial
Model : AD 750
Category : Dehumidifier